10 Free Video Tutorials For Learning Sketch.app

YouTube is the best place to teach yourself anything in the modern era. Techie subjects are covered in greater detail because most tech-savvy people also know how to record videos and get them online.

One of the newer design programs, Sketch, has been giving Photoshop a run for its money. This is an OSX-only program, but it’s made specifically for web and mobile designers.

It can feel a little strange coming from an Adobe background, but with the right tutorials anyone can learn it, and in this guide, I’ve curated the best Sketch tutorials to get you started with the basics and beyond.

Your Designer Toolbox
Unlimited Downloads: 500,000+ Web Templates, Icon Sets, Themes & Design Assets


iOS Calendar in Sketch 3

ios calendar tutorial

Mobile iOS apps are simple to design because they come with screen restrictions and clear guidelines for the designer. That’s why this iOS video tutorial is a great place to start learning Sketch.

Over the course of a half hour you’ll learn the fundamentals of icon design, vector creation, color selection, and keyboard shortcuts. The narration is easy to follow, and you can do all of this on your own with just a copy of the program.

If you’re hoping to learn more about icon design or mobile app design, then this video is for you.

Intro to Sketch for Web Design

intro web design sketch video

Alternatively you might be looking to use Sketch for website design. In that case you’ll love this brief intro from London designer Charli Marie.

If you’re a complete beginner then picking up Sketch can be a hassle, but this is particularly the case for websites where you need to consider responsive layouts, grid systems, and more intricate nuances like textures/patterns on the page.

Granted this video will not make you a complete Sketch master or an expert web designer. But it’ll offer a very clear introduction to the program so you can get up and running fast.

Simple Menu UI/UX

uiux sliding menu sketch

Diving into the more detailed side of design is this Sketch 3 tut covering how to make a sliding nav menu.

This video follows a very simple process of designing a slide out menu on top of an existing interface. Most mobile designers need to do something like this since the sliding menu is the most common choice for responsive menus.

And you can follow this tutorial with the newer version covering another method of designing a vertical slide-out menu.

Nike Store UI Redesign

nike store ui redesign

Another way to practice design is by re-creating interfaces. For example this tutorial teaches you how to redesign a Nike product page in Sketch 3.

It spans about half an hour with guides on working with vectors, basic page shapes, color schemes, textures, and pretty much everything else you’d need to learn.

This video will not make you an expert, but it’s definitely a fun way to get started in this design software.

Dropbox UI/UX Redesign

dropbox ux sketch video

Here’s another cool example from the same YouTuber teaching you how to redesign Dropbox in Sketch. It’s just about the same length of time, and the process feels similar, but there’s also a very unique methodology in this video.

You’ll learn more about matching the colors/textures/icons with Dropbox’s branding and how to design around the company’s image. So you’re not just learning how to use Sketch, but also how to design with specific goals and criteria.

Definitely a unique tutorial for web designers and the final result is fantastic.

Minimalist Website in Sketch 3

minimalist freebie sketch

If you’re looking for a simpler introduction, you might try this tutorial created by Hacksaw Academy. It’s one of the newest videos in this list, and it teaches you how to create a minimalist website mockup from scratch.

In total the video spans 15 minutes which isn’t too long for a design tutorial.

But the final result is also very simple, so beginners won’t feel too overwhelmed. This makes for an excellent starting point to pick up Sketch, but I recommend going beyond this tutorial if you really want to master the program.

Design a Landing Page

landing page video series

Designer Adam Rasheed went above & beyond with his landing page video tutorial covering all the major aspects of Sketch.

This tutorial breaks up into five parts with the very first video totaling over 90 minutes long. Talk about detailed!

You’ll learn about the proper workflow used to create a web page mockup and how you can follow this in future projects. Plus Adam gets into detail on how to create certain page elements like navigation menus, signup forms, and thumbnail galleries.

Basic iOS App Mockup

simple ios mockup sketch

The entire SketchCasts YouTube channel is full of great advice for beginners and experts alike. Sketch has a lot of features, and this channel covers all of them in practical lessons.

I specifically recommend starting with their iOS app mockup tutorial which feels more like a wireframe than a mockup. But you’ll learn all the fundamentals of designing a page by setting dimensions, grids, and proper alignments.

All the techniques you’ll learn in this video apply to professional design work no matter what type of interface you’re creating.

Button System with Nested Symbols

buttons nested symbols

If you wannt to get a little more technical then check out this tutorial on nested symbols in Sketch. This is a unique property of the software and you could learn it through other guides online.

But this 30-minute tutorial shows you visually how to create a Sketch library of buttons using nested symbols in your work. It’s an incredibly practical approach to nested symbols, and you’ll take a lot away from the experience.

However this is not really made for absolute beginners. You should at least have some comfort tinkering in Sketch before diving into this video.

Flexbox for Sketch App

sketch flexbox video tutorial

Modern web designers need to follow responsive techniques. This holds true for frontend development and basic mockup design/wireframing.

In Sketch this process is super easy and this tutorial shows you how it’s all done. This video guide uses the auto-layout plugin made solely for Sketch as a responsive design tool. If you’re a web designer moving into Sketch then this video is a must-watch.

But you can also read through the written article if you prefer that instead.

Fast Prototyping with Sketch, Invision and Craft

invision craft sketch tutorial

Before tackling a full mockup you may want to prototype your website or application. This is like a visual plan for how all your pages fit together and how users traverse the interface.

With this video tutorial you’ll learn how to setup Sketch and how to connect it with two other programs: InVision’s backend along with the free Craft plugin.

An excellent guide for skilled designers who want to work more with prototyping in their day-to-day.

These are my top picks for free Sketch video tutorials but there are many more released each year. If you want to continue the search, try browsing YouTube to see what else you can find.

10 Tips for Effectively Promoting Your Brand with Video Content

Whether you’re just getting started with website videos or you think you’re a veteran, there is always something you can learn. Web design and content marketing trends shift on a dime – and your business must be aware of the changes on the horizon.

It’s vital to connect with your audience in meaningful ways, and video content offers a fantastic medium for doing just that.

Videos on your website have proven results in terms of leads and conversion rates. YouTube reports mobile video consumption increasing by 100% every year, and analysts predict video will comprise 80% of all web traffic by 2019. Companies are already seizing this immense opportunity, and video ads now account for roughly 35% of all online ad spending.

Perhaps the most compelling statistic to encourage you to explore video content for your own brand is that an entire third of the time people spend online is spent consuming video content. If you haven’t considered what video content can do for your brand, you’re missing this third of internet traffic.

If you want to implement video content or improve your website’s existing video content, consider the following tips for marketing video content more effectively.

1. Assess Your Current Content Marketing Strategy

Modern marketing professionals understand the need to constantly benchmark their campaigns’ progress, assess the returns on their various marketing investments, and measure engagement among their audiences. If you want to improve your site’s video content or wonder what kind of video content would work well for your brand, start by assessing your current content marketing strategy. Figure out what works, what doesn’t work, and what may work better with some adjustment.

Once you assess your current situation, expect opportunities for improvement to crop up throughout your marketing campaign. Take the time to explore video content related to your industry or niche and see what your target consumers seem to enjoy, and then start brainstorming ways to generate compelling, engaging video content of your own.

2. Make Your Content More Interesting

Video provides the perfect opportunity to recycle popular pieces of content and augment existing content in various ways. For example, did you have a blog post last year that was particularly popular? Did a social media post go viral? Think of the marketing success you’ve seen recently and see whether any specific pieces of content jump out at you. Consider repurposing older content into new, engaging video content that will delight your audience.

video production

Consider live events as well. The Periscope app for Twitter and Facebook Live has proven very successful to various marketing campaigns. Live events encourage your target audience to quickly find you and engage with you, and they are far more likely to share these events on social media. Even after the event concludes, you can use the recording on your site or your company’s YouTube channel.

3. Encourage Sharing

Live events lead to the next tip, which is to make your video content shareable. Social media may be the most powerful marketing tool since the invention of the World Wide Web, and it is foolish to discount or undervalue the impact social media has on modern life. Maintaining a social media presence for a business can be difficult.

You need to determine which platforms and networks your customers prefer and focus your attention there. While it may be tempting and even seem logical to create profiles for your company on every social media outlet, casting a wide net like this is far more trouble than it’s worth.

Additionally, your audience will more than likely prefer one or two outlets. Younger crowds will typically appreciate Twitter and Instagram, whereas older audiences tend to prefer Facebook and LinkedIn for the professional end of things.

social sharing

Once you’ve committed to a social media platform, fill your page with compelling content. Video is incredibly shareable, and your target consumers can enjoy video content while working or performing other daily tasks, making it a great opportunity for you to engage with your audience on a consistent basis.

Videos typically go viral faster than any other type of content, so don’t forget this when generating video content for your audience. A fantastic video could quickly spread across social media and provide an incredible boost to your brand recognition and conversion rates. However, a gaffe or poorly timed video could be fruitless or, worse, endanger your brand’s reputation.

4. Stay in Touch with News

Some of the best video content campaigns are in touch with the times and popular culture. For example, the Arby’s marketing team regularly releases short stop-motion videos of its food and branded paper products. In these shorts, an artist uses Arby’s bags and boxes (and sometimes condiments) to create portrayals of scenes and characters from new movie and video game releases.

These clips delight younger audiences, and if you browse Arby’s social media profiles, you’ll more than likely see quite a few comments from consumers saying things like, “I’m buying Arby’s today just because of this ad.”

5. Know Your Audience

Arby’s video marketing tactics are successful, because it knows it younger audience members and their interests. The company found a way to capitalize on this using a few bits of paper and cardboard and a video camera. That is an incredible return on investment for a large company, and its content reaches droves of fans.

6. Be Authentic

Modern audiences and consumers are very discerning and wary. The average person on the internet has learned to ignore things like banner and sidebar ads automatically unless they’re immediately recognizable and valuable.

Strive for authenticity in your video content. You might consider doing a tour of your company grounds or a behind-the-scenes look at some of your processes. You may also want to livestream company events or find other ways to incorporate video content into the other ways you engage with your audience.

video editing

Your consumers will appreciate seeing the more human side of a brand and can sniff out dishonest marketing easily. Authenticity and honesty are the keys to generating interest and enthusiasm around your brand.

7. Generate Brand Awareness

Two of the biggest benefits of video content are its shareable nature and the higher-than-average propensity for going viral and reaching hundreds of thousands – if not millions – of people. To have a compelling effect, create video content that generates excitement and enthusiasm around your brand.

Instead of encouraging your consumers to share your content simply by asking them to do so, make them want to share your content by creating fun and valuable videos.

8. Reap the SEO Benefits

Search engine optimization (SEO) is a mainstay of modern marketing. Marketers are always tweaking their sites’ keywords, keyword density, content refreshes, link history, and various other elements to achieve the most positive SEO results possible. On the flipside, search engines Bing and Google are constantly adjusting their algorithms to keep the playing field as level as possible for everyone.

youtube mobile app

Video content is valuable, and there is so much video traffic that search engines now incentivize companies to feature videos on their websites for better SEO. You may want to invest in a video hosting provider or simply embed videos form your company’s YouTube channel.

9. Multi-Device Engagement

One of the best aspects of video content is that consumers can enjoy it on various devices. Mobile devices have finally overtaken desktop computers and comprise the lion’s share of internet traffic, so make sure your video content responds beautifully across devices.

10. Stick to Short and Sweet

Creating effective video content doesn’t have to be a large-scale production. Some of the most successful video marketing campaigns didn’t cost any more than the time it took to record them. When creating video content for your brand, keep things short and simple. A curious consumer is far more likely to watch a two-minute video than a 10-minute one, so get your point across quickly and effectively, and don’t rely too heavily on pageantry.

Ultimately, every brand will have different opportunities and face different challenges in the effort to create effective video content. These tips are just to get you started thinking about ways to create or improve video content.

Your biggest opportunities lie in your existing content strategy, how well you know your audience, and your business goals. Approach video content with a clear goal in mind and filming will be much easier than you may expect.

Getting Started with React Native Template Design – Tutorial Part 1

We always look for apps that are faster to develop and run, React Native is one such emerging framework. Being focused on mobile development; React Native is an open source framework from Facebook which can be run on multiple platforms and devices such as iOS and Android. React Native is a javascript library. You do not have to learn iOS’ Swift or Java for Android, all you need to know is Javascript. I am going to present series of articles on React Native. This article explains making of native mobile template using React Native. Today, I am introducing video tutorials on Youtube for an easy learning.

React Native Template Design

Read more »

React Native JSON Parsing and Helper Functions – Tutorial Part 2

This is the continuation of previous article Getting started with React Native Template Design – Tutorial Part I. Today’s article and video tutorial explains how to parse and render the json data using some of the best React Native packages. It explains how to make ajax calls using fetch. Fetch is the networking API, which is chosen by React Native to get the JSON data and render it in the page. I hope embedded videos with blog posts are more advantageous for you to learn. I appreciate to take any feedback if you have, so that I can make it better.

React Native Template Design

Read more »

Ionic 3 and Angular 2: Using the Native Camera, Take Multiple Photos with Delete Action.

Are you searching for easy camera access for taking multiple pictures in your mobile application? Then here is the post explaining on how to access camera and take pictures. In most recent days, this is achieved easily with the combination of Ionic framework and AngularJS. We have already discussed in my previous article, how easy it is to use pre-built it in components of Ionic with AngularJS and build awesome mobile apps. Today’s article explains Cordova plugin provided by Ionic framework to access camera , take picture and see the output. The most exciting thing about this article is, it explains you to upload multiple images you take in camera. Let’s follow the article and also the video tutorial on this.

Ionic 2 and Angular 2: Using the Native Camera

Read more »

Use Verticals To Increase Reach

In the last post, we looked at how SEO has always been changing, but one thing remains constant – the quest for information.

Given people will always be on a quest for information, and given there is no shortage of information, but there is limited time, then there will always be a marketing imperative to get your information seen either ahead of the competition, or in places where the competition haven’t yet targeted.

Channels

My take on SEO is broad because I’m concerned with the marketing potential of the search process, rather than just the behaviour of the Google search engine. We know the term SEO stands for Search Engine Optimization. It’s never been particularly accurate, and less so now, because what most people are really talking about is not SEO, but GO.

Google Optimization.

Still, the term SEO has stuck. The search channel used to have many faces, including Alta Vista, Inktomi, Ask, Looksmart, MSN, Yahoo, Google and the rest, hence the label SEO. Now, it’s pretty much reduced down to one. Google. Okay, there’s BingHoo, but really, it’s Google, 24/7.

We used to optimize for multiple search engines because we had to be everywhere the visitor was, and the search engines had different demographics. There was a time when Google was the choice of the tech savvy web user. These days, “search” means “Google”. You and your grandmother use it.

But people don’t spend most of their time on Google.

Search Beyond Google

The techniques for SEO are widely discussed, dissected, debated, ridiculed, encouraged and we’ve heard all of them, many times over. And that’s just GO.

The audience we are trying to connect with, meanwhile, is on a quest for information. On their quest for information, they will use many channels.

So, who is Google’s biggest search competitor? Bing? Yahoo?

Eric Schmidt thinks it’s Amazon:

Many people think our main competition is Bing or Yahoo,” he said during a visit to a Native Instruments, software and hardware company in Berlin. “But, really, our biggest search competitor is Amazon. People don’t think of Amazon as search, but if you are looking for something to buy, you are more often than not looking for it on Amazon….Schmidt noted that people are looking for a different kind of answers on Amazon’s site through the slew of reviews and product pages, but it’s still about getting information

An important point. For the user, it’s all about “getting information”. In SEO, verticals are often overlooked.

Client Selection & Getting Seen In The Right Places

I’m going to digress a little….how do you select clients, or areas to target?

I like to start from the audience side of the equation. Who are the intended audience, what does that audience really need, and where, on the web, are they? I then determine if it’s possible/plausible to position well for this intended audience within a given budget.

There is much debate amongst SEOs about what happens inside the Google black box, but we all have access to Google’s actual output in the form of search results. To determine the level of competition, examine the search results. Go through the top ten or twenty results for a few relevant keywords and see which sites Google favors, and try to work out why.

Once you look through the results and analyze the competition, you’ll get a good feel for what Google likes to see in that specific sector. Are the search results heavy on long-form information? Mostly commercial entities? Are sites large and established? New and up and coming? Do the top sites promote visitor engagement? Who links to them and why? Is there a lot news mixed in? Does it favor recency? Are Google pulling results from industry verticals?

It’s important to do this analysis for each project, rather than rely on prescriptive methods. Why? Because Google treats sectors differently. What works for “travel” SEO may not work for “casino” SEO because Google may be running different algorithms.

Once you weed out the wild speculation about algorithms, SEO discussion can contain much truth. People convey their direct experience and will sometimes outline the steps they took to achieve a result. However, often specific techniques aren’t universally applicable due to Google treating topic areas differently. So spend a fair bit of time on competitive analysis. Look closely at the specific results set you’re targeting to discover what is really working for that sector, out in the wild.

It’s at this point where you’ll start to see cross-overs between search and content placement.

The Role Of Verticals

You could try and rank for term X, and you could feature on a site that is already ranked for X. Perhaps Google is showing a directory page or some industry publication. Can you appear on that directory page or write an article for this industry publication? What does it take to get linked to by any of these top ten or twenty sites?

Once search visitors find that industry vertical, what is their likely next step? Do they sign up for a regular email? Can you get placement on those emails? Can you get an article well placed in some evergreen section on their site? Can you advertise on their site? Figure out how visitors would engage with that site and try to insert yourself, with grace and dignity, into that conversation.

Users may by-pass Google altogether and go straight to verticals. If they like video then YouTube is the obvious answer. A few years ago when Google was pushing advertisers to run video ads they pitched YouTube as the #2 global search engine. What does it take to rank in YouTube in your chosen vertical? Create videos that will be found in YouTube search results, which may also appear on Google’s main search results.

With 200,000 videos uploaded per day, more than 600 years required to view all those videos, more than 100 million videos watched daily, and more than 300 million existing accounts, if you think YouTube might not be an effective distribution channel to reach prospective customers, think again.

There’s a branding parallel here too. If the field of SEO is too crowded, you can brand yourself as the expert in video SEO.

There’s also the ubiquitous Facebook.

Facebook, unlike the super-secret Google, has shared their algorithm for ranking content on Facebook and filtering what appears in the news feed. The algorithm consists of three components…..

If you’re selling stuff, then are you on Amazon? Many people go directly to Amazon to begin product searches, information gathering and comparisons. Are you well placed on Amazon? What does it take to be placed well on Amazon? What are people saying? What are their complaints? What do they like? What language do they use?

In 2009, nearly a quarter of shoppers started research for an online purchase on a search engine like Google and 18 percent started on Amazon, according to a Forrester Research study. By last year, almost a third started on Amazon and just 13 percent on a search engine. Product searches on Amazon have grown 73 percent over the last year while searches on Google Shopping have been flat, according to comScore

All fairly obvious, but may help you think about channels and verticals more, rather than just Google. The appropriate verticals and channels will be different for each market sector, of course. And they change over time as consumer tastes & behaviors change. At some point each of these were new: blogging, Friendster, MySpace, Digg, Facebook, YouTube, Twitter, LinkedIn, Instagram, Pinterest, Snapchat, etc.

This approach will also help us gain a deeper understanding of the audience and their needs – particularly the language people use, the questions they ask, and the types of things that interest them most – which can then be fed back into your search strategy. Emulate whatever works in these verticals. Look to create a unique, deep collection of insights about your chosen keyword area. This will in turn lead to strategic advantage, as your competition is unlikely to find such specific information pre-packaged.

This could also be characterised as “content marketing”, which it is, although I like to think of it all as “getting in front of the visitors quest for information”. Wherever the visitors are, that’s where you go, and then figure out how to position well in that space.

Categories: 

Powered by WPeMatico

6 Ways to Make Your Posts More Actionable

action

Do you ever feel that your content just isn’t reaching your audience as well as you’d like it to?

…and that even though you’ve created something of value, it doesn’t seem like anyone’s actually taking your advice and implementing it?

I’ll let you in on a secret…

Almost every content marketer has felt this way at one point or another.

It’s difficult to create content that resonates with your readers, but it’s even more difficult to create content that inspires action.

Want to make your post more actionable? Then follow these 6 ways.

And not for the reason you think. 

Yes, people are lazy. Not all, but I’d say it’s fair to call most readers in a typical audience lazy.

But still, some of those lazy people should take action, right? And most of the rest of your audience should take action too, right?

So, why aren’t they? The most likely reason is that your content isn’t actionable enough.

Content marketers talk about storytelling, copywriting formulas, and other tactics to make better content. And all of that is important.

But actionability is a concept that’s rarely talked about, and it’s enormously underrated. Actionable content is almost always great content, and it’s one of the main things you should be striving to create.

Why actionable content is difficult—but crucial—to make: The reason why it’s hard to make your content actionable comes from your inability to fully empathize with your readers.

You might write something that seems obvious to you, but it won’t be to someone with less experience in your niche.

As soon as you do that once, a reader can’t fully follow the rest of your content.

And there are a few really big consequences of this:

  1. Your reader can’t take action because they don’t know what to do. Figuring it out might be possible, but it’s quite difficult to figure out some things without some guidance.
  2. Your reader loses interest. If it’s not clear how to apply some of your advice in your content, then there’s really no point for the reader to pay close attention.

To put it simply, content that isn’t actionable is not good for the reader.

But it also sucks for you too. You put in a lot of effort to create your content, and you want readers to get the full value of what you made.

It’s disappointing when your work has no real impact.

That’s why I’m going to show the six ways you can make your posts more actionable.

If you implement most of these on a regular basis, you’ll see some great things.

All of a sudden, you’ll get comments from readers telling you how your advice helped them improve their lives in a big way. And it’s going to be one of the most rewarding parts of creating content for you.

Pay close attention, and then actually apply the tactics I’m about to show you. I made them really actionable so that you can implement them right away.

1. Use this one phrase as often as possible…

If there’s one instant change that you can implement to make your content more actionable, it’s this:

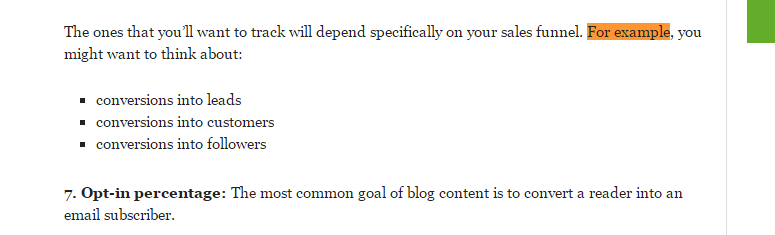
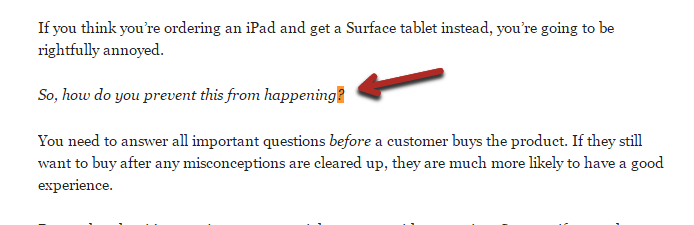
Whenever you finish giving a piece of advice, follow it up with a sentence that starts with “For example,…”

If you’ve read my posts in the past, you know that I use this phrase all the time:

image14

At first, this will take a conscious effort to do. Eventually, it will become your second nature.

The reason why it’s so powerful is because it makes it next to impossible to miss anything that requires further explanation.

For example (see what I did here?), pretend you are writing a post on building a website.

One major topic that you would include is picking a CMS.

Here’s what a snippet of your content might look like:

To make managing your website and its contents easier, you can use a simple content management system (CMS).

Next, you will need to pick a theme…

It might be obvious to you how to choose a CMS, but to someone new to the topic, it isn’t.

Let’s try that again, using our new phrase:

To make managing your website and its contents easier, you can use a simple content management system (CMS).

For example, you could choose from:

  • WordPress
  • Joomla
  • Drupal

Next, you will need to pick a theme…

I think it’d be good to go into more detail on each of the platforms, but this is already much more actionable for a reader.

Instead of having to read up on what a CMS is and what the different options are, the reader now has three good options to start with.

This quick example also illustrates that what comes after the “for example” phrase also matters. But don’t worry, I’m about to show you a few different ways you can make sure it’s as useful as possible.

2. Visuals are usually better than text

Earlier, I mentioned two main reasons why your readers don’t take action.

Some are just lazy, so you can’t really worry about them.

But the other ones just don’t have all the knowledge and guidance they need to take action. And that’s something you can fix.

To do that, we have to look at different ways readers might be missing information.

The first is they simply don’t understand what you wrote. Some things are very difficult to explain clearly in text.

Often, though, they are easy to explain with pictures.

The best example of this can be found in articles about building or baking something—anything to do with a procedure.

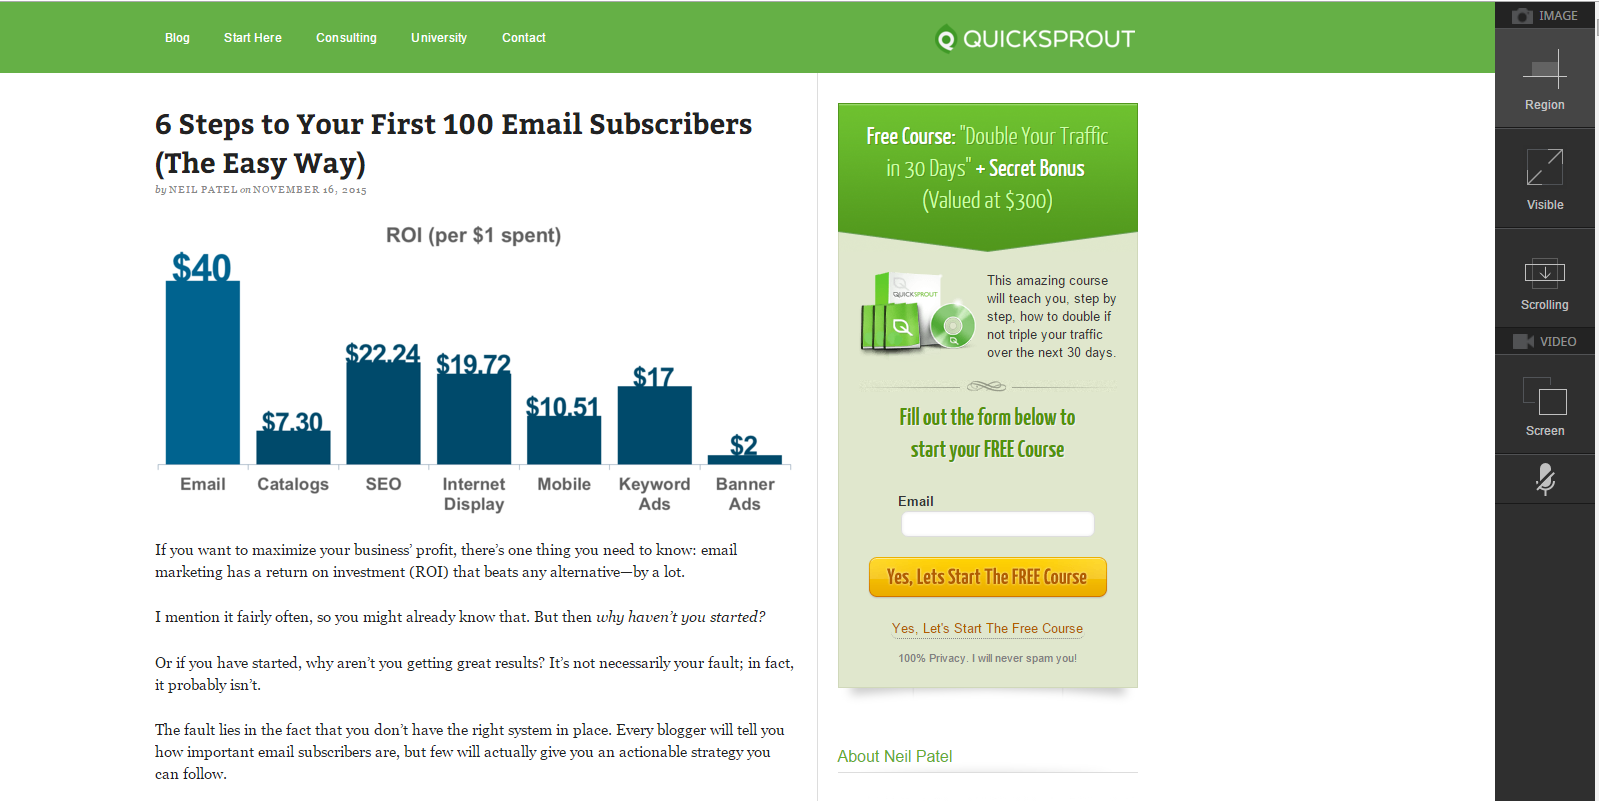
A simple picture can illustrate exactly what you’re talking about, like this picture in a pie recipe:

image16

If you just explained the step in writing, maybe half of your readers would know for certain what they’re trying to do here.

But with the picture (and text), I’m sure just about everyone would understand what they need to do.

Add up that difference for the 10+ steps in the recipe, and you can see how having pictures to accompany each step makes the content as a whole much more actionable.

There’s no more guessing or uncertainty about whether the procedure would work because a reader can follow along your example.

The takeaway:

Any time you describe how to use a tool or item of any kind, include a picture demonstrating the procedure.

This is another way to make your content instantly more actionable, and it doesn’t take any special kind of genius, just an extra bit of effort.

You can create the pictures yourself or try to find some online (always give credit).

3. How is just as important as What

Any advice you give in your posts revolves around what to do.

You tell your reader what they should do to achieve certain results.

For example, I’m showing you different tactics that you can use to make your posts more actionable.

But as we talked about earlier, not all readers will be able to implement your advice just based on the “what.”

If they don’t have the prior experience and knowledge, your advice isn’t going to be all that useful.

The solution is to always provide detailed procedures of “how” to do things or to illustrate concepts.

The image tactic from the previous section may fall into this category, but there are other ways to clearly demonstrate procedures. You can use:

  • screenshots
  • gifs
  • videos
  • drawings

They all have their best uses, depending on a particular situation.

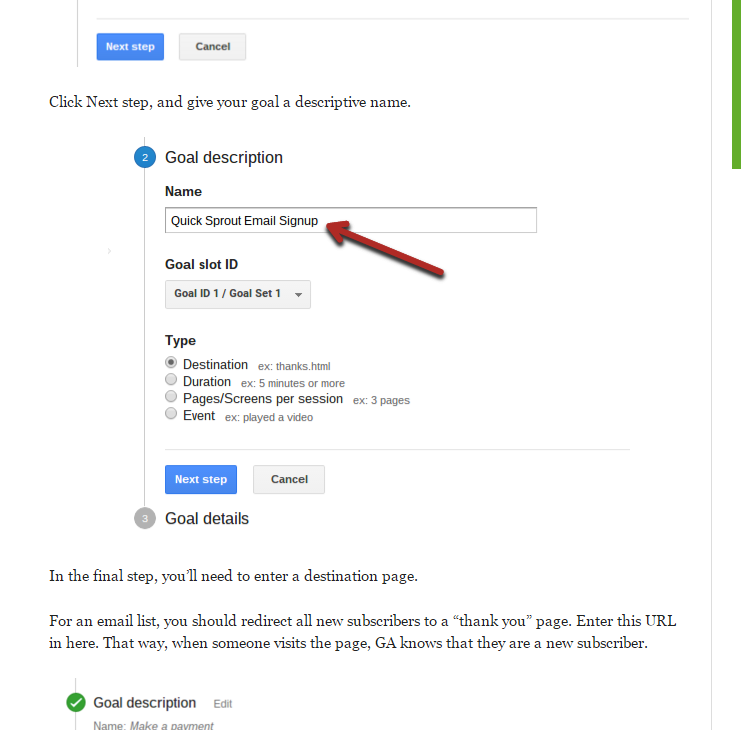
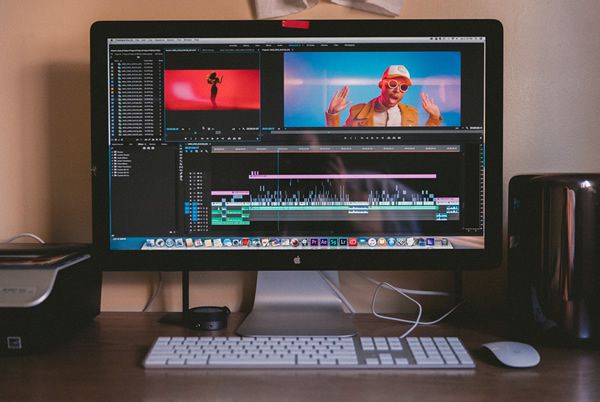
Screenshots are great for showing readers how to do a particular step on their computer.

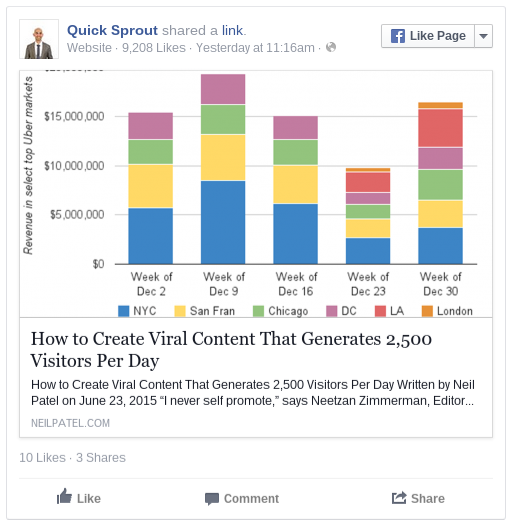
I use screenshots all the time. Here’s an example of one I included in a past article where I was showing you how to create goals in Google Analytics:

image29

In another post I wrote, I explained how to create great explainer videos because my readers might not have much experience with video marketing.

An example of a great video would help them know what to expect and what a great video looks like. I embedded it right into the content:

image00

Videos are better when you’re trying to illustrate more than just a few things; otherwise, images are easier.

The great news is that it’s really easy to embed videos.

You can find high quality video tutorials or examples of concepts for just about everything on YouTube.

Once you found a suitable video, scroll underneath it, click the “Share” button, and then click the “Embed” tab:

image07

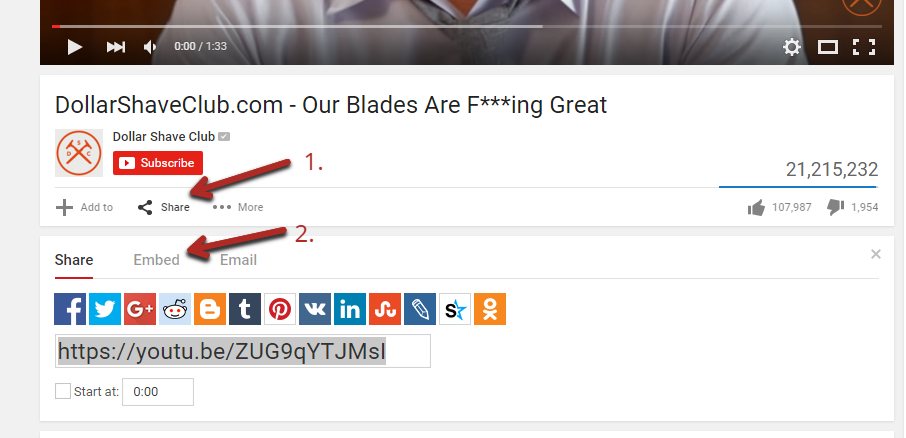
This will give you a simple iframe HTML code that you can copy and paste into your content.

image12

Finally, there are animated gifs (small clips of video without sound).

Gifs are great for a few different purposes. First of all, they’re entertaining and can make your content a lot more fun to read.

But since we’re focusing on actionability, know that gifs can be used in place of videos. At times, you might want to show a small part of a video as an example without having to embed the whole thing.

I’m going to show you in a second how you can clip a part of a video and make it into an animated gif.

Actually, I’m going to show you a few tools right now that will make creating any of these much easier.

Tool #1 – Techsmith Snagit (for screenshots and video): As I mentioned, in almost every article I write, I include annotated screenshots for the reasons we went over above.

This tool is a simple browser plugin that makes creating screenshots really easy.

To use it, click the icon on your browser (once you’ve installed the tool), which will trigger a black sidebar to pop up on the right.

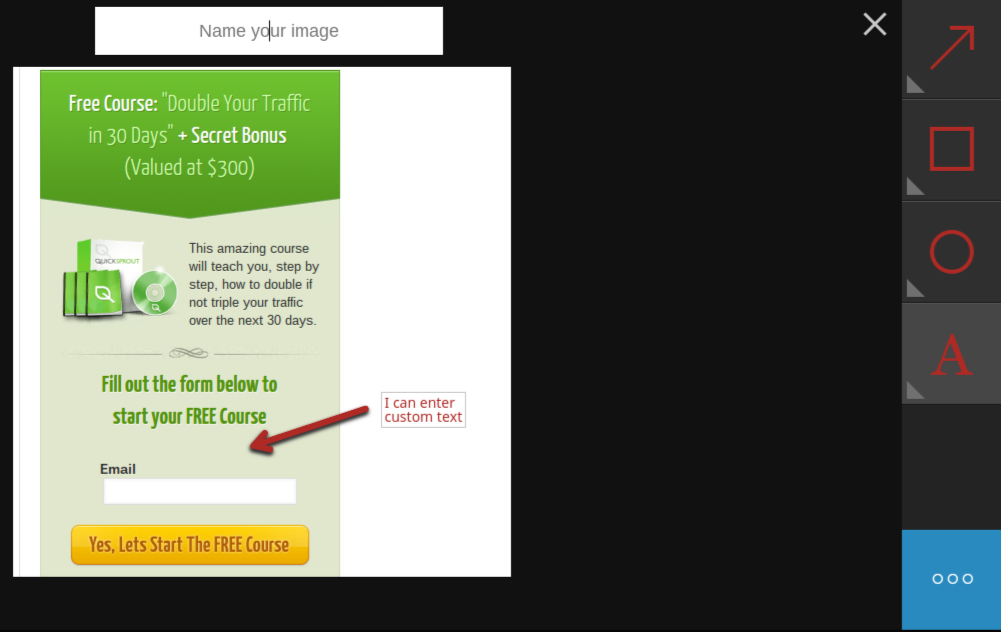
From here, you have four different options. In most cases, you’ll pick “region,” which allows you to take a screenshot of a certain part of the screen only:

image02

If you pick the “region” option, you simply drag a box around a part of your current browser screen that you want to capture. You can drag the corners to resize the box if you mess up on your first try:

image23

When it looks good, click the camera icon below the box.

That will capture your selection and open a new tab with it. Here, you can add arrows, boxes, circles, and text.

image10

The only downside is that you have a limited number of colors to choose from, but that’s not usually a big deal.

Once you’re done annotating the image, you click the blue button in the bottom right to download the picture or get a link to it.

If you’re trying to explain a multi-step procedure, a video might be better than several pictures. In that case, choose the video option from the original black sidebar. It will capture your screen as a video until you stop it.

Tool #2 – Evernote Web Clipper/Skitch (for screenshots): Snagit is typically the simplest option when it comes to annotated screenshots. However, sometimes it’s not enough.

Sometimes, you will want a more attractive screenshot, or you want to take a screenshot of something not in your browser (like your desktop or a folder).

That’s where this second option, made by Evernote, is better.

The web clipper is again a browser plugin. When you click its icon, you’ll get a pop-up, just like with Snagit:

image06

These are the same options, just with different names.

Mostly, you’ll be using the “screenshot” option, which allows you to select a part of the screen.

One drawback is that once you select a part of the screen, you can’t adjust it. If you mess it up, you’ll have to do it again.

After you get what you like, it’ll open in a new tab where you can annotate it.

image03

This tool has two main advantages over Snagit:

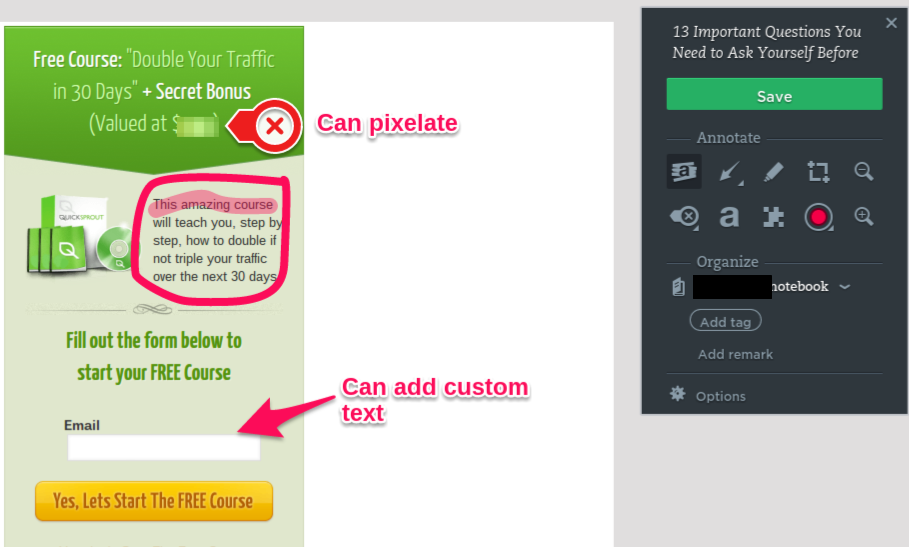
  • More options – In addition to having all the basic options, you can add labels, draw, and even blur parts of the picture.
  • More attractive – In my opinion, the arrows and other annotations look better.

Then, you can save the picture to your Evernote account and use it whenever you need it.

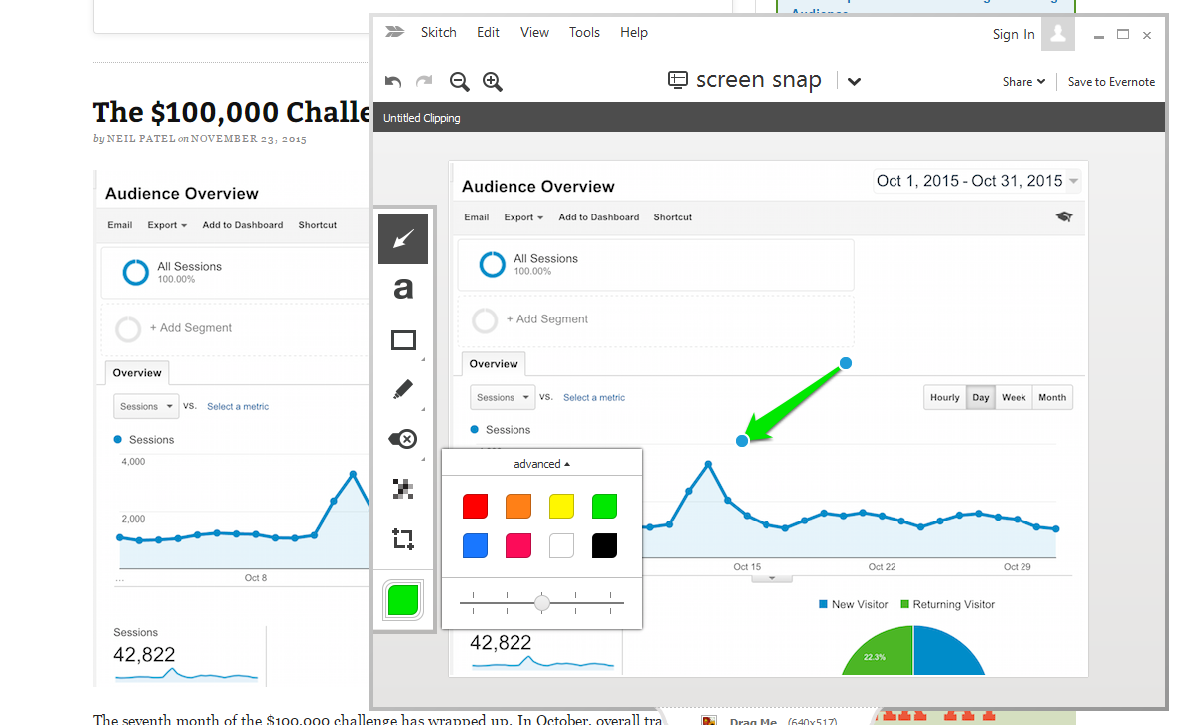
Sometimes, you’ll want to add annotations to pictures that aren’t in your browser. In that case, you’ll want to use Skitch, which is simply the offline equivalent for the web clipper that you install on your computer.

It has all the same options plus a few extra (like more colors):

image20

Tool #3 – Giphy Gif Maker (to make animated gifs): Very few marketers use gifs, and even fewer know how to make them.

This tool makes it easy to create gifs, and it allows you to make them straight from YouTube videos.

Let me quickly walk you through the steps.

First, you input the URL of the YouTube video (or URL from Vimeo or Vine):

image25

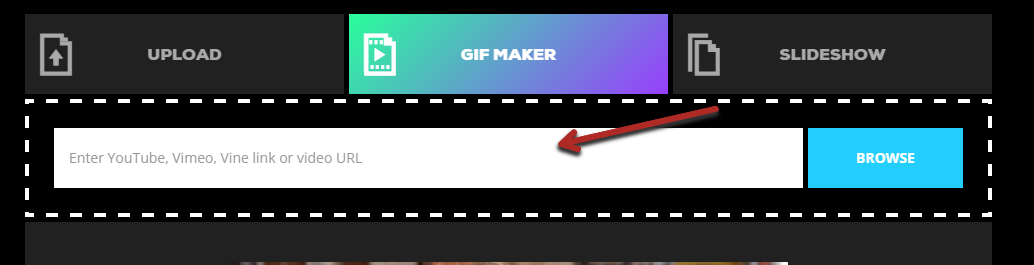
For this example, let’s use that video I showed you earlier in the article, the Dollar Shave Club ad.

Once you put in the URL, it will automatically load a preview of the video with a few key options:

  • start time – the timestamp in the video where you want the gif to start
  • duration – how long you want the gif to go for (from the start time)
  • caption – any text you want to display on the gif

image19

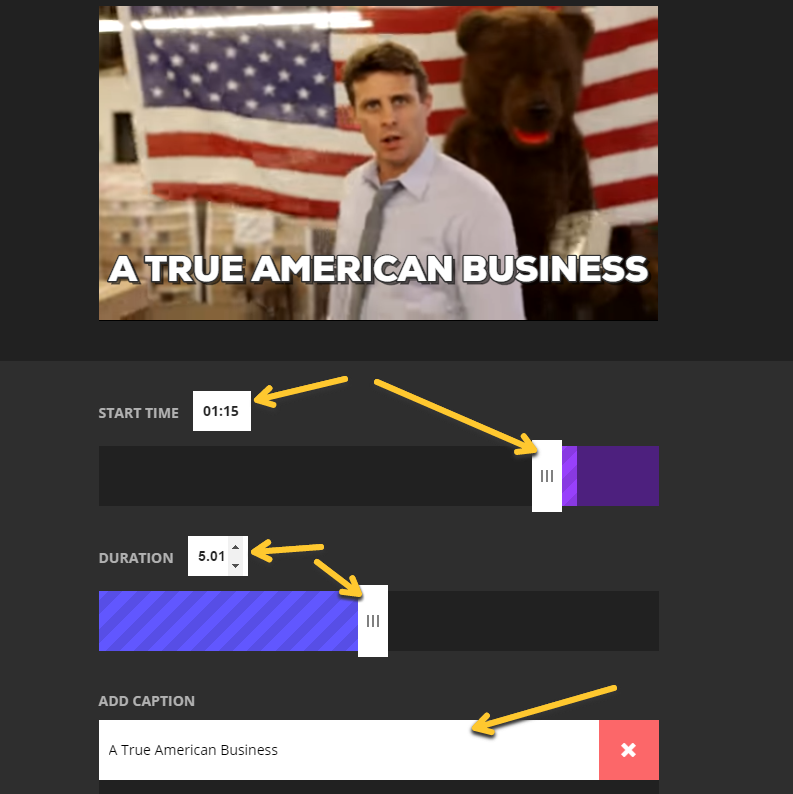
When it looks good, scroll down and click the “advanced” tab. From there, click the download button to save a copy of the gif.

image11

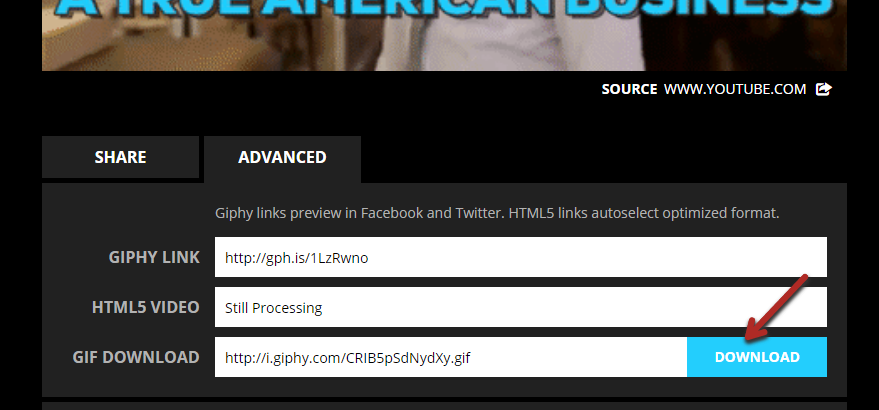
Finally, just upload it into your content like you would with a normal image, and voilà:

image18

You can also use Giphy as a gif search engine. Instead of making your own gif, you might one already made by someone else. Just search a few keywords.

image13

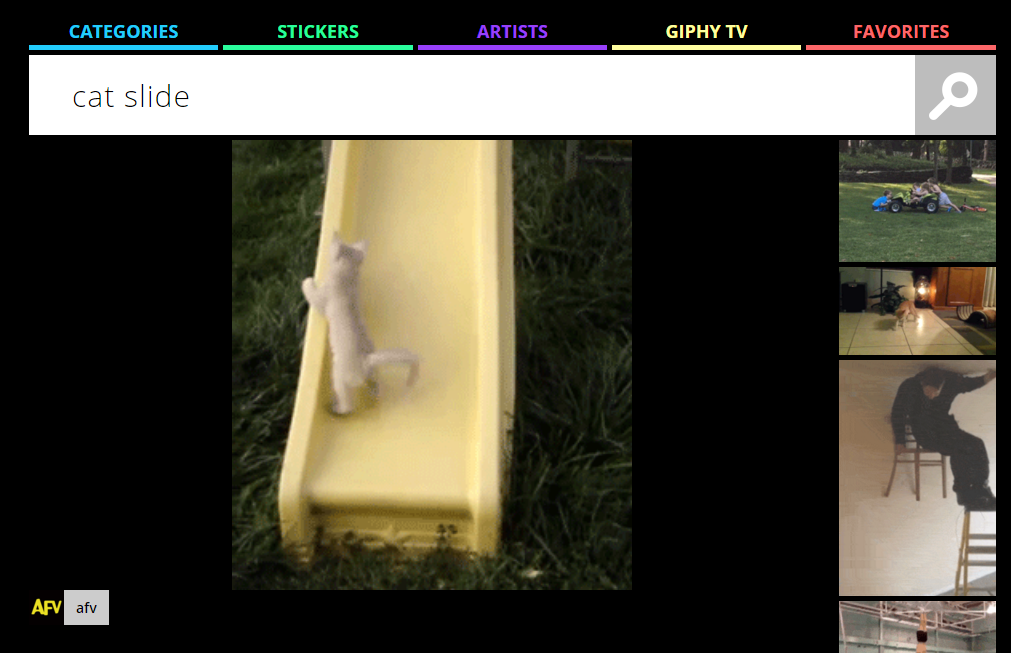
If there is a gif, you’ll likely find it.

4. Make the right things actionable

This is where things get a bit tricky…

There is a such thing as having too much actionability.

If you, by default, explain how to do every single thing you mention, your content is going to be filled with some very useful stuff and some very useless things.

While too actionable is better than not actionable enough, you want to find the sweet spot.

Let me give you a few examples of where it would be a bad idea to expand.

First, consider my example of baking a pie that I gave you earlier that illustrated how effective images can be.

Imagine if I had included a full tutorial on baking a pie. Would that add any value to my post?

No, of course not.

You don’t need to know how to bake a pie in order to understand how images can improve actionability.

That’s an extreme example so that you get what I’m talking about in general.

Now, let’s look at a more subtle example.

I often write about tools, e.g., tools that help you work as a team to create content. In these, I’ll provide tutorials on the most important functions of the tools in my list.

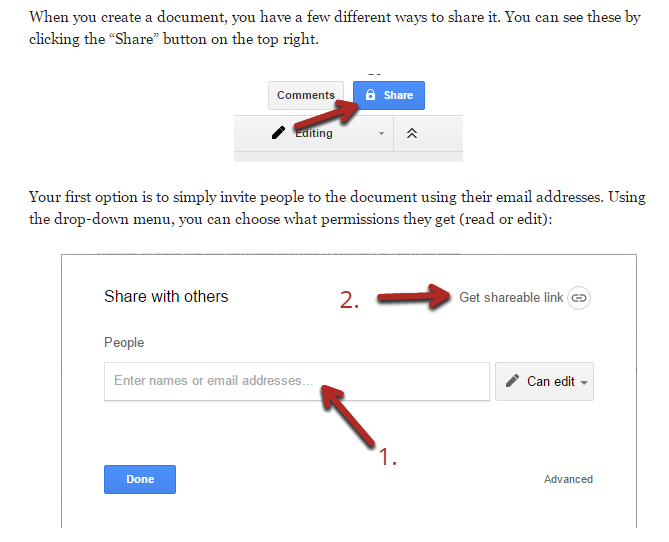
For example, here’s a tutorial of how to use the sharing function in Google docs:

image24

But Google docs has tons of features. There are probably hundreds—if you really dug in.

Should I give a tutorial for each and every one?

What about how to make tables, or format a page, or create custom bullets?

The simple answer is no, I don’t need to include tutorials for those.

That’s because only a minority of my readers would find those useful.

Even if I mention in my post that a table can be useful, that doesn’t mean I need to provide a tutorial on tables to make the post more actionable.

You want to focus on making the essential concepts you are explaining actionable, not the secondary ones.

You will have to make some judgement calls.

When you’re not sure if you should expand on a concept, ask yourself: “Do my readers need to know how to do this in order to put my advice into action?”

In the case of the Google Docs tool article, readers would have to know how to share articles with their co-workers, but they wouldn’t necessarily need to know how to create tables.

That’s the difference.

5. Calls to action can be powerful motivators

We’ve already looked at some reasons why people don’t take action when they read your content even if it has a valuable message.

One of them was not knowing what to do. But once they know that, it becomes a question of when to do it.

As you might know from firsthand experience, if we don’t do something right away, it’s very easy to forget about it and never do it.

That’s why so many readers simply bookmark articles and tell themselves that they’ll come back later and take action. Most never do.

This means that your goal is to get them to take action right then and there, while they’re reading your post (or immediately after).

To do this, you have to call out your audience. You need to explicitly tell your readers to take action and do something at a specific time.

There are two general ways to do this.

The first is to include these call-outs as instructions throughout your content.

In posts about step-by-step strategies, this works very well.

For example, here’s an excerpt from a post I published about creating a content marketing plan.

image15

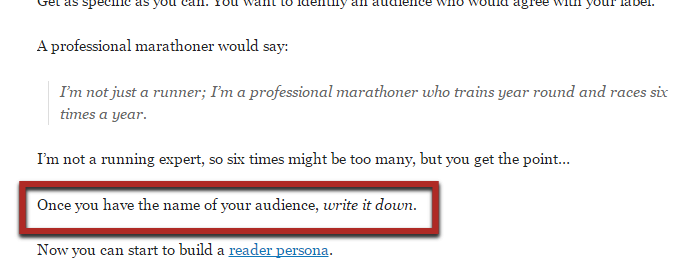
In that sentence that I put in a box, I explicitly tell the reader to take action. They’re supposed to apply the advice I just gave them about naming their audience and then take action by writing it down.

What you’ll find is that if you make that first step easy to do, you can get a lot of readers to start taking action. Then, they build the momentum, and it’ll be increasingly easier to get them to continue taking action as you move them through the steps.

Later in that article, I again urge the reader to write down a list of their readers’ problems:

image28

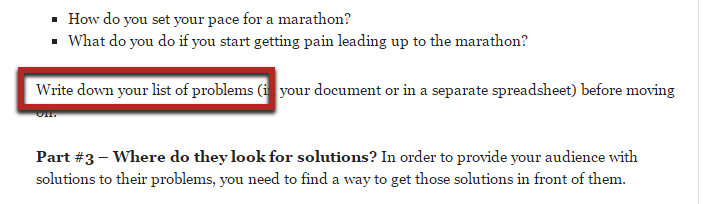
Before that point, I’ve given them all the advice they need to take that action easily.

I’m not going to go through them all, but throughout that post, I’ve broken down overall big actions into small, manageable steps at the right times.

The second approach is to put a call to action at the end of the post, in a conclusion.

This is useful for posts that aren’t necessarily step-by-step or for those cases when you need to understand all of the material before you can apply any of it effectively.

In most of my conclusions, I give next steps a reader can take:

image26

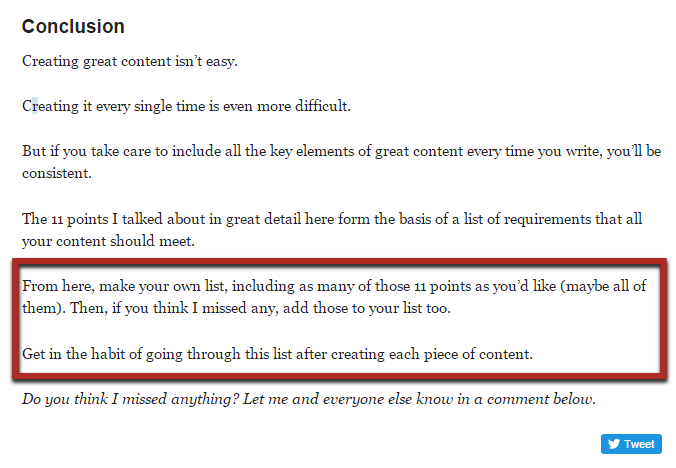
In the post I am using as an example, I specifically tell the reader to make their own list of points to include in their content and then to use it.

It’s not complicated, but it basically singles out the reader and makes it clear that the time to take action is now.

One final thing to keep in mind is that you don’t want to ask too much of your reader.

If you tell them to create a website from scratch, that’s a lot of work, and most readers won’t have time for that.

If the takeaway advice from your content is a big ask, then give them a way to make it easier.

Either tell them to start with one small piece of it, or give them a tool that helps them do it faster.

For example, in that same post, I offered a printable sheet of my 11-point content framework:

image05

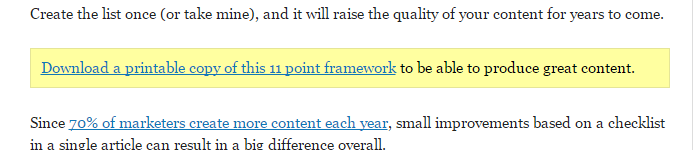
I knew it would be easier for the readers to create their plans based on my summary rather than start from scratch using the full article as their knowledge base.

6. Engaged audiences are more likely to take action

This final way of making your posts more actionable addresses the elephant in the room:

Readers are lazy.

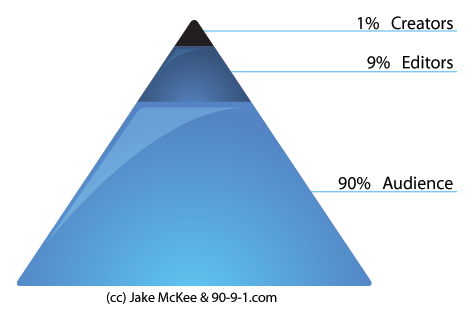
According to the 1% rule, only about 1% of forum users actually post regularly; most of them will only read, passively lurking around:

image09

The same is true for most blogs. Most readers will skim posts but never take action.

I told you it’s difficult to get lazy people to do anything, and it’s true, but there is something you can do to encourage even lazy people to take action.

The solution is to get them to engage with the content.

That means to get them to the point when they are actively reading it, thinking about what you wrote, and taking some sort of action throughout the content.

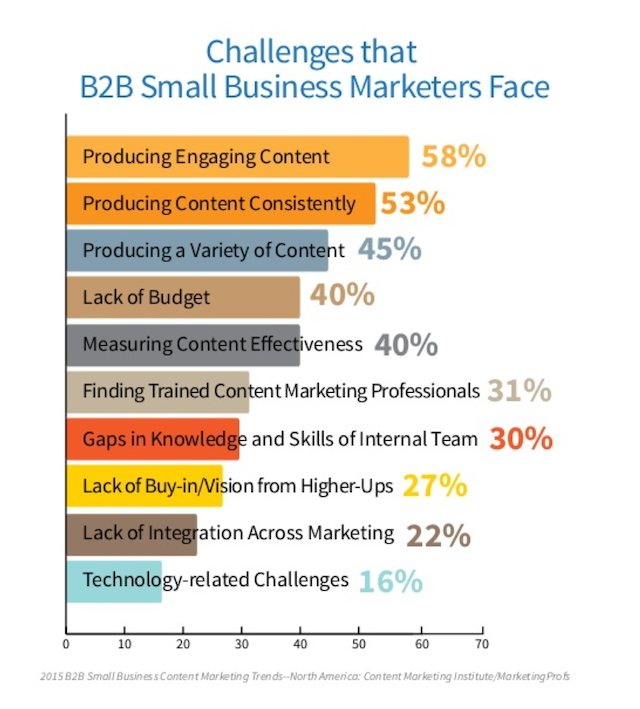
Creating engaging content is actually pretty hard. Surveys have shown that up to 58% of marketers struggle to produce engaging content:

image27

But don’t worry, I have a few easy solutions for you.

The first is a big one, and it’s using interactive content wherever possible. Interactive content describes any content with which the user can interact (shocking, I know). This might mean clicking, typing something in, etc.

The reason why interactive content leads to engagement can be seen in a recent study on university students.

They looked at different teaching methods and found that the teachers who used interactive teaching methods had an engagement rate that was double the norm and had an attendance rate 20% higher than normal.

So, on top of getting your readers focused on your content while creating some momentum so that they apply your advice, you’re also going to attract more readers in the first place.

Pretty cool, right?

The main way you can do this is to embed social media. This breaks up the content with something different and allows the reader to take action and engage with it, leading to all those other benefits.

Embedding social media in posts: In most cases, you’ll stick to embedding tweets and Facebook posts.

While Twitter has some native embed options, I suggest using a plugin such as TweetDis, which allows you to insert attractive tweets in seconds.

If you buy TweetDis, once you install it, you’ll see an icon in all of your post editors:

image01

In order to use it, highlight the text you want to be tweetable, and then click the icon.

The resulting pop-up has a few simple options.

image08

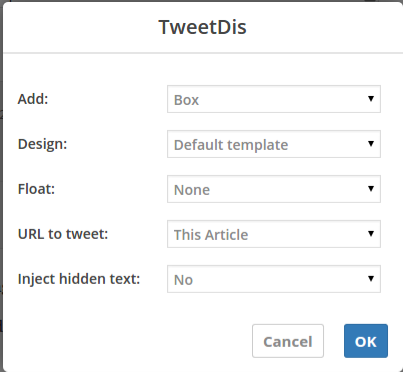
The first menu, “Add,” lets you pick the type of tweet you want. A “box” tweet looks like one that you’d see on Twitter itself, while a “hint” simply adds a highlighted link to your content that readers can tweet.

The hint is shown below:

image21

Getting the reader to switch from a passive consumption mode to an active mode (of sharing in this case) is a great way to boost engagement.

I haven’t come across any great options to embed Facebook posts, so you’ll have to do that the hard way.

If you make a post that you want to embed (or find someone else’s), you can click the drop-down arrow in the corner and choose the “Embed Post” option:

image22

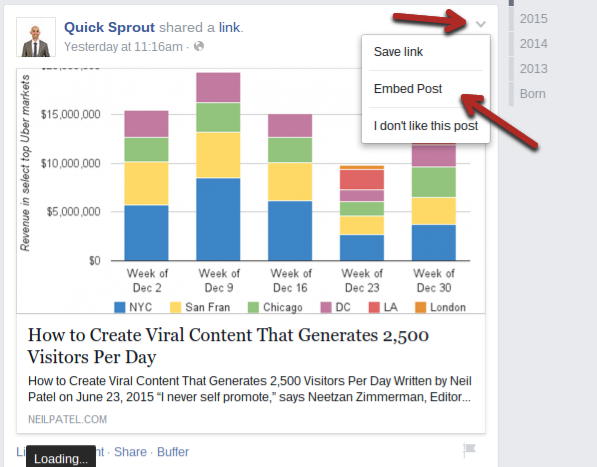
That will give you an HTML code that you can paste into your content. Then, it will show up just like a Facebook post in your content:

image04

Your readers will be able to like, comment on, and share it right from that embedded post.

There are many other ways you can use interactive content effectively, which is why I recommend reading my full guide on the topic.

Ask questions frequently in your content: The other way to engage readers in your content is to simply ask questions.

Don’t let them just read your statements; ask them questions that make them stop and think a little bit.

I do this all the time in my posts:

image17

Overall, it makes the content feel much more like a conversation rather than a one-sided lecture.

Finally, there are two important things to keep in mind when you ask your questions:

  1. Don’t ask stupid questions – Readers will feel that the questions are out of place.
  2. Always answer your own questions – Even if most of your readers might know the answer, not all will. Answering the question yourself ensures that everyone stays on the same page.

Conclusion

If you want your content to have a big impact on your readers’ lives, you need those readers to take action.

Not only is it good for them but it’s also good for your content marketing results. Readers who experience good results from your advice will become loyal fans and, often, customers.

I’ve shown you six different ways to make your posts more actionable.

Start with one or two tactics, and once you are comfortable with them, come back and apply the rest.

I’d love it if you shared the results you’ve had from implementing any of these methods. Leave your thoughts in a comment below.

Powered by WPeMatico

Implementing Push Notifications: Setting Up & Firebase

You know those the little notification windows that pop up in the top right (Mac) or bottom right (Windows) corner when, for example, a new article on our favorite blog or a new video on YouTube was uploaded? Those are push notifications.

Part of the magic of these notifications is that they can appear even when we're not currently on that website to give us that information (after you've approved it). On mobile devices, where supported, you can even close the browser and still get them.

Article Series:

  1. Setting Up & Firebase (You are here!)
  2. The Back End (Coming soon!)
Notification on Mac via Chrome
Push notification on a Mac in Chrome

A notification consists of the browser logo so the user knows from which software it comes from, a title, the website URL it was sent from, a short description, and a custom icon.

We are going to explore how to implement push notifications. Since it relies on Service Workers, check out these starting points if you are not familiar with it or the general functionality of the Push API:

What we are going to create

Preview of the our push notification demo website

To test out our notifications system, we are going to create a page with:

  • a subscribe button
  • a form to add posts
  • a list of all the previously published posts

A repo on Github with the complete code can be found here and a preview of the project:

View Demo Site

And a video of it working:

Gathering all the tools

You are free to choose the back-end system which suits you best. I went with Firebase since it offers a special API which makes implementing a push notification service relatively easy.

We need:

In this part, we'll only focus on the front end, including the Service Worker and manifest, but to use Firebase, you will also need to register and create a new project.

Implementing Subscription Logic

HTML

We have a button to subscribe which gets enabled if 'serviceWorker' in navigator. Below that, a simple form and a list of posts:

<button id="push-button" disabled>Subscribe</button>

<form action="#">
  <input id="input-title">
  <label for="input-title">Post Title</label>
  <button type="submit" id="add-post">Add Post</button>
</form>

<ul id="list"></ul>

Implementing Firebase

To make use of Firebase, we need to implement some scripts.

<script src="https://www.gstatic.com/firebasejs/4.1.3/firebase-app.js"></script>
<script src="https://www.gstatic.com/firebasejs/4.1.3/firebase-database.js"></script>
<script src="https://www.gstatic.com/firebasejs/4.1.3/firebase-messaging.js"></script>

Now we can initialize Firebase using the credentials given under Project Settings → General. The sender ID can be found under Project Settings → Cloud Messaging. The settings are hidden behind the cog icon in the top left corner.

firebase.initializeApp({
    apiKey: '<API KEY>',
    authDomain: '<PROJECT ID>.firebaseapp.com',
    databaseURL: 'https://<PROJECT ID>.firebaseio.com',
    projectId: '<PROJECT ID>',
    storageBucket: '<PROJECT ID>.appspot.com',
    messagingSenderId: '<SENDER ID>'
})

Service Worker Registration

Firebase offers its own service worker setup by creating a file called `firebase-messaging-sw.js` which holds all the functionality to handle push notifications. But usually, you need your Service Worker to do more than just that. So with the useServiceWorker method we can tell Firebase to use our own `service-worker.js` file as well.

Now we can create a userToken and a isSubscribed variable which will be used later on.

const messaging = firebase.messaging(),
      database  = firebase.database(),
      pushBtn   = document.getElementById('push-button')

let userToken    = null,
    isSubscribed = false

window.addEventListener('load', () => {

    if ('serviceWorker' in navigator) {

        navigator.serviceWorker.register('https://cdn.css-tricks.com/service-worker.js')
            .then(registration => {

                messaging.useServiceWorker(registration)

                initializePush()
            })
            .catch(err => console.log('Service Worker Error', err))

    } else {
        pushBtn.textContent = 'Push not supported.'
    }

})

Initialize Push Setup

Notice the function initializePush() after the Service Worker registration. It checks if the current user is already subscribed by looking up a token in localStorage. If there is a token, it changes the button text and saves the token in a variable.

function initializePush() {

    userToken = localStorage.getItem('pushToken')

    isSubscribed = userToken !== null
    updateBtn()

    pushBtn.addEventListener('click', () => {
        pushBtn.disabled = true

        if (isSubscribed) return unsubscribeUser()

        return subscribeUser()
    })
}

Here we also handle the click event on the subscription button. We disable the button on click to avoid multiple triggers of it.

Update the Subscription Button

To reflect the current subscription state, we need to adjust the button's text and style. We can also check if the user did not allow push notifications when prompted.

function updateBtn() {

    if (Notification.permission === 'denied') {
        pushBtn.textContent = 'Subscription blocked'
        return
    }

    pushBtn.textContent = isSubscribed ? 'Unsubscribe' : 'Subscribe'
    pushBtn.disabled = false
}

Subscribe User

Let's say the user visits us for the first time in a modern browser, so he is not yet subscribed. Plus, Service Workers and Push API are supported. When he clicks the button, the subscribeUser() function is fired.

function subscribeUser() {

    messaging.requestPermission()
        .then(() => messaging.getToken())
        .then(token => {

            updateSubscriptionOnServer(token)
            isSubscribed = true
            userToken = token
            localStorage.setItem('pushToken', token)
            updateBtn()
        })
        .catch(err => console.log('Denied', err))

}

Here we ask permission to send push notifications to the user by writing messaging.requestPermission().

The browser asking permission to send push notifications.

If the user blocks this request, the button is adjusted the way we implemented it in the updateBtn() function. If the user allows this request, a new token is generated, saved in a variable as well as in localStorage. The token is being saved in our database by updateSubscriptionOnServer().

Save Subscription in our Database

If the user was already subscribed, we target the right database reference where we saved the tokens (in this case device_ids), look for the token the user already has provided before, and remove it.

Otherwise, we want to save the token. With .once('value'), we receive the key values and can check if the token is already there. This serves as second protection to the lookup in localStorage in initializePush() since the token might get deleted from there due to various reasons. We don't want the user to receive multiple notifications with the same content.

function updateSubscriptionOnServer(token) {

    if (isSubscribed) {
        return database.ref('device_ids')
                .equalTo(token)
                .on('child_added', snapshot => snapshot.ref.remove())
    }

    database.ref('device_ids').once('value')
        .then(snapshots => {
            let deviceExists = false

            snapshots.forEach(childSnapshot => {
                if (childSnapshot.val() === token) {
                    deviceExists = true
                    return console.log('Device already registered.');
                }

            })

            if (!deviceExists) {
                console.log('Device subscribed');
                return database.ref('device_ids').push(token)
            }
        })
}

Unsubscribe User

If the user clicks the button after subscribing again, their token gets deleted. We reset our userToken and isSubscribed variables as well as remove the token from localStorage and update our button again.

function unsubscribeUser() {

    messaging.deleteToken(userToken)
        .then(() => {
            updateSubscriptionOnServer(userToken)
            isSubscribed = false
            userToken = null
            localStorage.removeItem('pushToken')
            updateBtn()
        })
        .catch(err => console.log('Error unsubscribing', err))
}

To let the Service Worker know we use Firebase, we import the scripts into `service-worker.js` before anything else.

importScripts('https://www.gstatic.com/firebasejs/4.1.3/firebase-app.js')
importScripts('https://www.gstatic.com/firebasejs/4.1.3/firebase-database.js')
importScripts('https://www.gstatic.com/firebasejs/4.1.3/firebase-messaging.js')

We need to initialize Firebase again since the Service Worker cannot access the data inside our `main.js` file.

firebase.initializeApp({
    apiKey: "<API KEY>",
    authDomain: "<PROJECT ID>.firebaseapp.com",
    databaseURL: "https://<PROJECT ID>.firebaseio.com",
    projectId: "<PROJECT ID>",
    storageBucket: "<PROJECT ID>.appspot.com",
    messagingSenderId: "<SENDER ID>"
})

Below that we add all events around handling the notification window. In this example, we close the notification and open a website after clicking on it.

self.addEventListener('notificationclick', event => {
    event.notification.close()

    event.waitUntil(
        self.clients.openWindow('https://artofmyself.com')
    )
})

Another example would be synchronizing data in the background. Read Google's article about that.

Show Messages when on Site

When we are subscribed to notifications of new posts but are already visiting the blog at the same moment a new post is published, we don't receive a notification.

A way to solve this is by showing a different kind of message on the site itself like a little snackbar at the bottom.

To intercept the payload of the message, we call the onMessage method on Firebase Messaging.

The styling in this example uses Material Design Lite.

<div id="snackbar" class="mdl-js-snackbar mdl-snackbar">
  <div class="mdl-snackbar__text"></div>
  <button class="mdl-snackbar__action" type="button"></button>
</div>
import 'material-design-lite'

messaging.onMessage(payload => {

    const snackbarContainer = document.querySelector('#snackbar')

    let data = {
        message: payload.notification.title,
        timeout: 5000,
        actionHandler() {
            location.reload()
        },
        actionText: 'Reload'
    }
    snackbarContainer.MaterialSnackbar.showSnackbar(data)
})

Adding a Manifest

The last step for this part of the series is adding the Google Cloud Messaging Sender ID to the `manifest.json` file. This ID makes sure Firebase is allowed to send messages to our app. If you don't already have a manifest, create one and add the following. Do not change the value.

{
  "gcm_sender_id": "103953800507"
}

Now we are all set up on the front end. What's left is creating our actual database and the functions to watch database changes in the next article.

Article Series:

  1. Setting Up & Firebase (You are here!)
  2. The Back End (Coming soon!)

Implementing Push Notifications: Setting Up & Firebase is a post from CSS-Tricks

How to Get Dreams Out of Your Head [And a Video of Me Wearing Tights]

wds2013-0415-IMG_6737Last month I had the honour of speaking at the World Domination Summit in Portland.

Conference founder, Chris Guillebeau, gave me the brief of sharing my story and to share some tips and ideas for helping people to lead remarkable lives in a conventional world. He also said he didn’t want me to just talk about blogging – a task I found very refreshing!

I spoke on the topic of ‘Getting Dreams out of Your Head‘ and covered quite a bit of ground. In this video you’ll see my full keynote and hear about:

  • How I started my first business at 9
  • The words an ex-girlfriend said that changed my life
  • The 4 words that started me blogging and changed the trajectory of my life
  • A close encounter I had with Russell Brand in a mens bathroom
  • Where to look for your ‘next big thing’
  • The two questions I ask myself every day that have unlocked some amazing opportunities for me

Oh – and at the end of the video you’ll see me as you’ll never have seen me before (it involves wearing tights)! There’s also a special guest performance by the amazing Clare Bowditch which touched the hearts of many at WDS.

Grab yourself a cup of your favourite beverage, sit back and enjoy.

Darren Rowse from Chris Guillebeau on Vimeo.

How to Get Dreams Out of Your Head [And a Video of Me Wearing Tights]
http://www.problogger.net/archives/2013/08/03/how-to-get-dreams-out-of-your-head-and-a-video-of-me-wearing-tights/
http://www.problogger.net/archives/category/miscellaneous-blog-tips/feed/
@ProBlogger» Miscellaneous Blog Tips
Blog Tips to Help You Make Money Blogging – ProBlogger
http://www.problogger.net/wp-content/plugins/podpress/images/powered_by_podpress_large.jpg

The Three Core Tenets Every Successful Blogger Needs to Have

As bloggers, we all have different goals. Some may be to monetize your blog; some may be to get a book deal; some may be to become recognized as an expert in your field; others may be to share company news and updates.

Some may even just be to have a personal outlet where you can let your creativity go and see what works, and what doesn’t.

But no matter the goals you have for your blog, to succeed in them takes more than just setting up a blog and watching the success come rolling in.

Succeed

While there may be early successes, to be a truly successful blogger you need to have the following three key tenets.

1. Patience

So many bloggers give up in the first few months because they’re not experiencing what they feel they should be, to be classed as successful. They’re not getting the thousands of subscribers, or visitors, or social shares, or sales.

The thing is, much like anything, blogging success is not an overnight success. To build a blog that has both longevity and solid foundations takes time.

You need to cultivate your community; understand who your audience is and what they’re interested in; what social platforms make sense for you to be on; and define your editorial voice.

You’ll make many mistakes in your first few months of blogging – but that’s a natural part of growth.

Don’t let perceived “failure” put you off your game – be patient and your goals will start to happen.

2. Strength

One of the great things about blogging is that it allows the fostering of some truly great ideas and discussions.

Sure, the blogger might start all this off with the original post, but then the following comments can really take the post into a rich and varied discussion point.

Of course, with discussions comes dissent – and many bloggers fail at welcoming this part of the discussion into their part of the web. Which is a mistake.

The very best bloggers not only welcome dissent, they encourage it and meet it head on – because they have strength in their convictions.

The very best bloggers not only welcome dissent, they encourage it and meet it head on. Click To Tweet

When you put something out for the world to read, you need to be strong enough to know that not everyone is going to fawn over your wisdom (real or otherwise), and that often questions will be asked.

Want to run a successful blog? Be strong when questioned, accept when wrong, and understand that the most successful blogs are the ones where the reader feels like they’re really a part of it, as opposed to just being a bystander to your soapbox.

3. Belief

One of the things I always notice when reading a blog is how much conviction is there.

It comes through in the words being written or the video/podcast being shared, as well as the advertising partners on the site, and the products/services being recommended.

In other words, it’s easy to see when a blogger truly believes in what they’re doing, or saying, versus one that’s just mailing their posts in.

Blog readers are smart people – we know when you’re the real deal and when you’re just out trying to make a fast buck, or position yourself as something you’re not.

Instead of trying to fool us, make us believe that you believe too.

  • Recommend products and services that you use, and would recommend anyway even if you weren’t getting paid to do so.
  • Believe in the words you’re writing. Passion wins over boring wisdom every time.
  • Believe in the wisdom of your readers – never take them for granted or expect them to believe your every word.

Simply put – if you believe, we’ll believe.

Which is what really matters at the end of the day, no?

The Three Core Tenets Every Successful Blogger Needs to Have originally appeared on Danny Brown – – all rights reserved.

Powered by WPeMatico

Reading Roundup: What’s New in Blogging Lately?

Reading Roundup: What's new in blogging this week / ProBlogger.net

Good morning! Welcome to your roundup of interesting titbits from around the web. Plenty to mull over here – tools, beta testing of our favourite social media sites, Google doing new Google things (who knew?!) and a cool script to help you tap into your blog audience’s personas. Enjoy!

5 Visual Content Tools to Boost Engagement // Social Media Examiner

If you’re on a tight budget (or let’s be honest: no budget) for graphics, these tools should help you up your visual content game. I love the Instagram collage idea.

Instagram Now Testing Support for Account Switching, No Logout Required // TechCrunch

Oh wouldn’t this be a boon for those of you who manage multiple accounts! Let’s cross our fingers that the choice proves popular in the beta testing and they keep it.

LinkedIn’s New Facebook-like App Arrives on iOS and Android // Mashable Australia

A much easier (and more eye-pleasing!) way to see who is sharing what on LinkedIn. I can imagine it would promote more engagement, which I’m all for. I have to admit, I don’t do much with my LinkedIn but I may be swayed by this!

How to Figure Out What Keywords Your Potential Customers are Using // Hubspot

And what your potential readers are searching for! This is a super-detailed piece – Bridget has taken a step back and started at SEO right from the start before launching into what tools you can use so you can be armed with all the knowledge to create a super campaign or tailored blog content.

How to Become a Virtual Assistant // Amy Lynn Andrews

I know plenty of us have “virtual assistant” on our Christmas lists, but for those of you who would like to be one (can be a great supplement to your blog income), Amy has recently updated her guide. Check it out!

image 2 tags snowmen

Google Turns Image Search Into Pinterest with New Collections Feature // TechCrunch

It’s only for mobile (and those of you in the US), and it looks as though it’s a part of the sort-of-revamped Google+, but now when you find an image you want to keep for later in Google search, you can organise your own personal collections. Search results are filterable and it appears quite intuitive.

“Don’t Pursue Something That Someone Said You Should Want”: Derek Sivers at WDS // Chris Gillebeau

I loved attending the World Domination Summit in Portland this year, and Chris Gillebeau, master of it all, has started releasing videos from the amazing speakers across the weekend. This video is from one of my favourite speakers – Derek Sivers – who delivered kick-ass, no-bullshit business advice. I took SO MUCH away from his philosophy. Watch it, you won’t be sorry!

Persona Research in Under 5 Minutes // Moz

You know how much we love a reader profile around these parts. Who are you speaking to? What kind of people make up your core audience? More importantly – where are they hanging out? I love this script for nailing all this info in under 5 minutes.

8 Creative Ways to Add Christmas Spirit to Your Social Media // Jeff Bullas

I just spent 10 minutes trying to find the best christmas photo for my Facebook profile. It’s that time of year!

From YouTube to Persicope: The Evolution of Web Video [Infographic] // AdWeek

Crazy to see how far it’s come (and how much I suck at all of them). I wonder where web video (and indeed, how audiences consume it) is headed next. Any ideas?

Have you Christmasified your social media yet?!

Stacey Roberts is the Managing Editor of ProBlogger.net: a writer, blogger, and full-time word nerd balancing it all with being a stay-at-home mum. She writes about all this and more at Veggie Mama. Chat with her on Twitter @veggie_mama or be entertained on Facebook.

The post Reading Roundup: What’s New in Blogging Lately? appeared first on @ProBlogger.

Powered by WPeMatico

4 WordPress Alternatives: the What, Where, and Why

This guest post is by Matt Setter of MaltBlue.com.

As bloggers, we’re all familiar with WordPress, whether as a self-hosted setup, or via WordPress.com. I think that, if you’re a blogger and you’ve not used it, then you’re likely in an odd minority.

If you do a Google search for “blogging software,” WordPress will likely be among the first results you’ll see. But is it necessarily the best choice?

Yes, “everybody’s doing it,” but does that make it the right choice? Just like in the 90’s when Microsoft seemed like the only choice, but then we found alternatives like Mac or Linux, there are alternatives to WordPress too.

Now maybe you’re quite happy with your WordPress installation, it meets your needs, and your site’s humming along nicely. Well, that’s perfectly fine. But what if you’re not? What if you want to change, or have the opportunity to change?

What if you’re:

  • just starting out
  • about to rebuild or redesign your blog
  • moving hosts
  • concerned WordPress is not meeting your needs
  • contrarian in your thinking?

Well if you’re any one of these, you’ll love this post. Today I present to you four alternatives you may never have heard of, showing you the pros and cons of each, how much they cost, and where you can get them from. Ready? Great! Let’s begin.

Habari

habariHabari is a secure blogging platform designed from the ground up with the current and future needs of the blogging community firmly in mind. It’s also designed to be open and transparent, using modern software development techniques in its design.

Some examples of blogs run on this platform include:

  • http://barefootrunner.co.uk/
  • http://futurespark.com.au/

The Habari project screencast linked below gives a great introduction to the CMS.

Features

  • Support for a wide variety of plugins and extensions, including:
    • contact forms
    • Last.FM
    • spam management
    • Amazon
    • Google Maps, AdSense, and Analytics
    • star ratings
    • members-only access
    • LinkedIn
    • Twitter
  • modern theme support
  • support for multiple users and multiple sites in one installation
  • support for tagging
  • support for a wide variety of media, including Viddler and Flickr
  • custom RSS feeds and statistics
  • Feedburner integration
  • modern spam filtering techniques
  • automatic Twitter updates
  • Disqus integration for commenting.

Cost and availability

Habari is available as a free download from the project home page. You can even try out a demo version without needing to install it.

Support options

Habari support is available via:

  • FAQ
  • users group
  • IRC (internet chat, similar to ICQ, MSN, Google Chat etc).

Is it for you?

If you’re keen to roll up your sleeves and manage things yourself, or you have great tech support, try out Habari. However, if your host doesn’t support it or you’re not able to do it yourself, then this may not be the best option for you.

CushyCMS

cushycmsCushyCMS is, as the home page says, “A Truly Simple CMS.” It was designed to be implemented with as little effort as possible; to be “Super Easy To Use!”

Where Habari is more like WordPress in that you can download, install, and configure it yourself, CushyCMS is a fully hosted solution.

Minimal manual effort is required on your part, other than the work required to implement modest customisations. Have a look at the introductory video below to see just how easy it is.

Blogs that use CushyCMS include:

  • http://thewebtherapist.com/
  • http://www.the-nomads.co.uk/

Features

Depending on the package that you choose, different features will be available to you. In the free package, you get:

  • five sites
  • unlimited site editors
  • availability in 20 languages.

If you take the pro package, you can:

  • brand your installation
  • customise the interface via a wysiwig editor
  • remove all ads from the site
  • use your own domain name and logo
  • configure access rights for each user
  • customise the CSS classes.

Cost and availability

CushyCMS is available from Stateless Systems and comes in two forms:

  • free
  • pro, for US$28 per month.

Support options

This depends on the package that you’ve chosen. If you’ve chosen the free package, you get:

  • videos
  • documentation
  • package FAQ
  • access to the Google user group.

If you upgrade to the pro package, you get all that, plus direct email support from Stateless Systems.

Is it for you?

Depending on your needs and requirements, CushyCMS could be just what you’re looking for. You can sign up and get started in minutes. There’s no need to worry about what your current provider does or doesn’t support, as this system is fully hosted. You can get started with the free version, but you’ll have limited branding and domain control privileges.

You can upgrade to the pro version, but unless you’re making regular money with your blog, you might not want to pay the monthly fee for it. However, you do get a company backing the product with 24/7 support, should you have any questions or queries.

concrete5

concrete5Just like WordPress and Habari, concrete5 is available to be downloaded, configured, and installed at your web host and is a blogging platform built from the ground up to satisfy the needs of website editors, designers, and developers alike on a foundation of proven open source technologies.

The underlying philosophy of concrete5 is to make running a website easy. As you can see from the demo video below, in just about all aspects of site administration, you can simply click on a region of the page and edit it to your heart’s content.

A couple of blogs that run on concrete5 are:

  • http://www.gigstadpainting.com/
  • http://www.sustainableharvest.com/

Features

Concrete5:

  • is easy to theme yourself, or you can choose from a wide variety of pre-made themes
  • supports a wide variety of plugins and extensions including:
    • digital download support
    • discussion forums
    • ecommerce
    • ad servers
    • configurable menu navigation
    • star reviews
    • scrolling ticker
    • image gallery
    • traffic and statistics management
    • Google Maps
    • user chat
    • country-based redirect
    • Vimeo and YouTube support.
  • easy to configure, whether by hand or via the wysiwig editor
  • easy to update, right from your browser
  • open source and completely free to use
  • easy to install and configure.

Cost and availability

Concrete5 is available from the concrete5 website and is open source, so it’s free.

Support options

Similar to Habari, concrete5 doesn’t have a paid support option, however it does have:

  • an active community
  • clear documentation
  • a thorough FAQ.

If you are a developer, or have access to development support, training and integration packages are also available.

Is it for you?

Concrete5 is a good mixture of the best parts of the two previous packages. You can install it yourself, but training and custom build support are also available. So, depending on your needs and your available budget, concrete5 may be the right option for you. Why not give a trial version a go today to see?

TomatoCMS

tomatocmsLast, but by no means least, is TomatoCMS. Like Habari and Concrete5, TomatoCMS is an open source, modern blogging and CMS platform designed from the ground up to meet today’s needs and demands.

Examples of blogs that run on this platform include:

  • http://www.thethao68.com/
  • http://home.phono.co.jp/

Two key aspects set TomatoCMS apart: Widgets and the Layout Editor. Let’s look at its feature list.

Features

Among a vast array of compelling features are:

  • a variety of built-in modules (extension) including:
    • banner advertising support
    • category management
    • comment management
    • simple menu management
    • multimedia management
    • in-built news system
    • tag support
    • poll support
  • built on the Zend Framework, jQuery, and 960grid, making it fast, light and flexible.

In addition to this it’s also:

  • SEO friendly
  • secure
  • highly themable
  • packaged with a simple visual editor allowing you to drag, drop, and resize almost any interface element.

Cost and availability

As with Habari and Concrete5, TomatoCMS is also a free download available to be installed and configured on your host as your needs demand.

Support options

Also like Habari and Concrete5, TomatoCMS doesn’t offer a commercial support package. However it does have a solid project wiki and a thriving forum. If you have troubles with it, then you’re likely to find the solution there without too much hassle.

Is it for you?

If you’re keen to control most, if not all, of the aspects of the system on your own host, then this is the option for you. However, if you need support then this option may not be the best choice.

Choices, choices

So there you have it. If you want to change from WordPress, have an opportunity to change, or are just starting out, now you have four additional options to WordPress to choose from.

Take a closer look and evaluate them. When you find the one that ticks all your boxes, give it a try and let me know how it goes for you.

Do you run your blog on an alternative to WordPress? Why is it your platform of choice? What makes it the best one for your blog and your business? Let us know in the comments.

Matthew Setter is a freelance writer, technical editor and proofreader. His mission is to help businesses present their online message in an engaging and compelling way so they’re noticed and remembered.

The post 4 WordPress Alternatives: the What, Where, and Why appeared first on ProBlogger.

4 WordPress Alternatives: the What, Where, and Why
https://problogger.com/4-wordpress-alternatives-the-what-where-and-why/
http://www.problogger.net/archives/category/blog-networks/feed/
Blog Networks – ProBlogger
Blog Tips to Help You Make Money Blogging – ProBlogger
https://problogger.com/wp-content/uploads/powerpress/problogger_podcast-891.jpg

Powered by WPeMatico

Creating Content Wireframes For Responsive Design


As I was leading my course in responsive web design between 2011 and 2012, I kept stumbling over the process of wireframing. My students tended to focus on the wireframe as being the end game in the planning process. They didn’t understand that responsive design focuses on how users will access the content.

How To Create Content Wireframes For Responsive Design

You can only imagine my relief when I happened to come across a video by Stephen Hay speaking at the Beyond the Desktop conference in 2012. There, in his talk on responsive design, he presented the concept of the content wireframe. This was a huge relief to me. I just knew there was a step before the process got real, but I couldn’t articulate it. In this post, I’ll describe the methods I use to get from content to responsive wireframe — and how you can, too.

The post Creating Content Wireframes For Responsive Design appeared first on Smashing Magazine.

Powered by WPeMatico