Designing A Textbox, Unabridged

Designing A Textbox, Unabridged

Designing A Textbox, Unabridged

Shane Hudson

Ever spent an hour (or even a day) working on something just to throw the whole lot away and redo it in five minutes? That isn’t just a beginner’s code mistake; it is a real-world situation that you can easily find yourself in especially if the problem you’re trying to solve isn’t well understood to begin with.

This is why I’m such a big proponent of upfront design, user research, and creating often multiple prototypes — also known as the old adage of “You don’t know what you don’t know.” At the same time, it is very easy to look at something someone else has made, which may have taken them quite a lot of time, and think it is extremely easy because you have the benefit of hindsight by seeing a finished product.

This idea that simple is easy was summed up nicely by Jen Simmons while speaking about CSS Grid and Piet Mondrian’s paintings:

“I feel like these paintings, you know, if you look at them with the sense of like ‘Why’s that important? I could have done that.’ It's like, well yeah, you could paint that today because we’re so used to this kind of thinking, but would you have painted this when everything around you was Victorian — when everything around you was this other style?”

I feel this sums up the feeling I have about seeing websites and design systems that make complete sense; it’s almost as if the fact they make sense means they were easy to make. Of course, it is usually the opposite; writing the code is the simple bit, but it’s the thinking and process that goes into it that takes the most effort.

With that in mind, I’m going to explore building a text box, in an exaggeration of situations many of us often find ourselves in. Hopefully, by the end of this article, we can all feel more emphatic to how the journey from start to finish is rarely linear.

A Comprehensive Guide To User Testing

So you think you’ve designed something that’s perfect, but your test tells you otherwise. Let’s explore the importance of user testing. Read more →

Brief

We all know that careful planning and understanding of the user need is important to a successful project of any size. We also all know that all too often we feel to need to rush to quickly design and develop new features. That can often mean our common sense and best practices are forgotten as we slog away to quickly get onto the next task on the everlasting to-do list. Rinse and repeat.

Today our task is to build a text box. Simple enough, it needs to allow a user to type in some text. In fact, it is so simple that we leave the task to last because there is so much other important stuff to do. Then, just before we pack up to go home, we smirk and write:

<input type="text">

There we go!

Oh wait, we probably need to hook that up to send data to the backend when the form is submitted, like so:

<input type="text" name="our_textbox">

That’s better. Done. Time to go home.

How Do You Add A New Line?

The issue with using a simple text box is it is pretty useless if you want to type a lot of text. For a name or title it works fine, but quite often a user will type more text than you expect. Trust me when I say if you leave a textbox for long enough without strict validation, someone will paste the entire of War and Peace. In many cases, this can be prevented by having a maximum amount of characters.

In this situation though, we have found out that our laziness (or bad prioritization) of leaving it to the last minute meant we didn’t consider the real requirements. We just wanted to do another task on that everlasting to-do list and get home. This text box needs to be reusable; examples of its usage include as a content entry box, a Twitter-style note box, and a user feedback box. In all of those cases, the user is likely to type a lot of text, and a basic text box would just scroll sideways. Sometimes that may be okay, but generally, that’s an awful experience.

Thankfully for us, that simple mistake doesn’t take long to fix:

<textarea name="our_textbox"></textarea>

Now, let’s take a moment to consider that line. A <textarea>: as simple as it can get without removing the name. Isn’t it interesting, or is it just my pedantic mind that we need to use a completely different element to add a new line? It isn’t a type of input, or an attribute used to add multi-line to an input. Also, the <textarea> element is not self-closing but an input is? Strange.

This “moment to consider” sent me time traveling back to October 1993, trawling through the depths of the www-talk mailing list. There was clearly much discussion about the future of the web and what “HTML+” should contain. This was 1993 and they were discussing ideas such as <input type="range"> which wasn’t available until HTML5, and Jim Davis said:

“Well, it's far-fetched I suppose, but you might use HTML forms as part of a game playing interface.”

This really does show that the web wasn’t just intended to be about documents as is widely believed. Marc Andreessen suggested to have <input type="textarea"> instead of allowing new lines in the single-line text type, [saying]: (http://1997.webhistory.org/www.lists/www-talk.1993q4/0200.html)

“Makes the browser code cleaner — they have to be handled differently internally.”

That’s a fair reason to have <textarea> separate to text, but that’s still not what we ended up with. So why is <textarea> its own element?

I didn’t find any decision in the mailing list archives, but by the following month, the HTML+ Discussion Document had the <textarea> element and a note saying:

“In the initial design for forms, multi-line text fields were supported by the INPUT element with TYPE=TEXT. Unfortunately, this causes problems for fields with long text values as SGML limits the length of attributea literals. The HTML+ DTD allows for up to 1024 characters (the SGML default is only 240 characters!)”

Ah, so that’s why the text goes within the element and cannot be self-closing; they were not able to use an attribute for long text. In 1994, the <textarea> element was included, along with many others from HTML+ such as <option> in the HTML 2 spec.

Okay, that’s enough. I could easily explore the archives further but back to the task.

Styling A <textarea>

So we’ve got a default <textarea>. If you rarely use them or haven’t seen the browser defaults in a long time, then you may be surprised. A <textarea> (made almost purely for multi-line text) looks very similar to a normal text input except most browser defaults style the border darker, the box slightly larger, and there are lines in the bottom right. Those lines are the resize handle; they aren’t actually part of the spec so browsers all handle (pun absolutely intended) it in their own way. That generally means that the resize handle cannot be restyled, though you can disable resizing by setting resize: none to the <textarea>. It is possible to create a custom handle or use browser specific pseudo elements such as ::-webkit-resizer.

The default <code>&lt;textarea&gt;</code> looks very small with a grey border and three lines as a resize handle.
A default textarea with no styling (Large preview)

It’s important to understand the defaults, especially because of the resizing ability. It’s a very unique behavior; the user is able to drag to change the size of the element by default. If you don’t override the minimum and maximum sizes then the size could be as small as 9px × 9px (when I checked Chrome) or as large as they have patience to drag it. That’s something that could cause mayhem with the rest of the site’s layout if it’s not considered. Imagine a grid where <textarea> is in one column and a blue box is in another; the size of the blue box is purely decided by the size of the <textarea>.

Other than that, we can approach styling a <textarea> much the same as any other input. Want to change the grey around the edge into thick green dashes? Sure here you go: border: 5px dashed green;. Want to restyle the focus in which a lot of browsers have a slightly blurred box shadow? Change the outline — responsibly though, you know, that’s important for accessibility. You can even add a background image to your <textarea> if that interests you (I can think of a few ideas that would have been popular when skeuomorphic design was more celebrated).

Scope Creep

We’ve all experienced scope creep in our work, whether it is a client that doesn’t think the final version matches their idea or you just try to squeeze in a tiny tweak and end up taking forever to finish it. So I ( enjoying creating the persona of an exaggerated project manager telling us what we need to build) have decided that our <textarea> just is not good enough. Yes, it is now multi-line, and that’s great, and yes it even ‘pops’ a bit more with its new styling. Yet, it just doesn’t fit the very vague user need that I’ve pretty much just thought of now after we thought we were almost done.

What happens if the user puts in thousands of words? Or drags the resize handle so far it breaks the layout? It needs to be reusable, as we have already mentioned, but in some of the situations (such as a ‘Twittereqsue’ note taking box), we will need a limit. So the next task is to add a character limit. The user needs to be able to see how many characters they have left.

In the same way we started with <input> instead of <textarea>, it is very easy to think that adding the maxlength attribute would solve our issue. That is one way to limit the amount of characters the user types, it uses the browser’s built-in validation, but it is not able to display how many characters are left.

We started with the HTML, then added the CSS, now it is time for some JavaScript. As we’ve seen, charging along like a bull in a china shop without stopping to consider the right approaches can really slow us down in the long run. Especially in situations where there is a large refactor required to change it. So let’s think about this counter; it needs to update as the user types, so we need to trigger an event when the user types. It then needs to check if the amount of text is already at the maximum length.

So which event handler should we choose?

  • change
    Intuitively, it may make sense to choose the change event. It works on <textarea> and does what it says on the tin. Except, it only triggers when the element loses focus so it wouldn’t update while typing.
  • keypress
    The keypress event is triggered when typing any character, which is a good start. But it does not trigger when characters are deleted, so the counter wouldn’t update after pressing backspace. It also doesn’t trigger after a copy/paste.
  • keyup
    This one gets quite close, it is triggered whenever a key has been pressed (including the backspace button). So it does trigger when deleting characters, but still not after a copy/paste.
  • input
    This is the one we want. This triggers whenever a character is added, deleted or pasted.

This is another good example of how using our intuition just isn’t enough sometimes. There are so many quirks (especially in JavaScript!) that are all important to consider before getting started. So the code to add a counter that updates needs to update a counter (which we’ve done with a span that has a class called counter) by adding an input event handler to the <textarea>. The maximum amount of characters is set in a variable called maxLength and added to the HTML, so if the value is changed it is changed in only one place.

var textEl = document.querySelector('textarea')
var counterEl = document.querySelector('.counter')
var maxLength = 200
    
textEl.setAttribute('maxlength', maxLength)
textEl.addEventListener('input', (val) => {
var count = textEl.value.length
counterEl.innerHTML = ${count}/${maxLength}
})

Browser Compatibility And Progressive Enhancement

Progressive enhancement is a mindset in which we understand that we have no control over what the user exactly sees on their screen, and instead, we try to guide the browser. Responsive Web Design is a good example, where we build a website that adjusts to suit the content on the particular size viewport without manually setting what each size would look like. It means that on the one hand, we strongly care that a website works across all browsers and devices, but on the other hand, we don’t care that they look exactly the same.

Currently, we are missing a trick. We haven’t set a sensible default for the counter. The default is currently “0/200” if 200 were the maximum length; this kind of makes sense but has two downsides. The first, it doesn’t really make sense at first glance. You need to start typing before it is obvious the 0 updates as you type. The other downside is that the 0 updates as you type, meaning if the JavaScript event doesn’t trigger properly (maybe the script did not download correctly or uses JavaScript that an old browser doesn’t support such as the double arrow in the code above) then it won’t do anything. A better way would be to think carefully beforehand. How would we go about making it useful when it is both working and when it isn’t?

In this case, we could make the default text be “200 character limit.” This would mean that without any JavaScript at all, the user would always see the character limit but it just wouldn’t feedback about how close they are to the limit. However, when the JavaScript is working, it would update as they type and could say “200 characters remaining” instead. It is a very subtle change but means that although two users could get different experiences, neither are getting an experience that feels broken.

Another default that we could set is the maxlength on the element itself rather than afterwards with JavaScript. Without doing this, the baseline version (the one without JS) would be able to type past the limit.

User Testing

It’s all very well testing on various browsers and thinking about the various permutations of how devices could serve the website in a different way, but are users able to use it?

Generally speaking, no. I’m consistently shocked by user testing; people never use a site how you expect them to. This means that user testing is crucial.

It’s quite hard to simulate a user test session in an article, so for the purposes of this article, I’m going to just focus on one point that I’ve seen users struggle with on various projects.

The user is happily writing away, gets to 0 characters remaining, and then gets stuck. They forget what they were writing, or they don’t notice that it had stopped typing.

This happens because there is nothing telling the user that something has changed; if they are typing away without paying much attention, then they can hit the maximum length without noticing. This is a frustrating experience.

One way to solve this issue is to allow overtyping, so the maximum length still counts for it to be valid when submitted but it allows the user to type as much as they want and then edit it before submission. This is a good solution as it gives the control back to the user.

Okay, so how do we implement overtyping? Instead of jumping into the code, let’s step through in theory. maxlength doesn’t allow overtyping, it just stops allowing input once it hits the limit. So we need to remove maxlength and write a JS equivalent. We can use the input event handler as we did before, as we know that works on paste, etc. So in that event, the handler would check if the user has typed more than the limit, and if so, the counter text could change to say “10 characters too many.” The baseline version (without the JS) would no longer have a limit at all, so a useful middle ground could be to add the maxlength to the element in the HTML and remove the attribute using JavaScript.

That way, the user would see that they are over the limit without being cut off while typing. There would still need to be validation to make sure it isn’t submitted, but that is worth the extra small bit of work to make the user experience far better.

An example showing “17 characters too many” in red text next to a <code>&lt;textarea&gt;</code>.
Allowing the user to overtype (Large preview)

Designing The Overtype

This gets us to quite a solid position: the user is now able to use any device and get a decent experience. If they type too much it is not going to cut them off; instead, it will just allow it and encourage them to edit it down.

There’s a variety of ways this could be designed differently, so let’s look at how Twitter handles it:

A screenshot from Twitter showing their textarea with overtyped text with a red background.
Twitter's <textarea> (Large preview)

Twitter has been iterating its main tweet <textarea> since they started the company. The current version uses a lot of techniques that we could consider using.

As you type on Twitter, there is a circle that completes once you get to the character limit of 280. Interestingly, it doesn’t say how many characters are available until you are 20 characters away from the limit. At that point, the incomplete circle turns orange. Once you have 0 characters remaining, it turns red. After the 0 characters, the countdown goes negative; it doesn’t appear to have a limit on how far you can overtype (I tried as far as 4,000 characters remaining) but the tweet button is disabled while overtyping.

So this works the same way as our <textarea> does, with the main difference being the characters represented by a circle that updates and shows the number of characters remaining after 260 characters. We could implement this by removing the text and replacing it with an SVG circle.

The other thing that Twitter does is add a red background behind the overtyped text. This makes it completely obvious that the user is going to need to edit or remove some of the text to publish the tweet. It is a really nice part of the design. So how would we implement that? We would start again from the beginning.

You remember the part where we realized that a basic input text box would not give us multiline? And that a maxlength attribute would not give us the ability to overtype? This is one of those cases. As far as I know, there is nothing in CSS that gives us the ability to style parts of the text inside a <textarea>. This is the point where some people would suggest web components, as what we would need is a pretend <textarea>. We would need some kind of element — probably a div — with contenteditable on it and in JS we would need to wrap the overtyped text in a span that is styled with CSS.

What would the baseline non-JS version look like then? Well, it wouldn’t work at all because while contenteditable will work without JS, we would have no way to actually do anything with it. So we would need to have a <textarea> by default and remove that if JS is available. We would also need to do a lot of accessibility testing because while we can trust a <textarea> to be accessible relying on browser features is a much safer bet than building your own components. How does Twitter handle it? You may have seen it; if you are on a train and your JavaScript doesn’t load while going into a tunnel then you get chucked into a decade-old legacy version of Twitter where there is no character limit at all.

What happens then if you tweet over the character limit? Twitter reloads the page with an error message saying “Your Tweet was over the character limit. You’ll have to be more clever.” No, Twitter. You need to be more clever.

Retro

The only way to conclude this dramatization is a retrospective. What went well? What did we learn? What would we do differently next time or what would we change completely?

We started very simple with a basic textbox; in some ways, this is good because it can be all too easy to overcomplicate things from the beginning and an MVP approach is good. However, as time went on, we realized how important it is to have some critical thinking and to consider what we are doing. We should have known a basic textbox wouldn’t be enough and that a way of setting a maximum length would be useful. It is even possible that if we have conducted or sat in on user research sessions in the past that we could have anticipated the need to allow overtyping. As for the browser compatibility and user experiences across devices, considering progressive enhancement from the beginning would have caught most of those potential issues.

So one change we could make is to be much more proactive about the thinking process instead of jumping straight into the task, thinking that the code is easy when actually the code is the least important part.

On a similar vein to that, we had the “scope creep” of maxlength, and while we could possibly have anticipated that, we would rather not have any scope creep at all. So everybody involved from the beginning would be very useful, as a diverse multidisciplinary approach to even small tasks like this can seriously reduce the time it takes to figure out and fix all the unexpected tweaks.

Back To The Real World

Okay, so I can get quite deep into this made-up project, but I think it demonstrates well how complicated the most seemingly simple tasks can be. Being user-focussed, having a progressive enhancement mindset, and thinking things through from the beginning can have a real impact on both the speed and quality of delivery. And I didn’t even mention testing!

I went into some detail about the history of the <textarea> and which event listeners to use, some of this can seem overkill, but I find it fascinating to gain a real understanding of the subtleties of the web, and it can often help demystify issues we will face in the future.

Smashing Editorial (ra, il)

October 2015 Income Report

I wanted to publish an honest income report for this blog… after being inspired by Esteban’s journey

So without further a do here is what I made off of TripleSEO in October.


tumblr_mp1jhr5dYA1qbcfcko1_500

Thanks

PS Please subscribe to my blog to find out my income in November

PPS Click on the few affiliate links I have on this on this blog and buy some stuff. Christmas is coming and my kids have their mothers spending habits.

Kthxbye


October 2015 Income Report by Chris D – if you enjoyed this post you can read more at TripleSEO or follow Chris on Twitter

Powered by WPeMatico

205: 5 Obstacles Bloggers Face (And How to Get Over Them)

205: 5 Obstacles Bloggers Face (And How to Get Over Them)

How to Overcome 5 Blogger Obstacles
As I record this, I’m just home from our first ProBlogger event of the year in Brisbane and am preparing for our next one in the coming days in Melbourne.
The Brisbane event was really worthwhile. We heard from Pat Flynn, Jadah Sellner, James Schramko, Kelly Exeter, Shayne Tilley and Laney Galligan and had a couple of days of great teaching and inspiration – including a day with a small group masterminding their businesses.

Each year at our events, I open the event with a keynote. This year I spoke about evolving your blog rather than getting into a ‘revolving’ pattern (or going in circles). I will share more on that topic on the podcast in the future but as we’re very much focused this week on our events and serving our attendees I wanted to give you another taste of what we do at our events and share with you the opening keynote from a previous year as this week’s episode.
I did this in the last episode too and got a lot of positive feedback and hope you’ll enjoy this one too. It’s from 4 years ago but I think it’s spot on in terms of a message for today too. Continue reading “205: 5 Obstacles Bloggers Face (And How to Get Over Them)”

203: How to Approach Influencers in Your Niche

203: How to Approach Influencers in Your Niche

How to Connect With Influencers in Your Niche
Today I want to share some teaching on how to approach influencers and other well known people in your niche (or outside it too).
One of the most powerful ways to grow your profile, audience and brand is to connect with others in your niche. The benefits of doing it can be many and varied – the opportunities that flow from these interactions can be pretty cool for the growth of your blog…. Continue reading “203: How to Approach Influencers in Your Niche”

Don’t Fall Into This Trap That Could Destroy Your Blog

NewImageLast week I spent time with a young blogger who was completely stalled with her blog (for the purpose of this post I’ll call her Sally).

Sally’s blogging had started with a bang and had put together 3 great months of content and had started to build a readership but then it suddenly all came to a halt.

I arranged to catch up for coffee to see what had happened and see if there was a way to get her moving again and she told me a story that I’m sure many readers will find familiar.

Paralysed by Comparisons

The reason Sally started blogging was that she had been a reader of another reasonably well known blogger. She had been so inspired by this established blogger that she simply had to start her own blog – which she did.

The problem that brought Sally’s blog to a grinding halt started a few weeks after her blog began when Sally began to compare her fledgling blog with her hero’s blog.

It started innocently enough with her noticing that this others blogger’s design just seemed to flow much better than Sally’s. However in the coming days and weeks Sally started to compare other things too.

Her hero seemed to blog with more confidence, she got more comments, she had a larger Twitter following, she was more active on Pinterest, she was getting some great brands advertise on her blog, she was invited to cool events…

Once Sally started comparing she couldn’t stop. She told me that she would sit down to work on her blog and end up on her hero’s blog and social media accounts – for hours on end – comparing what they were doing.

On one hand Sally knew it wasn’t a fair comparison – she had only been blogging by this stage for a couple of months and her hero had been blogging for over 4 years… but logic was clouded out by jealousy and Sally found her blogging beginning to stall.

She started second guessing herself. She would work for days on blog posts – hoping to perfect them to the standard of her hero only to get to the point of publishing them and trashing them instead for fear of them not being up to scratch.

Days would go by between posts and then weeks. Sally’s blog began to stall… and then it died completely.

The Comparison Trap

Sally isn’t the only blogger to fall into the trap of comparing oneself with others – in fact I’ve heard this story (or variations of it) numerous times. If I’m honest, it’s something that at times I’ve struggled with too.

I remember in the early days of my own blogging comparing my style of writing with other bloggers that I admired who wrote in a much more academic, heavy style of writing. I tried to emulate this over and over again and never felt I hit the benchmark that they set.

The temptation was to give up – but luckily I found my more informal and conversational voice through experimentation and persistance.

Comparing Is Never Fair

As I chatted with Sally last week a theme emerged in our conversation – the comparisons were simply not fair.

Sally knew this on some levels but needed to hear it again.

Her hero had been blogging for years. Sally had been blogging for months.

Not only that – Sally was comparing herself to tiny snapshots of this other blogger.

She could see her hero’s Twitter follower numbers, how many comments she was getting, how many times she Pinned on Pinterest and the instagram photos of this blogger at glamorous events – but she didn’t really have the full picture of this other blogger.

She didn’t know how many hours that blogger worked, she didn’t know whether that other blogger had people working for her, she didn’t know if that other blogger was actually happy with her blog or life and she certainly didn’t see the instagrams of that other bloggers boring, dull or hard moments of life.

I’m not saying the other blogger is hiding anything or doing anything wrong – just that the comparisons Sally was making were of everything Sally knew about herself (and her insecurities) with tiny edited snapshots of the life and work another person.

Run You Own Race

Sally is a remarkable person. I’d love to tell you her real name and story because she’s overcome some amazing things in her life, has some unique perspectives to share and has an inspirational story to tell.

My encouragement to Sally (and to us all) is run her own race. Yes she’s running beside others that at times seem to be running faster or with more flare… but nobody else around her has her unique personality, set of experiences or skills.

Nobody else can blog like Sally – so the sooner she gets comfy in her own skin the better.

Don’t Fall Into This Trap That Could Destroy Your Blog
http://www.problogger.net/archives/2013/09/04/dont-fall-into-this-trap-that-could-destroy-your-blog/
http://www.problogger.net/archives/category/miscellaneous-blog-tips/feed/
@ProBlogger» Miscellaneous Blog Tips
Blog Tips to Help You Make Money Blogging – ProBlogger
http://www.problogger.net/wp-content/plugins/podpress/images/powered_by_podpress_large.jpg

5 Unique Ways to Increase Your Blog Traffic

5 unique ways to increase your blog

This is a guest contribution from SEO expert Zach Radford.

Today, you don’t gain blog traffic by paying for backlinks or by swapping them like the old days. Instead, you need to focus on creating quality content that is beneficial to your visitors.

We know that. But how do you do it? And do it consistently?

The content should solve main problems faced by your reader. It should be actionable, specific and relevant to the audience. If you do this, your audience will come to trust your site, and visit it regularly looking for new content. They will also engage with you, which helps you to improve your blog.

To that end, here are five new ways of looking at increasing your blog traffic.

Create quality content and mention other bloggers

Your blog is the main avenue for communication with your audience. While your main purpose for the blog may be to promote your business, yourself, or some other product or service, you need to focus on providing quality content to the reader. Just focus on providing information that readers will find interesting to read, without trying to be overly strategic about it. Look for trending topics in different areas and create amazing content on those topics. Your audience will not only keep coming back for more if they find your posts interesting, they will also share your posts with their friends. You also need to mention other bloggers that you follow in your posts. You can quote them if you feel the information is interesting to the reader or just mention their names in the post. This will create good relationships with the bloggers and they might return the favour. Lifting each other up has the added benefit of leading to increased traffic.

Share your blogs on social networks

This is a no-brainer, but cannot be ignored. Facebook, Twitter, Google+ and Linkedin are where your readers are. Give them your posts. After creating your post, you can share a link of the post through Facebook or Twitter and then ask your friends or followers to comment. This will expose your blogs to thousands of social media users and eventually lead to increase in blog traffic.

Syndicate your posts

Syndicating your blog posts will expose them to more readers. You can use RSS feed or syndicate the blog to applicable high-traffic sites. RSS feeds allow your audience to keep track of your blogs without having to bookmark it. The readers only need to open their RSS reader and all your posts will be displayed there. Syndicating your blog to high traffic sites will also popularize it. This will also give your post more credibility, which could lead to high traffic.

Involve your readers

After posting to your blog, you need to ask your readers to leave a comment after reading the blog. Research shows that people will do (mostly) what you ask of them, and will comment where they might not have before. Read the comments that are left and try to reply all of them. Readers feel more valued if they are treated well and respected by the bloggers they engage with. They will keep on visiting your site to look for more content and to engage you as well. This will also build trust with your readers.

Use Pinterest Individual or Group Board

Pinterest allows bloggers to post on individual board and collaborate by posting on contributor boards. The main benefit of pinning your blog on contributor boards is that your blog is exposed to other contributors. Those contributors also have followers who will also see your post, leading to increased traffic.

The bottom line

Your blog will attract more readers if it is of good quality. Above all, this has to be the main aim. Therefore, it is important that you focus on quality more than selling your products or promoting your business through the blog. You also need to network with other bloggers and create good relationships with them. This will help you gain new ideas of increasing traffic to your blog.

Zach Radford is an SEO content expert, working as an SEO consultant and Sales manager for the past 10 years. He strives for success in everything he sets out to do. He believes that high-quality keyword-rich content is the key to running a successful online business. Currently starting his own venture: an SEO Content Company, aiming to provide quality SEO content to the masses.

Originally at: Blog Tips at ProBlogger
Build a Better Blog in 31 Days

5 Unique Ways to Increase Your Blog Traffic

5 Unique Ways to Increase Your Blog Traffic
http://www.problogger.net/archives/2014/09/22/5-unique-ways-to-increase-your-blog-traffic/
http://www.problogger.net/archives/category/blog-promotion/feed/
@ProBlogger» Blog Promotion
Blog Tips to Help You Make Money Blogging – ProBlogger
http://www.problogger.net/wp-content/plugins/podpress/images/powered_by_podpress_large.jpg

Powered by WPeMatico

Are You Ready to be a Full-Time Blogger?

This is a guest contribution from freelance writer, Ayelet Weisz.

A big part of the pro blogger dream is to be your own boss. No more office politics, competitions with colleagues or having to prove yourself to someone who reaps all the benefits of your hard work. You’ll set your own rules and live life your way.

Yet if you’ve never had to be accountable to yourself on a large-scale, long-term project, you might find yourself overwhelmed.

1. Unrealistic expectations. If you don’t know your own limitations, you could end up planning to invest too little time or leaving too little flexibility in your budget. You could also work yourself to exhaustion.

2. Getting lost. Being a full-time blogger leaves you plenty of opportunities to get lost – online, in sleep, in your own fears.

3. Missing tools and skills. There are lots of skills to master and tools to learn – not only in your chosen field of blogging, but in business management, time management, marketing – and the list goes on.

Boy looking confused

Do You Have The Skills?

Fortunately, tools and skills to be a successful full-time blogger are learnable. You need to incorporate the process of learning into your business plan, and don’t despair if you find yourself taking longer in one step or another. Instead, relish in your blogging journey and, as you challenge yourself, remember to give yourself a break.

Would You Hire You?

Few jobs will take you in without an interview – and your blogging business should be one of them. You must define the job before you can find out if you’ve got the right stuff.

You need to research what it means to run a full time blog and own a business, how to live on fluctuating income, what kind of marketing strategies are usually used, and where you could break the marketing rules to help your blog shine.

Read sites and magazines about your chosen niche, as well as general sites about professional blogging (like Problogger!), entrepreneurship and small businesses.

Once you have a vision of what your daily and annual life could look like, ask yourself the tough questions:

  • Are you ready to get started on the job?
  • Which areas require more learning, practise, tools or expertise?
  • What could you do with the skills you have right now to start building your blog?

Just as importantly, put on the interviewee’s hat – and ask yourself if you even want the position.

Go on at least one good course

Getting educated is valuable in gaining a deeper understanding of what you’re getting yourself into, as well as to speed up the process. Your chosen course, or several courses, might be about getting certification or about improving through feedback you’d get from professionals on your creative work. It might be about writing, marketing, business management or creating more self confidence in your life.

You could choose to learn all these aspects or some. You could learn them one by one or mix them together. You could decide learning is another business task, like marketing – or you could set aside a concentrated learning time before you take your first practical step in building your blog.

While you’ll likely keep on learning as you develop your blogging business, it’s easy to get caught up in the learning and never take a step beyond that.

Give yourself a deadline for when you absolutely have to go register your business or pitch a guest post for the first time.

Do You Have The Budget?Piggy bank

Importantly, remember that you need to save money in advance and put it aside to cover the cost of the course and the hours of paid work that you might miss.

Don’t forget to budget enough time for implementation either – homework tends to take longer than what you first expect.

Do You Need a Mentor?

At times, it’s recommended to hire a mentor even if you took a course or few. With a mentor, you’ll be able to ask questions you might not feel comfortable asking in a group, get a sense of direction and compile a list of actions it’s best to take for your specific blog and situation.

You might choose to keep this mentor on payroll for longer, yet sometimes even an appointment or several will do. Then, you could go on your merry way and sign up for another session when you feel one is needed.

Another option is to join a community of peers or top professionals, or one that’s combined of various levels of skills and successes. These can be paid or free, an online message board, meetings in your community or networking organisations’  gatherings.

Either way, that personalised attention will enable you to learn the inside world of launching and managing a blog, of marketing, of communicating with readers and of being the best blogger you can be.

Have you got more tips to test if you’re ready to start pro blogging? Share them with us in the comments!

Ayelet Weisz (www.AyeletWeisz.com) is an enthusiastic freelance writer, blogger and screenwriter, who focuses on business, technology, travel and women’s issues. Get her free report, 48 Must-Live Israeli Experiences, on her travel blog, and connect with her on Twitter.

Are You Ready to be a Full-Time Blogger?
http://www.problogger.net/archives/2013/06/10/are-you-ready-to-be-a-full-time-blogger/
http://www.problogger.net/archives/category/miscellaneous-blog-tips/feed/
@ProBlogger» Miscellaneous Blog Tips
Blog Tips to Help You Make Money Blogging – ProBlogger
http://www.problogger.net/wp-content/plugins/podpress/images/powered_by_podpress_large.jpg

7 Surprising Skills Blogging is Teaching You

This is a guest contribution from Kelly Teng, Digital Outreach Specialist at Switched on Media.

Blogging can take you on a whirlwind journey. It can have you running around at events, losing sleep, and sitting in front of your computer for hours and hours (and hours…). The end result is a great blog with stellar posts, and a myriad of experiences that you get to embark on and incredible people you get to meet.

However, your experiences and the amount of time you invest don’t just make for a great blog – in fact, your blogging benefits you in ways that you may not even realise.

Here are a few surprising skills that you acquire as a byproduct of blogging. You may discover some hidden talents you never thought you had (party tricks not included).

The gift of words

All right, perhaps this isn’t a surprising skill: blogging has you writing almost every day, so it’s almost a no-brainer that you’ll become proficient at it over time!

When you blog, you have to think up creative and interesting ways to convey your content to your readers, and also you have to articulate your thoughts clearly and express yourself well. Although you may not notice it, your writing has improved. Don’t believe me? Take a look at your first few posts and compare them to what you are writing now.

Blogging is also useful to help you find and establish your own personal tone of voice and style of writing. Whether your words are motivational, inspirational, dry and sarcastic, funny, or apathetic, you’ll slowly uncover a style that will stick with you and your blog for years to come.

Time management

Us humans are notorious for complaining about having so much to do in so little time. We struggle to find time for work and looking after our families, let alone looking after ourselves and doing the things we want to do.

Blogging is almost like a crash-course in time management. You have to manage your regular job (if you have one), your family, writing, answering emails, scheduling posts, and formatting and designing your blog. You have to coordinate taking photos for a post with making lunch or dinner for your kids. You have to be as punctual as possible with your posts and comment responses; if you don’t, your readership stays stagnant or falters. You have to check and reply to emails quickly as well, because often opportunity can come knocking, get impatient, and leave.

It starts to get overwhelming, but then you adjust and figure out better ways to manage your time. Your blog is teaching you how to be more efficient and effective, and to get as much out of every day as you can.

A little bit of design

When you started out, you probably selected a default Blogspot, WordPress or Tumblr theme for your blog. However, you have probably found that as your readership grows, you begin looking for a new theme or revamp your site with a customised feel (maybe it’s even in alignment to your tone of voice). You also have probably jazzed up your photos with text, borders, and colour balanced them on Photoshop to make them look better as well.

Without even realising it, your blog has helped turn you into a bit of a designer. From choosing a colour palette to redesigning your layout and editing your images, you now have more design experience than much of the adult population – without even trying.

Relationship creation and maintenance

Brands and bloggers are working together more now than ever. Many bloggers get approached by brands on a daily basis for reviews, giveaways, advertisements and guest posts; for those that haven’t yet, it’s only a matter of time.

The more you interact with brands and advertisers, the more adept you become at creating and maintaining business relationships. You learn how to reach diplomatic solutions and establish partnerships with stakeholders, and to work in a way that is mutually beneficial for you, your readers, and your stakeholders (be it a brand, client, or customer).

Through working with brands, you can also learn how to become a brand storyteller and a creative as well, by talking about products or companies in a new and exciting way that fits your audience.

Diplomacy to rival U.N. delegates

…and speaking of diplomatic solutions, blogging also helps you build your diplomacy skills.

There are always going to be readers who will be unhappy when you change something, or trolls who have nothing better to do but to try and upset people. Unfortunately, these are a byproduct of sharing a piece of your life with the world; however, another byproduct is the chance to build your diplomacy and establish best business practices.

Every unhappy reader you manage to quell and every troll you manage effectively contributes to your ability to diffuse a situation well – and this will come in handy often in day-to-day life, as well as in business. For extra tips to enhance your skills, have a read of Dale Carnegie’s How to win friends and influence people.

Content creation and management

The key to a successful blog is content – there’s no getting around it. As a blogger, you become a curator of content much like an editor of a magazine or newspaper. You plan and schedule posts, and must think about newsworthy and unique content that is relevant to your readership demographics. If your blog accepts sponsored posts, you often have to carefully plan it so it is spaced out along with regular content.

You learn how to create useful and original content, and how to create a balance of editorial and sponsorship. In essence, you have the skills of an editor, which makes sense – after all, you are the editor of your own publication.

Social media strategy and community management

This is perhaps one of the most coveted skills in today’s technologically saturated environment. With more and more businesses and people going online, experience with social media strategy and community management is a vital asset to have on your side.

As a blogger, you talk to your readership base through social media outlets such as Facebook and Twitter, and you engage with them and share your life through Instagram and Pinterest. You plan content in advance sometimes, and learn how to acquire more followers and post content that is relevant, informative, and interesting.

Through blogging, you have acquired the skills needed to manage a community online and strategies to foster stronger engagement and create effective content on social channels.

Did you ever realise you were becoming so talented? What other skills do you think your blogging has taught you?

Kelly Teng is a Digital Outreach Specialist at Switched on Media with a penchant for all things internet-related. Check out her other insights and musings here, or follow her on Twitter at @tellykeng.

7 Surprising Skills Blogging is Teaching You
http://www.problogger.net/archives/2013/07/11/7-surprising-skills-blogging-is-teaching-you/
http://www.problogger.net/archives/category/miscellaneous-blog-tips/feed/
@ProBlogger» Miscellaneous Blog Tips
Blog Tips to Help You Make Money Blogging – ProBlogger
http://www.problogger.net/wp-content/plugins/podpress/images/powered_by_podpress_large.jpg

WordPress Feature Review: New Features You Missed in 2012, Part 1

This guest post is by Michael Scott of WPHub.com.

One of the great things about WordPress is that it never stands still. The platform is constantly evolving beyond its blogging roots, with more great features being added every year.

WordPress used to release small updates frequently, but at the end of 2009 they changed this policy. They now aim to release three major updates every year, with small infrequent updates in between to address security issues.

The three major releases in 2011 were 3.1 (February 2011) and 3.2 (July 2011) and 3.3 (December 2011).

Today I’d like to walk you through the new features which were introduced in 2012, in WordPress 3.4 and 3.5.

I’ll be focusing on the features that are most relevant to bloggers and explaining how they can help you.

New features in WordPress 3.4

Released in June, WordPress 3.4 was a solid release that is best remembered for introducing the new theme customizer.

It also included a lot of other great new features such as Twitter embedding, HTML in captions, and flexible header images.

New feature: Live preview

Live preview enables you to preview themes before they are activated on your blog.

Browsing and installing themes and plugins directly from the WordPress admin area is one of WordPress’s greatest strengths. It’s amazing that you can modify your blog so much without even leaving your blog’s Admin area.

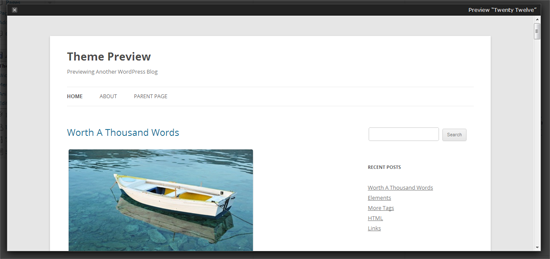
In the past, clicking on the Preview link for a theme would load up an overlay which displayed the theme over the current page.

live-preview-old

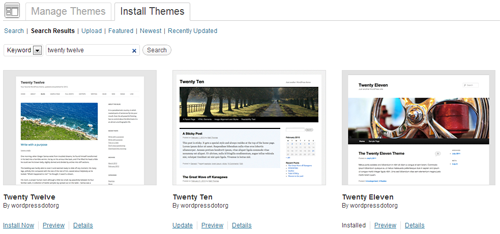
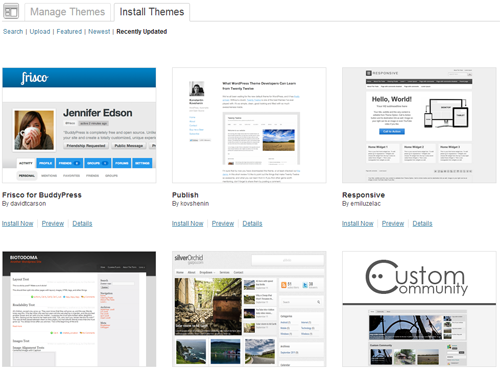
But the process of browsing WordPress designs changed in WordPress 3.4. In the past, the design was listed with Install and Preview links, and a full description.

Descriptions are now hidden by default, though you can view the description of a theme by clicking on the new Description link. This may seem like a small change, but it made browsing for designs within the Admin area much more user friendly.

live-preview-1

Themes are now previewed on their own dedicated Preview page. The page shows the theme on the right-hand side. On the left side, the theme name, thumbnail, rating and description are shown. To save you from having to click the Back button, themes can now be installed via this new Preview area.

live-preview-2

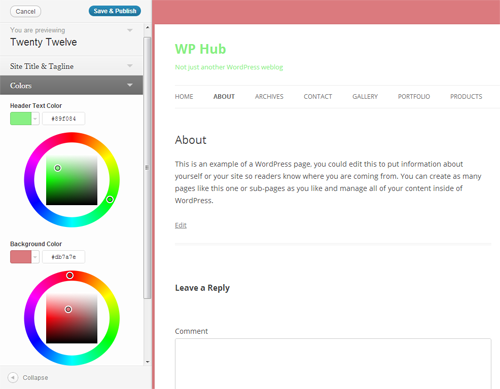
Once a theme has been installed on your WordPress blog, the Preview option becomes much more useful as it loads up the new theme customizer and lets you see how this design will look on your live website. This enables you to preview the theme using your menus, posts, pages and more.

live-preview-3

Being able to see how themes will look with your existing content has greatly improved the process of installing WordPress designs via your Admin area, and changed the way bloggers choose their themes.

New feature: Theme customizer

This feature allows you to configure your theme via a user-friendly Options area.

The WordPress customizer allows users to configure many different areas of their design, such as the header, background and navigation via a dedicated Options area. Older WordPress themes do not support the customizer but can be modified appropriately with a few simple edits to the theme functions.php file.

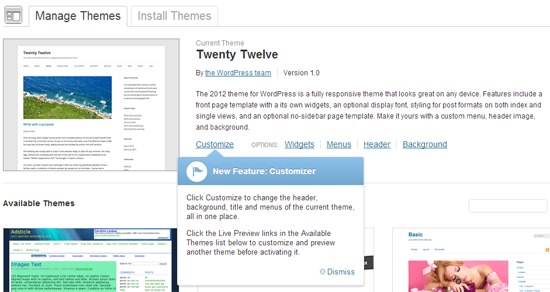
The Customize link can be found via the Themes link in the Appearance menu of your WordPress Admin area. Clicking on the link will take you directly to the theme customizer Options area.

theme-customizer-1

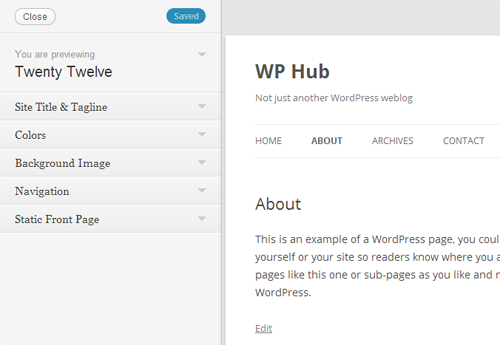
The options available to you in the customizer will depend on the theme itself. The default WordPress themes only had five or six different options, however over the last six months we have seen WordPress designers incorporate other options in their designs. Common options include site title and tagline, colors, background image, navigation menus, and whether posts or a static page were displayed on your home page.

theme-customizer-2

One of the reasons the theme customizer was so well received within the WordPress community was because changes can be seen in real time. Whenever you change your site name or adjust some colors, these are reflected in the theme preview. The changes are, however, only applied to your website after you have clicked the Save & Publish button.

theme-customizer-3

The theme customizer has made it possible for beginners to modify how their website looks without editing any templates. It’s very straightforward to use and since the release of WordPress 3.4, many designers have made sure their themes are compatible with it.

New feature: Twitter embedding

Now you can embed Twitter statuses directly into your blog posts and pages by simply entering the Twitter status URL.

Twitter is one of the most powerful tools available to bloggers. In addition to self promotion and networking, many bloggers use Twitter as a source of inspiration for their articles. The new Twitter embedding feature makes quoting Twitter statues simple and removes the need for taking screenshots or installing plugins to display a quote.

For example, simply enter this within your blog post:

https://twitter.com/problogger/status/271764815607898112

The corresponding Twitter status will be displayed:

twitter-embeds

The beauty of this new feature is its simplicity. There are no shortcodes to remember or buttons to click: you simply enter the URL of the Twitter status to embed it.

New feature: HTML in captions

This feature lets you add HTML directly to your image captions.

Captions have always been a great way of describing photographs and images to your readers. Being able to add HTML to captions has improved this considerably as you can now include links to photo credits, relevant articles, and websites directly inside the caption.

html-captions

Those who are using old WordPress themes may find that the new way WordPress adds captions has broken older image captions on your website. Upgrading to a new theme is recommended, though you could fix these issues manually by searching for posts with captions through your WordPress post area and updating the code.

New feature: Improved features for international users

Improved support is now offered for international WordPress users so that many locale-specific configurations can be modified from the core WordPress files.

As a native English speaker, localization is not something I ever have to deal with, so it’s easy to forget that around 44% of all websites are written in a language other than English.

WordPress 3.4 focused heavily on making WordPress more international. Some of the most important new features introduced for non-English users include:

  • Localizing commas: Many Asian and Middle Eastern languages do not use the comma (,). This causes a lot of problems for those users, as WordPress uses the comma as a delimiter for tags, quick edits and bulk edits. From 3.4, the comma can be translated to another character for languages where a comma isn’t used.
  • Translatable spellchecker language: The TinyMCE WYSIWYG editor can now be translated into any language.
  • Specify default time zone: Previously, the default timezone for all WordPress installations was set to GMT. This can now be modified so that the timezone does not have to be adjusted during the installation process.
  • Feed language: The language of your feed can now be set using the bloginfo_rss template tag.
  • Specifying start of week: You can now easily define the day the week starts.

If you don’t blog in English, many of these new features should make it easier for you to use WordPress in your native language.

New feature: Flexible header images

Header images are now responsive.

Custom headers were added to WordPress way back in 2007 (version 2.1). Previously WordPress allowed you to set the width and height of a header image, but all header images which were uploaded had to be cropped to fit these dimensions.

Now all images will resize dynamically to match the width of your header.

With so many people viewing blogs on mobile devices, flexible headers have made it easier for designs to accommodate any resolution. Check out Creating a responsive header in WordPress 3.4 at WebmasterDepot for a complete walkthrough of this new feature.

New feature: Login shortcodes

WordPress now offers more user-friendly login URLs.

WordPress users can log in using www.yoursite.com/wp-login.php and access the Admin area via www.yoursite.com/wp-admin/. Since version 3.4, you can log in using the more user-friendly URL www.yoursite.com/login. The Admin area can also be viewed by entering www.yoursite.com/admin or www.yoursite.com/dashboard.

There’s no denying that this is a small addition to WordPress, but I always welcome small things like this that make daily tasks such as logging in quicker and easier.

New feature: Comment via the post editor

Comments can now be added via the Post and Page editor pages.

For years the Post editing page has shown all the comments that were left on a post or page. In addition to viewing comments, there is now an option to leave a comment directly on a post from the post editor area. This saves you from having to load up the article in order to leave a comment.

add-comment-post-screen

New feature: Improved touch support

WordPress now offers vastly improved touch support in the user interface.

WordPress aimed to improve site usability on tablet devices such as the Apple iPad and Kindle Fire. Specifically, they added support for drag-and-drop functionality. This allows you to more easily customize the mobile user interface simply by moving things around.

New feature: Child themes added to the theme repository

The official WordPress themes directory now accepts child themes of WordPress themes that are already listed within the directory.

Child themes will be accepted within the theme directory if they can demonstrate sufficient difference from the parent theme to warrant inclusion.

I was particularly pleased with this feature, as it allows designers to take existing designs and modify them for different users. For example, designers will now be able to take a magazine-based theme and make it more blog-orientated, or remove features from designs that are too bloated.

child-themes

The theme installer supports child themes too. The great thing about this is that WordPress will automatically install a child theme’s parent theme if it isn’t already installed.

New feature: Scroll to top of Admin bar

Now, we can scroll to the top of the page by simply clicking the Admin bar.

This simple feature was missed by a lot of bloggers but it’s something that I’ve found myself using every day. Since WordPress 3.4, you can scroll to the top of the page by clicking in the empty area in the Admin bar. Simple but effective!

scroll-to-top

Other features added to WordPress 3.4

Since we’re short on space, here are some of the other great features that were added to WordPress 3.4:

  • The dashboard is now ready for high-resolution displays such as Apple’s retina display.
  • Multi-site improvements were made, such as auto-complete for adding new users and an increase in the default upload limit from 10mb to 100mb.
  • The Recent Comments widget had some small improvements.
  • Custom post types can now use the Distraction-free Editing mode (also known as Zen mode).
  • XML-RPC was improved to let WordPress interact with other applications more easily.

A full list of features added to WordPress in version 3.4 can be found in the WordPress codex.

That’s it for WordPress 3.4! Which of these features are you using, and which are your favorites? Let us know in the comments … and don’t miss Part 2 in this series, where I explain the handy new features available in WordPress 3.5.

Michael Scott has been working with WordPress themes and websites in varying capacities since 2007. It was mainly as a project manager where he quickly developed a love for their simplicity and scalability. As a strong advocate of all things WordPress, he enjoys any opportunity to promote its use across the Interweb and on WPHub.com .

The post WordPress Feature Review: New Features You Missed in 2012, Part 1 appeared first on ProBlogger.

WordPress Feature Review: New Features You Missed in 2012, Part 1
https://problogger.com/wordpress-feature-review-new-features-you-missed-in-2012-part-1/
http://www.problogger.net/archives/category/blog-networks/feed/
Blog Networks – ProBlogger
Blog Tips to Help You Make Money Blogging – ProBlogger
https://problogger.com/wp-content/uploads/powerpress/problogger_podcast-891.jpg

Powered by WPeMatico

An Experiment in Removing Share Buttons Altogether

Sharing

Unless you’ve been hiding under a social media rock recently, you probably know about Twitter removing their share counts.

This meant that, as of November 20, any blog posts that had some form of Twitter sharing button (native or third-party) would no longer be able to show how many times that post had been shared on Twitter.

Cue content marketers and social media sharing companies decrying the move, with dramatic quotes about it “being the death of Twitter”.

#SaveOurShareCounts Tweets

Because, yes, Twitter has nothing more serious to worry about than whether or not it shows share counts…

For the rest of us, it didn’t mean as big a deal. At the end of the day, a share count is simply one metric of a blog post’s “success”.

Given there are enough shady companies and scripts out there that can artificially inflate these numbers, it’s not even a great metric.

Personally, I’d rather go by engagement, reactions (as in discussions and thoughts elsewhere), and growth (either subscribers, readers or share of voice) as metrics that matter.

But it made me wonder – with so many people getting up in arms about a little number, what would they actually feel like if you removed the option to share via on-site buttons altogether?

And so I’m going to find out.

To Quickly Share or Not to Share

Last year, I read a post from a few other bloggers who were discussing the value of social sharing buttons, and whether they helped or hindered sites.

One of the best articles I read was from Sam Solomon, called Why I’m Done With Social Media Buttons.

Sam’s main premise was from a designer’s angle, and how sharing buttons could ruin the user experience.

Yet he also shared a couple of case studies that looked at on-page sharing, and the results weren’t great.

While he admits that he didn’t do any real conversion tracking on his own site before switching off, his points around the topic are very valid, and worth the read.

His closing argument has remained with me since reading his post:

If people really love your content, they’ll share it.

And it’s true.

Yes, having on-page buttons may make it easier – but then do they take away from other calls to action that you’re trying to achieve (comments, subscriptions, etc)?

For example, this company saw conversions increase when they removed their share buttons, which is clearly a more important metric than how many tweets they got.

But perhaps that shouldn’t come as too big of a surprise – it’s simply following the golden rule of marketing: that you have one main CTA and that’s your primary KPI (key performance indicator).

You then set secondary CTAs and KPIs based on the key one – but only if they don’t jeopardize your main one.

If you take this to your blog, your core CTA might be to get a comment. Or it might be to get a subscriber. Or to download an ebook, or something similar.

I’m going to hazard a guess that these will come before social sharing. So are we diluting our goals by the [apparent] importance on social sharing buttons?

Time to find out.

Setting 30 Days Comparable Metrics

If I look at my Google Analytics, I can see how much social traffic means to my blog.

In the last 30 days, my breakdown has been as follows:

  • DB analytics chartOrganic search – 58%
  • Direct – 22.3%
  • Social – 9.5%
  • Referral – 9%
  • Other and email – 1%

Just looking at that simple pie chart, I can see that – in the grand scheme of things – social isn’t a huge part of this blog’s traffic.

While 10% might mean X amount of visits, I tend to find the bounce rate (how soon someone leaves a page) higher for social traffic than search or direct.

Additionally, if I look deeper into my social analytics, I can see that both Facebook and Twitter are the key social drivers – Twitter accounts for 31% of social traffic, Facebook accounts for 29%.

That’s almost 2/3 of all my social traffic coming from just two networks.

So, truth be told, for this particular blog, maybe social isn’t a key driver of visits, even though I’ve continuously made it easier to share with ever-improved social sharing options.

Of course, the argument could be made that perhaps the content just wasn’t shareworthy. In which case, get off my lawn! 😉

One thing I do find interesting (and another reason for this experiment) is that when I look at both my Google Analytics as well as Share Tally, I can see there are a solid number of shares from Buffer and Pocket.

These are two platforms that my current social sharing solution doesn’t support – which suggests that readers are still happy to cut and paste a blog post’s URL onto their preferred platform of choice.

Well, I guess I’m about to find out.

For the next 30 days, I’m not going to enable on-page sharing for the posts I publish.

Instead, whenever a reader enjoys a post and wants to share it, they’ll need to grab the URL and paste it directly into Twitter, or Facebook, etc.

If they do, great. If they don’t, well, maybe great, maybe not – I guess we’ll see based on traffic comparisons as well as network activity.

Either way, I’m interested to see how removing share buttons impacts the shareability of this blog.

Let the fun begin!

Powered by WPeMatico

Reading Roundup: What’s New in Blogging Lately?

Reading Roundup: What's new in blogging this week / ProBlogger.net

Good morning! Welcome to your roundup of interesting titbits from around the web. Plenty to mull over here – tools, beta testing of our favourite social media sites, Google doing new Google things (who knew?!) and a cool script to help you tap into your blog audience’s personas. Enjoy!

5 Visual Content Tools to Boost Engagement // Social Media Examiner

If you’re on a tight budget (or let’s be honest: no budget) for graphics, these tools should help you up your visual content game. I love the Instagram collage idea.

Instagram Now Testing Support for Account Switching, No Logout Required // TechCrunch

Oh wouldn’t this be a boon for those of you who manage multiple accounts! Let’s cross our fingers that the choice proves popular in the beta testing and they keep it.

LinkedIn’s New Facebook-like App Arrives on iOS and Android // Mashable Australia

A much easier (and more eye-pleasing!) way to see who is sharing what on LinkedIn. I can imagine it would promote more engagement, which I’m all for. I have to admit, I don’t do much with my LinkedIn but I may be swayed by this!

How to Figure Out What Keywords Your Potential Customers are Using // Hubspot

And what your potential readers are searching for! This is a super-detailed piece – Bridget has taken a step back and started at SEO right from the start before launching into what tools you can use so you can be armed with all the knowledge to create a super campaign or tailored blog content.

How to Become a Virtual Assistant // Amy Lynn Andrews

I know plenty of us have “virtual assistant” on our Christmas lists, but for those of you who would like to be one (can be a great supplement to your blog income), Amy has recently updated her guide. Check it out!

image 2 tags snowmen

Google Turns Image Search Into Pinterest with New Collections Feature // TechCrunch

It’s only for mobile (and those of you in the US), and it looks as though it’s a part of the sort-of-revamped Google+, but now when you find an image you want to keep for later in Google search, you can organise your own personal collections. Search results are filterable and it appears quite intuitive.

“Don’t Pursue Something That Someone Said You Should Want”: Derek Sivers at WDS // Chris Gillebeau

I loved attending the World Domination Summit in Portland this year, and Chris Gillebeau, master of it all, has started releasing videos from the amazing speakers across the weekend. This video is from one of my favourite speakers – Derek Sivers – who delivered kick-ass, no-bullshit business advice. I took SO MUCH away from his philosophy. Watch it, you won’t be sorry!

Persona Research in Under 5 Minutes // Moz

You know how much we love a reader profile around these parts. Who are you speaking to? What kind of people make up your core audience? More importantly – where are they hanging out? I love this script for nailing all this info in under 5 minutes.

8 Creative Ways to Add Christmas Spirit to Your Social Media // Jeff Bullas

I just spent 10 minutes trying to find the best christmas photo for my Facebook profile. It’s that time of year!

From YouTube to Persicope: The Evolution of Web Video [Infographic] // AdWeek

Crazy to see how far it’s come (and how much I suck at all of them). I wonder where web video (and indeed, how audiences consume it) is headed next. Any ideas?

Have you Christmasified your social media yet?!

Stacey Roberts is the Managing Editor of ProBlogger.net: a writer, blogger, and full-time word nerd balancing it all with being a stay-at-home mum. She writes about all this and more at Veggie Mama. Chat with her on Twitter @veggie_mama or be entertained on Facebook.

The post Reading Roundup: What’s New in Blogging Lately? appeared first on @ProBlogger.

Powered by WPeMatico

10 Ways to Distribute One Piece of Content (Besides Social Shares)

Long gone are the days of the old publish-and-pray method of content distribution. And even if it ever did work — it was far from effective.

Today, planning the actual distribution of the content you’ve spent so many hours and resources expertly creating is just as critical to your marketing strategy as the quality of the content itself.

Unfortunately — for audiences and marketers alike — too many would-be content marketing rockstars give themselves a nice pat on the back for sharing content on Twitter and Facebook and calling it a day. So before you toast to your status as a progressive marketer who also publishes on LinkedIn and posts on Reddit, consider this: There are dozens, if not hundreds, of methods for content distribution beyond social that you might be overlooking.

But we’re not about to leave you empty-handed. Below you’ll find 10 creative ways to distribute your content — with a little bit of background to set the stage.

The Content Distribution Strategy Experiment

A few months ago, my team — the marketing department at Influence & Co. — sat down for a meeting to accomplish one mission: to come up with more than 50 ways to distribute one piece of content, which was our latest industry research report, “The State of Digital Media.”

We spent a lot of time surveying editors. We analyzed millions of pieces of published content and pored over the results, before we created, designed, and edited this report. We knew our findings were valuable to our audience, so the last thing we wanted to do was publish this report, share it on Twitter a few times, and let it collect dust.

So we gave ourselves one hour, four cups of coffee, and a huge whiteboard — and got to work brainstorming creative ways to distribute this content.

First, we divided our distribution tactics into different categories, based on the departments they benefited, the goals they achieved, and the extra resources they required. For example, the tactics that leveraged our publication relationships would fall under marketing and sales enablement categories. Those with a more educational perspective, on the other hand, were a better fit for HR, because they complemented that department’s recruiting and training efforts.

With a whiteboard full of over 50 ideas, we began executing our new distribution strategy — and just four months after the launch of the report, we already saw impressive results. When we compared that to the performance of a whitepaper we previously published, we found that this experiment resulted in a nearly 150% increase in page views, and a nearly 40% increase in submissions.

To help you get more creative — and effective — in your content distribution, here are 10 unique ways to distribute content, broken down by department.

10 Ways to Distribute Content Beyond Social Shares

Marketing

As marketers, many of us frequently think about content distribution tactics that fit within — and give a boost to — our marketing goals. Among them are the obvious and necessary tactics like social sharing, but there are others that can help you achieve greater brand awareness, influencer relationships, industry leadership, audience engagement, and more.

1) Personalized emails

Segment your email list down to the exact audience that would benefit most from your piece of content. Write a custom email to each of these audience members to add a level of personalization to your message. Explain what the content is, and why you think he or she will enjoy it. Personalized emails have shown a 6.2% higher open rate than those that aren’t.

2) Guest posting

Write an article that discusses — in a non-promotional way — the key findings or points within your content, and send it to the editor of an online publication that reaches your target audience. But be strategic about it. Make sure the publication not only helps you achieve your own reach goals, but also, has something to gain by sharing your insights, from your particular brand.

3) Influencer outreach

Reach out to relevant influencers in your industry for quotes to include in your content, and send them the piece once it’s published for them to share with their networks. Remember, personalization plays a role here, too — being able to personalize and segment emails is one of the most effective tactics for about 50% of marketing influencers.

Sales Enablement

The Influence & Co. sales team uses content just about as much as — if not more than — our marketing department. Our reps use it at every stage of the buyer’s journey to educate, nurture, and engage leads, and overcome objections with prospective clients. Use one of these distribution methods to do the same for your team.

4) Follow-up emails

Encourage your sales team to include a link to your content in their follow-up emails to prospective clients, to answer their questions and position your company as a resource they can trust. Note: This tactic works best when the content you create is educational and addresses specific questions or concerns your leads have — and is actionable enough for them to immediately apply it to their own plans or strategies.

5) Lead interviews

Work with your sales reps to identify prospective clients you can interview for your content. Include a quote in your content, and share it with them once it’s published. Not only can that keep your leads engaged over time, but they’ll appreciate the opportunity to be featured — and you benefit from the additional exposure to their networks when the content is shared with that audience.

6) Proposal references

The best proposals are often supported with relevant data that corroborates the solutions you’re suggesting to a prospect. And while we suggest citing a variety of authentic, reliable sources — otherwise, you might look biased — referencing your own research content can be effective. Not only is it another way to distribute your work, but also, it illustrates the time and thought your company has invested in this school of thought.

That said, some prospective clients like proposals to be brief. In these cases, if you preemptively anticipate additional questions, you can amend your proposal with a link to the content as a source of further reading and information.

Client Retention

Marketers who overlook their current customers in favor of prospective ones risk missing out on a major opportunity. Keeping in touch with your current clients and helping your customer service teams do the same can have a positive impact on both the customer lifetime and the potential for referrals — so don’t forget these internal distribution methods.

7) Client drip campaigns

If your content is related to your clients’ respective industries, or products and services, sharing it with them can enhance your collaborations and further nurture that relationship. Remember, it’s called client retention for a reason — you want to continue being a valued resource and partner for your existing customers. Consider creating something like an email campaign that uses your content, to continually educate and engage your clients.

8) Email signatures

Encourage your customer service reps or account management teams to feature your content in their email signatures. That can help to keep those cornerstone pieces of content top of mind for both current and prospective clients each time they receive an email from someone on your team.

Recruitment

People want to work with trustworthy companies that are true leaders within their industries. Content can communicate expertise and build trust. In fact, we used content to hire more than 30 people in one year.

But for many teams, unfortunately, content is often most underutilized in the areas of employer branding and recruitment marketing. Take advantage of content in HR with these tactics.

9) Content-rich job listings

Include your content in job postings. HubSpot, for example, links to its Culture Code at the end of every job description. By providing educational content up front, applicants can gain a more comprehensive understanding of your industry and how your company approaches it — directly from you.

10) Interview materials

When a job candidate progresses to the next step in the hiring process, share your content with her prior to the following interview, and ask her to come prepared to discuss it. That helps to get your content in front of qualified people in your industry — plus, it gives you the chance to talk in-depth about the concepts and ideas behind your marketing strategy. Even better: It can help you weed out candidates who don’t follow directions.

Whatever tactics your team uses, the most important thing to remember is that content distribution shouldn’t be an afterthought. With the right distribution strategy in place from the beginning, your team can more effectively put your content to work for you, reach more of the right audiences, and drive results for your company.

Powered by WPeMatico

The One Simple Reason Against Switching Off Blog Comments

Ignore

A recent blog post by Arik Hanson, that looked at seven trends impacting every blogger, caught my attention the other week.

I’ve read Arik’s blog for a good few years now, and his content is always informative, and not afraid to poke the bear and challenge standard thinking when it comes to content. This blogging trends post was no different.

It covered topics like RSS being retired soon (which I agree with), the changing face of content presentation, and social sharing losing traction, amongst other things.

One trend that stood out, though, was Arik’s belief that blog comments were “officially dead”.

Based on the examples of Copyblogger and others, Arik feels that we’ll see even more content creators and blogs switch off comments in the months ahead.

That may be indeed be true – but as anyone that’s read this blog for a while will know, it’s not something I buy into, and an approach I wouldn’t recommend for one simple reason.

You Care, But You Don’t Really

Imagine you go to an event where there’s a guest speaker. You pay your dollars to attend, and you allocate a certain amount of time to be at the event.

The speaker is entertaining, the topic is something you’re interested in, and the speech gets your mind buzzing with so many follow-up ideas.

Ideas that need answers.

Ideas that only questions to the speaker can answer.

So, you wait in line after the event so you can meet the speaker, thank them for their work, and ask your follow-up question that would expand the speaker’s talk.

Finally, you get your chance to ask a question, and…. silence. A blank stare. A look that acknowledges your presence, but nothing more.

Undeterred, you ask another question. Equally undeterred, the speaker offers the same response as before.

Suddenly, you realize that it’s not just you that’s being ignored – everyone is.

Everyone that wanted to publicly thank the speaker is being ignored. Everyone who wanted to add to the topic is being ignored.

Instead, there are various rooms that are roped off where you can go instead, with the vague promise that there may be an answer or two there.

Sound familiar?

Time is Investment Too

We have a lot of distractions. Both as content creators and content consumers, there’s a hell of a lot of competition vying for our attention.

Because of that, the readers that choose to visit your little part of the web are investing in you. Sure, they may not be financially investing – but they’re investing nonetheless.

That time that could be spent elsewhere. The exchange of knowledge that could be shared elsewhere. The referral of other readers in search of somewhere they can invest too.

All of that comes from comments.

Yes, the content attracts. Yes, the content educates. Yes, the content sparks ideas.

But the content eventually draws a blank – because it’s a finite resource.

Finite content

If the content on display doesn’t quite satiate the reader’s appetite, the comments after the post can. And usually do.

Because now you’re not just tied to the one-directional broadcast of the content creator – now you have the years of experience, wisdom and  questioning viewpoints of other attendees.

Because of that, your investment is rewarded. You leave wiser, and you help others leave wiser too.

Whether the wisdom comes from extra knowledge about the topic at hand, or a new mindset about an offshoot of the topic you’d never considered, it’s return for your investment in that part of the web.

Spend Your Money Wisely

The kicker for many of the blogs that have switched off comments is the invitation to “continue the conversation elsewhere”.

This is followed by a link to that content creator’s Facebook page, or Google+ community, or Twitter stream, etc.

All well and good – after all, they’re not saying they don’t value your opinion, they just want to have it elsewhere (after all, that’s where all the cool chat is happening).

But then you land on one of these other channels, and the two-way dialogue is equally non-existent.

Instead, it’s a broadcast-fest of links to their content. You know – the very content they don’t want to talk to you about, but come to this channel you’re on now to continue the conversation…

And so the circle goes.

Switching off blog comments doesn’t enhance a reader’s experience – it hinders it. Click To Tweet

Look, I get it. As I mentioned earlier in this post, time is a commodity we have increasingly little of.

So I get that you don’t want to spend that time talking when you could just as easily be broadcasting.

Just be honest about it.

If you want to be a broadcast channel (whether that’s your blog, social network, email blast or whatever), go ahead and knock yourself out.

But let’s not pretend that blog comments are being switched off to “offer a better experience more attuned to the reader’s choice.”

Instead, if you really care about the thoughts of your readers, and the discussions they want to have, it’s a simple decision – leave the blog comments on.

And if you’re a reader/commenter, choose better places to spend your investments – there are enough of them about.

And they really do care about your investment – you can trust me on that.

The post The One Simple Reason Against Switching Off Blog Comments appeared first on Danny Brown – all rights reserved.

Powered by WPeMatico

What Lies Ahead for Social Media in 2016

If it’s Friday it must be Friday Five time, our weekly roundup of five stories from one specific topic. This week it’s Social Media. 

Examining the Current State of Social Marketing (Infographic)

Social media may be an integrated and essential part of most marketing strategies, but measuring the return on the investment and taking action based on social media insights still presents a challenge to many marketing teams. An infographic from Morrison Foerster examines the current landscape of social marketing, and the challenges marketers still face.

Read the full story on Adweek.

How Social Media Marketing Is Set to Change in 2016

Hard to believe the first month of 2016 is nearly over (didn’t it just begin?) and even as I type this, tactics, strategies and options in the world of social media are changing. I know as a small business owner you’re not only on the lookout for the most effective use of your digital marketing dollars, you’re also looking to easily digest the latest offerings to see how they may benefit you. Here is a breakdown on what to expect in 2016.

Read the full story on Business 2 Community

10 ways brands are using social media marketing for good

Using social platforms like Twitter, Instagram, and Facebook to promote philanthropic content is an effective way to engage consumers and humanize your brand.

Asking questions, running contests, sharing pictures, promoting products and services; there are many ways for brands to attract attention on Twitter, Facebook, Instagram, and the like. Included among this list of ways to get people to sit up and take notice on social media is to show the softer side of your brand and declare your support of a worthy charitable organization.

Read the full story on ClickZ.

The Impact of Big Data on Social Media Marketing Strategies

The amount of information now available to crunch and parse in the service of analyzing absolutely anything is massive—and growing every second. In the face of this sheer overwhelm of data, an individual business owner or social media marketer can feel powerless to make any sense of it, let alone productive use of it. But as with any shift in the tide or evolutionary leap, a smart adjusting of strategy can help even the smallest of small fries to compete with the big guns and harness this unwieldy data deluge to work for them.

Read the full story on Tech.co.

The 5-Minute Social Media Competitive Analysis

We’ve talked about why you should monitor your competitor’s marketing, and how to set up a monitoring dashboard to do so. But really, all that data you’re collecting on competitors is worthless if you don’t know what to do with it. Smart data needs to lead to smart decisions.

And that means doing more than just hoarding competitor mentions in your dashboard. You need to sit down, dig in, and get analytical. Monitoring your competitors isn’t enough—you need to sit down and analyze the data.

Read the full story on Search Engine Journal.

Social media has of course become a ubiquitous part of every marketer’s arsenal. To understand how to fully leverage the power of social media download the Modern Marketing Essentials Guide to Social Marketing.

Powered by WPeMatico

DIY: Twitter Share Counts (Part 1)

From time to time, you may get clients that want share counts to be displayed on their site. There are indeed SAAS (software as a service) services out there that do this for you, but what if a third party isn’t possible? Since Twitter dropped their JSON endpoint for share counts, a lot of people are looking to these services, and most are commercial, offer a lot of bloat, and just do MORE than what you want. Instead, learn how to use the Twitter REST API to your advantage when counting your tweets.

Getting Started

To get going, you’re going to need two things at minimum. First and foremost, I’m not going to go into detail about how OAuth works, so for that we’ll use Abraham’s Oauth Library. If you don’t use composer, click the Manual Installation tab, and download it from his GitHub. Secondly, you’ll need a Twitter app. For this DIY, we’re going to be bending the REST API to do our bidding, and for that, you need an app. If you want to wing it and think you’ll be okay without instructions, here’s a handy link to get you there. If you’re not entirely sure how to register an app with Twitter, follow this blog post on iag.me which shows you how to register a Twitter app.

Once you make your app, go to ‘Keys and Access Tokens’ and note the following (you’ll need them in the code coming up):

  • Consumer Key
  • Consumer Secret
  • Access Token
  • Access Token Secret

On to the Code!!!

For the purposes of this tutorial, we’re going to use a simple singleton class. We know that for a definite we need a template tag to display the count. One other thing to keep in mind is Twitter’s rate limit; each API call has its own limits, so for this we’re going to use the GET search/tweets endpoint, which has a rate limit of 180 calls per fifteen minutes. Due to this rate limit, you want to make sure to cache the resulting count; for this I’m using transients, however, if you have a persistent cache like WP Engine, you may want to use wp_cache_get/set functions instead. So here’s our scaffolding:

<?php
class Twitter_Counts {

    /**
     * @var Twitter_Counts null
     */
    public static $instance = null;

    private function __construct() {
        // Fancy stuff.
    }

    public static function get_instance() {
        if ( is_null( self::$instance ) ) {
            self::$instance = new self;
        }
        return self::$instance;
    }

    public function tweet_count( $post_id ) {

    }
}

function Twitter_Counts() {
    return Twitter_Counts::get_instance();
}

function display_tweet_counts( $post_id = 0 ) {

    if ( empty( $post_id ) ) {
        $post_id = get_the_ID();
    }

    $cache_key = md5( 'twitter_counts_' . $post_id );
    $count = get_transient( $cache_key );

    if ( false == $count ) {

        $tc = Twitter_Counts();

        // ... do stuff

    }

    return $count;
}

Now that the scaffolding is setup, we need to start talking to Twitter with the OAuth library you downloaded. So setting it up is insanely easy (which is why I love this library):

require_once 'twitteroauth/autoload.php';
use AbrahamTwitterOAuthTwitterOAuth;

class Twitter_Counts {

    /**
     * @var Twitter_Counts null
     */
    public static $instance = null;

    private $consumer_key    = '';
    private $consumer_secret = '';
    private $access_token    = '';
    private $access_secret   = '';

    private function __construct() {
        // Fancy stuff.
    }

    public static function get_instance() {
        if ( is_null( self::$instance ) ) {
            self::$instance = new self;
        }
        return self::$instance;
    }

    public function tweet_count( $post_id ) {

        $oauth = new TwitterOAuth( $this->consumer_key, $this->consumer_secret, $this->access_token, $this->access_secret );

    }
}

If you are using Composer, you can ignore the first two lines. For me, I downloaded the library into a twitteroauth folder. Below that, you’ll see that there are new private variables. Since these are basically like passwords, it’s best if they’re inaccessible to anyone but the main class (although of course your requirements may be different and you’ll have to accommodate for that accordingly). Here is where those app values you copied from Twitter will come in handy; you’ll need to fill in these variables.

Line 29 is where the values are used. This literally does the OAuth handshake for you, and now all we have to do is make the request we want and process the results.

Getting the Data

Using the OAuth library makes it simple to do get requests. If you want to know all the parameters for the endpoint we’re using, you’ll need to consult the official search/tweets endpoint documentation. For now, we only need to worry about q, count, and include_entities.

Since we’re using the search endpoint, we need to search something unique to the page we’re looking at, or wanting counts for, that would be included in the tweet. Can’t get much more unique than the URL, right? We also want to return as many results as possible, this will help us in possibly going around the rate limit (unless you have a page with a million likes). For this, we set count to 100. Finally, we want to make sure to include Entities, since from what I can tell, those include the original URL prior to it being converted to the t.co shortener.

The code should look something like this:

    public function tweet_count( $post_id ) {

        $defaults = array(
            'q'                => get_permalink( $post_id ),
            'count'            => 100,
            'include_entities' => true,
        );

        $oauth = new TwitterOAuth( $this->consumer_key, $this->consumer_secret, $this->access_token, $this->access_secret );

        $statuses = $oauth->get( 'search/tweets', $defaults );

    }

So what about counts?

Looking at the results on the official documentation you’ll see that you get back a JSON object. A quite large one in fact, but don’t let that scare you, in the end, it’s all data, and we tell it what to do! So what do we do? Well, since the JSON data is keyed, you’ll see the main key we’re concerned with, statuses. Lastly we should also check if the property is available after the transformation by using an isset check.

Having as many checks as necessary prevents your debug log filling up. Alternatively, if you want to log these errors, you can do so in a much nicer manner. For that, you should read my other post on Debugging WordPress Tips and Snippets.

Now that we got those checks out of the way, it’s a simple as running count() over the statuses. The code goes like so:

    public function tweet_count( $post_id ) {

        $defaults = array(
            'q'                => get_permalink( $post_id ),
            'count'            => 100,
            'include_entities' => true,
        );

        $oauth = new TwitterOAuth( $this->consumer_key, $this->consumer_secret, $this->access_token, $this->access_secret );

        $statuses = $oauth->get( 'search/tweets', $defaults );

        if ( ! $statuses ) {
            return false;
        }
        
        if ( ! isset( $statuses->statuses ) ) {
            error_log( __LINE__ );
            return false;
        }

        return count( $statuses->statuses );
    }

The Finish Line

Now we have to wrap up–this is the simple part! Here we need to update our display_tweet_counts() template tag to actually use our tweet counting method. Since our count method can return a boolean value (true/false) we want to check for that and set the count to zero if there was a problem. Otherwise, we want to use the actual value.

So here’s the full code:

require_once 'twitteroauth/autoload.php';
use AbrahamTwitterOAuthTwitterOAuth;

class Twitter_Counts {

    /**
     * @var Twitter_Counts null
     */
    public static $instance = null;

        // You'll need to fill these in with your own data.
    private $consumer_key    = '';
    private $consumer_secret = '';
    private $access_token    = '';
    private $access_secret   = '';

    private function __construct() {
        // Fancy stuff.
    }

    public static function get_instance() {
        if ( is_null( self::$instance ) ) {
            self::$instance = new self;
        }
        return self::$instance;
    }

    public function tweet_count( $post_id ) {

        $defaults = array(
            'q'                => get_permalink( $post_id ),
            'count'            => 100,
            'include_entities' => true,
        );

        $oauth = new TwitterOAuth( $this->consumer_key, $this->consumer_secret, $this->access_token, $this->access_secret );

        $statuses = $oauth->get( 'search/tweets', $defaults );

        if ( ! $statuses ) {
            return false;
        }

        if ( ! isset( $statuses->statuses ) ) {
            return false;
        }

        return count( $statuses->statuses );
    }
}

function Twitter_Counts() {
    return Twitter_Counts::get_instance();
}

function display_tweet_counts( $post_id = 0 ) {

    if ( empty( $post_id ) ) {
        $post_id = get_the_ID();
    }

    $cache_key = md5( 'twitter_counts_' . $post_id );
    $count = get_transient( $cache_key );

    if ( false == $count ) {
        $tc = Twitter_Counts();
        $result = $tc->tweet_count( $post_id );
        $count = false == $result ? 0 : $result;
        set_transient( $cache_key, $count, 1 * HOUR_IN_SECONDS );
    }

    return $count;
}

What about pages with 100+ shares?

That comes in part two, so stay tuned! In part two, we’re going to get into recursion, and how to walk over the results page-by-page. Keep an eye out for the second installment, and let me know if you have any questions!

The post DIY: Twitter Share Counts (Part 1) appeared first on WebDevStudios.com.

Powered by WPeMatico