Blog Promotion Strategies: How to Think Outside the Square

It’s day three of our thirty one day challenge!

How are you feeling? Pumped? Motivated? Ready to shake up your blog and your routine during these 31 days?

We’ve already covered nailing your elevator pitch and how to create a super-shareable list post, and today it’s all about getting yourself off your blog to promote it and find some readers.

Build it and they will come“, you think? That is really not the case with blogging.

You need to put your blog where people will read it. In today’s podcast we discuss doing just that – how, where, and why to promote your blog with the maximum chances of it being seen. You have to get off your blog to get your blog read!

In todays episode there are tips on where to go to share your posts, how to build reader profiles (and why you need them), and how to figure out where those ideal readers are. Then we go through what to give those readers when you finally catch their attention – are you worthy of being found? How are you being useful? What kind of content are you creating?

Where are those potential readers?

The internet is vast, and while we immediately think of social media as the first place to share content, it isn’t always the only place.

In this episode we talk about developing editorial schedules for social media, but we also go beyond that, into the realm of guest posts, forums and other forgotten places to be seen.

We’re going to encourage you today to get off your blog and put yourself out there. Take today’s challenge and choose a certain post to share. All it takes is a little of your time and some creative thinking.

ProBlogger Podcast Avatar

Click here to listen to day three of the 31 Days to Build a Better Blog series on the ProBlogger Podcast. 

Let us know how you go with today’s challenge on twitter – just tag @ProBlogger and head to todays show notes to leave a comment.

Further Reading:

Don’t forget to subscribe to our podcast on iTunes and Stitcher to get updates of new episodes.

Blog Promotion Strategies: How to Think Outside the Square
http://www.problogger.net/archives/2015/07/03/blog-promotion-strategies-how-to-think-outside-the-square/
http://www.problogger.net/archives/category/31-days-to-building-a-better-blog/feed/
@ProBlogger » 31 Days to Building a Better Blog
Blog Tips to Help You Make Money Blogging – ProBlogger
http://www.problogger.net/wp-content/plugins/podpress/images/powered_by_podpress_large.jpg

How to Create Blog Posts That People Remember

Getting people to return to your blog

While traffic to a blog is usually top of mind for a blogger, the real gold is when you create recurring traffic from loyal and engaged fans. It’s all very well and good to have lots of numbers in your stats, but if nobody is interacting or sticking around, it actually doesn’t get you very far at all.

With this end goal in mind, you’ll find that it’s creating content that creates memories in your audience that’s important. And it’s important for a few reasons – your content becomes your brand, it’s what you become known for, and it’s what others tell about you when they share your content or your blog with their friends and family.

I find that when I go to conferences and blogging events, there is always someone who will come up and tell me about a piece of content I shared that resonated with them. It means that I’ve made a connection in some way, a left a lasting impression on a reader who has carried that impression with them as the kind of blog I have and the kind of content I provide.

In today’s episode of the ProBlogger podcast, I want to talk about all the ways you can make this kind of impression on the people who come to your blog. Whether they’ve searched for key terms, found you on Pinterest, were recommended your post by a friend, it doesn’t matter. What you want is for them to hang around.

The posts that people come up to me at conferences and remind me about are:
  • story posts
  • playful posts
  • emotive posts
  • inspirational posts
  • opinion pieces
  • personal posts
  • vulnerable posts

The times when I’ve opened up and shared something are usually the times when it strikes a chord in the reader and they feel as though they’re not alone.

The impact of most of these kinds of posts is that they hit the heart, not just the head. It makes the reader feel something, and you’ve succeeded in making a connection. It makes you human. It makes you relatable.

This is what people remember.

You can find today’s show notes on ProBlogger.com, and I’d love to hear – what posts do people remember on your blog? What have you written or shared that has struck a chord?


Further Reading:

  • Why My First Blog Failed … and What You Can Learn from My Mistakes
  • Hey Bloggers! Is it Time to Focus a little Less on Your Blog and A Little More on YOU?
  • ProBlogger Podcast 39: What is Your Why?
  • How to Write in a More Personal and Engaging Tone
  • ProBlogger Podcast: Turn Blog Surfers into Loyal Readers by Building a Sticky Blog

The post How to Create Blog Posts That People Remember appeared first on ProBlogger.

How to Create Blog Posts That People Remember
http://www.problogger.net/archives/2016/03/01/how-to-create-blog-posts-that-people-remember/
http://www.problogger.net/archives/category/blog-promotion/feed/
Blog Promotion – ProBlogger
Blog Tips to Help You Make Money Blogging – ProBlogger
http://www.problogger.net/wp-content/plugins/podpress/images/powered_by_podpress_large.jpg

Powered by WPeMatico

5 Unique Ways to Increase Your Blog Traffic

5 unique ways to increase your blog

This is a guest contribution from SEO expert Zach Radford.

Today, you don’t gain blog traffic by paying for backlinks or by swapping them like the old days. Instead, you need to focus on creating quality content that is beneficial to your visitors.

We know that. But how do you do it? And do it consistently?

The content should solve main problems faced by your reader. It should be actionable, specific and relevant to the audience. If you do this, your audience will come to trust your site, and visit it regularly looking for new content. They will also engage with you, which helps you to improve your blog.

To that end, here are five new ways of looking at increasing your blog traffic.

Create quality content and mention other bloggers

Your blog is the main avenue for communication with your audience. While your main purpose for the blog may be to promote your business, yourself, or some other product or service, you need to focus on providing quality content to the reader. Just focus on providing information that readers will find interesting to read, without trying to be overly strategic about it. Look for trending topics in different areas and create amazing content on those topics. Your audience will not only keep coming back for more if they find your posts interesting, they will also share your posts with their friends. You also need to mention other bloggers that you follow in your posts. You can quote them if you feel the information is interesting to the reader or just mention their names in the post. This will create good relationships with the bloggers and they might return the favour. Lifting each other up has the added benefit of leading to increased traffic.

Share your blogs on social networks

This is a no-brainer, but cannot be ignored. Facebook, Twitter, Google+ and Linkedin are where your readers are. Give them your posts. After creating your post, you can share a link of the post through Facebook or Twitter and then ask your friends or followers to comment. This will expose your blogs to thousands of social media users and eventually lead to increase in blog traffic.

Syndicate your posts

Syndicating your blog posts will expose them to more readers. You can use RSS feed or syndicate the blog to applicable high-traffic sites. RSS feeds allow your audience to keep track of your blogs without having to bookmark it. The readers only need to open their RSS reader and all your posts will be displayed there. Syndicating your blog to high traffic sites will also popularize it. This will also give your post more credibility, which could lead to high traffic.

Involve your readers

After posting to your blog, you need to ask your readers to leave a comment after reading the blog. Research shows that people will do (mostly) what you ask of them, and will comment where they might not have before. Read the comments that are left and try to reply all of them. Readers feel more valued if they are treated well and respected by the bloggers they engage with. They will keep on visiting your site to look for more content and to engage you as well. This will also build trust with your readers.

Use Pinterest Individual or Group Board

Pinterest allows bloggers to post on individual board and collaborate by posting on contributor boards. The main benefit of pinning your blog on contributor boards is that your blog is exposed to other contributors. Those contributors also have followers who will also see your post, leading to increased traffic.

The bottom line

Your blog will attract more readers if it is of good quality. Above all, this has to be the main aim. Therefore, it is important that you focus on quality more than selling your products or promoting your business through the blog. You also need to network with other bloggers and create good relationships with them. This will help you gain new ideas of increasing traffic to your blog.

Zach Radford is an SEO content expert, working as an SEO consultant and Sales manager for the past 10 years. He strives for success in everything he sets out to do. He believes that high-quality keyword-rich content is the key to running a successful online business. Currently starting his own venture: an SEO Content Company, aiming to provide quality SEO content to the masses.

Originally at: Blog Tips at ProBlogger
Build a Better Blog in 31 Days

5 Unique Ways to Increase Your Blog Traffic

5 Unique Ways to Increase Your Blog Traffic
http://www.problogger.net/archives/2014/09/22/5-unique-ways-to-increase-your-blog-traffic/
http://www.problogger.net/archives/category/blog-promotion/feed/
@ProBlogger» Blog Promotion
Blog Tips to Help You Make Money Blogging – ProBlogger
http://www.problogger.net/wp-content/plugins/podpress/images/powered_by_podpress_large.jpg

Powered by WPeMatico

How to get your Readers to become more Engaged, Loyal and to Share your Content

For many of us as bloggers, the ultimate goal is to build an audience of readers who feel engaged with our brand, who show up on a loyal and regular basis, and who eventually feel so much a part of what we do that they naturally want to share it with their own friends, family and networks.

Last week I sat down and put together a short presentation on how to do just that with your blog and shared it on my Periscope account. It contains a short exercise that for me helps to get into the mind of a reader and to analyse the journey that they might need to take to get fully engaged.

I’ve included the full presentation below for those who would like to watch rather than read but the exercise in brief is….

Grab a pen and paper and draw a line horizontally across the page.

On one side put ‘surfer’ and the other describe what you want them to become. For me it’s about helping them to go from being a ‘surfer’ to being ‘engaged, subscribed and sharing’ (and a customer).

Your page might look like this:

readers journey

Now that you’ve got the starting and ending positions – what needs to happen to get them from point A to point B?

When I did this exercise I came up with a variety of things that need to happen. I jotted down a few words for each thing:

  • I need to grab their attention
  • I need to pique their interest
  • They need to feel some desire about what I’m doing
  • They need to feel I’m a credible source
  • They need to start to feel engaged
  • They should feel some sense of anticipation that something is coming that gives them a reason to subscribe
  • They should feel a sense of belonging

Your list might be similar – or it could have other milestones that might get them to your ultimate goal.

Your page probably looks something like this:readers journey2

With this little roadmap of the journey of one of your readers it’s now time to ask yourself what would move a reader along this process?

There are a number of things that can help but as bloggers I want to suggest that the content we produce is the primary vehicle that drives people along this journey.

Every piece of content you publish whether on your blog, in an email, in social media updates has the potential to move people along this process but different types of content will achieve different things so it can be well worth mixing up the types of content that you produce to help with this.

I go into more detail of the types of content that help at different points in the journey in the video below (it starts at about the 6:35 minute mark if you want to start there).

On my photography blog:

  • Content that gets attention might include humorous content, infographics, list posts
  • Content that gets interest and builds desire can include our ‘image collections’ (aspirational content)
  • Content that builds credibility includes some of our longer form very comprehensive tutorials
  • Content that builds anticipation includes some of our series of posts that come out over a week or month
  • Content that builds engagement and gives a sense of belonging might include our weekly challenges

Of course here I’m just talking about blog content but the same goes for your content on social media and if you really want to ramp it up – your email autoresponders can be a brilliant way to move people through this type of sequence of content.

There’s lots more if you have about 25 minutes to watch the presentation below, but if not I hope some of the above also gives you a few ideas of how to get in your readers shoes and create content that moves them intentionally towards engagement rather than just hoping it happens.

Here’s the full recording of the presentation.

The post How to get your Readers to become more Engaged, Loyal and to Share your Content appeared first on ProBlogger.

How to get your Readers to become more Engaged, Loyal and to Share your Content
http://www.problogger.net/archives/2016/02/23/how-to-get-your-readers-to-become-more-engaged-loyal-and-to-share-your-content/
http://www.problogger.net/archives/category/blog-promotion/feed/
Blog Promotion – ProBlogger
Blog Tips to Help You Make Money Blogging – ProBlogger
http://www.problogger.net/wp-content/plugins/podpress/images/powered_by_podpress_large.jpg

Powered by WPeMatico

31DBBB Podcast Challenge: Write a Link Post (And Why You Should!)

This is it! Day Seven of the 31 Days to Build a Better Blog podcast series – you made it through the first week!

If you missed an episode here they are:

But back to today which is another writing challenge, which by the end of the month, should help you define what kinds of posts you like to write and what appeals to your readers.

Today’s challenge is very simple – a link post. But in this episode, I go into more detail about the types of link posts that do well (I talk about the six ways to write a link post), how to expand upon them, and of course – why I think these types of posts are important.

Things have changed since the early days when I favoured link posts, so there’s also tips to ensure your posts will be successful in today’s new online environment.

Don’t forget to share on social media how you’ve enjoyed your first week. What have been the hits and misses for you? What have you learned?

ProBlogger Podcast Avatar

31DBBB Podcast Challenge: Write a Link Post (And Why You Should!)
http://www.problogger.net/archives/2015/07/07/31dbbb-podcast-challenge-write-a-link-post-and-why-you-should/
http://www.problogger.net/archives/category/31-days-to-building-a-better-blog/feed/
@ProBlogger » 31 Days to Building a Better Blog
Blog Tips to Help You Make Money Blogging – ProBlogger
http://www.problogger.net/wp-content/plugins/podpress/images/powered_by_podpress_large.jpg

Transfer Your Blog From WordPress.com to WordPress.org Part 2

This guest post is by Ayelet Weisz of All Colores.

Yesterday, I started the convoluted process of swapping my blog from WordPress.com to WordPress.org. As you may remember, I’d finally got to the point where I was ready to import the files of my blog. Everything seemed to be okay, until….

Big Deal #4: The import keeps getting stuck

You see that white screen? That’s how it stayed.

Importing the files

At first, I was happy. The little circle on my browser was turning. I assumed it would take a lot of time. Even though my blog was obviously smaller (2.9 megabytes) than the maximum allowed file (64 megabytes), I figured it would take time to import eight months worth of blogging with almost 2000 photographs.

So I let it be.

When I returned to my computer, I found out that the import process had got stuck. Remember, my blog crashed for almost 48 hours. I was sure that was the reason of my current technical challenge. After my blog returned to life and I was able to work again, I repeated the process explained above. While my blog hasn’t crashed since (and it was in late February), after a short moment of importing, nothing was circling anymore: the white screen of the import remained white.

Big Deal #5: Challenges with the blog file

I decided to open the file I had exported from WordPress.com. This is what it looked like:

Inside the file

I learned that there were two errors in the file:

  1. Error on line 149 at column 32: Namespace prefix atom on link is not defined.
  2. Error on line 150 at column 29: Namespace prefix atom on link is not defined.

I Googled it and found various discussions on the matter. I looked for ways to fix the file, yet found no help in simple language. I tried exporting the file from WordPress.com and importing to WordPress.org various times, and kept hitting the same error, only in different lines and columns each time.

As I kept searching the web, more and more answers seemed to lead to one solution, but one that sounded too simple—and to be honest, too frustrating—to be true.

The advice said, refresh the page.

I exported the file once more. Imported it once more. And then refreshed it an unbelievable number of times.

Each time, more and more files appeared to be added. Sometimes only a few files were added when I hit Refresh; sometimes there were many at a time.

The list of problem files

Either way, the list of files kept growing.

At the end of every file line, it said “already exists”. For example, “Media ‘DSCF1372’ already exists”. Also, I didn’t see all my posts and pages on the list. I was concerned that some aspects of the blog were being imported multiple times and some not at all.

Then I got some good news.

“All Done. Have Fun!” WordPress.Org wrote to me.

All done, have fun

Could it all really be done? Could I now actually stop dealing with technicalities and return to writing?

I logged in to my new URL: www.AllColores.com—no “WordPress” between my blog’s name and the dot-com—and I saw my blog! It was an exciting moment.

Until I noticed something was not okay.

Big Deal #6: My photos weren’t included

All was well with the posts and the comments on my blog, but no photos appeared in the posts. Let me remind you, we are talking about almost 2000 photos, which I made sure to include in the export and import processes.

After some digging in my dashboard, it turned out I’d actually done things well. The photos were indeed imported to the new blog … most of them just weren’t “attached” to any blog post.

Unattached images

The solution? Take a deep breath!

On the left-hand sidebar of your dashboard you will find the word “media”. Click on it. You will reach your media library, where all your photos are listed. I had 1856 media files, all of which were photos, and 1847 of them were unattached. That means that only nine photos were attached.

As you will see in the above photo, in each line beside the media file, you will find a column named “author”. Next to it, there will be a column called “attached to”. If the photo is unattached, an Attach button will be available. Click on that button to attach the picture to the post.

Attaching images

An image will pop up, asking you to search for a post or a page. You can type the beginning of a post title, or choose from a list offered by WordPress by clicking on the right post, then click on Select.

If you, too, have many media files and don’t feel like spending hours “attaching” them to countless posts, you can Google for plugins that might do it for you. From the various message board discussions I read, these actually had helped several people. I tried a couple of options, but they did nothing for me. It was back to manual work.

How do you remember which media file belongs in which post?

That’s where not deleting your WordPress.com blog comes in handy. Keep one window open on your WordPress.org dashboard, and log back in to your WordPress.com dashboard on another. Go to your media library. In your WordPres.com dashboard, files are attached to posts. Follow what it says there as you attach photos on your WordPress.org dashboard.

And, as it turns out, there’s a way to hurry up the process after all.

On any given page, mark all the photos related to a single post and only then click Attach on one of the photos. You will select a post the same way, yet when you click Select, up to twenty photos will be attached at the same time.

Bulk image attachments

Once I was done attaching, I verified that all photos were transferred and attached well.

The end result

Here is a part of my post “More Photos from Bariloche”, which I published while in Argentina in September 2011 to let everyone back home know I’d been doing well and enjoying the snow.

A post

Here is part of that post as it appeared on my new WordPress.org blog in late February 2012:

The old post

At last, I could breathe a sigh of true relief. I would have preferred to start with WordPress.org, yet accomplishing this triumph gave me a new boost of energy as I returned to do what I love most: writing.

Have you encountered any other technical challenges while transferring your blog from WordPress.com to WordPress.org? Share your tips and tricks with us in the comments.

Ayelet Weisz is an enthusiastic writer and translator from Israel. She celebrates the everyday and extraordinaire joys of life through travel on her travel blog, All Colores. Follow her adventures onTwitter and sign up to her RSS Feed.

The post Transfer Your Blog From WordPress.com to WordPress.org Part 2 appeared first on ProBlogger.

Transfer Your Blog From WordPress.com to WordPress.org Part 2
https://problogger.com/transfer-your-blog-from-wordpress-com-to-wordpress-org-part-2/
http://www.problogger.net/archives/category/blog-networks/feed/
Blog Networks – ProBlogger
Blog Tips to Help You Make Money Blogging – ProBlogger
https://problogger.com/wp-content/uploads/powerpress/problogger_podcast-891.jpg

Powered by WPeMatico

How to Promote Yourself without Coming Across as a Jerk

How to Promote Yourself without Coming Across as a JerkThe thing about blogging is that it’s not just blogging – you have to push your work out to others in order to be read. It’s an aspect of the job that is so intimidating for some that it totally holds them back from reaching their blog’s full potential. But without it, your blog is one of millions begging for attention and not getting it. “Build it and they will come” unfortunately doesn’t work here!

I was recently asked by a reader how to tackle this head on:

I’ve been blogging now for a few months and have built up an archive of posts that I think are useful for those who might find them – but I’m struggling with one big question – how to get people to read!
 
I’ve listened to some of your episodes on growing readership and understand the techniques I probably need to use – but my problem is that I’m scared to start.
 
More specifically my issue is that I don’t want to get too self promotional and come across as a complete jerk by over doing it and always be in people’s faces. Can you help?

In today’s episode of the ProBlogger podcast, I do just that.

The thing is, you do have to promote yourself, there’s really no way around it. From episode 33 to 37 of the podcast, we talked about finding readers but I guess what Samantha is asking is how do you do it the right way? In this episode I discuss the best ways of showcasing your expertise without coming across as a know-it-all.

I also touch on how to work to the best of your ability, why you should focus on exchanges rather than just broadcasting, what topic you should lead your blog with, where you should admit your knowledge deficits, the usefulness of storytelling, and more – including why you shouldn’t go overboard with the modesty thing. It’s all about what I think the secret to being a good influencer is and how it can make a difference between promoting yourself and promoting yourself so much you turn others off.

You can listen to this episode in the player below or over on the episode 55 shownotes.

I’d love to know – what are your favourite self-promotion tips? And is it something you struggle with, like Samantha does?

The post How to Promote Yourself without Coming Across as a Jerk appeared first on @ProBlogger.

How to Promote Yourself without Coming Across as a Jerk
http://www.problogger.net/archives/2015/10/23/how-to-promote-yourself-without-coming-across-as-a-jerk/
http://www.problogger.net/archives/category/blog-promotion/feed/
@ProBlogger » Blog Promotion
Blog Tips to Help You Make Money Blogging – ProBlogger
http://www.problogger.net/wp-content/plugins/podpress/images/powered_by_podpress_large.jpg

Powered by WPeMatico

How to Back Up and Move a WordPress Blog

This guest post is by Caimin Jones of Genius Startup.

Sometimes you’ll need to move your blog from one host to another. It’s a bit of a pain and might seem a daunting task if you’ve never done it before.

But transferring a site is a fairly straightforward process that you can do yourself with an FTP program and this step-by-step guide.

Before trying the DIY method, it’s worth checking to see whether your new hosting company offers a site transfer service for new customers. Many do—but check whether there’s a cost involved. I’ve seen free services for this, but I’ve also seen prices around $300!

If you just need to learn how to make a simple backup of your posts, and don’t need to move hosts, take a look at this ProBlogger post.

But if you’re ready to back up and move your blog, let’s do it.

What you need to begin

To get stated, you’ll need:

  1. an FTP program (two good, free ones are FileZilla or FireFTP which works as a Firefox add-on)
  2. the FTP login information for your current host
  3. the FTP login information for your new host
  4. the MySQL username, password, and host name for your new server
  5. the nameserver information for your new host—there are usually two host names, sometimes more
  6. the login details for the registrar with which your domain name is registered.

It’s best to move hosts during a quiet time of the week for your blog, which probably means over the weekend. Check that support is available at your new host, and have the number handy. If something doesn’t work as it should, you’ll be glad you don’t have to go looking for that phone number.

Two preliminary steps to make life easier

If you’re using a cache plugin like Total Cache or WP Super Cache, deactivate and completely remove the plugin before you start the move process.

Cache plugins store file settings on the server, and these will be different for your new host, so you need to do a new install for those types of plugins. Most other types of plugins won’t need to be re-installed using the process I’m outlining here.

Secondly, it’s highly recommended go to your domain registrar or hosting company and lower the TTL value on your domain to something like 300 seconds, or the lowest value allowed.

TTL stands for Time To Live. It’s the number of seconds browsers should wait before refreshing the DNS information that connects domain names with web servers. Setting it to a low value means you won’t have to wait more than a few minutes for your host switching to take effect.

You’ll find the TTL as a setting under a DNS Zone file. For example, it looks like this in Media Temple:

TTL settings

And it looks like this in Go Daddy:

TTL settings GoDaddy

Make sure you change the TTL at least 12 hours before you plan to switch web hosts, so that the newer, faster refresh time has updated around the internet.

Making the move

Step 1. Install WordPress on the new hosting company

If the new host has a one-click install feature, use that to install WordPress—you’ll save yourself quite a bit of time and hassle.

If you have to install it manually, take a look at the official installation guide.

Step 2. Back up the database

The easiest way to make a complete database backup is to install the WP-DBManager plugin .

Once it’s installed, go to Database > Backup Database and click the Backup button. If you have a lot of posts or comments, this might take a few seconds.

When you see the message that the backup has been created, go to Database > Manage Backup DB and check the backup file is definitely there.

Step 3. Back up all the files from your old server

Using your FTP program, log in to your old host and navigate to your wp-content directory. Download everything in that directory to your computer.

At this stage you have a complete copy of your entire blog—and you’re halfway there.

Downloading the copy

Step 4. Upload your files to the new server

Now, it’s back to your FTP program. Log in to the new server and navigate to the wp-content directory.

Before you take the next step, double-check that you really are logged in to the new server and not the old one.

Now delete everything in the wp-content directory.

Then upload everything in the wp-content copy on your computer to your new host.

Step 5. Change nameservers

You’re nearly there! Now you need to log in to your domain name registrar and change the nameservers to those of your new hosting company.

Changing the nameservers

Changes to domain nameservers can take a few hours or more to propagate through the internet, so it may be a while before your blog is being served from its new home. However, if you followed the tip to reduce the TTL value before you began, you’ll only need to wait a few minutes for the changes to take effect.

Sep 6. Make the finishing touches

Visit your blog homepage and refresh it every few minutes until you see the WordPress install page (if you manually installed WordPress) or an empty blog using the standard theme (if you used a one-click install option).

Don’t panic! Log in to the Admin area and go to Database > Manage BackupDB. You should see the backup file you made on your old server. Select it and click Restore.

Now check your blog homepage and you should see a fully working blog, with posts, comments, theme, and plugins working correctly.

If everything looks good, you can now reinstall your cache plugin, if you were using one. I’d also say you’ve also earned a glass of your favorite beverage!

Caimin Jones is founder of Genius Startup which gives bloggers and small startups no fluff, practical strategies to build a successful web business.

The post How to Back Up and Move a WordPress Blog appeared first on ProBlogger.

How to Back Up and Move a WordPress Blog
https://problogger.com/how-to-back-up-and-move-a-wordpress-blog/
http://www.problogger.net/archives/category/blog-networks/feed/
Blog Networks – ProBlogger
Blog Tips to Help You Make Money Blogging – ProBlogger
https://problogger.com/wp-content/uploads/powerpress/problogger_podcast-891.jpg

Powered by WPeMatico

How to Build A Culture of Community on Your Blog

How to Build A Culture of Community on Your Blog

If you were listening to the episode 60 of the ProBlogger podcast, you would have heard me talking about why I think it’s so vital that bloggers create a culture of community on their blog to help deepen relationships with their readers and to drive engagement. I also promised a follow-up podcast on how to do just that!

Today’s episode is part two of building a culture of community and I wanted to talk about the strategy of how to create an atmosphere of belonging, what you should aim for, and how to go above and beyond just encouraging engagement, but to foster a sense of ownership and even collaboration with your readers.

There are 7 ways I think are useful in creating a culture of community to help your blog come alive. As i mentioned in the last podcast, there’s no real way to have it happen overnight, it just takes time as you build trust with your readers. These seven steps will help you on your journey though, so grab a pen and take some notes!

You can find the show notes of episode 61 here, and as always, I welcome your feedback on the podcast in the comment section. What have you done to create a culture of community on your own blog?

Further Reading:

  • You’ve Got Readers To Your Blog – This is How You Keep Them There
  • The ProBlogger Podcast How-To: Leave Comments on Blogs
  • 5 Ways to Ramp Up Comments on Your Blog
  • ProBlogger Podcast: Turn Blog Surfers into Loyal Readers by Building a Sticky Blog
  • Facebook Theme Week: Case Studies of Popular Pages (and What They’re Doing to Get Great Engagement)

The post How to Build A Culture of Community on Your Blog appeared first on @ProBlogger.

How to Build A Culture of Community on Your Blog
http://www.problogger.net/archives/2015/11/13/how-to-build-a-culture-of-community-on-your-blog/
http://www.problogger.net/archives/category/blog-promotion/feed/
@ProBlogger » Blog Promotion
Blog Tips to Help You Make Money Blogging – ProBlogger
http://www.problogger.net/wp-content/plugins/podpress/images/powered_by_podpress_large.jpg

Powered by WPeMatico

WordPress Feature Review: New Features You Missed in 2012, Part 1

This guest post is by Michael Scott of WPHub.com.

One of the great things about WordPress is that it never stands still. The platform is constantly evolving beyond its blogging roots, with more great features being added every year.

WordPress used to release small updates frequently, but at the end of 2009 they changed this policy. They now aim to release three major updates every year, with small infrequent updates in between to address security issues.

The three major releases in 2011 were 3.1 (February 2011) and 3.2 (July 2011) and 3.3 (December 2011).

Today I’d like to walk you through the new features which were introduced in 2012, in WordPress 3.4 and 3.5.

I’ll be focusing on the features that are most relevant to bloggers and explaining how they can help you.

New features in WordPress 3.4

Released in June, WordPress 3.4 was a solid release that is best remembered for introducing the new theme customizer.

It also included a lot of other great new features such as Twitter embedding, HTML in captions, and flexible header images.

New feature: Live preview

Live preview enables you to preview themes before they are activated on your blog.

Browsing and installing themes and plugins directly from the WordPress admin area is one of WordPress’s greatest strengths. It’s amazing that you can modify your blog so much without even leaving your blog’s Admin area.

In the past, clicking on the Preview link for a theme would load up an overlay which displayed the theme over the current page.
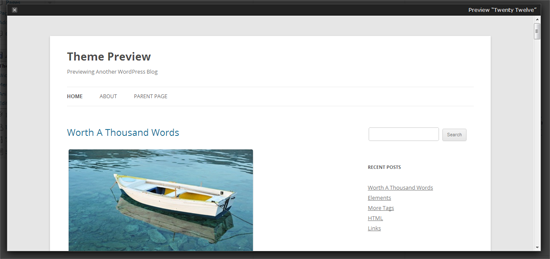
live-preview-old

But the process of browsing WordPress designs changed in WordPress 3.4. In the past, the design was listed with Install and Preview links, and a full description.

Descriptions are now hidden by default, though you can view the description of a theme by clicking on the new Description link. This may seem like a small change, but it made browsing for designs within the Admin area much more user friendly.
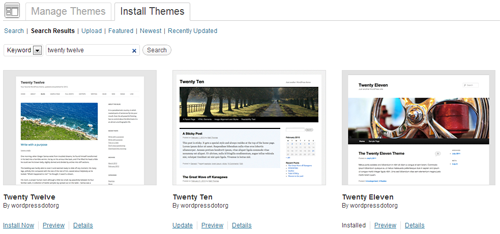
live-preview-1

Themes are now previewed on their own dedicated Preview page. The page shows the theme on the right-hand side. On the left side, the theme name, thumbnail, rating and description are shown. To save you from having to click the Back button, themes can now be installed via this new Preview area.
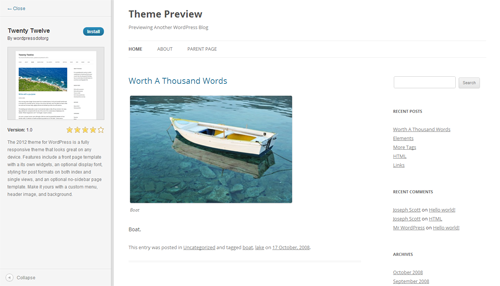
live-preview-2

Once a theme has been installed on your WordPress blog, the Preview option becomes much more useful as it loads up the new theme customizer and lets you see how this design will look on your live website. This enables you to preview the theme using your menus, posts, pages and more.
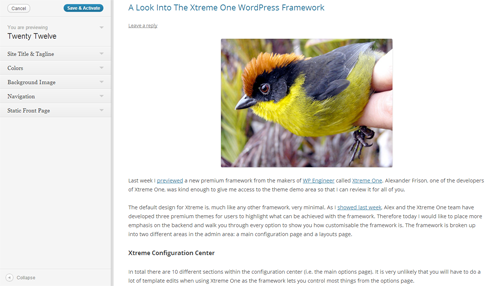
live-preview-3

Being able to see how themes will look with your existing content has greatly improved the process of installing WordPress designs via your Admin area, and changed the way bloggers choose their themes.

New feature: Theme customizer

This feature allows you to configure your theme via a user-friendly Options area.

The WordPress customizer allows users to configure many different areas of their design, such as the header, background and navigation via a dedicated Options area. Older WordPress themes do not support the customizer but can be modified appropriately with a few simple edits to the theme functions.php file.

The Customize link can be found via the Themes link in the Appearance menu of your WordPress Admin area. Clicking on the link will take you directly to the theme customizer Options area.
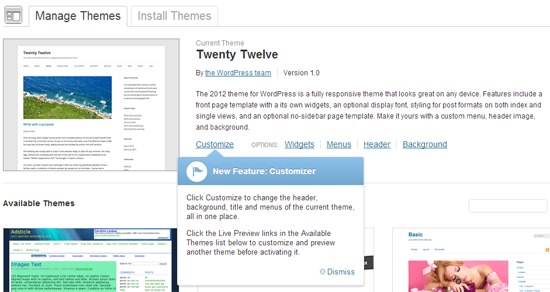
theme-customizer-1

The options available to you in the customizer will depend on the theme itself. The default WordPress themes only had five or six different options, however over the last six months we have seen WordPress designers incorporate other options in their designs. Common options include site title and tagline, colors, background image, navigation menus, and whether posts or a static page were displayed on your home page.
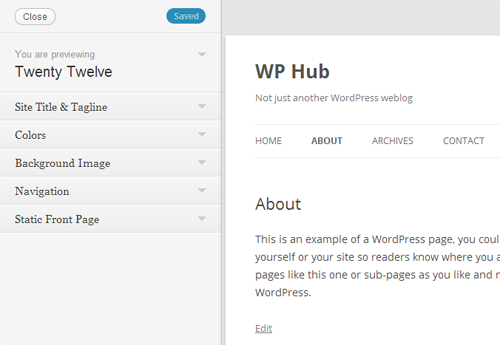
theme-customizer-2

One of the reasons the theme customizer was so well received within the WordPress community was because changes can be seen in real time. Whenever you change your site name or adjust some colors, these are reflected in the theme preview. The changes are, however, only applied to your website after you have clicked the Save & Publish button.
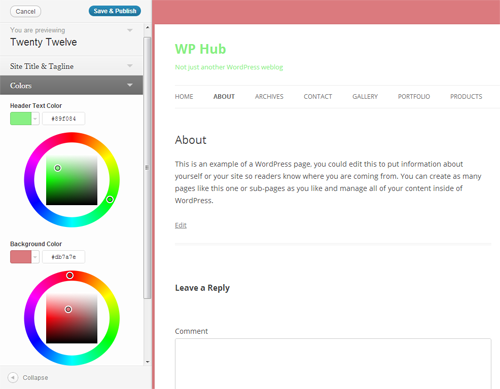
theme-customizer-3

The theme customizer has made it possible for beginners to modify how their website looks without editing any templates. It’s very straightforward to use and since the release of WordPress 3.4, many designers have made sure their themes are compatible with it.

New feature: Twitter embedding

Now you can embed Twitter statuses directly into your blog posts and pages by simply entering the Twitter status URL.

Twitter is one of the most powerful tools available to bloggers. In addition to self promotion and networking, many bloggers use Twitter as a source of inspiration for their articles. The new Twitter embedding feature makes quoting Twitter statues simple and removes the need for taking screenshots or installing plugins to display a quote.

For example, simply enter this within your blog post:

https://twitter.com/problogger/status/271764815607898112

The corresponding Twitter status will be displayed:

twitter-embeds

The beauty of this new feature is its simplicity. There are no shortcodes to remember or buttons to click: you simply enter the URL of the Twitter status to embed it.

New feature: HTML in captions

This feature lets you add HTML directly to your image captions.

Captions have always been a great way of describing photographs and images to your readers. Being able to add HTML to captions has improved this considerably as you can now include links to photo credits, relevant articles, and websites directly inside the caption.

html-captions

Those who are using old WordPress themes may find that the new way WordPress adds captions has broken older image captions on your website. Upgrading to a new theme is recommended, though you could fix these issues manually by searching for posts with captions through your WordPress post area and updating the code.

New feature: Improved features for international users

Improved support is now offered for international WordPress users so that many locale-specific configurations can be modified from the core WordPress files.

As a native English speaker, localization is not something I ever have to deal with, so it’s easy to forget that around 44% of all websites are written in a language other than English.

WordPress 3.4 focused heavily on making WordPress more international. Some of the most important new features introduced for non-English users include:

  • Localizing commas: Many Asian and Middle Eastern languages do not use the comma (,). This causes a lot of problems for those users, as WordPress uses the comma as a delimiter for tags, quick edits and bulk edits. From 3.4, the comma can be translated to another character for languages where a comma isn’t used.
  • Translatable spellchecker language: The TinyMCE WYSIWYG editor can now be translated into any language.
  • Specify default time zone: Previously, the default timezone for all WordPress installations was set to GMT. This can now be modified so that the timezone does not have to be adjusted during the installation process.
  • Feed language: The language of your feed can now be set using the bloginfo_rss template tag.
  • Specifying start of week: You can now easily define the day the week starts.

If you don’t blog in English, many of these new features should make it easier for you to use WordPress in your native language.

New feature: Flexible header images

Header images are now responsive.

Custom headers were added to WordPress way back in 2007 (version 2.1). Previously WordPress allowed you to set the width and height of a header image, but all header images which were uploaded had to be cropped to fit these dimensions.

Now all images will resize dynamically to match the width of your header.

With so many people viewing blogs on mobile devices, flexible headers have made it easier for designs to accommodate any resolution. Check out Creating a responsive header in WordPress 3.4 at WebmasterDepot for a complete walkthrough of this new feature.

New feature: Login shortcodes

WordPress now offers more user-friendly login URLs.

WordPress users can log in using www.yoursite.com/wp-login.php and access the Admin area via www.yoursite.com/wp-admin/. Since version 3.4, you can log in using the more user-friendly URL www.yoursite.com/login. The Admin area can also be viewed by entering www.yoursite.com/admin or www.yoursite.com/dashboard.

There’s no denying that this is a small addition to WordPress, but I always welcome small things like this that make daily tasks such as logging in quicker and easier.

New feature: Comment via the post editor

Comments can now be added via the Post and Page editor pages.

For years the Post editing page has shown all the comments that were left on a post or page. In addition to viewing comments, there is now an option to leave a comment directly on a post from the post editor area. This saves you from having to load up the article in order to leave a comment.
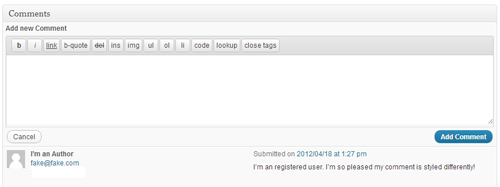
add-comment-post-screen

New feature: Improved touch support

WordPress now offers vastly improved touch support in the user interface.

WordPress aimed to improve site usability on tablet devices such as the Apple iPad and Kindle Fire. Specifically, they added support for drag-and-drop functionality. This allows you to more easily customize the mobile user interface simply by moving things around.

New feature: Child themes added to the theme repository

The official WordPress themes directory now accepts child themes of WordPress themes that are already listed within the directory.

Child themes will be accepted within the theme directory if they can demonstrate sufficient difference from the parent theme to warrant inclusion.

I was particularly pleased with this feature, as it allows designers to take existing designs and modify them for different users. For example, designers will now be able to take a magazine-based theme and make it more blog-orientated, or remove features from designs that are too bloated.
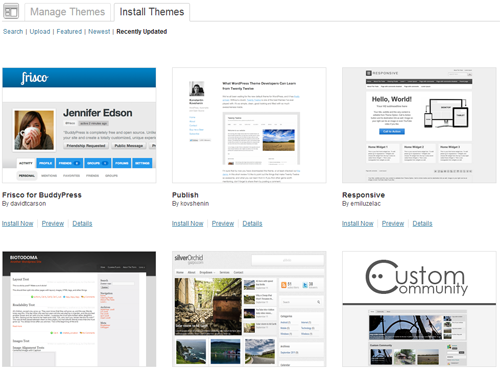
child-themes

The theme installer supports child themes too. The great thing about this is that WordPress will automatically install a child theme’s parent theme if it isn’t already installed.

New feature: Scroll to top of Admin bar

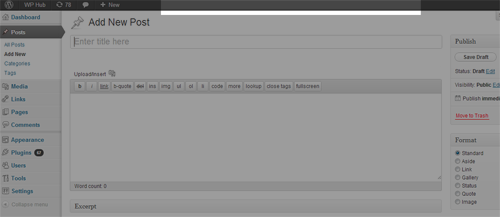
Now, we can scroll to the top of the page by simply clicking the Admin bar.

This simple feature was missed by a lot of bloggers but it’s something that I’ve found myself using every day. Since WordPress 3.4, you can scroll to the top of the page by clicking in the empty area in the Admin bar. Simple but effective!
scroll-to-top

Other features added to WordPress 3.4

Since we’re short on space, here are some of the other great features that were added to WordPress 3.4:

  • The dashboard is now ready for high-resolution displays such as Apple’s retina display.
  • Multi-site improvements were made, such as auto-complete for adding new users and an increase in the default upload limit from 10mb to 100mb.
  • The Recent Comments widget had some small improvements.
  • Custom post types can now use the Distraction-free Editing mode (also known as Zen mode).
  • XML-RPC was improved to let WordPress interact with other applications more easily.

A full list of features added to WordPress in version 3.4 can be found in the WordPress codex.

That’s it for WordPress 3.4! Which of these features are you using, and which are your favorites? Let us know in the comments … and don’t miss Part 2 in this series, where I explain the handy new features available in WordPress 3.5.

Michael Scott has been working with WordPress themes and websites in varying capacities since 2007. It was mainly as a project manager where he quickly developed a love for their simplicity and scalability. As a strong advocate of all things WordPress, he enjoys any opportunity to promote its use across the Interweb and on WPHub.com .

The post WordPress Feature Review: New Features You Missed in 2012, Part 1 appeared first on ProBlogger.

WordPress Feature Review: New Features You Missed in 2012, Part 1
https://problogger.com/wordpress-feature-review-new-features-you-missed-in-2012-part-1/
http://www.problogger.net/archives/category/blog-networks/feed/
Blog Networks – ProBlogger
Blog Tips to Help You Make Money Blogging – ProBlogger
https://problogger.com/wp-content/uploads/powerpress/problogger_podcast-891.jpg

Powered by WPeMatico

Install Your First WordPress Theme

This guest post is by Karol K of ThemeFuse.

Seeing a headline like “How to Install a WordPress Theme” on ProBlogger might seem strange at first. This doesn’t sound like a “pro”-thing at all, right? If you’ve been dealing with WordPress for a while then this is probably even more than obvious to you.

However, everyone starts somewhere, and there are plenty of experienced bloggers who haven’t ever installed a WordPress theme—but would like to give it a try. Maybe you’re installing your first theme right now, and you’re searching for a quick guide on how to do it.

Where can you get a good WordPress theme?

This is tricky. You see, when you’re installing a plugin the best place to go is the official directory at wordpress.org. When you’re installing a theme, however, the official theme directory is not the best place to go, I’m afraid.

Of course, you can find some interesting themes there, but you’re more likely to make your search much more fruitful if you just go to Google.

The thing with the official directory is that it only contains 1,490 themes or so. This is by no means the total number of themes available on the internet. There’s much much more interesting stuff out there, and settling for what you can find in the official directory would not be a wise thing to do.

Yesterday, I described how to select a theme that’s perfect for you and your blog. So here I will just assume that you already know which theme you want to use.

Step 1. Download the theme

Once you find a theme you like, you’ll need to download it to your computer before you can do anything else with it.

The package containing your theme can consist of many various elements. Depending on the license you’ve selected, you might find some PSD files, additional bonuses, documents, and so on. Of course, the theme files themselves will be present as well. Most of the time, all the contents of a theme are delivered as a ZIP archive.

2. Extract the files

Next, you have to extract the archive somewhere—onto your desktop, for example. If the archive contains more elements than just the theme (like the bonuses I mentioned above), open the archive’s readme file to locate the main theme’s directory.

As an example, here’s what you’ll find inside a ThemeFuse theme archive:

Once you’ve successfully identified the main theme directory, you can proceed to the next step.

3. Upload the theme to your WordPress blog

This step will require FTP access to your hosting account, and a piece of FTP software. You can try FileZilla—it’s good, and it’s free.

The theme’s main directory is the one you’ll be uploading to your blog. Connect to your site via FTP (the FTP tool’s help documentation will explain how to do this if you’re not sure) and navigate to the wp-content/themes directory of your site. This is where you upload your theme’s main directory.

Here’s the default look of the directory when it contains only one theme—the default theme TwentyEleven:

The next step in the process takes place in your WordPress Admin panel.

4. Activate your new theme

Log in to your WordPress Admin panel using your Admin account details.

Installing new themes requires Admin access rights; it can’t be done through other types of accounts.

Go to Appearance > Themes, as shown here:

Your new theme should be visible among all the others. The only thing left for you to do now is activate it:

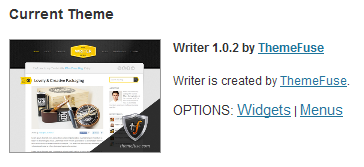
If everything goes well, your new theme will be marked as the Current Theme, and your blog will have an entirely new look.

5. All done!

This is where the guide ends. There’s nothing more for you to do now other than enjoy your new theme! Of course, you could make some final adjustments to make your blog look truly unique, for instance, adding branding elements such as your logo, pictures, and so on. Or, if you’re ready to install a WordPress plugin, we have a guide to that, too!

Have you installed a WordPress theme yet? Share your tips with us in the comments.

Karol K. is a 20-something year old web 2.0 entrepreneur from Poland and a writer at ThemeFuse.com, where he shares various WordPress advice. Currently, he’s working on a new e-book titled “WordPress Startup Guide – little known things worth doing when creating a WordPress site.” The e-book launches soon, and now the best part … it’s free. Also, don’t forget to visit ThemeFuse to get your hands on some premium WordPress themes.

The post Install Your First WordPress Theme appeared first on ProBlogger.

Install Your First WordPress Theme
https://problogger.com/install-your-first-wordpress-theme/
http://www.problogger.net/archives/category/blog-networks/feed/
Blog Networks – ProBlogger
Blog Tips to Help You Make Money Blogging – ProBlogger
https://problogger.com/wp-content/uploads/powerpress/problogger_podcast-891.jpg

Powered by WPeMatico

Keep Your New Year’s Resolution: Set up a Social, Search-optimized WordPress Blog … Today

This guest post is by Marcela De Vivo of Gryffin.co.

Recently ProBlogger discussed how to brand your blog, how to find your voice, and how to build your authority.

Mouse

Image courtesy stock.xchng user panoramadi

These articles are powerful, but often I find myself speaking with people who don’t have a blog yet, or are using Blogger or custom made, cumbersome platforms. Just this week alone I went through these steps with four different people who want to jump on the blogging bandwagon.

In this article we will go back to basics for those who haven’t started their blog yet, or who are on platforms that are hindering their progress.

If one of your New Year’s Resolutions was to improve your blogging presence—or start a new one—read on!

We’ll go through a step-by-step process, including tools and resources for each step, to set up a WordPress blog that is optimized for social and search marketing success.

Setting up your WordPress blog

WordPress is currently the most popular content management platform.  It can be used for static pages or as a blog.  You can add plugins for a shopping cart, image galleries, and much more.

Here’s how to set it up.

  1. Register your domain with sites like Register.com, Godaddy.com, or Enom.com
  2. Create a hosting account with sites like BlueHost.com, WPEngine, or HostGator.  If you would like to do more research on hosting companies, check out WhoIsHostingThis.
  3. Select a WordPress theme. I personally love using StudioPress as the themes are clean, functional, and easy to work with. Search for a responsive theme so your blog will be accessible to mobile users.
  4. Is your site running on a different CMS or platform? Consider using a blog migration service, such as BlogWranglers, to move your current site over to WordPress. Hundreds of thousands have done it, with no regrets.
  5. Upload WordPress to your hosting account, and customize with your relevant theme.  If you are not a techie, this is the part where you’ll need some help.  Check out Elance.com, Freelancer.com, or a site like Craiglist.org to find someone who can help you set up and customize your template.
  6. Install WordPress plugins.

Let’s take a deeper look at the plugins you’ll need.

Setting up your plugins

Social media

These are the social media plugins I recommend you consider.

  • Disqus or CommentLuv for comments
  • Digg Digg for social engagement
  • The Slide to recommend related articles
  • Social Metrics for a quick look at your social engagement from your Dashboard
  • MailChimp to collect email addresses for email marketing

SEO plugins

My favorite SEO plugins include these ones.

  • WordPress by Yoast
  • BWP Google XML SiteMaps
  • ScribeSEO
  • Outbrain for related articles at the end of each post

Usability

Usability plugins can be a huge help. Consider these:

  • WP Smush It
  • Broken Link Checker
  • Contact Form 7
  • WP Recaptcha for captcha

Doing keyword research

To gain exposure from search engines, you need to have your blog focused on a theme. Select a primary keyword within this general theme for each page of the site.  You can read more about keyword research in this ProBlogger article.

Select keywords by identifying low-competition and high-search terms for your industry from Google’s Keyword tool.

Other tools you can use include:

    • WordTracker
    • Keyword Discovery
    • Keyword Spy
    • Spy Fu
    • Market Samurai

.

Prepare content for your static pages and images

While a designer/programmer is working on setting up your site, you can start by writing and preparing content for your site.

A well-optimized page includes the primary keywords in the Title of the page, Meta Description tag, H1 tag, once or twice in the body, and in an outbound link.

As you’re preparing your content, remember these elements of an excellent blog post:

        • Post title: creative and compelling
        • Social share icons: make sharing your content easy
        • Image: an image speaks louder than words
        • Opening paragraph: include keywords in a teaser into the introduction
        • Body copy: use headers and bold words
        • Lists: make your content easy to scan
        • Conclusion: include a teaser for your next article
        • Related posts: give them more content to consume
        • Comment section: Always respond to comments

Read Darren’s compilation from earlier this year for more information on each element in The Anatomy of a Better Blog Post.

Connect your site for optimum findability

        • Create your Webmaster Tools account on Bing and Google.
        • Use BWP Sitemap tools to create and upload an XML sitemap.
        • Set up Google Analytics and connect it to your blog.
        • Set up your Author tag on Google Plus.

By this point you should have a WordPress blog with a range of enhancements made possible by plugins and other customizations.  You will have SEO plugins to improve your on-page SEO, page load times, keyword density, site maps, and other relevant SEO features.

You will also have a selection of social plugins so that you can encourage social shares from your site. You will have other features such as contact forms, tracking, reporting, and an email signup box to build your email list.

Incorporating keyword research will help you to deliver the content that people are looking for in a way that lets it be found.  You can write articles based on long-tail terms, answer questions that your audience may have, and target hundreds of keywords by writing articles specific to each one.

So what are you waiting for? Make your New Year’s Resolution a reality and start your new blog today. And if you have any suggestions of plugins, tools, or services to add to this list, please do share!

Marcela De Vivo is a freelance writer who writes about blogging, SEO and social media at Gryffin.co/blog.

The post Keep Your New Year’s Resolution: Set up a Social, Search-optimized WordPress Blog … Today appeared first on ProBlogger.

Keep Your New Year’s Resolution: Set up a Social, Search-optimized WordPress Blog … Today
https://problogger.com/keep-your-new-years-resolution-set-up-a-social-search-optimized-wordpress-blog-today/
http://www.problogger.net/archives/category/blog-networks/feed/
Blog Networks – ProBlogger
Blog Tips to Help You Make Money Blogging – ProBlogger
https://problogger.com/wp-content/uploads/powerpress/problogger_podcast-891.jpg

Powered by WPeMatico

Why You Should Make Building Community a Priority in Your Blogging

Why You Should Make Building Community a Priority in Your BloggingDo you ever feel as a blogger like you’re talking to an empty room?

I know I have definitely felt that way! Particularly when I first started Digital Photography School. But if you feel that way too, I want you to know: you’re not alone.

When you write a blog post, you hope that your readers will interact, leave a comment, acknowledge that you’ve even written something, and today I’m going to talk about how to do just that – deepen that reader engagement, and some reasons why I think this is so important (particularly for those just starting out).

Today’s ProBlogger podcast is the first of a two-part series, following up in the next episode with some really practical tips on how you build community.

The first thing I want to tackle is to talk about why you should try to deepen reader engagement. I know especially when first starting out there can be more of a focus on creating good content and promoting it (and there are a handful of established bloggers who make it a point not to encourage community on their sites), but most of the successful bloggers I know have invested time and energy in really inviting and facilitating a collaborative environment.

But back to the beginnings of Digital Photography School when I made a choice that really impacted how people responded to it: in this episode I discuss when (and how) I realised the choice I made meant I was missing out on the key factor that was really going to help my blog take off.

I also give 9 reasons why I think creating community is so incredibly important, and a couple of tips for getting through the negative flip side – building community takes real time and effort!

You can find episode 60 of the ProBlogger podcast show notes here.

Further Reading:

  • Finding Readers: Strategies for Building Your Audience in 2015
  • How to Build a Blog that Has Lasting Impact Upon Its Readers
  • Top Three Takeaways from Finding Readers Week: What Can You Do Today to Create Community?
  • Finding Readers Week: Mrs Woog’s Tips to Create Conversations on Your Blog
  • 7 Strategies for Growing Community on Your Blog


The post Why You Should Make Building Community a Priority in Your Blogging appeared first on @ProBlogger.

Why You Should Make Building Community a Priority in Your Blogging
http://www.problogger.net/archives/2015/11/10/why-you-should-make-building-community-a-priority-in-your-blogging/
http://www.problogger.net/archives/category/blog-promotion/feed/
@ProBlogger » Blog Promotion
Blog Tips to Help You Make Money Blogging – ProBlogger
http://www.problogger.net/wp-content/plugins/podpress/images/powered_by_podpress_large.jpg

Powered by WPeMatico

WordPress Feature Review: New Features You Missed in 2012, Part 2

This guest post is by Michael Scott of WPHub.com.

Yesterday, we started our tour of new features added to WordPress in version 3.4.

Today we continue the tour with a look at helpful new features available in version 3.5.

New features added to WordPress 3.5

Released late last year, WordPress 3.5 was the second and final major WordPress release of 2012.

This was the first release to include the new default design Twenty Twelve. It comes with a cool new feature that lets you install plugins you marked as a favorite on WordPress.org directly from your dashboard. However, many bloggers were surprised that the link manager has been removed from the default version of WordPress (though most agree removing this was a good decision).

Let’s take a look at the features.

New feature: Install favorite plugins

Now you can install your favorite plugins directly from your WordPress dashboard.

If you are logged in at WordPress.org, you will see a new option to favorite a plugin. You simply need to click on the link in order to add a plugin to your favorites.

favorite-plugin-1

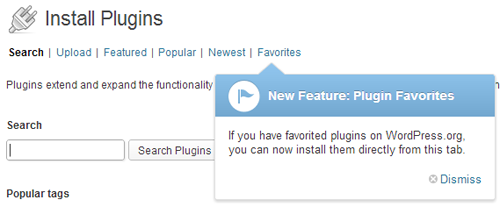
As you can see, a new link for favorites has been added to the WordPress plugin area.

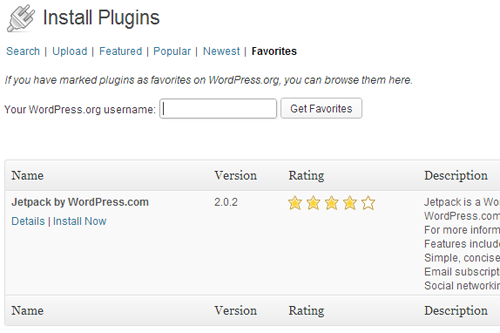
favorite-plugin-2

After you enter your WordPress.org username, you will see a list of all the plugins you have added as favorites. You can then install your chosen plugin easily.

favorite-plugin-3

Most WordPress users tend to use the same plugins on each of their WordPress websites. In the past, most people would bookmark their favorite plugins or keep a list of useful plugins so that they didn’t forget them. Saving important plugins at WordPress.org will allow you to quickly install frequently used plugins on every website you own very easily.

The way this new feature is set up, you don’t have to log in to your WordPress.org account on your blog, you only need to enter your username. This means you can see which plugins have been marked as favorites by any user on WordPress. You can share your favorites list with friends simply by telling them your username.

Also, if you know the WordPress username a website owner uses, you could enter their username into the plugin area to get a sneaky look into their favorite plugins (though there is no guarantee they are using a certain plugin on any given website).

New feature: Link manager removed

The Link Manager is no longer part of the core WordPress install.

The WordPress link manager, more commonly known as the Blogroll, was once one of the most popular features with bloggers and was used to display links on millions of blog sidebars. Thankfully, WordPress isn’t too sentimental—they know that the link manager is now only used by a small percentage of users.

The removal of the link manager follows the policy to remove non-essential items from the WordPress core to make the default version of WordPress quicker and leave additional functionality to plugins and themes.

links-new

Those who upgrade to WordPress 3.5 will no longer see the link manager in the WordPress menu if you haven’t used it before.

links-old

If you used your blogroll before you upgrade, the links manager will not be removed. It’s only removed on installations where no links were added (i.e. only the default links to WordPress-related websites were in your database). The link manager is available via an official plugin for anyone who wants to add the functionality back to their WordPress website.

New feature: New default design Twenty Twelve

The default design for WordPress has been released with this new version.

Twenty Twelve was originally planned to be part of WordPress 3.4 but was delayed. It was later released in the official WordPress theme directory in between the release of 3.4 and 3.5.

WordPress 3.5 is the first official release that includes this new theme (Twenty Ten and Twenty Eleven are included, too).

Some WordPress users have voiced their disappointment in Twenty Twelve’s minimal design, however most WordPress designers have been pleased with the evolutionary steps in this new official theme. The theme was clearly made with child themes in mind, and with the inclusion of child themes being introduced six months before, I imagine we are going to see a lot of varied designs being created from this base.

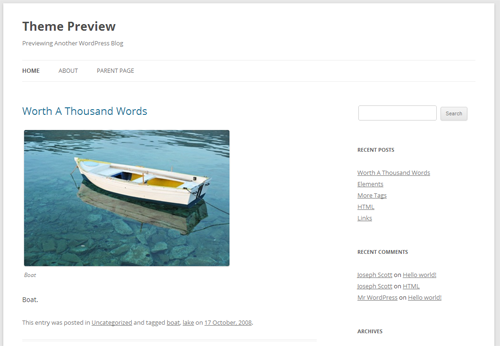
twenty-twelve-screenshot

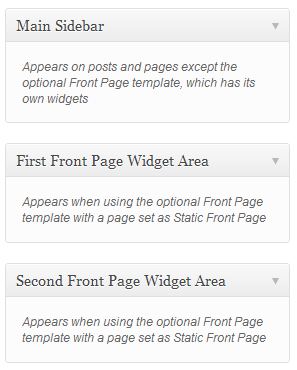
As before, the design can be modified using the theme customizer. Small differences are apparent—no header image is set by default, and no sidebar is shown if no sidebar widgets are present. In addition to the sidebar widget, the static home page also comes with two widget areas (each takes up 50% of the screen width). This makes creating a corporate-style home page very straightforward.

twenty-twelve-widgets

Like Twenty Eleven, Twenty Twelve supports post formats. Each of the additional post formats have a different design to distinguish them from other formats.

post-formats

You’ll find that there isn’t much difference in styling between some post formats. There’s a content template for each one, so these designs can easily be changed with just a few small edits.

asides

Twenty Twelve has a responsive design, so it looks the same on any browser and any device. It has beautiful typography too which makes reading a joy. If you know a little coding, you should be able to design some interesting websites using Twenty Twelve.

New feature: New Welcome screen

WordPress have improved the Welcome screen in 3.5.

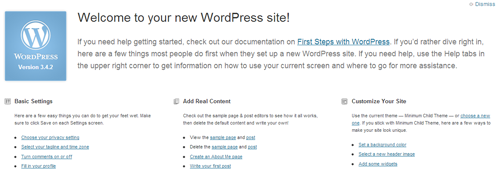
Previously, the Welcome screen had an introduction and three columns of links.

welcome-screen-old

The new Welcome screen looks much cleaner. The introductory description is gone, as is the description for each section. There are fewer links to choose from, and the link fonts have increased in size too. It’s much easier to use because of these changes.

welcome-screen

New feature: New color picker

Slight improvements have been made to the color picker.

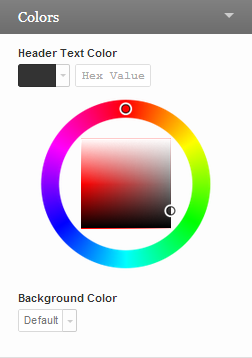
The color picker for the built-in theme customizer has had a small visual improvement. Previously WordPress used the popular color wheel.

color-picker-old

The new color picker looks much more modern. Common colors are displayed at the bottom and there is a new Default button which lets you return to the default color for the property instantly.

color-picker

New feature: Media interface improved

The WordPress media interface has been vastly improved.

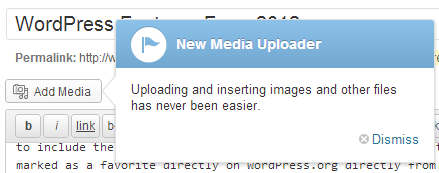
The media interface has had a much-needed overhaul. The old Upload/Insert text above your TinyMCE WYSIWYG editor has been replaced with a more prominent Add media button.

media-interface-1

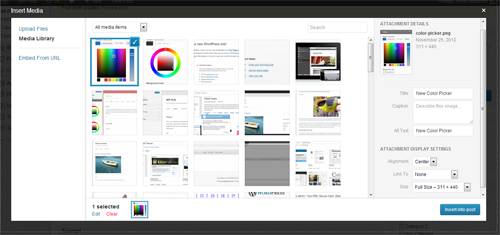
Clicking on the Add media button will bring up the new media interface. The old interface used to appear in an overlay that covered approximately 40% of the page (centered). The new overlay covers around 95% of the page. The same three options are available as before: Upload Files, Media Library and Embed from URL.

The media library not only looks better, it works better too. All items are shown in the center panel, with details of any selected item being shown on the right panel. Previously, items were shown vertically using a list and you had to click a Show link in order to see more details.

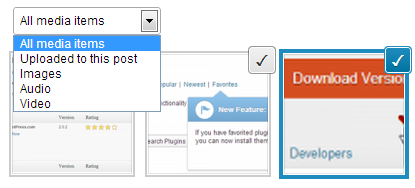
You can show all items, items uploaded to the post you are modifying, images, audio, and video. You can enter search terms to filter results, too.

media-interface-2

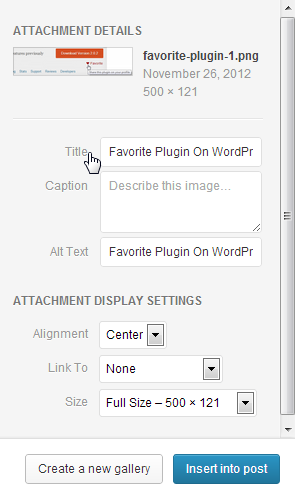
Multiple items can now be selected at once. Not only can you modify details of uploaded items more quickly, you can now insert multiple images, audio files, and videos directly into posts. This saves you a huge amount of time. The days of bloggers inserting dozens of images into blog posts one by one are over.

media-interface-3

If you select more than one item, you will have the option of inserting them into a post together. You will also see an option to Create a new gallery. In the past, media items were always grouped together with the post or page they were uploaded from. This new system means you can group items together at any time and insert them anywhere you want.

media-interface-4

The new media interface is arguably the most important new feature for WordPress bloggers. Images, videos, and audio are so important to us. The new interface really speeds up the process of inserting these assets into your blog posts.

New feature: XML-RPC enabled by default

XML-RPC is now enabled by default.

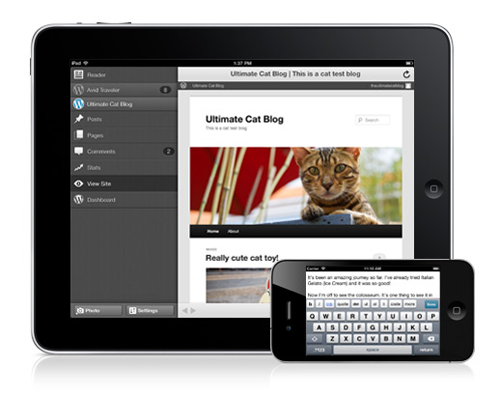
XML-RPC needs to be enabled in WordPress so that external applications can connect to WordPress. Historically, this setting has always been disabled by default.

ios-wordpress

When XML-RPC is enabled, WordPress can be used through a host of different mobile applications and you can use third-party blog editors such as Windows Live Writer, BlogDesk and Post2Blog.

New feature: Dashboard now supports all-HiDPI

The WordPress dashboard now supports retina display,

Those who have shiny new high-resolution retina display devices will be pleased to know that the WordPress dashboard is fully compatible with HiDPI.

Other features added to WordPress 3.4

Below is a list of some of the other features that were added to WordPress 3.5:

  • improved support for keyboard navigation and screen reading
  • search for comments of a particular status
  • external libraries for scripts such as TinyMCE, SimplePie, jQuery 1.8.2 and jQuery UI have all been updated. Backbone and Underscore have also been added.

A full list of features added to WordPress in version 3.5 can be found in the WordPress codex.

WordPress for the future

Each year the WordPress platform evolves and 2012 was no different. Features such as the theme customizer, live preview, and favorite plugins install option have made using WordPress easier for both beginners and veterans.

Whilst WordPress has moved beyond its humble blogging roots somewhat, it is still the best blogging platform available. The Link Manager has been downgraded, however new features such as inserting multiple media items, Twitter embeds and continued support for micro blogging post formats such as asides, quotes, and links, have ensured that WordPress remains number one in the blogging world.

WordPress have ensured they are keeping up with user habits, too. The Admin interface supports retina display, the new default design is responsive and they continue to improve their mobile applications. In short, WordPress is a mobile-friendly platform.

I hope you have enjoyed this review of the new features introduced to WordPress in 2012. Let us know what your favorite new feature is and why!

Michael Scott has been working with WordPress themes and websites in varying capacities since 2007. It was mainly as a project manager where he quickly developed a love for their simplicity and scalability. As a strong advocate of all things WordPress, he enjoys any opportunity to promote its use across the Interweb and on WPHub.com.

The post WordPress Feature Review: New Features You Missed in 2012, Part 2 appeared first on ProBlogger.

WordPress Feature Review: New Features You Missed in 2012, Part 2
https://problogger.com/wordpress-feature-review-new-features-you-missed-in-2012-part-2/
http://www.problogger.net/archives/category/blog-networks/feed/
Blog Networks – ProBlogger
Blog Tips to Help You Make Money Blogging – ProBlogger
https://problogger.com/wp-content/uploads/powerpress/problogger_podcast-891.jpg

Powered by WPeMatico

Weekend Project: Sharing a WordPress War Story

While we love blogging, we all know there are some aspects that really do seem impossible sometimes—none moreso than transferring a WordPress.com blog to the WordPress.org platform.

We’ve discussed the differences between these two platforms before, because more than one blogger has been caught up by the limitations of WordPress.com (usually the limitation that this platform doesn’t allow you to monetize your blog). But it’s well known that swapping to the .org platform from .com can be a challenge.

This weekend’s project explains the WordPress war story of a blogger who chose to start a blog on WordPress.com, because it required so little technical knowledge. But when she wanted to monetize her blog—and switch to the .org platform—that lack of technical skill proved a major hurdle. It’s no wonder the process has gained such a bad reputation!

Actually, I think this is something that blog platform developers probably want to consider as they’re creating their platforms‚ because any help they can give to users who want to upgrade or switch to other versions of their products is always much appreciated.

If you’re one of those bloggers who’s itching to move your blog from .com to .org, but you’ve been too scared, clear some time in your weekend schedule to implement the process that our Weekend Project sets out. I’m giving you plenty of warning for this project—it starts tomorrow!

For now, if you have a WordPress war story of your own that you’d like to get off your chest, feel free to vent in the comments.

The post Weekend Project: Sharing a WordPress War Story appeared first on ProBlogger.

Weekend Project: Sharing a WordPress War Story
https://problogger.com/weekend-project-sharing-a-wordpress-war-story/
http://www.problogger.net/archives/category/blog-networks/feed/
Blog Networks – ProBlogger
Blog Tips to Help You Make Money Blogging – ProBlogger
https://problogger.com/wp-content/uploads/powerpress/problogger_podcast-891.jpg

Powered by WPeMatico

Must-have Joomla Blog Extensions

This guest post is by Gere Jordan of Holony Media.

At first glance, Joomla isn’t the best platform for blogging. Actually, it’s probably not even in your top five. But that doesn’t negate all the strengths Joomla brings to the table as a content management system.

In fact, with the help of a few free extensions, it can rival some of the best blog platforms out there.

Why even give Joomla a chance?

I know what you’re thinking: why on earth would you even consider blogging with Joomla? It lacks core functionality that comes standard with WordPress, so why not use WP in the first place?

Well, without turning this post into a debate over the merits of Joomla versus WordPress, or any platform for that matter, let me just say this: Joomla is a powerful, mature content management system utilized by millions of websites worldwide. Millions of sites that would otherwise lack the ability to effectively run a blog.

Knowing the revenue and marketing potential of blogging, I think we can at least agree that Joomla users deserve the chance to make a go of it using their platform of choice. And that’s what this post is all about.

Not everything is missing

When you first set about creating a blog in Joomla, it takes a moment before you realize you’re in trouble. Adding posts (called “articles” in Joomla), organizing them by category, setting up multiple users, adding a blog area, sharing your RSS feed—all of this stuff is easy.

Once your first post is up, however, you start to notice things. Where’s the comment form? Why isn’t your profile information attached to your posts? How do users share your content?

A few Google searches later and you realize the truth: Joomla lacks some very important blog functionality.

Extensions to the rescue

Thankfully, like WordPress, Joomla has a vibrant community of developers creating plugins to expand upon its standard capabilities. These plugins are collectively known as extensions, and they’re easily accessible through the Joomla Extension Directory (JED).

Let’s dive into the JED and find the extensions we need to power our blog.

Comments

The most obvious blogging feature that Joomla lacks is the ability for visitors to comment on your posts. At present, several dozen comment extensions are available, spread across two categories in the extension directory.

Two of the top-rated comment extensions that you can get for free are JComments and Komento. Both are compatible with Joomla 2.5 and have received the illustrious “community choice” designation given by the Joomla Magazine team.

Author information

Another standard blog function that Joomla lacks is the ability to display author information within articles. All that you can show by default is the author’s name. This capability is built into WordPress, but whether it shows or not is dependent on your theme.

To add this capability in Joomla, check out the Author Info Box plugin. It’s free and compatible with Joomla 2.5. With this plugin, you can display a name, email address, image, and description for each author.

Social sharing

A final piece that’s important for a successful blog is social sharing, which allows readers to easily share your articles via social media. This is something that a standard WordPress install lacks as well.

As of this writing, two of the highest rated social sharing extensions in the JED are AddThis for Joomla and Facebook-Twitter-Google+1. Both are compatible with Joomla 2.5 and bring in the ability to share your articles via the most popular social channels.

Joomla all-in-one blogging extensions

If you’re looking to turn Joomla into a blog without installing multiple extensions, there are a few products that will do the job. You can find most of them in the blog category in the Joomla Extensions Directory, but the best ones will cost you some cash.

The best free all-in-one extension for blogging with Joomla is K2, which is an extremely powerful content construction component that gives you absolute control over your Joomla content. Not only does it do everything discussed in this post, it adds even more functionality like tags, item images, image galleries, user pages, and more.

The only downside to K2 is that there’s slightly more work involved to configure everything (nothing too difficult, just more time-intensive). However, if you’re looking to do a lot of publishing on your site and need more flexibility with your content, K2 is definitely worth the extra effort.

In conclusion

Just like WordPress and other platforms, a lot of Joomla’s power is derived from third-party extensions. By utilizing these extensions to add missing functionality, it’s relatively easy to turn Joomla into a blogging powerhouse.

Are there any noteworthy extensions that I am missing? Functionality that I left out? Please share in the comments!

Gere Jordan is a web designer, SEO, and internet marketing professional at Holony Media, a digital consulting company he founded in 2006.

The post Must-have Joomla Blog Extensions appeared first on ProBlogger.

Must-have Joomla Blog Extensions
https://problogger.com/must-have-joomla-blog-extensions/
http://www.problogger.net/archives/category/blog-networks/feed/
Blog Networks – ProBlogger
Blog Tips to Help You Make Money Blogging – ProBlogger
https://problogger.com/wp-content/uploads/powerpress/problogger_podcast-891.jpg

Powered by WPeMatico