Days back, I have posted an article on how to create a welcome page with proper login and logout using Ionic 3 and Angular 4. Today’s article is to create the same welcome page with ReactJS and ES 6. The article is about how to login/signup to get inside the application home page, you can navigate to different pages and finally you end up with a logout action. Lets see how to set a starting page with navigations using ReactJS and ES 6.
Video Tutorial: ReactJS Welcome Page with Routing Tutorial
This is the continuation of previous article Getting started with React Native Template Design – Tutorial Part I. Today’s article and video tutorial explains how to parse and render the json data using some of the best React Native packages. It explains how to make ajax calls using fetch. Fetch is the networking API, which is chosen by React Native to get the JSON data and render it in the page. I hope embedded videos with blog posts are more advantageous for you to learn. I appreciate to take any feedback if you have, so that I can make it better.
Firefox recently updated to version 43 & with that, they automatically disabled all extensions which are not signed, even if they were previously installed by a user and used for years.
If you go to the add ons screen after the update (by typing about:addons in the address bar) you will see a screen like this
Extensions which are submitted to the Mozilla Firefox add ons directory are automatically signed when approved, but other extensions are not by default:
Only Mozilla can sign your add-on so that Firefox will install it by default. Add-ons are signed by submitting them to AMO or using the API and passing either an automated or manual code review. Note that you are not required to list or distribute your add-on through AMO. If you are distributing the add-on on your own, you can choose the Unlisted option and AMO will only serve as the way to get your package signed.
In a couple days we will do that submission to get the add ons signed, but if you recently had the extensions go away it is fairly easy to override this signing feature to get the extensions back working right away.
Step 1: go to the Firefox settings configuration section
Type about:config into the address bar & hit enter. Once that page loads click on the “I’ll be careful, I promise” button.
Step 2: edit the signing configuration
Once the configuration box loads you’ll see a bunch of different listed variables in it & a search box at the top. In that search box, enter xpinstall.signatures.required
By default xpinstall.signatures.required is set to TRUE to force add ons to be signed. Click on it until it goes to bold, which indicates that the TRUE setting is set to FALSE.
Step 3: restart Firefox
After changing the add on signature settings, restart Firefox to apply the setting & your Firefox extensions will be restored.
There’s no shortage of boosterism or excitement about the fledgling service worker API, now shipping in some popular browsers. There are cookbooks and blog posts, code snippets and tools. But I find that when I want to learn a new web concept thoroughly, rolling up my proverbial sleeves, diving in and building something from scratch is often ideal.
The bumps and bruises, gotchas and bugs I ran into this time have benefits: Now I understand service workers a lot better, and with any luck I can help you avoid some of the headaches I encountered when working with the new API.
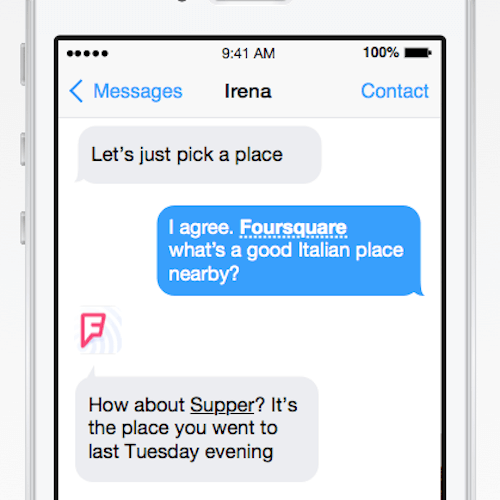
It’s interesting to see how user experience design advances now that we managed to understand what it means. I think artificial intelligence will become a huge part of user experience over time and that we will spend more time on developing clever integrations to third parties than developing our own “dumb” interfaces. That’s why I find it interesting to see research on how services can use unified interfaces like text messaging apps to become more intelligent. Enjoy your weekend!
Why reinvent everything and ship your own application when you could use a messaging app as input and output of your API instead? For example, a schedule for the next bus could be delivered to the user via a text, WhatsApp or Telegram message.
Things often come full circle in software engineering. The web in particular started with servers delivering content down to the client. Recently, with the creation of modern web frameworks such as AngularJS and Ember, we’ve seen a push to render on the client and only use a server for an API. We’re now seeing a possible return or, rather, more of a combination of both architectures happening.
“A JavaScript library for building user interfaces.”
It is a way to create reusable front-end components. Plain and simple, that is the goal of React.
What Makes It Different?
React has quickly risen to immense popularity in the JavaScript community. There are a number of reasons for its success. One is that Facebook created it and uses it. This means that many developers at Facebook work with it, fixing bugs, suggesting features and so on.
Another reason for its quick popularity is that it’s different. It’s unlike AngularJS2, Backbone.js3, Ember4, Knockout5 and pretty much any of the other popular MV* JavaScript frameworks that have come out during the JavaScript revolution in the last few years. Most of these other frameworks operate on the idea of two-way binding to the DOM and updating it based on events. They also all require the DOM to be present; so, when you’re working with one of these frameworks and you want any of your markup to be rendered on the server, you have to use something like PhantomJS.
Virtual DOM
React is often described as the “V” in an MVC application. But it does the V quite differently than other MV* frameworks. It’s different from things like Handlebars, Underscore templates and AngularJS templates. React operates on the concept of a “virtual DOM.” It maintains this virtual DOM in memory, and any time a change is made to the DOM, React does a quick diff of the changes, batches them all into one update and hits the actual DOM all at once.
This has huge ramifications. First and foremost, performance-wise, you’re not constantly doing DOM updates, as with many of the other JavaScript frameworks. The DOM is a huge bottleneck with front-end performance. The second ramification is that React can render on the server just as easily as it can on the client.
React exposes a method called React.renderToString(). This method enables you to pass in a component, which in turn renders it and any child components it uses, and simply returns a string. You can then take that string of HTML and simply send it down to the client.
Example
These components are built with a syntax called JSX. At first, JSX looks like a weird HTML-JavaScript hybrid:
What you do with this .jsx format is pass it through (or “transpile”) webpack, grunt, gulp, or your “renderer” of choice and then spit out JavaScript that looks like this:
That’s what our HelloWorld.jsx component transpiles to — nothing more than simple JavaScript. Some would consider this a violation of the separation of concerns by mixing JavaScript with HTML. At first, this seems like exactly what we’re doing. However, after working with React for a while, you realize that the close proximity of your component’s markup to the JavaScript enables you to develop more quickly and to maintain it longer because you’re not jumping back and forth between HTML and JavaScript files. All the code for a given component lives in one place.
React.render attaches your <HelloWorld> component to the body. Naturally, that could be any element there. This causes the component’s render method to fire, and the result is added to the DOM inside the <body> tag.
With a React component, whatever you pass in as attributes — say, <HelloWorld message="world" /> — you have access to in the component’s this.props. So, in the <HelloWorld> component, this.props.message is world. Also, look a bit closer at the JSX part of the code:
return (
    <h1>Hello {this.props.message}</h1>
);
You’ll notice first that you have to wrap the HTML in parentheses. Secondly, this.props.message is wrapped in braces. The braces give you access to the component via this.
Each component also has access to its “state.” With React, each component manages its state with a few simple API methods, getState and setState, as well as getInitialState for when the component first loads. Whenever the state changes, the render method simply re-renders the component. For example:
var Search = React.createClass({
    getInitialState() {
        return {
            search: ""
        };
    },
    render() {
        return (
            <div className="search-component">
                <input type="text" onChange={this.changeSearch} />
                <span>You are searching for: {this.state.search}</span>
            </div>
        );
    },
    changeSearch(event) {
        var text = event.target.value;

        this.setState({
            search: text
        });
    }
});

React.render(<Search />, document.body);
In this example, the getInitialState function simply returns an object literal containing the initial state of the component.
The render function returns JSX for our elements — so, an input and a span, both wrapped in a div. Keep in mind that only one element can ever be returned in JSX as a parent. In other words, you can’t return <div></div><div></div>; you can only return one element with multiple children.
Notice the onChange={this.changeSearch}. This tells the component to fire the changeSearch function when the change event fires on the input.
The changeSearch function receives the event fired from the DOM event and can grab the current text of the input. Then, we call setState and pass in the text. This causes render to fire again, and the {this.state.search} will reflect the new change.
Many other APIs in React are available to work with, but at a high level, what we did above is as easy as it gets for creating a simple React component.
Isomorphic JavaScript
With React, we can build “isomorphic” apps.
i·so·mor·phic: “corresponding or similar in form and relations”
This has already become a buzzword in 2015. Basically, it just means that we get to use the same code on the client and on the server.
This approach has many benefits.
Eliminate the FOUC
With AngularJS, Ember (for now) and SPA-type architecture, when a user first hits the page, all of the assets have to download. With SPA applications, this can take a second, and most users these days expect a loading time of less than two seconds. While content is loading, the page is unrendered. This is called the “flash of unstyled content” (FOUC). One benefit of an isomorphic approach to building applications is that you get the speed benefits of rendering on the server, and you can still render components after the page loads on the client.
The job of an isomorphic app is not to replace the traditional server API, but merely to help eliminate FOUC and to give users the better, faster experience that they are growing accustomed to.
Shared Code
One big benefit is being able to use the same code on the client and on the server. Simply create your components, and they will work in both places. In most systems, such as Rails6, ASP.NET MVC7, you will typically have erb or cshtml views for rendering on the server. You then have to have client-side templates, such as Handlebars or Hogan.js, which often duplicate logic. With React, the same components work in both places.
Progressive Enhancement
Server rendering allows you to send down the barebones HTML that a client needs to display a website. You can then enhance the experience or render more components in the client.
Delivering a nice experience to a user on a flip phone in Africa, as well as an enhanced experience to a user on a 15-inch MacBook Pro with Retina Display, hooked up to the new 4K monitor, is normally a rather tedious task.
React goes above and beyond just sharing components. When you render React components on the server and ship the HTML down to the client, React on the client side notices that the HTML already exists. It simply attaches event handlers to the existing elements, and you’re ready to go.
This means that you can ship down only the HTML needed to render the page; then, any additional things can be pulled in and rendered on the client as needed. You get the benefit of fast page loading by server rendering, and you can reuse the components.
Creating An Isomorphic Express App
Express138 is one of the most popular Node.js web servers. Getting up and running with rendering React with Express is very easy.
Adding React rendering to an Express app takes just a few steps. First, add node-jsx and react to your project with this:
All this does is allow us to actually use require to grab .jsx files. Otherwise, Node.js wouldn’t know how to parse them. The harmony option allows for ECMAScript 6-style components.
Next, require in your component and pass it to React.createFactory, which will return a function that you can call to invoke the component:
That’s it for the server code. Let’s look at what’s necessary on the client side.
Webpack
Webpack9 is a JavaScript bundler. It bundles all of your static assets, including JavaScript, images, CSS and more, into a single file. It also enables you to process the files through different types of loaders. You could write your JavaScript with CommonJS or AMD modules syntax.
For React .jsx files, you’ll just need to configure your webpack.config file a bit in order to compile all of your jsx components.
Getting started with Webpack is easy:
npm install webpack -g # Install webpack globally
npm install jsx-loader --save # Install the jsx loader for webpack
context
This is the root of your JavaScript files.
entry
This is the main file that will load your other files using CommonJS’ require syntax by default.
output
This tells Webpack to output the code in a bundle, with a path of public/javascripts/bundle.js.
The module object is where you set up “loaders.” A loader simply enables you to test for a file extension and then pass that file through a loader. Many loaders exist for things like CSS, Sass, HTML, CoffeeScript and JSX. Here, we just have the one, jsx-loader?harmony. You can append options as a “query string” to the loader’s name. Here, ?harmony enables us to use ECMAScript 6 syntax in our modules. The test tells Webpack to pass any file with .jsx at the end to jsx-loader.
In resolve we see a few other options. First, extensions tells Webpack to omit the extensions of certain file types when we require files. This allows us just to do require("./file"), rather than require("./file.js"). We’re also going to set a root, which is simply the root of where our files will be required from. Finally, we’ll allow Webpack to pull modules from the node_modules directory with the modulesDirectories option. This enables us to install something like Handlebars with npm install handlebars and simply require("handlebars"), as you would in a Node.js app.
Client-Side Code
In public/javascripts/app.js, we’ll require in the same App component that we required in Express:
We’re going to check that we’re in the browser with the typeof window !== "undefined". Then, we’ll attach to the onload event of the window, and we’ll call React.render and pass in our App(). The second argument we need here is a DOM element to mount to. This needs to be the same element in which we rendered the React markup on the server — in this case, the #content element.
The Search component in the example above was rendered on the server and shipped down to the client. The client-side React sees the rendered markup and attaches only the event handlers! This means we’ll get to see an initial page while the JavaScript loads.
Web architecture definitely goes through cycles. We started out rendering everything on the server and shipping it down to the client. Then, JavaScript came along, and we started using it for simple page interactions. At some point, JavaScript grew up and we realized it could be used to build large applications that render all on the client and that use the server to retrieve data through an API.
In 2015, we’re starting to realize that we have these powerful servers, with tons of memory and CPU, and that they do a darn good job of rendering stuff for us. This isomorphic approach to building applications might just give us the best of both worlds: using JavaScript in both places, and delivering to the user a good experience by sending down something they can see quickly and then building on that with client-side JavaScript.
React is one of the first of what are sure to be many frameworks that enable this type of behavior. Ember’s developers are already working on isomorphic-style applications as well. Seeing how this all works out is definitely going to be fun!
React To The Future With Isomorphic Apps http://www.smashingmagazine.com/2015/04/21/react-to-the-future-with-isomorphic-apps/ http://www.smashingmagazine.com/feed/?# Smashing Magazine For Professional Web Designers and Developers
The WordPress metadata API is a simple way to store and retrieve information related to various objects in WordPress, such as posts, users, comments, and taxonomy terms. Out of the box, WordPress includes post meta, user meta, comment meta, and term meta, but what if you want metadata on other objects, such as custom objects provided by a plugin? Thankfully, the metadata API is actually quite simple to extend, allowing developers to easily register their own kind of metadata that is attached to their own, custom objects.
Before diving into how we can extend the metadata API, let’s have a quick refresher on the existing metadata functions available in WordPress.
For each object type, there are four primary functions used by developers:
get
add
update
delete
Posts
For post objects, we have the following metadata functions:
get_post_meta()
add_post_meta()
update_post_meta()
delete_post_meta()
Comments
For comment objects, we have the following metadata functions:
get_comment_meta()
add_comment_meta()
update_comment_meta()
delete_comment_meta()
Users
For user objects, we have the following metadata functions:
get_user_meta()
add_user_meta()
update_user_meta()
delete_user_meta()
Terms
For term objects, we have the following metadata functions:
get_term_meta()
add_term_meta()
update_term_meta()
delete_term_meta()
All of these functions work exactly the same way. For example, to get metadata, it would look like this:
We have refreshed our memory on what the standard metadata API functions look like, so now let’s see how we can extend these to interact with our own metadata.
The first thing you need to do is have an object type that metadata will be registered for. This could really be anything but let me provide you with a few examples.
In AffiliateWP we use a custom table for affiliate accounts. An affiliate is similar to a user account and we often want to store metadata for affiliates, much like is often done for user accounts. We extended the metadata API to provide support for affiliate meta.
In Easy Digital Downloads we use a custom table to keep track of customer records. We recently added a new customer meta API that extends the one in WordPress. This allows us to store metadata for customer records.
In Restrict Content Pro we use a custom table for subscription levels and payment records. Both of these needed to support custom metadata, so we added metadata tables that extend the WordPress API.
Other examples of object types that may need metadata could include invoices, sale receipts, photos, and so many more. Basically, if you register a custom table and do not rely on the core WordPress tables, it may behoove you to add a metadata layer as well.
There are several components involved with registering your own metadata layer:
You need to create a custom table in which to store the metadata
You need to make WordPress aware of the meta table
You can optionally define wrapper functions or class methods for the core metadata functions that make it easier to interact with your metadata layer
Let’s look at each piece.
Creating the metadata table
The metadata has to be stored somewhere. In the vast majority of cases, the best option will likely be to register a custom table that closely mimics the default metadata tables for posts, users, comments, and terms.
If you’re unfamiliar with creating custom database tables, I’d recommend you read through my series on building a database abstraction layer, especially part 3, which covers creating the tables.
The MySQL syntax that WordPress core uses to create the postmeta table looks like this:
We create this table when AffiliateWP is first installed, along with our other custom tables.
The structure is simple and mimics core’s metadata structure:
meta_id – This is an auto incrementing row that holds the ID of the row
affiliate_id – This is an integer that is set to the ID of the affiliate the metadata belongs to
meta_key – This is a string identifier for the value stored
meta_value – This is the actual value of the metadata stored
Registering the metadata table with WordPress
Once the table has been created, we need to make WordPress aware of it. This is what will permit us to utilize the core metadata API functions, such as update_metadata(), to interact with our data.
I would recommend registering the table on the plugins_loaded hook but it could likely be done during other actions as well.
function pw_register_metadata_table() {
	global $wpdb;
	$wpdb->affiliatemeta = $wpdb->prefix . 'affiliate_wp_affiliate_meta';
}
add_action( 'plugins_loaded', 'pw_register_metadata_table' );
That’s really all there is to it. You can see how we actually do it in AffiliateWP here.
There is one important notes about registering the table. The value passed to $wpdb most follow an exact naming scheme as it defines the value that needs to be passed to the $object_type parameter of the metadata functions.
The type value is determined by everything before “meta”, so in our example above we used “affiliatemeta”, which makes the value we need to pass to the object type “affiliate”.
If you register the table as $wpdb->customermeta, you would pass “customer” as the object type.
Interacting with the metadata
Now that we have created the table and registered it with WordPress, we can use the metadata API functions in WordPress to read, write, and delete to our metadata table.
Add metadata:
$added = add_metadata( 'affiliate', $affiliate_id, 'some_key', 'The value' );
Update metadata:
$updated = update_metadata( 'affiliate', $affiliate_id, 'some_key', 'The value' );
If desired, this could be formalized a bit more for your specific use case by defining wrapper functions to the core functions. For example, in AffiliateWP, we register methods in our database class like this:
/**
 * Retrieve affiliate meta field for a affiliate.
 *
 * @param   int    $affiliate_id  Affiliate ID.
 * @param   string $meta_key      The meta key to retrieve.
 * @param   bool   $single        Whether to return a single value.
 * @return  mixed                 Will be an array if $single is false. Will be value of meta data field if $single is true.
 *
 * @access  public
 * @since   1.6
 */
function get_meta( $affiliate_id = 0, $meta_key = '', $single = false ) {
	return get_metadata( 'affiliate', $affiliate_id, $meta_key, $single );
}
We also define global functions to make the class methods more accessible:
/**
 * Retrieve affiliate meta field for a affiliate.
 *
 * @param   int    $affiliate_id  Affiliate ID.
 * @param   string $meta_key      The meta key to retrieve.
 * @param   bool   $single        Whether to return a single value.
 * @return  mixed                 Will be an array if $single is false. Will be value of meta data field if $single is true.
 *
 * @access  public
 * @since   1.6
 */
function affwp_get_affiliate_meta( $affiliate_id = 0, $meta_key = '', $single = false ) {
	return affiliate_wp()->affiliate_meta->get_meta( $affiliate_id, $meta_key, $single );
}
The metadata API in WordPress is really quite nice and does a lot of the heavy lifting for us. There’s no need to write any MySQL for CRUD actions since it’s all handled for us in the metadata API.
Step back in time two, three, four, or even 10 years and take a look at the development decisions you made then. What do you notice about them? Unless you are a one-in-a-million statistic, you probably look at those past decisions and say to yourself what was I thinking?! Why did I do it that way?! Welcome to the real world of actual development.
As developers, we grow and learn over time; we get better at making design pattern decisions; we get better at writing performant code; we get better at all aspects of development.
Take a look at any project that has been around for a number of years and you will find gremlins hiding in its shadows and crevices. There will be internal APIs that are convoluted; there will be data structures that make zero logical sense; there will be function names that seem asinine; there will be blatant problems and it will appear that these are the results of poorly made development decisions. While this is sometimes true, it is far more likely that these gremlins are actually the result of inexperience that leads to a lack of foresight and understanding of the future consequences of non-well-thought-out designs.
Smooth resolutions of bad design patterns
Imagine a project that begins as a small, internal system for doing one thing and only one thing, and imagine it as a project you build specifically for yourself. Due to the nature of it being a small, personal project, it is likely that you will take short cuts; it is likely you will make some decisions simply because Y provided a quicker solution than X; it is likely that you will name variables or API methods poorly; and it is guaranteed that you will make some decisions that have a severely negative impact on your small, personal project four years later when that project has grown far beyond a simple, personal project.
This is the reality of the real development world and the truth for all projects that grow over time. Poor data schemas and difficult APIs are the skeletons in our closets, the spider webs behind our furniture, and the ghosts in our machines. They exist in every project and are a natural product of development growth.
The real achievement is not in building a project with zero gremlins, it is learning how to get past those weaknesses and poor decisions in a smooth way that has little to no negative impact on the users of the project.
Let’s go back to the imaginary project above for a moment. Assume that when first building that project you made the decision to store large amounts of data in a poorly designed database schema, or perhaps even a database with zero design schema that applies to your project. At the time this database schema worked fine because it was easy and, after all, it was only you using the project, so who really cares? Now fast-forward four years and imagine that your project is now used by over 50,000 websites and tens of thousands of users and hundreds or even thousands of developers. Each of these users makes use of the project in a slightly different way and each of the developers builds new tools on top of the project. At this point those poor design decisions (or perhaps even the complete lack of a “design” decision) begin to have negative effects on the project by reeling their ugly heads and presenting your users with severe limitations and scaling issues.
Bad data schema designs can result in severe performance issues. Poor API design can make it difficult for other developers to use or extend the project. Poorly thought out relationships within your code and your database can become the elephant in the room that no one wants to talk about but are abundantly clear and really start to get in the way.
The question that all developers need to ask at some point is this: how do we get past the design decisions of the past so we can continue to grow and excel in the future?
Four years ago, when Easy Digital Downloads was brand new, I made some poor design decisions related to the database structure used in the plugin. Relationships between various pieces of information stored by the plugin were created haphazardly and we chose to rely on the data structures provided by WordPress core. This means that all of our eCommerce data (payment records, order items, order meta data, customers, etc) were stored in the wp_posts and wp_postmeta table. At the time this worked fine. It was easy, quick, and more than flexible enough for what we needed. What I failed to see, however, was just how cumbersome storing eCommerce data in the core posts table was going to be once the plugin scaled up to a lot of users and large websites processing significant sales volumes.
The decision to use wp_posts and wp_postmeta for our eCommerce data is a decision I regret and one that has created significant challenges for us, but none of the challenges are so significant that we cannot get past them.
When faced with the reality of bad data schemas, there are really two ways to address the problem:
Simply live it with and do what you can to mitigate the problems
Work out a plan for resolving the problem completely by re-building the data schema from the ground up
The first option is the easier of the two for many reasons. First, it requires the least amount of change. Second, it avoids the significant risk of severely breaking backwards compatibility. Third, it does not require any cooperation with third party developers that have built on top of your bad data schema.
Option two, however, can be much better for the health of the project in the long run. It does, however, present a serious risk to the project’s health and continued adoption by users and developers. When making significant changes, backwards compatibility must be kept an absolute priority. If backwards compatibility is ignored or implemented poorly, it’s very possible that the migration process to the new and improved schema will go poorly, resulting in developers and users abandoning future reliance on the project. It can also cause a support nightmare if hundreds or thousands of websites are suddenly breaking due to the changes implemented.
Building a backwards compatibility layer can be challenging, but it is a challenge that will be worth it in the end. Frankly, I would go as far as to say you should not even consider resolving a bad database schema if you do not plan to also introduce and maintain a complete backwards compatibility layer. Choosing to ignore backwards compatibility in a scenario like this is negligent and harmful to your users. With that in mind, how does one go about building a backwards compatibility layer? There are really a few parts of it.
Abstraction layers for backwards compatibility
The very first step in providing backwards compatibility is to ensure there is an abstraction layer for your database. An abstraction layer is simply an API for interacting with the database. It provides developers standardized methods for reading and writing to the database without writing actual queries. For example, WP_Query is an abstraction layer for the wp_posts table that provides methods for querying data from the posts database without writing any actual SQL. Why is this valuable? There are numerous reasons but for this particular discussion, it provides project maintainers the ability to change the database schema without disrupting external projects that utilize the data.
In Easy Digital Downloads, we have built abstraction layers for payments, customers, and products. These abstraction layers are fundamentally important when it comes time to change the underlying database structure.
Let’s look at a quick example.
Assume we wish to retrieve the first and last name of a customer record. In the current version of Easy Digital Downloads, both the first and last name are stored in a single column in the database, but perhaps in a future version we decide to separate them into two columns. Through the EDD_Customer object, getting the name of the customer is simple:
$customer = new EDD_Customer( 47 );
echo $customer->name;
That will output the customer’s full name, such as Elizabeth Johnston.
Where’s the value in this abstraction layer? well, it becomes very apparent (at a simple level) when we consider the following possibility.
Assume now that the EDD_Customer object was not originally available so a third party developer decides to directly query the database for the customer’s name:
echo $wpdb->get_var( "SELECT name FROM edd_customers where id = 47 LIMIT 1;" );
Since storing both the first and last name in a single column was probably a poor decision, we later on decide to separate the names into two columns, first_name and last_name. In this scenario, the first example, which relies on the abstraction layer of EDD_Customer, will continue to function exactly as is. The second example, however, will suddenly fail because the name column no longer exists.
This is a simple example but it does accurately illustrate the importance of having abstraction layers. Consider now how important it will be when you’re preparing to change not only a single column in the database but the entire database. Every single column. Without a proper abstraction layer, making that transition will be nearly impossible.
If an abstraction layer isn’t already present, build one immediately. That’s the very first step anytime a database schema needs to be changed.
After you have an abstraction layer in place, you need to work hard to ensure that everyone uses it. If a platform has been around for a while, it will be necessary to push and shove work hard to encourage developers to update their code to use the abstraction layer. This is something we’ve begun to do for the recent introduction of EDD_Payment.
With the creation and adoption of a good abstraction layer, the process of migrating to a good database schema becomes a lot simpler, though it is still a very, very significant task that has a lot of challenges. For example: how does a project maintainer account for all of those developers that ignored or simply didn’t see the news about the abstraction layer? Or how about all of the project’s users that did not update to the latest versions? For those, the best one can do is provide as much backwards compatibility as possible.
For Easy Digital Downloads, building a backwards compatibility layer will involve a number of factors. First, we will have to intercept and re-route every single call to get_post_meta() that is made against all EDD payment metadata. Thankfully, the WordPress metadata API includes number filters and action hooks that make this possible. Second, we will have to intercept and re-route every query to the wp_posts table that contains the edd_payment post type. Again, the prevalence of filters in the WordPress core codebase will provide ample ways for us to do this. Third, we will also have to intercept and re-route every write and deletion to the wp_posts and wp_postmeta tables for all EDD-related queries.
Slow and careful
This kind of migration process takes a long time and needs to be executed with extreme care. We will likely spend 6-12 months building this backwards compatibility layer. The most significant challenge for it will not be writing or handling the re-routing of queries; the real challenge will be finding and knowing all of the data points that we need to include. For example, we know very well what all of the meta_key values are that we use in Easy Digital Downloads and all of the officially maintained extensions. What we don’t know, however, is the meta_keys that third party developers have used in their own extension. There are some assumptions we can make, such as assuming that any meta_key containing “edd_” belongs an EDD plugin, but we’ll never be able to cover 100% of the data out there.
In the end, there should be several goals in defeating the monster that is a bad database schema:
Introduce a new and well thought-out schema that resolves all problems the original schema created
Introduce and maintain complete abstraction layers for the database schemas so that future changes are less difficult
Make the transition from old to new schemas as smooth and invisible as possible
Protect the user base that does not have the luxury of updating or is simply unaware of updates by providing complete backwards compatibility
There is no reason poor database schemas cannot be improved, they just have to be done so slowly and with great care.
Note: would you like to learn how to build a database abstraction layer or read more about the reasons for why you should use custom tables in WordPress? I have a complete tutorial series on the subject.