Including version 4.6 it was quite difficult to add custom bulk actions to the WordPress admin pages. In version 4.7 a hook is added that simplifies the task a lot:
You can define more than one bulk action in this function because it merely adds an additional element to the array $bulk_actions. You simply have to take care that you use different names for the element keys and, logically, for the display texts.
The screen ids
The screen id of an admin page can be displayed this code snippet:
As mentioned above you can define more than one custom bulk action but only a single callback function. So you first have to test which bulk action has been selected (lines 4 and 13).
Next the posts are processed in a foreach loop (lines 5 and 14). In this loop you can load the post with get_post or the post meta with get_post_meta() and process the data. Next the changed data is written back to the database with wp_update_post() or update_post_meta().
The variable $redirect_to (lines 9 and 18) is used to define the URL the browser will change to after the bulk actions have been completed, in our case it is set to .../wp-admin/edit.php?paged=1. We do not want to change the location but to use the variable to pass a value to the page the browser is redirected to.
With the function add_query_arg() we add an argument to the URL that specifies the number of processed posts: /wp-admin/edit.php?paged=1&bulk_posts_processed=1.
Display a success notification
After completing processing all posts you can display an admin notice using the action admin_notices(). The second parameter of the function call needs to contain the text string we have defined in our filter bulk_actions-{screen-id}:
WordPress database tables all begin with the wp_ prefix by default. Security gurus often recommend changing the prefix to secure your site, but is it really worth doing? Or is it just all sizzle and no steak?
The idea is that changing the database prefix helps avoid nasty SQL injections since hackers usually use queries with the standard settings in their attack, but if the database details are unique the hacker would get an error.
While updating the fix is by no means the best or only solution for protecting your site, it’s one step you can take to make your WordPress install that little bit more secure.
So in this post, I’m going to run you through why and how changing your WordPress database prefix can add to your site’s security.
What’s Prefix Got to Do with It?
To understand why changing your database’s tables prefix could help as a part of your site’s preventive measures against attacks, it’s important to explore both sides of the argument.
Knowing the reasoning behind the amendment should give you a better idea of what it takes to keep your site secure.
That’s all well and good, but why is it a popular practice to change the table prefix in the first place?
SQL Injections and the Common Recommendation
When you’re checking out the pros and cons, it’s important to note that the main reason why it’s widely recommended to rename your table prefix is to prevent a hacker from overtaking your site with a successful SQL injection.
In short, when your site is vulnerable to an SQL injection, it means that a hacker can execute an SQL query from an unsanitized form on your site without your permission or knowledge.
If a hacker can successfully run an unauthorized SQL query on your site, it means that there’s an open connection to the target database.
When this happens, a hacker can change whatever they want and gain full access and control over your site. Meaning they can change and do whatever they want with your site since the database is fully exposed to them.
They wouldn’t necessarily have access to your files, but they would have full reign over your database.
They could gain full access and control to your site and the first task is usually changing the admin login credentials.
This locks you out and lets them continue going about their way, making a wide range of changes from making your site turn into spam central and stealing personal information to infecting thousands of other sites where they can spam it up and steal all the more.
It’s certainly something you want to protect your site from and you can get more details on SQL injections and their prevention by checking out The Ultimate Guide to WordPress Spam.
Cons
The main reason against renaming anything in the database is that if a hacker can execute an SQL injection on your site, there’s already an open connection to your database.
This means that if their first SQL query fails, it’s easy enough for the hacker to run a query searching for the second half of the table names that are almost always identical to the default.
The second query could search for names including usermeta and postmeta.
The search would turn up the full table name and voilà! Your hacker reads your new prefix. From there, they could continue doing what they wanted.
This is also assuming they didn’t have access to your files as well. If they did, they could easily find your new prefix there as well.
At the end of the day, if your site and database aren’t vulnerable with an open connection, then it doesn’t matter what your table prefix happens to be and if there is an open connection, a hacker could easily figure out what you named your prefix making it useless.
Pretty cut and dry, right? Well, not exactly.
There are a couple of factors and one major one that’s left out of the picture here.
Changing your database prefix is just one small measure you can put in place to help prevent attacks on your WordPress site.
Pros
While it may seem like a pointless endeavor after considering the cons, it’s not like there’s no precedent for thinking renaming the prefix works.
Vulnerabilities have been consistently squashed since WordPress’s inception, but they started out being available on numerous sites for hackers to exploit.
That’s why adding a little precaution can be a valuable asset to your many security measures.
There’s also a reason why renaming your table prefix has been lumped into the “security essentials” label for over ten years.
Hackers rarely find out about a site’s vulnerability by visiting them through a known browser like the rest of us do every day.
Instead, they commonly use a program they create that’s commonly referred to as a bot. They start up the bot and it systematically goes to hundreds if not thousands of sites in a matter of minutes to automatically search for vulnerabilities.
Once a vulnerability is found such as the one that allows for an SQL injection, the bot then submits queries to hack all the vulnerable sites at the same time. Out of the sites that are successfully hacked, the bot continues from there.
But on the other hand, if some site admins have changed their table prefix, then the bot wouldn’t be able to successfully execute their first query since it only accounted for the default settings and would move onto sites where the query worked.
If your site were one of the ones where the prefix was changed, then your site would essentially be “safe” for the time being.
Keep in mind that in this situation, your site would still have a major vulnerability so if it’s not patched up immediately, it’s potentially only a matter of time until a hacker gets their squirmy fingers in there – so to speak.
This is why changing your database table prefix isn’t your be-it-end-all security solution. Far from it, actually.
While it can help the fight against hackers, it’s crucial to have a security plugin installed like our free Defender to truly secure your site.
While changing your database table prefix isn’t the be-all-end-all of security measures, it’s still worth the effort of applying it to your site, among your other security essentials. Read on to find out how to make the change to your site.
Like I’m Gonna Lose You
Since you’re going to be changing your database in a fundamental way that could completely break your site, it’s important to make a backup of your entire site as if you were going to lose everything.
That way, if you do, you can easily restore your site so you don’t end up losing everything for good.
For details on how to create a full backup of your site, check out some of these articles:
Once you have created a backup of your site, you can start changing your table prefix.
The Files, They Are A-Changing
To rename your table prefix, first, start with your wp-config.php file. You can either download a copy to edit it, then re-upload it to your site via FTP or the command line and SSH or you edit it directly in cPanel.
After logging into cPanel, go to Files > File Manager and locate your site’s files. Click on the wp-config.php file from the list, then click Edit at the top of the page.
Change wp to whatever you want, but it’s recommended that you keep the underscore after it is intact. Your new prefix can contain letters, numbers, and even underscores.
For example, you could choose something like wp2748, il0ved0gs, sg7bn40dg or ug44_db87, but don’t use these exact examples since they’re public and everyone can see them including hackers.
Once you’re happy with your changes, save the file. If you used FTP or SSH, upload the file back to your site and replace the old version.
You’re not done yet and you may even notice your site is completely broken now. That’s normal since your database’s data doesn’t match your changes.
To fix this and finish renaming your prefix completely, go ahead and move on to updating your database.
Rolling in the Database
To start making the change to your prefixes in your database, log in to phpMyAdmin so you can run some queries.
Don’t forget to replace tablename with the actual name of the table as well as change newprefix to the new prefix you saved to your wp-config.php file.
For single installs of WordPress, you can enter these queries, but don’t forget to change newprefix to the real prefix you created:
Beyond these queries, you also need to add any custom tables that plugins on your site have created as well as all the tables that are created for each subsite in your network.
Here’s a list of the site tables you should also include in your queries list:
wp_#_commentmeta
wp_#_comments
wp_#_links
wp_#_options
wp_#_postmeta
wp_#_posts
wp_#_terms
wp_#_term_relationships
wp_#_term_taxonomy
Be sure to replace # with the site ID of your subsites. For example, you would include wp_2_commentmeta in your query for your subsite with the site ID of two.
The search should retrieve a list of all the tables that need to be updated. You can click the edit buttons for each one to make the change.
Update Usermeta Table Entries
Similar to the options table, the user meta table also needs many of its entries updated. Instead of looking for them one-by-one, you can search for them as well.
Here’s the query you can use to search for entries that include the default prefix:
Be sure to rename newprefix to the real prefix you wrote into your wp-config.php file.
Finally, edit all the entries that appear in the search results to reflect your new prefix.
Won’t Get Fooled Again
You’re pretty well done updating your database table prefix to something completely custom, but the final step is to create one more full backup.
Once that’s done, you can go to your site and bask in its glory. While nothing has changed on the front end, you made a step toward a more secure site.
Although it’s not the only security measure you should take, it’s an added measure that can help protect you against hack bots that systematically try and infiltrate sites and their databases en masse.
If you visit a site and you get a “permissions” or “database connection not established” error, you forgot to rename one of the tables or entry prefixes.
It’s important to go back into phpMyAdmin and search for the tables or entries you forgot to change.
Some plugins rely on the default database prefix so if you’re sure you haven’t missed updating and tables or entries, you can disable all your plugins and re-enable them one-by-one until your site breaks.
The last plugin you activated is the culprit and you should consider deleting it and finding an alternative.
And Data Do It
Now that you know how to change your WordPress database prefix and your security should be beefed up and bots and hackers will be heading elsewhere.
Keep in mind that at any point, if you get stuck trying anything in this post or anything, ever for that matter, you can ask our expert support team for 24/7 help. If you’re already a WPMU DEV member, you’re all set to ask your question. If you’re not a member yet, you can take one of our premium memberships for a free trial and ask away.
Also, to really boost up your WordPress security, be sure to check out our free Defender plugin. Defender blocks hackers at every level with two-factor authentication, login masking, login lockout, 404 detections, and more!
You can read all about his malware scanning, login security, firewall, and getting the most out of him here.
Gravity Forms is a tremendously powerful plugin for WordPress and Help Scout is an awesome customer support system that also provides a service for handling documentation. What they miss, however, is a direct connection that allows site owners to provide customers with a way to search the Help Scout documentation before they can submit a support ticket submission form.
An ideal support ticket submission process goes like this:
Customer enters keywords related to their issue
Relevant search results are shown to provide customer with “self-help”
If the answer is not found in the documentation, customer can proceed with opening a support ticket
As far as I know, there are very few (if any) documentation / support solutions that provide this flow out of the box. There are numerous ways to build it but they are often complex and time consuming. Most product owners and service providers simply allow customers to fill out a contact form to ask for help without providing them with a good way to try and help themselves.
To help provide a better support experience for our products, and to make it easier for customers to help themselves, my team and I decided to build a custom integration between Gravity Forms and Help Scout that would allow customers to enter a search query, see results, and then, only if no relevant results were found, be permitted to open a support ticket. You can see this in action on the Easy Digital Downloads support page and also on AffiliateWP’s support page.
Let’s take a look at how we can set up a similar ticket submission form to the one we use for Easy Digital Downloads.
Requirements
Setting this up requires the following:
A paid Help Scout account with the Documentation application add-on.
There are numerous ways the form could be configured so feel free to deviate from the steps below. I’m just providing a sample configuration that can work well.
First, install all of the required plugins and setup the Help Scout documentation sub-domain setting and shown in the installation instructions for Gravity Forms and the Help Scout Search Field plugin.
Next, create a new form and add a text field to it that has a class of helpscout-docs:
The class name is required in order for the field to be made into a search field.
At this point you can preview your form and the search field will be functional.
Now, if you wish, you can continue to add additional fields and set up conditional logic for those fields so that they only display after a search has been performed. I would recommend breaking the form up into two pages with the search field on the first page and the other form elements on the second page, that way you only need to add conditional logic to the page break instead of each and every form input field after the search input.
My form looks like this:
The conditional logic for the page break:
On the second page of the form, I have added the following input fields:
name
email
website
message
Depending on your own needs, you could add additional fields as well.
This gives us a fully functional submission form that includes documentation search.
That’s all there is to it! Now customers can search your documentation before opening a support ticket. This could potentially cut down your support ticket stats dramatically while also making customers happier since it is now easier for them to help themselves.
Huge thanks are owed to Zack Katz for his contributions to the plugin. My team and I wrote the initial version that worked for us then Zack came in and made it 10x more awesome, allowing us to release it as a plugin that anyone can use.
If you could like to contribute to the plugin or report an issue of any kind, you can find it on GitHub.
The WordPress metadata API is a simple way to store and retrieve information related to various objects in WordPress, such as posts, users, comments, and taxonomy terms. Out of the box, WordPress includes post meta, user meta, comment meta, and term meta, but what if you want metadata on other objects, such as custom objects provided by a plugin? Thankfully, the metadata API is actually quite simple to extend, allowing developers to easily register their own kind of metadata that is attached to their own, custom objects.
Before diving into how we can extend the metadata API, let’s have a quick refresher on the existing metadata functions available in WordPress.
For each object type, there are four primary functions used by developers:
get
add
update
delete
Posts
For post objects, we have the following metadata functions:
get_post_meta()
add_post_meta()
update_post_meta()
delete_post_meta()
Comments
For comment objects, we have the following metadata functions:
get_comment_meta()
add_comment_meta()
update_comment_meta()
delete_comment_meta()
Users
For user objects, we have the following metadata functions:
get_user_meta()
add_user_meta()
update_user_meta()
delete_user_meta()
Terms
For term objects, we have the following metadata functions:
get_term_meta()
add_term_meta()
update_term_meta()
delete_term_meta()
All of these functions work exactly the same way. For example, to get metadata, it would look like this:
We have refreshed our memory on what the standard metadata API functions look like, so now let’s see how we can extend these to interact with our own metadata.
The first thing you need to do is have an object type that metadata will be registered for. This could really be anything but let me provide you with a few examples.
In AffiliateWP we use a custom table for affiliate accounts. An affiliate is similar to a user account and we often want to store metadata for affiliates, much like is often done for user accounts. We extended the metadata API to provide support for affiliate meta.
In Easy Digital Downloads we use a custom table to keep track of customer records. We recently added a new customer meta API that extends the one in WordPress. This allows us to store metadata for customer records.
In Restrict Content Pro we use a custom table for subscription levels and payment records. Both of these needed to support custom metadata, so we added metadata tables that extend the WordPress API.
Other examples of object types that may need metadata could include invoices, sale receipts, photos, and so many more. Basically, if you register a custom table and do not rely on the core WordPress tables, it may behoove you to add a metadata layer as well.
There are several components involved with registering your own metadata layer:
You need to create a custom table in which to store the metadata
You need to make WordPress aware of the meta table
You can optionally define wrapper functions or class methods for the core metadata functions that make it easier to interact with your metadata layer
Let’s look at each piece.
Creating the metadata table
The metadata has to be stored somewhere. In the vast majority of cases, the best option will likely be to register a custom table that closely mimics the default metadata tables for posts, users, comments, and terms.
If you’re unfamiliar with creating custom database tables, I’d recommend you read through my series on building a database abstraction layer, especially part 3, which covers creating the tables.
The MySQL syntax that WordPress core uses to create the postmeta table looks like this:
We create this table when AffiliateWP is first installed, along with our other custom tables.
The structure is simple and mimics core’s metadata structure:
meta_id – This is an auto incrementing row that holds the ID of the row
affiliate_id – This is an integer that is set to the ID of the affiliate the metadata belongs to
meta_key – This is a string identifier for the value stored
meta_value – This is the actual value of the metadata stored
Registering the metadata table with WordPress
Once the table has been created, we need to make WordPress aware of it. This is what will permit us to utilize the core metadata API functions, such as update_metadata(), to interact with our data.
I would recommend registering the table on the plugins_loaded hook but it could likely be done during other actions as well.
function pw_register_metadata_table() {
	global $wpdb;
	$wpdb->affiliatemeta = $wpdb->prefix . 'affiliate_wp_affiliate_meta';
}
add_action( 'plugins_loaded', 'pw_register_metadata_table' );
That’s really all there is to it. You can see how we actually do it in AffiliateWP here.
There is one important notes about registering the table. The value passed to $wpdb most follow an exact naming scheme as it defines the value that needs to be passed to the $object_type parameter of the metadata functions.
The type value is determined by everything before “meta”, so in our example above we used “affiliatemeta”, which makes the value we need to pass to the object type “affiliate”.
If you register the table as $wpdb->customermeta, you would pass “customer” as the object type.
Interacting with the metadata
Now that we have created the table and registered it with WordPress, we can use the metadata API functions in WordPress to read, write, and delete to our metadata table.
Add metadata:
$added = add_metadata( 'affiliate', $affiliate_id, 'some_key', 'The value' );
Update metadata:
$updated = update_metadata( 'affiliate', $affiliate_id, 'some_key', 'The value' );
If desired, this could be formalized a bit more for your specific use case by defining wrapper functions to the core functions. For example, in AffiliateWP, we register methods in our database class like this:
/**
 * Retrieve affiliate meta field for a affiliate.
 *
 * @param   int    $affiliate_id  Affiliate ID.
 * @param   string $meta_key      The meta key to retrieve.
 * @param   bool   $single        Whether to return a single value.
 * @return  mixed                 Will be an array if $single is false. Will be value of meta data field if $single is true.
 *
 * @access  public
 * @since   1.6
 */
function get_meta( $affiliate_id = 0, $meta_key = '', $single = false ) {
	return get_metadata( 'affiliate', $affiliate_id, $meta_key, $single );
}
We also define global functions to make the class methods more accessible:
/**
 * Retrieve affiliate meta field for a affiliate.
 *
 * @param   int    $affiliate_id  Affiliate ID.
 * @param   string $meta_key      The meta key to retrieve.
 * @param   bool   $single        Whether to return a single value.
 * @return  mixed                 Will be an array if $single is false. Will be value of meta data field if $single is true.
 *
 * @access  public
 * @since   1.6
 */
function affwp_get_affiliate_meta( $affiliate_id = 0, $meta_key = '', $single = false ) {
	return affiliate_wp()->affiliate_meta->get_meta( $affiliate_id, $meta_key, $single );
}
The metadata API in WordPress is really quite nice and does a lot of the heavy lifting for us. There’s no need to write any MySQL for CRUD actions since it’s all handled for us in the metadata API.
As a follow up to a previous post in which we took an in-depth look at the differences between Weebly and WordPress — and in parallel to another of our previous posts, in which we had a look at 50 Notable Examples of Extremely Famous Brands Using WordPress — we figured it might also be… View Article
It’s that time of year–when all of the conferences have really started to kick off full force, including one of our favorites: PressNomics is in just a few days, from March 3-4th, 2016.
For those of you who aren’t familiar:
PressNomics is a conference that was started by Joshua Strebel, CEO of Page.ly, in an effort to create a space where the economics of WordPress could be discussed by the “who’s who” of WordPress business owners and innovators.
WDS has attended for the last few years, and our own Dre is known as “The Godfather” of PressNomics. After all, the idea for PressNomics was inspired by some good old-fashioned Skype brainstorming over whiskey and “Josh-tinis” (ingredients: top-secret) about what Joshua and Dre would like to see develop in the WordPress community. While Dre was focused on WordCamp San Diego, Joshua stepped forward to make their vision a reality, and PressNomics was born.
Will we see you there? If so, make sure to let us know! Brian, John, and Scott from AppPresser will be there to hang out with the WordPress minded folk to skill-share, network, and examine the industry that has been born of our favorite platform’s flexibility. If you can’t go (boooooo!), live vicariously through the event over @PressNomics or by keeping tabs on the hashtag #PressNomics. See you there!
We have yet another new member that recently joined our team–please join us in welcoming Kellen Mace, our newest developer!
A little bit about Kellen:
Kellen is a lifelong learner with a fondness for interesting projects that push his creative and technical limits. He loves building and launching software that clients find both powerful and easy to manage.
Kellen started his career in the healthcare industry, but discovered a passion for tech, especially the creativity and problem solving inherent in web development. Eager to learn as much as he could on the subject, he completed coursework through a number of online educational services including Harvard University’s edx.org, Coursera, Lynda.com, Codecademy, and Code School. He ran a business for the next several years building WordPress-powered websites and custom themes and plugins, providing solutions to clients, and learning a great deal in the process.
Kellen has also released a theme and several plugins that are available on WordPress.org, and is a WordCamp conference speaker.
In his spare time, Kellen can be found going on adventures with his wife Meghan and their ridiculously cute two year old Desmond, reading, exercising, enjoying the outdoors, and rocking out on guitars, drums, keyboards, and digital audio workstations.
You can follow him over @kellenmace and find more of his social links here. Say hello! Oh, and guess what? We’re still looking for more back-end developers…come join us and build rad stuff!
Recent WordPress trends have seen page builder plugins rise to prominence, giving users the unrestricted ability to play web designer. However, the CSS Hero plugin combats this trend, shifting focus back to an old favorite: the WordPress theme. One of the biggest problems with WordPress themes in the past was, despite looking like they offered… View Article
BuddyPress 2.5 adds a few new tools and as always some under the hood improvements that you should get jazzed about! Here are some of the updates we can come to expect from this next BuddyPress update:
BP Email
Contributor Paul Gibbs has added a UI method for creating custom emails. This is a really neat feature. BuddyPress sends emails when users perform specific actions on the site. The emails are a way to keep users engaged with the site and to follow conversations. There is a new API to send messages.
In the admin, you add a new email message very much like adding a page or post. You can include tokens in the content to be replaced at send time. The token variables are for dynamically replaced text. If you are a plugin developer or want to add custom emails, it’s pretty easy. Everything is post, taxonomy and terms. The post is the message with the post type being bp-email. The taxonomy is bp-email-type. The terms are what you will use to pass to bp_send_email() during some action hook.
Custom Emails
BuddyPress only includes emails for BuddyPress core functionality. Blog posting is not part of BuddyPress, but it could be an integral part of your community. Let’s look at an example to send an email to a blog post author when a user comments on their post:
Since the emails are post types and taxonomy terms. We will need to insert a post for the post type and then assign it a custom taxonomy term. There is no special BuddyPress code here; it’s straight up WordPress wp_insert_post(), wp_set_post_terms() and wp_update_term(). Note: You must hook this to the action bp_core_install_emails. This hook ensures your emails can be flushed out if they need a reset.
function bp_custom_email_message() {

    // Create post object
    $my_post = array(
      'post_title'    => __( '[{{{site.name}}}] New post comment.', 'buddypress' ),
      'post_content'  => __( '{{commenter.name}} commented on your blog post.', 'buddypress' ),
      'post_status'   => 'publish',
      'post_type' => bp_get_email_post_type() // this is the post type for emails
    );

    // Insert the email post into the database
    $post = wp_insert_post( $my_post );

    if ( $post_id ) {
        // add our email to the taxonomy term 'post_recieved_comment'
        $term_id = wp_set_post_terms( $post, 'post_recieved_comment', bp_get_email_tax_type() );
        // update the term's description
        wp_update_term( $term_id[0], bp_get_email_tax_type(), array( 'description' => 'A member comments on a posts' ) );
    }

}
add_action( 'bp_core_install_emails', 'bp_custom_email_message' );
With that function, you should see the new email post in the admin with the correct term “situation” selected. Note: All situations are listed so only select the one that will work with your tokens. This is something that will need to be dealt with in a future version of BuddyPress.
For the next step, hook an action to wp_insert_comment to get the comment data and then send the post author an email. In this function, you create the tokens to parse out in the email before sending.
function bp_comment_inserted( $comment_id, $comment_object ) {

    if ( $comment_object ) {
        // get the post data
        $post = get_post( $comment_object->comment_post_ID );
        // add tokens to parse in email
        $args = array(
            'tokens' => array(
                'site.name' => get_bloginfo( 'name' ),
                'commenter.name' => $comment_object->comment_author,
            ),
        );
        // send args and user idto recieve email
        bp_send_email( 'post_recieved_comment', (int) $post->post_author, $args );
    }
}
add_action( 'wp_insert_comment','bp_comment_inserted', 99, 2 );
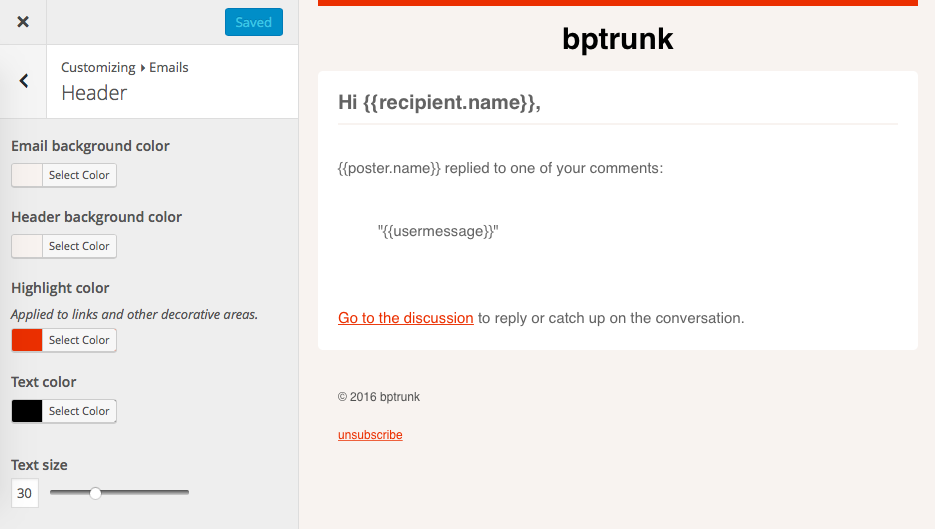
Email Design
In the BP Email admin menu there is a link to customizer, here you’ll have the ability to customize the style of the HTML emails from the customizer. In admin, under “Appearance,” there will be an “Emails” menu item. Click this and it will take you to the customizer where you can edit colors and fonts. This is a nice touch for branding your site emails.
Comment Tracking
BuddyPress has always had comment tracking for Posts but not Custom Post Types. The feature keeps the comments on posts and comments on the posts activity item in sync. You can add support when you register a post type or after. The code below shows how to add support. You can customize the text of the activity action when a comment is added.
$labels = array(
    'name'                              => 'foos',
    'singular_name'                     => 'foo',
    'bp_activity_comments_admin_filter' => __( 'Comments about foos', 'custom-textdomain' ), // label for the Admin dropdown filter
    'bp_activity_comments_front_filter' => __( 'Foo Comments', 'custom-textdomain' ),        // label for the Front dropdown filter
    'bp_activity_new_comment'           => __( '%1$s commented on the <a href="%2$s">foo</a>', 'custom-textdomain' ),
    'bp_activity_new_comment_ms'        => __( '%1$s commented on the <a href="%2$s">foo</a>, on the site %3$s', 'custom-textdomain' )
);

register_post_type( 'foo', array(
    'labels'   => $labels,
    'public'   => true,
    'supports' => array( 'buddypress-activity', 'comments' ), // Adding the comments support
    'bp_activity' => array(
        'action_id'         => 'new_foo',                     // The activity type for posts
        'comment_action_id' => 'new_foo_comment',             // The activity type for comments
    ),
) );
Emojis
WordPress recently added some new emoji enhancements and BuddyPress 2.5 is taking advantage. Emojis will now show up in activity updates, private messages, and group descriptions.
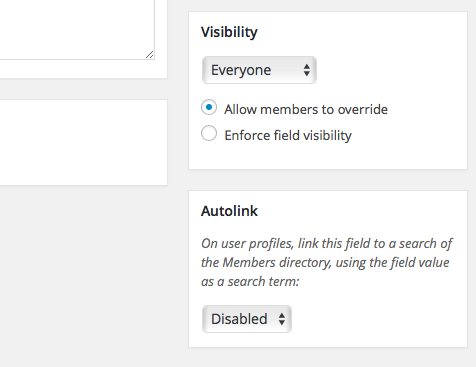
Auto Linking Fields
Auto linked profile fields have typically a very polarizing feature–people either love it or hate it. The feature takes common profile field words and creates a link that, when clicked, sends you to the members directory and filters the list with any other members with the same word in their profile. There is a filter to disable it all together, but not per specific field. Not anymore! @Boone has added a options UI to the profile fields admin creation screen so you can turn this off or on per field. Visit the admin and edit a profile fields you should see the meta box below the visibility options.
Activity Stream
2.5 receives some under the hood enhancements for activity.
Activity is sorted by date but if multiple items have the same date the order could look out of sync. A fix was added to use the id and a tie breaker if dates match.
Comments on posts are synced to its activity item. A bug would cause the comments to not be in sync if a comment was marked as spam.
Previously, if an activity item for a post was not added to the stream you were sorta out of luck to generate one, and post tracking might be off. Now, when you edit a post it will add the activity item if one doesn’t exists.
Twenty Twelve Style Sheet
BuddyPress has companion stylesheets for WordPress yearly themes. These stylesheets have a bit more styles to make BP Legacy templates fit better. BuddyPress 2.5 includes a style sheet for Twenty Twelve.
Inline Docs and A11y
New A11y support for BuddyPress administration screens and ongoing enhancements of inline code documentation.
That about wraps it up. I’m excited for BP Email feature; how about you? It’s the first unique feature BuddyPress has added in awhile that really enhances BuddyPress over all as great solution to creating community sites.
If you’ve been around computers for a while, you may already be familiar with compression. For those that aren’t, in short: compression is a super-useful tool for grouping a bunch of files into one, considerably smaller (and more easily transportable) file, which translates, for websites, to significantly faster page load times. In this article we’ll… View Article
I love me some Sass. I also love the color purple, as you’ll discover below. I think part of the reason I dig SCSS is because you can dip your toes in gradually, which is less overwhelming. As time goes on, you get to continue to discover new things as you dive deeper (and brain space allows).
“Does my sassiness upset you? Why are you beset with gloom?” ~Maya Angelou
Don’t be gloomy; be Sass-y. Sass is powerful because it can increase your code efficiency and helps introduce more modular elements that can be incredibly helpful for using across larger projects.
Sass-y Colors
One thing you might already be aware of is the ability to create color variables (check out our starter theme wd_s for some examples of this). Creating variables is great to help differentiate hexadecimal codes (#DC143C) to something more palatable ($ruby-red-slippers). Let’s use those variables and ramp them up to help streamline other portions of your site!
Color functionscombined with the ‘for’ control directive can lead to a magical world of loops. And as someone who works at a WordPress company, I am ALL ABOUT LOOPS.
The code above is an example of utilizing an existing color variable within a ‘for’ directive. Loosely translated into human-speak, it is saying for all elements ( $i ) from one to fourteen that have the class of ‘box’, increasingly darken the background color by a factor of three.
Now, what if you want to create a consistent effect across your site for an element like a button? You can create a mixin using color functions to streamline it!
The concept is to supply one base color and let the mixin take care of the other aspects you would like to define. In this case, the button is supplied the base color. From that variable, the hover effect and border are taken care of automatically.
What happens when you combine the first ‘for’ directive with the mixin? You get a lot of purple and a less-than-subtle button design but you also get a gradient of button backgrounds and an automatically implemented hover effect. Keep in mind that you can add other variables within your button design (maybe a highlight or a shadow?).
When it comes to MultiPurpose WordPress themes, BeTheme — by MuffinGroup — is one of the most impressive released to date: not only in terms of diversity (it comes with over a staggering 180 ready-to-use pre-made layouts) but also in terms of popularity (BeTheme is currently the 10th best selling WordPress theme available on ThemeForest)…. View Article
We all have to do things in life that we don’t like doing. That’s just how things work. Some unsavory things in life are unable to be avoided or altered and we just have to take them as they come. Luckily, there are still a great number of things in our daily lives that we have, if not partial control, full control over. So when the front-end developers at WDS began talking about upgrades and changes that could be made to wd_s, there was one item at the top of my list: the dreaded hamburger navigation icon.
The conversation first started with the aim of creating an icon that really spoke to us–something that would inspire friends, and Romans, to brave the battlefields of poorly thought-out navigation menus. My initial response pulled no punches and laid out a suggestion as flatly as one could be laid out:
Or, we could totally abandon the hamburger icon like we’ve talked about internally and come up with a different solution for mobile menus since the burger is trash anyway. Just a thought! coreymcollinscommented on Dec 21, 2015
I didn’t give much feedback on why, because this is something that we had talked about internally over and over again. As Greg noted in his follow-up, every design comp we produced in 2015 used that icon. This, however, was part of the problem and was indicative of the overall problem with the hamburger navigation icon.
The problem we faced was one of education. Clients and users expect to see those three little lines on a website because that’s just what they’re used to. The icon itself doesn’t outwardly scream, “Hey, bozo! This is a menu!” to a user. It’s just become a thing that is on every website and that does something when pressed. Clients will continue to expect it so long as we continue to include it in our mockups. With that comes a solution: stop including it in mockups.
Let’s maybe backup a little bit here and catch our breath. Why exactly do we want to get rid of this icon, anyway? If it’s become synonymous with “a thing lives behind this button,” then why drop it? Only for the reason that there have been countless tests, studies, and use-case scenarios to prove that the hamburger menu icon is an engagement killer. Even in the last test where the icon was replaced with a button reading “menu,” the user engagement increased by 20%. 20%! That’s a lot of percents! These are no small potatoes, folks. While users may understand that something happens behind that button, they don’t know what happens because the content behind that button is 100% hidden. There is no indication that the content they need is behind it, so pressing the button is really a leap of faith.
Well, lemme tell ya what–I have no more faith in that little icon and I haven’t for quite a while now. With so much information out there to prove to us, and others, that the hamburger icon is a user-engagement and site usage killer, there wasn’t much more to do but decide how we wanted to proceed.
What we eventually boiled it down to is a menu that feels like a native mobile app’s navigation rather than trying to reinvent the wheel or, in this case, the hamburger icon. Most apps place their navigation at the bottom of the window using icons and/or text to let you know what happens when you press said link. Now, I know what you’re thinking: if a client has a mega menu or some such thing with thirty items being displayed at desktop breakpoints, how the heck are we going to cram that into a little baby menu on mobile devices?
The answer is simple: we don’t. Again, this all comes back to education. Not only do we need to educate the client on the best choices for user experience, but we need the client to educate us on their content. We need to know which pages or sections of the site are the most important–it is those pages and sections that should be displayed in our mobile navigation menu.
So, here is our final plan:
Display the navigation as a horizontal bar at the bottom of the window
Display up to five top-level items
If there are more than five top-level items, replace the 5th item with a “more” button
The “more” button will display the rest of the menu items in an overlay
Display the navigation menu using the same menu being used as the primary navigation
Allow for the user to add a mobile-specific menu if their mobile navigation menu should differ greatly from the primary navigation menu
Provide a graceful fallback for cases when JavaScript is disabled
Out of the box, this is how the mobile navigation appears with more than 5 top-level navigation items:
When pressing the “More” button, the navigation slides in using CSS3 animations:
We get the same action when clicking top-level menu items with children:
We need to make sure all of the interactivity is still alive for the parent menu items, though, so we’re also throwing in some JS to allow for parent menu items to be clicked as standard links on a second click:
We’re also able to easily switch between menus without having to close them using the X button each time:
Our last bullet point above talked about a graceful non-JS fallback. Well, here’s what we have so far:
We’ve added some simple gradient overlays to the edges of the menu, as well as some left and right padding to the first and last menu items respectively. This means that the user will see an overlay on top of still-existing menu items that they have yet to scroll to; when the user is at the start of the end of the menu, the extra padding means that our first and last menu items will not be obscured by the overlay.
The menu will always be fixed at the bottom of the window, so as a user scrolls through your site they always have an eye on your navigation. This means that their engagement is being address right at the root–rather than links to your most important pages and sections behind a wall, the user can see them anytime they want. There is no longer a question of how to get from Point A to Point B; all of the thinking is being taken out of the equation for them.
What you’re seeing above is just the out-of-the-box wd_s styles with no spices sprinkled in. You can, of course, style this puppy up to appeal more to your user base:
We think that this is the way to with mobile navigation menus. This solution offers far more user interaction and engagement and does away with a tired old icon that may be hampering your website’s overall potential.
This is still a work-in-progress, but you can follow along with my fork of wd_s. We’ll need to run this sucker through the battery of WDS internal tests and make sure that it makes sense for all use cases, or at least as many use cases as can be imagined, before pushing it out into the world. We’d love to hear your feedback, too! Let us know what you think about the rejuvenation of the mobile navigation menu in wd_s or your thoughts on the transition away from the hamburger icon in general in the comments below.
It’s only February, and we already have news we are all too delighted to share!
Please join us in welcoming John Hawkins to our team! John, a long-time member of the WordPress community and old friend of the executive team, will be stepping in as the Director of Products. You may remember that we mentioned we’d be using our energies this year to focus on the products that we’ve worked on, and this is a major step forward in that direction. We’ve wanted to work with John for a very long time, and when the stars aligned in our favor, we jumped at the opportunity.
If you aren’t familiar with John, here’s a little bit about him:
John Hawkins caught the blogging bug early on. He used several platforms, including hand-coded HTML, to publish posts before installing WordPress for the first time in the summer of 2003. Even though it was brand new at the time, it was already easier to produce content than any of the previous methods. He’s been hooked ever since. In 2009, after growing tired of his corporate job, John turned his love for WordPress in o a full time gig as the founder of 9seeds, a WordPress development shop.
John is a huge fan of the community aspect of WordPress and loves to give back in whatever ways he can. He founded the Las Vegas WordPress meetup group and was its lead organizer for 4+ years. He’s also a frequent presenter at the meetup and at WordCamp conferences around the country.
John lives just outside of Las Vegas with his wife and two grown children. When he’s not working, John enjoys doing CrossFit and is a CrossFit Level 1 trainer. If you meet him at a conference, there’s a good chance he’ll challenge you to do some burpees with him.
I asked John a few questions about what we can expect and his history with WDS. Check it:
What was your first introduction to WebDevStudios?
I sat in on Brad’s talk at WordCamp Chicago in 2010. I keep trying to find myself in his fist pump video. I know I’m in the room, but can’t spot me. It’s like a game of where’s Waldo at this point!
What excites you most about joining the WDS team?
As mentioned above, we’ve looked for opportunities to work together in the past, but the timing or situations were never quite right. This time, everything just fell in to place and I’m excited for the opportunity to see where it takes us.
Why Director of Products? What about this position appeals to you?
Long before WordPress existed, I built and sold small applications that helped people sell products online. I loved it. Every aspect of it. I like figuring out what clients want in a product, what features should be there, how to make those features simple and understandable, and I could go on all day. Having the opportunity to focus 100% of my time toward products…that should have probably been my answer to the previous question!
Can you share anything about what we have to look forward to?
Nothing specific at this point. It’s still a little early. But rest assured, we’ll have some fun stuff to tell you about in the near future.
Once again, please join us in welcoming John aboard and keep your ears open for further updates! You can follow also John on Twitter @vegasgeek, and of course, you know we’ll be updating our Twitter with all the good stuff as well!
Looking for that perfect WordPress theme? It’s easy to get lost, I know. Unfortunately, however, choosing the right theme can make or break your site’s chances of success, so it’s not a decision to undertake lightly. The problem: with so many thousands of themes out there, it’s difficult to settle on just one. I’ve lost… View Article
If you’re looking to create an online photography portfolio to show off your skills and promote your services, there’s a number of relatively obvious things you’ll clearly need to consider, such as ensuring your photographs are all presented in the very best light possible. However, when it comes to choosing the perfect WordPress theme for… View Article
When choosing their preferred theme and plugins, WordPress users are spoiled for choice. With the official repository, dedicated marketplaces, and various different WordPress shops to choose from, there are literally thousands of options — so many in fact, that it can all-to-easily become difficult to make any kind of decision at all! Making the right… View Article
Sometimes things happen on a page that you can’t figure out. You click on a link and nothing happens; you submit a form and a modal pops up. Something is happening in JavaScript, but you can’t figure out where.
Enter, once again, the Chrome Developer Tools.
Let’s say we have a link on the page that when clicked, instead of taking us to the URL in its href attribute, throws error messages all over the page randomly. A quick search all of your codebase returns no clear clues towards what script could be causing it. There are either too many references to the link to filter through, or nothing that seems to point directly to this link. We need to check what events are bound to this DOM node.
To do this, open up Chrome on the page, right click on the element, and click “Inspect Element.” This opens up the familiar Chrome Developer Tools. Hopefully you are already familiar with the basics here, inspecting elements and their styles, and basic JavaScript debugging (if you aren’t do yourself a favor and do a bit of looking around and look up some tutorials!). What interests us now is the “Event Listeners” tab on the right in the elements screen (which should be the screen that opens when you use “Inspect Element”).
Under this panel, you should see a bunch of expandable event names and under each links to the functions that are bound to that event on the currently selected element. For our example, we should check out the click event to see what scripts we have bound to that event. On the left, we can see the DOM node the event is specifically bound to (events can be bound to a parent object listening for actions on child objects), and on the right, we can see the script and the location in the script of the function that is bound to that action.
Clicking on that file name will bring us to the Sources page of the Developer Tools with that file shown. From here you can read through each function bound to the event and find which seems most likely to be the one triggering the behavior you are trying to figure out. You can add breakpoints and pause the code mid-execution to check exactly what is happening that may be causing the issue.
If the code is minimized make sure to click the “Pretty Print” button in the bottom left of the source view to expand out the code for easier reading, turning this:
Into this:
Much better, right?
Do you have any questions? Other tips you’d like to add to the mix? Throw them in the comments below!


 Depending on your content,