How to Install New WordPress Plugins (YouTube Video)

How to Install New WordPress Plugins (YouTube Video)

For anybody just getting started with WordPress, pretty much as soon as you’ve chosen your theme, the next thing to do is to take a look at plugins… in preparation, let’s take a look at how to download/upload, install and activate them… Here’s a quick all-you-need-to-know video – from our new YouTube channel: How to… View Article

The post How to Install New WordPress Plugins (YouTube Video) appeared first on WinningWP.

Go to Source
Author: WinningWP EditorialHow to Install New WordPress Plugins (YouTube Video)

Powered by WPeMatico

22 Essential Tips for Choosing the Best Possible Domain Name for a Website (2017)

22 Essential Tips for Choosing the Best Possible Domain Name for a Website (2017)

Choosing the best possible domain name for your website can be absolutely critical! It’s something that deserves hours (if not days) of thought… and it’s no exaggeration to say that in some circumstances, making the wrong choice can break a business… In short: choosing the ideal domain name is something that every website owner needs… View Article

The post 22 Essential Tips for Choosing the Best Possible Domain Name for a Website (2017) appeared first on WinningWP.

Go to Source
Author: Karol K22 Essential Tips for Choosing the Best Possible Domain Name for a Website (2017)

Powered by WPeMatico

How to Install a New WordPress Theme (YouTube Video)

How to Install a New WordPress Theme (YouTube Video)

If you’re just getting started with WordPress, one of the first things you’ll want to do is get the design right, which usually involves installing a new theme. But how? Well, fear not, because as part of our new new YouTube channel, we’ve put together a handy step-by-step guide. How to install a brand new… View Article

The post How to Install a New WordPress Theme (YouTube Video) appeared first on WinningWP.

Go to Source
Author: WinningWP EditorialHow to Install a New WordPress Theme (YouTube Video)

Powered by WPeMatico

WordPress Hosting Explained: Shared, VPS, Dedicated and Managed WordPress Hosting (YouTube Video)

WordPress Hosting Explained: Shared, VPS, Dedicated and Managed WordPress Hosting (YouTube Video)

As we’ve said previously a bunch of times, when it comes to starting a WordPress website (especially for business), you need to get your hosting RIGHT! The wrong kind of hosting will leave your site unstable, slow and require constant fussing over. When it comes to making money via a business website, you need to… View Article

The post WordPress Hosting Explained: Shared, VPS, Dedicated and Managed WordPress Hosting (YouTube Video) appeared first on WinningWP.

Go to Source
Author: WinningWP EditorialWordPress Hosting Explained: Shared, VPS, Dedicated and Managed WordPress Hosting (YouTube Video)

Powered by WPeMatico

Post Event Report: WordCamp Minneapolis/St. Paul

Post Event Report: WordCamp Minneapolis/St. Paul

They ate donuts, drank beer, and played board games. But it wasn’t just about having fun at WordCamp Minneapolis/St. Paul. There was also education, information, assistance, and plenty of networking.

WebDevStudios (WDS) Senior Backend Developer, Justin Foell, and Backend Developers, Jeremy Ward and Gary Kovar, all attended the event, each playing an active role. Justin acted as a volunteer, while Jeremy assisted the WordCamp as a volunteer organizer, including working the Happiness Bar for two hours. Gary presented a seminar, “Cowboy Coding – Best Practices,” which went really well.

But educating others wasn’t Gary’s only favorite moment. “I really enjoyed the hallway track with a bunch of friendly folks in Minneapolis/St. Paul,” he says. Another big highlight was when the three developers co-worked together at Jeremy’s home. Because we work remote at WDS, it’s always an enjoyable moment when teammates can spend time bonding in-person and working together.

Of course, no WordCamp would be complete without tacos.

WordCamps are a pretty big deal to us. We attend and speak at many. Find out which ones we’ll be at next by visiting the WDS Gives Back page.

The post Post Event Report: WordCamp Minneapolis/St. Paul appeared first on WebDevStudios.

Go to Source
Author: Laura CoronadoPost Event Report: WordCamp Minneapolis/St. Paul

Powered by WPeMatico

What Is WordPress Multisite and How Can It Help You? (Part 1)

What Is WordPress Multisite and How Can It Help You? (Part 1)

Editor’s Note: The following is Part 1 in a three-part series titled, “What Is WordPress Multisite and How Can It Help You?”

Introduction to WordPress Multisite

There is a good deal of information on the web about WordPress Multisite, but most of it dives too deep technically, or quickly shows you steps to set up a Multisite environment. I am going to tackle it from another angle, from the point of view of an outsider looking in (with possibly no technical background) wondering if WordPress Multisite will fit the needs of their organization. To help facilitate the discussion, let’s start with some terminology.

New Terminology

WordPress Multisite introduces new ideas into WordPress, and there are several new terms that come along with it. Below are the various Multisite terminologies defined to help provide a foundation in communication for the rest of the article.

  • Network: The Network refers to a group of sites created on your Multisite instance. Though it is technically possible to run multiple networks on a single Multisite instance, we will focus on the basic single network that comes with Multisite. To keep things simple, you should be aware that some older literature referred to a Network as a Site.
  • Site: A site refers to a single site within a network. These are sometimes also referred to as subsites, or blogs. Over the years, the term site has changed meaning to refer to the individual sites on a network. You may see reference in older literature that use the term site in the context of network.
  • Blog: Another name for a single site on the network.
  • Subsite: Another name for a single site on the network.
  • Network Admin: This is a new section of the wp-admin area that appears in the Admin Bar after enabling Multisite on your WordPress installation. The Network Admin is where you will control the sites, plugins, and themes available to your sites.
  • Super Admin: Super Admin is a new role that is available specifically for Multisites. Users with Super Admin access are allowed to access the Network Admin area and manage the entire network. Super Admins can access the dashboards of any site and administer them as well. The traditional Administrator account only has access to the sites it has permissions on.
  • Subdomain Install: Network setup option that creates new sites with a subdomain of the primary domain. For example:
    • Primary domain: example.com
    • Site for Bob: bob.example.com
    • Site for Sally: sally.example.com 
  • Subdirectory Install: Network setup option that creates new sites with a subdomain of the primary site. Useful when creating sites that all need the same look and feel such as corporate or language sites. For example:
    • Primary domain: example.com
    • Site for Bob: example.com/bob
    • Site for Sally: example.com/sally

What is WordPress Multisite?

You are undoubtedly familiar with WordPress. A content management system you install to manage your website content. Perhaps you have multiple websites, each with their own installation of WordPress running the site. Enter WordPress Multisite; WordPress Multisite transforms a single site into a powerhouse that can run an unlimited number (nobody has found a max number yet!) of websites from a single WordPress installation. In essence, it could combine all the individual WordPress installations you run into one single installation that supports all the sites. Each site can have its own domain, theme, and set of plugins utilized.

As an example of how I use the power of WordPress Multisite, I have several family members who have basic blogs set up to post their random thoughts. There are also several organizations that I have helped support over the years and test beds for new corporate sites running. Each of the site owners are able to manage their own content, while I ensure the network stays up and running efficiently with WordPress, and that all plugins are kept up to date.

Feel free to take a peek at a couple sites on my network:

You will notice there are subdomains and custom domains. WordPress handles both with elegance. By default, new sites on my network are created as subdomains of lobaugh.us and then a custom domain is applied when ready. Subdirectories are also supported. Subdirectories make it look like all the sites are part of the same domain. For example, in my network, my sister’s site could be http://lobaugh.us/raeann. There are good reasons to run WordPress Multisite in subdomain mode that I will get into in Part 3.

In Part 1, you were introduced to new terminology used by WordPress Multisite and provided a high level view of what WordPress Multisite is. In the following parts, we will cover why using WordPress Multisite matters, and how to determine if it could be the right tool for your organization.

The post What Is WordPress Multisite and How Can It Help You? (Part 1) appeared first on WebDevStudios.

Go to Source
Author: Ben LobaughWhat Is WordPress Multisite and How Can It Help You? (Part 1)

Powered by WPeMatico

Meet BRAD

Meet BRAD

WebDevStudios (WDS) would like to proudly introduce you to BRAD. No, not Brad Williams, our CEO. We mean the WordPress plugin you didn’t even know you needed till now: Better Responsibility Around Discoverability, aka BRAD.

Developers Aaron Jorbin and Andrew Norcross created the BRAD plugin after our own Brad tweeted this:

I REALLY wish this was easier to spot on WordPress installs. So many sites are launching with privacy enabled https://t.co/X12J8tdYVy

— Brad Williams (@williamsba) July 13, 2017

Boom. Aaron and Andrew combined their talents and BRAD was born—their effort to prevent WordPress websites from accidentally excluding themselves from search engines. Learn more about how and why Aaron and Andrew developed the plugin at The Daily Jorbin.

When Brad innocently tweeted his dismay with sites launching with privacy enabled, he certainly didn’t expect to inspire the creation of a plugin, much less have one named after him.

“It’s funny because years ago Scott Basgaard and I worked on a patch for WordPress Core to make the Privacy Enabled option more obvious,” explains Brad. “It was eventually accepted into Core and looked great, but somewhere over the years, and many many releases since then, the notice was made less obvious again.” Sounds like BRAD is the solution to that.

Overall, Brad loves BRAD.

“Aaron and Andrew are both great guys, and amazing developers, so it was awesome to see them go from idea to release in less than 24 hours. You really do have to love the WordPress Community.”

But don’t get the wrong idea. It’s not as though having a WordPress plugin named after him has gone to Brad’s head. Okay. That’s a lie. Brad thinks he’s immortal now.

“I think I’m reaching Highlander status,” he declares. At the very least, Brad is grateful, and he plans to repay Aaron and Andrew through gifts of whisky and coffee.

“They know who gets what,” he says. Are you launching a new site and want to ensure that it’s not excluded from search engines? Download and install BRAD today. Use the link below.

BRAD

Follow Aaron and Andrew on Twitter: @aaronjorbin and @norcross. Aside from installing BRAD, use the checklist below (created by WDS Lead Frontend Developer, Greg Rickaby) next time you launch a new website.

  • Turn off the “Block Robots” setting under Settings –> Reading
  • Check robots.txt to ensure it’s also not blocking robots
  • Manage redirects (old pages to new pages, and www -> non-www)
  • Make sure the SSL certificate is set up for both WWW and non-WWW
  • Make sure any Webhooks are set up (WooCommerce, Stripe, Gravity Forms, etc…) and pointing at the new URL
  • Optimize images
  • Check accessibility
    • Total Validator
    • WAVE extension
    • Screen Reader testing
  • Set your favicon
  • Run the site against: https://www.webpagetest.org/
  • Run the WordPress SEO (Yoast) Configuration wizard and input social media links, logos, and turn on Sitemap
  • Set up Google Analytics
  • Ensure that Website Feature Documentation is up-to-date
  • Create a screenshot for your theme
  • Set up your RSS Feed

The post Meet BRAD appeared first on WebDevStudios.

Go to Source
Author: Laura CoronadoMeet BRAD

Powered by WPeMatico

Preparing for Gutenberg

Preparing for Gutenberg

Your WordPress editor is about to get a makeover! While the details aren’t complete yet, we know that soon, the way we edit our content in WordPress is going to change. It’s called the Gutenberg Editor, and the time has come for you to prepare for it.

Typically when you log into your website, you go to a Post, Page, or other “thing” to add or edit text, images, and more. Central to your website experience is a the big blank Text Editor. Most of the stuff you want to show your users goes into this Text Editor. If your site has a bit more customization, you’ll have extra meta boxes to add extra bits of information and content. Whether it’s for SEO or linking to related resources, these meta boxes aren’t always displayed in the editor where they show up in your content. Heck, sometimes they don’t even show up in your content at all.

When you think about, it’s not the most intuitive way to deal with your content. How did we end up here? Years ago, the WordPress admin interface was revolutionary, if you wanted to publish and still own your content. Instead of having to learn HTML, you could simply enter a username/password, write, and show the world—totally friction-less. Just type, publish, and it went live.

As website complexity has grown and site owners have figured out how visitors use websites, our understanding of content has expanded well beyond just a wall of text and a picture. Content, these days, can be relationships to other posts and products, supporting images, sales pipelines, tutorials, forms, and a billion other things. Essentially, web publishing has outgrown the humble Text Editor view. WordPress agencies and plugin developers have been dealing with this by bolting on meta boxes as needed.

WordPress core developers see this Frankenstein approach as problematic. The solution is Gutenberg. Named after Johannes Gutenberg, who invented a printing press with movable type more than 500 years ago, the Gutenberg Editor is very much beta software. Each point (0.0.x) release of Gutenberg has significant changes and improvements over the previous, so it’s difficult at this point to see where it will end up. Because the developers are seeking active feedback, each update polishes the user experience a bit more. However, we’re still months from Gutenberg being part of WordPress core. So, expect many more changes before all the dust settles.

Gutenberg is an attempt to make the editing experience feel a bit more logical. This is accomplished by treating everything as a block. Ideally, this will make the task of creating content much more intuitive (and heck maybe even fun?). One of the biggest changes that hasn’t been accounted for in Gutenberg is what to do with all of the “legacy meta boxes.” In some cases, they’ll make sense as a block that is added to the content. But some meta isn’t necessarily something you’ll need to display. That kind of content doesn’t fit in the Gutenberg block model.

We expect Gutenberg will ship in WordPress 5.0. That’ll probably be in the second quarter of 2018. In the meantime, it will be important to stay on top of both WordPress core and plugin updates as some of the groundwork for dealing with Gutenberg will be laid before it’s available in the backend. Start thinking about the metadata you use in your posts. Unlike when Facebook changes the interface, WordPress is giving us a huge amount of notice. If you need help in either of these areas, reach out to experts at Maintainn. They’re actively preparing for Gutenberg and are fluent in all things WordPress.


Photo by Bruno Martins on Unsplash

The post Preparing for Gutenberg appeared first on WebDevStudios.

Go to Source
Author: Gary KovarPreparing for Gutenberg

Powered by WPeMatico

Oh Hey PressNomics 2016!!

It’s that time of year–when all of the conferences have really started to kick off full force, including one of our favorites: PressNomics is in just a few days, from March 3-4th, 2016.

For those of you who aren’t familiar:

PressNomics is a conference that was started by Joshua Strebel, CEO of Page.ly, in an effort to create a space where the economics of WordPress could be discussed by the “who’s who” of WordPress business owners and innovators.

WDS has attended for the last few years, and our own Dre is known as “The Godfather” of PressNomics. After all, the idea for PressNomics was inspired by some good old-fashioned Skype brainstorming over whiskey and “Josh-tinis” (ingredients: top-secret) about what Joshua and Dre would like to see develop in the WordPress community. While Dre was focused on WordCamp San Diego, Joshua stepped forward to make their vision a reality, and PressNomics was born.

Will we see you there? If so, make sure to let us know! Brian, John, and Scott from AppPresser will be there to hang out with the WordPress minded folk to skill-share, network, and examine the industry that has been born of our favorite platform’s flexibility. If you can’t go (boooooo!), live vicariously through the event over @PressNomics or by keeping tabs on the hashtag #PressNomics. See you there!

The post Oh Hey PressNomics 2016!! appeared first on WebDevStudios.com.

Powered by WPeMatico

Welcome Our Newest Dev, Kellen Mace!

We have yet another new member that recently joined our team–please join us in welcoming Kellen Mace, our newest developer!

A little bit about Kellen:

Kellen is a lifelong learner with a fondness for interesting projects that push his creative and technical limits. He loves building and launching software that clients find both powerful and easy to manage.

Kellen started his career in the healthcare industry, but discovered a passion for tech, especially the creativity and problem solving inherent in web development. Eager to learn as much as he could on the subject, he completed coursework through a number of online educational services including Harvard University’s edx.org, Coursera, Lynda.com, Codecademy, and Code School. He ran a business for the next several years building WordPress-powered websites and custom themes and plugins, providing solutions to clients, and learning a great deal in the process.

Kellen has also released a theme and several plugins that are available on WordPress.org, and is a WordCamp conference speaker.

In his spare time, Kellen can be found going on adventures with his wife Meghan and their ridiculously cute two year old Desmond, reading, exercising, enjoying the outdoors, and rocking out on guitars, drums, keyboards, and digital audio workstations.

You can follow him over @kellenmace and find more of his social links here. Say hello! Oh, and guess what? We’re still looking for more back-end developers…come join us and build rad stuff!

The post Welcome Our Newest Dev, Kellen Mace! appeared first on WebDevStudios.com.

Powered by WPeMatico

CSS Hero Review: WordPress Theme Customization Made Easy!

Recent WordPress trends have seen page builder plugins rise to prominence, giving users the unrestricted ability to play web designer. However, the CSS Hero plugin combats this trend, shifting focus back to an old favorite: the WordPress theme. One of the biggest problems with WordPress themes in the past was, despite looking like they offered… View Article

The post CSS Hero Review: WordPress Theme Customization Made Easy! appeared first on WinningWP.

Powered by WPeMatico

What’s New in BuddyPress 2.5

BuddyPress 2.5 adds a few new tools and as always some under the hood improvements that you should get jazzed about! Here are some of the updates we can come to expect from this next BuddyPress update:

BP Email

Contributor Paul Gibbs has added a UI method for creating custom emails. This is a really neat feature. BuddyPress sends emails when users perform specific actions on the site. The emails are a way to keep users engaged with the site and to follow conversations. There is a  new API to send messages.

In the admin, you add a new email message very much like adding a page or post. You can include tokens in the content to be replaced at send time. The token variables are for dynamically replaced text. If you are a plugin developer or want to add custom emails, it’s pretty easy. Everything is post, taxonomy and terms. The post is the message with the post type being bp-email.  The taxonomy is bp-email-type. The terms are what you will use to pass to bp_send_email() during some action hook.

Custom Emails

BuddyPress only includes emails for BuddyPress core functionality. Blog posting is not part of BuddyPress, but it could be an integral part of your community. Let’s look at an example to send an email to a blog post author when a user comments on their post:

Since the emails are post types and taxonomy terms. We will need to insert a post for the post type and then assign it a custom taxonomy term. There is no special BuddyPress code here; it’s straight up WordPress wp_insert_post()wp_set_post_terms() and wp_update_term(). Note: You must hook this to the action bp_core_install_emails. This hook ensures your emails can be flushed out if they need a reset.

function bp_custom_email_message() {

    // Create post object
    $my_post = array(
      'post_title'    => __( '[{{{site.name}}}] New post comment.', 'buddypress' ),
      'post_content'  => __( '{{commenter.name}} commented on your blog post.', 'buddypress' ),
      'post_status'   => 'publish',
      'post_type' => bp_get_email_post_type() // this is the post type for emails
    );

    // Insert the email post into the database
    $post = wp_insert_post( $my_post );

    if ( $post_id ) {
        // add our email to the taxonomy term 'post_recieved_comment'
        $term_id = wp_set_post_terms( $post, 'post_recieved_comment', bp_get_email_tax_type() );
        // update the term's description
        wp_update_term( $term_id[0], bp_get_email_tax_type(), array( 'description' => 'A member comments on a posts' ) );
    }

}
add_action( 'bp_core_install_emails', 'bp_custom_email_message' );

With that function, you should see the new email post in the admin with the correct term “situation” selected. Note: All situations are listed so only select the one that will work with your tokens. This is something that will need to be dealt with in a future version of BuddyPress.

For the next step, hook an action to wp_insert_comment to get the comment data and then send the post author an email. In this function, you create the tokens to parse out in the email before sending.

function bp_comment_inserted( $comment_id, $comment_object ) {

    if ( $comment_object ) {
        // get the post data
        $post = get_post( $comment_object->comment_post_ID );
        // add tokens to parse in email
        $args = array(
            'tokens' => array(
                'site.name' => get_bloginfo( 'name' ),
                'commenter.name' => $comment_object->comment_author,
            ),
        );
        // send args and user idto recieve email
        bp_send_email( 'post_recieved_comment', (int) $post->post_author, $args );
    }
}
add_action( 'wp_insert_comment','bp_comment_inserted', 99, 2 );
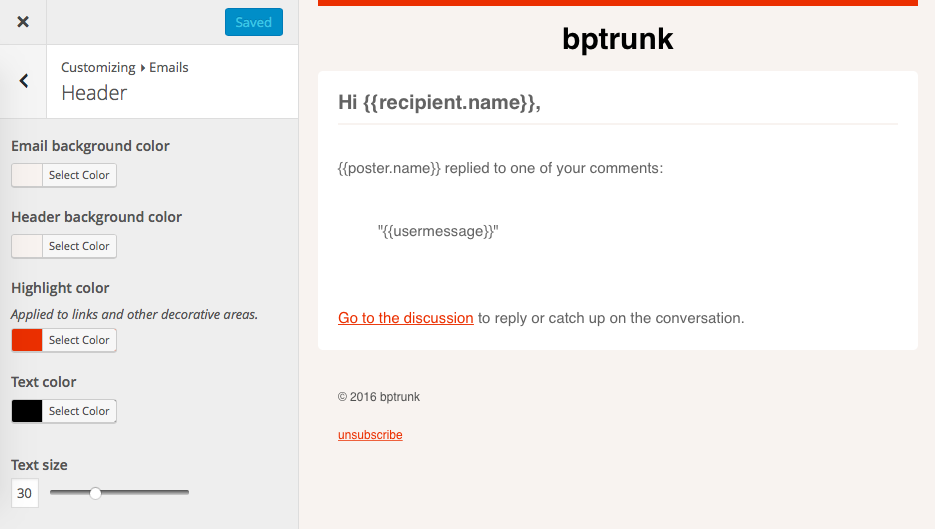
Email Design

In the BP Email admin menu there is a link to customizer, here you’ll have the ability to customize the style of the HTML emails from the customizer. In admin, under “Appearance,” there will be an “Emails” menu item. Click this and it will take you to the customizer where you can edit colors and fonts. This is a nice touch for branding your site emails.

customizer


Comment Tracking

BuddyPress has always had comment tracking for Posts but not Custom Post Types. The feature keeps the comments on posts and comments on the posts activity item in sync. You can add support when you register a post type or after. The code below shows how to add support. You can customize the text of the activity action when a comment is added.

$labels = array(
    'name'                              => 'foos',
    'singular_name'                     => 'foo',
    'bp_activity_comments_admin_filter' => __( 'Comments about foos', 'custom-textdomain' ), // label for the Admin dropdown filter
    'bp_activity_comments_front_filter' => __( 'Foo Comments', 'custom-textdomain' ),        // label for the Front dropdown filter
    'bp_activity_new_comment'           => __( '%1$s commented on the <a href="%2$s">foo</a>', 'custom-textdomain' ),
    'bp_activity_new_comment_ms'        => __( '%1$s commented on the <a href="%2$s">foo</a>, on the site %3$s', 'custom-textdomain' )
);
 
register_post_type( 'foo', array(
    'labels'   => $labels,
    'public'   => true,
    'supports' => array( 'buddypress-activity', 'comments' ), // Adding the comments support
    'bp_activity' => array(
        'action_id'         => 'new_foo',                     // The activity type for posts
        'comment_action_id' => 'new_foo_comment',             // The activity type for comments
    ),
) );

Emojis

WordPress recently added some new emoji enhancements and  BuddyPress 2.5 is taking advantage. Emojis will now show up in activity updates, private messages, and group descriptions. 🌟😏🎉💯😍
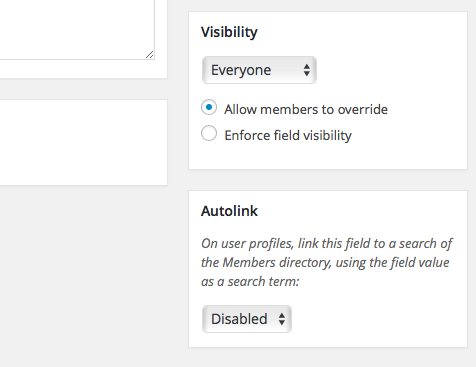
buddypress 2.5 emoji


Auto Linking Fields

Auto linked profile fields have typically a very polarizing feature–people either love it or hate it. The feature takes common profile field words and creates a link that, when clicked, sends you to the members directory and filters the list with any other members with the same word in their profile. There is a filter to disable it all together, but not per specific field. Not anymore! @Boone has added a options UI to the profile fields admin creation screen so you can turn this off or on per field. Visit the admin and edit a profile fields you should see the meta box below the visibility options.

buddypress 2.5 auto link


Activity Stream

2.5 receives some under the hood enhancements for activity.

  • Activity is sorted by date but if multiple items have the same date the order could look out of sync. A fix was added to use the id and a tie breaker if dates match.
  • Comments on posts are synced to its activity item. A bug would cause the comments to not be in sync if a comment was marked as spam.
  • Previously, if an activity item for a post was not added to the stream you were sorta out of luck to generate one, and post tracking might be off. Now, when you edit a post it will add the activity item if one doesn’t exists.

Twenty Twelve Style Sheet

BuddyPress has companion stylesheets for WordPress yearly themes. These stylesheets have a bit more styles to make BP Legacy templates fit better. BuddyPress 2.5 includes a style sheet for Twenty Twelve.

Inline Docs and A11y

New A11y support for BuddyPress administration screens and ongoing enhancements of inline code documentation.


That about wraps it up. I’m excited for BP Email feature; how about you? It’s the first unique feature BuddyPress has added in awhile that really enhances BuddyPress over all as great solution to creating community sites.

BuddyPress 2.5 RC1 download it from here.

The post What’s New in BuddyPress 2.5 appeared first on WebDevStudios.com.

Powered by WPeMatico

How To Enable GZIP Compression For WordPress

If you’ve been around computers for a while, you may already be familiar with compression. For those that aren’t, in short: compression is a super-useful tool for grouping a bunch of files into one, considerably smaller (and more easily transportable) file, which translates, for websites, to significantly faster page load times. In this article we’ll… View Article

The post How To Enable GZIP Compression For WordPress appeared first on WinningWP.

Powered by WPeMatico

Getting Sass-y with Color Functions

I love me some Sass. I also love the color purple, as you’ll discover below. I think part of the reason I dig SCSS is because you can dip your toes in gradually, which is less overwhelming. As time goes on, you get to continue to discover new things as you dive deeper (and brain space allows).

Does my sassiness upset you? Why are you beset with gloom?” ~Maya Angelou

Don’t be gloomy; be Sass-y. Sass is powerful because it can increase your code efficiency and helps introduce more modular elements that can be incredibly helpful for using across larger projects.

Sass-y Colors

One thing you might already be aware of is the ability to create color variables (check out our starter theme wd_s for some examples of this). Creating variables is great to help differentiate hexadecimal codes (#DC143C) to something more palatable ($ruby-red-slippers). Let’s use those variables and ramp them up to help streamline other portions of your site!

Color functions combined with the ‘for’ control directive can lead to a magical world of loops. And as someone who works at a WordPress company, I am ALL ABOUT LOOPS.

See the Pen Sass ‘for’ directive grid by Allison Tarr (@allisonplus) on CodePen.

The code above is an example of utilizing an existing color variable within a ‘for’ directive. Loosely translated into human-speak, it is saying for all elements ( $i ) from one to fourteen that have the class of ‘box’, increasingly darken the background color by a factor of three.

Grid of Purple SquaresDepending on your content, you’ll wind up with a gradient-type design going through your grid of boxes without having to sort out all the different hexadecimal codes.

Now, what if you want to create a consistent effect across your site for an element like a button? You can create a mixin using color functions to streamline it!

@mixin buttonColorProperties($color) {
    $border: adjust-hue($color, -6deg);
    background-color: $color; 
    border: 3px solid $border;
}

@mixin buttonColors($baseColor) {
    @include buttonColorProperties($baseColor);
  
    &:hover {
      $base-hover: darken($baseColor, 30);
      
      @include buttonColorProperties($base-hover);
      transition: all 0.25s;
    }
}

.button-purple  {
  @include buttonColors($violet-base);
}

The concept is to supply one base color and let the mixin take care of the other aspects you would like to define. In this case, the button is supplied the base color. From that variable, the hover effect and border are taken care of automatically.

See the Pen Buttons with Sass Colour Functions by Allison Tarr (@allisonplus) on CodePen.

What happens when you combine the first ‘for’ directive with the mixin? You get a lot of purple and a less-than-subtle button design but you also get a gradient of button backgrounds and an automatically implemented hover effect. Keep in mind that you can add other variables within your button design (maybe a highlight or a shadow?).

See the Pen Buttons with Sass Colour Functions by Allison Tarr (@allisonplus) on CodePen.

Go forth and be Sass-y. And if you create a cool button mixin*, be sure to share it with me!

*(Bonus points if it involves purple.)

The post Getting Sass-y with Color Functions appeared first on WebDevStudios.com.

Powered by WPeMatico

15+ Stunning Examples of ThemeForest’s Popular BeTheme WordPress Theme in Action

When it comes to MultiPurpose WordPress themes, BeTheme — by MuffinGroup — is one of the most impressive released to date: not only in terms of diversity (it comes with over a staggering 180 ready-to-use pre-made layouts) but also in terms of popularity (BeTheme is currently the 10th best selling WordPress theme available on ThemeForest)…. View Article

The post 15+ Stunning Examples of ThemeForest’s Popular BeTheme WordPress Theme in Action appeared first on WinningWP.

Powered by WPeMatico

wd_s Goes Vegetarian: Dropping the Hamburger Navigation Menu

We all have to do things in life that we don’t like doing. That’s just how things work. Some unsavory things in life are unable to be avoided or altered and we just have to take them as they come. Luckily, there are still a great number of things in our daily lives that we have, if not partial control, full control over. So when the front-end developers at WDS began talking about upgrades and changes that could be made to wd_s, there was one item at the top of my list: the dreaded hamburger navigation icon.

The conversation first started with the aim of creating an icon that really spoke to us–something that would inspire friends, and Romans, to brave the battlefields of poorly thought-out navigation menus. My initial response pulled no punches and laid out a suggestion as flatly as one could be laid out:

Or, we could totally abandon the hamburger icon like we’ve talked about internally and come up with a different solution for mobile menus since the burger is trash anyway. Just a thought!
coreymcollins commented on Dec 21, 2015

I didn’t give much feedback on why, because this is something that we had talked about internally over and over again. As Greg noted in his follow-up, every design comp we produced in 2015 used that icon. This, however, was part of the problem and was indicative of the overall problem with the hamburger navigation icon.

The problem we faced was one of education. Clients and users expect to see those three little lines on a website because that’s just what they’re used to. The icon itself doesn’t outwardly scream, “Hey, bozo! This is a menu!” to a user. It’s just become a thing that is on every website and that does something when pressed. Clients will continue to expect it so long as we continue to include it in our mockups. With that comes a solution: stop including it in mockups.

Let’s maybe backup a little bit here and catch our breath. Why exactly do we want to get rid of this icon, anyway? If it’s become synonymous with “a thing lives behind this button,” then why drop it? Only for the reason that there have been countless testsstudies, and use-case scenarios to prove that the hamburger menu icon is an engagement killer. Even in the last test where the icon was replaced with a button reading “menu,” the user engagement increased by 20%. 20%! That’s a lot of percents! These are no small potatoes, folks. While users may understand that something happens behind that button, they don’t know what happens because the content behind that button is 100% hidden. There is no indication that the content they need is behind it, so pressing the button is really a leap of faith.

Well, lemme tell ya what–I have no more faith in that little icon and I haven’t for quite a while now. With so much information out there to prove to us, and others, that the hamburger icon is a user-engagement and site usage killer, there wasn’t much more to do but decide how we wanted to proceed.

What we eventually boiled it down to is a menu that feels like a native mobile app’s navigation rather than trying to reinvent the wheel or, in this case, the hamburger icon. Most apps place their navigation at the bottom of the window using icons and/or text to let you know what happens when you press said link. Now, I know what you’re thinking: if a client has a mega menu or some such thing with thirty items being displayed at desktop breakpoints, how the heck are we going to cram that into a little baby menu on mobile devices?

The answer is simple: we don’t. Again, this all comes back to education. Not only do we need to educate the client on the best choices for user experience, but we need the client to educate us on their content. We need to know which pages or sections of the site are the most important–it is those pages and sections that should be displayed in our mobile navigation menu.

So, here is our final plan:

  • Display the navigation as a horizontal bar at the bottom of the window
  • Display up to five top-level items
  • If there are more than five top-level items, replace the 5th item with a “more” button
    • The “more” button will display the rest of the menu items in an overlay
  • Display the navigation menu using the same menu being used as the primary navigation
    • Allow for the user to add a mobile-specific menu if their mobile navigation menu should differ greatly from the primary navigation menu
  • Provide a graceful fallback for cases when JavaScript is disabled

Out of the box, this is how the mobile navigation appears with more than 5 top-level navigation items:

wdunderscores-basic-mobile-menu

When pressing the “More” button, the navigation slides in using CSS3 animations:

wdunderscores-mobile-menu-more

We get the same action when clicking top-level menu items with children:

wdunderscores-mobile-parent-menu

We need to make sure all of the interactivity is still alive for the parent menu items, though, so we’re also throwing in some JS to allow for parent menu items to be clicked as standard links on a second click:

wdunderscores-mobile-parent-menu-second-click

We’re also able to easily switch between menus without having to close them using the X button each time:

wdunderscores-mobile-menu-switching

Our last bullet point above talked about a graceful non-JS fallback. Well, here’s what we have so far:

wdunderscores-mobile-menu-scroll

We’ve added some simple gradient overlays to the edges of the menu, as well as some left and right padding to the first and last menu items respectively. This means that the user will see an overlay on top of still-existing menu items that they have yet to scroll to; when the user is at the start of the end of the menu, the extra padding means that our first and last menu items will not be obscured by the overlay.

The menu will always be fixed at the bottom of the window, so as a user scrolls through your site they always have an eye on your navigation. This means that their engagement is being address right at the root–rather than links to your most important pages and sections behind a wall, the user can see them anytime they want. There is no longer a question of how to get from Point A to Point B; all of the thinking is being taken out of the equation for them.

What you’re seeing above is just the out-of-the-box wd_s styles with no spices sprinkled in. You can, of course, style this puppy up to appeal more to your user base:

wdunderscores-mobile-menu-with-icons

We think that this is the way to with mobile navigation menus. This solution offers far more user interaction and engagement and does away with a tired old icon that may be hampering your website’s overall potential.

This is still a work-in-progress, but you can follow along with my fork of wd_s. We’ll need to run this sucker through the battery of WDS internal tests and make sure that it makes sense for all use cases, or at least as many use cases as can be imagined, before pushing it out into the world. We’d love to hear your feedback, too! Let us know what you think about the rejuvenation of the mobile navigation menu in wd_s or your thoughts on the transition away from the hamburger icon in general in the comments below.

The post wd_s Goes Vegetarian: Dropping the Hamburger Navigation Menu appeared first on WebDevStudios.com.

Powered by WPeMatico

Welcome John Hawkins, our new Director of Products!

It’s only February, and we already have news we are all too delighted to share!

Please join us in welcoming John Hawkins to our team! John, a long-time member of the WordPress community and old friend of the executive team, will be stepping in as the Director of Products. You may remember that we mentioned we’d be using our energies this year to focus on the products that we’ve worked on, and this is a major step forward in that direction. We’ve wanted to work with John for a very long time, and when the stars aligned in our favor, we jumped at the opportunity.

If you aren’t familiar with John, here’s a little bit about him:

John Hawkins caught the blogging bug early on. He used several platforms, including hand-coded HTML, to publish posts before installing WordPress for the first time in the summer of 2003. Even though it was brand new at the time, it was already easier to produce content than any of the previous methods. He’s been hooked ever since. In 2009, after growing tired of his corporate job, John turned his love for WordPress in o a full time gig as the founder of 9seeds, a WordPress development shop.

John is a huge fan of the community aspect of WordPress and loves to give back in whatever ways he can. He founded the Las Vegas WordPress meetup group and was its lead organizer for 4+ years. He’s also a frequent presenter at the meetup and at WordCamp conferences around the country.

John lives just outside of Las Vegas with his wife and two grown children. When he’s not working, John enjoys doing CrossFit and is a CrossFit Level 1 trainer. If you meet him at a conference, there’s a good chance he’ll challenge you to do some burpees with him.

I asked John a few questions about what we can expect and his history with WDS. Check it:

What was your first introduction to WebDevStudios?

I sat in on Brad’s talk at WordCamp Chicago in 2010. I keep trying to find myself in his fist pump video. I know I’m in the room, but can’t spot me. It’s like a game of where’s Waldo at this point!

What excites you most about joining the WDS team?

As mentioned above, we’ve looked for opportunities to work together in the past, but the timing or situations were never quite right. This time, everything just fell in to place and I’m excited for the opportunity to see where it takes us.

Why Director of Products? What about this position appeals to you?

Long before WordPress existed, I built and sold small applications that helped people sell products online. I loved it. Every aspect of it. I like figuring out what clients want in a product, what features should be there, how to make those features simple and understandable, and I could go on all day. Having the opportunity to focus 100% of my time toward products…that should have probably been my answer to the previous question!

Can you share anything about what we have to look forward to?

Nothing specific at this point. It’s still a little early. But rest assured, we’ll have some fun stuff to tell you about in the near future.


Once again, please join us in welcoming John aboard and keep your ears open for further updates! You can follow also John on Twitter @vegasgeek, and of course, you know we’ll be updating our Twitter with all the good stuff as well!


The post Welcome John Hawkins, our new Director of Products! appeared first on WebDevStudios.com.

Powered by WPeMatico