This book was launched at the perfect time for me, because I’m working hard to turn my photography blog into a business. This is my review of the latest ProB…
WordPress Feature Review: New Features You Missed in 2012, Part 1
This guest post is by Michael Scott of WPHub.com.
One of the great things about WordPress is that it never stands still. The platform is constantly evolving beyond its blogging roots, with more great features being added every year.
WordPress used to release small updates frequently, but at the end of 2009 they changed this policy. They now aim to release three major updates every year, with small infrequent updates in between to address security issues.
The three major releases in 2011 were 3.1 (February 2011) and 3.2 (July 2011) and 3.3 (December 2011).
Today I’d like to walk you through the new features which were introduced in 2012, in WordPress 3.4 and 3.5.
I’ll be focusing on the features that are most relevant to bloggers and explaining how they can help you.
New features in WordPress 3.4
Released in June, WordPress 3.4 was a solid release that is best remembered for introducing the new theme customizer.
It also included a lot of other great new features such as Twitter embedding, HTML in captions, and flexible header images.
New feature: Live preview
Live preview enables you to preview themes before they are activated on your blog.
Browsing and installing themes and plugins directly from the WordPress admin area is one of WordPress’s greatest strengths. It’s amazing that you can modify your blog so much without even leaving your blog’s Admin area.
In the past, clicking on the Preview link for a theme would load up an overlay which displayed the theme over the current page.
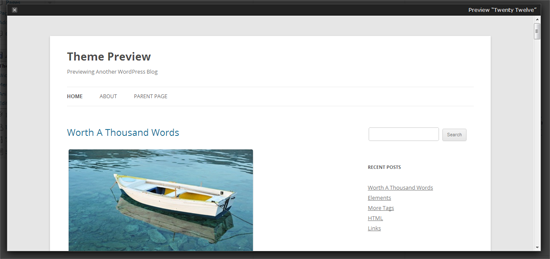
But the process of browsing WordPress designs changed in WordPress 3.4. In the past, the design was listed with Install and Preview links, and a full description.
Descriptions are now hidden by default, though you can view the description of a theme by clicking on the new Description link. This may seem like a small change, but it made browsing for designs within the Admin area much more user friendly.
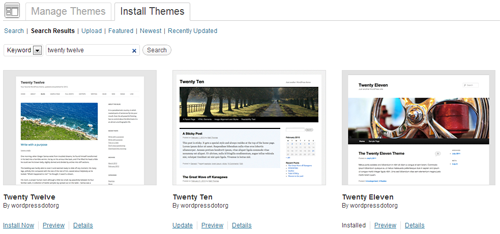
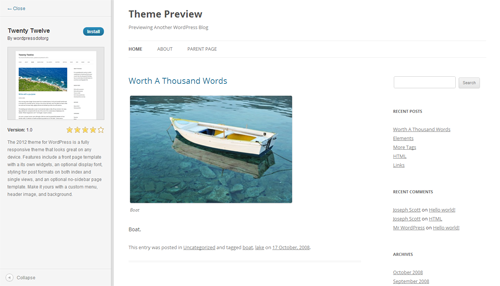
Themes are now previewed on their own dedicated Preview page. The page shows the theme on the right-hand side. On the left side, the theme name, thumbnail, rating and description are shown. To save you from having to click the Back button, themes can now be installed via this new Preview area.
Once a theme has been installed on your WordPress blog, the Preview option becomes much more useful as it loads up the new theme customizer and lets you see how this design will look on your live website. This enables you to preview the theme using your menus, posts, pages and more.
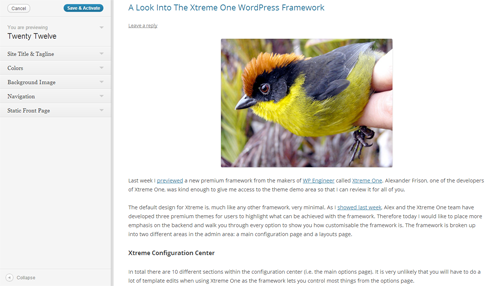
Being able to see how themes will look with your existing content has greatly improved the process of installing WordPress designs via your Admin area, and changed the way bloggers choose their themes.
New feature: Theme customizer
This feature allows you to configure your theme via a user-friendly Options area.
The WordPress customizer allows users to configure many different areas of their design, such as the header, background and navigation via a dedicated Options area. Older WordPress themes do not support the customizer but can be modified appropriately with a few simple edits to the theme functions.php file.
The Customize link can be found via the Themes link in the Appearance menu of your WordPress Admin area. Clicking on the link will take you directly to the theme customizer Options area.
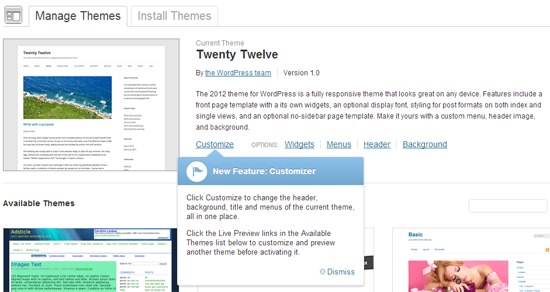
The options available to you in the customizer will depend on the theme itself. The default WordPress themes only had five or six different options, however over the last six months we have seen WordPress designers incorporate other options in their designs. Common options include site title and tagline, colors, background image, navigation menus, and whether posts or a static page were displayed on your home page.
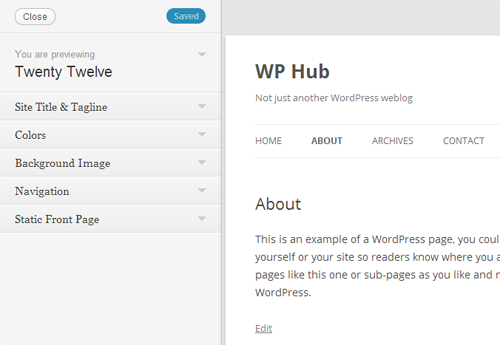
One of the reasons the theme customizer was so well received within the WordPress community was because changes can be seen in real time. Whenever you change your site name or adjust some colors, these are reflected in the theme preview. The changes are, however, only applied to your website after you have clicked the Save & Publish button.
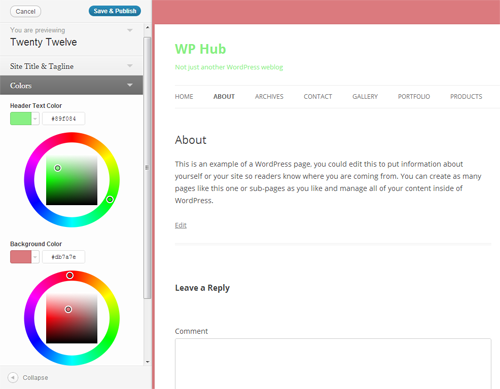
The theme customizer has made it possible for beginners to modify how their website looks without editing any templates. It’s very straightforward to use and since the release of WordPress 3.4, many designers have made sure their themes are compatible with it.
New feature: Twitter embedding
Now you can embed Twitter statuses directly into your blog posts and pages by simply entering the Twitter status URL.
Twitter is one of the most powerful tools available to bloggers. In addition to self promotion and networking, many bloggers use Twitter as a source of inspiration for their articles. The new Twitter embedding feature makes quoting Twitter statues simple and removes the need for taking screenshots or installing plugins to display a quote.
For example, simply enter this within your blog post:
https://twitter.com/problogger/status/271764815607898112
The corresponding Twitter status will be displayed:

The beauty of this new feature is its simplicity. There are no shortcodes to remember or buttons to click: you simply enter the URL of the Twitter status to embed it.
New feature: HTML in captions
This feature lets you add HTML directly to your image captions.
Captions have always been a great way of describing photographs and images to your readers. Being able to add HTML to captions has improved this considerably as you can now include links to photo credits, relevant articles, and websites directly inside the caption.

Those who are using old WordPress themes may find that the new way WordPress adds captions has broken older image captions on your website. Upgrading to a new theme is recommended, though you could fix these issues manually by searching for posts with captions through your WordPress post area and updating the code.
New feature: Improved features for international users
Improved support is now offered for international WordPress users so that many locale-specific configurations can be modified from the core WordPress files.
As a native English speaker, localization is not something I ever have to deal with, so it’s easy to forget that around 44% of all websites are written in a language other than English.
WordPress 3.4 focused heavily on making WordPress more international. Some of the most important new features introduced for non-English users include:
- Localizing commas: Many Asian and Middle Eastern languages do not use the comma (,). This causes a lot of problems for those users, as WordPress uses the comma as a delimiter for tags, quick edits and bulk edits. From 3.4, the comma can be translated to another character for languages where a comma isn’t used.
- Translatable spellchecker language: The TinyMCE WYSIWYG editor can now be translated into any language.
- Specify default time zone: Previously, the default timezone for all WordPress installations was set to GMT. This can now be modified so that the timezone does not have to be adjusted during the installation process.
- Feed language: The language of your feed can now be set using the bloginfo_rss template tag.
- Specifying start of week: You can now easily define the day the week starts.
If you don’t blog in English, many of these new features should make it easier for you to use WordPress in your native language.
New feature: Flexible header images
Header images are now responsive.
Custom headers were added to WordPress way back in 2007 (version 2.1). Previously WordPress allowed you to set the width and height of a header image, but all header images which were uploaded had to be cropped to fit these dimensions.
Now all images will resize dynamically to match the width of your header.
With so many people viewing blogs on mobile devices, flexible headers have made it easier for designs to accommodate any resolution. Check out Creating a responsive header in WordPress 3.4 at WebmasterDepot for a complete walkthrough of this new feature.
New feature: Login shortcodes
WordPress now offers more user-friendly login URLs.
WordPress users can log in using www.yoursite.com/wp-login.php and access the Admin area via www.yoursite.com/wp-admin/. Since version 3.4, you can log in using the more user-friendly URL www.yoursite.com/login. The Admin area can also be viewed by entering www.yoursite.com/admin or www.yoursite.com/dashboard.
There’s no denying that this is a small addition to WordPress, but I always welcome small things like this that make daily tasks such as logging in quicker and easier.
New feature: Comment via the post editor
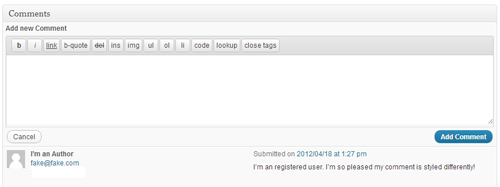
Comments can now be added via the Post and Page editor pages.
For years the Post editing page has shown all the comments that were left on a post or page. In addition to viewing comments, there is now an option to leave a comment directly on a post from the post editor area. This saves you from having to load up the article in order to leave a comment.
New feature: Improved touch support
WordPress now offers vastly improved touch support in the user interface.
WordPress aimed to improve site usability on tablet devices such as the Apple iPad and Kindle Fire. Specifically, they added support for drag-and-drop functionality. This allows you to more easily customize the mobile user interface simply by moving things around.
New feature: Child themes added to the theme repository
The official WordPress themes directory now accepts child themes of WordPress themes that are already listed within the directory.
Child themes will be accepted within the theme directory if they can demonstrate sufficient difference from the parent theme to warrant inclusion.
I was particularly pleased with this feature, as it allows designers to take existing designs and modify them for different users. For example, designers will now be able to take a magazine-based theme and make it more blog-orientated, or remove features from designs that are too bloated.
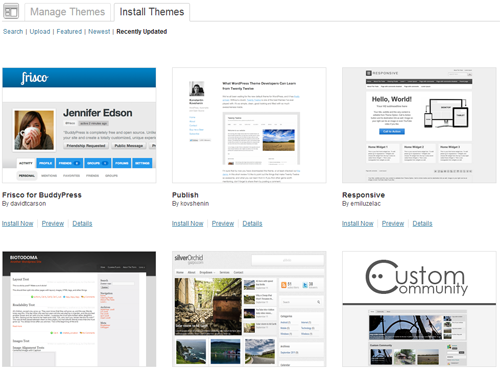
The theme installer supports child themes too. The great thing about this is that WordPress will automatically install a child theme’s parent theme if it isn’t already installed.
New feature: Scroll to top of Admin bar
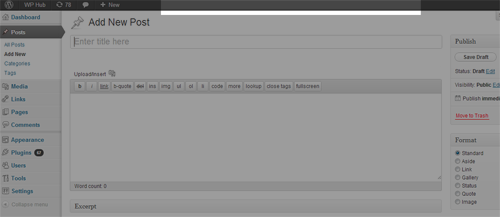
Now, we can scroll to the top of the page by simply clicking the Admin bar.
This simple feature was missed by a lot of bloggers but it’s something that I’ve found myself using every day. Since WordPress 3.4, you can scroll to the top of the page by clicking in the empty area in the Admin bar. Simple but effective!
Other features added to WordPress 3.4
Since we’re short on space, here are some of the other great features that were added to WordPress 3.4:
- The dashboard is now ready for high-resolution displays such as Apple’s retina display.
- Multi-site improvements were made, such as auto-complete for adding new users and an increase in the default upload limit from 10mb to 100mb.
- The Recent Comments widget had some small improvements.
- Custom post types can now use the Distraction-free Editing mode (also known as Zen mode).
- XML-RPC was improved to let WordPress interact with other applications more easily.
A full list of features added to WordPress in version 3.4 can be found in the WordPress codex.
That’s it for WordPress 3.4! Which of these features are you using, and which are your favorites? Let us know in the comments … and don’t miss Part 2 in this series, where I explain the handy new features available in WordPress 3.5.
Michael Scott has been working with WordPress themes and websites in varying capacities since 2007. It was mainly as a project manager where he quickly developed a love for their simplicity and scalability. As a strong advocate of all things WordPress, he enjoys any opportunity to promote its use across the Interweb and on WPHub.com .
The post WordPress Feature Review: New Features You Missed in 2012, Part 1 appeared first on ProBlogger.
WordPress Feature Review: New Features You Missed in 2012, Part 1
https://problogger.com/wordpress-feature-review-new-features-you-missed-in-2012-part-1/
http://www.problogger.net/archives/category/blog-networks/feed/
Blog Networks – ProBlogger
Blog Tips to Help You Make Money Blogging – ProBlogger
https://problogger.com/wp-content/uploads/powerpress/problogger_podcast-891.jpg
Powered by WPeMatico
Install Your First WordPress Theme
This guest post is by Karol K of ThemeFuse.
Seeing a headline like “How to Install a WordPress Theme” on ProBlogger might seem strange at first. This doesn’t sound like a “pro”-thing at all, right? If you’ve been dealing with WordPress for a while then this is probably even more than obvious to you.
However, everyone starts somewhere, and there are plenty of experienced bloggers who haven’t ever installed a WordPress theme—but would like to give it a try. Maybe you’re installing your first theme right now, and you’re searching for a quick guide on how to do it.
Where can you get a good WordPress theme?
This is tricky. You see, when you’re installing a plugin the best place to go is the official directory at wordpress.org. When you’re installing a theme, however, the official theme directory is not the best place to go, I’m afraid.
Of course, you can find some interesting themes there, but you’re more likely to make your search much more fruitful if you just go to Google.
The thing with the official directory is that it only contains 1,490 themes or so. This is by no means the total number of themes available on the internet. There’s much much more interesting stuff out there, and settling for what you can find in the official directory would not be a wise thing to do.
Yesterday, I described how to select a theme that’s perfect for you and your blog. So here I will just assume that you already know which theme you want to use.
Step 1. Download the theme
Once you find a theme you like, you’ll need to download it to your computer before you can do anything else with it.
The package containing your theme can consist of many various elements. Depending on the license you’ve selected, you might find some PSD files, additional bonuses, documents, and so on. Of course, the theme files themselves will be present as well. Most of the time, all the contents of a theme are delivered as a ZIP archive.
2. Extract the files
Next, you have to extract the archive somewhere—onto your desktop, for example. If the archive contains more elements than just the theme (like the bonuses I mentioned above), open the archive’s readme file to locate the main theme’s directory.
As an example, here’s what you’ll find inside a ThemeFuse theme archive:
Once you’ve successfully identified the main theme directory, you can proceed to the next step.
3. Upload the theme to your WordPress blog
This step will require FTP access to your hosting account, and a piece of FTP software. You can try FileZilla—it’s good, and it’s free.
The theme’s main directory is the one you’ll be uploading to your blog. Connect to your site via FTP (the FTP tool’s help documentation will explain how to do this if you’re not sure) and navigate to the wp-content/themes directory of your site. This is where you upload your theme’s main directory.
Here’s the default look of the directory when it contains only one theme—the default theme TwentyEleven:

The next step in the process takes place in your WordPress Admin panel.
4. Activate your new theme
Log in to your WordPress Admin panel using your Admin account details.
Installing new themes requires Admin access rights; it can’t be done through other types of accounts.
Go to Appearance > Themes, as shown here:
Your new theme should be visible among all the others. The only thing left for you to do now is activate it:

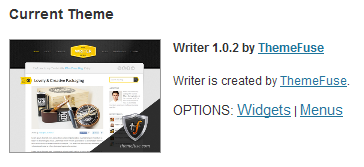
If everything goes well, your new theme will be marked as the Current Theme, and your blog will have an entirely new look.
5. All done!
This is where the guide ends. There’s nothing more for you to do now other than enjoy your new theme! Of course, you could make some final adjustments to make your blog look truly unique, for instance, adding branding elements such as your logo, pictures, and so on. Or, if you’re ready to install a WordPress plugin, we have a guide to that, too!
Have you installed a WordPress theme yet? Share your tips with us in the comments.
Karol K. is a 20-something year old web 2.0 entrepreneur from Poland and a writer at ThemeFuse.com, where he shares various WordPress advice. Currently, he’s working on a new e-book titled “WordPress Startup Guide – little known things worth doing when creating a WordPress site.” The e-book launches soon, and now the best part … it’s free. Also, don’t forget to visit ThemeFuse to get your hands on some premium WordPress themes.
The post Install Your First WordPress Theme appeared first on ProBlogger.
Install Your First WordPress Theme
https://problogger.com/install-your-first-wordpress-theme/
http://www.problogger.net/archives/category/blog-networks/feed/
Blog Networks – ProBlogger
Blog Tips to Help You Make Money Blogging – ProBlogger
https://problogger.com/wp-content/uploads/powerpress/problogger_podcast-891.jpg
Powered by WPeMatico
How to Improve Workflow in a Multi-Author WordPress Blog
This guest post is by Syed Balkhi of WPBeginner.
Running a multi-author blog can become a hassle, especially if you do not have a dedicated content manager for your site.Having run several multi-author blogs myself, I understand the issues you face and decisions you have to make.
If you’re running a multi-author blog, you may have asked yourself questions like, should I give the writer access to my WordPress dashboard? Is it secure? How do I monitor their activities to see they aren’t messing up my website? How do I improve my workflow?
In this article, I will share my personal experience in managing a collaborative WordPress site safely and effectively.
The “t” in “team” is also for “trust”
If you want to improve your workflow, then you will have to give your writers access to your WordPress dashboard. Otherwise, you will find yourself copying and pasting a lot of elements from a Word Document into your WordPress dashboard, attaching images, adding styling elements, and so on.
Fortunately, WordPress comes with numerous user roles with various permission levels.
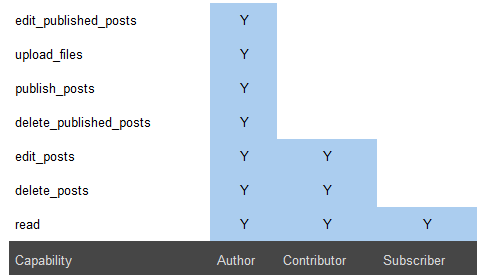
If you look at the charts above, the two permission levels that make the most sense for multi-author blogs are Contributor and Author.
The biggest issue with Contributors is that they can’t attach images because they do not have the ability to upload files. Since you want your authors to have the ability to upload and attach images to their articles, you will want to give them Author-level permissions.
The big issue with that is that it gives them the ability to publish posts, delete posts, edit published posts, and so on. While I trust all of my authors, I don’t want things to go live without going through an editorial review. So I don’t want them to have this capability.
The good thing about WordPress is that there is a plugin for just about everything. You can use a popular plugin called Members to modify the capabilities of the Author role. Once you install the plugin, go to Users > Roles and modify the Author role. Your final permissions settings should look something like this:
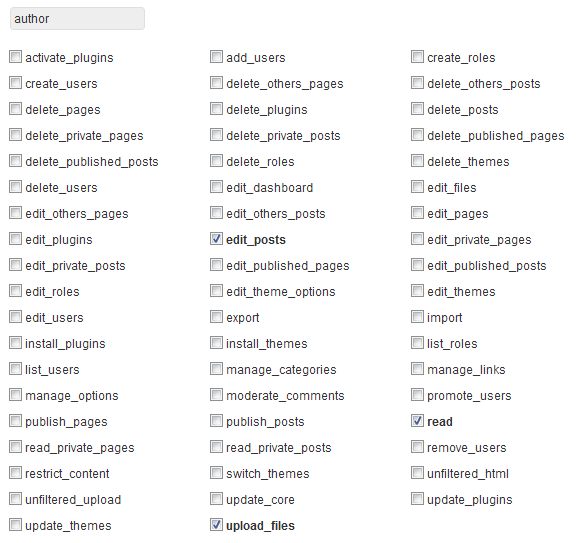
As you notice, the only abilities we’ve given Authors here are editing posts, reading posts, and uploading files.
Security and monitoring
In the past, I have seen hackers trying brute force attacks through the login page. Because each author’s URL contains their username, they only have to guess the password for an author to get access to your site. What’s worse is if your author has used the same password elsewhere, and the hacker knows this.
To prevent this kind of attack, the first thing you need to do is to limit the number of failed login attempts. This means that after three failed login attempts, the user will be locked out.
The second thing you need to do is make sure that you use the plugin Force Strong Passwords. To monitor users’ activity, you can use plugins like Audit Trail or ThreeWP Activity Monitor.
Last, but certainly not least, make sure that you have a strong WordPress backup solution in place. Of course there are other security measures you can take to protect your site in other ways, but these are the ones that are specific to multi-author blogs.
Improving your workflow
A good editorial workflow can make things a lot easier. The key to a good workflow is communication. I use a plugin called Edit Flow to make things easy for me.
The first step is to define the stages of your workflow. My workflow looks like this:
- Draft: default auto-saved posts, or any un-assigned posts
- Pitch: when an author pitches a post idea
- Assigned: the editor or admin assigns the post idea to a specific author
- In progress: the author puts the article in this mode so everyone knows that someone is working on it
- Pending review: once the author finishes the post, they submit it for an editorial review.
- Ready to publish: once the editorial review is complete, we make the post Ready to publish. From there, I or another admin can take a look at it and schedule it for publication.
This workflow makes the process really easy, especially when we have a lot of writers. This plugin comes with default statuses, but you can always add your custom post statuses.
The best part is that you can sort posts by the custom status. Changing the status is extremely simple.
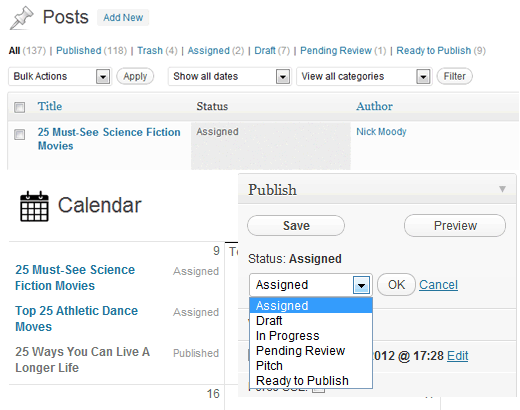
You can also use the Edit Flow plugin to communicate with the author from within your dashboard. This makes the communication part really easy, and prevents you juggling through emails. Also, when assigning posts to a specific author, you can set deadlines in the Editorial Meta Data option.
The plugin also gives you a convenient month-by-month calendar-view of posts. This lets you know if you have a post scheduled for a specific day or not.

A private area just for contributors
Over time I have learned that I don’t have to do everything myself. I can assign tasks to trusted folks in my team. The best way to establish this trust and find out who is the right person for the job is by judging their interest level. Setting up a private area just for your team members can help you determine that.
I recommend that you set up a site with P2 theme and invite your team members and authors there. Password-protect the site, so only logged-in users can see the content. And when an author stands out in this environment, you can promote them to an Editor or another position within your business.
What’s your workflow process? I’d love to hear about it in the comments. Feel free to share your tips and tricks for multi-author blogging, too.
Syed Balkhi is the founder of WPBeginner, the largest unofficial WordPress resource site that offers free WordPress videos for beginners as well as comprehensive guides like choosing the best WordPress hosting, speeding up WordPress, and many more how-to’s.
The post How to Improve Workflow in a Multi-Author WordPress Blog appeared first on ProBlogger.
How to Improve Workflow in a Multi-Author WordPress Blog
https://problogger.com/how-to-improve-workflow-in-a-multi-author-wordpress-blog/
http://www.problogger.net/archives/category/blog-networks/feed/
Blog Networks – ProBlogger
Blog Tips to Help You Make Money Blogging – ProBlogger
https://problogger.com/wp-content/uploads/powerpress/problogger_podcast-891.jpg
Powered by WPeMatico
Keep Your New Year’s Resolution: Set up a Social, Search-optimized WordPress Blog … Today
This guest post is by Marcela De Vivo of Gryffin.co.
Recently ProBlogger discussed how to brand your blog, how to find your voice, and how to build your authority.
Image courtesy stock.xchng user panoramadi
These articles are powerful, but often I find myself speaking with people who don’t have a blog yet, or are using Blogger or custom made, cumbersome platforms. Just this week alone I went through these steps with four different people who want to jump on the blogging bandwagon.
In this article we will go back to basics for those who haven’t started their blog yet, or who are on platforms that are hindering their progress.
If one of your New Year’s Resolutions was to improve your blogging presence—or start a new one—read on!
We’ll go through a step-by-step process, including tools and resources for each step, to set up a WordPress blog that is optimized for social and search marketing success.
Setting up your WordPress blog
WordPress is currently the most popular content management platform. It can be used for static pages or as a blog. You can add plugins for a shopping cart, image galleries, and much more.
Here’s how to set it up.
- Register your domain with sites like Register.com, Godaddy.com, or Enom.com
- Create a hosting account with sites like BlueHost.com, WPEngine, or HostGator. If you would like to do more research on hosting companies, check out WhoIsHostingThis.
- Select a WordPress theme. I personally love using StudioPress as the themes are clean, functional, and easy to work with. Search for a responsive theme so your blog will be accessible to mobile users.
- Is your site running on a different CMS or platform? Consider using a blog migration service, such as BlogWranglers, to move your current site over to WordPress. Hundreds of thousands have done it, with no regrets.
- Upload WordPress to your hosting account, and customize with your relevant theme. If you are not a techie, this is the part where you’ll need some help. Check out Elance.com, Freelancer.com, or a site like Craiglist.org to find someone who can help you set up and customize your template.
- Install WordPress plugins.
Let’s take a deeper look at the plugins you’ll need.
Setting up your plugins
Social media
These are the social media plugins I recommend you consider.
- Disqus or CommentLuv for comments
- Digg Digg for social engagement
- The Slide to recommend related articles
- Social Metrics for a quick look at your social engagement from your Dashboard
- MailChimp to collect email addresses for email marketing
SEO plugins
My favorite SEO plugins include these ones.
- WordPress by Yoast
- BWP Google XML SiteMaps
- ScribeSEO
- Outbrain for related articles at the end of each post
Usability
Usability plugins can be a huge help. Consider these:
- WP Smush It
- Broken Link Checker
- Contact Form 7
- WP Recaptcha for captcha
Doing keyword research
To gain exposure from search engines, you need to have your blog focused on a theme. Select a primary keyword within this general theme for each page of the site. You can read more about keyword research in this ProBlogger article.
Select keywords by identifying low-competition and high-search terms for your industry from Google’s Keyword tool.
Other tools you can use include:
- WordTracker
- Keyword Discovery
- Keyword Spy
- Spy Fu
- Market Samurai
.
Prepare content for your static pages and images
While a designer/programmer is working on setting up your site, you can start by writing and preparing content for your site.
A well-optimized page includes the primary keywords in the Title of the page, Meta Description tag, H1 tag, once or twice in the body, and in an outbound link.
As you’re preparing your content, remember these elements of an excellent blog post:
- Post title: creative and compelling
- Social share icons: make sharing your content easy
- Image: an image speaks louder than words
- Opening paragraph: include keywords in a teaser into the introduction
- Body copy: use headers and bold words
- Lists: make your content easy to scan
- Conclusion: include a teaser for your next article
- Related posts: give them more content to consume
- Comment section: Always respond to comments
Read Darren’s compilation from earlier this year for more information on each element in The Anatomy of a Better Blog Post.
Connect your site for optimum findability
- Create your Webmaster Tools account on Bing and Google.
- Use BWP Sitemap tools to create and upload an XML sitemap.
- Set up Google Analytics and connect it to your blog.
- Set up your Author tag on Google Plus.
By this point you should have a WordPress blog with a range of enhancements made possible by plugins and other customizations. You will have SEO plugins to improve your on-page SEO, page load times, keyword density, site maps, and other relevant SEO features.
You will also have a selection of social plugins so that you can encourage social shares from your site. You will have other features such as contact forms, tracking, reporting, and an email signup box to build your email list.
Incorporating keyword research will help you to deliver the content that people are looking for in a way that lets it be found. You can write articles based on long-tail terms, answer questions that your audience may have, and target hundreds of keywords by writing articles specific to each one.
So what are you waiting for? Make your New Year’s Resolution a reality and start your new blog today. And if you have any suggestions of plugins, tools, or services to add to this list, please do share!
Marcela De Vivo is a freelance writer who writes about blogging, SEO and social media at Gryffin.co/blog.
The post Keep Your New Year’s Resolution: Set up a Social, Search-optimized WordPress Blog … Today appeared first on ProBlogger.
Keep Your New Year’s Resolution: Set up a Social, Search-optimized WordPress Blog … Today
https://problogger.com/keep-your-new-years-resolution-set-up-a-social-search-optimized-wordpress-blog-today/
http://www.problogger.net/archives/category/blog-networks/feed/
Blog Networks – ProBlogger
Blog Tips to Help You Make Money Blogging – ProBlogger
https://problogger.com/wp-content/uploads/powerpress/problogger_podcast-891.jpg
Powered by WPeMatico
Aprendendo a Blogar com Darren Rowse | um dos maiores Blogueiros do Mundo
conheça o meu blog: http://acblog.com.br Neste vídeo a Ana do site Vídeo-Aulas by Ana, resume uma entrevista feita com o Blogueiro Darren Rowse um dos maiore…
Make Money Online With No Investment With Problogger Blog
Make money online articles with no monetary investment is making big money online lessons Make money online articles earn money online, make money online and…
OVERVIEW: Nuffnang Blogopolis 2011.m4v
On July 30, 2011, some 300 Australian bloggers converged n Melbourne venue Zinc for the inaugural Nuffnang Blogopolis event. The event featured Problogger Da…
HubNewz Week#5 Snapchat Raises $60 Million in funding, Rebekah Radice & Problogger.net
Limited Time SPECIALOFFER– Sign up to my Awesome Weekly Newsletter and I’ll send you my Huge — 6 week email bonus “Blockbuster Offer” perfect for bloggers …
Reading Roundup: What’s New in Blogging Lately?
Good morning! Welcome to your roundup of interesting titbits from around the web. Plenty to mull over here – tools, beta testing of our favourite social media sites, Google doing new Google things (who knew?!) and a cool script to help you tap into your blog audience’s personas. Enjoy!
5 Visual Content Tools to Boost Engagement // Social Media Examiner
If you’re on a tight budget (or let’s be honest: no budget) for graphics, these tools should help you up your visual content game. I love the Instagram collage idea.
Instagram Now Testing Support for Account Switching, No Logout Required // TechCrunch
Oh wouldn’t this be a boon for those of you who manage multiple accounts! Let’s cross our fingers that the choice proves popular in the beta testing and they keep it.
LinkedIn’s New Facebook-like App Arrives on iOS and Android // Mashable Australia
A much easier (and more eye-pleasing!) way to see who is sharing what on LinkedIn. I can imagine it would promote more engagement, which I’m all for. I have to admit, I don’t do much with my LinkedIn but I may be swayed by this!
How to Figure Out What Keywords Your Potential Customers are Using // Hubspot
And what your potential readers are searching for! This is a super-detailed piece – Bridget has taken a step back and started at SEO right from the start before launching into what tools you can use so you can be armed with all the knowledge to create a super campaign or tailored blog content.
How to Become a Virtual Assistant // Amy Lynn Andrews
I know plenty of us have “virtual assistant” on our Christmas lists, but for those of you who would like to be one (can be a great supplement to your blog income), Amy has recently updated her guide. Check it out!
Google Turns Image Search Into Pinterest with New Collections Feature // TechCrunch
It’s only for mobile (and those of you in the US), and it looks as though it’s a part of the sort-of-revamped Google+, but now when you find an image you want to keep for later in Google search, you can organise your own personal collections. Search results are filterable and it appears quite intuitive.
“Don’t Pursue Something That Someone Said You Should Want”: Derek Sivers at WDS // Chris Gillebeau
I loved attending the World Domination Summit in Portland this year, and Chris Gillebeau, master of it all, has started releasing videos from the amazing speakers across the weekend. This video is from one of my favourite speakers – Derek Sivers – who delivered kick-ass, no-bullshit business advice. I took SO MUCH away from his philosophy. Watch it, you won’t be sorry!
Persona Research in Under 5 Minutes // Moz
You know how much we love a reader profile around these parts. Who are you speaking to? What kind of people make up your core audience? More importantly – where are they hanging out? I love this script for nailing all this info in under 5 minutes.
8 Creative Ways to Add Christmas Spirit to Your Social Media // Jeff Bullas
I just spent 10 minutes trying to find the best christmas photo for my Facebook profile. It’s that time of year!
From YouTube to Persicope: The Evolution of Web Video [Infographic] // AdWeek
Crazy to see how far it’s come (and how much I suck at all of them). I wonder where web video (and indeed, how audiences consume it) is headed next. Any ideas?
Have you Christmasified your social media yet?!
Stacey Roberts is the Managing Editor of ProBlogger.net: a writer, blogger, and full-time word nerd balancing it all with being a stay-at-home mum. She writes about all this and more at Veggie Mama. Chat with her on Twitter @veggie_mama or be entertained on Facebook.
The post Reading Roundup: What’s New in Blogging Lately? appeared first on @ProBlogger.
Powered by WPeMatico
Media Talks Q&A: Starting out in Media I Darren Rowse
http://www.faustinaagolley.com http://www.facebook.com/faustinathefuzz http://www.twitter.com/faustinathefuzz Media Talks Panelists: Darren Rowse (Problogger…
Social Media Power Panel at the PeSA Internet Conference 2013
Social Media Power Panel at #PeSA13 Australia’s Leaders in Social media share their insights. Josh Rowe from Australia Post as MC with Darren Rowse from ProB…
4 WordPress Alternatives: the What, Where, and Why
This guest post is by Matt Setter of MaltBlue.com.
As bloggers, we’re all familiar with WordPress, whether as a self-hosted setup, or via WordPress.com. I think that, if you’re a blogger and you’ve not used it, then you’re likely in an odd minority.
If you do a Google search for “blogging software,” WordPress will likely be among the first results you’ll see. But is it necessarily the best choice?
Yes, “everybody’s doing it,” but does that make it the right choice? Just like in the 90’s when Microsoft seemed like the only choice, but then we found alternatives like Mac or Linux, there are alternatives to WordPress too.
Now maybe you’re quite happy with your WordPress installation, it meets your needs, and your site’s humming along nicely. Well, that’s perfectly fine. But what if you’re not? What if you want to change, or have the opportunity to change?
What if you’re:
- just starting out
- about to rebuild or redesign your blog
- moving hosts
- concerned WordPress is not meeting your needs
- contrarian in your thinking?
Well if you’re any one of these, you’ll love this post. Today I present to you four alternatives you may never have heard of, showing you the pros and cons of each, how much they cost, and where you can get them from. Ready? Great! Let’s begin.
Habari
 Habari is a secure blogging platform designed from the ground up with the current and future needs of the blogging community firmly in mind. It’s also designed to be open and transparent, using modern software development techniques in its design.
Some examples of blogs run on this platform include:
- http://barefootrunner.co.uk/
- http://futurespark.com.au/
The Habari project screencast linked below gives a great introduction to the CMS.
Features
- Support for a wide variety of plugins and extensions, including:
- contact forms
- Last.FM
- spam management
- Amazon
- Google Maps, AdSense, and Analytics
- star ratings
- members-only access
- modern theme support
- support for multiple users and multiple sites in one installation
- support for tagging
- support for a wide variety of media, including Viddler and Flickr
- custom RSS feeds and statistics
- Feedburner integration
- modern spam filtering techniques
- automatic Twitter updates
- Disqus integration for commenting.
Cost and availability
Habari is available as a free download from the project home page. You can even try out a demo version without needing to install it.
Support options
Habari support is available via:
- FAQ
- users group
- IRC (internet chat, similar to ICQ, MSN, Google Chat etc).
Is it for you?
If you’re keen to roll up your sleeves and manage things yourself, or you have great tech support, try out Habari. However, if your host doesn’t support it or you’re not able to do it yourself, then this may not be the best option for you.
CushyCMS
 CushyCMS is, as the home page says, “A Truly Simple CMS.” It was designed to be implemented with as little effort as possible; to be “Super Easy To Use!”
Where Habari is more like WordPress in that you can download, install, and configure it yourself, CushyCMS is a fully hosted solution.
Minimal manual effort is required on your part, other than the work required to implement modest customisations. Have a look at the introductory video below to see just how easy it is.
Blogs that use CushyCMS include:
- http://thewebtherapist.com/
- http://www.the-nomads.co.uk/
Features
Depending on the package that you choose, different features will be available to you. In the free package, you get:
- five sites
- unlimited site editors
- availability in 20 languages.
If you take the pro package, you can:
- brand your installation
- customise the interface via a wysiwig editor
- remove all ads from the site
- use your own domain name and logo
- configure access rights for each user
- customise the CSS classes.
Cost and availability
CushyCMS is available from Stateless Systems and comes in two forms:
- free
- pro, for US$28 per month.
Support options
This depends on the package that you’ve chosen. If you’ve chosen the free package, you get:
- videos
- documentation
- package FAQ
- access to the Google user group.
If you upgrade to the pro package, you get all that, plus direct email support from Stateless Systems.
Is it for you?
Depending on your needs and requirements, CushyCMS could be just what you’re looking for. You can sign up and get started in minutes. There’s no need to worry about what your current provider does or doesn’t support, as this system is fully hosted. You can get started with the free version, but you’ll have limited branding and domain control privileges.
You can upgrade to the pro version, but unless you’re making regular money with your blog, you might not want to pay the monthly fee for it. However, you do get a company backing the product with 24/7 support, should you have any questions or queries.
concrete5
 Just like WordPress and Habari, concrete5 is available to be downloaded, configured, and installed at your web host and is a blogging platform built from the ground up to satisfy the needs of website editors, designers, and developers alike on a foundation of proven open source technologies.
The underlying philosophy of concrete5 is to make running a website easy. As you can see from the demo video below, in just about all aspects of site administration, you can simply click on a region of the page and edit it to your heart’s content.
A couple of blogs that run on concrete5 are:
- http://www.gigstadpainting.com/
- http://www.sustainableharvest.com/
Features
Concrete5:
- is easy to theme yourself, or you can choose from a wide variety of pre-made themes
- supports a wide variety of plugins and extensions including:
- digital download support
- discussion forums
- ecommerce
- ad servers
- configurable menu navigation
- star reviews
- scrolling ticker
- image gallery
- traffic and statistics management
- Google Maps
- user chat
- country-based redirect
- Vimeo and YouTube support.
- easy to configure, whether by hand or via the wysiwig editor
- easy to update, right from your browser
- open source and completely free to use
- easy to install and configure.
Cost and availability
Concrete5 is available from the concrete5 website and is open source, so it’s free.
Support options
Similar to Habari, concrete5 doesn’t have a paid support option, however it does have:
- an active community
- clear documentation
- a thorough FAQ.
If you are a developer, or have access to development support, training and integration packages are also available.
Is it for you?
Concrete5 is a good mixture of the best parts of the two previous packages. You can install it yourself, but training and custom build support are also available. So, depending on your needs and your available budget, concrete5 may be the right option for you. Why not give a trial version a go today to see?
TomatoCMS
 Last, but by no means least, is TomatoCMS. Like Habari and Concrete5, TomatoCMS is an open source, modern blogging and CMS platform designed from the ground up to meet today’s needs and demands.
Examples of blogs that run on this platform include:
- http://www.thethao68.com/
- http://home.phono.co.jp/
Two key aspects set TomatoCMS apart: Widgets and the Layout Editor. Let’s look at its feature list.
Features
Among a vast array of compelling features are:
- a variety of built-in modules (extension) including:
- banner advertising support
- category management
- comment management
- simple menu management
- multimedia management
- in-built news system
- tag support
- poll support
- built on the Zend Framework, jQuery, and 960grid, making it fast, light and flexible.
In addition to this it’s also:
- SEO friendly
- secure
- highly themable
- packaged with a simple visual editor allowing you to drag, drop, and resize almost any interface element.
Cost and availability
As with Habari and Concrete5, TomatoCMS is also a free download available to be installed and configured on your host as your needs demand.
Support options
Also like Habari and Concrete5, TomatoCMS doesn’t offer a commercial support package. However it does have a solid project wiki and a thriving forum. If you have troubles with it, then you’re likely to find the solution there without too much hassle.
Is it for you?
If you’re keen to control most, if not all, of the aspects of the system on your own host, then this is the option for you. However, if you need support then this option may not be the best choice.
Choices, choices
So there you have it. If you want to change from WordPress, have an opportunity to change, or are just starting out, now you have four additional options to WordPress to choose from.
Take a closer look and evaluate them. When you find the one that ticks all your boxes, give it a try and let me know how it goes for you.
Do you run your blog on an alternative to WordPress? Why is it your platform of choice? What makes it the best one for your blog and your business? Let us know in the comments.
Matthew Setter is a freelance writer, technical editor and proofreader. His mission is to help businesses present their online message in an engaging and compelling way so they’re noticed and remembered.
The post 4 WordPress Alternatives: the What, Where, and Why appeared first on ProBlogger.
4 WordPress Alternatives: the What, Where, and Why
https://problogger.com/4-wordpress-alternatives-the-what-where-and-why/
http://www.problogger.net/archives/category/blog-networks/feed/
Blog Networks – ProBlogger
Blog Tips to Help You Make Money Blogging – ProBlogger
https://problogger.com/wp-content/uploads/powerpress/problogger_podcast-891.jpg
Powered by WPeMatico
Present Darren Rowse
Present Darren Rowse Video.
MarketLeverage BlogWorld Interview Darren Rowse
MarketLeverage BlogWorld Interview Darren Rowse.
Jason Falls & Darren Rowse on Online Communities
From the Avoiding Disaster: How Not to Use Social Media panel at BlogWorld08, Jason Falls asks Darren Rowse what are some of the differences between online c…
Bloggers to Watch in 2017

This is a guest contribution from Jade Craven.
The blogosphere has changed so much over the past decade. I curated Bloggers To Watch column here on Problogger for four years and it is phenomenal how much has changed since I wrote my last post in 2012.
In that time, popular bloggers have pivoted multiple times. Social platforms have risen and fallen. It is a fascinating time. So fascinating that I asked to compile another list of bloggers that haven appeared on my radar.
This post features bloggers who have gotten my attention over the past year. It doesn’t reflect the top bloggers online. Rather, it’s a list of bloggers that have sparked my interest and is heavily biased towards the marketing niche.
Sol Orwell
Sol Orwell is someone that has gotten a lot of attention in the entrepreneurship space over the past 2 years. To quote from Smart Passive Income:
Sol’s built his career across a dizzying number of spaces. He’s a master at building authority in a niche, identifying community pain points, and crafting businesses that meet those urgent needs
His latest project, Examine.Com, garners around 70,000 visitors a day and is a seven-figure business. Normally, such figures would put me off recommending him. However, his work stands out and he can teach you a lot about networking and selling products. His post about How I made my guest post a massive success [CASE STUDY] blew me away when I first read it.
It is refreshing because his work doesn’t repeat the passive income rhetoric. If anything, he rebels against many of the common themes in the marketing niche. To quote from his about page:
Having a one-time launch of $50,000 does not make you a guru, nor does making $2k/mo from your websites make you a passive income genius, nor does getting 2000 visitors a day to your site make you some kind of traffic genius.
You can learn more by checking out his blog at SJO.com
Ryan Holiday
Ryan Holiday is a writer and media strategist. I initially discovered him via his first book Trust Me, I’m Lying: Confessions of a Media Manipulator, where he shows how blogs control and distort the news. As a blogger, I found it useful to learn how I was being manipulated.
He’s written extensively about his business experiences. The following posts have helped me immensely:
- From Zero to 35,000: How I Built A Big Email List Exclusively About Books I Liked
- How I Did Research For 3 New York Times Bestselling Authors (In My Spare Time)
- Behind The Book Campaign: How to Sell 30,000 Copies in Six Weeks
- The Notecard System: The Key For Remembering, Organising And Using Everything You Read
Lately, his work has focused on what we can learn from philosophy. I believe everyone can learn from the principles of Stoicism, which he explores at Daily Stoic.
You can learn more by visiting his blog at RyanHoliday.net
Emilie Wapnick
Emilie Wapnick wowed attendees of the 2106 Problogger Event with her talk about bringing multiple passions/interests into one blog. In 2015, she gave her TEDx presentation about why some of us don’t have one true calling. I believe that was her reaching her tipping point. Since then, interest in her work has exploded. The release of her book, How To Be Everything, this year will spread that even further.
You can check out her top resources for multipotentialites at her Start Here page.
Ramit Sethi
Ramit Sethi is a New York Times bestselling author and founder of iwillteachyoutoberich.com. Over 1,000,000 people read his material to learn how to use psychology and systems to live a Rich Life. His work has helped me change my relationship with money.
His work has been featured here in the past via two guest posts by Michael Alexis.
- Ramit Sethi: I Will Teach You To Monetize (In 6 Steps)
- Ramit Sethi Exposed: How He Earns Millions Blogging
His blog posts are brilliant but I also love it when he is interviewed. Here are a few of my favourites:
- How Creatives Should Negotiate via Tim Ferris
- How Ramit Sethi Launched a Product That Generated $5m in a Week via The Hustle
- Why The Loooooong Sales Letter Works And Other Surprising Sales Hacks via Mixergy
Now, he’s helping his readers create a low-risk and automated online business at his new site, Growth Lab. I highly recommend following it.
Sujan Patel
Sujan Patel is a leading expert in digital marketing. He is the co-founder of WebProfits, a growth marketing agency, and is a partner in many software companies.
It is so easy to be intimidated by Sujan’s experience and breadth of knowledge, especially if you are at the start of his blogging career. Don’t be. He is a prolific writer and content curator and shares so many useful resources via his Twitter account. He contributes regularly to Forbes, Wall Street Journal, and Inc.
Some of my favourite posts include:
- 10 Brainstorming Exercises to Generate 100 New Blog Post Ideas
- How to Validate Demand for Content Before Creating It
- How to Secure Guest Posts on Big Publications (WSJ, Forbes & HuffPo)
Find out SujanPatel.com
Neil Fahey
Neil Fahey is one of my favourite Australian bloggers. He created Bushwalking Blog in 2008 to provide detailed reports of his hikes. In 2011 he expanded the scope of Bushwalking Blog to cover all things hiking, from how-tos and trip reports to news, outdoors photography, safety, and gear reviews.
What I find fascinating is how he leveraged his growing popularity in the outdoor niche into other online businesses. In 2013, he launched a hire service for personal locator beacons – a product that many hikers need but can’t afford to purchase outright. Later, he created an online booking site for nature-based walking tours at AussieHikingTours.com.
So many bloggers look at traditional methods of monetization such as advertising, affiliate income and developing online products. Neil has taken a different approach to meet the needs of his audience. I think we can learn a lot from his experience.
Alexis Grant
I featured Alexis as one of the 20 Bloggers to Watch in 2012 describing her as a “publishing powerhouse.” Well – I was right! She has blown me away with the work she has done since then.
Mid 2013, she launched her new blog The Write Life. She shares more about the behind the scenes development of this site in the bottom half of the websites about page. The site has since become one of the premiere destinations on the web for writers.
In 2015, her content marketing company was acquired by Taylor Media, the company behind the popular The Penny Hoarder blog. She became the Executive Editor, running the editorial side of the company. In 2016, the site was named the #1 fastest-growing private media company by Inc. 500.
I believe she will be accomplishing great things in the coming year, and beyond. You can follow her journey at AlexisGrant.com
Over To You
What bloggers are you watching in 2017? Any trends piquing your interest? Please share in the comments.
The post Bloggers to Watch in 2017 appeared first on ProBlogger.
Bloggers to Watch in 2017
https://problogger.com/bloggers-to-watch-in-2017/
http://www.problogger.net/archives/category/blog-networks/feed/
Blog Networks – ProBlogger
Blog Tips to Help You Make Money Blogging – ProBlogger
https://problogger.com/wp-content/uploads/powerpress/problogger_podcast-891.jpg
Powered by WPeMatico
Darren Rowse on Photographers Starting to use Social Media
ProBlogger Darren Rowse offers a tip for photographers wanting to make the most of social media, based on his personal experiences from when he was starting …


