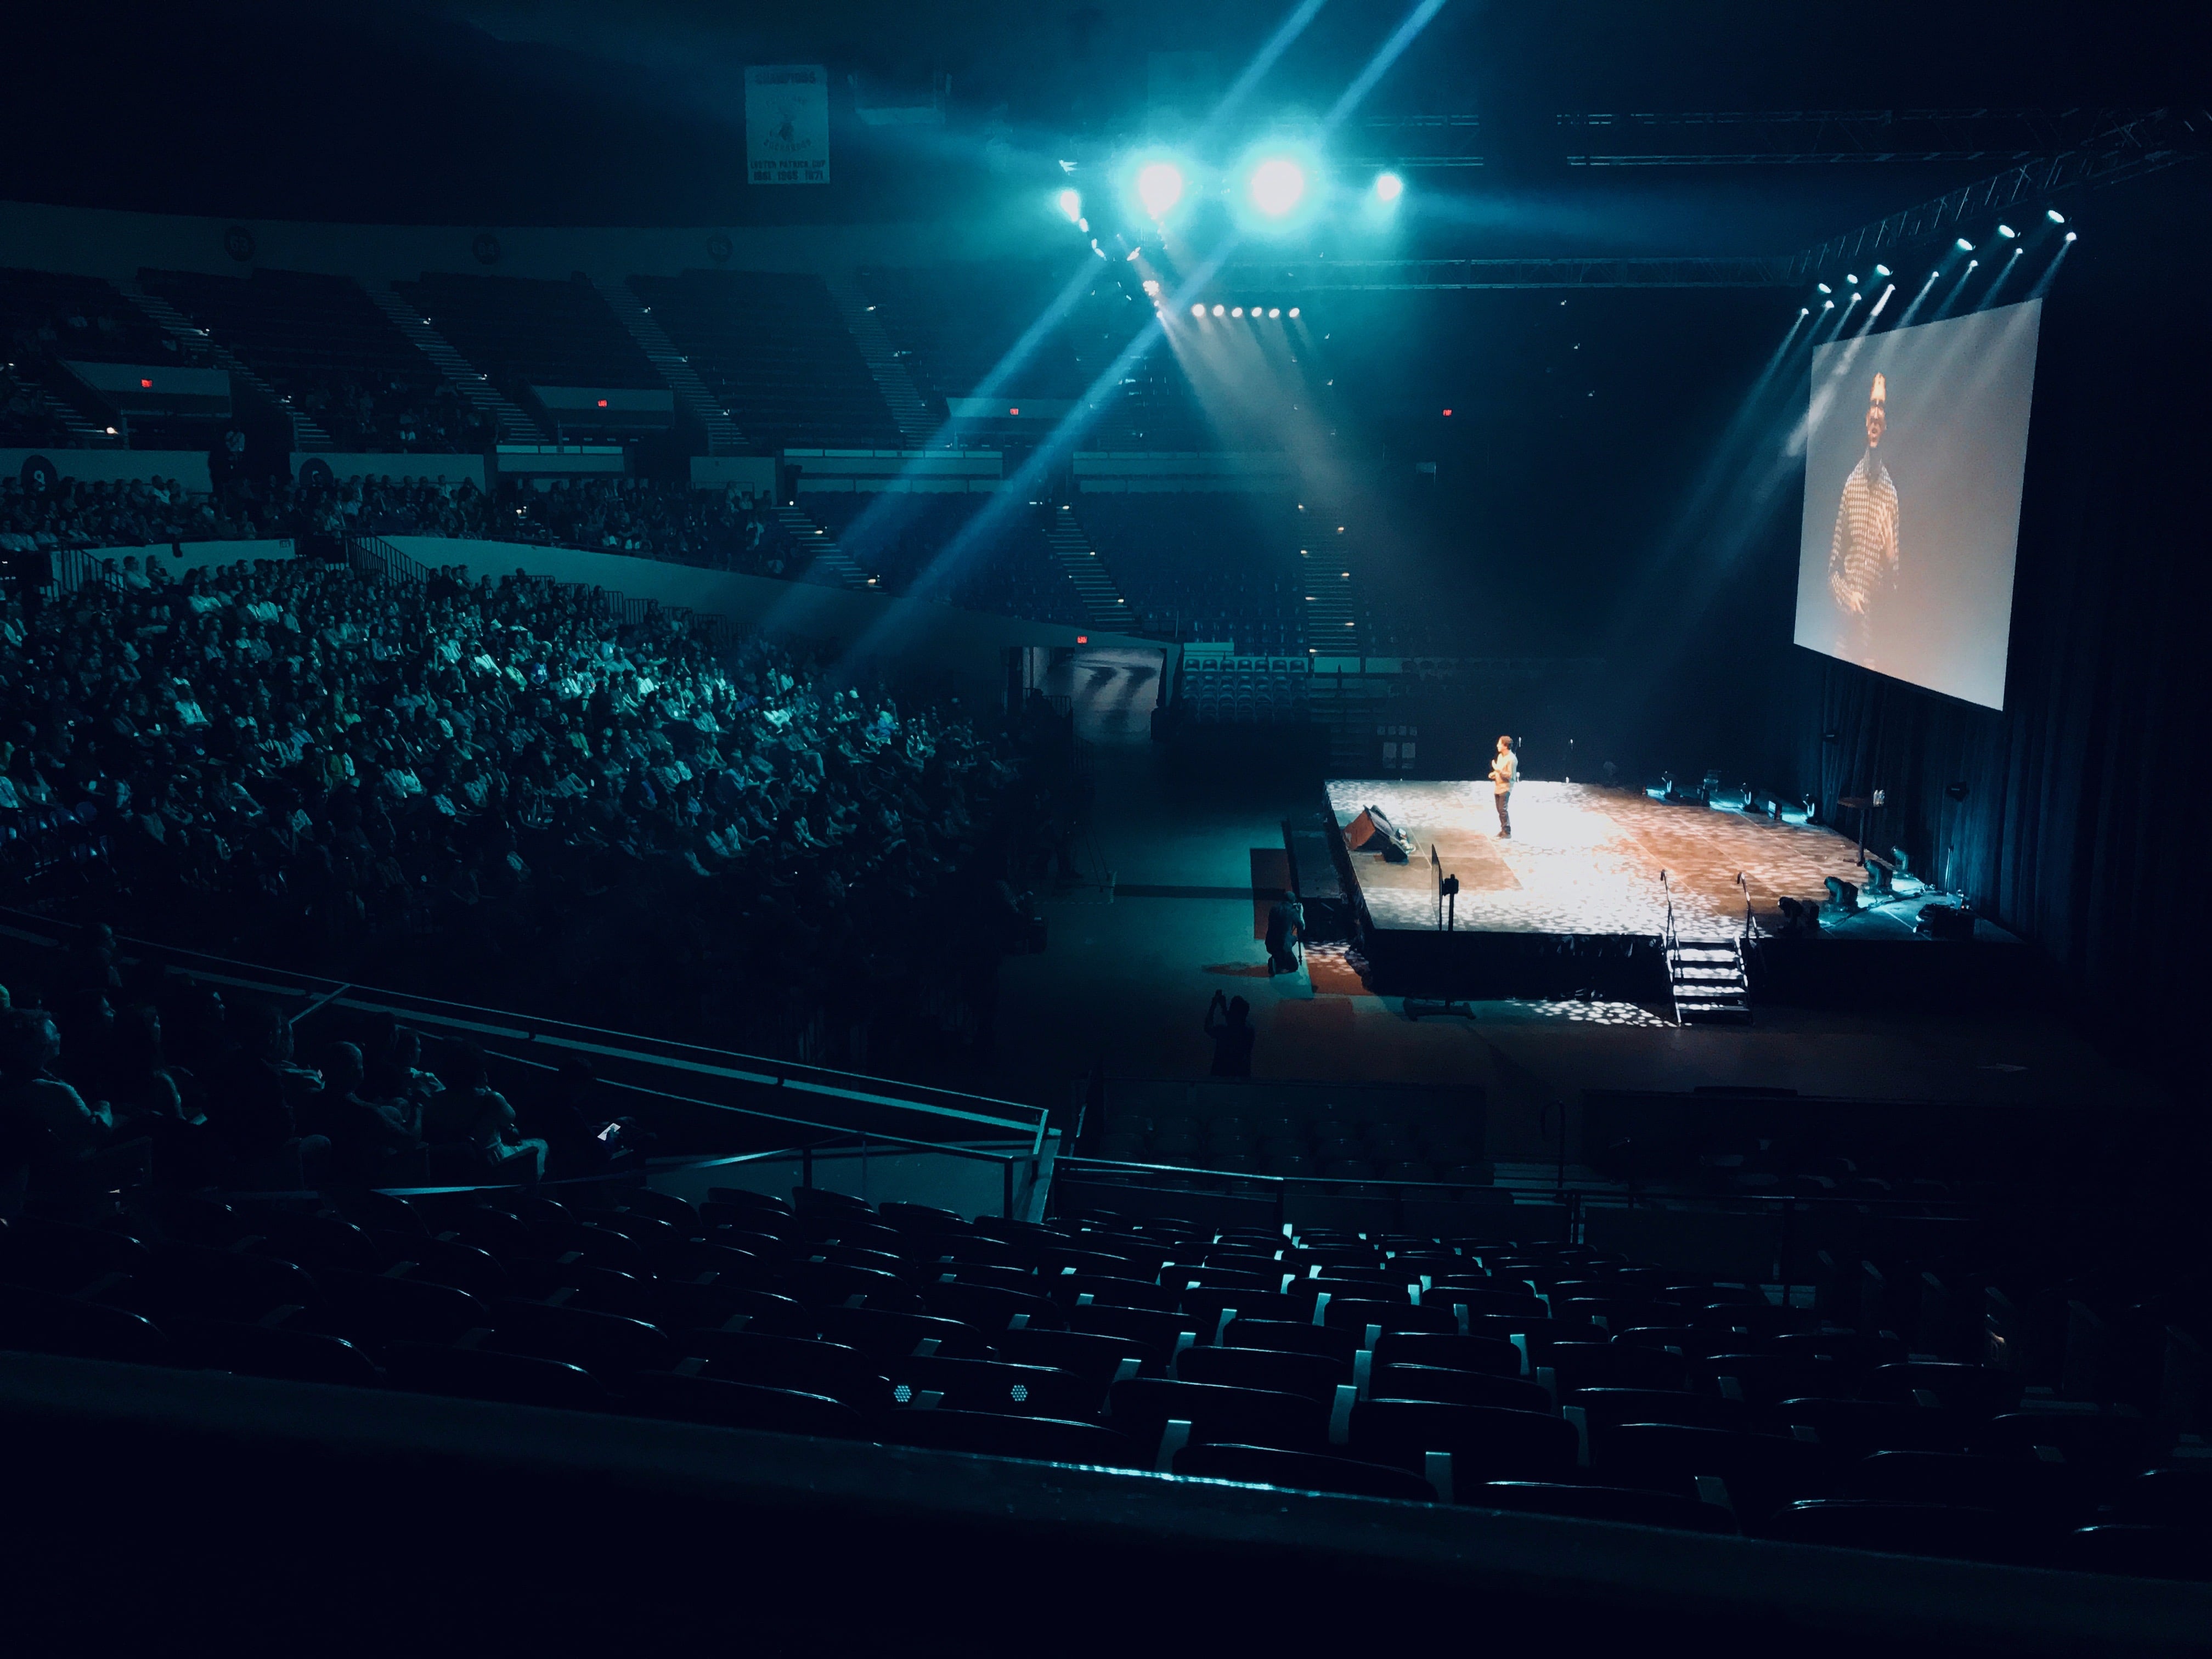
There’s not much talk about frameworks here. There’s no shaming about old techniques, or jokes about JavaScript. There’s just a couple hundred people all around me laughing and smiling and watching talks about making things on the web and it all feels so fresh and new to me. Unlike many other conferences I’ve visited, these talks are somehow inclusive and rather feel, well, there’s no other word for it: inspiring.
I’m sitting in a little room buried underneath the Veterans Memorial Coliseum in Portland and I’m here for my third XOXO. And I can’t stop smiling.
Although the festival is not entirely focused on coding and front-end development, there are a lot of developers here that make art on the web for fun. From Jenn Schiffer’s pixel art to Monica Dinculescu’s emoji projects and Nicole He’s buck-wild enhance.computer, there’s a lot of interesting discussions about coding — but! — it’s from a very different perspective than the one I’m familiar with.
Most conferences tend to focus on being practical. Here’s the newest technique! Here’s how to improve your career! Here’s the coolest new folks that you should be following! But it’s important to remember that the web isn’t only a serious place for serious work. It can be this entirely other thing, too.
The web can be for fun. It can be utterly weird and unexpected. And that’s what we’re all seeing in this little room right now at XOXO; websites that can’t be monetized, websites that can’t be controlled by corporate interests or giant ad networks.
It began, as many things do, with a silly conversation. In this case, I was talking with our Front End Technology Competency Director (aka "boss man") Mundi Morgado.
It went something like this…
Mundi Morgado I want you to build a visual screen reader.
Nathan Smith Who what now?
Mundi Morgado I want a CSS library that allows you to see the structure of a document. It shouldn't use class so that you're forced to focus on semantics. Also, make it theme-able.
Nathan Smith Sure, let me see what I can come up with.
Fast-forward a week, and we've got what we are now calling:
Trashy.css: The throwaway CSS library with no class
Why throwaway? Well, it's not really meant to be a fully fledged, production-ready style framework. Rather, it's like training wheels for document semantics, with some bumper lanes (think: bowling) to keep you on the right track.
It's part of our ongoing effort at TandemSeven to promote code literacy throughout our organization. As more of our UX designers are beginning to share responsibility for the accessibility and semantics of a project, it makes sense that we would build in such a way that allows UX and development to be more collaborative.
There are four main aspects to Trashy.
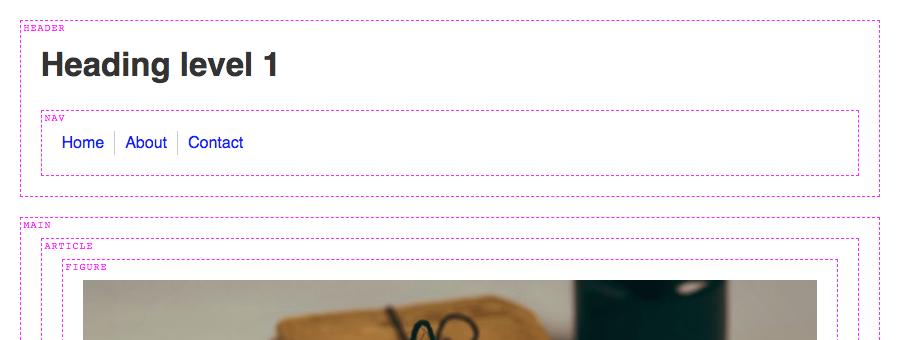
Trashy: "Basic"
First is the base trashy.css file, which applies a passably basic look and feel to the majority of common HTML elements. Check out this example of a basic page.
Trashy: "Boxes"
Second, there is trashy.boxes.css. This visually distinguishes otherwise invisible semantic elements, such as: header, main, nav, etc. That way, one can see where those elements are (or aren't) as a page is being authored. Here’s a page with semantic boxes outlined.
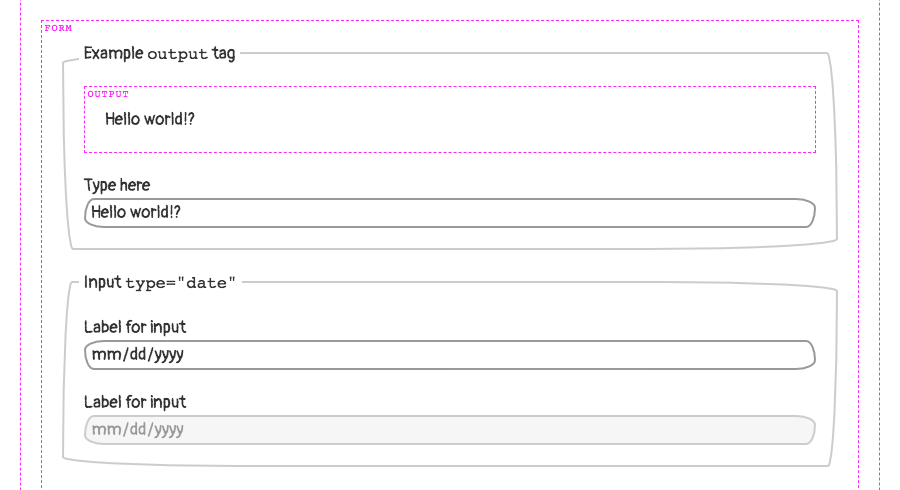
Trashy: "Theme"
Thirdly, theming is possible via trashy.theme.css. This is mostly just an example — inspired by PaperCSS) — of how to make UI look "hand drawn," to prevent observers from being too fixated on the look and feel, rather than the semantics of a document. Here’s the example theme in action.
Trashy: "Debug"
Lastly, there is a trashy.debug.css file that highlights and calls out invalid and/or problematic markup. Here’s a gnarly example of "everything" going wrong on a single HTML page. This was inspired by a11y.css, though it diverges in what is considered noteworthy.
For instance, we call out "div-itis" when multiple div:only-child have been nested within one another. We're also opinionated about type="checkbox" being contained inside of a <label>. This is for maximum click-ability within an otherwise dead whitespace gap, between a checkbox (or radio) and its textual label.
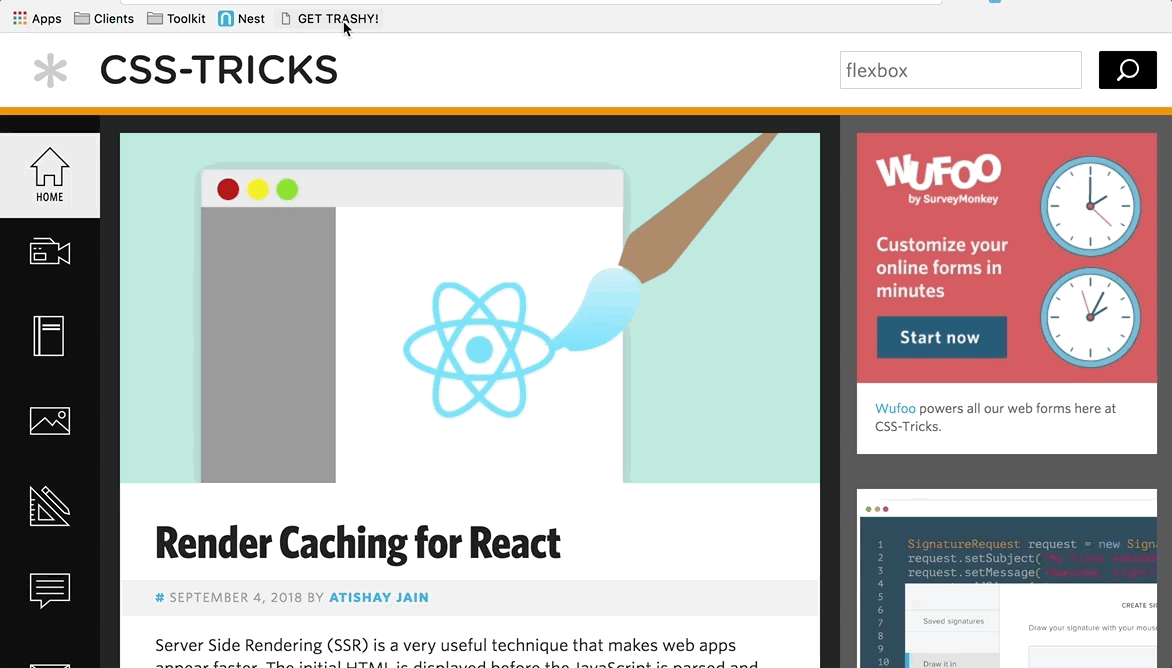
Any or all of these CSS files can be applied individually or in conjunction with one another. There is also a bookmarklet (labeled "GET TRASHY!") on the Trashy home page you can use to get results for any webpage.
The bookmarklet will remotely pull in:
sanitize.css
trashy.css
trashy.boxes.css
trashy.debug.css
Our "reset" - Sanitize.css
A quick word on Santitize.css: It was created by my coworker Jonathan Neal (author of Normalize.css), as a way to have a semi-opinionated CSS "reset." Meaning, it puts in a lot of defaults that we find ourselves writing as developers anyway, so it makes for a good starting point.
Technically speaking
Okay, so now that we’ve covered the "why," let’s dig into the "how."
Basically, it all revolves around using (abusing?) the ::before and ::after pseudo elements. For instance, to show the name of a block level tag, we’re using this CSS.
Semantic tags (using ::before)
Here is an abbreviated version of the trashy.boxes.css file, for succinctness. It causes the <section> tag to have a dashed border, and to have its tag named displayed the top left corner.
Likewise, here’s a snippet of code from the trashy.debug.css file that drives the markup warning messages. This particular example causes <script> tags to be displayed, which may be further optimized or need the developer’s attention: inline JavaScript and/or external src without async.
In the case of inline JS, we set the font-size and line-height to 0 because we’re making the element visible. We yank the text off the page via text-indent: -99999px just to make sure it doesn’t show up. We wouldn’t want that random JS code displayed alongside legit page content.
(Please don’t ever do this for "real" content. It’s just a hack, mkay?)
To get our error message to show up though, we have to set the font-size and line-height back to non-zero values, and remove our text-indent. Then, with a bit more absolute positioning, we ensure the message is visible. This lets us see, amidst the rest of the page content, whereabouts to check (via DOM inspector) for the <script> insertion point.
Note: Some scripts do need to be loaded synchronously. You wouldn’t want your "app" code to load before your "framework" code. Heck, some inline JS is probably fine too, especially if you’re doing some super speed optimization for the critical rendering path. These warnings are "dumb" in the sense that they match only via CSS selectors. Take ‘em with a grain of salt, your mileage may vary, etc.
JS bookmarklet
The aforementioned JS bookmarklet finds all <link rel="stylesheet"> and <style> tags in the page, and causes them to be ineffective. This allows us to add in our own CSS to take over, so that the only styles applied are those provided directly via Trashy.
The magic is accomplished by setting rel="stylesheet" to rel="". If an external stylesheet is not identified as such, even if it’s cached, the browser will not apply its styles to the page. Similarly, we destroy the contents of any inline <style> tags by setting the innerHTML to an empty string.
This leaves us with the tags themselves still intact, because we still want to validate that no <link> or <style> tags are present within <body>.
We also check that there aren’t too many <style> tags being used in the <head>. We allow for one, since it could be used for the critical rendering path. If there’s a build process to generate a page with consolidated inline styles, then it’s likely they’re being emitted through a single tag.
<a href="javascript:(
  function (d) {
    var f = Array.prototype.forEach;
    var linkTags = d.querySelectorAll('[rel=\'stylesheet\']');
    var styleTags = d.querySelectorAll('style');

    f.call(linkTags, function (x) {
      x.rel = '';
    });

    f.call(styleTags, function (x) {
      x.innerHTML = '';
    });

    var newLink = d.createElement('link');

    newLink.rel = 'stylesheet';

    newLink.href =
      'https://t7.github.io/trashy.css/css/bookmarklet.css';

    d.head.appendChild(newLink);
  }
)(document);">
  GET TRASHY!
</a>
That pretty much covers it. It's a simple drop-in to help you visualize your document semantics and debug possibly problematic markup.
I have also found it to be super fun to use. A quick click of the bookmarklet on any given site usually yields lots of things that could be improved upon.
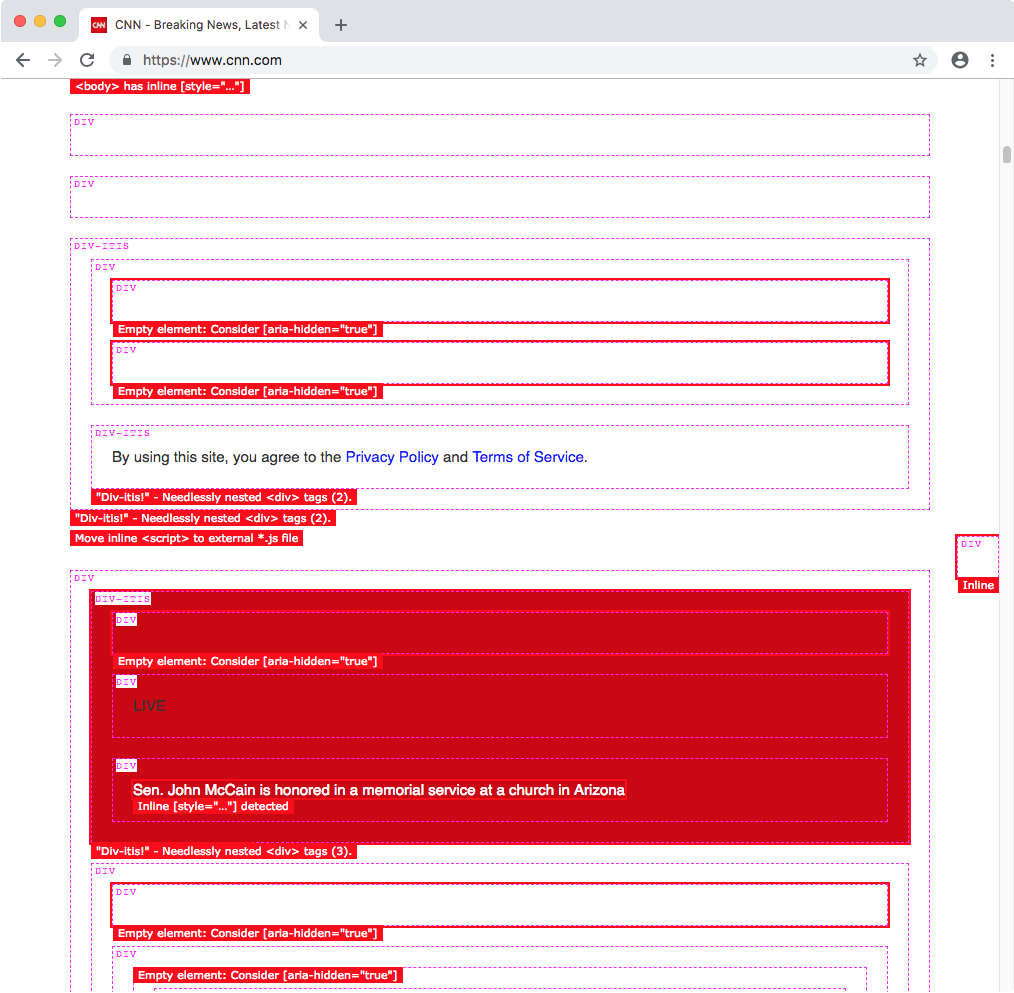
For instance, here's what CNN's site looks like with Trashy applied…
P.S. Call security!
If you try this with Twitter’s site, you might wonder why it doesn’t work. We were initially perplexed by this, too. It has to do with the site's Content Security Policy (CSP). This can be used to disallow CSS and/or JavaScript from being loaded externally, and can whitelist safe domains.
This can be set either at the server level, or by a <meta> tag in the <head>.
In the case of Twitter, it’s emitted from the server. Even if it were in the HTML, destroying it has no effect on the actual browser behavior. It’s locked in.
Okay, so...
Can’t you insert your own security meta tag and override it?
You’d think so. But, thankfully, no. Once a CSP been accepted by the browser for that page, it cannot be overridden. That’s probably a good thing, even though it ruins our fun.
I suppose that’d be like wishing for more wishes. It’s against the genie rules!
In the first part of this series we set up the front end with a Service Worker, a `manifest.json` file, and initialized Firebase. Now we need to create our database and watcher functions.
Log into Firebase and click on Database in the navigation. Under Data you can manually add database references and see changes happen in real-time.
Make sure to adjust the rule set under Rules so you don't have to fiddle with authentication during testing.
{
  "rules": {
    ".read": true,
    ".write": true
  }
}
Watching Database Changes with Cloud Functions
Remember the purpose of all this is to send a push notification whenever you publish a new blog post. So we need a way to watch for database changes in those data branches where the posts are being saved to.
With Firebase Cloud Functions we can automatically run backend code in response to events triggered by Firebase features.
Set up and initialize Firebase SDK for Cloud Functions
To start creating these functions we need to install the Firebase CLI. It requires Node v6.11.1 or later.
npm i firebase-tools -g
To initialize a project:
Run firebase login
Authenticate yourself
Go to your project directory
Run firebase init functions
A new folder called `functions` has been created. In there we have an `index.js` file in which we define our new functions.
Import the required Modules
We need to import the Cloud Functions and Admin SDK modules in `index.js` and initialize them.
The Firebase CLI will automatically install these dependencies. If you wish to add your own, modify the `package.json`, run npm install, and require them as you normally would.
Set up the Watcher
We target the database and create a reference we want to watch. In our case, we save to a posts branch which holds post IDs. Whenever a new post ID is added or deleted, we can react to that.
exports.sendPostNotification = functions.database.ref('/posts/{postID}').onWrite(event => {
  // react to changes
}
The name of the export, sendPostNotification, is for distinguishing all your functions in the Firebase backend.
All other code examples will happen inside the onWrite function.
Check for Post Deletion
If a post is deleted, we probably shouldn't send a push notification. So we log a message and exit the function. The logs can be found in the Firebase Console under Functions → Logs.
First, we get the post ID and check if a title is present. If it is not, the post has been deleted.
In the last article we saved a device token in the updateSubscriptionOnServer function to the database in a branch called device_ids. Now we need to retrieve these tokens to be able to send messages to them. We receive so called snapshots which are basically data references containing the token.
If no snapshot and therefore no device token could be retrieved, log a message and exit the function since we don't have anybody to send a push notification to.
const getDeviceTokensPromise = admin.database()
  .ref('device_ids')
  .once('value')
  .then(snapshots => {

      if (!snapshots) return console.log('No devices to send to.')

      // work with snapshots
}
Create the Notification Message
If snapshots are available, we need to loop over them and run a function for each of them which finally sends the notification. But first, we need to populate it with a title, body, and an icon.
You know those the little notification windows that pop up in the top right (Mac) or bottom right (Windows) corner when, for example, a new article on our favorite blog or a new video on YouTube was uploaded? Those are push notifications.
Part of the magic of these notifications is that they can appear even when we're not currently on that website to give us that information (after you've approved it). On mobile devices, where supported, you can even close the browser and still get them.
Article Series:
Setting Up & Firebase (You are here!)
The Back End (Coming soon!)
Push notification on a Mac in Chrome
A notification consists of the browser logo so the user knows from which software it comes from, a title, the website URL it was sent from, a short description, and a custom icon.
We are going to explore how to implement push notifications. Since it relies on Service Workers, check out these starting points if you are not familiar with it or the general functionality of the Push API:
You are free to choose the back-end system which suits you best. I went with Firebase since it offers a special API which makes implementing a push notification service relatively easy.
In this part, we'll only focus on the front end, including the Service Worker and manifest, but to use Firebase, you will also need to register and create a new project.
Implementing Subscription Logic
HTML
We have a button to subscribe which gets enabled if 'serviceWorker' in navigator. Below that, a simple form and a list of posts:
Now we can initialize Firebase using the credentials given under Project Settings → General. The sender ID can be found under Project Settings → Cloud Messaging. The settings are hidden behind the cog icon in the top left corner.
Firebase offers its own service worker setup by creating a file called `firebase-messaging-sw.js` which holds all the functionality to handle push notifications. But usually, you need your Service Worker to do more than just that. So with the useServiceWorker method we can tell Firebase to use our own `service-worker.js` file as well.
Now we can create a userToken and a isSubscribed variable which will be used later on.
Notice the function initializePush() after the Service Worker registration. It checks if the current user is already subscribed by looking up a token in localStorage. If there is a token, it changes the button text and saves the token in a variable.
Here we also handle the click event on the subscription button. We disable the button on click to avoid multiple triggers of it.
Update the Subscription Button
To reflect the current subscription state, we need to adjust the button's text and style. We can also check if the user did not allow push notifications when prompted.
Let's say the user visits us for the first time in a modern browser, so he is not yet subscribed. Plus, Service Workers and Push API are supported. When he clicks the button, the subscribeUser() function is fired.
Here we ask permission to send push notifications to the user by writing messaging.requestPermission().
The browser asking permission to send push notifications.
If the user blocks this request, the button is adjusted the way we implemented it in the updateBtn() function. If the user allows this request, a new token is generated, saved in a variable as well as in localStorage. The token is being saved in our database by updateSubscriptionOnServer().
Save Subscription in our Database
If the user was already subscribed, we target the right database reference where we saved the tokens (in this case device_ids), look for the token the user already has provided before, and remove it.
Otherwise, we want to save the token. With .once('value'), we receive the key values and can check if the token is already there. This serves as second protection to the lookup in localStorage in initializePush() since the token might get deleted from there due to various reasons. We don't want the user to receive multiple notifications with the same content.
function updateSubscriptionOnServer(token) {

    if (isSubscribed) {
        return database.ref('device_ids')
                .equalTo(token)
                .on('child_added', snapshot => snapshot.ref.remove())
    }

    database.ref('device_ids').once('value')
        .then(snapshots => {
            let deviceExists = false

            snapshots.forEach(childSnapshot => {
                if (childSnapshot.val() === token) {
                    deviceExists = true
                    return console.log('Device already registered.');
                }

            })

            if (!deviceExists) {
                console.log('Device subscribed');
                return database.ref('device_ids').push(token)
            }
        })
}
Unsubscribe User
If the user clicks the button after subscribing again, their token gets deleted. We reset our userToken and isSubscribed variables as well as remove the token from localStorage and update our button again.
Below that we add all events around handling the notification window. In this example, we close the notification and open a website after clicking on it.
Another example would be synchronizing data in the background. Read Google's article about that.
Show Messages when on Site
When we are subscribed to notifications of new posts but are already visiting the blog at the same moment a new post is published, we don't receive a notification.
A way to solve this is by showing a different kind of message on the site itself like a little snackbar at the bottom.
To intercept the payload of the message, we call the onMessage method on Firebase Messaging.
The last step for this part of the series is adding the Google Cloud Messaging Sender ID to the `manifest.json` file. This ID makes sure Firebase is allowed to send messages to our app. If you don't already have a manifest, create one and add the following. Do not change the value.
{
  "gcm_sender_id": "103953800507"
}
Now we are all set up on the front end. What's left is creating our actual database and the functions to watch database changes in the next article.