Blog Promotion Strategies: How to Think Outside the Square

It’s day three of our thirty one day challenge!

How are you feeling? Pumped? Motivated? Ready to shake up your blog and your routine during these 31 days?

We’ve already covered nailing your elevator pitch and how to create a super-shareable list post, and today it’s all about getting yourself off your blog to promote it and find some readers.

Build it and they will come“, you think? That is really not the case with blogging.

You need to put your blog where people will read it. In today’s podcast we discuss doing just that – how, where, and why to promote your blog with the maximum chances of it being seen. You have to get off your blog to get your blog read!

In todays episode there are tips on where to go to share your posts, how to build reader profiles (and why you need them), and how to figure out where those ideal readers are. Then we go through what to give those readers when you finally catch their attention – are you worthy of being found? How are you being useful? What kind of content are you creating?

Where are those potential readers?

The internet is vast, and while we immediately think of social media as the first place to share content, it isn’t always the only place.

In this episode we talk about developing editorial schedules for social media, but we also go beyond that, into the realm of guest posts, forums and other forgotten places to be seen.

We’re going to encourage you today to get off your blog and put yourself out there. Take today’s challenge and choose a certain post to share. All it takes is a little of your time and some creative thinking.

ProBlogger Podcast Avatar

Click here to listen to day three of the 31 Days to Build a Better Blog series on the ProBlogger Podcast. 

Let us know how you go with today’s challenge on twitter – just tag @ProBlogger and head to todays show notes to leave a comment.

Further Reading:

Don’t forget to subscribe to our podcast on iTunes and Stitcher to get updates of new episodes.

Blog Promotion Strategies: How to Think Outside the Square
http://www.problogger.net/archives/2015/07/03/blog-promotion-strategies-how-to-think-outside-the-square/
http://www.problogger.net/archives/category/31-days-to-building-a-better-blog/feed/
@ProBlogger » 31 Days to Building a Better Blog
Blog Tips to Help You Make Money Blogging – ProBlogger
http://www.problogger.net/wp-content/plugins/podpress/images/powered_by_podpress_large.jpg

31DBBB Podcast Challenge: Write a Link Post (And Why You Should!)

This is it! Day Seven of the 31 Days to Build a Better Blog podcast series – you made it through the first week!

If you missed an episode here they are:

But back to today which is another writing challenge, which by the end of the month, should help you define what kinds of posts you like to write and what appeals to your readers.

Today’s challenge is very simple – a link post. But in this episode, I go into more detail about the types of link posts that do well (I talk about the six ways to write a link post), how to expand upon them, and of course – why I think these types of posts are important.

Things have changed since the early days when I favoured link posts, so there’s also tips to ensure your posts will be successful in today’s new online environment.

Don’t forget to share on social media how you’ve enjoyed your first week. What have been the hits and misses for you? What have you learned?

ProBlogger Podcast Avatar

31DBBB Podcast Challenge: Write a Link Post (And Why You Should!)
http://www.problogger.net/archives/2015/07/07/31dbbb-podcast-challenge-write-a-link-post-and-why-you-should/
http://www.problogger.net/archives/category/31-days-to-building-a-better-blog/feed/
@ProBlogger » 31 Days to Building a Better Blog
Blog Tips to Help You Make Money Blogging – ProBlogger
http://www.problogger.net/wp-content/plugins/podpress/images/powered_by_podpress_large.jpg

Transfer Your Blog From WordPress.com to WordPress.org Part 1

 This guest post is by Ayelet Weisz of All Colores.

WordPressIt was finally happening: I was about to embark on the trip of my dreams—and I wanted to write all about it.

I decided that a travel blog, shared initially with family and friends, would be a great experiment to see if I felt comfortable with the format of blogging that I’d wanted to try for quite some time. I did some research and found out that WordPress was a highly recommended platform. I read about the differences between WordPress.com and WordPress.org, yet I wasn’t up for all the technical mumbo-jumbo that I thought comes with launching a site on WordPress.org, even if it allowed me to monetize the blog.

I opted for WordPress.com, thinking I could always transfer later if I decided that was the path for me.

Transferring from WordPress.com to WordPress.org looks easy at first

I read blog posts about it, I read explanations about it on the WordPress website, I watched videos on YouTube. And they all said roughly the same thing: all you have to do is follow these very simple steps, and then your blog is exported from WordPress.com and imported to WordPress.org.

What’s the big deal?

The basic process is supposed to go something like this:

  1. Log in to your WordPress.com dashboard.
  2. Choose “Tools” on your left-hand sidebar.
  3. Under “Tools”, choose “Export”.

There, choose the material you’d like to export. You can choose to export only your posts, for example, and create brand-new pages at your blog’s new home. Or you could choose to transfer the pages, yet start fresh on the posts front. You can also choose to export all the content at once—posts, pages, media files and comments.

Since I wanted to transfer everything in my blog to its new location, I chose All Content and clicked on Download Export File.

Selecting All Content

The file was downloaded pretty quickly. The file—an XML file type—appeared at the bottom of my screen.

The file downloads

My blog’s name is All Colores and the URL I had at WordPress.com was http://allcolores.wordpress.com . That’s why you see it in the image. When the download ended, I clicked on that box to open the file, which contained lots and lots of lines of code. Who knows how to read that?

Later, since I wanted to import this file to my WordPress.org blog, I needed to know where this file was saved. You’ll see soon that I needed to select it from my computer and upload it. But I didn’t know where that code was saved! It looked as weird to me as writing from right to left will probably look to you. What’s a blogger to do?

The solution is simple—at least in this case—so savor it: click on that arrow you see and choose to view the file in a folder. A folder will open up with a list of files, and the file you need will be marked—like magic! This is what you will see at the bottom of your screen:

What appears on screen

(Note: You might not see Hebrew on your computer—unless you have an Israeli computer like I do…)

You can make a note for yourself or memorize the location where this file is saved. I decided to copy it to my desktop, where I don’t have many wandering files and it would be easy for me to pick up during the import process.

Important: Do not delete your site from WordPress.com, at least not yet. You might need it later in the import process.

Big Deal #1: Get a domain and server, and install WordPress.org

You’ve exported the file and you know where it’s saved—congratulations! Now … where do you move it to?

Getting a domain is the easy part. That’s the www.YourSite.com URL. Just Google around for best domain sellers and you’ll find plenty of recommendations. I got mine at NameCheap, as I got a personal recommendation for that store, and it included some free protection with its regular sales price.

Next, Google for recommendations on a web host where you can host your site. If you plan on writing lots of posts and including many media files, it is best to find a host with unlimited space. It won’t necessarily cost you more. Another aspect to consider is that some hosts will allow you to use a large or unlimited number of domains. This is important if you dream of launching a network of blogs. Hosts will sometimes offer a one-click installation of WordPress, which will make your life a bit easier, yet I suggested finding YouTube videos that will guide you until that one click. For me, Hostgator has been the perfect fit these past few months, and I am also satisfied with its customer service.

Big Deal #2: The blog crashes after you’ve finished installing

Note that it’s best to do this process a few days before you actually plan to start working on your blog. While your site will usually go live right away, sometimes it can take up to 72 hours for all the systems of cyberspace to cooperate and recognize your blog. If your blog does crash in the meantime, you will not even have access to write posts.

For me, it took almost 48 hours. Those 48 hours plus all the technical challenges that followed added up to days. Remember, I had no idea what I was doing and therefore researched almost every move as I went along. Those days were days I cleared to write content for my blog before a busy month started, and instead, I found myself dealing with technical mumbo-jumbo. So register and install in advance!

This whole ordeal of domain, server, and installation processes scared me immensely back in July, when I launched my blog. Little did I know that you can find great how-to videos on YouTube. Just doing it would have you done with these challenges in almost no time—rather than taking days off your writing time. If you’re reading this and haven’t launched your blog yet, stop right now. Go get yourself a domain and a host. Trust me, the worst in this post is yet to come.

Once that’s installed, you’re ready to begin importing your blog

You can now access your dashboard from http://yourdomain.com/wp-admin. So access it and log in. Once you do, it’s time to start the importing process!

Follow these steps:

  1. Click on Tools on the left sidebar.
  2. Choose Import.
  3. Your screen will look like the image bellow. Click on “WordPress” at the bottom of this list.

Importing your blog

This is what I saw when I clicked on “WordPress”:

A plugin is needed

My Dashboard was darkened and I was required to install a plugin that would enable the importing of my blog to WordPress.org.

As with any plugin on WordPress.org, after you download it—which usually takes a second—you must activate it before it will work. The screen for activating the plugin will appear right after the download is complete. But if you accidentally closed your browser or clicked on something else, worry not: you can always access your downloaded plugins on the left-hand sidebar of the Dashboard. Each plugin that you activate can later be de-activate and even deleted here.

Downloading the plugin

I decided to follow the advice of WordPress and the YouTube videos I watched: I downloaded the plugin and clicked on Activate Plugin & Run Importer. Within a second, the plugin was activated. That’s right—no installation nightmares! How good is that?

Finally, you get to upload your file (good thing you know where it’s saved). Import it and then start working, right?

Importing your blog file

Wrong. This is where all the trouble begins!

First, I was concerned my blog might be too large, as it contained almost 2000 photos. WordPress asked me to upload a file with the maximum size of 64MB (64 megabytes). I looked at my saved blog file to see how big it was. The number I got was 2989. That’s way bigger than 64! But wait—this figure had different letters next to it: KB. That would be kilobytes.

What does this mean? I asked Google. It turned out 2989 kilobytes equaled 2.9 megabytes. If you scroll back up, you’ll see this information was given to me when it was time to save the file. Paying attention to details is important. What’s 2.9 megabytes compared to 64 megabytes? I was about to find out.

I uploaded my file…

Big Deal #3: My blog’s file version was outdated

This is the message I received when I tried uploading my file: “This WXR file (version 1.2) may not be supported by this version of the importer. Please consider updating”.

The file version warning

Well, I did consider it. However, first, I couldn’t figure out what a WXR file was. I thought it might be the file I just uploaded—that seemed to make sense, yet that file was an XML file. Could a file be both XML and WXR?

Second, I couldn’t figure out how to update the file. I searched on my WordPress.com dashboard and on Google and couldn’t find the answer.

WordPress tip: For any challenge you might be experiencing, type it into Google and you’ll find plenty of message board discussions that were started by people with similar challenges. Many of these discussions take place on WordPress forums, which will start showing up many times once you Google your challenge.

I found message board discussions regarding my file version challenge. I just didn’t find solutions. When I did find message board answers that seemed to be offering a solution, the language they used was too technical for me to understand and know how to implement. I didn’t have the background or experience necessary to do it.

Whether it was the “right” thing to do or not, this is what worked for me. I don’t know if this will work for you too. What made most sense to me was that the above-mentioned comment referred to the file I just uploaded. I mean, it wasn’t there before, it appeared the moment the file finished uploading and it mentioned a file! Unable to discover how to update its version, I decided to go along and use it anyway the way it was. After all, if the file “may not be supported”, it may be supported. WordPress did not obligate me to update—it simply recommended it.

For me, this worked. I had a bunch of technical challenges that you’ll read about tomorrow, and they may or may not have resulted from this decision. Nonetheless, the fact is my blog is up and running on its new domain as you read this. Therefore, this is the place to smile: there is hope!

Before you click Submit…

It’s important to notice two elements on this page before continuing to the next screen.

First, you can assign user roles and positions to posts during this import. If you do this, you might need to handle more settings manually later on. Since I am the only author of my blog, I decided to leave this space blank and avoid dealing with settings. If you have more than one writer, you will likely want to explore it further.

Second, you need to choose whether to download attachments. If you leave the box “download and import file attachments” (right above the Submit button) empty, your photos and videos will not be imported to your WordPress.org file. Do yourself a favor, check that box.

Then click Submit.

At last, you can breathe

WordPress is importing your blog file! Yay! Celebration time, right?

Import problems

Wrong!

That’s right: there were problems with this step too. Don’t worry—I’ll show you what the problem was, and explain how I solved it tomorrow in the second part of this series. In the meantime, if you have any WordPress.com to WordPress.org war stories to share, we’d love to hear them in the comments!

Ayelet Weisz is an enthusiastic writer and translator from Israel. She celebrates the everyday and extraordinaire joys of life through travel on her travel blog, All Colores. Follow her adventures on Twitter and sign up to her RSS Feed.

The post Transfer Your Blog From WordPress.com to WordPress.org Part 1 appeared first on ProBlogger.

Transfer Your Blog From WordPress.com to WordPress.org Part 1
https://problogger.com/transfer-your-blog-from-wordpress-com-to-wordpress-org-part-1/
http://www.problogger.net/archives/category/blog-networks/feed/
Blog Networks – ProBlogger
Blog Tips to Help You Make Money Blogging – ProBlogger
https://problogger.com/wp-content/uploads/powerpress/problogger_podcast-891.jpg

Powered by WPeMatico

31DBBB Day Five Challenge: Email a Blog Reader

Welcome to day 5 in the 31 Days to Build a Better Blog Challenge. You can find today’s challenge here.

There’s nothing like a personal touch in any kind of business, and that includes blogging. When service goes above and beyond, or when a blogger takes the time to notice and acknowledge their readers, it can result in ongoing loyalty and goodwill.

In the early days of my blog I would always email readers who left a comment to thank them and let them know I’d responded. It was always met with surprise and gratitude, and I know to this day some of those commenters still read ProBlogger today.

It’s the kind of gesture that people are pleasantly surprised by and it is one of the absolute most simple things you can do (and that’s why many people don’t!). It may be too slow for some – converting readers one at a time – but that one connection can have a lasting impact and it’s often in ways you can’t even see yet.

So reach out to your readers. Follow them where they are on social media. Chat. Create a community. Today’s episode will show you how (and in ways you might not even have thought to consider).

ProBlogger Podcast Avatar

Click here to listen to day five of the 31 Days to Build a Better Blog series on the ProBlogger Podcast. 

Don’t forget to let us know how you’re going with the challenges – you can do so by leaving a comment on todays show notes page here.

If you missed yesterday’s post about analysing other blogs and finding gaps you can fill, go here. For all other podcast episodes, go here.

Further Reading:

Further reading is further watching today, as Pat Flynn from Smart Passive Income tells us how to turn casual readers into raving fans. He gave this presentation as the keynote speech for the ProBlogger Training Event in 2014 and it turned the whole room into raving Pat fans:

31DBBB Day Five Challenge: Email a Blog Reader
http://www.problogger.net/archives/2015/07/05/31dbbb-day-five-challenge-email-a-blog-reader/
http://www.problogger.net/archives/category/31-days-to-building-a-better-blog/feed/
@ProBlogger » 31 Days to Building a Better Blog
Blog Tips to Help You Make Money Blogging – ProBlogger
http://www.problogger.net/wp-content/plugins/podpress/images/powered_by_podpress_large.jpg

How I use Google Analytics ‘Compare’ Feature to Motivate Me to Grow My Blog

This morning, a reader asked me this question:

“How do you motivate yourself to grow your blog traffic from day to day?”

We’ve covered a whole heap of techniques for growing the amount of traffic you attract to your blog in our Blog Promotion category (also check out this ‘how to find readers page‘ and listen to my recent finding reader webinar) but one thing that has helped me on the ‘motivation’ front lately is the report below in Google Analytics (click to enlarge).

comparing-traffic.png

What you’re looking at is the traffic so far today (the blue line) on Digital Photography School compared to the traffic on the site one week ago (the orange line) – arranged by the hour.

I’ll tell you how to get this report below but first, the reason I love this report is that it tells me whether I’m on track to get as much traffic to my site today as I had this time last week.

Having something to compare traffic keeps me motivated to better the previous week’s result.

Note: I always choose to compare traffic from exactly 1 week previous because on our site we see quite distinct rises and falls in traffic on different days of the week.

In the chart above you can see the day’s traffic started well, with the first 4 hours between 1.7% and 18.1% higher than the previous week.

This all happened while I was asleep so when I checked in at 9am I was pleased! However, I also saw that from 6am-8am that we were beginning to slip behind.

Knowing this gave me a little bit of motivation to find some ways to drive more traffic to the site today.

I took a look at the schedule of Facebook updates that I had planned for the day and decided to move a status update I thought would drive some traffic to be earlier in the day.

That status update went live at 9am and resulted in a nice bump in traffic to get the blue line trending up above the orange again.

I also identified some older posts from my archives that I then scheduled to be tweeted throughout the next 24 hours (based upon my advice from last month to promote old content), which I thought would help us to keep nudging the traffic up higher for the rest of the day.

Having this report open is a great little source of motivation to keep working not only at writing great content but also driving traffic to it.

I also find that having this comparison open during the day (and watching ‘real time’ stats) helps me to spot anomalies in traffic. It helps me to quickly spot if there’s a problem (server issues) or on the flip side it shows me when a post might have been shared on a big blog or social media account.

Knowing this information helps me to react quickly to fix a problem or leverage a traffic event.

UPDATE: here’s how the traffic looked at the end of the day in the comparison view:

Screen Shot 2013-11-21 at 8.56.20 am.png

Things slipped for the last hour or two but over the full day visitor numbers were up by 4.22%.

While a 4% increase in traffic isn’t the most spectacular result I see it is a small step in a larger race I’m running. I know if I can see even a 1% increase in traffic each week that over a year or longer that it’ll significantly grow the site over time.

How to Get This Report

For those of you new to Google Analytics here’s the easy process to get this report (it will only take you a couple of minutes).

1. Login to your Google Analytics Account

2. In the menu click on the ‘Overview’ link under ‘Audience’

Audience_Overview_-_Google_Analytics.png

3. By default you’ll be looking at the last months traffic. You want to drill down now to today so in the top right corner click on the date range and a calendar will open up like this:

Audience_Overview_-_Google_Analytics-6.png

4. Select today’s date.

Audience_Overview_-_Google_Analytics-5.png

5. Check the ‘compare to’ box and then in the new date field that opens up underneath you can put in last weeks date by clicking on the day you want to compare it to. Once you have – click ‘Apply’.

Audience_Overview_-_Google_Analytics-7.png

6. You’re almost done now. You should be looking at a report that compares the two days but by default it’ll be showing you the total of the days in the chart as two dots. You want to view this now as ‘hourly’ so hit the ‘hourly’ tab.

Audience_Overview_-_Google_Analytics-8.png

You now should be looking at the comparison of today’s traffic with the same day last week (note: your current days report won’t yet be complete unless the day is almost over and it does run an hour behind).

Variations on this report to check out

This comparison tool is really useful for a while heap of reports.

For example you can choose to compare one week with another:

Audience_Overview_-_Google_Analytics-10.png

In fact, any period of time can be compared with any other period.

Also, with a date range locked in you can drill down into many other metrics.

For example, earlier today I was doing some analysis comparing this last week with the corresponding week in September, which was just before we did our new redesign on Digital Photography School.

A day by day comparison showed a great improvement in overall traffic.

Audience_Overview_-_Google_Analytics-11.png

Drilling down further, and viewing the two weeks by the hour, was also fascinating and showed that the two weeks had remarkably similar patterns in traffic from hour to hour – so the increase in traffic was very even across the week.

Audience_Overview_-_Google_Analytics-12.png

Under that chart was some interesting data:

Audience_Overview_-_Google_Analytics-16.png

Not only were Visits and Page views well up – but being able to see that bounce rate was slightly down and that average visitor duration was up was encouraging. Seeing Pages Viewed Per Visit was down showed we have an area to improve on (we’re already working on this) and seeing that we had a good rise in ‘new’ visitors was something that should be investigated further.

To investigate the rise in ‘new’ visitors I moved into the ‘Acquisition’ menu on Google analytics. The same date range and comparison is still selected so now I’m able to compare the two periods when it comes to different sources of traffic and see why we’ve had rises in traffic:

It turns out we’ve seen increases in a few area:

Search Traffic is up:

All_Traffic_-_Google_Analytics_and_Preview_of_“Untitled”.png

Facebook Traffic is up (due to my recent experiments):

All_Traffic_-_Google_Analytics-2.png

But interestingly Feed traffic is down (giving us something to investigate).

All_Traffic_-_Google_Analytics-3.png

There are many other areas you can drill down into with the comparison tool – almost anything that Google Analytics has a report for you can compare from period to period and get a great overview of how that stat compares very quickly.

Have a go yourself – do some comparisons and let me know what you find in comments below!

How I use Google Analytics ‘Compare’ Feature to Motivate Me to Grow My Blog
http://www.problogger.net/archives/2013/11/21/how-i-use-google-analytics-compare-feature-to-motivate-me-to-grow-my-blog/
http://www.problogger.net/archives/category/blogging-tools-and-services/feed/
@ProBlogger» Blogging Tools and Services
Blog Tips to Help You Make Money Blogging – ProBlogger
http://www.problogger.net/wp-content/plugins/podpress/images/powered_by_podpress_large.jpg

Top 10 WordPress Security Myths

This guest post is by Anders Vinther of The WordPress Security Checklist.

WordPress Security is about as sexy as cleaning your house. And as a serious blogger, you already know that securing your site properly is not a trivial task.

That makes it a fantastic topic for myth fabrication.

In this post, I’ve compiled the top ten WordPress security myths for your easy consumption, followed by a light sprinkle of facts to debunk the myths.

Here are the myths:

  1. WordPress is not secure.
  2. Nobody wants to hack my blog.
  3. My WordPress site is 100% secure.
  4. I only use themes and plugins from wordpress.org so they are secure.
  5. Updating WordPress whenever I log in is cool.
  6. Once my WordPress site is setup my job is finished.
  7. I’ll just install xyz plugin and that’ll take care of security for me.
  8. If I disable a plugin or theme, there is no risk.
  9. If my site is compromised I will quickly find out.
  10. My password is good enough.

Myth 1. WordPress is not secure

When people experience security problems with their WordPress sites, they tend to blame WordPress. However, the WordPress core is very secure. And when a security hole is found, the development team is very quick to respond.

The most frequent causes for compromised WordPress sites are in fact:

  • outdated software
  • insecure themes and plugins
  • bad passwords
  • stolen FTP credentials
  • hosting problems.

For more on this topic, see WordPress Security Vulnerabilities.

Myth 2. Nobody wants to hack my blog

Most hacking attempts are automated. There are rarely personal or political motives behind WordPress hacking—more often the motives involve financial gain.

Maybe you’re thinking, “But I don’t have anything for sale on my site. I don’t have credit card information or any other sensitive information. What could they possibly steal from my site?”

What you do have is resources.

Possible ways to exploit your site are:

  • the insertion of spam links in your content to boost SEO for other sites
  • through malware infections of your visitors computers, e.g. to steal their financial information
  • redirecting your traffic to other sites.

For more details, see Are Small Sites Targeted For Hacking?

Myth 3. My WordPress site is 100% secure

No site that’s accessible on the internet will ever be 100% secure. Security vulnerabilities will always exist.

That is why you need a backup and recovery plan. If disaster strikes, you need to have a good backup available, and a plan for how to restore your site.

For more, see:

  • WordPress Backup – The Plugin and The Plan
  • How To Restore A WordPress Site
  • The WordPress Rescue Plan

Myth 4. I only use themes and plugins from wordpress.org so they are secure

The WordPress Team reviews themes and plugins before they are included in the wordpress.org repository. However they do not have the resources to review updates.

Themes and plugins are developed by programmers from all over the world. Their experience and programming skills vary greatly, and so does the quality of their work. Even the best programmers make mistakes and all software contains bugs. Just pick a random plugin, look at the change log and you will see that bugs are routinely discovered and fixed. Even the best plugins developed by the most renowned people could contain undiscovered security risks.

Is it safer to get your themes and plugins from wordpress.org? Absolutely.

Is it guaranteed that there are no security problems with themes and plugins from wordpress.org? Absolutely not.

For more information, see:

  • WordPress Plugin Management
  • WordPress Theme Reviews
  • Why You Should Never Search For Free WordPress Themes

Myth 5. Updating WordPress whenever I log in is cool

You need to keep WordPress core, plugins, and themes updated at all times. Whenever a security update is released the whole world can see what the problem was. This obviously exposes any site that has not been updated. Unless you log in to your WordPress admin dashboard every day, you’ll need a plugin that will notify you when updates are available.

More information can be found in the article, Update Notifications.

Myth 6. Once my WordPress site is set up, my job is finished

Having a WordPress site is an ongoing commitment—it’s like having a dog. As a bare minimum your WordPress blog needs to be maintained when new updates come out. This is crucial even if you do not write new posts or otherwise update the content.

If you simply leave your WordPress site behind like an abandoned holiday pet, chances are that you will be helping the bad guys carry out their malicious schemes to control the world. So if you will not or cannot keep your WordPress site updated, it’s better if you take it down!

Myth 7. I’ll just install xyz plugin and that’ll take care of security for me

You do need security plugins. And you need the right mix of security plugins. However, keeping your WordPress site secure goes well beyond what you install on your site.

Other factors you need to consider include:

  • securing the computer you use to connect to your hosting account (anti-virus, malware and firewalls)
  • creating and managing strong passwords
  • using Secure FTP to access your hosting account
  • protecting sensitive WordPress files from access from the internet
  • off-site WordPress monitoring.

Myth 8. If I disable a plugin or theme, there is no risk

All files that exist in your WordPress folder are accessible from the internet unless you specifically protect them. This means even disabled themes and plugins can be exploited if they are vulnerable.

The best practice is to remove anything you do not use. Or, at a minimum, make sure you keep de-activated themes and plugins updated.

Myth 9. If my site is compromised I will quickly find out

Professional hackers are not interested in you finding out that your site has been compromised. Therefore you might not find out what has happened until quite some time after a hack has occurred—if you find out at all.

Some types of hacks that are difficult to spot include:

  • redirection of all traffic coming from a search engine (so if you enter the URL in your browser or use a bookmark, everything will look normal)
  • the inclusion of hidden text in your posts and pages.

You need some kind of off-site monitoring of your WordPress site. For more details, see:

  • Off Site Monitoring for WordPress
  • Backdoor Tool Kit – Today’s Scary Web Malware Reality

Myth 10. My password is good enough

Unless your WordPress admin password looks something like LR!!g&6uTFL%MD8cyo, you need to change your password management strategy. And make sure you do not reuse passwords on multiple websites.

Amazingly password and 123456 are still the two most used passwords! To find out more about this issue—and how to solve it—see:

  • 25 most used passwords
  • LastPass Password Manager

Don’t get caught out!

Getting WordPress security right is not trivial. That’s probably the reason why too many bloggers stick their heads in the sand when it comes to protecting their valuable assets.

While you do need to be pro-active and take action WordPress Security is by no means an impossible task. The same way you would add an alarm to your car and get a guard dog for your house you need to secure your website. Don’t get caught with sand in your ears, nose, and mouth when the hackers come knocking on your door. Act now!

Check out Anders Vinther’s free WordPress Security Checklist, which is all about protecting your WordPress assets properly and sleeping well at night.

The post Top 10 WordPress Security Myths appeared first on ProBlogger.

Top 10 WordPress Security Myths
https://problogger.com/top-10-wordpress-security-myths/
http://www.problogger.net/archives/category/blog-networks/feed/
Blog Networks – ProBlogger
Blog Tips to Help You Make Money Blogging – ProBlogger
https://problogger.com/wp-content/uploads/powerpress/problogger_podcast-891.jpg

Powered by WPeMatico

WordPress Feature Review: New Features You Missed in 2012, Part 2

This guest post is by Michael Scott of WPHub.com.

Yesterday, we started our tour of new features added to WordPress in version 3.4.

Today we continue the tour with a look at helpful new features available in version 3.5.

New features added to WordPress 3.5

Released late last year, WordPress 3.5 was the second and final major WordPress release of 2012.

This was the first release to include the new default design Twenty Twelve. It comes with a cool new feature that lets you install plugins you marked as a favorite on WordPress.org directly from your dashboard. However, many bloggers were surprised that the link manager has been removed from the default version of WordPress (though most agree removing this was a good decision).

Let’s take a look at the features.

New feature: Install favorite plugins

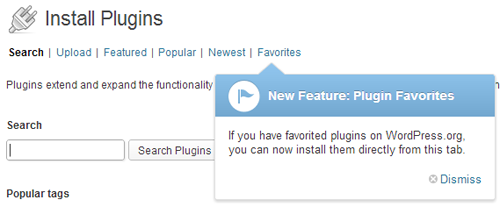
Now you can install your favorite plugins directly from your WordPress dashboard.

If you are logged in at WordPress.org, you will see a new option to favorite a plugin. You simply need to click on the link in order to add a plugin to your favorites.

favorite-plugin-1

As you can see, a new link for favorites has been added to the WordPress plugin area.
favorite-plugin-2

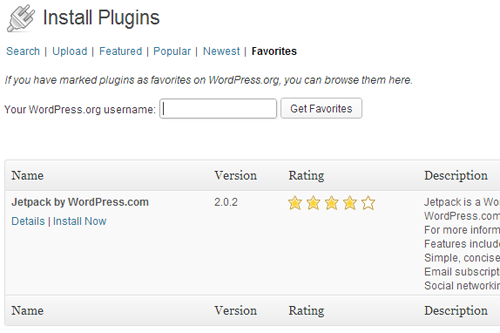
After you enter your WordPress.org username, you will see a list of all the plugins you have added as favorites. You can then install your chosen plugin easily.
favorite-plugin-3

Most WordPress users tend to use the same plugins on each of their WordPress websites. In the past, most people would bookmark their favorite plugins or keep a list of useful plugins so that they didn’t forget them. Saving important plugins at WordPress.org will allow you to quickly install frequently used plugins on every website you own very easily.

The way this new feature is set up, you don’t have to log in to your WordPress.org account on your blog, you only need to enter your username. This means you can see which plugins have been marked as favorites by any user on WordPress. You can share your favorites list with friends simply by telling them your username.

Also, if you know the WordPress username a website owner uses, you could enter their username into the plugin area to get a sneaky look into their favorite plugins (though there is no guarantee they are using a certain plugin on any given website).

New feature: Link manager removed

The Link Manager is no longer part of the core WordPress install.

The WordPress link manager, more commonly known as the Blogroll, was once one of the most popular features with bloggers and was used to display links on millions of blog sidebars. Thankfully, WordPress isn’t too sentimental—they know that the link manager is now only used by a small percentage of users.

The removal of the link manager follows the policy to remove non-essential items from the WordPress core to make the default version of WordPress quicker and leave additional functionality to plugins and themes.

links-new

Those who upgrade to WordPress 3.5 will no longer see the link manager in the WordPress menu if you haven’t used it before.

links-old

If you used your blogroll before you upgrade, the links manager will not be removed. It’s only removed on installations where no links were added (i.e. only the default links to WordPress-related websites were in your database). The link manager is available via an official plugin for anyone who wants to add the functionality back to their WordPress website.

New feature: New default design Twenty Twelve

The default design for WordPress has been released with this new version.

Twenty Twelve was originally planned to be part of WordPress 3.4 but was delayed. It was later released in the official WordPress theme directory in between the release of 3.4 and 3.5.

WordPress 3.5 is the first official release that includes this new theme (Twenty Ten and Twenty Eleven are included, too).

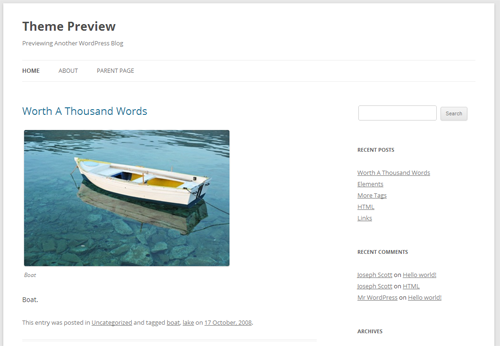
Some WordPress users have voiced their disappointment in Twenty Twelve’s minimal design, however most WordPress designers have been pleased with the evolutionary steps in this new official theme. The theme was clearly made with child themes in mind, and with the inclusion of child themes being introduced six months before, I imagine we are going to see a lot of varied designs being created from this base.
twenty-twelve-screenshot

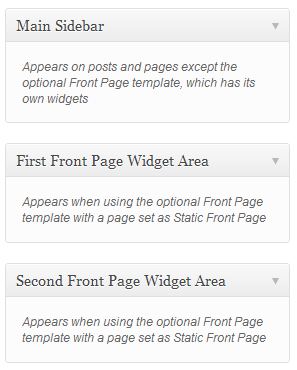
As before, the design can be modified using the theme customizer. Small differences are apparent—no header image is set by default, and no sidebar is shown if no sidebar widgets are present. In addition to the sidebar widget, the static home page also comes with two widget areas (each takes up 50% of the screen width). This makes creating a corporate-style home page very straightforward.
twenty-twelve-widgets

Like Twenty Eleven, Twenty Twelve supports post formats. Each of the additional post formats have a different design to distinguish them from other formats.

post-formats

You’ll find that there isn’t much difference in styling between some post formats. There’s a content template for each one, so these designs can easily be changed with just a few small edits.

asides

Twenty Twelve has a responsive design, so it looks the same on any browser and any device. It has beautiful typography too which makes reading a joy. If you know a little coding, you should be able to design some interesting websites using Twenty Twelve.

New feature: New Welcome screen

WordPress have improved the Welcome screen in 3.5.

Previously, the Welcome screen had an introduction and three columns of links.
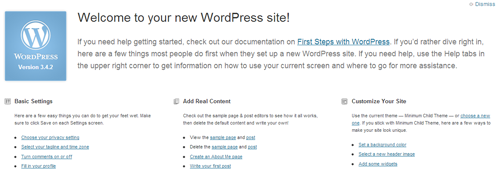
welcome-screen-old

The new Welcome screen looks much cleaner. The introductory description is gone, as is the description for each section. There are fewer links to choose from, and the link fonts have increased in size too. It’s much easier to use because of these changes.

welcome-screen

New feature: New color picker

Slight improvements have been made to the color picker.

The color picker for the built-in theme customizer has had a small visual improvement. Previously WordPress used the popular color wheel.
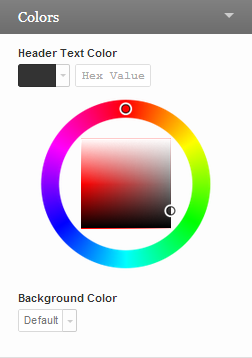
color-picker-old

The new color picker looks much more modern. Common colors are displayed at the bottom and there is a new Default button which lets you return to the default color for the property instantly.

color-picker

New feature: Media interface improved

The WordPress media interface has been vastly improved.

The media interface has had a much-needed overhaul. The old Upload/Insert text above your TinyMCE WYSIWYG editor has been replaced with a more prominent Add media button.
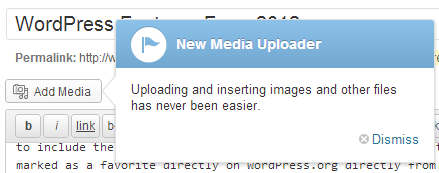
media-interface-1

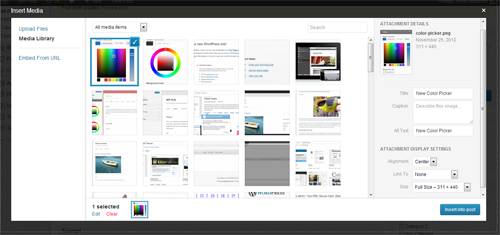
Clicking on the Add media button will bring up the new media interface. The old interface used to appear in an overlay that covered approximately 40% of the page (centered). The new overlay covers around 95% of the page. The same three options are available as before: Upload Files, Media Library and Embed from URL.

The media library not only looks better, it works better too. All items are shown in the center panel, with details of any selected item being shown on the right panel. Previously, items were shown vertically using a list and you had to click a Show link in order to see more details.

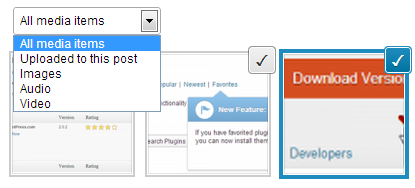
You can show all items, items uploaded to the post you are modifying, images, audio, and video. You can enter search terms to filter results, too.
media-interface-2

Multiple items can now be selected at once. Not only can you modify details of uploaded items more quickly, you can now insert multiple images, audio files, and videos directly into posts. This saves you a huge amount of time. The days of bloggers inserting dozens of images into blog posts one by one are over.
media-interface-3

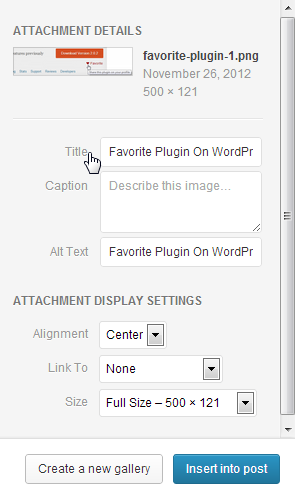
If you select more than one item, you will have the option of inserting them into a post together. You will also see an option to Create a new gallery. In the past, media items were always grouped together with the post or page they were uploaded from. This new system means you can group items together at any time and insert them anywhere you want.
media-interface-4

The new media interface is arguably the most important new feature for WordPress bloggers. Images, videos, and audio are so important to us. The new interface really speeds up the process of inserting these assets into your blog posts.

New feature: XML-RPC enabled by default

XML-RPC is now enabled by default.

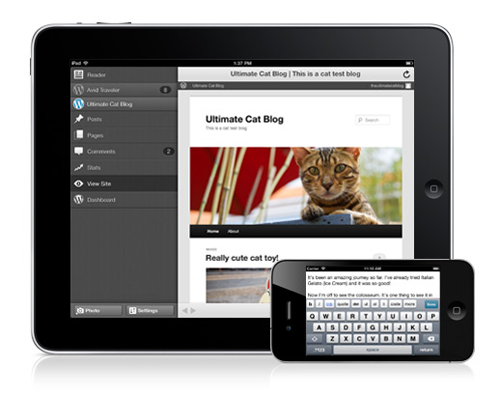
XML-RPC needs to be enabled in WordPress so that external applications can connect to WordPress. Historically, this setting has always been disabled by default.
ios-wordpress

When XML-RPC is enabled, WordPress can be used through a host of different mobile applications and you can use third-party blog editors such as Windows Live Writer, BlogDesk and Post2Blog.

New feature: Dashboard now supports all-HiDPI

The WordPress dashboard now supports retina display,

Those who have shiny new high-resolution retina display devices will be pleased to know that the WordPress dashboard is fully compatible with HiDPI.

Other features added to WordPress 3.4

Below is a list of some of the other features that were added to WordPress 3.5:

  • improved support for keyboard navigation and screen reading
  • search for comments of a particular status
  • external libraries for scripts such as TinyMCE, SimplePie, jQuery 1.8.2 and jQuery UI have all been updated. Backbone and Underscore have also been added.

A full list of features added to WordPress in version 3.5 can be found in the WordPress codex.

WordPress for the future

Each year the WordPress platform evolves and 2012 was no different. Features such as the theme customizer, live preview, and favorite plugins install option have made using WordPress easier for both beginners and veterans.

Whilst WordPress has moved beyond its humble blogging roots somewhat, it is still the best blogging platform available. The Link Manager has been downgraded, however new features such as inserting multiple media items, Twitter embeds and continued support for micro blogging post formats such as asides, quotes, and links, have ensured that WordPress remains number one in the blogging world.

WordPress have ensured they are keeping up with user habits, too. The Admin interface supports retina display, the new default design is responsive and they continue to improve their mobile applications. In short, WordPress is a mobile-friendly platform.

I hope you have enjoyed this review of the new features introduced to WordPress in 2012. Let us know what your favorite new feature is and why!

Michael Scott has been working with WordPress themes and websites in varying capacities since 2007. It was mainly as a project manager where he quickly developed a love for their simplicity and scalability. As a strong advocate of all things WordPress, he enjoys any opportunity to promote its use across the Interweb and on WPHub.com.

The post WordPress Feature Review: New Features You Missed in 2012, Part 2 appeared first on ProBlogger.

WordPress Feature Review: New Features You Missed in 2012, Part 2
https://problogger.com/wordpress-feature-review-new-features-you-missed-in-2012-part-2/
http://www.problogger.net/archives/category/blog-networks/feed/
Blog Networks – ProBlogger
Blog Tips to Help You Make Money Blogging – ProBlogger
https://problogger.com/wp-content/uploads/powerpress/problogger_podcast-891.jpg

Powered by WPeMatico