This Week In Web Design – June 18, 2021

…

Tips, Expertise, Articles and Advice from the Pro's for Your Website or Blog to Succeed
For most people, the first thing that comes to mind when thinking of voice user interfaces are voice assistants, such as Siri, Amazon Alexa or Google Assistant. In fact, assistants are the only context where most people have ever used voice to interact with a computer system.
While voice assistants have brought voice user interfaces to the mainstream, the assistant paradigm is not the only, nor even the best way to use, design, and create voice user interfaces.
In this article, I’ll go through the issues voice assistants suffer from and present a new approach for voice user interfaces that I call direct voice interactions.
A voice assistant is a piece of software that uses natural language instead of icons and menus as its user interface. Assistants typically answer questions and often proactively try to help the user.
Instead of straightforward transactions and commands, assistants mimic a human conversation and use natural language bi-directionally as the interaction modality, meaning it both takes input from the user and answers to the user by using natural language.
The first assistants were dialogue-based question-answering systems. One early example is Microsoft’s Clippy that infamously tried to aid users of Microsoft Office by giving them instructions based on what it thought the user was trying to accomplish. Nowadays, a typical use case for the assistant paradigm are chatbots, often used for customer support in a chat discussion.
Voice assistants, on the other hand, are chatbots that use voice instead of typing and text. The user input is not selections or text but speech and the response from the system is spoken out loud, too. These assistants can be general assistants such as Google Assistant or Alexa that can answer a multitude of questions in a reasonable way or custom assistants that are built for a special purpose such as fast-food ordering.
Although often the user’s input is just a word or two and can be presented as selections instead of actual text, as the technology evolves, the conversations will be more open-ended and complex. The first defining feature of chatbots and assistants is the use of natural language and conversational style instead of icons, menus, and transactional style that defines a typical mobile app or website user experience.
Recommended reading: Building A Simple AI Chatbot With Web Speech API And Node.js
The second defining characteristic that derives from the natural language responses is the illusion of a persona. The tone, quality, and language that the system uses define both the assistant experience, the illusion of empathy and susceptibility to service, and its persona. The idea of a good assistant experience is like being engaged with a real person.
Since voice is the most natural way for us to communicate, this might sound awesome, but there are two major problems with using natural language responses. One of these problems, related to how well computers can imitate humans, might be fixed in the future with the development of conversational AI technologies, but the problem of how human brains handle information is a human problem, not fixable in the foreseeable future. Let’s look into these problems next.
Voice user interfaces are of course user interfaces that use voice as a modality. But voice modality can be used for both directions: for inputting information from the user and outputting information from the system back to the user. For example, some elevators use speech synthesis for confirming the user selection after the user presses a button. We’ll later discuss voice user interfaces that only use voice for inputting information and use traditional graphical user interfaces for showing the information back to the user.
Voice assistants, on the other hand, use voice for both input and output. This approach has two main problems:
As humans, we have an innate inclination to attribute human-like features to non-human objects. We see the features of a man in a cloud drifting by or look at a sandwich and it seems like it’s grinning at us. This is called anthropomorphism.

This phenomenon applies to assistants too, and it is triggered by their natural language responses. While a graphical user interface can be built somewhat neutral, there’s no way a human could not start thinking about whether the voice of someone belongs to a young or an old person or whether they are male or a female. Because of this, the user almost starts to think that the assistant is indeed a human.
However, we humans are very good at detecting fakes. Strangely enough, the closer something comes to resembling a human, the more the small deviations start to disturb us. There is a feeling of creepiness towards something that tries to be human-like but does not quite measure up to it. In robotics and computer animations this is referred to as the “uncanny valley”.

The better and more human-like we try to make the assistant, the creepier and disappointing the user experience can be when something goes wrong. Everyone who has tried assistants has probably stumbled upon the problem of responding with something that feels idiotic or even rude.
The uncanny valley of voice assistants poses a problem of quality in assistant user experience that is hard to overcome. In fact, the Turing test (named after the famous mathematician Alan Turing) is passed when a human evaluator exhibiting a conversation between two agents cannot distinguish between which of them is a machine and which is a human. So far, it has never been passed.
This means that the assistant paradigm sets a promise of a human-like service experience that can never be fulfilled and the user is bound to get disappointed. The successful experiences only build up the eventual disappointment, as the user begins to trust their human-like assistant.
The second problem of voice assistants is that the turn-based nature of natural language responses causes delay to the interaction. This is due to how our brains process information.

There are two types of data processing systems in our brains:
These two systems can operate in parallel, but both systems process only one thing at a time. This is why you can speak and drive a car at the same time, but you can’t text and drive because both of those activities would happen in the visuospatial system.

Similarly, when you are talking to the voice assistant, the assistant needs to stay quiet and vice versa. This creates a turn-based conversation, where the other part is always fully passive.
However, consider a difficult topic you want to discuss with your friend. You’d probably discuss face-to-face rather than over the phone, right? That is because in a face-to-face conversation we use non-verbal communication to give realtime visual feedback to our conversation partner. This creates a bi-directional information exchange loop and enables both parties to be actively involved in the conversation simultaneously.
Assistants don’t give realtime visual feedback. They rely on a technology called end-pointing to decide when the user has stopped talking and replies only after that. And when they do reply, they don’t take any input from the user at the same time. The experience is fully unidirectional and turn-based.
In a bi-directional and realtime face-to-face conversation, both parties can react immediately to both visual and linguistic signals. This utilizes the different information processing systems of the human brain and the conversation becomes smoother and more efficient.
Voice assistants are stuck in unidirectional mode because they are using natural language both as the input and output channels. While voice is up to four times faster than typing for input, it’s significantly slower to digest than reading. Because information needs to be processed sequentially, this approach only works well for simple commands such as “turn off the lights” that don’t require much output from the assistant.
Earlier, I promised to discuss voice user interfaces that employ voice only for inputting data from the user. This kind of voice user interfaces benefit from the best parts of voice user interfaces — naturalness, speed and ease-of-use — but don’t suffer from the bad parts — uncanny valley and sequential interactions
Let’s consider this alternative.
The solution to overcome these problems in voice assistants is letting go of natural language responses, and replacing them with realtime visual feedback. Switching feedback to visual will enable the user to give and get feedback simultaneously. This will enable the application to react without interrupting the user and enabling a bidirectional information flow. Because the information flow is bidirectional, its throughput is bigger.
Currently, the top use cases for voice assistants are setting alarms, playing music, checking the weather, and asking simple questions. All of these are low-stakes tasks that don’t frustrate the user too much when failing.
As David Pierce from the Wall Street Journal once wrote:
“I can’t imagine booking a flight or managing my budget through a voice assistant, or tracking my diet by shouting ingredients at my speaker.”
— David Pierce from Wall Street Journal
These are information-heavy tasks that need to go right.
However, eventually, the voice user interface will fail. The key is to cover this as fast as possible. A lot of errors happen when typing on a keyboard or even in a face-to-face conversation. However, this is not at all frustrating as the user can recover simply by clicking the backspace and trying again or asking for clarification.
This fast recovery from errors enables the user to be more efficient and doesn’t force them into a weird conversation with an assistant.

“Isn’t this semantics?”, you might ask. If you are going to talk to the computer does it really matter if you are talking directly to the computer or through a virtual persona? In both cases, you are just talking to a computer!
Yes, the difference is subtle, but critical. When clicking a button or menu item in a GUI (Graphical User Interface) it is blatantly obvious that we are operating a machine. There is no illusion of a person. By replacing that clicking with a voice command, we are improving the human-computer interaction. With the assistant paradigm, on the other hand, we are creating a deteriorated version of the human-to-human interaction and hence, journeying into the uncanny valley.
Blending voice functionalities into the graphical user interface also offers the potential to harness the power of different modalities. While the user can use voice to operate the application, they have the ability to use the traditional graphical interface, too. This enables the user to switch between touch and voice seamlessly and choose the best option based on their context and task.
For example, voice is a very efficient method for inputting rich information. Selecting between a couple of valid alternatives, touch or click is probably better. The user can then replace typing and browsing by saying something like, “Show me flights from London to New York departing tomorrow,” and select the best option from the list by using touch.

Contrary to the traditional turn-based voice assistant systems that wait for the user to stop talking before processing the user request, systems using streaming spoken language understanding actively try to comprehend the user intent from the very moment the user starts to talk. As soon as the user says something actionable, the UI instantly reacts to it.
The instant response immediately validates that the system is understanding the user and encourages the user to go on. It’s analogous to a nod or a short “a-ha” in human-to-human communication. This results in longer and more complex utterances supported. Respectively, if the system does not understand the user or the user misspeaks, instant feedback enables fast recovery. The user can immediately correct and continue, or even verbally correct themself: “I want this, no I meant, I want that.” You can try this kind of application yourself in our voice search demo.
As you can see in the demo, the realtime visual feedback enables the user to correct themselves naturally and encourages them to continue with the voice experience. As they are not confused by a virtual persona, they can relate to possible errors in a similar way to typos — not as personal insults. The experience is faster and more natural because the information fed to the user is not limited by the typical rate of speech of about 150 words per minute.
Recommended reading: Designing Voice Experiences by Lyndon Cerejo
While voice assistants have been by far the most common use for voice user interfaces so far, the use of natural language responses makes them inefficient and unnatural. Voice is a great modality for inputting information, but listening to a machine talking is not very inspiring. This is the big issue of voice assistants.
The future of voice should therefore not be in conversations with a computer but in replacing tedious user tasks with the most natural way of communicating: speech. Direct voice interactions can be used to improve form filling experience in web or mobile applications, to create better search experiences, and to enable a more efficient way to control or navigate in an application.
Designers and app developers are constantly looking for ways to reduce friction in their apps or websites. Enhancing the current graphical user interface with a voice modality would enable multiple times faster user interactions especially in certain situations such as when the end-user is on mobile and on the go and typing is hard. In fact, voice search can be up to five times faster than a traditional search filtering user interface, even when using a desktop computer.
Next time, when you are thinking about how you can make a certain user task in your application easier to use, more enjoyable to use, or you are interested in increasing conversions, consider whether that user task can be described accurately in natural language. If yes, complement your user interface with a voice modality but don’t force your users to conversate with a computer.
Hyperlinks have been one of the jewels of the Web since its inception . According to MDN, hyperlinks are what makes the Web, a web. While used for purposes such as linking between documents, its primary use is to reference different web pages identifiable by a unique web address or a URL.
Routing is an important aspect of each web application as much as hyperlinks are to the Web. It is a mechanism through which requests are routed to the code that handles them. In relation to routing, Next.js pages are referenced and identifiable by a unique URL path. If the Web consists of navigational web pages interconnected by hyperlinks, then each Next.js app consists of route-able pages (route handlers or routes) interconnected by a router.
Next.js has built-in support for routing that can be unwieldy to unpack, especially when considering rendering and data fetching. As a prerequisite to understanding client-side routing in Next.js, it is necessary to have an overview of concepts like routing, rendering, and data fetching in Next.js.
This article will be beneficial to React developers who are familiar with Next.js and want to learn how it handles routing. You need to have a working knowledge of React and Next.js to get the most out of the article, which is solely about client-side routing and related concepts in Next.js.
Routing and Rendering are complementary to each other and will play a huge part through the course of this article. I like how Gaurav explains them:
Routing is the process through which the user is navigated to different pages on a website.
Rendering is the process of putting those pages on the UI. Every time you request a route to a particular page, you are also rendering that page, but not every render is an outcome of a route.
Take five minutes to think about that.
What you need to understand about rendering in Next.js is that each page is pre-rendered in advance alongside the minimal JavaScript code necessary for it to become fully interactive through a process known as hydration. How Next.js does this is highly dependent on the form of pre-rendering: Static Generation or Server-side rendering, which are both highly coupled to the data fetching technique used, and separated by when the HTML for a page is generated.
Depending on your data fetching requirements, you might find yourself using built-in data fetching functions like getStaticProps, getStaticPaths, or, getServerSideProps, client-side data fetching tools like SWR, react-query, or traditional data fetching approaches like fetch-on-render, fetch-then-render, render-as-you-fetch (with Suspense).
Pre-rendering (before rendering — to the UI) is complementary to Routing, and highly coupled with data fetching — a whole topic of its own in Next.js. So while these concepts are either complementary or closely related, this article will be solely focused on mere navigation between pages (routing), with references to related concepts where necessary.
With that out of the way, let’s begin with the fundamental gist: Next.js has a file-system-based router built on the concept of pages.
Pages in Next.js are React Components that are automatically available as routes. They are exported as default exports from the pages directory with supported file extensions like .js, .jsx, .ts, or .tsx.
A typical Next.js app will have a folder structure with top-level directories like pages, public, and styles.
next-app
├── node_modules
├── pages
│   ├── index.js // path: base-url (/)
│   ├── books.jsx // path: /books
│   └── book.ts // path: /book
├── public
├── styles
├── .gitignore
├── package.json
└── README.md
Each page is a React component:
// pages/books.js — `base-url/book`
export default function Book() {
  return Books
}Note: Keep in mind that pages can also be referred to as “route handlers”.
These are special pages that reside in the pages directory but do not participate in routing. They are prefixed with the underscore symbol, as in, _app.js, and _document.js.
_app.js_document.js_app.js, _document.js is a custom component that Next.js uses to augment your applications <html> and <body> tags. This is necessary because Next.js pages skip the definition of the surrounding document’s markup. next-app
├── node_modules
├── pages
│ ├── _app.js // ⚠️ Custom page (unavailable as a route)
│ ├── _document.jsx // ⚠️ Custom page (unavailable as a route)
│ └── index.ts // path: base-url (/)
├── public
├── styles
├── .gitignore
├── package.json
└── README.mdNext.js exposes a Link component from the next/link API that can be used to perform client-side route transitions between pages.
// Import the <Link/> component
import Link from "next/link";

// This could be a page component
export default function TopNav() {
  return (
    <nav>
      <Link href="/">Home</Link>
      <Link href="/">Publications</Link>
      <Link href="/">About</Link>
    </nav>
  )
}

// This could be a non-page component
export default function Publications() {
  return (
    <section>
      <TopNav/>
      {/* ... */}
    </section>
  )
}
The Link component can be used inside any component, page or not. When used in its most basic form as in the example above, the Link component translates to a hyperlink with an href attribute. (More on Link in the next/link section below.)
Next.js file-based routing system can be used to define the most common route patterns. To accommodate for these patterns, each route is separated based on its definition.
By default, in your Next.js app, the initial/default route is pages/index.js which automatically serves as the starting point of your application as /. With a base URL of localhost:3000, this index route can be accessed at the base URL level of the application in the browser.
Index routes automatically act as the default route for each directory and can eliminate naming redundancies. The directory structure below exposes two route paths: / and /home.
next-app
└── pages
    ├── index.js // path: base-url (/)
    └── home.js // path: /home
The elimination is more apparent with nested routes.
A route like pages/book is one level deep. To go deeper is to create nested routes, which requires a nested folder structure. With a base-url of https://www.smashingmagazine.com, you can access the route https://www.smashingmagazine.com/printed-books/printed-books by creating a folder structure similar to the one below:
next-app
└── pages
    ├── index.js // top index route
    └── printed-books // nested route
        └── printed-books.js // path: /printed-books/printed-books
Or eliminate path redundancy with index routes and access the route for printed books at https://www.smashingmagazine.com/printed-books.
next-app
└── pages
    ├── index.js // top index route
    └── printed-books // nested route
        └── index.js // path: /printed-books
Dynamic routes also play an important role in eliminating redundancies.
From the previous example we use the index route to access all printed books. To access individual books requires either creating different routes for each book like:
// ⚠️ Don't do this.
next-app
└── pages
    ├── index.js // top index route
    └── printed-books // nested route
        ├── index.js // path: /printed-books
        ├── typesript-in-50-lessons.js // path: /printed-books/typesript-in-50-lessons
        ├── checklist-cards.js // path: /printed-books/checklist-cards
        ├── ethical-design-handbook.js // path: /printed-books/ethical-design-handbook
        ├── inclusive-components.js // path: /printed-books/inclusive-components
        └── click.js // path: /printed-books/click
which is highly redundant, unscalable, and can be remedied with dynamic routes like:
// ✅ Do this instead.
next-app
└── pages
    ├── index.js // top index route
    └── printed-books
        ├── index.js // path: /printed-books
        └── [book-id].js // path: /printed-books/:book-id
The bracket syntax — [book-id] — is the dynamic segment, and is not limited to files alone. It can also be used with folders like the example below, making the author available at the route /printed-books/:book-id/author.
next-app
└── pages
    ├── index.js // top index route
    └── printed-books
        ├── index.js // path: /printed-books
        └── [book-id]
            └── author.js // path: /printed-books/:book-id/author
The dynamic segment(s) of a route is exposed as a query parameter that can be accessed in any of the connecting component involved in the route with query object of the useRouter() hook — (More on this in the next/router API section).
// printed-books/:book-id
import { useRouter } from 'next/router';

export default function Book() {
  const { query } = useRouter();

  return (
    <div>
      <h1>
        book-id <em>{query['book-id']}</em>
      </h1>
    </div>
  );
}
// /printed-books/:book-id/author
import { useRouter } from 'next/router';
export default function Author() {
const { query } = useRouter();
return (
<div>
<h1>
Fetch author with book-id <em>{query['book-id']}</em>
</h1>
</div>
);
}
You’ve seen the dynamic route segment bracket syntax as in the previous example with [book-id].js. The beauty of this syntax is that it takes things even further with Catch-All Routes. You can infer what this does from the name: it catches all routes.
When we looked at the dynamic example, we learned how it helps eliminate file creation redundancy for a single route to access multiple books with their ID. But there’s something else we could have done.
Specifically, we had the path /printed-books/:book-id, with a directory structure:
next-app
└── pages
    ├── index.js
    └── printed-books
        ├── index.js
        └── [book-id].js
If we updated the path to have more segments like categories, we might end up with something like: /printed-books/design/:book-id, /printed-books/engineering/:book-id, or better still /printed-books/:category/:book-id.
Let’s add the release year: /printed-books/:category/:release-year/:book-id. Can you see a pattern? The directory structure becomes:
next-app
└── pages
    ├── index.js
    └── printed-books
        └── [category]
            └── [release-year]
                └── [book-id].js
We substituted the use of named files for dynamic routes, but somehow still ended up with another form of redundancy. Well, there’s a fix: Catch All Routes that eliminates the need for deeply nested routes:
next-app
└── pages
    ├── index.js
    └── printed-books
        └── [...slug].js
It uses the same bracket syntax except that it is prefixed with three dots. Think of the dots like the JavaScript spread syntax. You might be wondering: If I use the catch-all routes, how do I access the category ([category]), and release year ([release-year]). Two ways:
import { useRouter } from 'next/router';

export default function Book() {
  const { query } = useRouter();
  // There's a brief moment where slug is undefined
  // so we use the Optional Chaining (?.) and Nullish coalescing operator (??)
  // to check if slug is undefined, then fall back to an empty array
  const [category, releaseYear, bookId] = query?.slug ?? [];

  return (
    <table>
      <tbody>
        <tr>
          <th>Book Id</th>
          <td>{bookId}</td>
        </tr>
        <tr>
          <th>Category</th>
          <td>{category}</td>
        </tr>
        <tr>
          <th>Release Year</th>
          <td>{releaseYear}</td>
        </tr>
      </tbody>
    </table>
  );
}
Here’s more example for the route /printed-books/[…slug]:
| Path | Query parameter |
|---|---|
/printed-books/click.js |
{ “slug”: [“click”] } |
/printed-books/2020/click.js |
{ “slug”: [“2020”, “click”] } |
/printed-books/design/2020/click.js |
{ “slug”: [“design”, “2020”, “click”] } |
As it is with the catch-all route, the route /printed-books will throw a 404 error unless you provide a fallback index route.
next-app
└── pages
    ├── index.js
    └── printed-books
        ├── index.js // path: /printed-books
        └── [...slug].js
This is because the catch-all route is “strict”. It either matches a slug, or it throws an error. If you’d like to avoid creating index routes alongside catch-all routes, you can use the optional catch-all routes instead.
The syntax is the same as catch-all-routes, but with double square brackets instead.
next-app
└── pages
    ├── index.js
    └── printed-books
        └── [[...slug]].js
In this case, the catch-all route (slug) is optional and if not available, fallbacks to the path /printed-books, rendered with [[…slug]].js route handler, without any query params.
Use catch-all alongside index routes, or optional catch-all routes alone. Avoid using catch-all and optional catch-all routes alongside.
The capability to be able to define the most common routing patterns can be a “black swan”. The possibility of routes clashing is a looming threat, most especially when you start getting dynamic routes worked up.
When it makes sense to do so, Next.js lets you know about route clashes in the form of errors. When it doesn’t, it applies precedence to routes according to their specificity.
For example, it is an error to have more than one dynamic route on the same level.
// ❌ This is an error
// Failed to reload dynamic routes: Error: You cannot use different slug names for the // same dynamic path ('book-id' !== 'id').
next-app
└── pages
    ├── index.js
    └── printed-books
        ├── [book-id].js
        └── [id].js
If you look closely at the routes defined below, you’d notice the potential for clashes.
// Directory structure flattened for simplicity
next-app
└── pages
    ├── index.js // index route (also a predefined route)
    └── printed-books
        ├── index.js
        ├── tags.js // predefined route
        ├── [book-id].js // handles dynamic route
        └── [...slug].js // handles catch all route
For example, try answering this: what route handles the path /printed-books/inclusive-components?
/printed-books/[book-id].js, or/printed-books/[…slug].js.The answer lies in the “specificity” of the route handlers. Predefined routes come first, followed by dynamic routes, then catch-all routes. You can think of the route request/handling model as a pseudo-code with the following steps:
true — handle the route request.false — go to 2.true — handle the route request.false — go to 3.true — handle the route request.false — throw a 404 page not found.Therefore, /printed-books/[book-id].js wins.
Here are more examples:
| Route | Route handler | Type of route |
|---|---|---|
/printed-books |
/printed-books |
Index route |
/printed-books/tags |
/printed-books/tags.js |
Predefined route |
/printed-books/inclusive-components |
/printed-books/[book-id].js |
Dynamic route |
/printed-books/design/inclusive-components |
/printed-books/[...slug].js |
Catch-all route |
next/link APIThe next/link API exposes the Link component as a declarative way to perform client-side route transitions.
import Link from 'next/link'

function TopNav() {
  return (
    <nav>
      <Link href="/">Smashing Magazine</Link>
      <Link href="/articles">Articles</Link>
      <Link href="/guides">Guides</Link>
      <Link href="/printed-books">Books</Link>
    </nav>
  )
}
The Link component will resolve to a regular HTML hyperlink. That is, <Link href="/">Smashing Magazine</Link> will resolve to <a href="/">Smashing Magazine</a>.
The href prop is the only required prop to the Link component. See the docs for a complete list of props available on the Link component.
There are other mechanisms of the Link component to be aware of.
Prior to Next.js 9.5.3, Linking to dynamic routes meant that you had to provide both the href and as prop to Link as in:
import Link from 'next/link';

const printedBooks = [
  { name: 'Ethical Design', id: 'ethical-design' },
  { name: 'Design Systems', id: 'design-systems' },
];

export default function PrintedBooks() {
  return printedBooks.map((printedBook) => (
    <Link
      href="/printed-books/[printed-book-id]"
      as={`/printed-books/${printedBook.id}`}
    >
      {printedBook.name}
    </Link>
  ));
}
Although this allowed Next.js to interpolate the href for the dynamic parameters, it was tedious, error-prone, and somewhat imperative, and has now been fixed for the majority of use-cases with the release of Next.js 10.
This fix is also backward compatible. If you have been using both as and href, nothing breaks. To adopt the new syntax, discard the href prop and its value, and rename the as prop to href as in the example below:
import Link from 'next/link';

const printedBooks = [
  { name: 'Ethical Design', id: 'ethical-design' },
  { name: 'Design Systems', id: 'design-systems' },
];

export default function PrintedBooks() {
  return printedBooks.map((printedBook) => (
    <Link href={/printed-books/${printedBook.id}}>{printedBook.name}</Link>
  ));
}passHref PropTake a close look at the snippet below:
import Link from 'next/link';

const printedBooks = [
  { name: 'Ethical Design', id: 'ethical-design' },
  { name: 'Design Systems', id: 'design-systems' },
];

// Say this has some sort of base styling attached
function CustomLink({ href, name }) {
  return <a href={href}>{name}</a>;
}

export default function PrintedBooks() {
  return printedBooks.map((printedBook) => (
    <Link href={/printed-books/${printedBook.id}} passHref>
      <CustomLink name={printedBook.name} />
    </Link>
  ));
}
The passHref props force the Link component to pass the href prop down to the CustomLink child component. This is compulsory if the Link component wraps over a component that returns a hyperlink <a> tag. Your use-case might be because you are using a library like styled-components, or if you need to pass multiple children to the Link component, as it only expects a single child.
See the docs to learn more.
The href prop of the Link component can also be a URL object with properties like query which is automatically formatted into a URL string.
With the printedBooks object, the example below will link to:
/printed-books/ethical-design?name=Ethical+Design and/printed-books/design-systems?name=Design+Systems.import Link from 'next/link';
const printedBooks = [
{ name: 'Ethical Design', id: 'ethical-design' },
{ name: 'Design Systems', id: 'design-systems' },
];
export default function PrintedBooks() {
return printedBooks.map((printedBook) => (
<Link
href={{
pathname: `/printed-books/${printedBook.id}`,
query: { name: `${printedBook.name}` },
}}
>
{printedBook.name}
</Link>
));
}If you include a dynamic segment in the pathname, then you must also include it as a property in the query object to make sure the query is interpolated in the pathname:
import Link from 'next/link';

const printedBooks = [
  { name: 'Ethical Design', id: 'ethical-design' },
  { name: 'Design Systems', id: 'design-systems' },
];

// In this case the dynamic segment `[book-id]` in pathname
// maps directly to the query param `book-id`
export default function PrintedBooks() {
  return printedBooks.map((printedBook) => (
    <Link
      href={{
        pathname: `/printed-books/[book-id]`,
        query: { 'book-id': `${printedBook.id}` },
      }}
    >
      {printedBook.name}
    </Link>
  ));
}
The example above have paths:
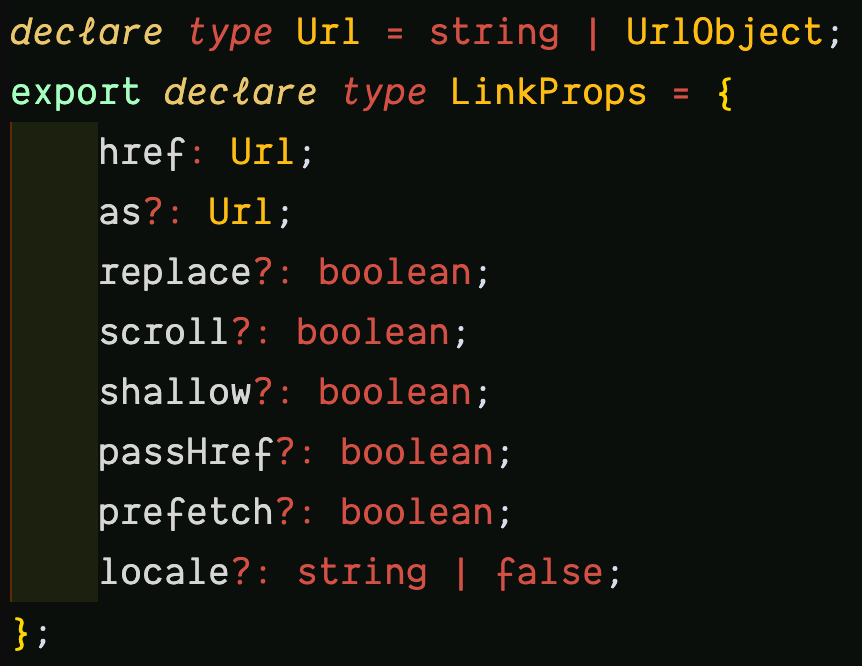
/printed-books/ethical-design, and/printed-books/design-systems.If you inspect the href attribute in VSCode, you’d find the type LinkProps, with the href property a Url type, which is either a string or UrlObject as mentioned previously.
Inspecting the UrlObject further leads to the interface with the properties:
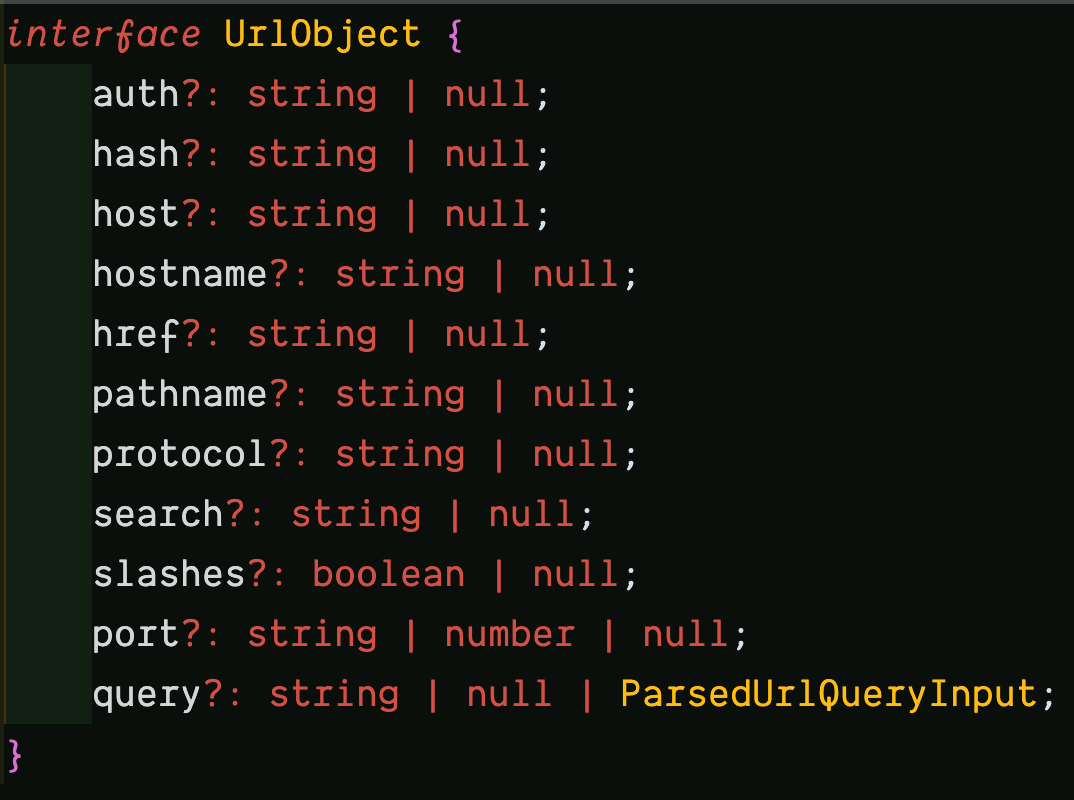
You can learn more about these properties in the Node.js URL module documentation.
One use case of the hash is to link to specific sections in a page.
import Link from 'next/link';

const printedBooks = [{ name: 'Ethical Design', id: 'ethical-design' }];

export default function PrintedBooks() {
  return printedBooks.map((printedBook) => (
    <Link
      href={{
        pathname: /printed-books/${printedBook.id},
        hash: 'faq',
      }}
    >
      {printedBook.name}
    </Link>
  ));
}
The hyperlink will resolve to /printed-books/ethical-design#faq.
Learn more in the docs.
next/router APIIf the next/link is declarative, then the next/router is imperative. It exposes a useRouter hook that allows access to the router object inside any function component. You can use this hook to manually perform routing, most especially in certain scenarios where the next/link is not enough, or where you need to “hook” into the routing.
import { useRouter } from 'next/router';

export default function Home() {
  const router = useRouter();

  function handleClick(e) {
    e.preventDefault();
    router.push(href);
  }

  return (
    <button type="button" onClick={handleClick}>Click me</button>
  )
}
useRouter is a React hook and cannot be used with classes. Need the router object in class components? Use withRouter.
import { withRouter } from 'next/router';

function Home({router}) {
  function handleClick(e) {
    e.preventDefault();
    router.push(href);
  }

  return (
    <button type="button" onClick={handleClick}>Click me</button>
  )
}

export default withRouter(Home);router ObjectBoth the useRouter hook and withRouter higher-order component, return a router object with properties like pathname, query, asPath, and basePath that gives you information about the URL state of the current page, locale, locales, and defaultLocale that gives information about the active, supported, or current default locale.
The router object also has methods like push for navigating to a new URL by adding a new URL entry into the history stack, replace, similar to push but replaces the current URL instead of adding a new URL entry into the history stack.
Learn more about the router object.
next.config.jsThis is a regular Node.js module that can be used to configure certain Next.js behavior.
module.exports = {
  // configuration options
}
Remember to restart your server anytime you update
next.config.js. Learn more.
It was mentioned that the initial/default route in Next.js is pages/index.js with path /. This is configurable and you can make your default route a sub-path of the domain.
module.exports = {
  // old default path: /
  // new default path: /dashboard
  basePath: '/dashboard',
};
These changes will automatically take effect in your application with all / paths routed to /dashboard.
This feature can only be used with Next.js 9.5 and above. Learn more.
By default, a trailing slash will not be available at the end of each URL. However, you can switch that with:
module.exports = {
  trailingSlash: true
};
# trailingSlash: false
/printed-books/ethical-design#faq
# trailingSlash: true
/printed-books/ethical-design/#faqBoth the base path and trailing slash features can only be used with Next.js 9.5 and above.
Routing is one of the most important parts of your Next.js application, and it reflects in the file-system-based router built on the concept of pages. Pages can be used to define the most common route patterns. The concepts of routing and rendering are closely related. Take the lessons of this article with you as you build your own Next.js app or work on a Next.js codebase. And check the resources below to learn more.