Building A Rich Text Editor (WYSIWYG)

In recent years, the field of Content Creation and Representation on Digital platforms has seen a massive disruption. The widespread success of products like Quip, Google Docs and Dropbox Paper has shown how companies are racing to build the best experience for content creators in the enterprise domain and trying to find innovative ways of breaking the traditional moulds of how content is shared and consumed. Taking advantage of the massive outreach of social media platforms, there is a new wave of independent content creators using platforms like Medium to create content and share it with their audience.

As so many people from different professions and backgrounds try to create content on these products, it’s important that these products provide a performant and seamless experience of content creation and have teams of designers and engineers who develop some level of domain expertise over time in this space. With this article, we try to not only lay the foundation of building an editor but also give the readers a glimpse into how little nuggets of functionalities when brought together can create a great user experience for a content creator.

Understanding The Document Structure

Before we dive into building the editor, let’s look at how a document is structured for a Rich Text Editor and what are the different types of data structures involved.

Document Nodes

Document nodes are used to represent the contents of the document. The common types of nodes that a rich-text document could contain are paragraphs, headings, images, videos, code-blocks and pull-quotes. Some of these may contain other nodes as children inside them (e.g. Paragraph nodes contain text nodes inside them). Nodes also hold any properties specific to the object they represent that are needed to render those nodes inside the editor. (e.g. Image nodes contain an image src property, Code-blocks may contain a language property and so on).

There are largely two types of nodes that represent how they should be rendered -

  • Block Nodes (analogous to HTML concept of Block-level elements) that are each rendered on a new line and occupy the available width. Block nodes could contain other block nodes or inline nodes inside them. An observation here is that the top-level nodes of a document would always be block nodes.
  • Inline Nodes (analogous to HTML concept of Inline elements) that start rendering on the same line as the previous node. There are some differences in how inline elements are represented in different editing libraries. SlateJS allows for inline elements to be nodes themselves. DraftJS, another popular Rich Text Editing library, lets you use the concept of Entities to render inline elements. Links and Inline Images are examples of Inline nodes.
  • Void Nodes — SlateJS also allows this third category of nodes that we will use later in this article to render media.

If you want to learn more about these categories, SlateJS’s documentation on Nodes is a good place to start.

Attributes

Similar to HTML’s concept of attributes, attributes in a Rich Text Document are used to represent non-content properties of a node or it’s children. For instance, a text node can have character-style attributes that tell us whether the text is bold/italic/underlined and so on. Although this article represents headings as nodes themselves, another way to represent them could be that nodes have paragraph-styles (paragraph & h1-h6) as attributes on them.

Below image gives an example of how a document’s structure (in JSON) is described at a more granular level using nodes and attributes highlighting some of the elements in the structure to the left.
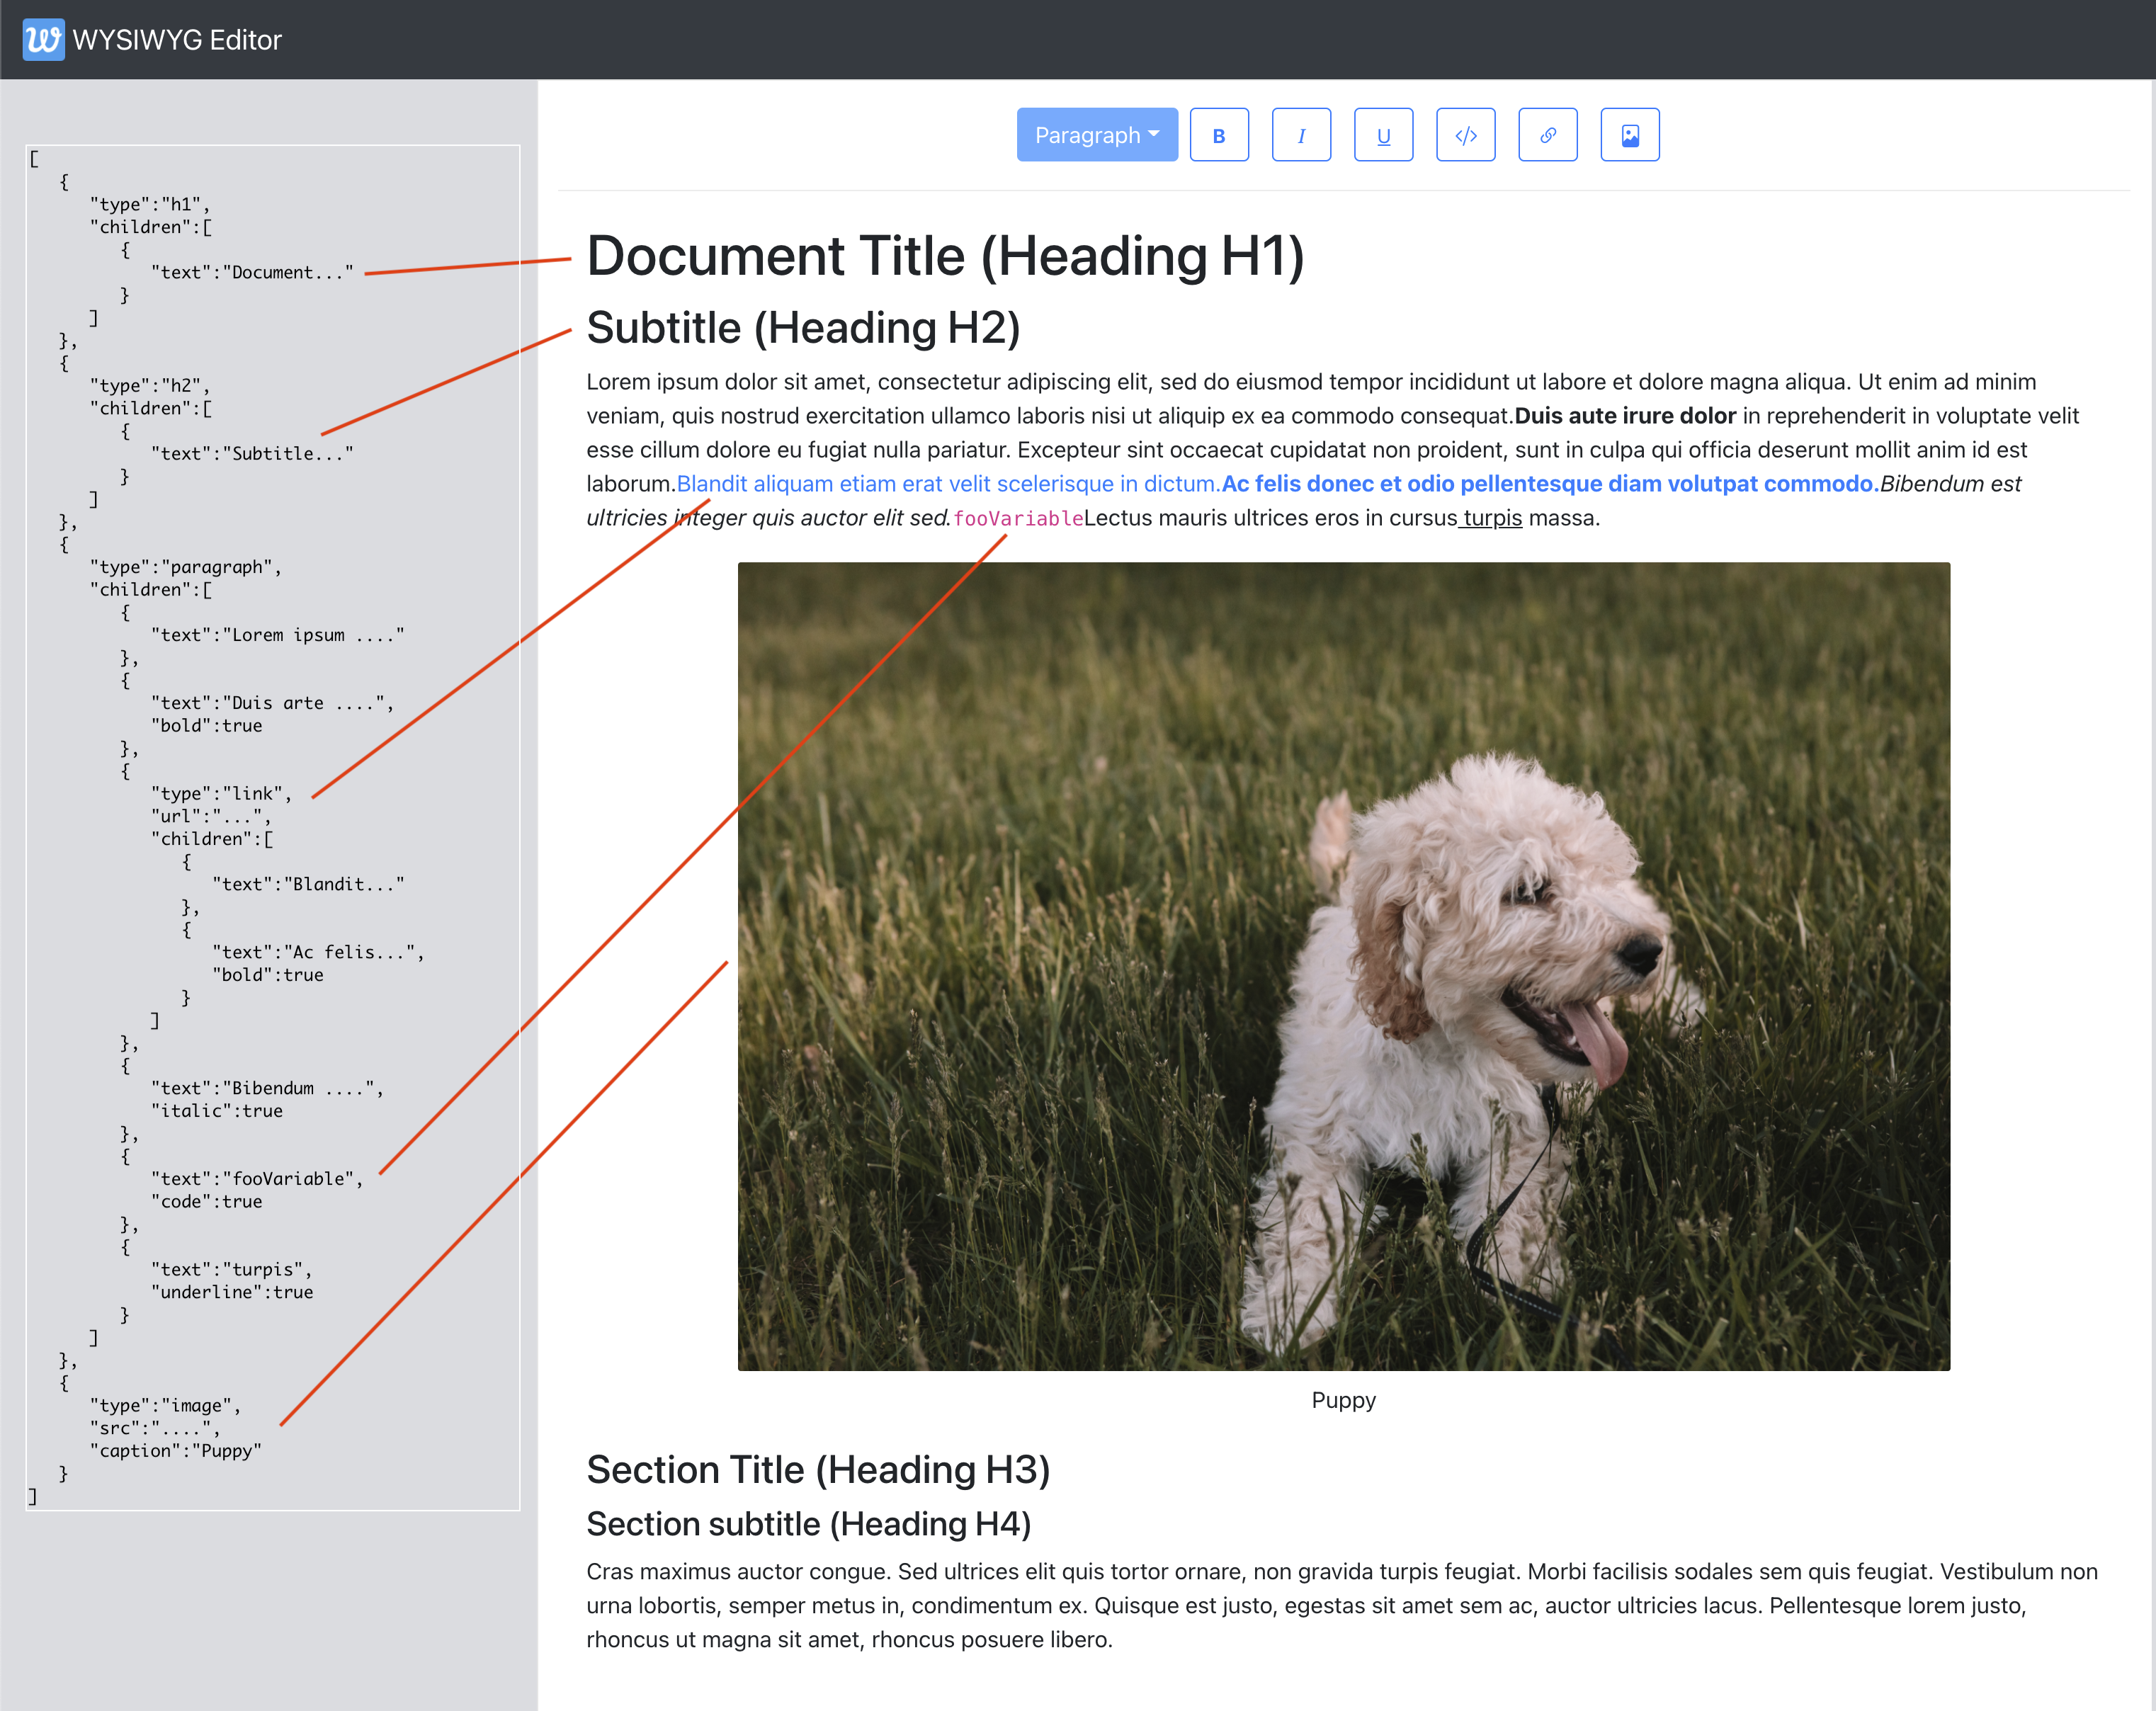
Some of the things worth calling out here with the structure are:

  • Text nodes are represented as {text: 'text content'}
  • Properties of the nodes are stored directly on the node (e.g. url for links and caption for images)
  • SlateJS-specific representation of text attributes breaks the text nodes to be their own nodes if the character style changes. Hence, the text ‘Duis aute irure dolor’ is a text node of it’s own with bold: true set on it. Same is the case with the italic, underline and code style text in this document.

Locations And Selection

When building a rich text editor, it is crucial to have an understanding of how the most granular part of a document (say a character) can be represented with some sort of coordinates. This helps us navigate the document structure at runtime to understand where in the document hierarchy we are. Most importantly, location objects give us a way to represent user selection which is quite extensively used to tailor the user experience of the editor in real time. We will use selection to build our toolbar later in this article. Examples of these could be:

  • Is the user’s cursor currently inside a link, maybe we should show them a menu to edit/remove the link?
  • Has the user selected an image? Maybe we give them a menu to resize the image.
  • If the user selects certain text and hits the DELETE button, we determine what user’s selected text was and remove that from the document.

SlateJS’s document on Location explains these data structures extensively but we go through them here quickly as we use these terms at different instances in the article and show an example in the diagram that follows.

  • Path
    Represented by an array of numbers, a path is the way to get to a node in the document. For instance, a path [2,3] represents the 3rd child node of the 2nd node in the document.
  • Point
    More granular location of content represented by path + offset. For instance, a point of {path: [2,3], offset: 14} represents the 14th character of the 3rd child node inside the 2nd node of the document.
  • Range
    A pair of points (called anchor and focus) that represent a range of text inside the document. This concept comes from Web’s Selection API where anchor is where user’s selection began and focus is where it ended. A collapsed range/selection denotes where anchor and focus points are the same (think of a blinking cursor in a text input for instance).

As an example let’s say that the user’s selection in our above document example is ipsum:

The user’s selection can be represented as:

{
  anchor: {path: [2,0], offset: 5}, /0th text node inside the paragraph node which itself is index 2 in the document/
  focus: {path: [2,0], offset: 11}, // space + 'ipsum'
}`

Setting Up The Editor

In this section, we are going to set up the application and get a basic rich-text editor going with SlateJS. The boilerplate application would be create-react-app with SlateJS dependencies added to it. We are building the UI of the application using components from react-bootstrap. Let’s get started!

Create a folder called wysiwyg-editor and run the below command from inside the directory to set up the react app. We then run a yarn start command that should spin up the local web server (port defaulting to 3000) and show you a React welcome screen.

npx create-react-app .
yarn start

We then move on to add the SlateJS dependencies to the application.

yarn add slate slate-react

slate is SlateJS's core package and slate-react includes the set of React components we will use to render Slate editors. SlateJS exposes some more packages organized by functionality one might consider adding to their editor.

We first create a utils folder that holds any utility modules we create in this application. We start with creating an ExampleDocument.js that returns a basic document structure that contains a paragraph with some text. This module looks like below:

const ExampleDocument = [
  {
    type: "paragraph",
    children: [
      { text: "Hello World! This is my paragraph inside a sample document." },
    ],
  },
];

export default ExampleDocument;

We now add a folder called components that will hold all our React components and do the following:

  • Add our first React component Editor.js to it. It only returns a div for now.
  • Update the App.js component to hold the document in its state which is initialized to our ExampleDocument above.
  • Render the Editor inside the app and pass the document state and an onChange handler down to the Editor so our document state is updated as the user updates it.
  • We use React bootstrap’s Nav components to add a navigation bar to the application as well.

App.js component now looks like below:

import Editor from './components/Editor';

function App() {
  const [document, updateDocument] = useState(ExampleDocument);

  return (
    <>
      <Navbar bg="dark" variant="dark">
        <Navbar.Brand href="#">
          <img
            alt=""
            src="/app-icon.png"
            width="30"
            height="30"
            className="d-inline-block align-top"
          />{" "}
          WYSIWYG Editor
        </Navbar.Brand>
      </Navbar>
      <div className="App">
        <Editor document={document} onChange={updateDocument} />
      </div>
    </>
  );

Inside the Editor component, we then instantiate the SlateJS editor and hold it inside a useMemo so that the object doesn’t change in between re-renders.

// dependencies imported as below.
import { withReact } from "slate-react";
import { createEditor } from "slate";

const editor = useMemo(() => withReact(createEditor()), []);

createEditor gives us the SlateJS editor instance which we use extensively through the application to access selections, run data transformations and so on. withReact is a SlateJS plugin that adds React and DOM behaviors to the editor object. SlateJS Plugins are Javascript functions that receive the editor object and attach some configuration to it. This allows web developers to add configurations to their SlateJS editor instance in a composable way.

We now import and render <Slate /> and <Editable /> components from SlateJS with the document prop we get from App.js. Slate exposes a bunch of React contexts we use to access in the application code. Editable is the component that renders the document hierarchy for editing. Overall, the Editor.js module at this stage looks like below:

import { Editable, Slate, withReact } from "slate-react";

import { createEditor } from "slate";
import { useMemo } from "react";

export default function Editor({ document, onChange }) {
  const editor = useMemo(() => withReact(createEditor()), []);
  return (
    <Slate editor={editor} value={document} onChange={onChange}>
      <Editable />
    </Slate>
  );
}

At this point, we have necessary React components added and the editor populated with an example document. Our Editor should be now set up allowing us to type in and change the content in real time — as in the screencast below.

Character Styles

Similar to renderElement, SlateJS gives out a function prop called renderLeaf that can be used to customize rendering of the text nodes (Leaf referring to text nodes which are the leaves/lowest level nodes of the document tree). Following the example of renderElement, we write an implementation for renderLeaf.

export default function useEditorConfig(editor) {
  return { renderElement, renderLeaf };
}

// ...
function renderLeaf({ attributes, children, leaf }) {
  let el = <>{children}</>;

  if (leaf.bold) {
    el = <strong>{el}</strong>;
  }

  if (leaf.code) {
    el = <code>{el}</code>;
  }

  if (leaf.italic) {
    el = <em>{el}</em>;
  }

  if (leaf.underline) {
    el = <u>{el}</u>;
  }

  return <span {...attributes}>{el}</span>;
}

An important observation of the above implementation is that it allows us to respect HTML semantics for character styles. Since renderLeaf gives us access to the text node leaf itself, we can customize the function to implement a more customized rendering. For instance, you might have a way to let users choose a highlightColor for text and check that leaf property here to attach the respective styles.

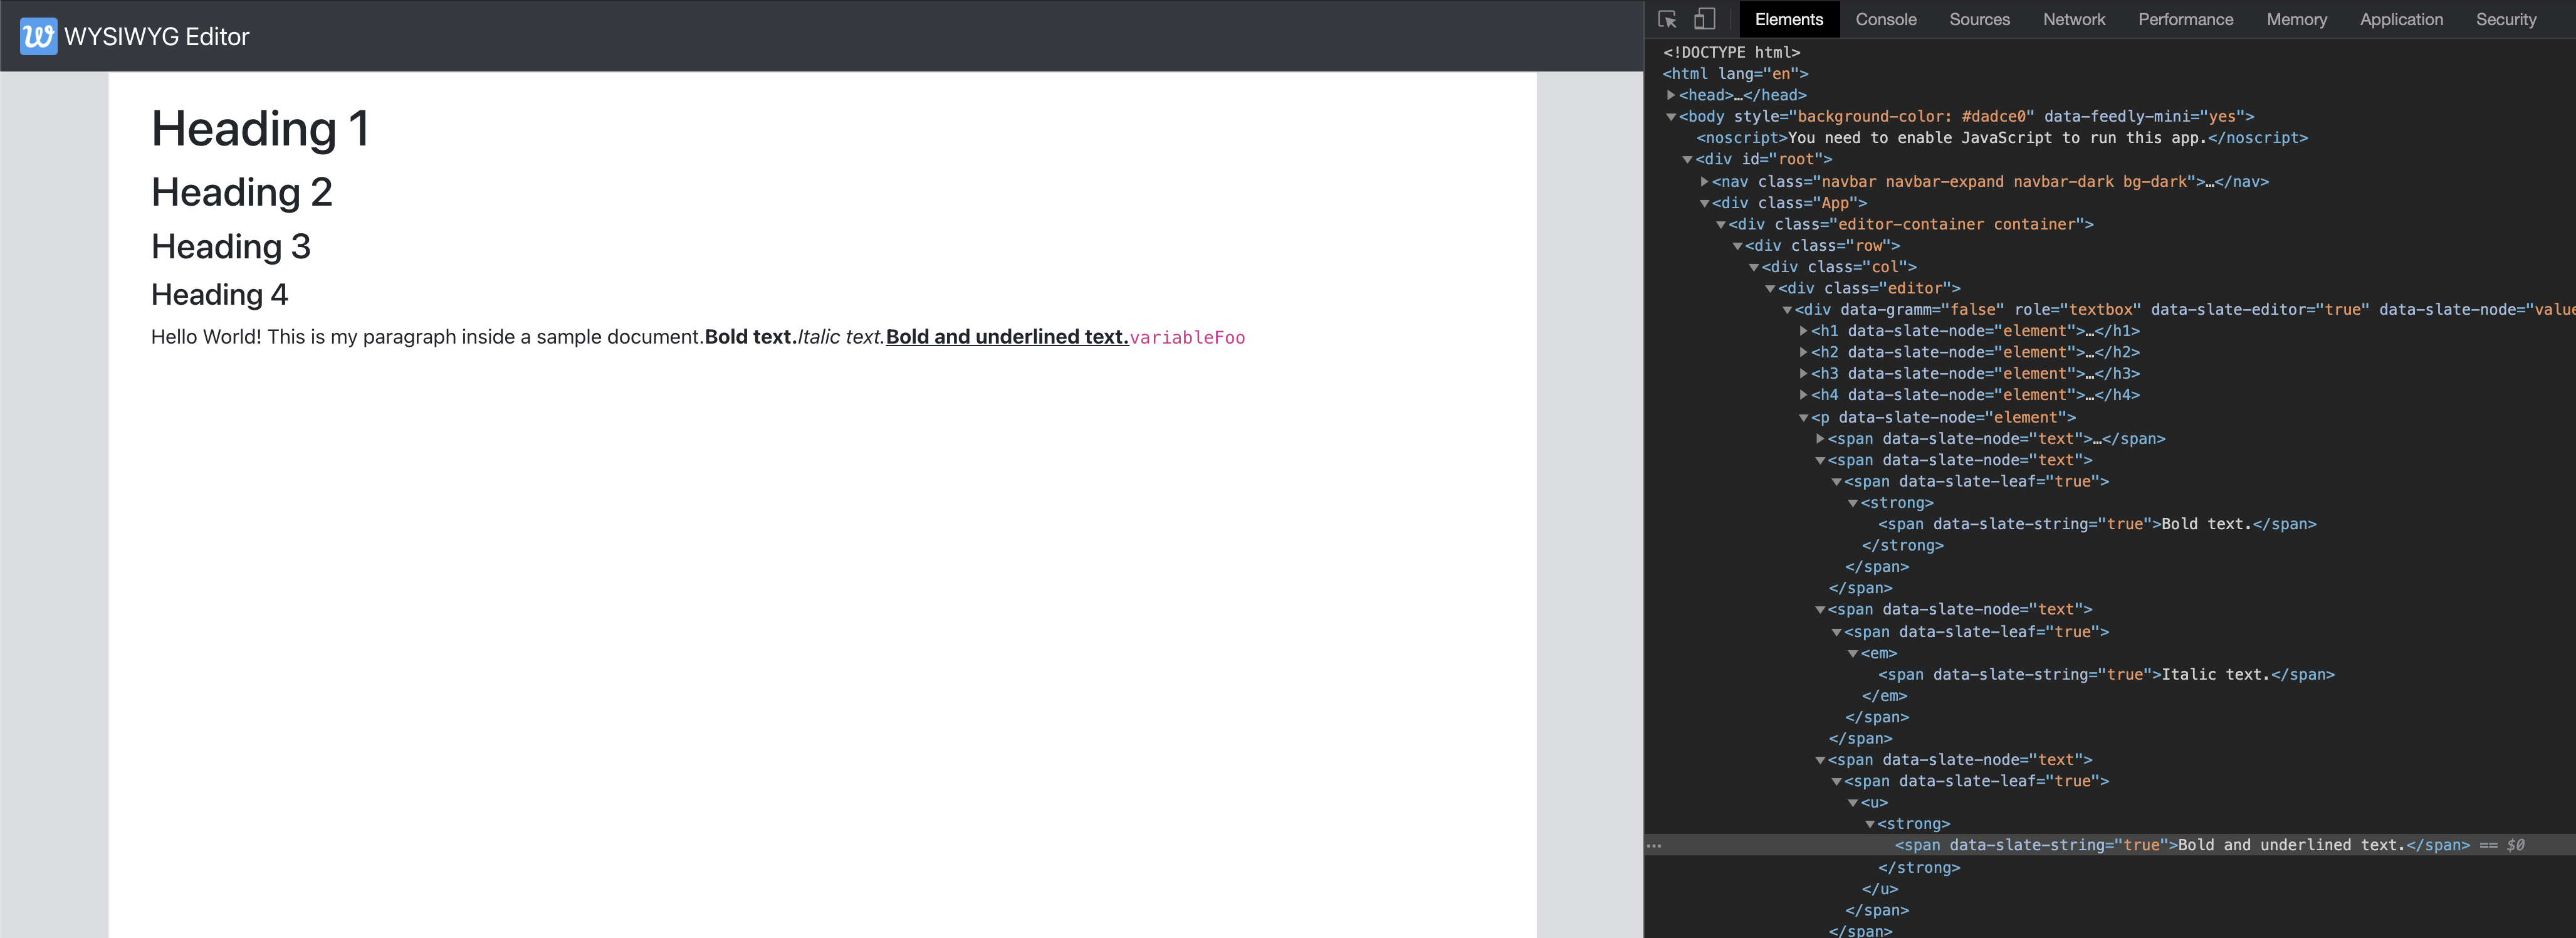
We now update the Editor component to use the above, the ExampleDocument to have a few text nodes in the paragraph with combinations of these styles and verify that they are rendered as expected in the Editor with the semantic tags we used.

# src/components/Editor.js

const { renderElement, renderLeaf } = useEditorConfig(editor);

return (
    ...
    <Editable renderElement={renderElement} renderLeaf={renderLeaf} />
);
# src/utils/ExampleDocument.js

{
    type: "paragraph",
    children: [
      { text: "Hello World! This is my paragraph inside a sample document." },
      { text: "Bold text.", bold: true, code: true },
      { text: "Italic text.", italic: true },
      { text: "Bold and underlined text.", bold: true, underline: true },
      { text: "variableFoo", code: true },
    ],
  },
Adding A Toolbar

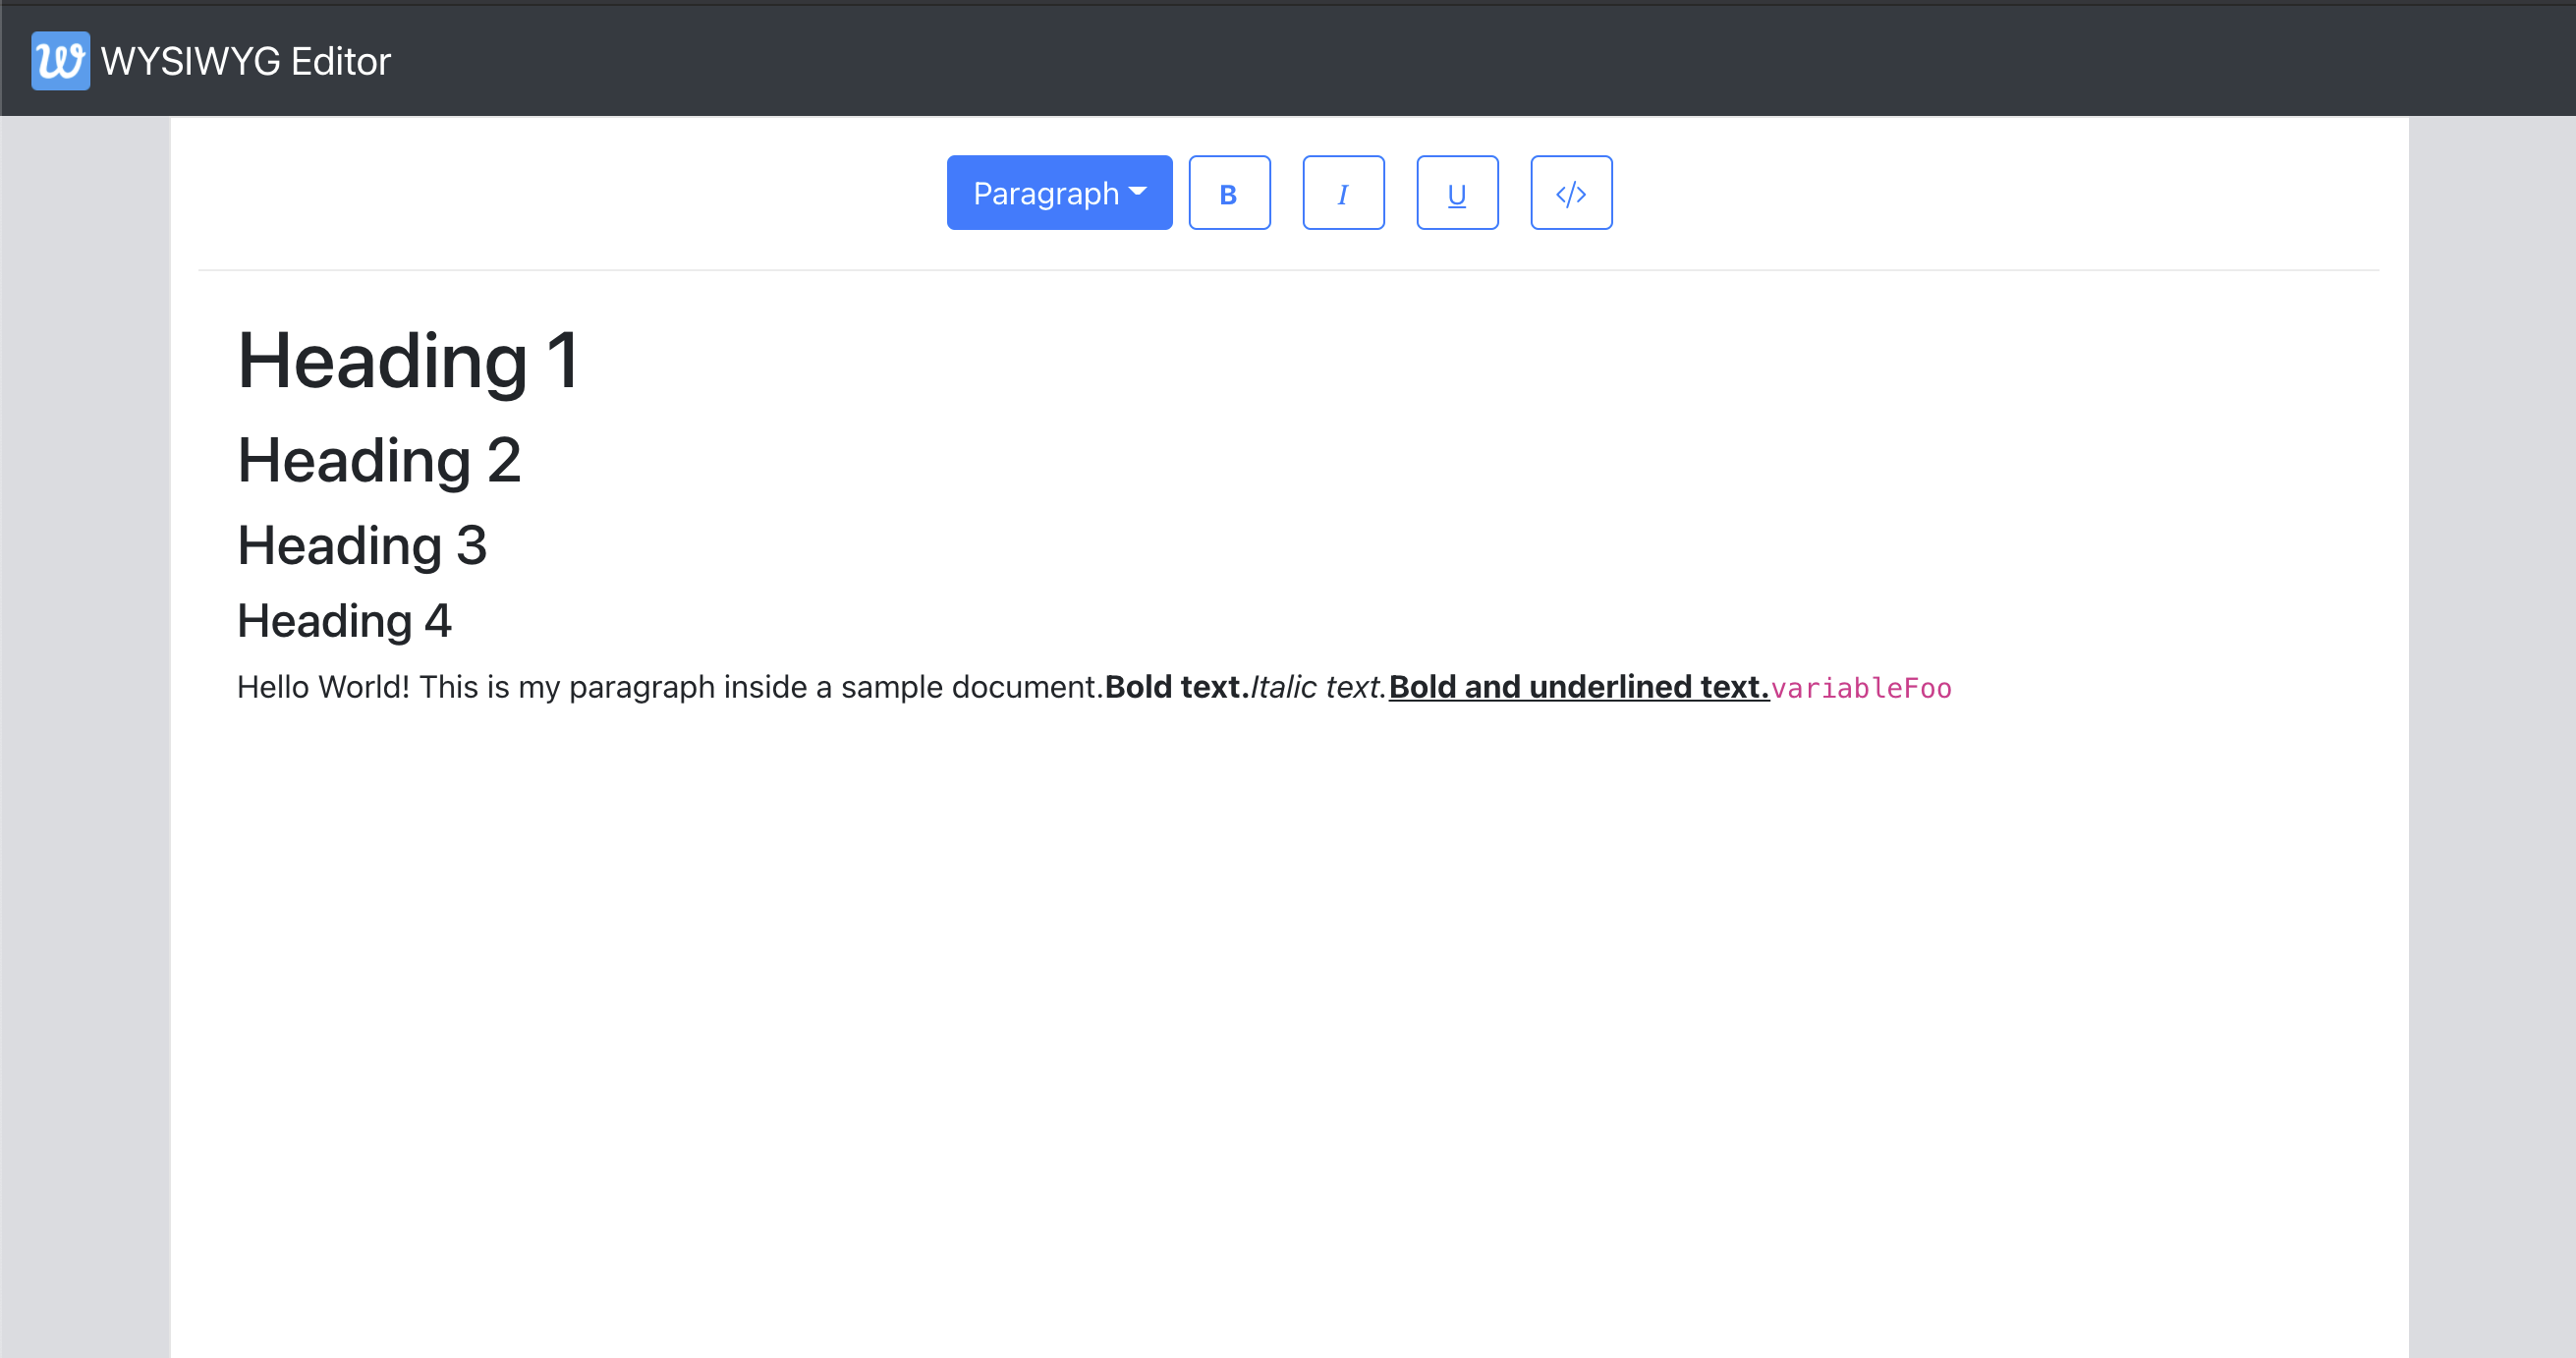
Let’s begin by adding a new component Toolbar.js to which we add a few buttons for character styles and a dropdown for paragraph styles and we wire these up later in the section.

const PARAGRAPH_STYLES = ["h1", "h2", "h3", "h4", "paragraph", "multiple"];
const CHARACTER_STYLES = ["bold", "italic", "underline", "code"];

export default function Toolbar({ selection, previousSelection }) {
  return (
    <div className="toolbar">
      {/* Dropdown for paragraph styles */}
      <DropdownButton
        className={"block-style-dropdown"}
        disabled={false}
        id="block-style"
        title={getLabelForBlockStyle("paragraph")}
      >
        {PARAGRAPH_STYLES.map((blockType) => (
          <Dropdown.Item eventKey={blockType} key={blockType}>
            {getLabelForBlockStyle(blockType)}
          </Dropdown.Item>
        ))}
      </DropdownButton>
      {/* Buttons for character styles */}
      {CHARACTER_STYLES.map((style) => (
        <ToolBarButton
          key={style}
          icon={<i className={`bi ${getIconForButton(style)}`} />}
          isActive={false}
        />
      ))}
    </div>
  );
}

function ToolBarButton(props) {
  const { icon, isActive, ...otherProps } = props;
  return (
    <Button
      variant="outline-primary"
      className="toolbar-btn"
      active={isActive}
      {...otherProps}
    >
      {icon}
    </Button>
  );
}

We abstract away the buttons to the ToolbarButton component that is a wrapper around the React Bootstrap Button component. We then render the toolbar above the Editable inside Editor component and verify that the toolbar shows up in the application.
Here are the three key functionalities we need the toolbar to support:

  1. When the user’s cursor is in a certain spot in the document and they click one of the character style buttons, we need to toggle the style for the text they may type next.
  2. When the user selects a range of text and click one of the character style buttons, we need to toggle the style for that specific section.
  3. When the user selects a range of text, we want to update the paragraph-style dropdown to reflect the paragraph-type of the selection. If they do select a different value from the selection, we want to update the paragraph style of the entire selection to be what they selected.

Let’s look at how these functionalities work on the Editor before we start implementing them.

Adding A Link Button To The Toolbar

Let’s add a Link Button to the toolbar that enables the user to do the following:

  • Selecting some text and clicking on the button converts that text into a link
  • Having a blinking cursor (collapsed selection) and clicking the button inserts a new link there
  • If the user’s selection is inside a link, clicking on the button should toggle the link — meaning convert the link back to text.

To build these functionalities, we need a way in the toolbar to know if the user’s selection is inside a link node. We add a util function that traverses the levels in upward direction from the user’s selection to find a link node if there is one, using Editor.above helper function from SlateJS.

# src/utils/EditorUtils.js

export function isLinkNodeAtSelection(editor, selection) {
  if (selection == null) {
    return false;
  }

  return (
    Editor.above(editor, {
      at: selection,
      match: (n) => n.type === "link",
    }) != null
  );
}

Now, let’s add a button to the toolbar that is in active state if the user's selection is inside a link node.

# src/components/Toolbar.js

return (
    <div className="toolbar">
      ...
      {/* Link Button */}
      <ToolBarButton
        isActive={isLinkNodeAtSelection(editor, editor.selection)}
        label={<i className={`bi ${getIconForButton("link")}`} />}
      />
    </div>
  );

If we had to do this by ourselves, we’d have to figure out the range of selection and create three new nodes (text, link, text) that replace the original text node. SlateJS has a helper function called Transforms.wrapNodes that does exactly this — wrap nodes at a location into a new container node. We also have a helper available for the reverse of this process — Transforms.unwrapNodes which we use to remove links from selected text and merge that text back into the text nodes around it. With that, toggleLinkAtSelection has the below implementation to insert a new link at an expanded selection.

# src/utils/EditorUtils.js

export function toggleLinkAtSelection(editor) {
  if (!isLinkNodeAtSelection(editor, editor.selection)) {
    const isSelectionCollapsed =
      Range.isCollapsed(editor.selection);
    if (isSelectionCollapsed) {
      Transforms.insertNodes(
        editor,
        {
          type: "link",
          url: '#',
          children: [{ text: 'link' }],
        },
        { at: editor.selection }
      );
    } else {
      Transforms.wrapNodes(
        editor,
        { type: "link", url: '#', children: [{ text: '' }] },
        { split: true, at: editor.selection }
      );
    }
  } else {
    Transforms.unwrapNodes(editor, {
      match: (n) => Element.isElement(n) && n.type === "link",
    });
  }
}

If the selection is collapsed, we insert a new node there with Transform.insertNodes that inserts the node at the given location in the document. We wire this function up with the toolbar button and should now have a way to add/remove links from the document with the help of the link button.

# src/components/Toolbar.js
      <ToolBarButton
        ...
        isActive={isLinkNodeAtSelection(editor, editor.selection)}       
        onMouseDown={() => toggleLinkAtSelection(editor)}
      />

If the text ’ABCDE’ was the first text node of the first paragraph in the document, our point values would be —

cursorPoint = { path: [0,0], offset: 5}
startPointOfLastCharacter = { path: [0,0], offset: 4}

If the last character was a space, we know where it started — startPointOfLastCharacter.Let’s move to step-2 where we move backwards character-by-character until either we find another space or the start of the text node itself.

...

  if (lastCharacter !== " ") {
    return;
  }

  let end = startPointOfLastCharacter;
  start = Editor.before(editor, end, {
    unit: "character",
  });

  const startOfTextNode = Editor.point(editor, currentNodePath, {
    edge: "start",
  });

  while (
    Editor.string(editor, Editor.range(editor, start, end)) !== " " &&
    !Point.isBefore(start, startOfTextNode)
  ) {
    end = start;
    start = Editor.before(editor, end, { unit: "character" });
  }

  const lastWordRange = Editor.range(editor, end, startPointOfLastCharacter);
  const lastWord = Editor.string(editor, lastWordRange);

Here is a diagram that shows where these different points point to once we find the last word entered to be ABCDE.

Note that start and end are the points before and after the space there. Similarly, startPointOfLastCharacter and cursorPoint are the points before and after the space user just inserted. Hence [end,startPointOfLastCharacter] gives us the last word inserted.

We log the value of lastWord to the console and verify the values as we type.
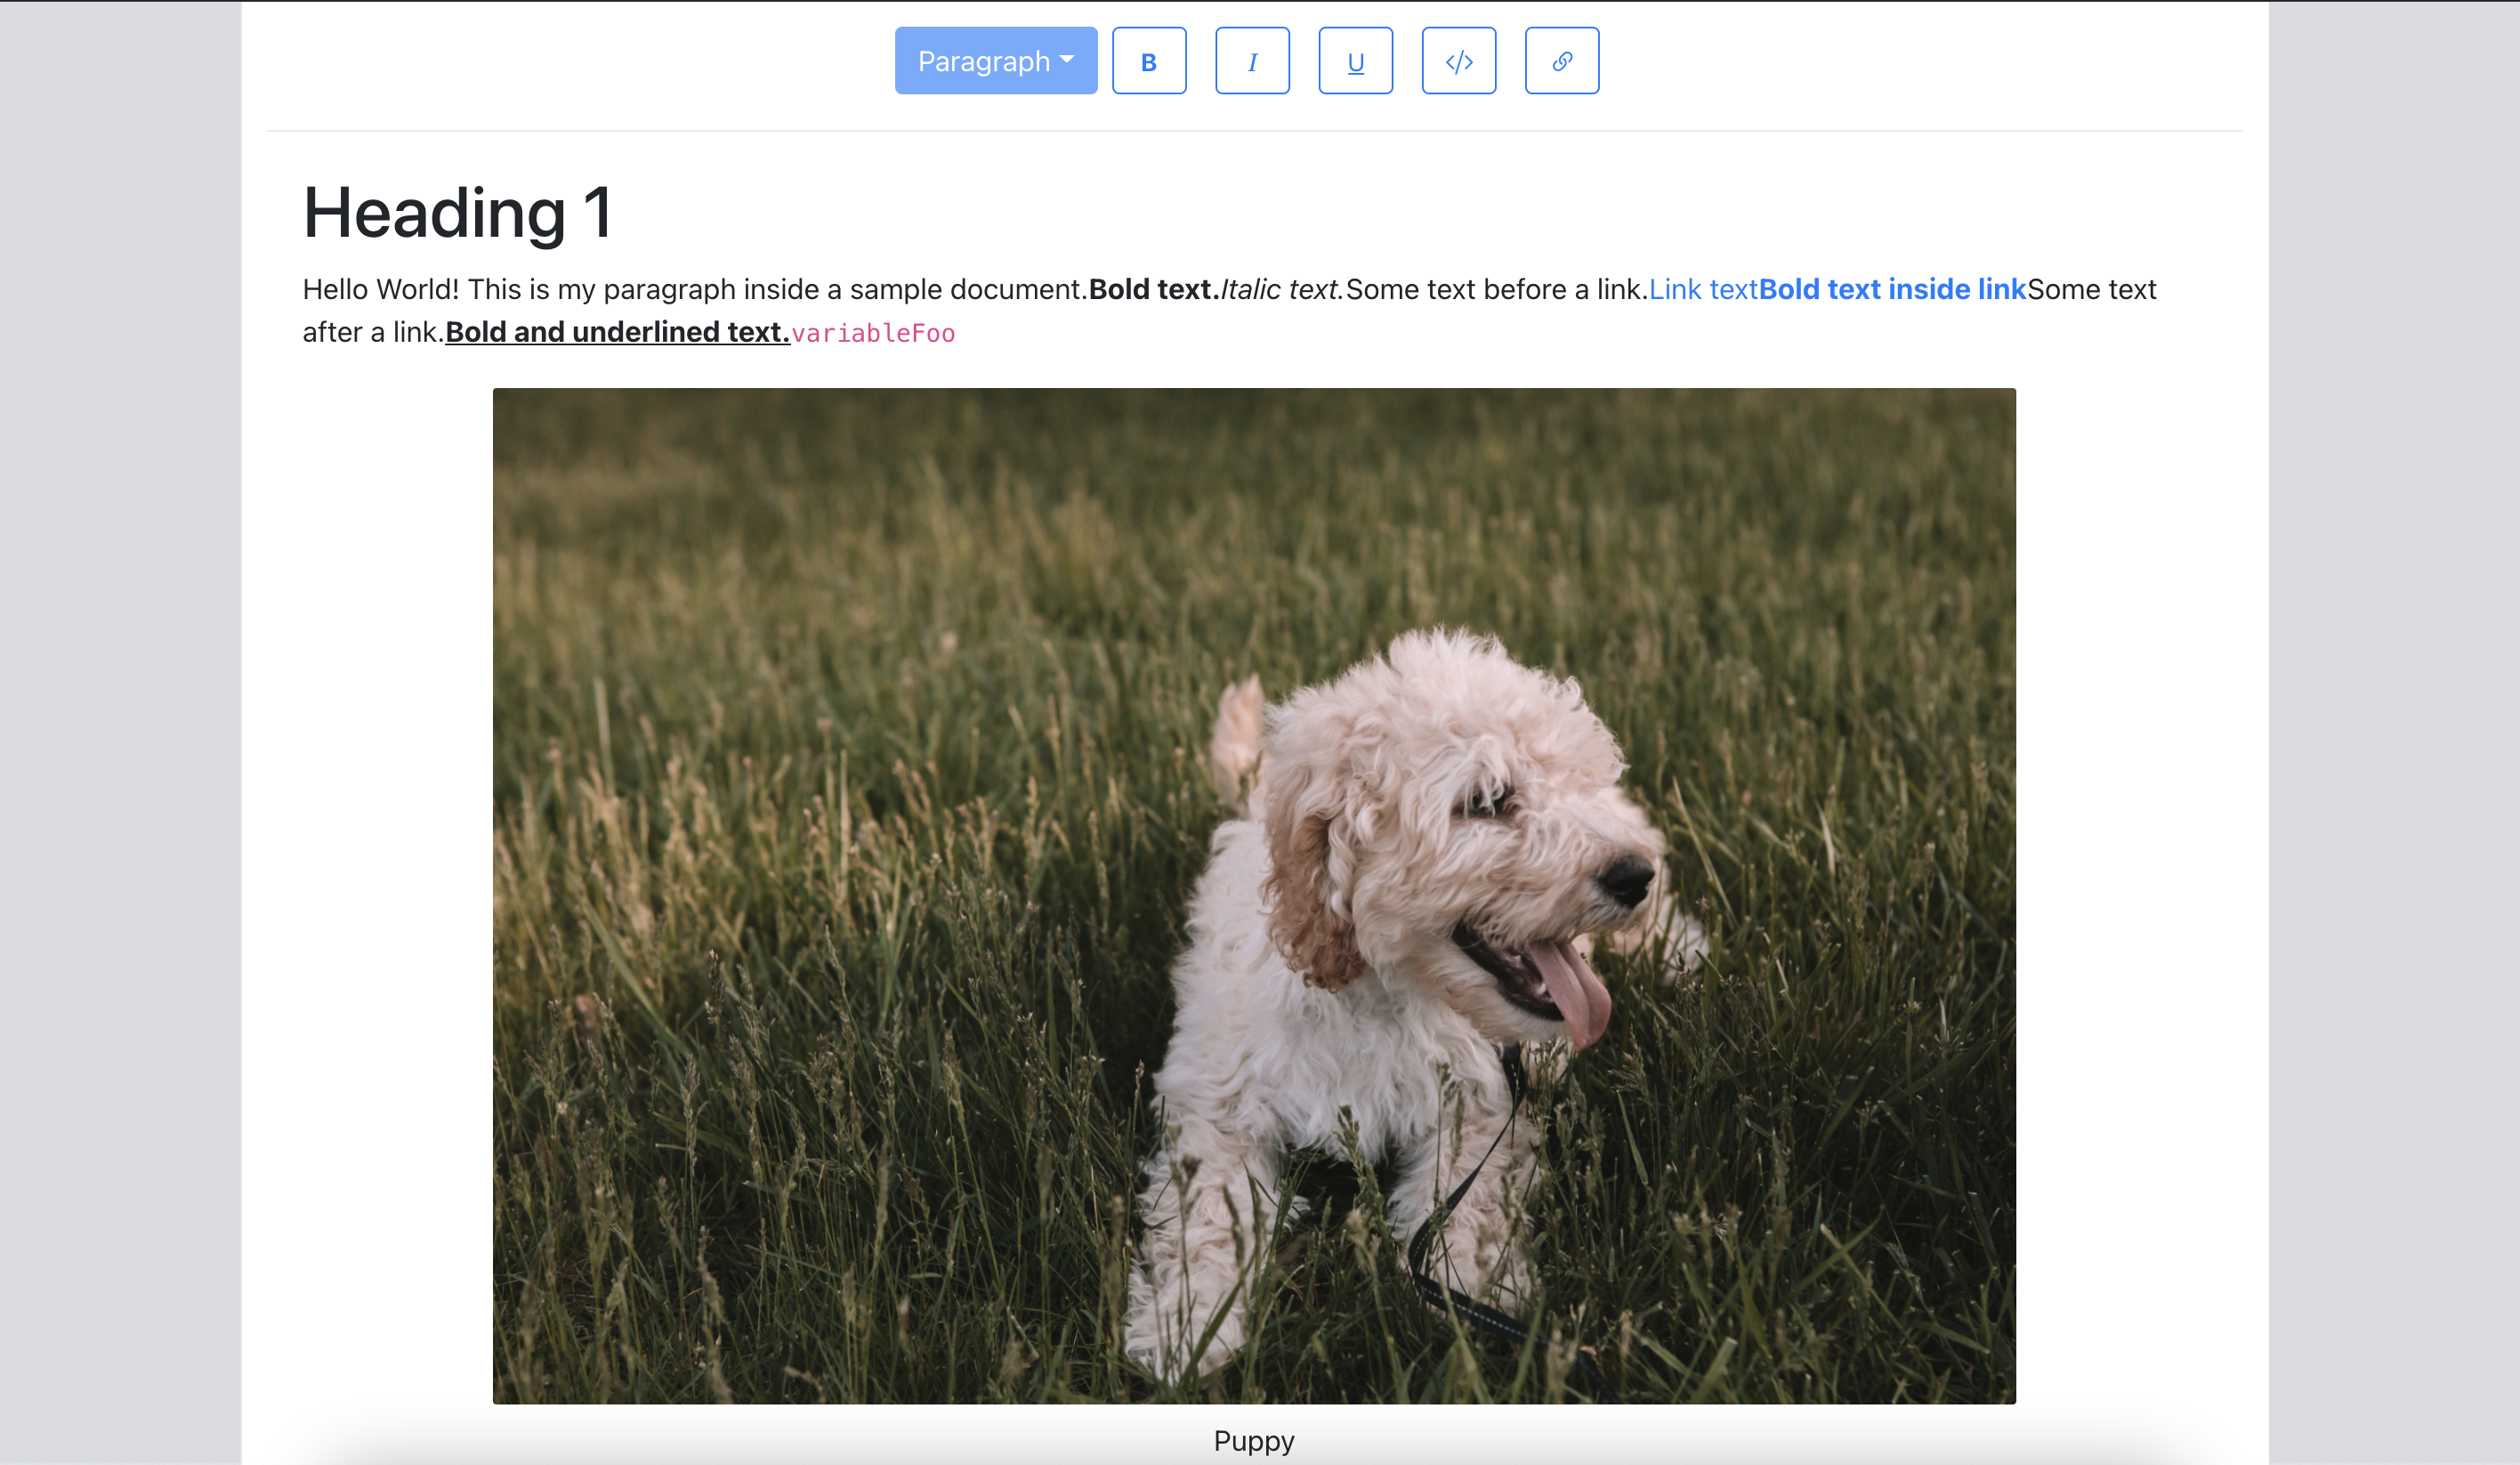
Now let’s focus on caption-editing. The way we want this to be a seamless experience for the user is that when they click on the caption, we show a text input where they can edit the caption. If they click outside the input or hit the RETURN key, we treat that as a confirmation to apply the caption. We then update the caption on the image node and switch the caption back to read mode. Let’s see it in action so we have an idea of what we’re building.

Let’s update our Image component to have a state for caption’s read-edit modes. We update the local caption state as the user updates it and when they click out (onBlur) or hit RETURN (onKeyDown), we apply the caption to the node and switch to read mode again.

const Image = ({ attributes, children, element }) => {
  const [isEditingCaption, setEditingCaption] = useState(false);
  const [caption, setCaption] = useState(element.caption);
  ...

  const applyCaptionChange = useCallback(
    (captionInput) => {
      const imageNodeEntry = Editor.above(editor, {
        match: (n) => n.type === "image",
      });
      if (imageNodeEntry == null) {
        return;
      }

      if (captionInput != null) {
        setCaption(captionInput);
      }

      Transforms.setNodes(
        editor,
        { caption: captionInput },
        { at: imageNodeEntry[1] }
      );
    },
    [editor, setCaption]
  );

  const onCaptionChange = useCallback(
    (event) => {
      setCaption(event.target.value);
    },
    [editor.selection, setCaption]
  );

  const onKeyDown = useCallback(
    (event) => {
      if (!isHotkey("enter", event)) {
        return;
      }

      applyCaptionChange(event.target.value);
      setEditingCaption(false);
    },
    [applyCaptionChange, setEditingCaption]
  );

  const onToggleCaptionEditMode = useCallback(
    (event) => {
      const wasEditing = isEditingCaption;
      setEditingCaption(!isEditingCaption);
      wasEditing && applyCaptionChange(caption);
    },
    [editor.selection, isEditingCaption, applyCaptionChange, caption]
  );

  return (
        ...
        {isEditingCaption ? (
          <Form.Control
            autoFocus={true}
            className={"image-caption-input"}
            size="sm"
            type="text"
            defaultValue={element.caption}
            onKeyDown={onKeyDown}
            onChange={onCaptionChange}
            onBlur={onToggleCaptionEditMode}
          />
        ) : (
          <div
            className={"image-caption-read-mode"}
            onClick={onToggleCaptionEditMode}
          >
            {caption}
          </div>
        )}
      </div>
      ...

With that, the caption editing functionality is complete. We now move to adding a way for users to upload images to the editor. Let’s add a toolbar button that lets users select and upload an image.

# src/components/Toolbar.js

const onImageSelected = useImageUploadHandler(editor, previousSelection);

return (
    <div className="toolbar">
    ....
   <ToolBarButton
        isActive={false}
        as={"label"}
        htmlFor="image-upload"
        label={
          <>
            <i className={`bi ${getIconForButton("image")}`} />
            <input
              type="file"
              id="image-upload"
              className="image-upload-input"
              accept="image/png, image/jpeg"
              onChange={onImageSelected}
            />
          </>
        }
      />
    </div>

As we work with image uploads, the code could grow quite a bit so we move the image-upload handling to a hook useImageUploadHandler that gives out a callback attached to the file-input element. We’ll discuss shortly about why it needs the previousSelection state.

Before we implement useImageUploadHandler, we’ll set up the server to be able to upload an image to. We setup an Express server and install two other packages — cors and multer that handle file uploads for us.

yarn add express cors multer

We then add a src/server.js script that configures the Express server with cors and multer and exposes an endpoint /upload which we will upload the image to.

# src/server.js

const storage = multer.diskStorage({
  destination: function (req, file, cb) {
    cb(null, "./public/photos/");
  },
  filename: function (req, file, cb) {
    cb(null, file.originalname);
  },
});

var upload = multer({ storage: storage }).single("photo");

app.post("/upload", function (req, res) {
  upload(req, res, function (err) {
    if (err instanceof multer.MulterError) {
      return res.status(500).json(err);
    } else if (err) {
      return res.status(500).json(err);
    }
    return res.status(200).send(req.file);
  });
});

app.use(cors());
app.listen(port, () => console.log(`Listening on port ${port}`));

Now that we have the server setup, we can focus on handling the image upload. When the user uploads an image, it could be a few seconds before the image gets uploaded and we have a URL for it. However, we do what to give the user immediate feedback that the image upload is in progress so that they know the image is being inserted in the editor. Here are the steps we implement to make this behavior work -

  1. Once the user selects an image, we insert an image node at the user’s cursor position with a flag isUploading set on it so we can show the user a loading state.
  2. We send the request to the server to upload the image.
  3. Once the request is complete and we have an image URL, we set that on the image and remove the loading state.

Let’s begin with the first step where we insert the image node. Now, the tricky part here is we run into the same issue with selection as with the link button in the toolbar. As soon as the user clicks on the Image button in the toolbar, the editor loses focus and the selection becomes null. If we try to insert an image, we don’t know where the user's cursor was. Tracking previousSelection gives us that location and we use that to insert the node.

# src/hooks/useImageUploadHandler.js
import { v4 as uuidv4 } from "uuid";

export default function useImageUploadHandler(editor, previousSelection) {
  return useCallback(
    (event) => {
      event.preventDefault();
      const files = event.target.files;
      if (files.length === 0) {
        return;
      }
      const file = files[0];
      const fileName = file.name;
      const formData = new FormData();
      formData.append("photo", file);

      const id = uuidv4();

      Transforms.insertNodes(
        editor,
        {
          id,
          type: "image",
          caption: fileName,
          url: null,
          isUploading: true,
          children: [{ text: "" }],
        },
        { at: previousSelection, select: true }
      );
    },
    [editor, previousSelection]
  );
}

As we insert the new image node, we also assign it an identifier id using the uuid package. We’ll discuss in Step (3)’s implementation why we need that. We now update the image component to use the isUploading flag to show a loading state.

{!element.isUploading && element.url != null ? (
   <img src={element.url} alt={caption} className={"image"} />
) : (
   <div className={"image-upload-placeholder"}>
        <Spinner animation="border" variant="dark" />
   </div>
)}

That completes the implementation of step 1. Let’s verify that we are able to select an image to upload, see the image node getting inserted with a loading indicator where it was inserted in the document.

Moving to Step (2), we will use axois library to send a request to the server.

export default function useImageUploadHandler(editor, previousSelection) {
  return useCallback((event) => {
    ....
    Transforms.insertNodes(
     …
     {at: previousSelection, select: true}
    );

    axios
      .post("/upload", formData, {
        headers: {
          "content-type": "multipart/form-data",
        },
      })
      .then((response) => {
           // update the image node.
       })
      .catch((error) => {
        // Fire another Transform.setNodes to set an upload failed state on the image
      });
  }, [...]);
}

We verify that the image upload works and the image does show up in the public/photos folder of the app. Now that the image upload is complete, we move to Step (3) where we want to set the URL on the image in the resolve() function of the axios promise. We could update the image with Transforms.setNodes but we have a problem — we do not have the path to the newly inserted image node. Let’s see what our options are to get to that image —

  • Can’t we use editor.selection as the selection must be on the newly inserted image node? We cannot guarantee this since while the image was uploading, the user might have clicked somewhere else and the selection might have changed.
  • How about using previousSelection which we used to insert the image node in the first place? For the same reason we can’t use editor.selection, we can’t use previousSelection since it may have changed too.
  • SlateJS has a History module that tracks all the changes happening to the document. We could use this module to search the history and find the last inserted image node. This also isn’t completely reliable if it took longer for the image to upload and the user inserted more images in different parts of the document before the first upload completed.
  • Currently, Transform.insertNodes’s API doesn’t return any information about the inserted nodes. If it could return the paths to the inserted nodes, we could use that to find the precise image node we should update.

Since none of the above approaches work, we apply an id to the inserted image node (in Step (1)) and use the same id again to locate it when the image upload is complete. With that, our code for Step (3) looks like below —

axios
        .post("/upload", formData, {
          headers: {
            "content-type": "multipart/form-data",
          },
        })
        .then((response) => {
          const newImageEntry = Editor.nodes(editor, {
            match: (n) => n.id === id,
          });

          if (newImageEntry == null) {
            return;
          }

          Transforms.setNodes(
            editor,
            { isUploading: false, url: `/photos/${fileName}` },
            { at: newImageEntry[1] }
          );
        })
        .catch((error) => {
          // Fire another Transform.setNodes to set an upload failure state
          // on the image.        
        });

With the implementation of all three steps complete, we are ready to test the image upload end to end.

With that, we’ve wrapped up Images for our editor. Currently, we show a loading state of the same size irrespective of the image. This could be a jarring experience for the user if the loading state is replaced by a drastically smaller or bigger image when the upload completes. A good follow up to the upload experience is getting the image dimensions before the upload and showing a placeholder of that size so that transition is seamless. The hook we add above could be extended to support other media types like video or documents and render those types of nodes as well.

Conclusion

In this article, we have built a WYSIWYG Editor that has a basic set of functionalities and some micro user-experiences like link detection, in-place link editing and image caption editing that helped us go deeper with SlateJS and concepts of Rich Text Editing in general. If this problem space surrounding Rich Text Editing or Word Processing interests you, some of the cool problems to go after could be:

  • Collaboration
  • A richer text editing experience that supports text alignments, inline images, copy-paste, changing font and text colors etc.
  • Importing from popular formats like Word documents and Markdown.

If you want to learn more SlateJS, here are some links that might be helpful.

  • SlateJS Examples
    A lot of examples that go beyond the basics and build functionalities that are usually found in Editors like Search & Highlight, Markdown Preview and Mentions.
  • API Docs
    Reference to a lot of helper functions exposed by SlateJS that one might want to keep handy when trying to perform complex queries/transformations on SlateJS objects.

Lastly, SlateJS’s Slack Channel is a very active community of web developers building Rich Text Editing applications using SlateJS and a great place to learn more about the library and get help if needed.

Boost Your Skills Online: Smashing Workshops On Front-End And Design

How do we build and establish a successful design system? What about modern CSS and JavaScript? What’s the state of HTML Email? And what are new, smart design patterns we could use? What will it take us to move to TypeScript or Vue.js? With our online workshops, we try to answer these questions well.

Our workshops bring in knowledgeable, kind folks from the community to explore real-life solutions to real-life problems, live, with you. All sessions are broken down into 2.5h-segments across days, so you always have time to ask questions, share your screen and get immediate feedback. Jump to all workshops.

Meet Smashing Online Workshops: live, interactive sessions on front-end & UX.

In fact, live discussions and interactive exercises are at the very heart of every workshop, with group work, homework, reviews and live interaction with people around the world. Plus, you get all video recordings of all sessions, so you can re-watch at any time, in your comfy chair in familiar comfort of your workspace.

Upcoming Workshops (May-September 2021)

No pre-recorded sessions, no big picture talks. Our workshops take place live and span multiple days. They are split into 2.5h-sessions, plus you’ll get all workshop video recordings, slides and a friendly Q&A in every session.

We also have friendly bundles for larger teams and agencies.

Workshops in May–July

Meet our friendly front-end & UX workshops. Boost your skills online and learn from experts — live.

Workshops in August–September

What Are Online Workshops Like?

Do you experience Zoom fatigue as well? After all, who really wants to spend more time in front of their screen? That’s exactly why we’ve designed the online workshop experience from scratch, accounting for the time needed to take in all the content, understand it and have enough time to ask just the right questions.

In our workshops, everybody is just a slightly blurry rectangle on the screen; everybody is equal, and invited to participate.

Our online workshops take place live and span multiple days across weeks. They are split into 2.5h-sessions, and in every session there is always enough time to bring up your questions or just get a cup of tea. We don’t rush through the content, but instead try to create a welcoming, friendly and inclusive environment for everyone to have time to think, discuss and get feedback.

There are plenty of things to expect from a Smashing workshop, but the most important one is focus on practical examples and techniques. The workshops aren’t talks; they are interactive, with live conversations with attendees, sometimes with challenges, homework and team work.

Of course, you get all workshop materials and video recordings as well, so if you miss a session you can re-watch it the same day.

TL;DR

  • Workshops span multiple days, split in 2.5h-sessions.
  • Enough time for live Q&A every day.
  • Dozens of practical examples and techniques.
  • You’ll get all workshop materials & recordings.
  • All workshops are focused on front-end & UX.
  • Get a workshop bundle and save $250 off the price.

Thank You!

We hope that the insights from the workshops will help you improve your skills and the quality of your work. A sincere thank you for your kind, ongoing support and generosity — for being smashing, now and ever. We’d be honored to welcome you.

How To Implement Authentication In Next.js With Auth0

“Authentication” is the action of validating that a user is who he or she claims to be. We usually do this by implementing a credentials system, like user/password, security questions, or even facial recognition.

“Authorization” determines what a user can (or can’t) do. If we need to handle authentication and authorization in our web application, we will need a security platform or module. We can develop our own platform, implement it, and maintain it. Or we can take the advantage of existing authentication and authorization platforms in the market that are offered as services.

When evaluating whether it’s better for us to create our own platform, or to use a third-party service, there are some things that we should consider:

  • Designing and creating authentication services is not our core skill. There are people working specially focused on security topics that can create better and more secure platforms than us;
  • We can save time relying on an existing authentication platform and spend it adding value to the products and services that we care about;
  • We don’t store sensitive information in our databases. We separate it from all the data involved in our apps;
  • The tools third-party services offer have improved usability and performance, which makes it easier for us to administrate the users of our application.

Considering these factors, we can say that relying on third-party authentication platforms can be easier, cheaper, and even more secure than creating our own security module.

In this article, we will see how to implement authentication and authorization in our Next.js applications using one of the existing products in the market: Auth0.

What Is Auth0?

It allows you to add security to apps developed using any programming language or technology.

“Auth0 is a flexible, drop-in solution to add authentication and authorization services to your applications.”

Dan Arias, auth0.com

Auth0 has several interesting features, such as:

  • Single Sign-On: Once you log into an application that uses Auth0, you won’t have to enter your credentials again when entering another one that also uses it. You will be automatically logged in to all of them;
  • Social login: Authenticate using your preferred social network profile;
  • Multi-Factor Authentication;
  • Multiple standard protocols are allowed, such as OpenID Connect, JSON Web Token, or OAuth 2.0;
  • Reporting and analytics tools.

There is a free plan that you can use to start securing your web applications, covering up to 7000 monthly active users. You will start paying when the amount of users increases.

Another cool thing about Auth0 is that we have a Next.js SDK available to use in our app. With this library, created especially for Next.js, we can easily connect to the Auth0 API.

Auth0 SDK For Next.js

As we mentioned before, Auth0 created (and maintains) a Next.js focused SDK, among other SDKs available to connect to the API using various programming languages. We just need to download the NPM package, configure some details about our Auth0 account and connection, and we are good to go.

This SDK gives us tools to implement authentication and authorization with both client-side and server-side methods, using API Routes on the backend and React Context with React Hooks on the frontend.

Let’s see how some of them work in an example Next.js application.

Example Next.js App Using Auth0

Let’s go back to our previous video platform example, and create a small app to show how to use Auth0 Next.js SDK. We will set up Auth0’s Universal Login. We will have some YouTube video URLs. They will be hidden under an authentication platform. Only registered users will be able to see the list of videos through our web application.

Note: This article focuses on the configuration and use of Auth0 in your Next.js application. We won’t get into details like CSS styling or database usage. If you want to see the complete code of the example app, you can go to this GitHub repository.

Create Auth0 Account And Configure App Details

First of all, we need to create an Auth0 account using the Sign Up page.

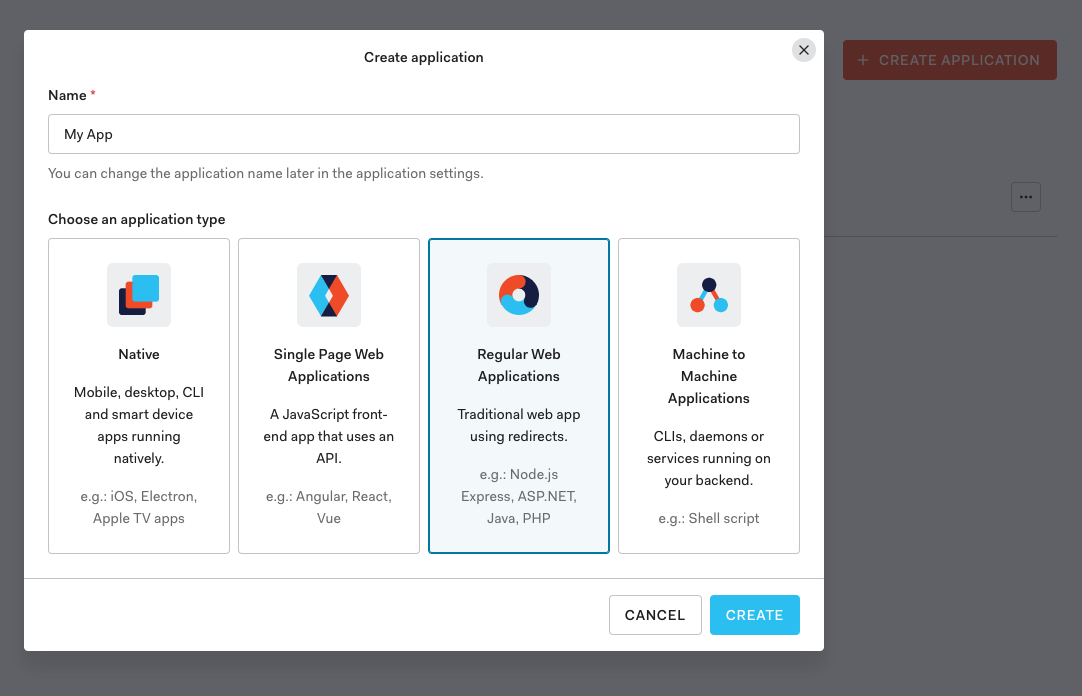
After that, let’s go to the Auth0 Dashboard. Go to Applications and create a new app of type ["Regular Web Applications"].

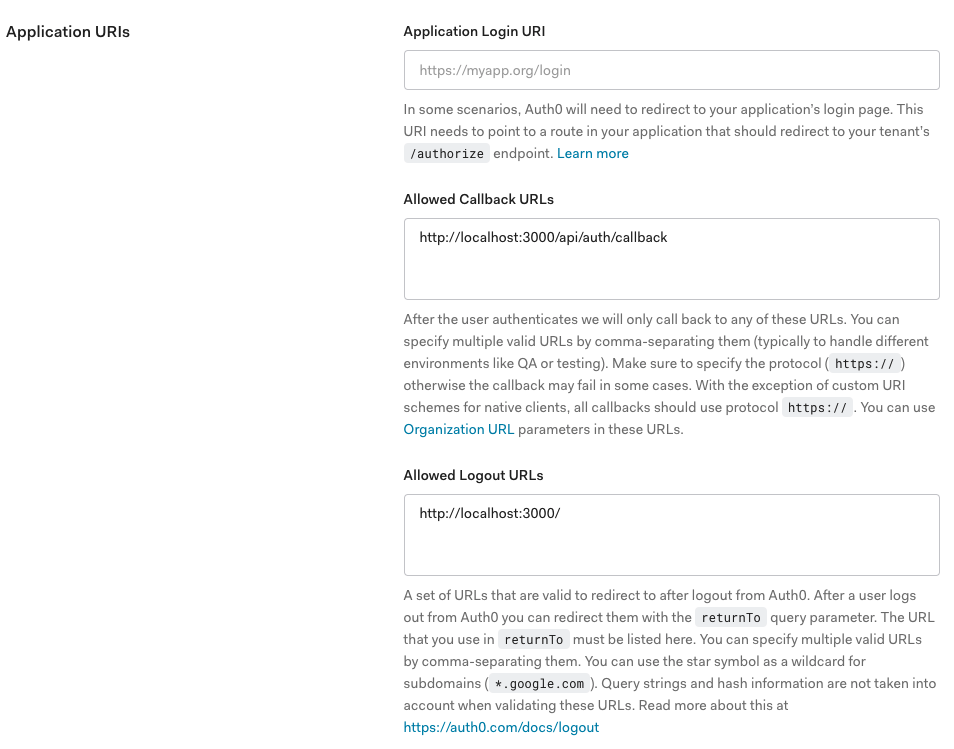
Now let’s go to the Settings tab of the application and, under the Application URIs section, configure the following details and save the changes:

  • Allowed Callback URLs: add http://localhost:3000/api/auth/callback
  • Allowed Logout URLs: add http://localhost:3000/

By doing this, we are configuring the URL where we want to redirect the users after they login our site (Callback), and the URL where we redirect the users after they log out (Logout). We should add the production URLs when we deploy the final version of our app to the hosting server.

Auth0 Dashboard has many configurations and customizations we can apply to our projects. We can change the type of authentication we use, the login/sign-up page, the data we request for the users, enable/disable new registrations, configure users' databases, and so on.

Create Next.js App

To create a brand new Next.js app, we will use create-next-app, which sets up everything automatically for you. To create the project, run:

npx create-next-app [name-of-the-app]

Or

yarn create next-app [name-of-the-app]

To start the develop server locally and see the site just created in your browser, go to the new folder that you created:

cd [name-of-the-app]

And run:

npm run dev

Or

yarn dev

Install And Configure The Auth0 Next.js SDK

Let’s install the Auth0 Next.js SDK in our app:

npm install @auth0/nextjs-auth0

Or

yarn add @auth0/nextjs-auth0

Now, in our env.local file (or the environment variables menu of our hosting platform), let’s add these variables:

AUTH0_SECRET="[A 32 characters secret used to encrypt the cookies]"
AUTH0_BASE_URL="http://localhost:3000"
AUTH0_ISSUER_BASE_URL="https://[Your tenant domain. Can be found in the Auth0 dashboard under settings]"
AUTH0_CLIENT_ID="[Can be found in the Auth0 dashboard under settings]"
AUTH0_CLIENT_SECRET="[Can be found in the Auth0 dashboard under settings]"

If you want more configuration options, you can take a look at the docs.

Create the Dynamic API Route

Next.js offers a way to create serverless APIs: API Routes. With this feature, we can create code that will be executed in every user request to our routes. We can define fixed routes, like /api/index.js. But we can also have dynamic API routes, with params that we can use in our API routes code, like /api/blog/[postId].js.

Let’s create the file /pages/api/auth/[...auth0].js, which will be a dynamic API route. Inside of the file, let’s import the handleAuth method from the Auth0 SDK, and export the result:

import { handleAuth } from '@auth0/nextjs-auth0';

export default handleAuth();

This will create and handle the following routes:

  • /api/auth/login
    To perform login or sign up with Auth0.
  • /api/auth/logout
    To log the user out.
  • /api/auth/callback
    To redirect the user after a successful login.
  • /api/auth/me
    To get the user profile information.

And that would be the server-side part of our app. If we want to log in to our application or sign up for a new account, we should visit http://localhost:3000/api/auth/login. We should add a link to that route in our app. Same for logging out from our site: Add a link to http://localhost:3000/api/auth/logout.

Add The UserProvider Component

To handle user authentication state on the frontend of our web application we can use UserProvider React component, available on Auth0 Next.js SDK. the component uses React Context internally.

If you want to access the user authentication state on a Component, you should wrap it with a UserProvider component.

<UserProvider>
  <Component {...props} />
</UserProvider>

If we want to access all of the pages in our application, we should add the component to the pages/_app.js file. pages/_app.js overrides the React App component. It’s a feature that Next.js exposes to customize our application. You can read more about it here.

import React from 'react';
import { UserProvider } from '@auth0/nextjs-auth0';

export default function App({ Component, pageProps }) {
  return (
    <UserProvider>
      <Component {...pageProps} />
    </UserProvider>
  );
}

We have a React hook useUser that accesses to the authentication state exposed by UserProvider. We can use it, for instance, to create a kind of welcome page. Let’s change the code of the pages/index.js file:

import { useUser } from "@auth0/nextjs-auth0";

export default () => {
 const { user, error, isLoading } = useUser();

 if (isLoading) return <div>Loading...</div>;

 if (error) return <div>{error.message}</div>;

 if (user) {
   return (
     <div>
       <h2>{user.name}</h2>
       <p>{user.email}</p>
       <a href="/api/auth/logout">Logout</a>
     </div>
   );
 }
 return <a href="/api/auth/login">Login</a>;
};

The user object contains information related to the user’s identity. If the person visiting the page is not logged in (we don’t have a user object available), we will display a link to the login page. If the user is already authenticated, we will display user.name and user.email properties on the page, and a Logout link.

Let’s create a videos.js file, with a list of three YouTube video URLs that will only be visible for registered people. To only allow logged users to see this page, we will use withPageAuthRequired method from the SDK.

import { withPageAuthRequired } from "@auth0/nextjs-auth0";

export default () => {
 return (
   <div>
     <a href="https://www.youtube.com/watch?v=5qap5aO4i9A">LoFi Music</a>
     <a href="https://www.youtube.com/watch?v=fEvM-OUbaKs">Jazz Music</a>
     <a href="https://www.youtube.com/watch?v=XULUBg_ZcAU">Piano Music</a>
   </div>
 );
};

export const getServerSideProps = withPageAuthRequired();

Take into consideration that our web application allows any person to sign up for an account, using the Auth0 platform. The user can also re-use an existing Auth0 account, as we’re implementing Universal Login.

We can create our own registration page to request more details about the user or add payment information to bill them monthly for our service. We can also use the methods exposed in the SDK to handle authorization in an automatic way.

Conclusion

In this article, we saw how to secure our Next.js applications using Auth0, an authentication and authorization platform. We evaluate the benefits of using a third-party service for the authentication of our web applications compared to creating our own security platform. We created an example Next.js app and we secured it using Auth0 free plan and Auth0 Next.js SDK.

If you want to deploy an Auth0 example application to Vercel, you can do it here.

Further Reading And Resources

Optimizing WPBakery’s Impreza Theme With Smush And Hummingbird Plugins

Impreza is a popular WPBakery-based theme with a flavor all of its own. In this post, a WPMU DEV member shares how to optimize this multipurpose WordPress theme for top speed and best performance.

As Phil Martin, WPMU DEV member, web developer, and owner of Canadian-based web design company CapitalWebDesign.ca recently shared with us, “there is a lot of interest in optimizing WPBakery-based themes these days, so I thought I’d provide my 2¢ on the WPBakery-powered theme I have been using lately, Impreza.”

WordPress Impreza Theme
Impreza is a multi-purpose WordPress theme that uses WPBakery.

In this post, we’ll cover the following:

Overview of Impreza Theme for WordPress

Impreza is a premium WordPress theme that uses WPBakery. It was developed and maintained by UpSolution and is currently available from ThemeForest, where it ranks as one of their best-selling themes with over 80,000 sales to date and a 4.89/5 star rating from over 2,200 user reviews.

Best-selling WordPress themes on ThemeForest
Impreza is one of the top-selling WordPress themes on ThemeForest.

The theme’s license normally costs $59 but often goes on sale for $39 and comes with 12 months of support.

As Phil states: “They push big updates every month on average. Seriously, check out this changelog and try to convince me that isn’t the best changelog layout/styling you’ve seen in a long time.”

The Impreza theme uses WPBakery but with their own flavor thrown in. It’s an incredibly modular theme that decouples many of the structural components, including:

  • Grid layouts: Impreza lets you customize how you display groups of data such as posts, custom post types like testimonials or products, image galleries, etc. You can effectively customize any element in a grid. Check out their grid layout doc page for a glimpse.
  • Page blocks: The theme provides reusable blocks. This lets you edit everything in one place and the changes are then reflected everywhere you have added the block. Use these for footers, call to actions, etc.
  • Page templates: You can build a template using WPBakery that can be applied to any post type or page. Use these to have different footers for posts versus pages or to support a different template based on the post type (e.g. a cooking recipe vs a product review in a blog).
  • Header builder: Impreza provides a unique, powerful, and very intuitive header builder. Check out the header builder doc page.
Impreza Grid Layout
Impreza lets you effectively customize any element in a grid.

Some additional points to note about Impreza:

  • It natively supports most of the ACF custom fields (doubly great if you use our SmartCrawl plugin for SEO, which also supports ACF).
  • 100% compatible with WPML language translation plugin.
  • Built-in performance optimization options (including a one-click asset optimization for WPBakery elements: only include CSS + JS for elements that exist on your pages)
  • Built-in maintenance mode, button builder, custom image sizes among others
  • Ability to import individual demo pages or copy in specific rows from specific demo pages. This is a great quality of life option: when you see a specific row in a demo that you’d like to replicate, just copy + paste.
  • Each license is valid for 1 production site and 1 development site (forces maintenance mode). A licensed site provides you with theme white label, demo import, one-click theme updates (without Envato Plugin), addons/recommended plugins (e.g. Smush)
  • Note: Running a license per site is not necessary and you can rotate a license where you need to install addons or import demos. Theme updates are still available through Envato Plugin for unlicensed sites, too. Also, while your support is active, the theme developers will help you with pretty much any theme customization and, according to Phil who uses the theme extensively, their support staff are incredibly knowledgeable.

So, Impreza is a great WordPress theme to use, especially if you love using WPBakery.

What we really want to know, however, is this:

  • Do sites created with Impreza load fast and perform well?
  • Can we make sites created with Impreza load even faster and perform even better using our optimization plugins Smush and Hummingbird and managed WordPress hosting?

For these answers, let’s turn to Phil’s…

Testing Methodology for Optimizing the Impreza WordPress Theme

Impreza is very performance-oriented, as evidenced by some of the advanced theme options they provide.

Impreza - Advanced Theme Options.
Impreza offers advanced theme options to help improve performance.

To see how well Impreza can be made to rank on Google PageSpeed Insights and GTmetrix, here is Phil’s testing methodology in his own words:

(Editor’s Note: WPMU DEV members like Phil get access to the Pro versions of our plugins automatically as part of their WPMU DEV membership but you can follow the same methodology shown below using the free versions of Smush and Hummingbird.)

  • Use a real website: The website I used in this benchmark is a real, fully-built website. Although it’s not yet live to public traffic, it’s running WPML and is full of real content including images.
  • Hosted on WPMU DEV: A simple bronze-level server located in Toronto, Canada. We’ll be testing FastCGI serverside caching
  • Smush Pro: Image optimization is important to this site as every blog post has a featured image. This website is likely to grow to 10,000+ blog posts over the next 5 years, so we need to make sure we optimize from the start.
  • Hummingbird Pro: Test to see if asset optimization works with Impreza.
  • Caching: We don’t need redundancy in caching solutions, so either Hummingbird Pro caching or serverside FastCGI caching was used.
  • Impreza performance settings: keep “http/https” in the paths to files, disable jQuery migrate script, move jQuery scripts to the footer, dynamically load theme JS components, disable extra features of WPBakery Page Builder, disable Gutenberg (block editor) CSS files, optimize JS and CSS size, and merge Google Fonts styles into single CSS file.

Benchmark Results

Tests were performed by starting with both plugins disabled, Impreza performance settings off, and serverside cache disabled.

Phil then incrementally enabled one component at a time. Google PageSpeed Insights was run three times (average of three runs kept) and a GTmetrix performance report was generated.

Here are Phil’s test results:

Impreza Theme- Test Results
The above tests were run independently by Phil Martin, a professional WordPress website developer and a WPMU DEV member. Phil’s test results with Impreza theme and incremental optimization methods.

As you can see from the above, Phil’s test results went from…

Before (Impreza only):

  • Google PSI mobile score: 27
  • Google PSI desktop score: 83
  • GTmetrix score: A – 92%-94%
  • GTmetrix *FCP: 1.1s
  • GTmetrix **TTFB: 0.8s

After (Impreza + Smush + Hummingbird + CDN/Caching):

  • Google PSI mobile score: 87 (222% improvement)
  • Google PSI desktop score: 96 (15.6% improvement)
  • GTmetrix score: A – 100%-95%
  • GTmetrix *FCP: 0.461s
  • GTmetrix **TTFB: 0.206s

* FCP = First Contentful Paint
** TTFB = Time To First Byte

After running the above tests, here is the setup that Phil found to perform the best:

  • Impreza performance settings: ALL enabled.
  • Smush: ALL recommended + CDN + WebP (Pro-only features). Additionally, make sure the WPBakery Page Builder integration is enabled in the Smush > Integrations menu. This will smush custom-sized images resized using WPBakery’s Page Builder editor.
  • Hummingbird: ALL recommended + CDN + Asset Optimization Automatic/Speedy.
  • Caching: EITHER Hummingbird Pro or serverside FastCGI.
  • Impreza + WPMU DEV hosting on their own still do a good job out of the box. 83/100 on PageSpeed Desktop and an A grade (92%; 94%) on GTmetrix is impressive, but obviously the 27 score on Mobile is not desirable.
  • Impreza’s built-in performance optimizations is very effective. It improves both Google PageSpeed scores into the 90s, which is especially important for Mobile.
  • Smush doesn’t appear to make much of a difference to performance scores, but it will reduce your overall page load size where images are present.
  • Hummingbird cache appears to be on-par to FastCGI serverside cache.
  • Hummingbird Pro CDN appears to be on-par with letting the server provide CSS + JS via FastCGI caching.

Here are some additional valuable insights that Phil provided after running the tests:

  • “The #1 thing that completely ruins these scores is Google’s reCAPTCHA javascript.”
  • “I am honestly surprised at how well the theme + WPMU DEV Hosting w/ FastCGI serverside caching performed. TTFB of 0.224s and 92/98 on PageSpeed Insights without additional plugins is incredibly impressive. Smush Pro is then an extra layer of optimization on top by serving super-optimized image files. Hummingbird Pro can relax a bit and not have to worry about serving cache. Rather, it can focus on setting all our expiry headers, monitoring uptime and serving CSS/JS from CDN.”

Optimize Impreza with Smush and Hummingbird and you can have your cake and eat it too!

Making Impreza’s Performance Even More Imprezive

In Phil’s own words:

“Having used many of the top ranking multipurpose themes in the past (Avada, Enfold, Etalon, Extra, Jupiter, Salient, etc.) I have never had as much success building modern, minimalist, efficient and hyper-performing websites as I have with Impreza. Trading pre-built template and demo libraries for thoughtful design, extensive customizability and ridiculous performance is worth it to me.

And look, the results don’t lie: not a single test dropped out of the A grade on GTmetrix.”

Impreza theme - performance results.
You don’t need to be a Canadian like Phil to get all “A”s – just install Smush and Hummingbird… WPMU DEV’s “moose’t-have” optimization plugins.

So, there you have it!

Impreza is not only a fast-loading WordPress multi purpose theme powered by the WPBakery page builder but its performance can be improved using Smush and Hummingbird optimization plugins with serverside hosting features like CDN and FastCGI enabled.

To access our entire suite of Pro plugins, blazing-fast managed WordPress hosting, and expert 24×7 help and support for all things WordPress, become a WPMU DEV member today with our 7-day free membership trial.

Contributors

This article was written in collaboration with:

Capital Web Design - Ottawa Web Design

Phil Martin –  Capital Web Design.  Phil uses his twenty years of web design experience to achieve one goal: give back to his hometown by building modern websites for businesses and nonprofits in the Canadian capital!

***

Note: We do not accept articles from external sources. WPMU DEV members, however, may contribute ideas and suggestions for tutorials and articles on our blog via the Blog XChange.

Frustrating Design Patterns: Mega-Dropdown Hover Menus

Complex websites often rely on complex navigation. When a website houses thousands of pages, often combined with micro-websites and hundreds of subsections, eventually the navigation will go deep and broad. And with such a complex multi-level navigation, showing the breadth of options requires quite a bit of space. Think of large eCommerce retailers and large corporate sites, catering to many audiences and having plenty of entry points.

No wonder that a common way to deal with this complexity is to expose customers to a large amount of navigation quickly. That’s exactly why mega-dropdowns have become somewhat an institution on the web — albeit mostly for complex and large projects. A mega-dropdown is essentially a large overlay that appears on a user’s action. Usually it includes a mixed bag of links, buttons, thumbnails and sometimes nested dropdowns and overlays on its own.

For decades, a common behavior for this kind of navigation is to open the menu on mouse hover. And for decades, a common user’s complaint about this pattern has been the absolute lack of certainty and control about how and when the sub-navigation opens and closes.

Sometimes the submenu appears unexpectedly, and sometimes it suddenly disappears, and sometime it stays on the screen for a while, although the mouse pointer is already in a very different part of the page, or on another page altogether.

Why Are Mega-Dropdowns Hover Menus Frustrating?

The main reason why mega-dropdowns can be cumbersome to use is because of a mismatch of intentions and expectations. With hover menus, we try to deduce and act on a particular intent by tracking mouse behavior, yet our customers might have very different objectives and very different limitations when accessing a page.

Customer’s behavior is usually unpredictable, even although our analytics might tell a slightly different story with data points gathered and normalized over a longer period of time. We just rarely can predict behavior accurately.

The common scenarios we usually explore are:

  1. The customer is aiming at the category link and travels there directly to explore the sub-navigation items in that category.
  2. The customer is moving the mouse towards a target on the screen, but the trajectory that the mouse has to travel covers a nav link that opens a mega-dropdown.

However, there are also plenty of other situations to consider. Just to name a few:

  1. The customer wants to look up mega-dropdown options while typing in a search autocomplete. To do that, they have to keep re-opening mega-dropdown, or use separate browse tabs, positioned side by side.
  2. The customer might use a trackpad (or a mouse) to operate a large secondary display, so pointer movements will be slower, abrupt and inaccurate. This would cause the mega-dropdown to open involuntarily every time the user pauses when traveling to CTAs or shopping cart at the top of the page.
  3. The customer wants to open the category page, so they travel to the category link, click on it, but experience flickering because a mega-dropdown appears delayed.
  4. With nested sub-menus within a mega-dropdown, the customer wants to explore similar items within the category in which they currently are, but because of nesting, they have to re-open the mega-dropdown over and over again, and travel the same hover tunnel over and over again.
  5. Imagine a situation when you want to resize the window, and just as you are about to snap to the right edge of the window, a hover menu keeps showing up — just because you’ve moved your mouse cursor too closely.
  6. The user starts scrolling down slowly to assess the content on a page, but the menu keeps popping up. And every time the user bumps away a cursor to read the contents of the mega-dropdown, the menu accidentally disappears.

The problem is that we need to support all these intentions and all these accidents, but at the same time we need to make sure that we don’t create an annoying and frustrating experience for any of these cases either. Of course, as designers and developers, we’ve invented a number of techniques to tackle this problem.

Hover Entry/Exit Delay

One of the first solutions, and also one of the most common ones still, is to introduce a hover entry/exit delay. We need to make sure that the menu doesn’t open and doesn’t close too early. To achieve that, we introduce a delay, usually around 0.5 seconds. That means that we give customers a buffer of around 0.5 seconds to:

  • Cross the trajectory to a remote target if needed, or
  • Indicate that they intent to explore the navigation by remaining on the mega-dropdown category link, or
  • Correct a mistake if they left the boundaries of a mega-dropdown by accident.

In other words, as long as the customer stays within the mega-dropdown overlay, we keep displaying it. And we hide the overlay once the customer has moved their mouse cursor outside of the sub-navigation overlay for at least 0.5 seconds.

While it solves the problem of accidental flickering on the page, it introduces a lag in cases when a user has left the mega-dropdown for more than 0.5 seconds. As a result, it slows down every interaction with the mega-dropdown across the entire site. Unfortunately, it becomes very quickly very noticeable, especially if the navigation is used a lot.

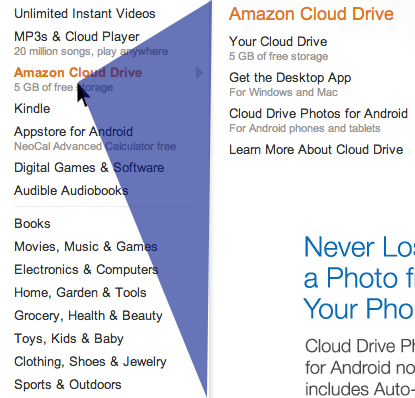
As long as the user stays within the triangle or within the entire mega-dropdown area, the overlay is still displayed. If the user chooses to travel outside of the triangle, the content of the mega-dropdown overlay will change accordingly. And of course it will disappear altogether immediately once the user has moved outside of the category list altogether.

Chris Coyier highlights some of the technical intricacies of this technique in his post on Dropdown Menus with More Forgiving Mouse Movement Paths, along with a vanilla JavaScript demo by Alexander Popov on “Aim-Aware Menus”.

With this technique we minimize the friction of sudden disappearance and re-appearance of sub-navigation. But it might become ineffective if category links are positioned too close to each other, or we display the hover menu by hovering over a larger button. We can do a bit better with SVG path exit areas.

SVG Path Exit Areas

When calculating a trajectory triangle with the previous technique, sometimes we would not only track the exact position of the mouse pointer, but also recalculate the triangle with every pointer movement — all the time. We can improve the strategy by calculating the overall SVG overlay area once and track whether the mouse pointer is inside it — without recalculating the triangle all the time. A great example of it is Hakim el Hattab’s implementation that draws the areas dynamically with SVG based on the position of the navigation item on the screen.

Hakim’s solution is actually responsive, so if the sub-navigation doesn’t fit on the screen, it will float next to the main navigation item, displayed in full width or height. The SVG path area will be recalculated accordingly, but only if the user scrolls vertically or horizontally. You can see a working demo of the technique in action on Hakim’s debug view mode of the Menu pattern.

In case you do have to deal with a complex navigation of this kind, it might be worth testing if issues disappear when only one (rather than two) hover menu is used. That menu would be slightly larger and house all options within columns. Or if possible, for every category, consider displaying all navigation options within that category as a permanent navigation bar (sidebar or a sticky top bar) — usually it should eliminate all these issues altogether.

Category titles doing too many things

As we’ve seen previously, sometimes category titles have two different functions. On the one hand, each category title could be linked to the category’s page, so customers could click on them to go straight to the page. On the other hand, they also could open a mega-dropdown overlay. So if the user is hovering over the title for a long enough time, the mega-dropdown will open, but the user might have clicked on a link already, and this will cause flickering. For customers, it’s difficult to have the right expectations when the interface doesn’t really provide any hints.

There are a few options to resolve this problem:

  1. To indicate that the category’s title is a link, it might be helpful to underline it,
  2. To make the distinction between the category title and a dropdown more obvious, add a vertical separator (e.g. vertical line) and an icon (chevron),
  3. Leave the category’s title opening only the mega-dropdown, and add a link to the category’s “Home” section within the mega-dropdown overlay. It could also be a prominent “See all options” button instead (see The Guardian example above).

As mentioned above, sometimes you can see an extra icon being used to indicate that the menu opens an overlay, while the category’s title is a link. In our usability tests, we noticed that whenever an icon is present (and it doesn’t matter which icon that is), users often make a mental distinction between the action that will be prompted by a click on an icon, and the action prompted by a click on the category title.

In the former case, they usually expect a dropdown to open, and in the latter case, the category page to appear. More importantly, they seem to expect the menu to open on tap/click, rather than hover.

If you are looking for a technical implementation, you can check In Praise of the Unambiguous Click Menu, in which Mark Root-Wiley shows how to build an accessible click menu. The idea is to start building the menu as a CSS-only hover menu that uses li:hover > ul and li:focus-within > ul to show the submenus.

Then, we use JavaScript to create the <button> elements, set the aria attributes, and add the event handlers. The final result is available as a code example on CodePen and as a GitHub repo. This should be a good starting point for your menu as well.

Accordions vs. Overlays vs. Split-Menus On Mobile

It goes without saying that not every mega-dropdown on tap/click is performing well though. Target.com is another interesting example for an accessible, large navigation that avoids multi-column layout and shows only one level of navigation on the time — all opening on tap/click.

“Our brands” leads to a separate page while each label under it opens a new navigation overlay on top of the mega-dropdown. Did you notice that “All brands” is underlined, while the rest of the navigation option isn’t? One can see the intention of designers creating the menu. Indeed, “All brands” is a link, while the other labels open an overlay:

With all of these options in place, how would we go around displaying a mega-dropdown navigation on mobile? As it turns out, grouping such mega-dropdown overlays on mobile is difficult: usually there isn’t enough space nor visual aid to highlight different levels differently and make them easy to distinguish. In the example above, it might take a while to figure out on which page we actually have landed.

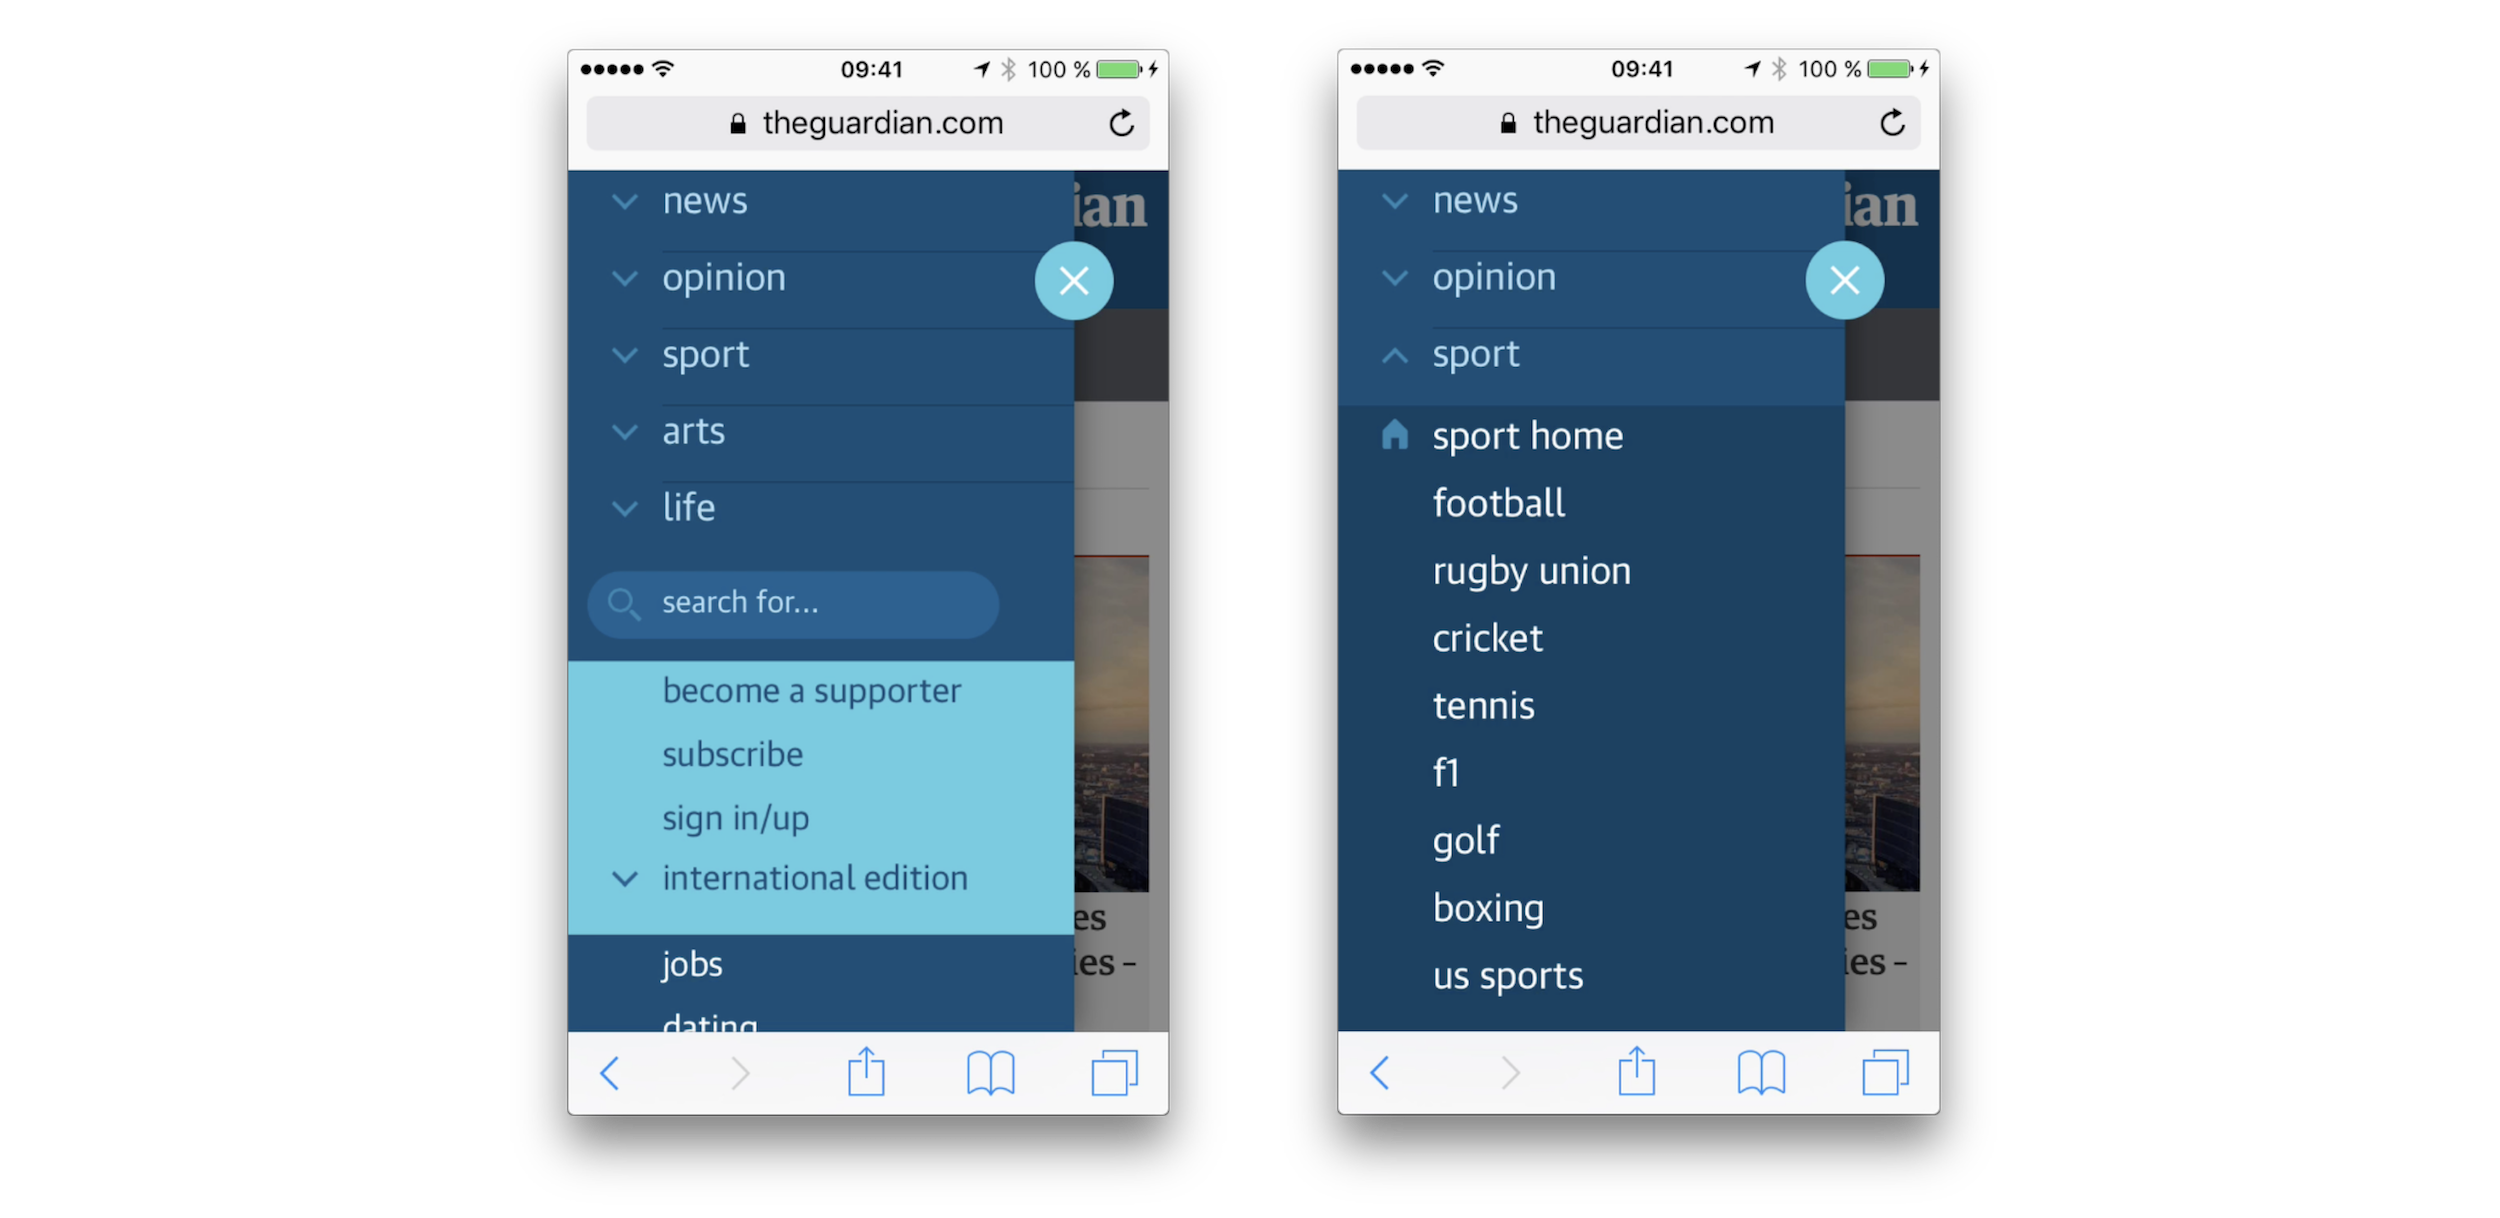
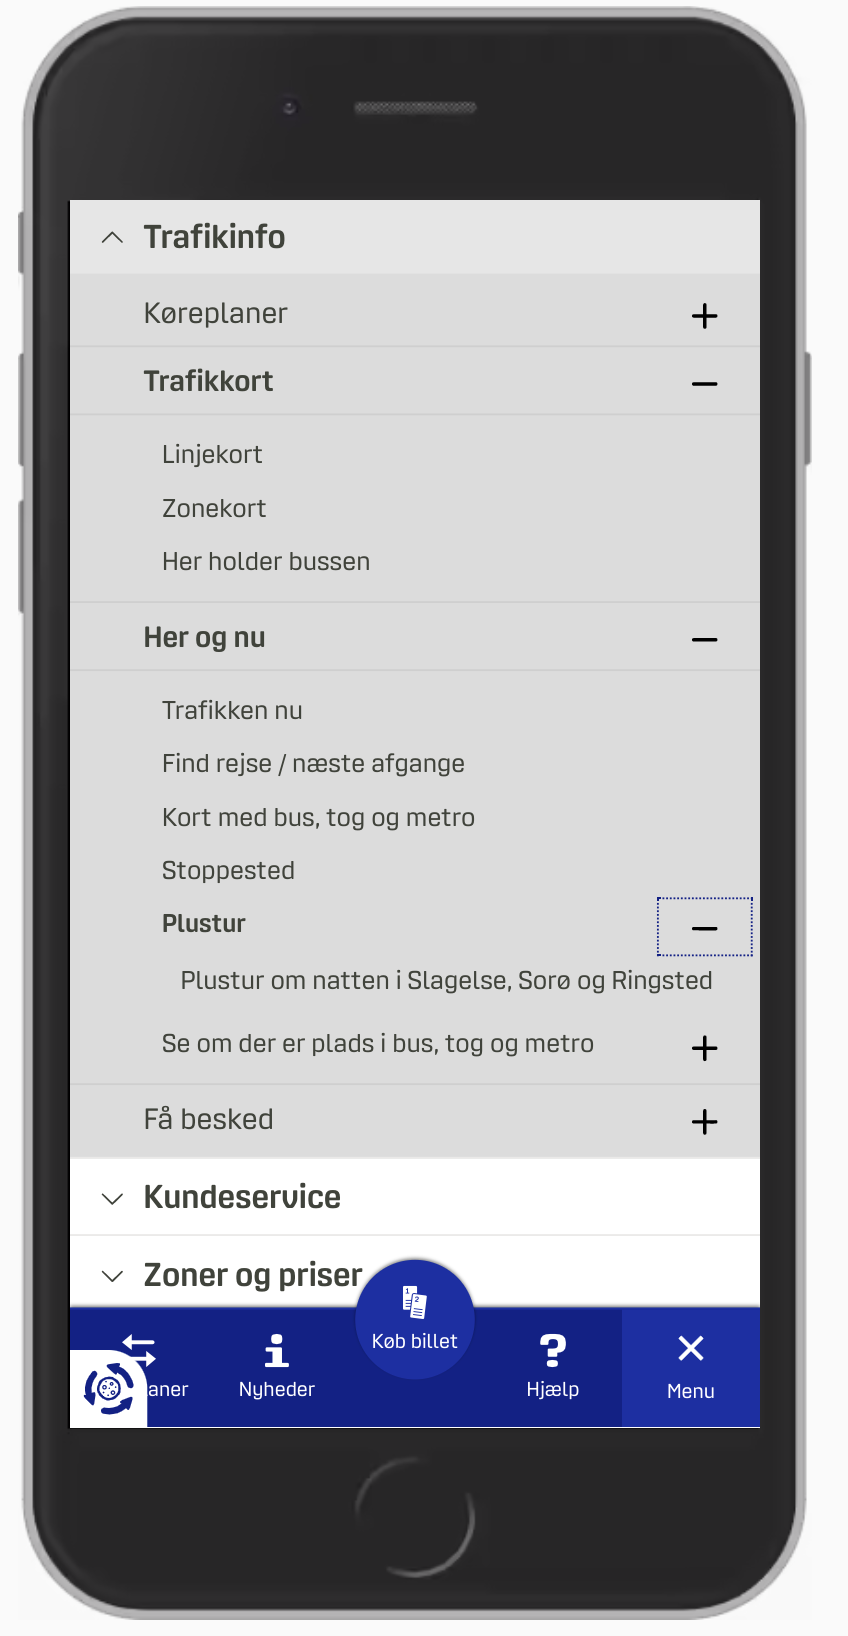
It’s a bit easier to understand at which level we currently are and what options we have with an accordion approach, as we can see on Dinoffentligetransport.dk. However, it might be a good idea to underline links within each subsection as they drive customers to the category’s page. Also, the entire category bar should probably be clickable and expand the accordion.

In the example above, most of the time we probably will be able to show a limited amount of navigation sections at a time. But if the titles of each sections are relatively short, we could split the screen horizontally and display multiple levels at the same time. LCFC.com is a good example of this pattern in action.

Which Option Works Best?

In my personal experience, when we compare the implementations of mega-dropdowns on mobile, vertical accordions appear to be faster and more predictable than overlays (be it single-column or multiple layers). And split-menus appear to be faster and more predictable than accordions.

There are a few advantages that both accordions and split-menus provide:

  • There is no need to display a “Back” button to return to the parent page.
  • The eye doesn’t have to jump between the top of the navigation menu and the section’s sub-navigation with every jump.
  • Customers can navigate between multiple levels faster: instead of hitting “Back” multiple times, the can jump to the accordion that they find interesting.
  • Customers can explore multiple sections at the same time (unless the implementation automatically closes one accordion when another one has been opened). It isn’t possible with overlays.

In general, accordions and split-menus appear to be a better option. But they don’t seem to be working well when there is a lot of navigation in place. Whenever each category has more than 6–7 items, it proved to be a good idea to either add a “Browse all” button underneath 6–7 items within another accordion (or on a separate page), or use overlays instead.

So depending on the amount of navigation, we can start out with split-menus, then if it’s not viable, move to accordions, and if the navigation is getting complex still, eventually turn accordions into overlays.

When Mega-Dropdown Might Not Be Needed After All

We’ve referenced the work of the Gov.uk team in the previous article already, but their insights are valuable in the context of mega-dropdowns as well. For large, multi-level navigation, the team has decided employed findings by form expert Caroline Jarrett’s one thing per page principle. According to Caroline, “questions that naturally ‘go together’ from the point of designers […] don’t need to be on the same page to work for users”. Caroline primarily applied it to the design of web forms, but we could apply it in the context of navigation as well.

The idea, then, is to avoid complex mega-dropdowns altogether, and provide customers with a clear, structured way to navigate through the trenches of the website, from one page to another. In the case of Gov.uk, it seems to be happening through a well-considered information architecture and guides, that lead the visitors through predictable steps towards the goal.

The Kanton Zürich is using the same pattern. Instead of layers of mega-dropdown navigation, all options are displayed in a structured way, with main topics featured on the top as “Top topics” and the navigation within each section displayed as a sticky navigation bar on the top.

An alternative approach is to use the “I-want-to” navigation pattern. In addition to the conventional navigation, we could provide a “navigation dropdown” to allow customers to construct a navigation query of their choice, and be directed straight to the page they are looking for. Basically, it’s a series of drop-downs that appear under another to let the user select what they intend to do or find on the website.

For a while, the pattern was used on Commonbond (see the video above), and it’s also used on Corkchamber.ie. An interesting, albeit unconventional way to provide access to a deep level of navigation without having to use a mega-dropdown at all.

Mega-Dropdown Navigation Design Checklist

Every time we bring up a conversation about mega-dropdown menus, everyone seems be settling in a few groups: some colleagues prefer hover, the others prefer tap and click, some prefer both, and the others don’t mind either as long as there is both a category link and an icon that opens the menu.

It’s impossible to say that one approach is always better than the others, but both in terms of technical implementation and UX, opening the menu on tap/click usually causes way less trouble and way less frustration while allowing for a simple implementation, and thus resulting in a predictable and calm navigation. Before moving to a hover menu, we could try keeping tap/click behavior first, measure the engagement, and study if hover is needed after all.

And as always, here are some general things to keep in mind when designing and building a mega-dropdown:

  • Avoid placing important, frequently used items close to the mega-dropdown navigation (e.g. search bar, CTA, shopping cart icon) (if hover),
  • Avoid multiple sub-navigations within mega-dropdown appearing after each other with delays (if hover),
  • Avoid overloading category titles with multiple functions.
  • Underline category titles to identify them as links to the category’s page (of course if they are linked to the category page).
  • If you can, add a “Home” link or a “Browse all” button within each sub-category instead of linking the category directly.
  • Avoid horizontal overlays and consider replacing them with vertical accordions and split-menus,
  • Add an icon to indicate that a category title triggers a mega-dropdown on click (e.g. chevron) and always make it large enough for comfortable tapping (e.g. 50×50px),
  • Avoid long fade-in/fade-out transitions when a mega-dropdown appears/disappears (at most 300ms),
  • Consider testing a structured guide or a navigation query (“I-want-to” navigation pattern) instead or additionally to the mega-dropdown.
  • Avoid mega-dropdown hover menus if possible.

Related Articles

If you find this article useful, here’s an overview of similar articles we’ve published over the years — and a few more are coming your way.

How To Create, Edit And Animate SVGs All In One Place With SVGator 3.0

SVGator is evolving and it’s evolving a lot. Three years ago, we published a comprehensive introduction to the basic use of SVGator. At that time it was an app meant solely for animating SVG files created in other apps. Two years ago, we introduced you to a new version of SVGator and its improved animation capabilities. This time, we are introducing a new major version of SVGator that offers a matured, complete environment for drawing from scratch and animating SVG graphics.

Note: Some of the SVGator’s features covered in this tutorial are paid. On the free plan, you can create and export an unlimited number of SVG graphics. You can also use basic animation features and export 3 animations per month. Advanced animation features are available under a paid plan, starting at 11 USD/month.

In this article, we will follow a process of creating a custom SVG loader, from drawing it from scratch and applying various visual effects, through creating different types of animations, to exporting your file and preparing it for use on the web.

From here, we can start drawing the illustration we are going to animate later. SVGator allows you to draw all the standard SVG shapes such as ellipses, rectangles and polygons as well as use a Pen and Pencil tools to draw your own. You can also use boolean functions to combine shapes with one another.

To make it easier for me to create the desired shape, I started by drawing a circle as a guide in the center of the canvas. Fortunately, SVGator makes it dead simple to align and measure elements, thanks to a smart system of guides and snapping functions. You can also use grids and rulers for better precision and fidelity.

Next, using a Pen Tool, we draw the first blob roughly following the shape of the circle underneath. The Pencil Tool would also do well for that purpose. What is really cool about this one is that SVGator’s Pencil Tool usually creates shapes with much fewer node points than comparable tools in other apps, which makes the result not only look smoother but also be much lighter on file size.

With a first blob ready, it’s time to style it a bit. Here, we’re stumbling upon one of the biggest competitive advantages of the app. Other popular vector graphics applications that allow you to export SVG files usually have to leverage their features to fit a plethora of formats and use cases. At the same time, apps focused primarily on user interfaces, cater mostly for what’s possible with HTML and CSS properties, rarely giving much love to SVG-specific features such as stroke markers or filters.

SVGator, being solely aimed at creating SVG files, takes full advantage of what this format, in particular, has to offer. This includes options specific to how SVG handles strokes, fills, gradient elements (have you heard about the spreadMethod attribute of SVG gradients?), filters (such as blur, shadow or sepia), and many others.

It also allows you to style (your fills, strokes, effects, and so on) with confidence that the final result will be as expected, as all these features have been created especially for SVG files.

In our case, a single gradient fill and a gradient stroke will do. I also applied a light blur filter on the element as a final touch. Notice that as SVGator uses native SVG filters instead of CSS, it allows you to control the blur properties for both axes separately. In this case, I only applied an x-axis blur.

Next, we can duplicate the blob and use the Pen Tool again to create two more different blobs. The way Pen Tool works makes it really easy to modify the shape without losing the smooth, continuous line of it.

Our loader in its initial state is ready. Now, it’s time for the most fun part: animation!

It doesn’t really matter which element of the illustration we will animate first. In my case, I started with animating the sparkles. By adding a Position animator to each element, we can create complex path animations. Path animations allow us to make an element follow a path of any shape over time. In our case, will make the sparkles circulate around the canvas to create an impression of flying around the center elements of the illustration. We can also use Scale and Opacity Animators to make the sparkle seem to wander further and closer from the viewer and strengthen an illusion of movement in 3-dimensional space.

To animate the blobs, a Morph animator can be used. It allows us to modify a shape in time and create smooth transitions between those states. To achieve a nice, clean transition between two shapes, we add a keyframe to the Morph animator’s timeline and modify the shape with a Pen Tool — just like we did when we drew the additional blobs.

For blobs, I also used an Ease In Out function. You can notice that both timing functions are different from how Ease In Out functions look like by default. I “sharpened” them up a bit using the bezier curve interface. This allowed me to make the movements look smooth and natural, without sudden turns and hiccups but also without too visible slowdowns.

After a few more minor adjustments, the file is ready to be exported. The new version of SVGator combines the preview functionality with exporting functionalities. Thanks to that you can have a real-time browser preview of your animations while you are also testing and changing the export settings.

In our case, we want the animation to act as an infinite loop. You can also control the behavior of the graphic, to show on load or upon user’s action such as click or scroll.

The exported file perfectly matches the animation we created within the app and is ready to use on the web.

See the Pen SVGator Loader by Mikołaj.

I hope you enjoyed this article and that it will inspire you to create the most amazing things with SVG in your work!

Where next? Below you can find a few useful resources to continue your journey with SVG and SVGator:

Smashing Podcast Episode 37 With Adam Argyle: What Is VisBug?

In this episode, we’re talking about VisBug. What is it, and how is it different from the array of options already found in Chrome DevTools? Drew McLellan talks to its creator Adam Argyle to find out.

Show Notes

Weekly Update

Transcript

Drew McLellan: He’s a bright, passionate, punk engineer with an adoration for the web, who prefers using his skills for best in class UI and UX, and empowering those around him. He’s worked at small and large companies, and is currently a developer advocate working at Google on Chrome. He’s a member of the CSS working group and the creator of VisBug, a design debugging tool. So we know he knows his way around design and UX, but did you know he owns more pairs of flip flops than any living biped? My smashing friends, please welcome Adam Argyle.

Adam Argyle: Hello.

Drew: Hi Adam, how are you?

Adam: Oh, I am smashing, you know it.

Drew: That’s good to hear. So I wanted to talk to you today about your project, VisBug, and generally, about the concept behind design debugging and how it might fit into project workflows. I mean, we’ve had developer focused browser debugging tools for a long time, I mean, probably more than a decade now. But those are obviously very much focused on code. So what is different about VisBug? And what’s the sort of problem that it’s trying to solve?

Adam: Awesome. Yeah, the main problem that it’s rooted in is, as a front-end engineer I work with designers all the time, and I always loved this moment where we sat down and I’d be like, "Okay. I’m making the final touches. We’ve got another day or two until we deploy. So designer, sit down, and would you critique this? I want you to open up my local host version on your browser and on your phone, or whatever, and talk to me about what you see."

Adam: And after doing this for many years and always loving this interaction, I kind of started to feel guilty after a while because of how common and simple the tasks were. They’d be like, "One pixel down here. Five pixels margin here." And it was always nits and nudges, and nits and nudges to spacing and type. I mean, rarely was it like, "Ooh, hold on minute while I spend 30 minutes changing some angular, or whatever, to adjust my DOM so that the DOM can support your request," or whatever.

Adam: It was usually tiny stuff. And then I ended up making a survey, and I surveyed all these designers at Google. And I was like, "When you open up DevTools, what do you do?" And it kind of was resounding that they just need basics. And so it was born out of, I was like, "This should be easier. You shouldn’t have to pop the hood on the Ferrari, move a chunk of engine, just to change the color of the car seats. That’s not fair. You should just be able to touch the car’s seats and change the color, just like a design tool." I was like, "Something could facilitate this workflow." And I was like, "Okay, I guess I’ll hack on something to see if I can create the solution."

Adam: And that’s how it all started. It really started with spacing and then typography. And once I had a selection mechanism down that emulated design tools it was like, "Well what else can I do?" And it just kept going from there. But yeah, born in that moment.

Drew: So the idea is that the client asks you to make the logo bigger, and VisBug helps the browser behave more like a design tool for making those sorts of tweaks. So closer to something like Illustrator, or Photoshop, or Figma, or any of these types of things.

Adam: Yeah. That use case is a good one too. Because you could be a with a client and they say, "Oh, we love this," this is so classic, "we love the design, but that color blue is hard for us." And you’re like, "Really?" This is like, people can submit a form and you can make money, but you want to talk to me about blue right now? And usually it would create a whole cycle. The PM would go, "Okay, we’ll take down your request and then we’ll send it to design."

Adam: But if the designer’s there and it’s their browser that’s showing it they’d be like, "Okay. Well I’ll just click the thing and change the color." And you can nip an entire cycle of work by just prototyping the change there in the browser. So it is. It’s most effective against an existing product, right? Because it’s a debugging tool. It’s not necessarily a generation tool. It doesn’t create a site for you. It can, but it’s kind of awkward.

Drew: So technically it’s an extension that you install in a Chrome browser. Is that right?

Adam: Yep. And it’s an extension. When you launch it it downloads a JavaScript file that says, "Here’s a custom element called VisBug." And then you put the DOM element, vis-bug on the page. And poof, I just take that moment and turn it into a toolbar, and start to listen to events on the page. I listen to your hover events, and I listen to your click events. And I try to do my best to intercept them, and not compete with your main page.

Adam: But yeah, that’s the essence of... The only reason it’s an extension is just so it’s easy to put on your page. Although at this point it does have some settings now that come with you across browsers. But it’s still mostly, 99.9%, a custom element with no dependencies. I think I like a color library I use, and it’s otherwise just all vanilla. Yeah.

Drew: I guess that’s how Firebug sort of started out, wasn’t it? As a Firefox extension back in the day.

Adam: Yep. That’s why it’s called VisBug. It’s very much inspired by Firebug but for visual designers.

Drew: Ah. There we go. I mean, this isn’t perhaps the ideal format, being an audio podcast, to talk about a visual tool. But run us through, if you will, some of the sort of tools and the options that VisBug gives you.

Adam: Absolutely. So one of the first things that VisBug does, and you can also, if you are at home or at a computer, you can go to visbug.web.app, and try VisBug without the extension, right?

Drew: Ah.

Adam: It’s a web component, so I’ve loaded up a webpage for you here at visbug.web.app that looks like it’s got a whole bunch of art boards, and then of course, VisBug preloaded. And the goal of this site is to let you play, and explore, and delete. I think the delete key is one of the most satisfying tools to begin with. You’re like, "What can I do to a page?" And you’re like, "Well I can destroy it."

Adam: And I made it so that you can hold delete, it will find the next... Which is pretty difficult on a delete. You delete something and it selects the next sibling. So it’ll select the next sibling forever. If you hold delete until you delete the whole... Anyway, very satisfying. Hit refresh and it all comes back. But the first tool that VisBug ships with, so when you just launch it, is the guides tool. And I used to literally hold up paper to my screen, or I would go get a system extension that would allow me to sort of mark things and create lines.

Adam: Because, yeah, alignment becomes very optical at a certain point for a lot of designers, right? They don’t want, necessarily, mathematical alignment, right? This is why typography has optical kerning. It’s not math kerning. This is human kerning. And so the guides tool is rooted in that a lot of nits that happen from a designer are zooming in on stuff, checking alignment. Is the spacing good?

Adam: So that’s the second thing that the guides tool does. When you launch it and you just hover on stuff you’ll see the element that you’re hovered on gets a little box around it. And then dashed guides show up, just like rulers would normally do. And just like in Sketch and Zeplin where you sort of hover and you get these guides, it’s the same concept, just live on your page. And if you click something, and then hover to a new destination, you get measuring tools. And the measuring tools are in pixels, and they’re calculated... So visually, how many pixels are between it. Not what did someone say. It’s not adding up all the spacing, it’s just you click this thing and it’s this far away from that other box.

Adam: And I think that becomes really helpful, because you can hold shift and continue clicking, and essentially verify that you have equal spacing between five icons. And it’s just a couple of clicks. Don’t have to know code, just launch VisBug, hover, click, click, click, and you get to see that, "Oh look it is. Yeah. 15 pixels between each of these." Or sometimes you get something that’s kind of annoying, you’ll click in a box and then click its parent box and you’ll realize that its top distance is nine and the bottom one is eight. And you go, "How will I center this? It is somehow in between." And shakes fist.

Adam: But at least you’re able to see it nice and easily with the guides tool. So yeah, that’s the guides tool.

Drew: I’ve definitely been there, with holding up bits of paper to the screen. And also, the other trick that I would use is to open another browser window and use the edge of the window to align items. And then you sort of try and keep everything in the right place so that as you make code change and refresh it’s all still lining up. Yeah, not an ideal way of working, so.

Adam: Not an ideal way of working. Yep. And there’s the next... So, oh, and the first version of that was very loose. It didn’t snap, it just held up a crosshair, which is a feature that I’ll add back later. So some users are like, "Hey, I love the snapping, it’s just like my design tools. But what if I want a loose measurement? Or I want to do a letter, I want to measure a letter, not its letter box?" And so, well, this guides tool could very easily be changed to having a modifier key.

Adam: So here’s where VisBug gets a little kind of different, but also hopefully familiar, is it’s very heavy on hotkey modifiers. So just like if you watch a pro designer, they’re very much hotkey savvy. And they’re hitting hotkeys here, zooming in, hitting hotkeys over there, and just doing all their nudging from their keyboard. And so VisBug is very keyboard-centric in the way that you change things.

Adam: It’s also because VisBug allows multiple selections, and it can change 100 items’ spacing at the same time. And it does so relatively. So anyway, it has a couple interesting quirks, but the keyboard in a modifier concept is really important. And you can hold option, or shift, or command in a lot of the tools and get something different, or get a new sort of feature in there.

Drew: So it’s one of those tools where it really pays to learn the keyboard shortcuts.

Adam: It does. And so when you launch VisBug and you hover over one of the tool icons, you’ll get a breakdown. It throws out a little flyout menu, it says the hotkey for choosing this tool, and it tells you what it can do, and what interactions to do in order to get them. So the guides tool says, "Element guides, just hover. Measure something, click, and then hover something new. Sticky measurements are shift plus click so they’ll persist."

Adam: And these guides are really nice too for screenshotting. So if you’re reviewing a PR, even as just a front-end engineer, or maybe a designer reviewing a PR, this can be a really powerful way for you to get in there and, yeah, have some high fidelity inspection. Which kind of leads us into the next tool. Do you want to hear about the next tool?

Drew: Yeah, sure. Let’s go for it.

Adam: Awesome. The next one is the inspect tool. And this one is like... Designers usually, they don’t want all of the CSS, right? When they expect with... I almost said Firebug, but the Chrome DevTools, you get the full list, right? I selected this H1 and so here’s everything all the way back to the browser style sheet. And the designer’s like, "The browser what? The browser has a style sheet?"

Drew: Down at the murky bottom of that scrolling panel.

Adam: The murky bottom, right?

Drew: Yeah.

Adam: It’s like you peeled back all the layers and then you’re like, "Ooh, I don’t like these layers anymore." And the inspect tool here, it says, "Ah, designers, I know what you want. It’s just the border color." Basically, only show me something if it’s unique, so don’t just cover me with CSS properties. And I’m really mostly interested in color, typography, and spacing. So I’m going to look at margins, line heights, font family’s really important, right? There’s a whole extension just to tell you what the font family is on a page.

Adam: In VisBug that’s just a line item in the inspect tool. So you just launch VisBug, hit inspect, and hover on any typography and it’ll tell you the font family. So yeah, it tries to make a designer focused in what it surfaces, yeah.

Drew: So that tool is not showing any inherited styles. Is that right?

Adam: That is correct. Unless they are inherited and unique. So if they... A text color or something, if the text color isn’t literally the word inherit, it will tell you that it’s a computed value, that it’s something interesting.

Drew: Yeah, that’s a really useful just... Yes. Helps you focus on the things that are just literally applying to that one instance of something, which is obviously what you wanted to change. I mean, I guess this could be really useful, all these tools would be really useful in, sort of as you mentioned, getting stakeholder feedback. And sort of working interactively with a client.

Drew: I guess it would work equally well over screen sharing, as we have to do these days, more and more. You don’t have to be sat at a computer with someone, you could be sat on the other end of a call and share your browser and do it that way. I guess it’d be quite an effective way of getting feedback when a client can’t point at the screen and say-

Adam: Definitely.

Adam: It’s always magical when you turn the live webpage into what looks like a Zeplin artboard. Someone’s like, "What... Did we just go somewhere new?" And you’re like, "No, this is your product. We’re just interacting with it very visually." Yeah, it can be really nice.

Drew: Are there any other interesting use cases that you’ve seen VisBug put to or that have occurred to you might be interesting?

Adam: Yeah. So, yeah, there’s so many it’s kind of hard to start. Oh, one that’s important is developer to developer communication. VisBug works on the calculated values. So it doesn’t look at your authored values. And that can be really nice, because you’re sort of measuring and inspecting the absolute end result into the way that the pixels got calculated on the screen. And that can be really nice, to have a conversation that way, as you’re working on the results, as opposed to the authoring side.

Adam: And you can go back towards like, "Okay, well how did we go wrong in the authoring side if this is what we got visually?" Which also kind of plays into, the next tool is the accessibility inspect tool. So the inspect tool makes it easy just to see the styles on an element, and it breaks them down in a very designer-friendly way. The accessibility tool helps you inspect all of the elements on a page, and it surfaces any accessible properties it has, which makes it, I’m hoping, easier to go verify that something is done.

Adam: So a PR... And things often get created. So this is, again, developer to developer, designer developer, you’re reviewing interfaces. It’s just so critical. If you’re looking at an interface and you’re curious, VisBug has a use case for you there. There’s also use cases where you can sort of prototype in the browser. So we talked about one where it’s like, the client wanted to try blue. Okay, that’s a pretty easy scenario.

Adam: But there’s other ones too. If you hit command D on VisBug you’ll duplicate an element. And it doesn’t care what you’re duplicating. So you could duplicate a header, go add some spacing between the two headers, and go make a variant live in the browser. You double click the header text and it becomes an editable text field, and you go try a new headline out and go see how the headline fits. Go adjust some spacing and you just saved yourself all this developer work, finding a source file and all that sort of stuff, and you’re just...

Adam: So yeah, it can help you explore and verify. It’s kind of a weird... I mean, it’s a lot of the things DevTools does, right? It comes in after you’re done, it doesn’t actually give you source code very often, it’s not very often that you copy code out of DevTools. You might copy a key value pair. Like, "Oh, I changed this style." But yeah, anyway.

Drew: Mm-hmm (affirmative). Yeah. I can think of sort of particularly visual cases where you might want to, you mentioned, duplicating items. You might want to take a whole section of the page and duplicate it to simulate what it would be like if there was a lot more content than you were expecting.

Adam: Yes. That’s the chaos testing use case.

Drew: Yeah.

Adam: Absolutely.

Drew: Which is something that we all have to deal with, designing with sort of CMS-based systems and all those sorts of fun tasks.

Adam: Yep, that’s a really crucial use case too. Because I do that one for... Yeah, headlines, like I said. You just double click some text and I just go slam the keyboard. Blah, blah, blah, blah, and hit a bunch of spaces, blah, blah. And I’m like, "Okay, how’d the layout do? Oh, it did good. Okay, good, I can move on to the next thing. What happens if I duplicate this four times? Is there still space between everything? Does it flow next to the next item?"

Adam: It can be really nice for that simulation of the, yeah, content chaos. Really short title, really long titles, has no friends, has a million friends. How do you handle these use cases in the UI? Yep.

Drew: So it works with any browser-based content. So PWAs as well as regular webpages?

Adam: Yes, it does. So if you have Spotify installed, I do this all the time, I’ve got Spotify installed and I’ll just be like, "Spotify, you look like you’re an impossible app to inspect." But guess what? VisBug don’t care. VisBug overlays all your stuff, inspects all the typography. I made a light theme for... Oh, I have a tweet somewhere where I made a light theme of Spotify.

Adam: Oh, this was another use case, sorry, for prototyping color. I can create a light theme on the product itself without having to go mess with a bunch of sticker sheets, right? So there’s this important even mentality, I’d love VisBug to help folks get into which is, use your product as a playground. Use that as... It’s so real. It’s more real than your design comps are. So spend some more time in there. I think you’ll find that you can make more effective design decisions working on your actual product.

Drew: And the case of accessibility as well is particularly interesting, because often, particularly these days, we’re working very much in component libraries, and looking at small components of a page. And spending less time looking at all those integrated together to create the sort of views that a customer actually interacts with. And it gets really difficult to keep an eye on those sort of finer details like accessibility things, attributes, that aren’t visible on the page.

Drew: It’s very difficult to keep an eye on things that aren’t visible. So this is where tooling can really, really help to be able to inspect something and see that, yes, it’s got the correct roles on it and it’s-

Adam: It does. That’s the exact use case. I want a PM to be able to go verify this stuff. I want a designer to be able to go look at accessibility and not have to pop open the tools, find the DOM node, it’s all crunched up in the elements panel and looking weird. That it just says, "Here’s the area attributes, here’s the title if it exists." There’s also some other accessibility tools to. VisBug ships with the search icon. The search icon has multiple ways to interact with it.

Adam: So first it queries the page. So if you know the element type or the element class name that you want you can just search it, so you don’t have to find it with the mouse. But that also has slash commands in it. So there’s plugins in VisBug, and they’ll execute scripts on the page. So if you’ve ever had a bookmark that you’ve saved three or four... You’re like, "I’m going to use this one because it highlights all the borders and shows me my boxes." It’s like a debug trick or something.

Adam: It’s probably a VisBug plugin. So you launch VisBug, hit slash, and you’ll get autocomplete, and it’ll show you all the different plugins. And there’s some accessibility ones that are really nice that overlay errors, and various things like that. So I agree. Accessibility should be more accessible. That’s just lame to say. But it needs to be closer to the tool belt. And I think sometimes it’s too far away, and maybe that’s why it gets missed. So I’m hoping if it’s a little more up front, and center, and easier that it gets checked more. Yeah.

Drew: And it’s interesting you say that VisBug works with the sort of computed values of things, so like colors. So does that mean that if you have several layered elements that have different levels of opacity that you’d be able to measure the exact color that is being rendered on the screen rather than-

Adam: Ooh.

Drew: ... looking at the individual elements and trying to somehow work it out?

Adam: That’s a really good question. So I think, if I’m understanding the question right, which this is a classic difficulty in the front-end is, yeah, how do you know if you have a half opaque text word, what is its color over gray versus over white? And how do you know its contrast? Right now, we don’t know. So VisBug knows the color, and it’ll say, "50% gray," or whatever the color is that you have there. But it doesn’t know anything smarter than that. It’s not able to...

Adam: I think what you’d have to do in that case is create a canvas, paint all the layers on there, and then use an eyedropper or a... So you’d render it in canvas, make them all smashed together into a single painted layer, and then go pluck the single pixel value out to see what its actual end computed gray is after it’s been layered on the other stuff.

Adam: I think someone specced it, or maybe I have it as a GitHub issue that it would be nice. Because VisBug could facilitate this, 100%. VisBug, behind the scenes, I’ve already done with text metrics, where you hover on things and it gives you crazy rad information about the fonts. It’s almost too much info, like x height, and cap height, but it goes even more. And it’s like, "Ooh, I’m kind of turned off at a certain point." So I have to figure out how to find the signal versus noise there.

Adam: But yeah, I like this thought process, because we should have a tool that does that. And if we know how to compute it, we can teach VisBug to do it, and that would be a really cool feature to have, opacity relevant calculated color. Love it.

Drew: Yeah, I mean, it’s the sort of standard case of having text against a background where you’re not sure if the contrast is enough to pass the accessibility requirements. And perhaps it’s not, perhaps it’s too low contrast and you want to then tweak the values until you get it just to the point where the contrast is good, but it’s not drifted too far away from what the client initially wanted in terms of brand colors and things.

Adam: I call that bump, bump until you pass.

Drew: Yeah.

Adam: Because that’s what it feels like. I’m like, "Ooh, I’m a little short on the score." So it’s like, I’ll go to my HSL lightness and I’ll just bump, bump, bump, and watch the little numbers tick up until it’s like, "Ding," I got a green check mark. I’m like, "Okay, cool." And yeah, sometimes, some of that color is not cool. So, have you studied much of the 3.0 perceptual accessibility work that’s going on? So that we’ll no longer have AA or AAA, we’ll have on number and it includes things like font thinness. So if it’s a thin font it will get a lower score, if it’s a thick font it goes... Because there’s a lot that goes into contrast.

Drew: Yeah, no, I hadn’t seen any of that, but that sounds-

Adam: Anyway, it’s a really cool thing to explore.

Drew: That sounds fascinating, yes. I’ll have to find someone to talk to about that. That’s another episode. So, I mean, I’m sure some developers might argue that everything that VisBug is doing you can just do through the CSS panel in DevTools. And I think that’s sort of fair but probably misses the point, in that, yes, you are manipulating CSS when you’re making changes, but it’s putting a sort of designer-focused user interface on top rather than a developer-focused interface. Is that a fair characterization of it?

Adam: That’s a really fair one. And honestly, the best ideas graduate out of VisBug into DevTools. And they already have. So VisBug, if you hit command option C on any element it takes every computed style, at least that’s unique. Again, so it’s like, we’ll do ones that we’re not just going to give you all these inherited properties. But puts them all on your clipboard, and you can go paste that style somewhere else, in a style sheet, in a CodePen, and literally recreate the element in a couple clicks.

Adam: And those sort of interactions have made their way into DevTools, into that elements panel. There’s other things, though, that haven’t, which is, the DevTools is a single node inspection only tool. And VisBug follows the design tool mantra which is, no, I should be able to multiselect. I need to be able to bulk edit, bulk inspect. And so I use VisBug all the time for spacing. Because I can highlight multiple elements and see margin collapsing.

Adam: In DevTools you can’t ever see it, because you can only see one node at a time most of the time, although there’s way to show multiple margins, but it’s not the same. And so, yeah, it has these niche use cases that can be really fun like that. Another one is, if you highlight a... Let’s say you have a typography system and you have H1 through H7, like in a storybook or something like that, you can highlight all of them in VisBug, hold shift, just click all of them. Boop, boop, boop, boop, go to the typography tool and hit up or down, and it makes a relative change to each of them.

Adam: So each of them will nudge up one or down one. And that’s just not something that DevTools makes very easy. And so, yeah, it has some superpowers like that, because it’s a little more agnostic. And it’s prepared to always iterate on an array. Yeah.

Drew: So what was the origin of VisBug? And now is it just a personal project? Or is it a Google project? Or what’s the status of it?

Adam: Yeah. So first, status is, it is a Google project. Its primary goal is to be a place to prototype and explore before things go into DevTools. At least from the Google side of things. But from my personal side of things I still see it as a place to go bake in the common tasks, or to bake in some optimizations to get through common tasks. And just to give a wider audience a way to look into the DOM.

Adam: I really think that the DevTools is super powerful, but it’s very intimidating. Just one tab in it can take a career to learn. I’m still learning things in DevTools, and I use them all the time. And so yeah, this is kind of a different audience in some ways. It’s more of the beginners, the folks coming in, or maybe even folks like PMs, managers, that don’t ever intend to code but are interested in the output. And so it kind of gives them, yeah, just light tooling to get into there.

Drew: It’s an interesting point you bring up, because I personally often find that I struggle to find a comfortable workflow in managing all these sort of DevTools. And you’ve got all these little claustrophobic panels, and you can detach them into another window, but then you’re having to keep track of two different windows. And once you’ve got a few browser windows open you can’t... You focus one and you don’t know which DevTools belongs to it.

Drew: And then within the panels themselves, it’s kind of a sort of a bit of a Wild West of user interface conventions. You’ll scroll and things’ll start doing strange things that you didn’t expect. And in terms of user experience I feel like it’s all just a big mess.

Adam: It is. Yeah.

Drew: Do you think that’s unavoidable? Can it be better?

Adam: I definitely have thoughts here. And yeah, I think a good... So let’s say you have a listener right now that’s like, "I’m pretty savvy with the DevTools. I don’t think they’re that crazy." I’d say, "Okay, go open up Android Studio or Xcode. Begin a project, and go look at the DevTools, go look at the output. How familiar do you feel right now?" Probably very foreign. You’re looking at that going, "This is garbage. Why do they do this? Why is this panel over here?" And your mind starts to race with all these questions why and confusion.

Adam: And it’s like, well that’s how everyone feels the first time they open DevTools. So you got to really kind of be empathetic to that.

Drew: Is it inevitable that... Can we do better? Or is this just the sort of natural order of things?

Adam: So here’s my current take on this, is I think complexity is really easy to find yourself getting into. And DevTools is one of those things, they’re just naturally complex. There’s no good UI to facilitate a lot of these things. A lot of these things get built by devs. And I think devs building tools for devs is fine, because you’re going to have... If it’s the only way, or if it’s even if it’s a good way, you’re going to learn it, and you’ll get good at it, and you’ll get comfy with it.

Adam: And all DevTools are kind of weird, because they’re made for their weird use cases, right? Development is weird. Let’s just be honest. We make invisible cogs and invisible two by fours, and we build houses, basically, with invisible, virtual parts. So yeah, we need weird tools to go inspect these things, and to tell us what they’re outputting.

Adam: Now, that being said, what VisBug does, and what I’ve been kind of slowly moving things into DevTools as, is smaller tools that are more focused as opposed to a big tool that claims to do a lot. I think it’s hard for things to do a lot really well. And this is classic argument, right? This is all stars, specialists versus generalists. Neither are always going to be perfect.

Adam: But what VisBug is trying to do is, it has made specialists. So the guides tool just does guides. And that tool never leak into the other tools of the page. And so I’m trying to do that more with DevTools, where DevTools wants to help designers more, which is something VisBug has helped inspire DevTools to see. And the way that I keep introducing things is, instead of making a grid editor, for example, where you can... "Full power of grid in one overlay," right? "You can add tracks, remove tracks, blah, blah, blah."

Adam: And I’m like, "That sounds really cool and also really complex." I’m like, "Grid is crazy, there’s no way we’re going to build a GUI for that." So I’m like, "Why don’t we just handle grid template columns first, and the ability to manage the tracks in there, almost like they’re chips? What if we could just add, and edit, and delete them?" They’re much more physical and less of string. I’m like, "Well what we’ve done is, we’ve created a micro-experience that solves one problem really well and then doesn’t leak anywhere else, and it’s also really naïve. It’s a naïve tool."

Adam: So and a good example of that is the angel tool in DevTools. Have you seen that tool yet?

Drew: No, I haven’t.

Adam: Any angle... So this is, I’m calling these type components. So their CSS is typed, and the angle is a type, and many CSS properties will take a type value of angle. And what I was like... Well, angles, those are just a wheel like a clock. Why don’t we give someone a GUI so that if they click an angle they can change an angle and snap it to 45, snap it to 90, there’s common interactions with just this unit of angle.

Adam: And we made a tool for it. And it’s super cool. It looks great, the interaction is great, keyboard accessible the whole nine, and that’s an example where I think you can make small focused things that have big impact, but don’t necessarily solve some big problem. And yeah, you’ll have another tool like Webflow that’s trying to create entire design tool and facilitate all your CSS.

Adam: So, yeah, I don’t know the right answer, but I do know that an approachability factor comes in when things do less. And so it just kind of makes it a little easier. Like VisBug, you might only know three tools on it. You only use the guides, the margin tool, and then the accessibility inspect tool. Maybe you never use the move tool or the opposition tool. Just, yeah.

Drew: I mean, talking of design tools, we’ve seen a big rise in the last few years of tools. Things like Figma, which are great for originating new design work in the browser. Is there overlap there with what Figma is doing and what VisBug is trying to do?

Adam: There’s definitely overlap. I think they come at it from different directions. One of the things that I’m frustrated with Figma at is not something that VisBug could solve. And I think that design these days, even with the powerful tools and the Flexbox-like layouts that we have, I still think we start wrong when we draw a box on a canvas of a certain size. I’m like, "Sorry, that’s just not the web. You’re already not webby."

Adam: Nothing is very content-focused. If I just drop a paragraph into Figma, it gives it some default styles and I’m like, "Why doesn’t it do what the web does? Put it in one big long line." You’re like, "Contain it somehow," right? And so I don’t know. I think that Figma is empowering people to be expressive, limitless... What is the phrase I like to use? Yeah, okay, it’s expression-centric. That’s where I think VisBug and a lot of debug tooling is...

Adam: So yeah, one is empowering expression, and the other one is empowering inspection and augmentation. You need both, I think. I think that in one cycle of a product you’re in full expression. You need to not have any limiters. You need it to feel free, create something exciting, something unique. But then as your product evolves and as more teammates get added, and just the thing grows and solidifies, you’ll exit a phase of expression and into a phase of maintenance, and augmentation, and editing.

Adam: At which point your Figma files do two things, they get crusty, because your product is more... Well, it’s real. Your product has made changes, and design decisions, because it’s now in the medium. And so your file starts to look crusty. And then your file also just is constantly chasing production. And that’s just a pain in the butt. And so VisBug is sort of waiting. So in the expression phase VisBug’s like, "I can’t help you very much. I’m just sort of, I’m not that powerful at expression."

Adam: But then as you have a real product you can inspect it. And yeah, it can inspect anything. It has no limits. It goes into shadow DOM and everything. So yeah, I think they’re just different mentalities for different phases of products, yeah.

Drew: So in VisBug if you have made a whole lot of changes, maybe you’re sat with a client and you’ve tweaked some spacing, and you’ve changed some colors, and you’ve got it looking exactly how the client wants, they’re happy. They obviously now think that all the work has been done.

Adam: It’s done.

Drew: Which of course, it’s not. We understand that. But what is the path? What is the developer journey from that point to... I mean, I presume that it’s not practical to save or export, because there’s no way to map what you’re doing in the browser with those source files that originated that look. But what’s the journey? How do you save, or export, or is it, I guess, taking a screenshot? Or what do you do?

Adam: Yeah, there’s a couple paths here. And I want to reflect quickly on what we do in DevTools. So let’s say, DevTools, we made a bunch of changes, there is the changes tab in DevTools, I don’t think very many people know about it, which will surface your source file changes, and some other changes in there that you could go copy paste.

Adam: And yeah, this becomes a hard thing with all these tools that are editing code output, they don’t have any knowledge of source or authoring files. I mean, maybe they have source maps, but I think that’s a really interesting future. If we get to something where the calculated output could be mapped all the way back to the uncompiled source, that’d be really cool. But until then, VisBug does do similar to what you do in DevTools. Where you just copy paste the sort of pieces.

Adam: But I will share some fun ways to sort of make it even better. So one thing, let’s say you made a header change, color change, and a change over here. You can go to the inspect tool, and when you hover on something it will show you a delta. It’ll say, "Local modifications." And if you hold shift you can create multiple sticky pinned inspections. And so you’ll go to your header, you’ll click it, you’ll hold shift, click your other little box, and hold shift to click another little box. And now you have tool tips showing what you changed over the actual items in the page, take a screenshot, and ship it to a dev.

Adam: And they can sort of say, "Okay, I see you changed margin top to 20 pixels. I don’t use pixels or margin top in my CSS. So I’ll go ahead and change to margin block start two RAM, thank you and bye bye." And that’s kind of nice, is that the editor didn’t have to care or know about the system details, they just got to say something visually and screenshot it. So that workflow is nice. It’s pretty hands off and creates a static asset which is fine for a lot of changes.

Adam: But if you had a lot of changes and you really changed the page and you wanted to save it, there is another extension called... Let’s see. Page, single file. Single file will download the entire current page as a single file HTML element, at which point you could drag that right into Netlify and get yourself a hosted version of your prototype.

Adam: Because what VisBug does is, it writes its styles in line on the DOM notes themself. So save file comes with it all. And I’ve got a tweet where I went to GitHub and I made... I just totally tweaked the whole site, and it looked cool. And I was like, "All right, save file." And I saved it, opened it up in a new tab, just dragged it into the new tab and I was like, "Well this is really cool." Because VisBug’s been wanting a feature like this for a while. But it’s a whole other extension’s responsibility, is taking those third party assets, dealing with all the in line... And anyway, so it’s really nice that that exists.

Adam: And so you can deliver a file, if you want to, or host it somewhere, and share multiple links to multiple versions of production. You modified production and then shipped it into netlify, and someone can go inspect it, and it’s still responsive at that point too, right? At that point it’s not a static comp you’re sharing, it’s still the live, responsive... Anyway, it’s exciting. I mean, there’s a future here that’s, I think, really, really interesting and not far away.

Adam: It’s just like we’re a little still stuck, as designers, in our expression land. We’re just too happy expressing. And we’re dipping our toes into design systems, but even those I think are starting to get a little heavy for designers. And they’re like, "Ooh, maybe it’s too much system now." And like, "Ugh, I’m getting turned off. I liked making pretty stuff. And it’s a whole new job if you’re doing design ops," or whatever. So...

Drew: I like the fact that VisBug takes an approach of not being another DevTools panel, because the interface, it embeds a toolbar on top of your page just like a design toolbar. I guess that was a deliberate move to make it more familiar to people who are familiar with design tools.

Adam: Yep. If you’ve used Paint or Photoshop, they all come that way. And so it was the sort universal thing, that if I put a toolbar on the left that floated over your content, almost everyone’s going to be like, "Well I’ll go hover on these and see what my options are. And here’s my tools. And I get to go play." And it made a really nice, seamless interaction there. I do have a really exciting almost finished enhancement to this.

Adam: So, it’s so cool to me, but I don’t know if everyone else is going to be as excited. And this’ll be a mode that you can change in your extension settings, is how do you want to overlay the page? Because right now VisBug puts a toolbar right on the browser page, which the page is rendered normal, and I know this is going to be weird to say that, but okay, so you scroll the page, and the content, and the body is width to width in the browser, right? So it’s filling the little viewport.

Adam: I have a mod where, when you launch VisBug it takes the whole HTML document and shrinks it into an artboard. It looks like an artboard. It’s floating on a shadow on a gray space. You can infinitely pan around it. So you can scroll away from your page canvas, and what it lets you do is, see, let’s say you have a page that’s really long, and you want to measure something from the top to the bottom, well you can do that right now, but you’d kind of lose context as you go.

Adam: Well in this new VisBug zoom scenario, you hold option or alt on your keyboard, you use the mouse wheel, or you hit plus minus with your command and you can zoom your webpage as if it’s an artboard. And I try to make it as seamless as it is. So you’re going in and out, and you scroll down, you go in and out, measure from the... And VisBug just doesn’t care. It keeps drawing computed overlays, you can change spacing.

Adam: Because I think it’s really important, as a designer to see the bird’s eye of your page live. Animations are still playing, y’all. Scrollable areas are still scrollable, right? It’s really cool. You’re like, "My whole page in one view." Anyway, so it’s almost done. It’s in-

Drew: Sounds trippy.

Adam: It’s very trippy. And it’s in, I just need to make sure it works cross browser, because it’s doing some, obviously, some tricky things to make your live page feel that way. But yeah.

Drew: Amazing. Is it... I mean, I presume that VisBug is fairly regularly updated and is being progressed. What is it that we might expect to see in the future?

Adam: Yep, that’s definitely one of the features I’m working on there. I have a feature where... So, when you click something you get an overlay with what looks like handles, right? And it’s sort of an illusion, it’s supposed to make you feel comfortable. And the intent is to eventually have those handles be draggable. But I have some fundamental things I have to solve first, like elements in the browser don’t have a width. So if you just start grabbing the width I have to do work to make that illusion feel right.

Adam: And you might not even get the results you want, because it could be a block level element that you’re pulling the width smaller, and you’re not getting reflow of an item next to it. And you might be wondering why. So I have prototypes where you can drag corners, drag elements around. But I really need to focus on how the design tools are doing this. They always have this toggle button. And it’s like... See, what’s the toggle called?

Adam: But it’s basically like shrink... I call it shrink wrap. Shrink wrap my element, it’s the width of this element is the width of its content, versus here’s the width of my element, stick something in it. So I need something like that in the browser, overlayed on the element so that you could choose between these and maybe even something that let’s you choose between block and inline, so that you could get the results that you want.

Adam: But ultimately the goal here is that VisBug does not want to be entirely keyboard-driven. I want you to be able to drag spacing. If you see 12 margin spacing on top, you should be able to reach in and grab it, whereas right now you have to hit up on the keyboard to specify the top side of the box needs an addition of margin.

Adam: And so yeah, I have a couple of quirks to work out, in terms of strategy. But it’s very much a goal to make it even closer to design tools. And maybe even I will bend in that. It’s like, well, if you want to change the width and you’re going to get a weird design, there’s always ways to get out of it with VisBug, like the position tool really lets you escape the flow. So flow is ruining your idea, the position tool lets you escape.

Adam: And so there’s... If someone was to get really savvy with VisBug they would blow people’s minds, because it’s sort of unlimited, and it’s like, what can you bring to the table? It has an expression element to it. There is definitely expressive tactics. But anyway, so long story short is, the illusion is, I just want to make it smaller and smaller and smaller. I want the illusion to just be like, "Wow, I’m really feeling like a design tool."

Adam: And then, yeah, some enhancements to exporting would be nice. But also, enhancement to exporting for DevTools would be nice, and that doesn’t really stop us. So I don’t know. There’s a ton of issues, definitely go vote on them. I think one of the next big features I’d love to do is green lines. So instead of just showing accessibility overlays on hover to really indicate some things with green lines, and expose more, and surface more information, and I don’t know. Yeah.

Drew: Sort of thinking about the process of building a Chrome extension like this, I mean, presuming it’s all implemented in JavaScript, how much like regular web development is it? Building a Chrome extension.

Adam: That’s good question. It’s... Phew, this is hard one. It’s quirky. First off, the environment that you get to launch your code in isn’t the browser. They don’t really give you full access there. You can, if you really get tricky with it, which VisBug had to graduate into, this even trickier scenario. So right now, I used to execute in the... This is going to get so fuzzy so fast.

Adam: Because there’s multiple sandboxes for your extension, for privacy issues. And they make it hard to execute scripts on the actual page, right? Because you don’t want someone submitting your form when you launch the thing or something, submitting it to themselves or whatever. It could be really destructive. So it has some quirks like that. There’s a bridge you have to pass over. And one of them that’s been plaguing VisBug is, VisBug used to use...

Adam: So it’s all custom elements, and custom elements allow you to pass rich data to them as property. So you’re saying like, customelement.foo=myrichobject, full of arrays or whatever. And the custom element just gets that as some data on the node itself. But since I’m in this weird little sandbox world, if I try to set something unique like that on my object, essentially it’s filtered out. They’ve established that certain things can’t... So I can pass a string to my custom element, but I can’t pass it a rich object.

Adam: But yeah, other than little quirks like that, once you get the flow down, and if you spend the time to get a rollup scenario, which is going to be an hour or so of work so that you give LiveReload in your thing, it can become pretty natural. I think Firefox has, honestly, the best extension development experience if you’re savvy with the CLI you can spin something up with one command, and it installs it, gives you these LiveReload features, and gives you debugging tools. It kind of holds your hand through it, it can be really nice.

Adam: But ultimately, it’s a little quirky. That’s why I do a lot of the work on that demo site that looks like a bunch of artboards, because I don’t really need a real webpage most of the time, to do VisBug testing, as long as I’ve got artboards that simulate various issues, or have accessible things to look at, and sort of give me the content I need to see. I do a lot of the work right there in the browser as if it’s just a normal web application. So VisBug’s dev experience is really easy, unless you’re trying to test it across browser, and then it just gets kind of messy and whatever.

Drew: That’s really interesting insights. So I’ve been learning all about VisBug today, what have you been learning about lately, Adam?

Adam: I am still improving my wok skills. So I want to be a wok man, and I’m not talking the ’90s cassette player. I’m want to flip veggies and have them kind of catch fire a little bit in the air, cover them with some delicious spices, and just really sear up that garlic and make it crispy delicious. And then put it on a little bed of rice and slide it towards you and see what you think.

Adam: So I’m excited for summer right now, because that means I get to whip out the wok and get back into that fast-paced, hot cooking environment, and it’s really fun.

Drew: Amazing. That sounds delicious. If you, dear listener, would like to hear more from Adam you can follow him on Twitter where he’s @argyleinc, and find his personal website at nerdy.dev. If you want to give VisBug a try, you can find it in the Chrome Web Store, and you can try out the sandbox version at visbug.web.app. Thanks for joining us today Adam. Did you have any parting words.

Adam: No, you were really nice. This was really sweet. Thanks for having me on, I really appreciate it.

The Best Google Chrome Extensions

Best Google Chrome extensions

Here’s a list of my favorite extensions for Google Chrome that I depend on every day. These recommended extensions will improve your productivity and also enhance your overall web browsing experience.

The Best Extensions for Google Chrome

  • Vimium C — Browse the web, interact with web pages, navigate browser history using keyboard shortcuts. Inspired by Vim commands.
  • Fika - Read pages in a Kindle-style clean layout with beautiful typography while hiding the distracting parts.
  • PushBullet — Easily transfer web page links, text notes, or push photos and files from the computer to your phone and vice-versa.
  • OneTab — Save all your open tabs in a group and duplicate your session anytime later with a click.
  • Gmail Sender Icons - Quickly identify the sending domain of an email in Gmail without opening the message.
  • Bubble Cursor - The add-on makes it easy for you to click on links that are too small to select with your mouse or for typing inside input boxes.
  • Picture in Picture - Watch YouTube videos in an always-on-top floating window while you work on other tasks.
  • Zoho Annotator - A simple ad-free screenshot capture tool with a built-in editor for annotating images. Also integrates with Google Drive, OneDrive and Dropbox.
  • Loom - Record a screencast video with voice narration, include your webcam video and share instantly. Also see Screenity.
  • URL Render - Instead of clicking individual links on the Google search page, hover your mouse and instantly view the underlying page in a floating window.
  • Clipt - A universal clipboard for Android and desktop computers. Copy any text on your phone and instantly paste it on the desktop and vice-versa.
  • Hover Zoom - Hover your mouse over any thumbnail image on sites like Facebook and Amazon and the add-on will enlarge the image to its full size.
  • Quick Source Viewer - A better alternative to the native View Source option that displays both JS and CSS files in addition to HTML content.
  • Save To Drive - Right-click and save the current web page, or images on a page, to your Google Drive.
  • Google Input - Type text in any language of your choice using virtual keyboards, your handwriting and transliteration.
  • Google Dictionary - Use this add-on to view definitions of words and learn their correct pronunciation.
  • uBlacklist - Blocks specific sites and entire domains from appearing in your Google search results.
  • Gmail Notes - Attach sticky notes to your email message that are persistent and will show up the next time you open that same email inside Gmail.
  • Tab Notes - A minimalistic start page for Chrome that opens a simple notepad in each new tab where you can quickly jot down your todos and notes.
  • Simple ToDo - Replace the new tab page of your Chrome with an elegant todo list that requires no signup.
  • Ugly Email - Some emails contain a tracking pixel that notifies the sender when their emails are read. This add-on blocks the tracking attempts.
  • Stylebot - Change the appearance of any web page with CSS selectors, permanently hide elements on a page and the changes persist across browser sessions.
  • Webtime Tracker — Keep track of how you spend your time on individual websites and visualize your Internet usage through graphs.
  • Skip Search - An address bar shortcut for the I'm lucky command that directly takes you to the most relevant website for your search query.
  • Single File - Download the entire web page into a single HTML file. The associated CSS files, fonts and images are also saved in the file.
  • Go Incognito - Open the current tab of your browser in a new incognito tab, useful for browsing news websites are behind paywalls.
  • Feeder - An excellent RSS feed reader that is accessible from the Chrome toolbar and supports notifications for your favorite feeds.
  • Scribe - Create step-by-step guides and tutorials by recording steps and publish them as PDF guides.
  • Visbug - A must-have design tool for web developers that brings powerful editing capabilities to the browser.
  • Sitemod - Modify any website on the Internet through Chrome Dev Tools and create a permanent copy of the modified website with a unique, shareable URL.
  • iCloud Passwords - Access your Safari passwords that are saved inside iOS and Mac device from Chrome on Windows PCs.
  • Twitter Screenshots - Take beautiful, uncluttered screenshots of tweets with a click.
  • Black Menu - Create shortcuts to your favorite Google services and access your emails, calendar, videos and more in an easily accessible popup.

How to Use Notion with Gmail and Google Sheets using Apps Script

Notion, my absolute favorite tool for storing all sorts of things from web pages to code snippets to recipes, just got better. They’ve released a public API and thus it will be a lot easier for developers to read and write to their Notion workspace from external apps.

For instance, you can create a document in Google Docs and export it to Notion while staying inside Docs. Google Sheets users can pull pages from Notion database into their spreadsheet. Any new submissions in Google Forms can be directly saved to Notion and so on!

Save Gmail Messages in Notion

I have put together a Gmail add-on that makes it easy for you to save email messages, or any other text content, from Gmail to your Notion workspace with a click. Here’s how the app works.

Step 1: Connect Gmail to Notion

002815

Step 2: Allow Access to Notion pages - if you have multiple databases in your Notion workspace, you have an option to grant access to select databases and the rest will be inaccessible to the external app.

Authorize Notion

Step 3: Choose Email - open any email message in Gmail and you’ll have an option to edit the content of the email subject and body before sending the content to your Notion page. Please note that the app only supports plain text format at this time.

Send Email to Notion

Step 4: Open Notion - As soon as you hit the Send to Notion button, the content of the currently selected email message is added to your Notion database. You can click the All updates link in your Notion sidebar to view to recently added page.

Notion page

If you would like to try this Gmail to Notion app, please get in touch.

How to Use Notion with Google Apps Script

If you would to integrate your own Google add-on with Notion API, here’s a brief outline of the steps involved.

  1. Go to notion.so and click the Create New Integration button. You’ll be provided with a Client ID and Client Secret that you’ll need in a later step.

  2. Include the OAuth2 library in your Apps Script project and invoke the getRedirectUri method to get the OAuth2 redirect URL for the previous step.

const getNotionService = () => {
  return OAuth2.createService("Notion")
    .setAuthorizationBaseUrl("https://api.notion.com/v1/oauth/authorize")
    .setTokenUrl("https://api.notion.com/v1/oauth/token")
    .setClientId(CLIENT_ID)
    .setClientSecret(CLIENT_SECRET)
    .setCallbackFunction("authCallback")
    .setPropertyStore(PropertiesService.getUserProperties())
    .setCache(CacheService.getUserCache())
    .setTokenHeaders({
      Authorization: `Basic ${Utilities.base64Encode(
        `${CLIENT_ID}:${CLIENT_SECRET}`
      )}`,
    });
};

const authCallback = (request) => {
  const isAuthorized = getNotionService().handleCallback(request);
  return HtmlService.createHtmlOutput(
    isAuthorized ? "Success!" : "Access Denied!"
  );
};

const getRedirectUri = () => {
  console.log(OAuth2.getRedirectUri());
};
  1. Connect to Notion API - Make a Get HTTP request to the /vi/databases to fetch a list of all databases that the user has explicitly shared with authorized app.
function getDatabasesList() {
  var service = getNotionService();
  if (service.hasAccess()) {
    const url = "https://api.notion.com/v1/databases";
    const response = UrlFetchApp.fetch(url, {
      headers: {
        Authorization: `Bearer ${service.getAccessToken()}`,
        "Notion-Version": "2021-05-13",
      },
    });
    const { results = [] } = JSON.parse(response.getContentText());
    const databases = results
      .filter(({ object }) => object === "database")
      .map(({ id, title: [{ plain_text: title }] }) => ({ id, title }));
    console.log({ databases });
  } else {
    console.log("Please authorize access to Notion");
    console.log(service.getAuthorizationUrl());
  }
}

Gmail to Notion - Try the App

The Gmail to Notion app is in private beta. If you would like to use it with your Gmail or Google Workspace account, please get in touch for an invite.

Create React App with Multiple Entry Points

The Create React App frameworks lets you easily build single page applications but it doesn’t support multiple entry points. To give you an example, if a website outputs separate home pages for mobile and desktop clients, the pages could be sharing some common React components between them, and it may thus not be practical to build two completely separate React applications.

Also see: Bundle React App with Gulp

CRA doesn’t support multiple entry points but there are couple of ways to solve this problem.

Option 1 Eject from the Create React App using the npm run eject command and update the entry inside webpack.config.js file to include multiple entry points.

Option 2 Use an alternate build tool like Vite.js that includes support for multiple entry points out of the box.

Option 3 Use the rewired app - it lets you easily make changes and small tweaks to the default Webpack configuration without ejecting the app.

Option 4 Use REACT_APP environment variables to specify the target component and then use ES5 dynamic imports to load the corresponding app component as shown in this example.

React Multiple Entry Points

Multiple Entry Points for Create React App

If you intend to use the Create React App configuration without ejecting it, here’s a simple workaround that will help you define multiple entry points and the output will be bundle in separate folders.

Inside the src folder, create two components.

// ./src/Desktop.js
import React from "react";

const Desktop = () => {
  return <h1>For Desktop</h1>;
};

export default Desktop;
// ./src/Mobile.js
import React from "react";

const Mobile = () => {
  return <h1>For Mobile</h1>;
};

export default Mobile;

The default entry file index.js looks something like this:

import React from "react";
import ReactDOM from "react-dom";
import App from "./App";

ReactDOM.render(
  <React.StrictMode>
    <App />
  </React.StrictMode>,
  document.getElementById("root")
);

Next, edit your package.json file and add commands, one per build target.

"scripts": {
    "start": "react-scripts start",
    "build": "react-scripts build",
    "build:mobile": "cp src/Mobile.js src/App.js && npm run build && mv build build-mobile",
    "build:desktop": "cp src/Desktop.js src/App.js && npm run build && mv build build-desktop"
  }

Run npm run build:mobile when the build target is mobile or npm run build:desktop for the desktop entry point.

Google Sheets – Find Values in One Column that are Missing in Another Column

A small business maintains their staff roster in a simple Google Sheet - the column A of the sheet contains a list of all employee names and column B contains a list of employees who have been assigned to a project.

Items in column A that are not in column B

The immediate task is to identify staff members who are part of the organization but have not been assigned any project yet. In other words, the manager needs to figure out all employee names from column A who are not preset in column B.

There are two ways to solve this problem - visually and through formulas.

Using Visual Formatting

The first option would be to highlight cells in column A that are missing in column B.

Inside the Google Sheet, go to the Format menu and choose conditional formatting. Here select A2:A for the range field, choose Custom Formula from the Format Cells If dropdown and paste the formula:

=COUNTIF(B$2:B, A2)=0

The COUNTIF function will essentially count the occurrence of each item in Column A against the range of cells in Column B. If the count for an item in Column A is 0, it means that the cell value is not present in column B and the cell is highlighted with a different background color.

Visual Formatting - Missing Column Values

Find Missing Items in Another Column

The next approach uses Google Sheet formulas to create a list of items that are in Column A but missing in Column B.

We’ll make use of the FILTER function that, as the name suggests, returns only a filtered version of a range that meets a specific criteria. In our case, the criteria is similar to the one that we used in the visual formatting section.

Go to column C (or any blank column) and enter this formula in the first empty cell.

=FILTER(A2:A,ISNA(MATCH(A2:A,B2:B,0)))

Google Sheets MATCH function

The MATCH function returns the position of items in Column A in the range associated with Column B and it returns #N/A if the values is not found. When the result is used with ISNA, it returns true only when the match is not found.

Using Google Query Language

SQL geeks may also use the Google Query Language, we are used it with D3.js visualization, to print the list of names that are in Column B but not in Column B.

=QUERY(A2:A,
   "SELECT A WHERE A <> ''
    AND NOT A MATCHES '"&TEXTJOIN("|",TRUE,B2:B)&"'
    ORDER BY A")

missing values - Google Query

The matches operator in the where clause does a regex comparison and the order by clause in the query will automatically sort the output alphabetically.

How to Email Spreadsheets Automatically on a Recurring Schedule

The Email Spreadsheets add-on for Google Sheets will help you automate the reporting of spreadsheet data and dashboards by email. If you are an office worker who has been emailing spreadsheets to colleagues manually, this add-on will save you a ton of time. And because it runs on the Google Cloud, your spreadsheet reports will be delivered even while you are offline or on vacation.

With Email Spreadsheets, you can schedule reports and it will automatically send them by email on a recurring schedule. You can email entire workbooks, specific sheets inside a workbook or even range of cells. Watch the video to get started.

Email Google Sheets Automatically

Go to the Google add-on store and install Email Google Sheets. Next, open any Google Spreadsheet in your Google Drive, go to the Add-ons menu inside the sheet, choose Email Spreadsheets from the dropdown and then choose Rules to create your first scheduled email report.

You are presented with a 3-step wizard to help the email schedule of your spreadsheet report.

Step 1: Select Sheet Export Options

Google Sheet - Export Options

  1. Expand the “Select Sheets” dropdown and select one or more sheets that you would like to include in the email. Each sheet is attached as a separate file in the email but you can choose the “Merge all sheets” option to create a single file from all sheets in the workbook.
  2. Select the export format. You can choose between PDF, Excel (xlsx), OpenDocument or CSV formats. The “Email without Attachment” option can be used to embed a specific range of cells in the email body without including any sheet as an attachment.
  3. If you have selected PDF as the export format in step 2, you are presented with a few more options. For instance, you can change the paper orientation (Portrait or Landscape), the paper size or alter the print margins to fit more content on a page. You can choose to show gridlines, notes, sheet names and page numbers in the exported file.
  4. (optional) The Cell Range option lets you specify a range in A1 notation and only that range will be exported in the PDF file.

Tip: Use the Preview button to test how your exported files would be like with the various export options.

Step 2: Write the Email Template

Email Template with Dynamic Sheet Cell Values

Next, we create an email template that will be sent with your reports. You can specify one or email recipients in the TO, CC, or BCC fields. Multiple email addresses should be separated by a comma.

You can also specify dynamic email recipients based on cell values in the spreadsheet. For instance, if the email address of the recipient is specified in cell B2 of a sheet titled “Employee Shifts”, you can put {{Employee Shifts!B2}} in the To field, and the add-on will pull the dynamic value from the cell at the time of sending the email report.

These dynamic cell values enclosed inside double curly braces can be used inside any of the email fields including subject, email body, and the sender’s name.

The email body can include dynamic cell values as well as ranges that make it easy of you to send portions of the spreadsheet without sharing the full workbook. For instance, you can write {{Employee Wages!B2:F9}} to include only the specific range (B2:F9) from the Wages sheet. Internally, the add-on converts the range to an HTML table, retaining all the display formatting with CSS, and embed it into the email.

You can also include standard HTML tags like H1, IMG, A, B, EM and more to include images and rich formatting in your emails.

Tip: Use the Test Email button to send an email with the exported files before setting up the schedule.

C: Create the Email Schedule

Email Sheets Daily, Hourly, Weekly or Monthly

The Google Sheets add-on includes a scheduler to help you set up recurring schedules visually. You can send email hourly, daily, weekly, monthly or even on a yearly recurring basis.

It is also possible to setup advanced schedules like:

  • Send a recurring email on the last working day of the month.
  • Send email reports every alternate day and end the reporting after 15 days.
  • Set up a quarterly schedule and send email reports on the first Monday of the quarter.

That’s it. After specifying the schedule, hit the Save button and your email report will be scheduled.

If you would like to edit your current email report or schedule a new report, go the add ons menu again, choose Email Spreadsheets and Rules.

Download Email Sheets

Email Google Sheets - How it works?

The add-on is written in Google Apps Script. It uses the Google Sheets API to convert sheets to PDF files and uses the Gmail API for sending the converted files as attachments.