We spend so much time in our text editors, and every now and again we encounter those little frustrating issues that slow us down. Perhaps finding the right file takes too long, or finding a matching closing bracket becomes a long-winded adventure on its own.
Let’s fix all these annoyances for good. In this post, we look into useful VS Code extensions for front-end development, from fine productivity boosters to advanced debugging helpers.
Table of Contents
Below you’ll find quick jumps to specific extensions that you might need. Scroll down for a general overview. Or skip the table of contents.
- automate log messages
- bundle size
- code formatting
- code screenshots
- code snippets (React, Vue, TypeScript)
- custom snippets
- comments
- debugging
- DevTools
- file utils
- file tags and labels
- folder icons
- fonts for coding
- Git
- Git history
- highlight annotations
- highlight brackets and tags
- highlight harmful characters
- highlight indents
- highlight stacking contexts
- highlight workspaces
- IntelliCode
- onboarding
- open GitHub fast
- pets
- rapid JS/TS prototyping
- remote SSH access
- Sass compilation
- tips and tricks
Automating Log Messages
When it comes to log messages, the turbo-console-log extension has got your back. It automates the operation of writing meaningful log messages and inserts them automatically.

All you need to do is select the variable which you want to debug, press Ctrl + Alt + L, and the log message will be inserted in the next line. Keyboard shortcuts let you comment, uncomment, or delete all log messages from the current document.
Keeping Bundle Size Under Control
We all know that performance matters, but in practice, it can be quite a challenge not to lose it out of sight when you’re in the flow of writing code. To keep your bundle size under control, the Import Cost extension lets you immediately know if you’re importing a hefty package into your project.

Import Cost isn’t a bundle analysis tool but was built with the idea to help you find possible performance bottlenecks before you ship them to your users. To do so, it gives you instant feedback by displaying the size of an imported third-party library as you’re importing it, right next to your line of code. A handy little helper.
Code Formatting, Automated
When writing code, a lot of time goes into formatting. Prettier automates the task for you. It removes all original styling and ensures that the outputted code conforms to a consistent style.

Prettier parses your code and re-formats it with its own rules, taking the maximum line length into account and wrapping the code when necessary. You decide if you want to apply it to all languages or alternatively you can define the ones you prefer to format manually. Also a great solution for teams who struggle finding a common style guide.
Useful Code Snippets (React, Vue, TypeScript, jQuery)
Are you tired of typing the snippets you frequently need over and over again, always from scratch? Here are some handy little helpers to ease the job. For Vue, be sure to check out Sarah Drasner’s Vue.js VS Code Snippets extension. It was built for real-world use and focuses on developer ergonomics instead of cataloguing API definitions.
Burke Holland provides you with a collection of essential React snippets and commands that he selected from his day-to-day React use. And if you’re looking for Angular snippets, John Papa has got you covered. His extension adds snippets for Angular for TypeScript and HTML to your VS Code setup.

These two might also come in handy: The JavaScript code snippets extension by Charalampos Karypidis contains snippets in ES6 syntax and supports both JavaScript and TypeScript. And, last but not least, Don Jayamanne’s jQuery code snippets feature over 130 jQuery snippets. Once installed, just type jq to get a list of all of them.
Speaking of snippets: If you prefer a good snippets library over defining them yourself from scratch, these collections have got your back:
- Accessibility Snippets
- ES7 React/Redux/GraphQL/React-Native
- CSS
- CSS Grid
- HTML
- Node.js
- JavaScript (ES6)
- Angular 10
- Vue.js + TypeScript
- WordPress
- WordPress Gutenberg
- PHP
- PHP Tools
- Svelte
- TensorFlow
Write Your Own Code Snippets
There are a lot of code snippet plugins for different languages out there, but have you ever wondered how to define your own snippets in VS Code? Maurice Borgmeier summarized everything you need to know to get started.

Another great article on the topic comes from Rob O’Leary. He dives deeper into when and why to use snippets, takes a closer look at different types of snippets, how VS Code handles them, and, last but not least, how to write your own, of course.
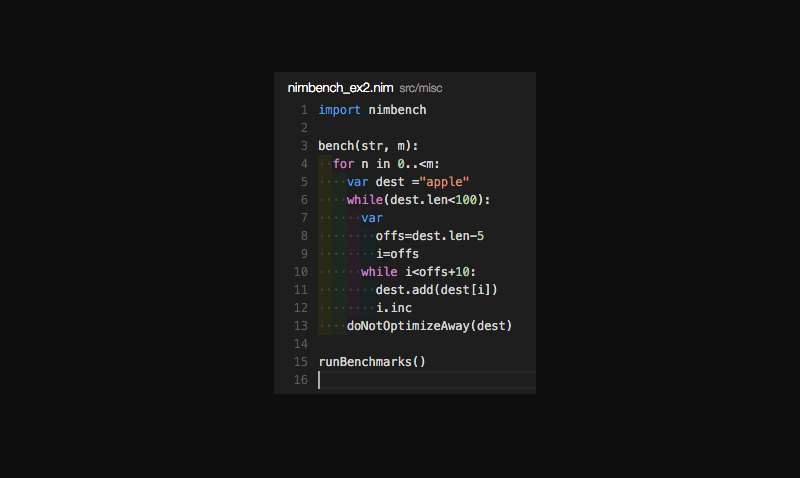
Code Screenshots, The Fancy Way
Let’s be honest, taking good-looking screenshots of code can be a challenge. Polacode is here to change that.

Described as "Polaroid for your code", Polacode lets you take and edit screenshots of your code directly in VS Code. You can resize the code’s container by dragging the corner and use commands to control the image appearance. A great solution to make the code you’ve spent so many hours on shine in the best light — in blog posts or presentations, for example.
Human-Friendly Comments
How do you handle comments? If your code requires a lot of explanations, it might be a good idea to make those usually grayed-out comments more human-friendly, so that it’s easier to see at a glance if a comment alerts you of a deprecated method, for example, or if it’s a todo your teammate left for you.

The VS Code extension Better Comments helps you do just that, categorizing annotations into alerts, queries, todos, highlights, and more. Commented-out code can also be styled to make it clear it shouldn’t be there.
Chrome Debugging Inside VS Code
Do you use Chrome and find yourself switching back and forth between the browser and your editor when debugging? Then you might want to give the VS Code Chrome debugger a try. It helps you debug client-side JavaScript code that runs in Chrome directly from VS Code.

The debugger connects to Chrome over its Chrome Debugger protocol where it maps files loaded in the browser to the files you have open in VS Code. So without leaving the editor, you can set breakpoints in your source code, set up variables to watch, and see the full call stack when debugging. A little tool to make your debugging routine more straightforward.
DevTools For VSCode Extension
Wouldn’t it be cool to have DevTools integrated into your code editor so that you don’t need to switch back and forth between the two? If you’re using VSCode and Edge, a small extension makes it possible.
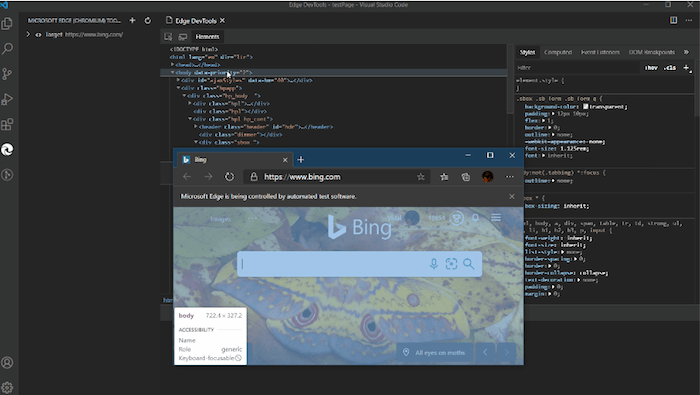
The extension shows the browser’s Elements and Network tool inside VSCode, giving you the ability to see the runtime HTML structure, alter styling and layout, perform diagnostics, and debug your project — without leaving the editor. By the way, Rachel Weil shared some handy DevTools tips for working with Chromium-based browsers like Edge and Chrome at SmashingConf San Francisco a few weeks ago. Be sure to tune into the recording to take your DevTools skills to the next level.
File Management Utils for VS Code
A lot of time is usually spent on organizing and managing files. File Utils makes the task more convenient.

The extension enables you to create, duplicate, move, rename, and delete files and directories with just a handful of commands. It also supports brace extension which automatically generates arbitrary strings strings to set up your document structure.
Adding Tags To Files In Your Editor
In large projects, finding one specific variant of a component, or just the right file requires you to know the file that you are actually looking for. But what if you could add bookmarks or labels to specific files, so you could find them faster?

File Ops VS Code Extension allows you to tag and alias files, and then quickly switch between them. You can also quickly list all tags just in case you lose track of them, view all files from the current directory and switch between .css and .js files in the same folder. You can also take a look at the video explaining how it all works. Now that will come in handy!
Folder Icons In VS Code
Custom file and folder icons in VS Code? Yes, please! To help you maneuver your workspace more easily, even if a lot of files and folder are involved, the VS Code Icons Team released an extension that brings icons to your editor. From “access” to “zip”, “Android” to “www”, the collection is sure to have the file and folder icons you need.

The project-specific icons toggle feature and project auto-detection will automatically detect the type of project you have opened in your workspace and prompt you to toggle the icons accordingly. It’s also possible to use custom icons, if you prefer.
Monospaced Fonts For Coding
Programming fonts are certainly the workhorses in typography. They need to offer great readability, enable quick text scanning, and prevent eye strain even when a developer looks at the code for hours. To help you find a programming font that meets your needs, Chris Coyier curates Coding Fonts, a selection of more than 30 (mostly free) monospaced fonts that all match this criteria.

To make the decision easier, each font comes with a short description, an overview of all characters, and HTML, CSS, and JavaScript code examples in both day and night mode. Mostafa Gaafar maintains a similar list of fonts for developers with the option to also view the code examples in different color schemes. To add custom fonts to VS Code, you’ll need to define the font in “Settings”.
Git Supercharged
A useful extension to supercharge the Git capabilities built into VS Code is GitLens. To better understand the code you’re working on, GitLens lets you glimpse into whom, why, and when a line or code block was changed.

The extension visualizes code authorships at a glance, helps you seamlessly navigate and explore Git repositories, gain valuable insights via comparison commands, and more. Everything you need to know about your codebase right at your fingertips, without leaving the editor.
Git History In VS Code
Viewing and searching git log along with the graph and details, viewing a previous copy of the file you’re working on, searching the history, comparing branches and commits — these are just a few of the features that the Git History extension offers to streamline your workflow.

Speaking of Git: Another VS Code extension worth taking a closer look at when working with Git is Git Graph: It lets you view a Git graph of your repository and easily perform Git actions from the graph.
Highlight Annotations In Your Code
Do you sometimes forget to review the to-dos you’ve added while coding? The TODO Highlight extension reminds you that there are notes or things that need your attention before you publish to production.

The keywords TODO and FIXME are preconfigured, but you can customize the configuration to your liking if you prefer. A command highlights the open comments for you right in your code or as a list of all annotations. A great little reminder.
Highlighting Matching Brackets And Tags
An intense coding session strains the eyes, so anything that helps cater for more visual clarity is a welcome helper. To take your syntax highlighting to the next level when working with VS Code, you might want to check out the Bracket Pair Colorizer. The extension identifies matching brackets — in colors you define.

Now that you’ve got full control over your brackets, another little detail to watch out for are matching opening and closing tags. VS Code does already come with a tag matching feature, but it is rather basic. The Highlight Matching Tag extension does the work more thoroughly, matching tags anywhere — from tag attributes to inside strings — and even highlighting the path from tag to tag in the status bar. Extensive styling options let you customize how tags are highlighted. HTML and JSX are officially supported.
Revealing Harmful Characters
Zero-width spaces and non-joiners, non-breaking spaces, left and right double quotation marks — when coding, some characters can be harmful because they are invisible or looking like legitimate ones. Gremlins Tracker finds them for you.

Gremlins Tracker uses a color scheme to alert you of harmful, potentially harmful, and less harmful characters. Lines that include such a character are marked with a Gremlins icon, and moving the cursor over the character gives you a hint of the potential issue. If you like, you can add new gremlins characters or override them for a specific language.
Highlighting Indentation
Indentation is key to ensure your code can be scanned quickly. A handy little plugin that makes indentations even more readable is Indent-Rainbow. It colorizes the indentation in front of your text alternating four different colors on each step and marking those lines where the indentation is not a multiple of the tab size.
While error highlighting is useful, there are instances where it might get in your way. When dealing with RegEx patterns, for example. Luckily, Indent-Rainbow lets you turn off error highlighting on those, just like on comment lines, and, if you like, you can even skip it for entire languages.
Visualizing Stacking Contexts
Do you have difficulties spotting stacking contexts when using z-index? You’re not alone! If you sometimes find yourself setting a z-index to a billion on an element and it’s not moving forward in your stacking order, CSS Stacking Contexts is for you.

The extension makes stacking contexts visible in CSS and SCSS so that you can confidently use small values when writing z-index declarations. Additionally, it will also tell you when a z-index declaration has no effect and offer quick fixes.
Custom Colors To Tell Workspaces Apart
If you frequently have multiple VS Code instances open and struggle to tell them apart, Peacock might be worth taking a closer look at: the extension subtly changes the color theme of your workspace.

But it’s not only when working on multiple projects at once where Peacock shines. It also comes in handy when using VS Live Share or VS Code’s Remote features and you quickly want to identify your editor.
IntelliSense: AI-Assisted Development Features
The IntelliCode extension provides AI-assisted development features for Python, TypeScript/JavaScript and Java developers in Visual Studio Code, with insights based on understanding your code context combined with machine learning.

Providing AI-assisted IntelliSense, the extension shows you recommended auto-completion items for your code context at the top of the completions list. When it comes to overloads, it doesn’t cycle through the alphabetical list of member but presents you the most relevant one first. No more hunting through the list yourself.
Recording Guided Onboarding For Your Codebase
A large codebase can feel intimidating. CodeTour attempts to change that. The extension allows you to record and play back guided walkthroughs of your codebases, directly within the editor. Think of it as a table of contents that makes it easier to onboard or re-board to new project or feature area, to visualize bug reports, or understand the context of a code review.

To create a code tour, you can annotate lines of code (Markdown is supported) and navigate as many files as you need, and the recorder captures the sequence. The tours can be checked into a repo or exported to a “tour” file so that anyone can replay it without having to clone any code. Handy!
From GitHub To VS Code, In One Second
Once you’ve discovered a snippet of code on GitHub, what if you want to start working with it in your project immediately? Instead of cloning the repo and finding that file that you need, you can use Github1s. Just add 1s after github in the URL, press Enter, and the repo, or a single file, will open straight in VS Code.

You can also use a bookmarklet to quickly switch between github.com and github1s.com, access private repositories and there are plenty of browser extensions that are listed on the project page as well. If you need an alternative, Gitpod is a slightly more advanced option, which also allows you to start an online development environment, run parallel workspaces and work on the codebase collaboratively.
Pets For Your VS Code
Ever wanted to pep up your VS code editor? Well, how about adding a cat, dog, snake, rubber duck or even good ol’ Clippy? All you need to do is install vscode-pets and run the vscode-pets.start command in order to see the panel. Once you’ve chosen a pet, its fur color and size, lean back and watch them interact with you!
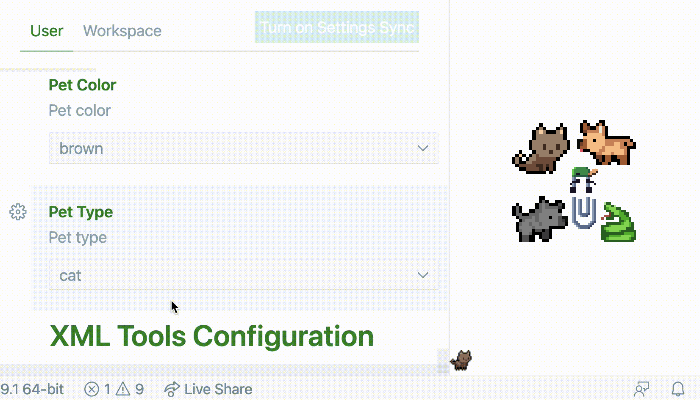
From throwing a ball and playing catch with your pet (run vscode-pets.throw-ball) to adding additional pets (run vscode-pets.spawn-pet), you’re coding workflow is bound to be anything but boring! The creator, Anthony Shaw, is open for ideas and discussion and welcomes feedback anytime.
Speed Up JavaScript / TypeScript Prototyping
If you’re looking for a way to speed up your JavaScript prototyping process, Quokka is for you. The rapid prototyping playground lives in your editor and gives prototyping, learning, and testing JavaScript and TypeScript a speed boost.

Runtime values are updated and displayed in your IDE next to your code, as you type. To get you up and running right away, there’s no config required, all you need to do to start experimenting is opening a new Quokka file. Happy prototyping!
Use A Remote Machine As Your Dev Environment
There’s a variety of reasons why you might want to use a remote machine with an SSH server as a development environment. Because you need faster or more specialized hardware than your local machine, for example, or to debug an application running somewhere else, such as a customer site or an application in the cloud. To simplify development and troubleshooting, the Remote - SSH extension helps you do just that.
The extension runs commands and other extensions directly on the remote machine, so you won’t need any source code on your machine. Instead, you can open any folder on the remote machine and work with it just as you normally would, taking full advantage of VS Code’s full feature set. Handy!
Compile Sass In Real Time
A real-time Sass compiler with live browser reload? Live Sass extension has got you covered. It helps you compile/transpile your SASS/SCSS files to CSS files in real time.
Features include customizing the file location of the exported CSS as well as its style and extension name, there’s a quick status bar control, you can exclude specific folders in the settings, and autoprefix is supported, too.
Tips And Tricks Nobody Bothered To Tell You
Are you really making full use of the powerful features VS Code has to offer? Burke Holland and Sarah Drasner claim you don’t, so to change that, they share all the best things about VS Code that nobody ever bothered to tell you.
From automatically updating HTML img tags with the correct size of the image to using font ligatures for better readability when coding or log points to log information out from your application, “VS Code Can Do That?!” features 36 valuable tips that’ll make your workflow even more efficient.
Wrapping Up
There are literally hundreds of VS Code extensions out there, and we hope that some of the ones listed here will prove to be useful in your day-to-day work — and most importantly help you avoid some time-consuming, routine tasks. Happy coding, everyone!