Something revolutionary happened in 2005: Google launched its sitemap protocol. It soon became one of the first things every website …
WordPress Sitemap Beginner’s Guide Read More »
The post WordPress Sitemap Beginner’s Guide appeared first on .

Tips, Expertise, Articles and Advice from the Pro's for Your Website or Blog to Succeed
Something revolutionary happened in 2005: Google launched its sitemap protocol. It soon became one of the first things every website …
WordPress Sitemap Beginner’s Guide Read More »
The post WordPress Sitemap Beginner’s Guide appeared first on .
As the world’s most popular CMS, WordPress websites are a vulnerable target for hackers and scammers worldwide. Don’t assume your …
WordPress Security Beginner’s Guide Read More »
The post WordPress Security Beginner’s Guide appeared first on .
Slow loading times and poor site performance are the downfalls of websites. They lead to bounces, page abandonment, and kill …
WordPress Performance Speed Beginner’s Guide Read More »
The post WordPress Performance Speed Beginner’s Guide appeared first on .
Every website needs to prioritize performance. When visitors land on a web page, they expect instant load times and a …
Optimize Website Beginner’s Guide Read More »
The post Optimize Website Beginner’s Guide appeared first on .
Ideally, you want to pick a reliable web hosting provider, so you don’t have to move your website. But it’s …
How to Move WordPress to a New Host or Server in 6 Simple Steps Read More »
The post How to Move WordPress to a New Host or Server in 6 Simple Steps appeared first on .
Do you want to learn how to display full-size images in WordPress?
The latest version of WordPress automatically resizes large images to improve performance. But sometimes you may need to display images with larger dimensions.
In this tutorial, we’ll share four different ways to display full-size images on your WordPress site.

Earlier versions of WordPress allowed users to upload images with very large dimensions.
But, what happened is WordPress beginners were uploading images that were simply too large for the modern web. Large images lead to slow website loading speeds and poor performance.
To fix this issue, the WordPress 5.3 update changed how WordPress handles very large images.
For example, if you upload an image with the dimensions of 5000px by 7000px, then WordPress will resize the image to 2560px and scale the width to match the original dimensions.
Now, when a user visits a page with a previously large image, they’ll see the scaled-down version of that image.
This leads to improved website performance and happier users overall.
This new feature is useful for most WordPress website owners, but some users might need to display full-size images.
For example, if you’re a photographer or artist who sells your work, then you may want to display larger images on your website, so visitors can buy or download them.
Or, you could be running a website where larger images are a requirement, like a stock photo website or website that sells custom prints and pictures.
Maybe, you need one large image for your home page background image that’s bigger than the 2560px limits?
No matter what your reason for wanting a full-size image, we’ll show you how to do it, step by step.
There are 4 different ways you can display full-size images in WordPress.
Some methods work better for single images, while others are best for an entire image library.
You’ll want to choose the full-size image method that’s right for your goals.
If you only want to use one or two large images on your website, then this solution is probably best.
When you upload an image to WordPress that exceeds the dimensions, WordPress will scale your image and create a new one. But, the original image is still intact.
To display the original image dimensions, you’ll need to delete ‘-scaled’ from the end of the WordPress image URL and insert the image into your site with the modified link.
Simply head over to your media library by going to Media » Library and select your large image.
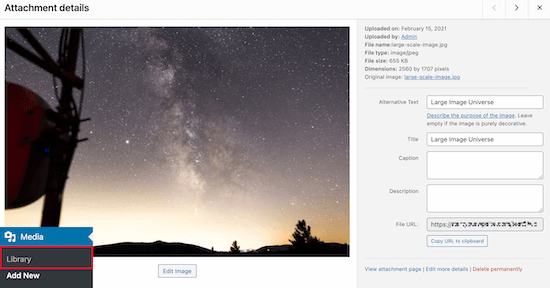
Now, locate your ‘File URL’ in the image box.
Next, you’ll want to delete ‘-scaled’ from the end of your image URL.

After that, you can copy the image URL and insert the image into your website.
Note that you’ll need to embed the image into your site using the link, minus the scaled portion.
To do this navigate to a post or page you want to add the image and click the ‘+’ icon to add a new block.
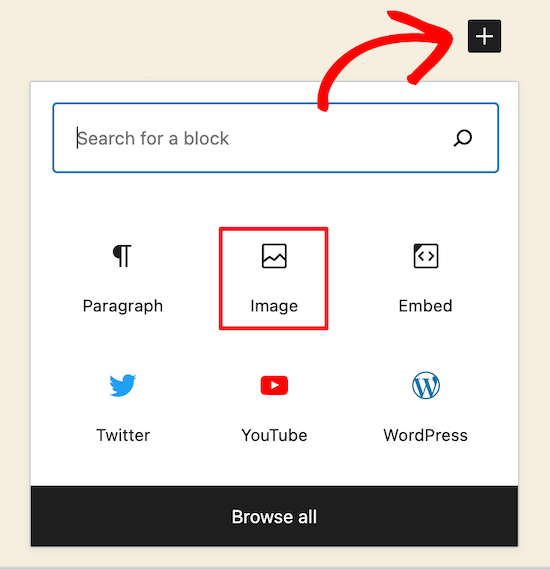
Then click the ‘Image’ icon to add an image block where you can paste your URL.
Click ‘Insert from URL’, then paste your full size image URL into the box and press the ‘Enter’.
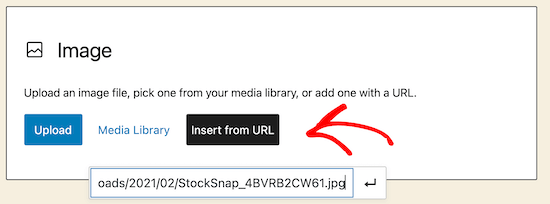
After that, you’ll need to click ‘Publish’, or ‘Update’, if the post is already live, and your full-size image will now be viewable on your site.
You can follow this same process for every full-size image you want to add to your site. But, as long as you use the File URL minus ‘scaled,’ your WordPress images will display in full size.
The second method is using a WordPress plugin to disable image scaling across your site.
The plugin we recommend is called Disable “BIG Image” Threshold. This plugin offers one of the easiest workarounds for displaying big images on your site, and it’s entirely free to use.
First, you’ll need to install and activate the Disable “BIG Image” Threshold plugin. For more details on installing a plugin, see our step by step guide on how to install a WordPress plugin.
Once you’ve installed and activated the plugin on your site, it’ll automatically remove the big image threshold added by WordPress.
You’re free to add new images just as you were before the WordPress image update.
When this plugin is active, WordPress will not add the ‘-scaled’ attribute to any image.
Another option is to add a code snippet to WordPress that accomplishes the same goal as the plugin above.
If the plugin doesn’t work for some reason, or you don’t want to install too many plugins, then you can use this method.
The new WordPress image scaling feature uses a filter called big_image_size_threshold.
You’ll want to use the following code to disable this function:
add_filter( 'big_image_size_threshold', '__return_false' );
You need add this code in your theme’s functions.php file, in a site-specific plugin, or by using the Code snippets plugin.
The final option is to add a full-size image lightbox to your site. With this solution, you get the best of both world.
You can load smaller image thumbnails in your blog content, gallery, or carousel, and when clicked, it will popup with your full-size image.

To do this, we recommend using the Envira Gallery plugin. It’s the best WordPress image gallery plugin in the market and lets you easily add the lightbox popup image effect.
The first thing you’ll need to do is install the Envira Gallery plugin. For more details, see our step by step guide on how to install a WordPress plugin.
After installing and activating the plugin, see our step by step guide on creating an image gallery in WordPress with the lightbox effect.
Keep in mind that before you upload full-size images for your gallery, you’ll need to disable image scaling via the plugin or child theme methods above.
Otherwise, your lightbox images will be using the scaled-down version of the image.
Finally, it’s important to note that if you add images with large dimensions, it’s essential to optimize them for the web, so you don’t slow down your website.
We hope this article has helped you display full-size images in WordPress. You may want to see our guide on optimizing images for SEO and our expert pick of 40 useful tools to manage and grow your blog.
If you liked this article, then please subscribe to our YouTube Channel for WordPress video tutorials. You can also find us on Twitter and Facebook.
The post How to Display Full Size Images in WordPress (4 Methods) appeared first on WPBeginner.
Are you looking for great tips, tutorials, and hacks from experienced web developers to take your skills to the next level and help you solve client problems faster? Well, so are we! That’s why we are launching The BLOG XCHANGE!

tl;dr – The Blog XChange is a new initiative for WPMU DEV members aimed at providing better engagement with our member community by focusing on the content that matters most to you. Help us to help you and we’ll reward you with Hero points and links to your site.
Here at WPMU DEV’s secret content lab, we are always searching for new blog content ideas.
You would think that hiring the most brilliant writers in the WordPress universe would result in endless blog content, but alas, this isn’t so.
Which is ironic, I know, given that one of us is the author of a best ok-selling book called “Infinite Content Creation (How to Never Run out of Content Ideas for Your Blog).”
The WPMU DEV blog, however, is a different beast. We don’t publish fluffy filler content about WordPress. We know that our audience (yes, YOU!!) would never stand for it.
We know that you expect us to write articles and tutorials with substance. Beefy content (or tofurkey if you prefer non-meaty adjectives) that you can apply in your business to improve not only your skills but also solve real challenges for your clients and deliver them better and faster websites that will help them get results.

Writing blog content targeted to your needs requires us to spend a lot of time researching previous post comments, scouring our members’ forum, analyzing analytics, doing keyword research, peeking into our competitors’ sites, reading through tons of industry newsletters, etc.
Sometimes, we come near, but near just isn’t close enough.
We want to post content on our blog that reflects who you are, what you do, and how you solve everyday challenges in your business working at the coalface and deep in the trenches.
Since we can’t be you (somebody’s gotta write the blog, right?) we came up with an ingenious idea:
“Why not tap into your knowledge and experiences as a WordPress web developer and reward you for all contributions you make to our blog?”
When we recently floated the suggestion to create an area where members could exchange their knowledge for hero points and links to their sites, we received overwhelmingly positive feedback and support from our members…“provided it’s a fair trade,” said all of you in unison.
We know you’re busy running a business and that you pay us to serve you, so we don’t expect you to give us something for nothing.
We’re all about fair trading here at the DEV…(you’re probably not even aware of this, but did you know that you can now get hero points just for commenting on our blog posts?)
Hence, Blog XChange (and not Blog XPloitation!)
By sharing your knowledge and experiences on the Blog XChange, you will be helping other members and helping us too! In return, we will reward you for your contributions with loads of hero points and, if we use your content on our blog, with links to help promote your business.

In this post, I’ll briefly tell you how it works and how to get started if you’d like to contribute. For full details, including guidelines for posting content and exactly how we will reward you for your contributions, see the pinned post inside the Blog XChange. (Check it out…it’s now live in your Member’s Area!)
First off, we’re not looking for Pulitzer-prize-winning authors. You don’t have to submit polished prose or perfectly-presented publish-ready posts…we’ll take care of that.
What we’re looking for is a good ‘chunky’ piece of content that comes from your experience as a WordPress web developer, website builder, digital agency, tech support services provider, etc.
In your own words, tell us about a problem you have solved or a solution, fix, or hack you discovered that improved some Aspect of your or your client’s website or business.
Test and compare different plugins you are currently using against ours and share your results.
If you like, also feel free to share code snippets, screenshots, links to your favorite time-saving tools and resources, etc.
Preferably, it would be ideal if the content you share on the Blog XChange includes using our plugins or services (you’ll get extra points for that!) but it’s not a requirement.
Every contribution you make on the Blog XChange will earn you points. After all, just by posting it, you are helping other members.

What the blog team will do, is regularly scan the contributions posted on the Blog XChange. We will then reward you for anything we use on the blog. This includes quotable sentences, paragraphs, or sections of text, code snippets, mini-tutorials, video reviews,…even links to great tutorials published on your own sites, or a great headline idea for a new post will earn you a point.
In some cases, we may contact you to discuss publishing a full-blown article, tutorial, or case study. This is exactly what happened when one of our members posted a comment on one of our discussions. We then created a case study and promoted her business throughout the post…so, win-win!
Obviously, there are some things we will not publish, like content designed to promote affiliate links or hyped-up self-promotional stuff…basically we’ll apply the same editorial guidelines and criteria to whatever you submit that we ourselves use to ensure that we maintain our blog to the highest standards.
Contributing content to the Blog XChange is super easy. Any WPMU DEV member can do it.
As soon as you get an idea for a post, head on over to the Members section and click on the Blog XChange link (or click here to go there now.)

Click ‘Start Discussion’.

Enter the title of your post in the ‘Subject’ field (it doesn’t have to be a snazzy title or an SEO-optimized headline…just tell us what it’s about!)
Under ‘Topic’ select ‘Blog XChange’.
Type or paste in your content in the ‘Discussion’ field. Feel free to use the formatting, quotation, and hyperlink tools too!)
If you’d like to keep track of any discussions on your thread, check the ‘Notify me by Email’ box.
Click the Post button to submit your contribution.

Your contribution is now added to the Blog XChange. If you need to make any adjustments to your post, just click on the Edit link.

That’s it! you’re all done.
Thank you! Hero points coming right up…check your sidebar!
We’ll get in touch with you if we use your content on our blog (e.g. to confirm the URL we’ll be linking to) and to discuss things further if we have any questions.

As web developers and WordPress service providers, you know the challenges that you and your clients face every day. Better still, you know how good it feels to solve these challenges and come up with better, faster, more efficient ways to get things done.
By sharing your knowledge and experiences with us, you’ll be helping us write the exact content you’d like to see on our blog, helping other members, and helping yourself too!
As Winston Churchill famously never stated…
“To improve is to XChange; to be perfect is to XChange often.”
We look forward to seeing your contributions and to working more closely with you to benefit our valued members and help improve your businesses.
See you at the Blog XChange!
Not sure if this is the right forum to post this. We are looking to improve the speed of our custom website to rank higher on google. Can anyone guide us on how this could be done?
Do you want to easily disable the admin bar in WordPress?
By default, you can easily disable the WordPress admin bar for any user from the dashboard. But this method can take time if you have a lot of registered users on your site.
In this article, we’ll show you how to disable the WordPress admin bar for all users except administrators.
By default, WordPress displays an admin bar on the top for all logged-in users. This toolbar is visible in the WordPress admin area as well as all other pages when you are logged in.
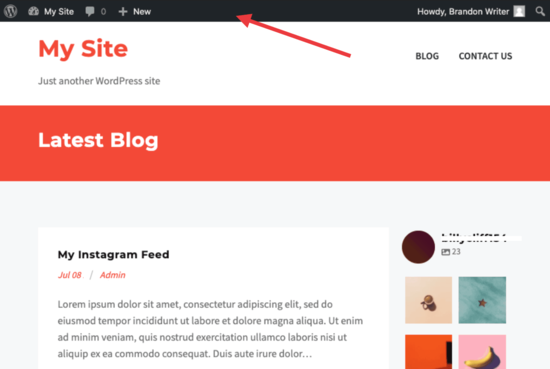
The WordPress admin toolbar contains useful shortcuts to different WordPress sections. The shortcuts available in the admin bar change based on a users’ role and permissions in WordPress.
However, when viewing the public pages on the front-end of your website, the admin bar can be a bit distracting. It may also affect your website’s design and user experience.
Luckily, there are multiple ways to easily disable the WordPress admin bar for all users except administrators.
WordPress allows each user to disable the admin bar by simply editing their user profile. As a site owner, you can also edit other user’s profiles and disable the admin bar for them.
If you want to disable the admin bar for any particular user in WordPress, you’ll need to edit their user profile.
Simply go to the Users » All Users page and then click on the ‘edit’ link for any user you want to disable the admin bar for.

This will bring you to the user profile editor page. From here, uncheck the box next to the ‘Show toolbar when viewing site’ option.

Scroll down and click the ‘Update User’ button to save your changes.
This will disable the admin bar for that particular user when they visit the website.
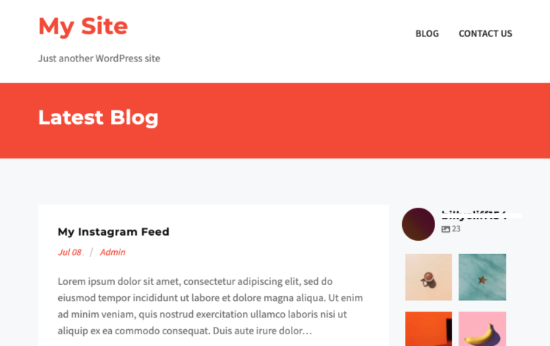
If you have a handful of users, then you can go ahead and manually disable the admin bar for all of them. However, if you run a membership site with a lot of users, then this method wouldn’t work.
Luckily, there are other ways to quickly disable the admin bar for all users except administrators.
This method allows you to quickly disable the WordPress admin for all users.
First, you need to install and activate the Hide Admin Bar Based on User Roles plugin. For more details, see our step by step guide on how to install a WordPress plugin.
Upon activation, go to the Settings » Hide Admin Bar Settings page. From here, check the boxes next to the user roles where you want to disable the admin bar.
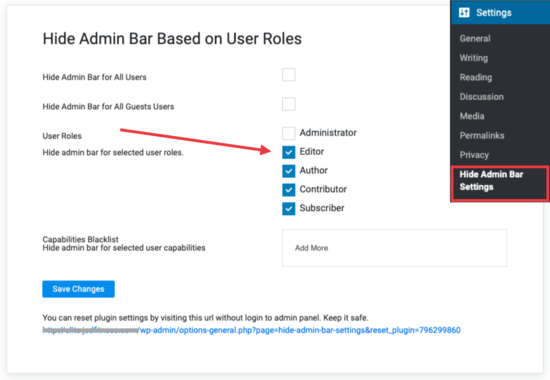
Don’t forget to click on the ‘Save Changes’ button to store your settings.
This method requires you to add code to your WordPress theme files. If you have not done this before, then check out our guide on how to copy and paste code snippets in WordPress.
Simply add the following code to your theme’s functions.php file or a site-specific plugin.
add_action('after_setup_theme', 'remove_admin_bar');
function remove_admin_bar() {
if (!current_user_can('administrator') && !is_admin()) {
  show_admin_bar(false);
}
}
This code checks if the current user is not an administrator, and they are not viewing the admin dashboard. If both conditions match, then it will disable the WordPress admin bar.
Don’t forget to save your changes and check your website to make sure everything is working fine.
What if you wanted to disable the admin bar for all users including yourself and any other administrator on your site?
You can do this by modifying the code we showed earlier.
Simply add the following code to your theme’s functions.php file or a site-specific plugin.
/* Disable WordPress Admin Bar for all users */
add_filter( 'show_admin_bar', '__return_false' );
This code will disable the admin bar for all users when viewing the public pages of your website. All users will still be able to see the toolbar inside the WordPress admin dashboard.
We hope this article helped you learn how to disable the WordPress admin bar for all users except administrators. You may also want to see our ultimate WordPress security guide and our comparison of the best WordPress page builder for creating custom page layouts without any code.
If you liked this article, then please subscribe to our YouTube Channel for WordPress video tutorials. You can also find us on Twitter and Facebook.
The post How to Disable WordPress Admin Bar for All Users Except Administrators appeared first on WPBeginner.
Security needs to be a top priority for every website. From small personal blogs to global ecommerce sites, added security builds trust with visitors and boosts search rankings.
If you’re looking for a quick and easy way to secure your website, start with an SSL certificate.
What is an SSL certificate? SSL stands for “secure sockets layer.” It’s an internet protocol that secures the data transfer between a website and the visitor’s web browser. SSLs are typically used to protect login credentials, credit card data, and other sensitive information.
Generally speaking, SSL certificates can cost anywhere from $50 to $200 per year. But there’s no reason to pay those prices.
As someone who has owned and managed dozens of sites throughout my career, I’ll show you how to get an SSL for free.
The best way to get a free SSL certificate is by signing up for a web hosting plan from Bluehost. All of their hosting packages come with a free SSL, and the entire process can be completed in just three simple steps:
For the most part, getting an SSL certificate is easy. Many web hosting providers include a free SSL certificate with hosting plans. You need to get web hosting regardless, so it makes sense to get a hosting plan and SSL all from the same provider.
In many cases, you won’t even need to select the SSL certificate as an add-on. The certificate will automatically be bundled within the hosting plan.
You can get an SSL certificate for free with entry-level web hosting. Most new websites choose shared web hosting. These plans are cheap and have enough resources to accommodate brand new sites. Even with these low-cost hosting packages, you can still get an SSL certificate for free.
There is no shortage of reputable web hosting providers on the market today. So, you won’t have to dig too hard to find one that will provide you with a free SSL. I’ll show you my favorite option shortly (Bluehost).
Getting an SSL certificate for free involves a few extra steps. It’s not a one-click process.
New website owners need to buy a domain and find a web hosting provider before they can consider getting an SSL certificate. Choosing a CMS (content management system) or site builder is something else that you’ll have to ponder. Some of these extra steps will cost money. And web hosting isn’t free, so you’ll still have to pay something.
But just because you have an SSL certificate doesn’t necessarily mean that it’s activated. So, there might be an additional step or two for enabling your SSL. Once installed, it could still take a few hours to activate.
Starting a website without an SSL certificate is a bad idea. Besides exposing your visitors to potential threats and hackers, some web browsers go out of the way to inform people that the site isn’t secure.

If people see this next to your URL, it makes them nervous and causes them to leave your site.
Personally, I always try to avoid unsecured websites. I’m not alone in this thought process. In fact, 50.8% of people immediately leave a website when they see a “not secure” notice. An additional 23.8% of visitors say they won’t share any personal details on these sites.
Bluehost is arguably the most reputable and reliable web hosting provider on the market today. It’s an easy and affordable way for new websites to get a hosting plan and SSL certificate.
I like Bluehost because it’s essentially an all-in-one solution for new website needs. All hosting packages come with a free SSL certificate and a free domain.

They have hosting solutions for everyone. Whether you’re looking for a cheap entry-level plan, managed solution, WordPress hosting, or web hosting for an ecommerce site, Bluehost has you covered.
Before we dive into the free SSL, take a minute to assess your hosting needs. This will make the process much smoother as you continue through the tutorial. Here’s a brief overview of Bluehost’s hosting solutions, which will help you determine the best option for your website.
For new websites, shared hosting will be the best option. These plans are cheap but still accommodate the needs of low-traffic sites.
You’ll be sharing server resources with other websites, which can potentially cause slower loading times and performance issues. But that’s fine for most new sites, especially for smaller sites and personal blogs.
If you’re not expecting a ton of website visitors for the foreseeable future, there’s really no reason to break the bank and choose anything more advanced than a shared hosting plan.
In addition to a free SSL certificate, all of Bluehost’s shared plans also come with a free CDN and free domain for one year.
Bluehost’s VPS (virtual private server) plans are designed for sites that want better performance. This is a step above shared hosting and comes at a higher price point as well.
VPS hosting provides guaranteed resources to your site. While you’ll technically still be sharing a server with other websites, you’ll have dedicated resources on your “virtual” server.
For sites expecting higher volumes of traffic out of the gate, VPS hosting is a viable option. Advanced users will benefit from features like optional root access as well.
Dedicated hosting is the top of the line in web hosting. You can rent an entire server just for your website and won’t have to share it with anyone else.
These packages come with premium performance, but for a premium price.
The vast majority of you won’t need a dedicated hosting plan, so I won’t spend too much time explaining how this works. But generally speaking, these are reserved for high-traffic sites or for people who want complete control over their hosting environment.
Bluehost has hosting plans that come with an automatic WordPress installation. This is one of only three web hosting providers explicitly recommended by WordPress, so these plans are extremely popular.
They also offer fully managed WordPress hosting, a viable option for growing websites with higher traffic volumes. Even the entry-level managed hosting plan can accommodate up to 50,000 visitors per month.
Additionally, Bluehost has ecommerce plans optimized for WooCommerce. So, if you’re planning to run an online store via WordPress with the WooCommerce plugin, these plans will be perfect for you.
Now that you understand the different hosting options offered by Bluehost, it’s time to select a plan that’s right for you. For the purposes of this tutorial, I’ll go with a shared hosting plan since most of you will likely fall into that same boat.
Here’s a quick overview of the shared packages:
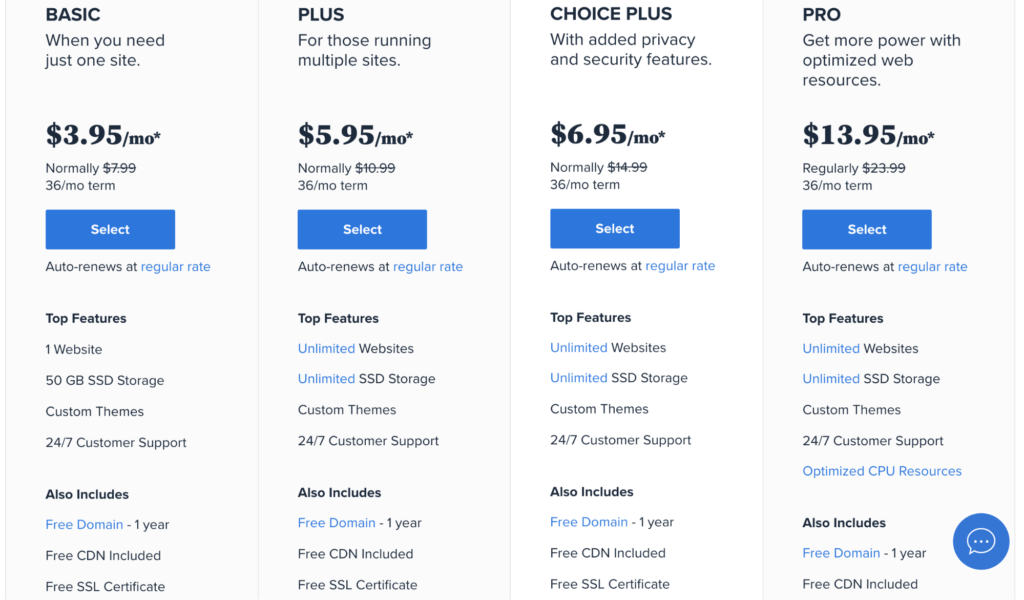
All of these plans come with a free SSL certificate. Once you’ve decided on a package, just click “Select” to continue.
After selecting a plan, you’ll automatically be prompted to set up your domain. There are two options to choose from, depending on your unique situation: creating a new domain or using a domain you already own.
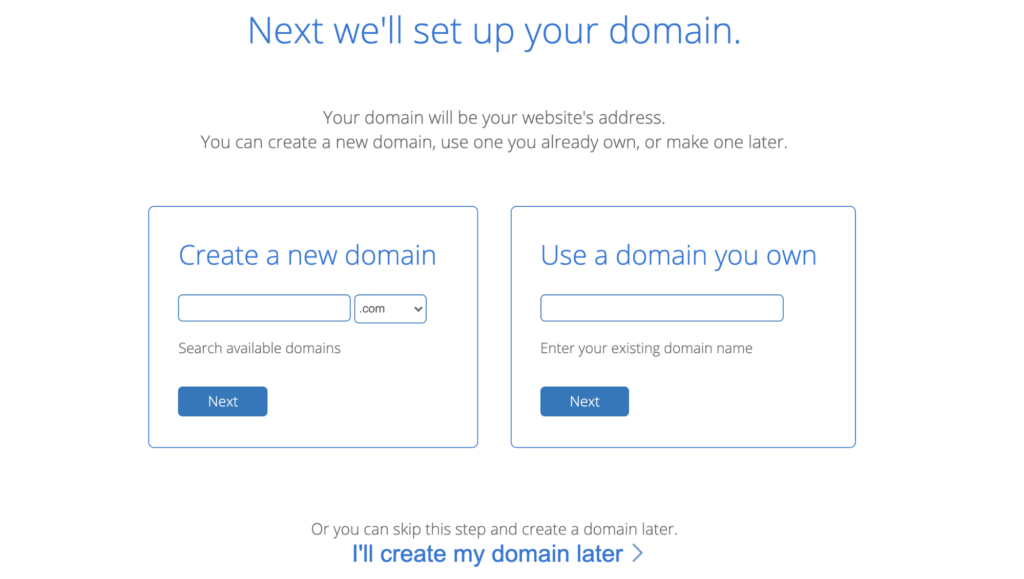
This is pretty self-explanatory. If you’ve already purchased a domain elsewhere, just enter it here. For those of you who don’t have a domain name yet, you can search for an available domain and get one directly from Bluehost.
Another reason why Bluehost is so appealing for new websites is that you’ll get a domain free for the first year when you create it with Bluehost.
If you’re not ready to do this quite yet, you can skip it and set up your domain later. Even if you skip this step, you’ll still be entitled to a free domain credit if you get one with Bluehost.
Since this tutorial focuses on getting an SSL certificate, I’ll select the option at the bottom of the screen and create my domain later.
Bluehost will prompt you to sign up and create an account. You’ll just need to provide some basic details about yourself or your business to continue.
Those details include:
This is about as straightforward as it gets and shouldn’t take more than a minute or so to fill out.
To get the best possible rate, sign up for a 36-month plan, and pay upfront. Bluehost also offers 24-month plans and 12-month hosting plans.
I’m all about value, so I recommend choosing the most extended contract to get the best terms. But the plans are cheap no matter what term length you decide on. Don’t overthink it.
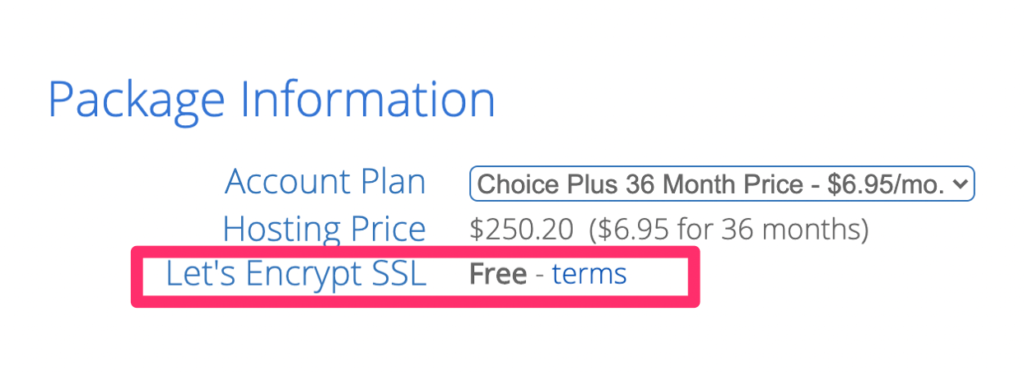
As you can see, a free Let’s Encrypt SSL is automatically added to your package. You don’t need to check any boxes or select an add-on to get this feature.
Bluehost will hit you with a couple of other upsells as you finalize the package. Examples include SEO tools and SiteLock Security. You can probably skip the SEO tools, but lots of people like SiteLock for added security. This covers things like malware detection, weekly scan reports, automatic malware removal, file-level scanning, and Google blacklist monitoring. You’ll want these features eventually, so it makes sense to get it now.
Paying for your Bluehost plan is the final step to creating an account. Just enter your credit card details or pay via PayPal.
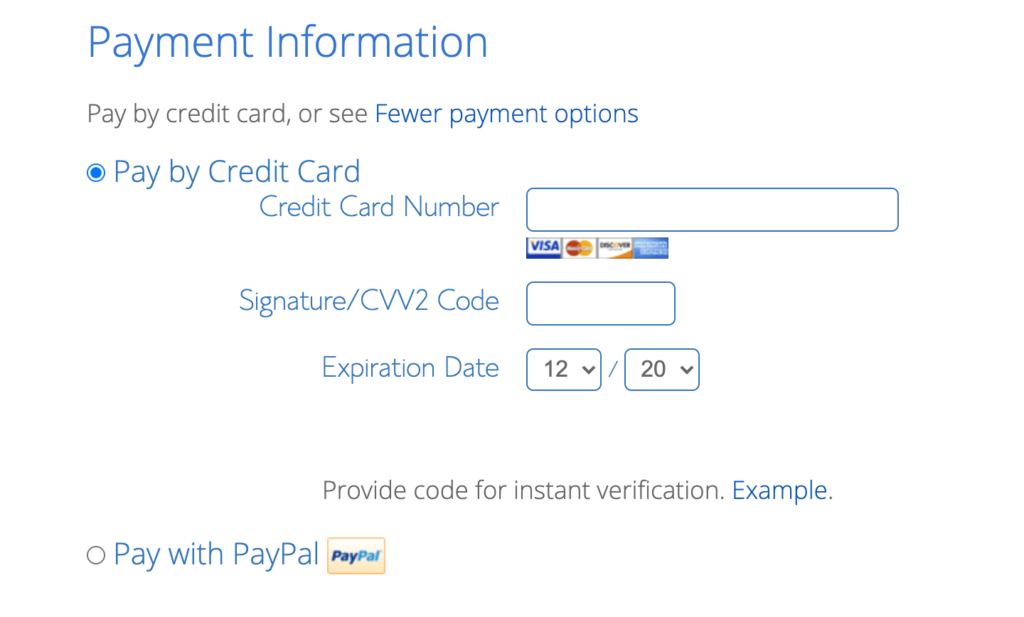
A 30-day money-back guarantee backs Bluehost plans. So, if you decide to cancel within 30 days, you’ll be eligible for a full refund. This guarantee doesn’t extend to add-on products like purchased domain names.
Your plan will automatically renew at the regular rate when the term expires. That’s another reason why I recommend locking in a longer contract. You won’t be able to access these low introductory rates after the first term.
Once you’re signed up, you need to make sure the SSL is active. In most cases, the SSL will be automatically assigned to your website and install itself on the domains in your account. However, some Bluehost customers need to enable the SSL certificate manually.
Whether you got your domain from Bluehost or a third-party provider, always verify that the SSL has been activated.
This is easily managed from your Bluehost control panel.
Once you’ve logged in to Bluehost, make your way over to the “My Sites” page of the dashboard. For those of you who have multiple sites hosted in the same account, you’ll see all options listed here.
Find the site you want to activate the SSL for and click the “Manage Site” button.
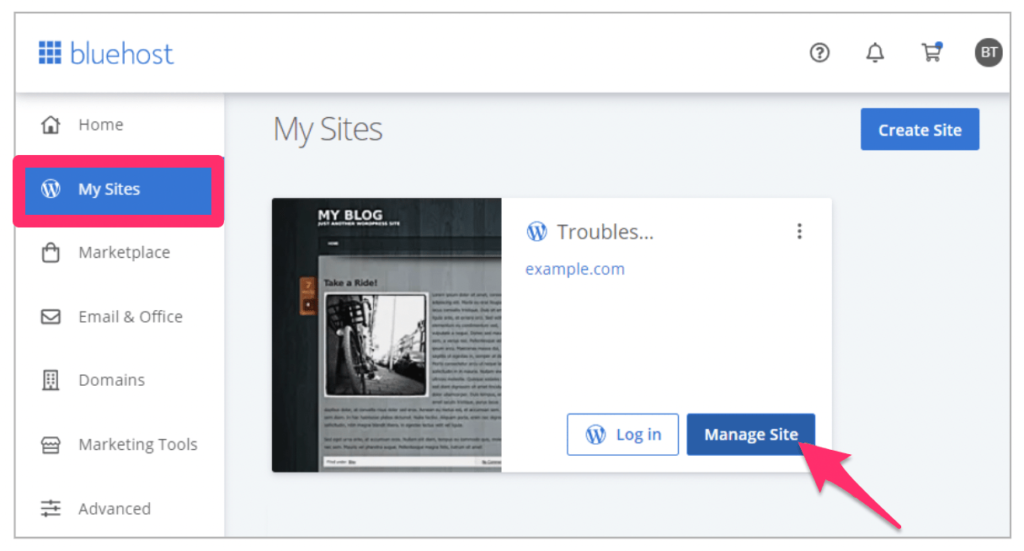
From here, you need to make your way to the “Security” menu. This can be found towards the top of the screen.
Next, locate the “Security Certificate” portion of this page. You’ll see “Free SSL Certificate” listed in this area.
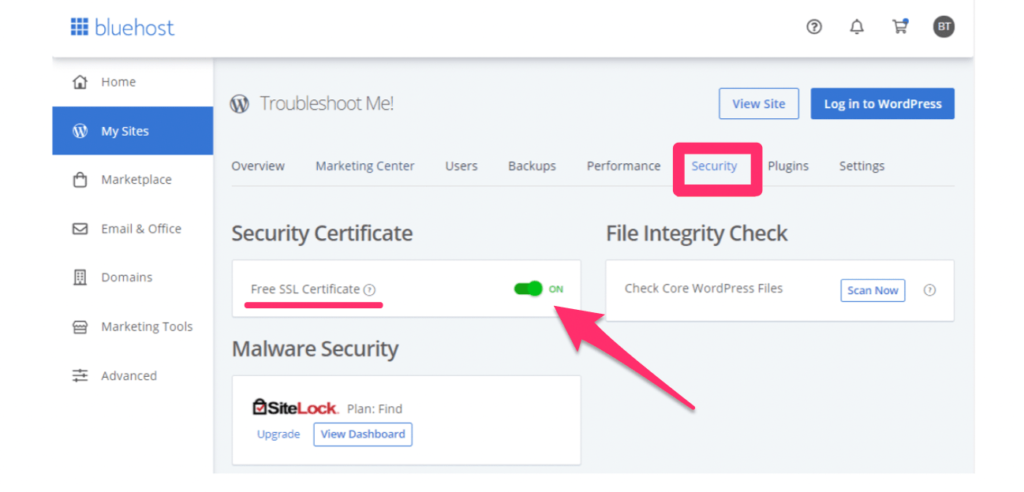
If the certificate is turned on (as shown above), there’s nothing you need to do. The SSL has already been installed. If not, simply toggle the free SSL certificate to the “on” position to activate it.
Once turned on, the SSL certificate can take a few hours to install itself completely and activate. Don’t be alarmed if your site is still showing as “not secure” immediately after turning the SSL on.
Keep a close eye on your email for the next few hours as well. In some instances, Bluehost will require you to complete an action to continue. Clear instructions will be sent to you via email if necessary.
If for some reason you ever want to de-activate the SSL, follow the same steps, and just switch the slider to the “Off” position.
If you build websites for clients with contact forms, your clients may be required by multiple privacy laws to have ...
Read moreHow to Add Privacy Policies to All Your WordPress Client Sites
The post How to Add Privacy Policies to All Your WordPress Client Sites appeared first on WPArena.
Do you want to add a WordPress logout link to your site?
If you run a membership site, bbPress forum, eCommerce store, or a learning management system (LMS) using WordPress, having a prominent logout link is helpful for your users.
In this article, we will show you how to add the WordPress logout link to your navigation menu, as well as to other areas of your site.
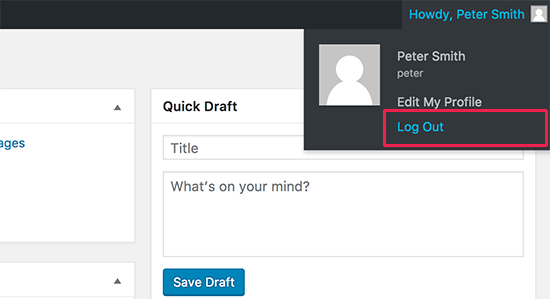
Normally you can log out of your WordPress site by clicking on the logout link. This link is located below your profile picture in the top right corner of the WordPress admin bar.
All you have to do is take your mouse over to your username, and it will appear in the dropdown menu.
In case you or your site administrator have disabled the WordPress admin bar, then you will not be able to see the WordPress logout link.
The good thing is that the WordPress logout link can be directly accessed to log out of your current WordPress session.
The logout link for your WordPress site looks like this:
http://example.com/wp-login.php?action=logout
Don’t forget to replace example.com with your own domain name.
You can access this link directly in your browser window to log out of your WordPress site.
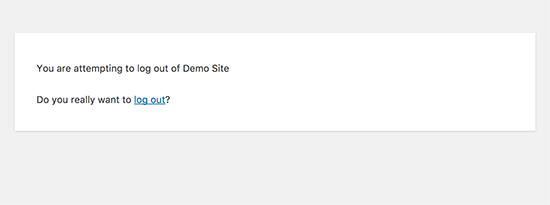
When you visit the WordPress logout link, it will take you to a warning page. You will need to click on the logout link to confirm that you really want to log out.
You can also manually add this logout link anywhere on your WordPress site. Let’s take a look at how to do that.
If you don’t like the video or need more instructions, then continue reading.
Adding the WordPress logout link in your site’s navigation menu will make it easily accessible from any page on your website.
Simply head over to the Appearance » Menus page in your WordPress admin. After that, you need to click on the custom links tab to expand it and add the logout link in the URL field.
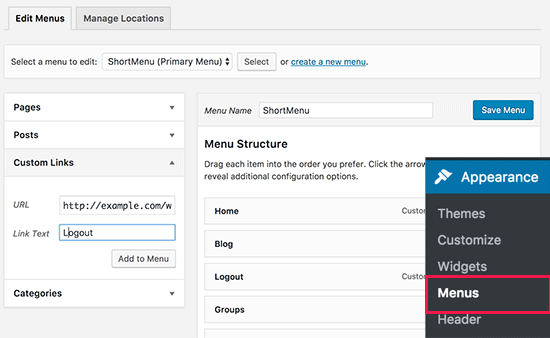
Once you are done, click on the ‘Add to menu’ button, and you will notice the link appear in the right column. You can adjust its position by simply dragging it up or down.
Don’t forget to click on the ‘Save Menu’ button to store your changes.
You can now visit your website to see the logout link in your navigation menu.
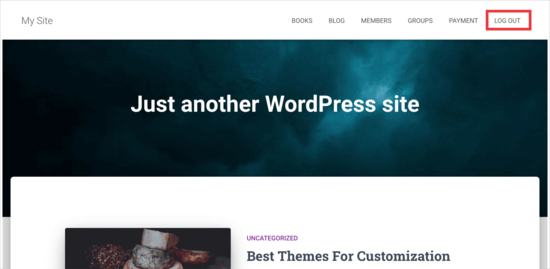
The problem with adding the logout link in the menu is that it is visible to all users (both logged-in and logged-out). It only makes sense to show the logout link to users who are actually logged in.
You can do that by following our instructions on how to show different menus to logged in users.
WordPress comes with a default widget called Meta. This widget shows a bunch of useful links including a logout or login link to users.
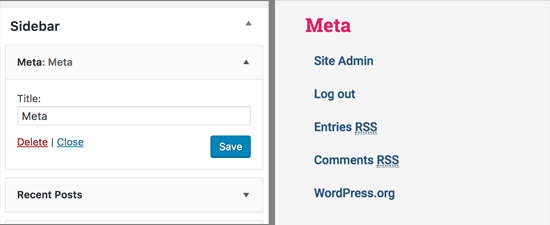
Some people find the other links in the Meta widget are not quite as useful.
As an alternate, you can also add a plain text or custom HTML widget with the logout link in plain HTML. Here is the HTML code you’ll need to add:
<a href="http://example.com/wp-login.php?action=logout">Logout</a>
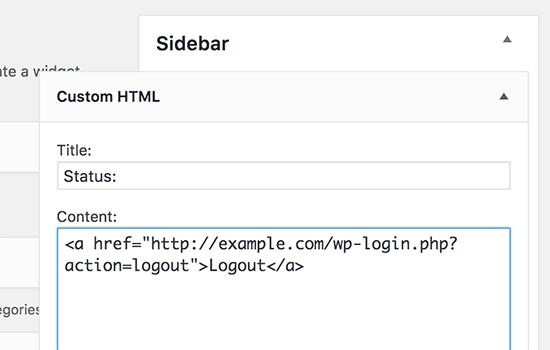
If you manually add a logout link in WordPress, then the problem is that it does not change based on the user’s login status.
To fix that, you can use a plugin to dynamically display the login or logout link based on the user’s session.
First, you’ll need to install the Login or Logout Menu Item plugin. For details, see our step-by-step guide on how to install a WordPress plugin.
After you install and activate the plugin, you’ll go to Appearance » Menus in your WordPress admin and add the Login/Logout link to your menu.
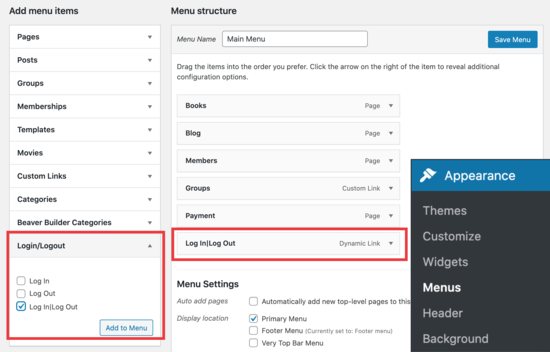
After you hit ‘Save Menu’ and check your WordPress website, you’ll see the link in your menu.
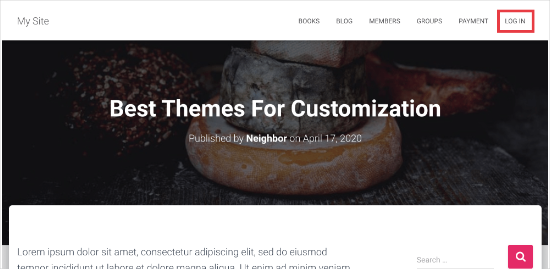
When you click on it, it’ll take you to a page to login, or if you’re already logged in, it will log you out.
This method also works with WooCommerce, MemberPress, and other WordPress eCommerce platforms.
We hope this article helped you find the direct WordPress logout link and add it to your navigation menu. You may also want to see our guide on how to add a call button in WordPress, and how to track link / button clicks in WordPress to make data-driven decisions.
If you liked this article, then please subscribe to our YouTube Channel for WordPress video tutorials. You can also find us on Twitter and Facebook.
The post How to Add the WordPress Logout Link to Navigation Menu appeared first on WPBeginner.
hello to every one , i have newly developed website for IT small company ,which is indexed now on google but there is no traffic so any can help for traffic , my website is http://rijasoft.com/ . thank you
Are you in need of a fresh and beautiful color palette for your website? Whether you want to give your …
How To Create A Color Palette For Your Website Read More →
The post How To Create A Color Palette For Your Website first appeared on WP Superstars.
Hi Experts, I want to improve my website techxonic.com ranking for freelance business specifically in UAE. Your suggestions will be highly appreciated.
Thanks,
With our integrated videos plugin, you can embed high-quality educational tutorial videos on your site’s frontend and admin!
Video tutorials are a great resource to share insightful information in an organized way for you and your users.
The Integrated Video Tutorials plugin (IVT) functions as a perfect method to improve WordPress skills, onboard new users, and reduce support requests, making it valuable for anyone with access to your site to refer to.
Included are 45+ WordPress training videos which we keep regularly updated, white-label branding, user displays, and more. Plus, you can create and have your own custom training videos, along with even customized playlists.
In this article, you will learn how to get the most out of integrated tutorials. I’ll be going over how to:
When you’re finished reading, you’ll know the best way to deploy these videos for your WordPress sites and use them to their full potential — in just a few clicks!
From The Hub dashboard, you can download the integrated videos plugin from the Plugins tab. Once you click on the integrated videos tab, you’ll get the options to Install or Download.

Choosing to install makes it simple. It will pull-up all of the sites you have in The Hub, and you can install it directly from here and your WordPress dashboard.

Once installed, you can get a 360-degree overview of the dashboard. From here, you can view the most recently updated video, playlists, create new videos, and more.

You can see the total videos you have at the top of the dashboard, the date of the last uploaded video, your most recently updated video, your newly created custom video, and the latest playlist you created.

In the Video section, you can quickly access all of the 45+ videos that come with the plugin, create a custom video, edit the titles, and more.

And finally, in the dashboard, the Playlists area lets you view and edit all of your playlists.

It’s fast and easy to organize, access, create playlists and more — right from the dashboard.
Do you need to explain something to your users that aren’t already covered in our videos? Something specific to your brand or your website? No problem! Integrated Video Tutorials lets you add custom videos quickly and easily.
From the Video section of the dashboard, get started by clicking the Add Custom Video button.

The Add Custom Video button opens up an area where you’ll select what source your custom video is hosted from. You have the options for Wistia, YouTube, and Vimeo. (Note: More options are coming very soon for Dailymotion, Amazon S3, Google Drive, and more!)
Simply choose what option you have for the video and add the link.
In this example, it’s a YouTube video.
From here, you can change the title and set a customized start & end time. Also, upload a thumbnail image if you’d like.

After hitting continue, add it to a playlist in a click. A drop-down menu will appear with all of your current playlists options. You can even add it to multiple playlists at one time!
When done, it’ll be all set to go when you hit Publish.
Add a video to as many playlists as you like.
It’s then displayed in the Available Videos.

You can access it and edit the custom video at any time.
Next, I’ll show you how to…
Quickly access your custom video to edit and view in just a few clicks. You’ll simply go to the Available Videos section, find your video, and access or edit accordingly.
Click on the gear icon next to the video you’d like to gain access to and you’ll get the options to Edit Video, Copy Shortcode, or Delete.

When you click Edit, you’ll get the options that were discussed earlier for custom videos. You can change the title, start & end time, and upload a thumbnail image.

For any of the pre-uploaded videos that come with this plugin, you have the option to Edit Title and Copy Shortcode.

Preview any video by clicking on the video title in the Available Videos section.
Play the video in the preview area at any time.
Ready to publish? Use the Shortcode to embed videos. Add the shortcode to any acceptable area, and you’ll be all set.

It’s as simple as that to access and edit videos!
Manage, create, delete, and customize playlists from the Playlists area. Playlists are great when you have a specific topic that includes several related areas you would like to cover in separate videos.
This section shows you how many playlists you currently have, recently created playlists, and recently updated playlists.

Let’s create a new playlist first. To do that, click on Create Playlist.

It will then prompt you to add a name, description, and – if you want – a thumbnail image.

Once Continue is hit, you can search for videos to add or simply click on the ones you want to include in the playlist. If you want to delete one from the list, you can do that as well in one-click.
Add as many videos as you’d like!
Your playlist will then appear with all of the other playlists you already have.
With any of the playlists, you can click on the gear icon and get the options to:

Editing and adding videos is exactly the same as when they’re created. And if you add Visibility Settings, you can control which user roles (e.g. author) can view the playlist and the default locations for it to display.

Add a video at any time to a playlist quickly by clicking on the icon next to a video. You’ll then choose what playlist you want to add it to, and you can also add it to multiple playlists by checking the boxes.
Pick any amount of playlists that you’d like by checking the boxes next to each one.
And just like that, you have a customized playlist for your video tutorials.
You can adjust additional settings for your tutorials in the Settings area in the admin. This is so you can determine how your videos should display in the admin area of your website.
In the Display Settings section, you can enable a tutorials tab in the WordPress admin sidebar in the Tutorials Tab area in one-click
Determine the location of the videos page in the admin menu. You can pick to display all the videos under the WordPress Dashboard menu item, or you can have it be a top-level menu item.
Plus, you can set the menu title that will be displayed as your tutorial videos menu in the WordPress admin sidebar.

The Help Videos area is where you can enable the option to have videos appear in the Contextual Help boxes. It’s based on how you set your visibility settings for your playlists.

Do you want someone else to have admin access to edit playlists and videos? You can configure permissions in the Permissions area.
Simply choose which user roles can have access.

Once you change the settings, you can always adjust them at any time.
As we close the credits on this post, you can see how using our integrated video tutorials is quick, easy, and beneficial. And since we already have you stocked up with over 45 useful videos to begin with, you can implement them right away!
For more information, be sure to check out our documentation. And keep tabs on what’s coming up next in our Roadmap.
Install the plugin to train and empower new WordPress users and start reducing your support costs today!
This post is originally published on Designmodo: Website Design: The Ultimate Guide with Examples

With modern technologies getting more powerful and widely supported by current browsers, the website has become a designer’s canvas. It is here where artists show off their skills and vivid imagination. We contemplate website designs of all shapes and sizes …
For more information please contact Designmodo
How to optimize your website and other owned digital properties with SEO techniques, meaningful content and a consistent customer experience