How to Move a Website to a New Host (Without Downtime or Issues)

Featured Imgs 22
Trying to figure out how to move a website to a new host without breaking anything, causing downtime or any other issues that could hurt your Google rankings? As with any move, moving your site to a new host can feel a little daunting, especially if you haven’t done it before. However, it doesn’t have to be, and with the tutorial that we’ll share in this post, you should be able to move virtually any website to a new host.

4 Different Types of Landing Pages and How to Use Them

Category Image 006

Most successful businesses create landing pages that are designed specifically for conversion and making a good first impression on customers. Landing pages are a significant Aspect of your website, and if you create your pages correctly, you can increase conversions by up to 300%. However, there are many different types of landing pages and all […]

The post 4 Different Types of Landing Pages and How to Use Them appeared first on WPArena.

How to Restart a WordPress Site – Reset WordPress (The Fast Way)

Category Image 091

Recently, one of our readers asked us, “How do I restart my WordPress site?”.

This isn’t something that most users will need to do, but knowing how to reset WordPress can be very helpful in some situations.

In this tutorial, we’ll show you how to restart or reset your WordPress site, the fast way.

Restarting a WordPress site

Why Restart a WordPress Site?

Restarting or resetting WordPress is a process where you restore WordPress to the default settings. Think of it as a similar process to restoring your phone to the default “factory settings”.

It will delete all your apps and customizations, so you can start over fresh.

There are several situations where you might want to restart or reset a WordPress site:

1. You’re using a demo site on your own computer. If you’ve installed WordPress on localhost, then you might want to reset after you’ve built a site and moved it from localhost to a live server. If you’re a developer and constantly test themes & plugins on your local install, then it can help to reset it every quarter to start fresh.

2. You’ve been working on a new site and want to start over. Maybe you’ve been busy creating a blog or website, but you are not happy with the customizations. Instead of undoing everything, you can simply reset WordPress and quickly start over with a new design.

3. You’re going to rework a client’s website. If they want something very different from what’s already there, then you might need to reset WordPress on staging server to start from scratch.

4. You’re learning about WordPress, hands-on. Maybe you’ve had a go at developing your own plugins or themes, or you’ve been experimenting with a starter theme. You might want to start again with a fresh installation of WordPress.

How to Restart and Reset a WordPress Site

Restarting your WordPress site might sound difficult, but it’s really not.

We’re going to walk you through the entire reset process, step by step.

Before you begin, it’s important to create a full backup of your site using a WordPress backup plugin. This is important in case you want to restore your site from the backup after restarting it.

Restart Your WordPress Site with WP Reset

Now you’re ready to move on and restart your WordPress site. We’re going to use the free version of the WP Reset plugin for this.

First, you’ll need to install and activate the WP Reset plugin. For more details, see our instructions on how to install a WordPress plugin.

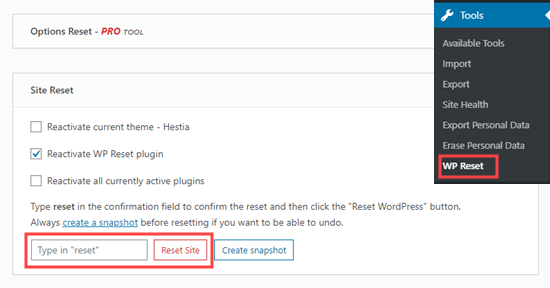
Once the plugin is activated, you need to go to the Tools » WP Reset in your WordPress dashboard and scroll down to the Site Reset section of the page.

To reset your site, you need to type the word ‘reset’ in the confirmation field before clicking the red ‘Reset Site’ button.

The button in WP Reset to restart your WordPress site

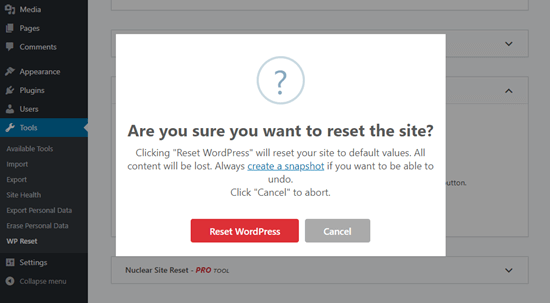
WP Reset will pop up a message asking you to confirm that you want to reset the site. Click ‘Reset WordPress’ to continue.

Confirm that you want to reset your website

You’ll see a ‘Resetting in progress’ message for a few seconds. Then, your site will be restarted.

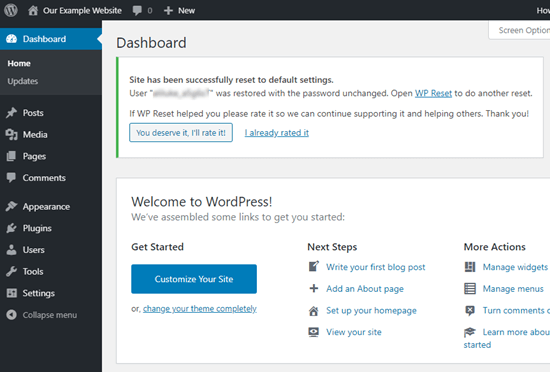
Next, you’ll see the homepage of your WordPress dashboard with a success message at the top from WP Reset.

WPReset's message confirming that you've successfully reset your WordPress site

That’s it. You’ve restarted your WordPress site.

Optional WP Reset Functions When Restarting Your Site

The above method gives you everything you need in order to restart your site.

However, there are some other options in WP Reset that you might want to use too.

Taking a Snapshot of Your WordPress Site Before Restarting

You can use WP Reset to take a snapshot of your site. A snapshot is a restore point for your WordPress database. It lets you see what changes have been made since the snapshot was taken. You can use it to roll back changes if necessary.

Important: A snapshot is not a WordPress backup. You should still make backups to restore your website.

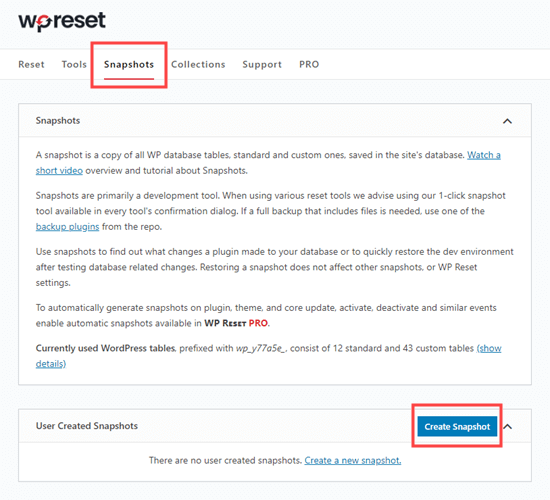
To create the snapshot, click on the Snapshots tab. Then, scroll down and click the Create Snapshot button:

Creating a snapshot of your WordPress site before restarting it

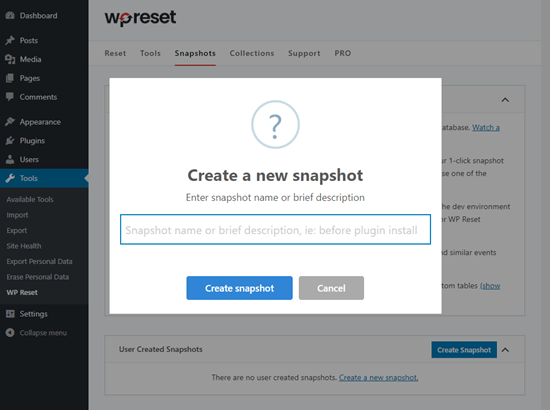
You’ll be prompted to enter a name or description for the snapshot. Type in whatever you want to use, then click the ‘Create snapshot’ button.

Name the snapshot you're creating

Deleting Themes and Plugins Using WP Reset

By default, WP Reset doesn’t delete theme and plugin files. It simply deactivates them. However, you can use it to delete these files too.

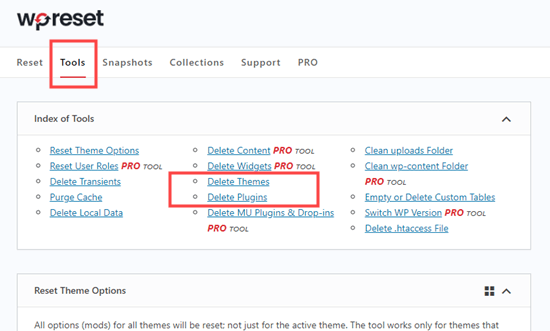
First, you’ll need to go to Tools » WP Reset and click the ‘Tools’ tab. Once there, simply click on the ‘Delete Themes’ or ‘Delete Plugins’ links to jump straight to those tools.

Click the link to delete themes and/or plugins

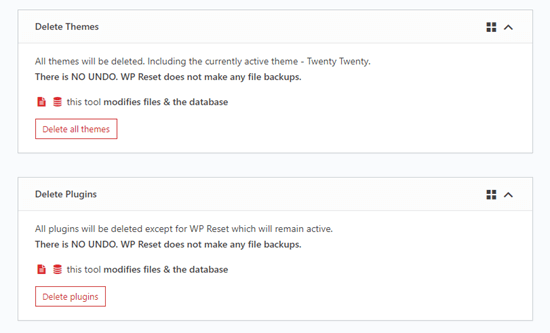
Once you click either link, you’ll be scrolled down the page to the right tool:

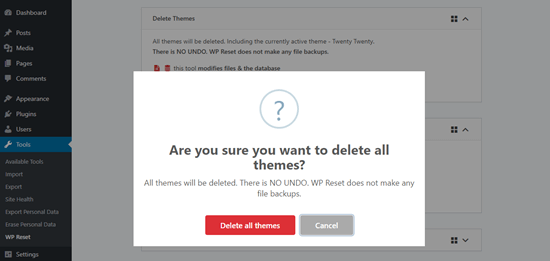
Click the button to delete all themes from your WordPress site (including the active one)

You can click the ‘Delete all themes’ or ‘Delete plugins’ button to delete them.

Important: WP Reset doesn’t backup your files in any way. Deleting your themes and plugins can’t be undone.

After you click the button, you’ll be prompted to confirm. Click the Delete button on the popup to continue.

WP Reset will bring up a warning before allowing you to delete all themes

You’ll then see a message telling you how many themes or plugins have been deleted.

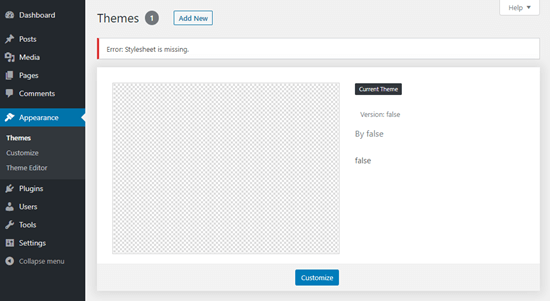
If you delete all themes, then you’ll need to install and activate a theme manually. Your site won’t work without one. If you go to Appearance » Themes, then you’ll see a screen like this:

The empty themes page with no themes installed

Go ahead and click the ‘Add New’ button and choose or upload a theme of your choice. If you need help, check out how to install a WordPress theme.

Restoring Your Data After Restarting Your WordPress Site

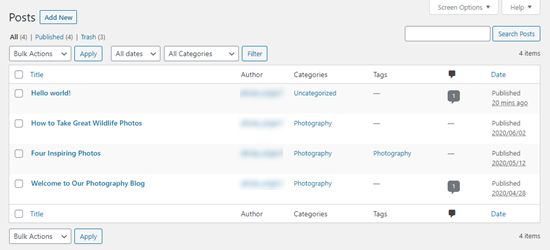
After restarting your WordPress site, any posts and pages you had will be gone. Instead, you’ll see the default pages and the ‘Hello, world’ post:

The 'Hello World' default post

To restore your old data, you will need to reinstall and activate the backup plugin that you used to create your backup.

You can then follow its instructions to restore your site from the backup.

Viewing Your Restored Content

Once you’ve restored your site from backup, your content should be back on your site.

You’ll find all your posts under Posts » All Posts. They’ll have the correct time stamps, categories, tags, and comments.

Viewing the imported postsv

We hope this tutorial helped you learn how to reset a WordPress site the fast way. You might also like our ultimate guide to speeding up WordPress and our list of must have WordPress plugins for all sites.

If you liked this article, then please subscribe to our YouTube Channel for WordPress video tutorials. You can also find us on Twitter and Facebook.

The post How to Restart a WordPress Site – Reset WordPress (The Fast Way) appeared first on WPBeginner.

How to Use Elementor to Build Websites Remotely

Featured Imgs 13

How to Use Elementor to Build Websites RemotelyIn these times of economic uncertainty and social distancing, businesses are looking to develop their own online presences now more than ever. If you’re looking to get your business online, or if you’re a freelancer who’s building websites for businesses who want to get online, Elementor can help you efficiently build a website remotely that’s […]

The post How to Use Elementor to Build Websites Remotely appeared first on WPExplorer.

Hello. I’m Niun

Category Image 052

Hello. I'm Niun. No joke, this is how they call me IRL :x

I got into web developing arround 5 months ago, and currently am trying to learn React.js

I just finished (i hope i finished) my first project, and i think it is pretty much what i wanted it to be. I have been working on optimisation of the site and ,ofcoure, SEO.
multiple sources including google say that Text to HTML ratio should be 7:3 or similar which is difficult to achieve given the nature of my website, so i ended up adding a bunch of useless text at the bottom of each page, because in google it says that hiding the text with css rules will get me penalised.

The website covers mobile gaming, more specifically mobile MMO, MMORPG and Multiplayer Online games.
I was wondering if hiding this much text would be a 100% penalisation from google, or should i keep it there like that?
this is the site https://www.teletappie.com/

The topic of the site is not original and competition fot it is rather big but, my main purpose is creating a gamelist ( https://www.teletappie.com/Gamelist ) where all of the mobile games that have some multiplayer function would be sorted, and the user could easily and quickly get the suggestion.

10 Top APIs for SEO

Featured Imgs 23

Successfully marketing a website can be a tricky endeavor. That is why Search Engine Optimization (SEO) tools are available to give websites greater visibility. Search Engines use several avenues for populating search engine results pages (SERP), and website developers want to make sure they follow the optimization guidelines for the best page rank results.

Beginner’s Guide on How to Add a Link in WordPress

Category Image 091

Do you want to add a hyperlink in WordPress? Recently, one of our users asked us how to add a link in WordPress.

There are several different ways to add links in WordPress. You can add links in your posts, pages, navigation menu, sidebar widgets, footer area, and more.

In this comprehensive beginner’s guide, we will show you how to add a link in WordPress posts, pages, widgets, navigation menus, and more.
How to easily add a link in WordPress

Since this is a detailed tutorial, please use the navigation below to quickly jump to the section you need:

Why Are Links Important?

Links are the bloodstream of the internet, which makes them really important.

Basically, most websites on the internet are connected via links, which is why the term ‘web’ or ‘World Wide Web’ was introduced in the first place.

These are the hyperlinked text, buttons, and other elements that you click to go from one page to another or from one website to another.

Imagine visiting a web page with no link for you to click on. You’ll have no option but to click on the back button in your browser.

For individual websites, links tell your users where to click to view more information.

Properly placing links on your website allows you to increase the time users spend on your website. It also helps users discover more content, make a purchase on your online store, or subscribe to your email newsletter.

That being said, let’s take a look at how to easily add links in different areas of your WordPress website.

How to Add Links in WordPress Posts and Pages

WordPress makes it really easy to add links in your blog posts and pages using the block editor.

Simply edit your post or page, or create a new one.

Next, highlight the text that you want to attach the link to. This selected text is called the anchor text for the link. Now click on the ‘Link’ button:

You’ll see a box where you can enter a URL. A URL is a web address. For instance, WPBeginner’s guide on how to start a WordPress blog has the URL https://www.wpbeginner.com/start-a-wordpress-blog.

You can simply copy and paste the URL of the post or page you want to link to, like this:

Creating a link by pasting in a URL using the WordPress block editor

Click the Apply (Enter) button to insert the link into your post.

If you’re linking to content on your own site, then it might be quicker to search for it. Type a word or two from your content title, and WordPress will find it:

Searching for a page to link to using the WordPress block editor

Click on the title of the page or post you want to link to, and the URL will be automatically added for you. Again, you’ll need to click the Apply button to put the link into your post.

If you want to set your link to open in a new tab, then click the arrow on the right. You can then click the toggle and set your link to open in a new tab.

Setting your link to open in a new tab using the WordPress block editor

Note: We recommend that you only use this option for links to third-party websites. This way your users don’t leave your website while visiting it.

Adding Link in Old WordPress Editor

If you are using the older classic editor instead of the block editor, then the process for adding a link is quite similar.

Open up the post that you want to edit, or create a new one. Find the text you want to use as the link’s anchor and highlight it. Then, click the ‘Link’ button which should appear in the first row of toolbar buttons.

Creating a link using the WordPress classic editor

You can then copy and paste the URL you want to link to, or search for it, as in the block editor.

Pasting your URL directly onto the anchor text

Another, even quicker, way to add a link in both the block editor and classic editor is to simply paste the URL onto the anchor text.

First, copy the URL you want to link to. Then, highlight your chosen anchor text in your post.

Next, you can either right-click and select ‘Paste’ or simply press Ctrl+V (Windows) or Command+V (Mac) to paste the URL.

Paste your link directly into your content

WordPress will automatically detect that you’re pasting a URL, not text, and will turn the anchor text into a link.

Take a look at our tips for mastering the WordPress content editor to learn more about using the block editor effectively.

How to Add Links in WordPress Text Widgets

WordPress allows you to add widgets to your site’s non-content areas like sidebar, footer, or other widget areas.

Some of these widgets are automated and do not have many options. For example, the Recent Posts widget will automatically show links to your recent posts. You don’t need to do anything extra.

However, if you want to add some custom text with links in your sidebar, then you can use the Text Widget.

Go to the Appearance » Widgets page and then drag ‘Text’ widget into your sidebar or other widget area.

You can then type in your text and add a link just as you would when adding one to a post or page.
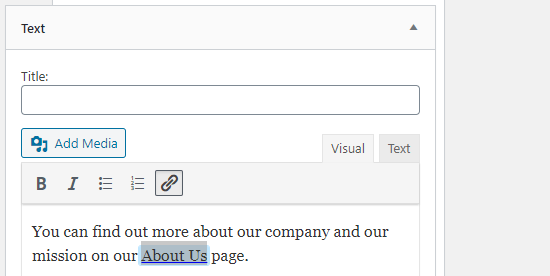
Adding a link in a widget

Make sure you click the ‘Save’ button beneath your widget after making changes.

How to Add Links in WordPress Navigation Menus

Do you want to add links to your site’s navigation menu? WordPress comes with a built-in drag and drop menu editor which allows you to create and manage navigation menus on your WordPress site.

Go to the Appearance » Menus page. If you don’t already have a menu set up, then you can create one by entering a menu name.

Next, select the pages you want to add to your menu on the left-hand side, then click the ‘Add to Menu’ button.

WordPress will automatically link to your selected posts and pages. You can move menu items and up and down to rearrange them.

You can also add any link you want to your menu. It doesn’t have to be a page or post on your site. For instance, you could enter the URL of your Twitter profile and add that to your navigation menu.

To enter a link, just click the arrow next to the ‘Custom Links’ section on the left. You can then type in the URL and the text you want to use for the link.
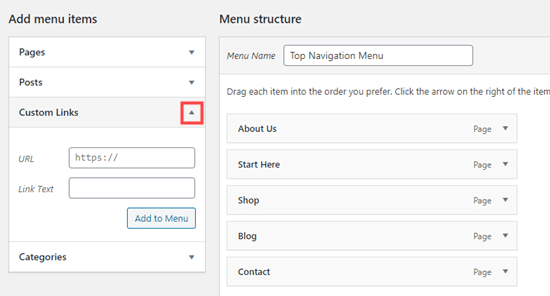
Adding a custom link to your navigation menu

For more help with creating your menu, take a look at our beginner’s guide on how to add navigation menus in WordPress.

How to Add Title and Nofollow in WordPress Links

It’s often useful to give your links a title. This is the text that appears when someone runs their mouse cursor over the link, like this:

A link with a title

Adding a title often makes it clear where the link leads to. It can be helpful or even reassuring for your readers.

However, WordPress does not allow you to add title to the links with the default editor. You can still add it, and we’ll show you how to do that in a bit.

You may also want to add a nofollow tag to external links. This tells search engines not to pass your site’s SEO score to that link because you don’t own or control the content on that website.

WordPress also does not support nofollow by default either.

Method 1. Use AIOSEO plugin in Gutenberg

All in One SEO plugin (AIOSEO) for WordPress automatically adds the title, nofollow, sponsored, and UGC attributes to your links.
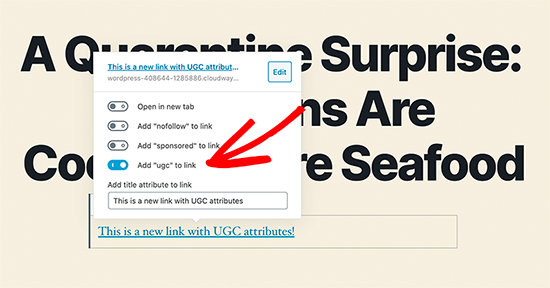
All in One SEO Title and Nofollow

Method 2. Use HTML code in Gutenberg

If you’re using the Gutenberg editor, and don’t want to use AIOSEO, then you’ll need to manually edit the HTML to add title and nofollow attributes to your links.

First, add your link within your paragraph block in the usual way. Next, click on the three vertical dots and select ‘Edit as HTML’ as shown here:
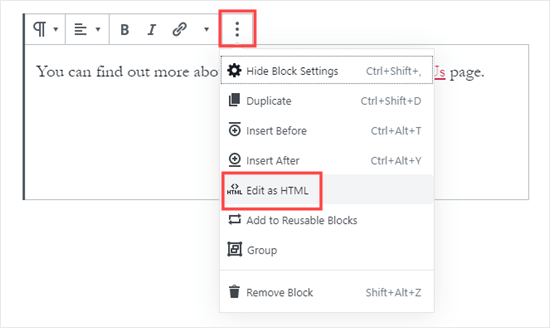
Switching to the HTML view of a block in the WordPress block editor

You’ll now see the HTML code for your block.

Viewing the HTML code for a block in the WordPress editor

You can add a title and/or a nofollow attribute to the link like this:

<p>You can find out more about our company on our <a href="https://www.examplecompany.com/about-us/" title="About Us" rel="nofollow">About Us</a> page.</p>

For the title, you can change “About Us” to be whatever you want. With the nofollow attribute, this should always be rel="nofollow". Don’t forget the double quotation marks around the title and the “nofollow” as your link won’t work correctly without them.

Method 3. Use a Plugin with the Classic Editor

If you’re using the Classic Editor, you can install and activate the the Title and Nofollow for Links plugin.

This plugin will add title, nofollow, and sponsored checkbox options to the insert link popup.

Highlight your anchor text and click the ‘Link’ button, then click the cog:

Locating the cog icon for a link in the classic editor

You’ll then see the additional options:
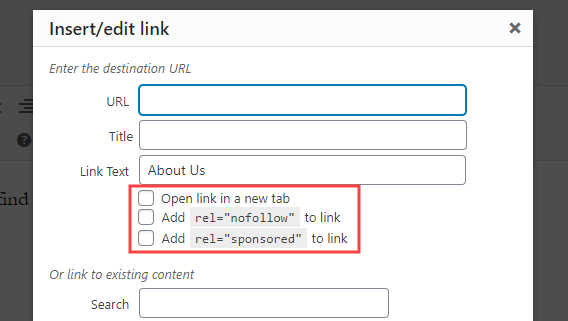
Additional options created by the Title and Nofollow for Links WordPress plugin

For more help, take a look at our guide on how to add title and nofollow to the insert link popup in WordPress for more information on this plugin.

How to Add Link Buttons in WordPress

Do you want to add a button to your WordPress posts or pages? There are many ways you can do this. The easiest is using WordPress’s built-in Button block.

Create a new post or page, or edit an existing one. Then, click the (+) icon to create a new block. Select ‘Button’ from the ‘Layout Elements’ options, or simply search for the Button block.
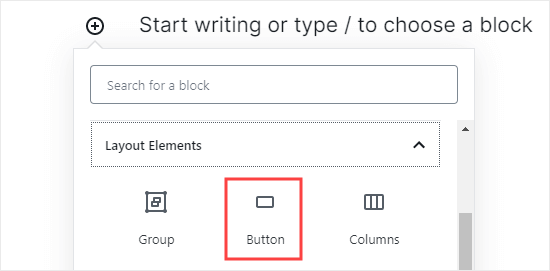
Adding a 'Button' block to your post or page in WordPress

You can type the text for your button by clicking in the colored area. Enter the URL that the button should go to in the ‘Link’ box.
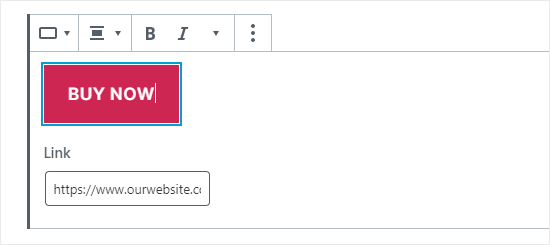
Adding the text and link for your button

To change the button’s alignment, or to make the text bold or italic, just use the controls at the top of the block itself.

You can make more changes to how the button looks in the block options on the right-hand side of your screen. For instance, you might want to change the color or add a wider border.

You can also change the link settings here. You can set your link to open in a new tab, and if you want, you can also add the ‘nofollow’ attribute to the link by typing it in the ‘Link rel’ box.
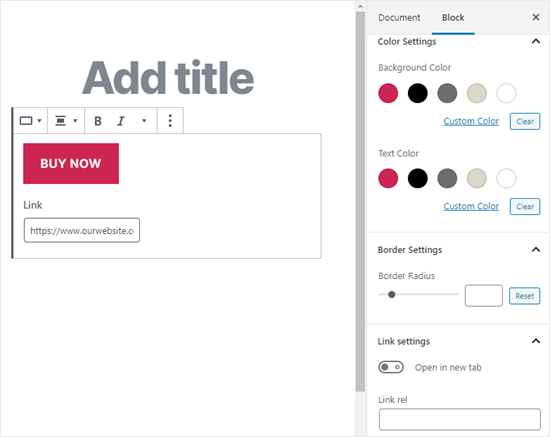
The right hand panel where you can edit your button's design and how the link works

What if you’re still using the old WordPress classic editor? You can install the “Forget About Shortcode Buttons” plugin to easily create buttons while you’re editing a post or page.

Simply install and activate the Forget About Shortcode Buttons plugin. Then, create a new post or edit an existing one.

You’ll see the ‘Insert Button’ icon in the toolbar, on the right hand side:

The Insert Button icon on the right hand side of the classic editor's toolbar

Click on the button, and you’ll see a popup. Here, you can customize your button, choose colors, borders, add text, add an icon, and include the link itself while seeing a live preview.
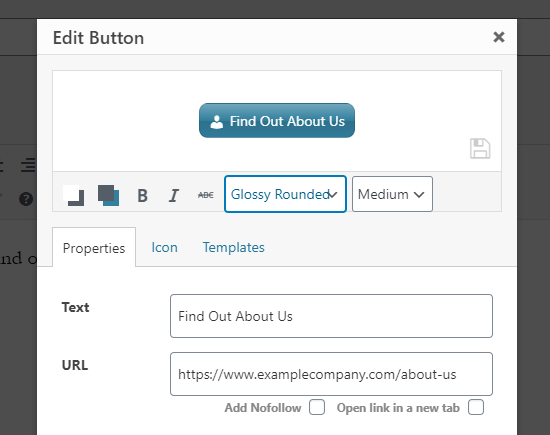
Creating a button for your link and customizing the design

For more information and details take a look at our guide on how to add buttons in WordPress without using shortcodes.

How to Embed Linked Content in WordPress

You can easily embed certain types of content in WordPress by simply inserting its URL in your post. This is sometimes called creating a “content card” in your post.

Just paste the whole URL into its own paragraph block. The whole tweet, including images, likes, timestamp, and more will be embedded like this:
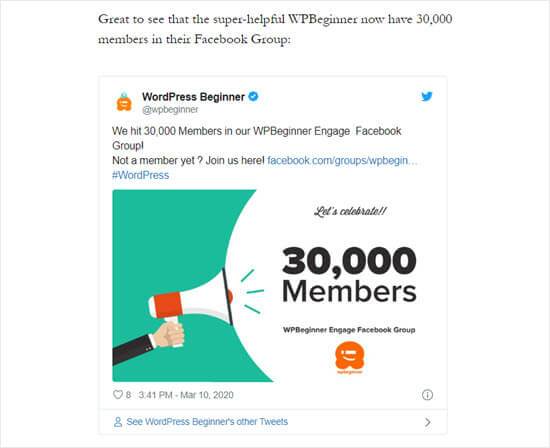
Embedding a tweet by pasting in the link to it in WordPress

The process is the same for YouTube videos. Simply find the video you want to use on YouTube and copy the URL from the top of your browser window:

Get the link to your chosen YouTube video from your browser's address bar

Next, paste the link into your post or page. It’ll automatically embed the video:
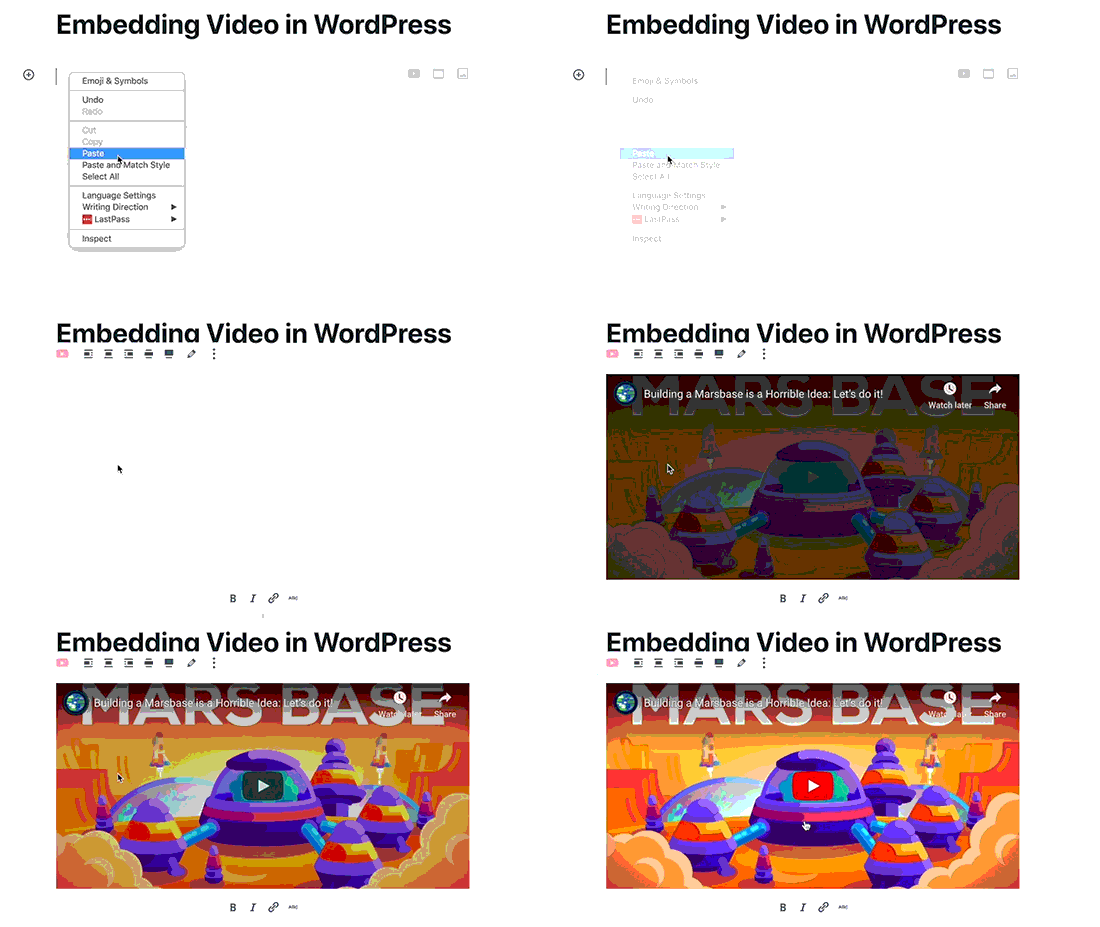
Embedding a YouTube video into your post

As well as being great for Twitter posts and YouTube videos, this method also works for many other types of content. You can find out more from WordPress’s support article on ‘Embeds’.

How to Add Affiliate Links in WordPress

Do you want to increase your site’s revenue by using affiliate links? Affiliate marketing provides a steady income to many blogs and websites.

All you need to do is add special referral links to products and services that you recommend. When your visitors purchase these products after clicking your links, you get a commission.

The problem that most beginners face is that each product or website they want to recommend has a different URL. It’s tricky to keep track of these, especially if you’re recommending lots of products.

The best way to add and manage affiliate links is by using an affiliate management plugin. We recommend using either Pretty Links or Thirsty Affiliates.

Both of these plugins work by creating redirect links such as www.yoursite.com/refer/partnersitename that send people to your special affiliate link.

The plugins will add a new option to your WordPress menu where you can add your affiliate links. Here’s how that looks with ThirstyAffiliates. You simply copy and paste your special affiliate link into the ‘Destination URL’ box.
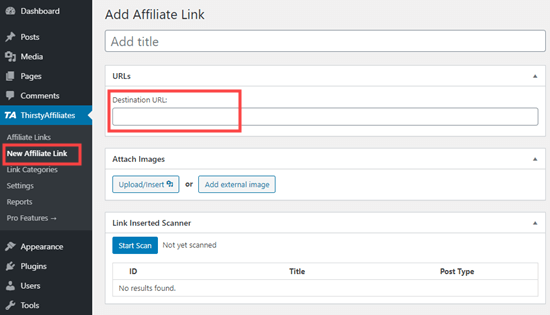
Adding a link in ThirstyAffiliates

You can set specific options for your link on the right hand side, deciding whether to nofollow it, open it in a new window/tab, and more.
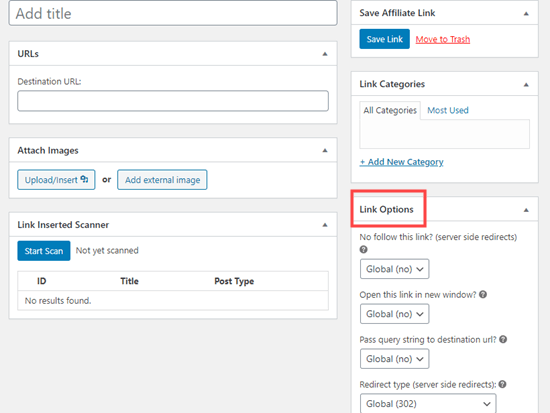
Setting the options for your affiliate link with ThirstyAffiliates

Once you’re done, click ‘Save Link’.

After you’ve set up your affiliate links, you can easily add them into your posts and pages. In a paragraph block, click the down arrow then select the ‘Affiliate Link’ option:
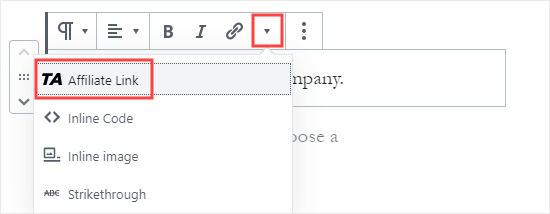
Adding an affiliate link to your post

Next, type in the start of whatever you named that affiliate link. In our example, that’s “Our Affiliate Partner”.

Finding your affiliate link by searching for it

You can then click the name and click ‘Apply’ to add the affiliate link to your post.

If you ever need to change an affiliate link (e.g. if the company you’re linking to moves to a different affiliate program) then that’s really easy to do.

You just change it once in your dashboard, under “ThirstyAffiliates” or “Pretty Links”. The redirect link stays the same as before, but it’ll now redirect to the new affiliate link everywhere it’s used.

For more handy affiliate plugins, check out our post on the best affiliate marketing tools and plugins for WordPress.

How to Manually Add a Link in HTML

Occasionally, you might want to add a link to your site using HTML code. This could happen if you need to use a custom HTML block or widget.

You might also need to directly edit a link in your theme file. Just make sure you always use a child theme so you don’t lose your changes when you update the parent theme.

It’s easy to create a link in HTML. To try it, add a custom HTML block to a post or page. You can find this block under ‘Formatting’ or you can search for it using the search bar.
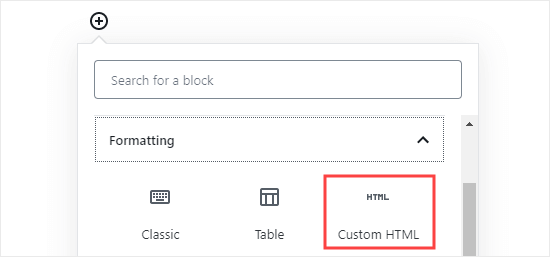
Adding a custom HTML block to your post or page

Next, you’ll see a box where you can write HTML. Copy this code into the box:

<a href="https://www.yourlinkhere.com">Text</a>

It should look like this:

The HTML code to create a link

You can click the ‘Preview’ tab to see how your code will look in your post or page:

Previewing how the HTML will display in the post or page

Now click back to the ‘HTML’ tag. Change the URL to the URL you want to link to. Change the word ‘Text’ to whatever word or words you want to use for your link.

To add a title to your link, you’ll need to include it in the code like this. You can change “This is the title” to anything you want.

<a href="https://www.yourlinkhere.com" title="This is the title">Text</a>

If you want your link to open in a new tab, simply add target="_blank" to the HTML code, like this:

<a href="https://www.yourlinkhere.com" target="_blank">Text</a>

If you want your link to be nofollowed, add rel="nofollow", like this:

<a href="https://www.yourlinkhere.com" rel="nofollow">Text</a>

You can include all of these at once. This is how a link with a title, that opens in a new tab and is nofollowed, would look:

<a href="https://www.yourlinkhere.com" title="This is the title" target="_blank" rel="nofollow">Text</a>

That’s how you create a link in HTML, if you ever need to.

An anchor link is a type of link on the page that brings you to a specific place on that same page. It allows users to jump to the section they’re most interested in.

Take a look at the animated screenshot below:
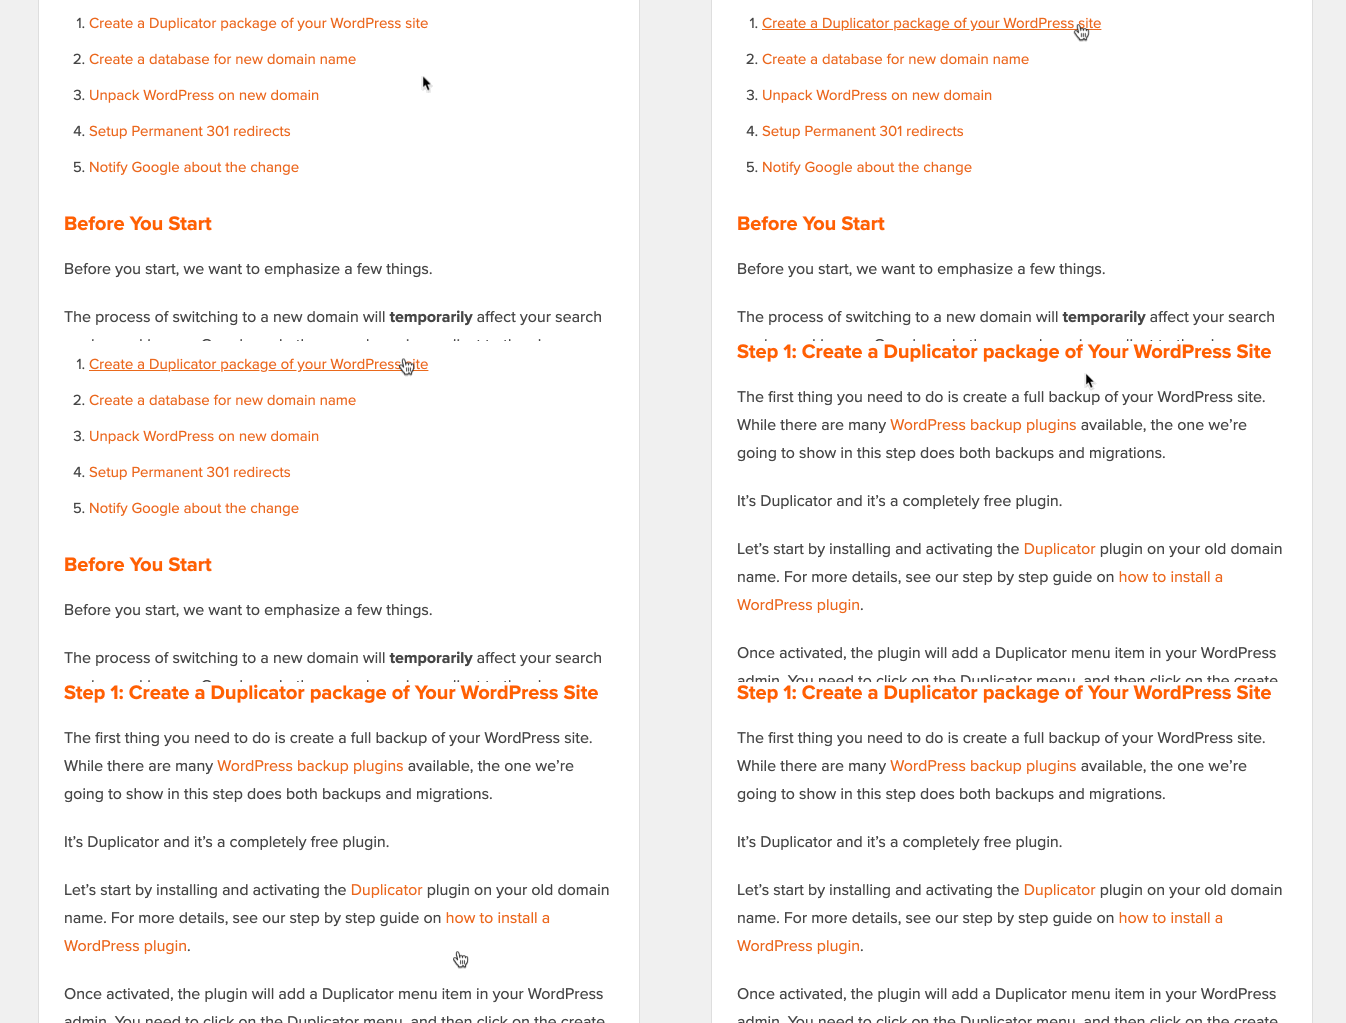
Anchor link preview

These type of links are really helpful when writing longer tutorials or content, so your users can easily jump to the section they’re most interested in.

We have created a detailed step by step guide on how to easily add anchor links in WordPress.

Want to add social share links or buttons on your site?

These links make it easy for your users to share your content on their favorite social networks. Sometimes social share links or buttons are also accompanied by total share count.
Facebook social share button

We don’t advise users to add these links manually. Instead, you should always use a social share plugin.

We have a step by step guide on how to add social share buttons in WordPress.

We hope this article helped you learn how to add a link in WordPress. You may also want to see our beginner’s guide on how to create a professional business email address, and how to start an email newsletter to grow your audience.

If you liked this article, then please subscribe to our YouTube Channel for WordPress video tutorials. You can also find us on Twitter and Facebook.

The post Beginner’s Guide on How to Add a Link in WordPress appeared first on WPBeginner.

How to Easily Change the Font Size in WordPress

Category Image 052

Do you want to change the font size in your WordPress posts or pages?

Sometimes, you may want to make a line or a paragraph larger, or you might want to increase the font size of your entire page content.

In this article, we’ll show you how to easily change the font size in WordPress. You’ll learn not only how to change font size in your WordPress posts, but also how to do it across your website.

Change font size in WordPress

Method 1: Using Paragraph Headings

It takes your visitors just a couple of seconds to decide whether they want to stay or leave your website. This gives you very little time to convince them to stay on your website.

Using Headings in your content is a great way to grab user attention.

They allow you to break your posts and pages into sections using different headings (often called “subheadings”).

Headings are great for SEO as well. Search engines give proper headings more weight than normal paragraph text.

How to add a heading in the default WordPress block editor

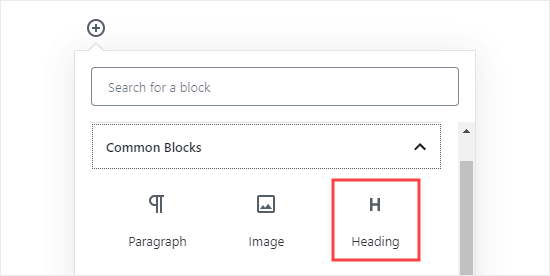
You can add a heading to your posts or pages by simply adding the ‘Heading’ block. You can search for it or find it in the ‘Common Blocks’ section in the WordPress block editor.

Adding a heading block in Gutenberg

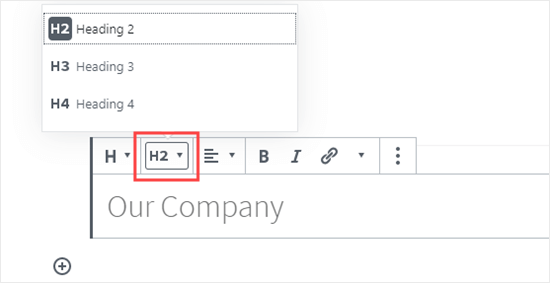
The block will default to Heading 2. Normally, it makes sense to stick with Heading 2 for your subheadings. If you want to change this, then you can simply click on the ‘H2’ drop-down to select a different size.

Selecting your Heading size in the block editor

Alternatively, you can change this in the block settings on the right-hand side of the screen. You can also change the heading’s color there as well.

How to add a heading in the older Classic Editor

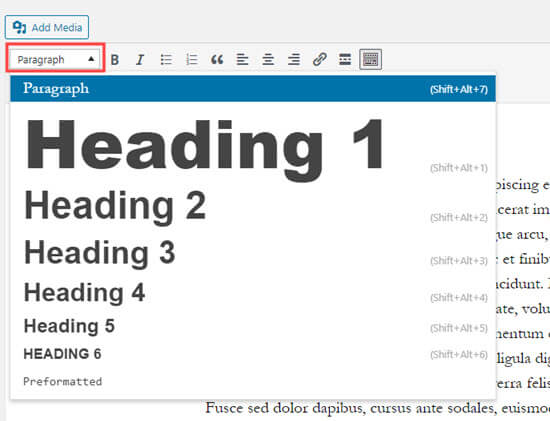
If you are still using the older classic editor in WordPress, then you can add headings using the ‘Paragraph’ drop-down.

Just highlight the text that you want to turn into a heading, click the ‘Paragraph’ drop-down, and select your heading size.

Creating a heading by clicking on the Paragraph drop-down in the classic editor

The sizes and colors of the different Heading styles are controlled by your theme’s stylesheet (style.css).

If you’re using a premium WordPress theme, then you may have the option to change these settings under Appearance » Customize.

Using subheadings in your articles makes it easier for readers to follow what you’re telling them. At the same time, it also makes your WordPress posts SEO friendly.

Method 2: Changing the Size of the Text in the Block Editor

What if you want to have a paragraph or even your whole post in a larger font? You can do this really easily using the default WordPress block editor.

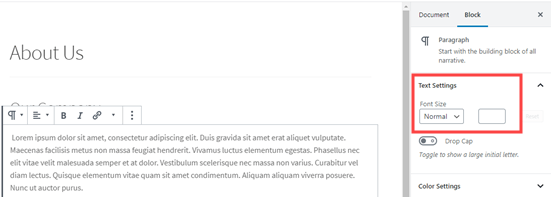
Just click on any paragraph block, then select the font size under ‘Text Settings’ on the right-hand side.

Changing the text size of a paragraph block

You can select from the drop-down, which covers Small, Normal, Medium, Large, and Huge. If you change your mind, then just click the ‘Reset’ button to set your paragraph back to the default text.

There’s also a ‘Custom’ option where you can simply type in the pixel size that you’d like. If you want, you can also set a large Drop Cap to appear at the start of your paragraph.

These options aren’t available in the older classic editor for WordPress. If you want to use them, then think about making the switch. Our tutorial on how to use the new WordPress block editor will help you.

If you are determined to stick with the classic editor, then this next option is for you.

Method 3: Change Font Size Using The TinyMCE Advanced Plugin

TinyMCE Advanced is a WordPress plugin that gives you more control over font sizes and text formatting, as well as a range of other features.

This is particularly useful with the older classic editor, but it also works with the block editor. It adds a new block called “Classic Paragraph” that has all the TinyMCE controls.

To use it, you’ll first need to install and activate the TinyMCE Advanced plugin. If you’re not sure how to do that, check out our step by step guide on how to install a WordPress plugin.

Next, go to Settings » TinyMCE Advanced to configure the editor settings. This is where you can set up the buttons you want to use in the TinyMCE Advanced toolbar.

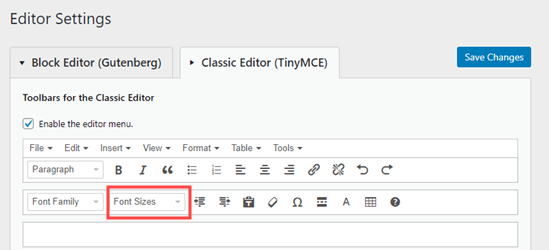
If you’re using it with the Classic editor, then you should see that TinyMCE has the ‘Font Size’ drop-down enabled by default in the second row of icons.

You can move it to the first row by dragging it upwards if you want.

The font sizes drop-down button on the TinyMCE Advanced menu for the classic editor

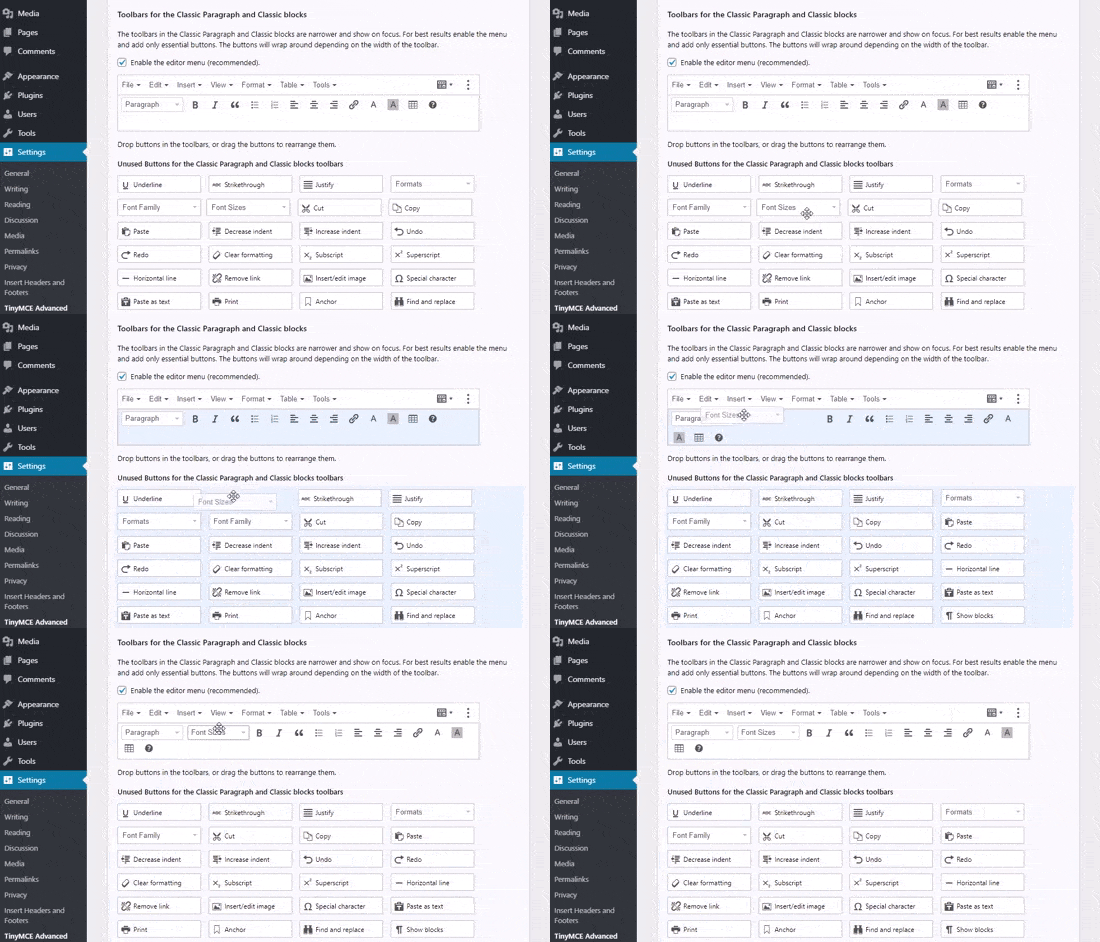
If you’re using the block editor, then you’ll need to scroll down the screen and add the Font Sizes drop-down to the toolbar by dragging and dropping it:

Adding the font sizes button to the TinyMCE Advanced block toolbar

Make sure you click ‘Save Changes’ at the bottom of the screen.

To see the button in action, create a new post or edit an existing one.

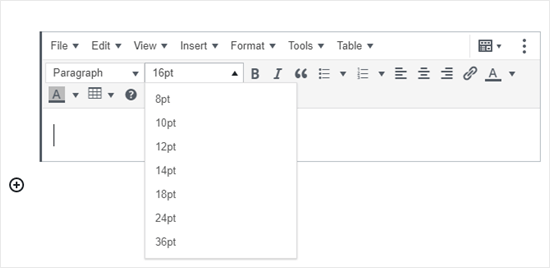
In the block editor, you’ll now have the option to add a ‘Classic Paragraph’ block. It will have the TinyMCE Advanced controls, like this:

The Classic Paragraph block in the block editor, added by the TinyMCE Advanced plugin

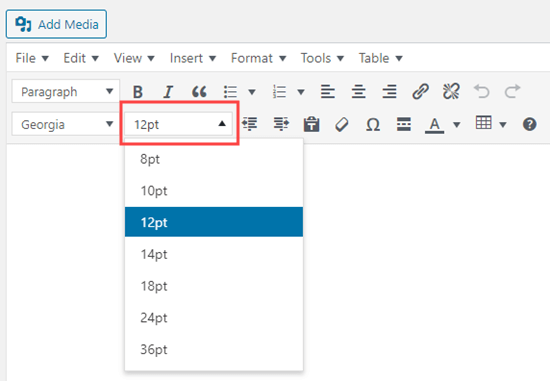
In the classic editor, you’ll see the TinyMCE Advanced toolbars with a font size drop-down:

Changing the font size using the TinyMCE Advanced editor

You can select any font size from the drop-down.

Note: this doesn’t give you as many options as the WordPress block editor, and you can’t type in your own font size.

Method 4: Change Site-Wide Font Size Using CSS

If you are changing font sizes every time you edit a post, then you may want to make it easier by changing it permanently in your theme.

The good news is that you can change the default paragraph size across your whole site. The best way to do this is by using the Theme Customizer under Appearance » Customize.

Some WordPress themes may come with an option for you to change the font size. If you can find this option, then you can use it without writing CSS code.

However, if your theme does not have that feature, then you can add custom CSS to add your own font size rules.

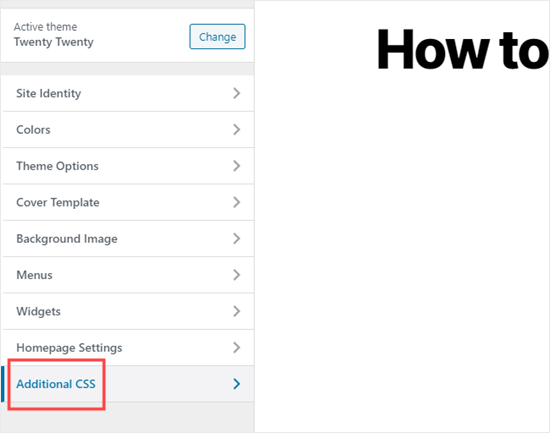
Simply click on the ‘Additional CSS’ option in the theme customizer. This is where you can store all your custom CSS code.

Using the Customizer to add CSS code to your site

Now under the additional CSS text box, simply add your CSS code. In this example, we are changing the font size to ’16px’, you can choose a different font size.

p { 
font-size:16px; 
} 

You’ll immediately see the changes on the preview on the right-hand side of the screen. If you’re happy with the font size, click the ‘Publish’ button at the top of your screen to make it live.

Note: Your custom CSS will only be applied to the theme you’re using. If you later choose to switch to a different WordPress theme, you’ll need to copy and paste it into the Customizer again.

The above code only applies to paragraph text. What if you wanted to change the font size of all h2 sub-headings?

Simply modify the above code to target the h2 element in your theme like this:

h2 { 
font-size:32px; 
} 

You can do the same thing with other headings as well by simply changing h2 to h3, h4, or h5.

We hope this article helped you learn how to easily change the font size in WordPress. You may also want to see our guide on how to use custom fonts in WordPress or our list of the best drag & drop WordPress page builder plugins.

If you liked this article, then please subscribe to our YouTube Channel for WordPress video tutorials. You can also find us on Twitter and Facebook.

The post How to Easily Change the Font Size in WordPress appeared first on WPBeginner.
How to Duplicate a WordPress Page or Post with a Single Click

Wp Plugins

Recently one of our readers asked if it was possible to duplicate a WordPress page with a single click?

Creating a duplicate post or page allows you to work on it without affecting the existing version.

In this article, we will show you how to quickly duplicate a WordPress page or post with all the settings.

Easily duplicate a WordPress post or page

Why Clone or Duplicate a Page / Post in WordPress?

When you are running a blog for a while, you may sometimes need to quickly copy a post or page.

For instance, a sales page that already has a lot of content that you can reuse, or an older article that can be extended as a new article.

Now, you could manually copy and paste the contents of the post or page to a new draft. However, this does not copy your featured image, post settings, SEO settings, and other metadata.

Wouldn’t it be nice if there was an easier way to automatically duplicate a post or page with all its settings and content?

With this approach, you can just edit a post and start working on it right away.

Let’s see how to easily and properly clone a WordPress post or page with just a click.

Video Tutorial

If you prefer written instructions, then continue reading.

Duplicate a WordPress Post or Page

First, you need to install and activate the Duplicate Post plugin. For more details, see our step by step guide on how to install a WordPress plugin.

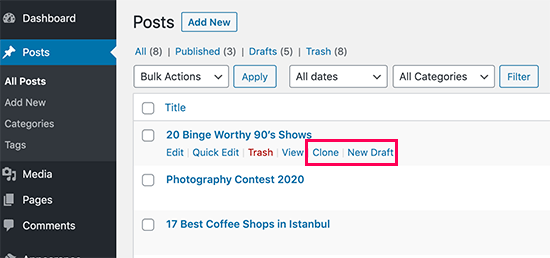
Upon activation, you need to visit Posts » All Posts page. You will notice two new links to clone or to create a new draft below each post title.

Clone post or create a new draft

Clicking on ‘Clone’ will simply create a duplicate post and will not open the duplicate post in the post editor.

The ‘New Draft’ option will duplicate the post and open the duplicate version in the post editor, so you can start working on it right away.

You will also find the same options for pages as well.

The duplicate post plugin works really well. However, if you want to use it mainly for updating old published posts, then there is a better way to do that.

See our guide on how to properly update live published posts in WordPress for more details.

If you want to use it for other scenarios such as website redesign, copying landing pages, etc, then this is where the plugin really shines.

Customizing Duplicate Post Plugin Settings

The duplicate post plugin works out of the box and supports posts and pages by default.

You can also customize the plugin to enable support for custom post types, restrict to user roles, and choose what to copy when creating a duplicate.

Let’s take a look at all these settings.

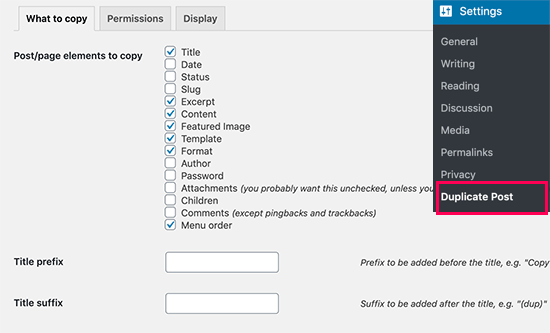
Head over to Settings » Duplicate Post page to configure plugin settings.

Duplicate post settings

The settings page is divided into three tabs. First tab allows you to choose what to copy when creating a duplicate.

The default options should work for most websites. However, you can check things you want to copy and uncheck items that you don’t want to be copied.

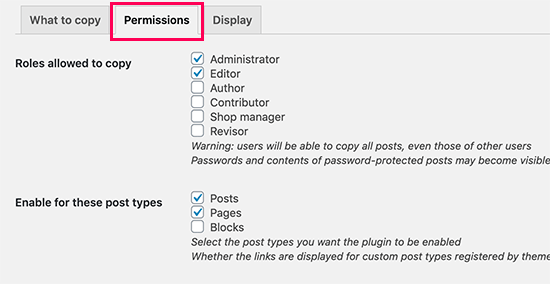
Next, you need to move on to the permissions tab.

Duplicate Post permissions

By default, the plugin allows administrator and editor user roles to create duplicate posts.

It also enables duplicate post feature for posts and pages post types.

If you are using custom post types on your website, then those post types will appear here. You can choose whether you want to enable duplicate post feature for those post types as well.

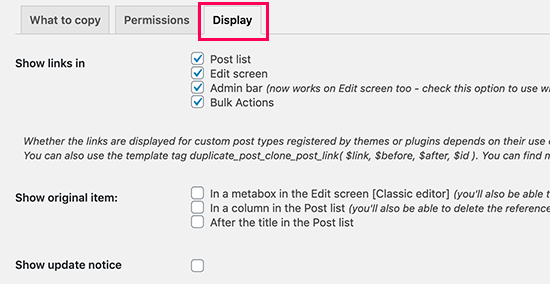
Finally, click on the Display tab to choose where you want to display the clone post links. By default, the plugin shows them on post list, edit screen, and admin bar.

Duplicate Post display options

Don’t forget to click on the save changes button to store your settings.

That’s all, we hope this article helped you learn how to easily duplicate a WordPress page or post. You may also want to see our ultimate WordPress SEO guide for beginners and our tips on how to speed up your WordPress site.

If you liked this article, then please subscribe to our YouTube Channel for WordPress video tutorials. You can also find us on Twitter and Facebook.

The post How to Duplicate a WordPress Page or Post with a Single Click appeared first on WPBeginner.

#266: Rubber Ducking

Featured Imgs 23

Show Description

It is rubber duck season! As we all spend a lot more time on our own, team CodePen and the CodePen community are squashing bugs with the "rubber ducking" technique for breaking down complex problems. Goofy name, but it really works!

Time Jumps

  • 01:33 What is rubber ducking?
  • 05:03 Reduced test case
  • 08:40 Getting debugging help on social media
  • 15:17 Sponsor: Porkbun
  • 16:00 CodePen Collab mode rubber ducking
  • 19:51 Console on CodePen

Sponsor: Porkbun

Did you know? You can get a free .design domain name for your website! .design lets everyone — especially your clients or future employers — know what you do before they even arrive to your website. Unlike .com or .net, it’s more relevant to what you do as a designer and it helps with your branding. It looks great on resumes, business cards, or as your professional email address (e.g. you@website.design). Right now you can get a free .design domain name. Your .design domain name comes with free email hosting, SSL certificates, & a free site builder.

Show Links

CodePen Links

The post #266: Rubber Ducking appeared first on CodePen Blog.