Hi i am computer science students. I always confused to about php base websites or another website. Yesterday my teacher gave me assingement to check website either it is php base or other platform. But i haven't decided to give answer. I am week student in class. please help me in this regarding. I am sharing a weblink please expert tell me. is this php base or anohter platform
(https://www.malumaat.pk/latest-wapda-jobs)
Please tell above mentioned link is on php or not?
Thanks
Web Hosting Vs. Website Builder
Building your first website can feel a lot like doing your taxes. It’s confusing, there’s a TON of information out …
Web Hosting Vs. Website Builder Read More »
The post Web Hosting Vs. Website Builder appeared first on .
8 Ways to Increase Your CTR in WordPress
 Your website is an essential business asset. And that’s especially true when marketing and lead generation are concerned. But for it to do the heavy work of generating leads for you, it must be optimized for visibility. More than that, your WordPress site must be optimized to drive clicks. And that’s why you must know […]
The post 8 Ways to Increase Your CTR in WordPress appeared first on WPExplorer.
Keeping Your WordPress Sites Fully Backed-up with Snapshot and The Hub
Backing up your WordPress site(s) has never been easier. Regardless of your hosting setup, The Hub and Snapshot make keeping your sites fully backed up a breeze. Here’s how…
Whether you manage one or multiple WordPress sites, keeping your site’s files and data regularly backed-up is an essential part of website maintenance and security.
So, it’s important that the backup process be made as simple, easy, safe, and reliable as can be.
In this tutorial, we’ll show you how to keep your WordPress sites fully backed up using The Hub, our WordPress management console, and Snapshot, our automated backups plugin.
Specifically, we’ll look at how to:
- Access Backup Info from The Hub
- Manage WordPress Backups Using The Hub’s Backups Tab
- Create a WordPress Backup in One-click
- Schedule WordPress Backups Automatically
- Check Detailed Backup Information
- Safely Restore Your Backups

Access Backup Info from The Hub
With The Hub, you can easily manage multiple WordPress sites from one central location. This includes managing, deleting, downloading, backing up, and restoring site backups.

The types of backup you will manage from The Hub depend on whether you choose to host your sites with WPMU DEV or a third-party host.
If you host your sites with WPMU DEV’s managed WordPress hosting, your sites’ files and data will be fully backed up every night automatically using our secure, reliable, and super-fast Hosted Backups service. See our Hosting Backups Guide for more details.
Note: You can also use Snapshot to schedule additional backups (e.g. store your backups on a third-party storage service like Amazon S3, *Google Drive, *Dropbox, etc.)
*coming soon
If you host your sites with a third-party host, you can install Snapshot and use it with The Hub to manage all of your backups. See our Snapshot documentation for full details on using the plugin.
Tip: The Hub icons show you which backup service each of your sites is using (i.e. WPMU DEV backups or Snapshot). These icons display in your site’s Hub menus and panels.

With The Hub, you can view information about your sites’ backups as soon as you log in.
Simply hover over the backup icons on your Sites screen and a small pop-up window will display the backup details for that site.

WPMU DEV Hosted Backups vs Snapshot Backups
Depending on the backup service your site uses, The Hub’s Overview section will display your Backups module differently.
For example, here is the Overview screen of a site hosted with WPMU DEV using our Hosted Backups service…

And here’s the same Overview screen of a site hosted with a third-party service using Snapshot, as indicated by the icon on the Backups panel…

As you can see, there is a slight difference in how information displays about your backups in The Hub’s Overview panel.
If you use Snapshot to manage your site’s backups, the Overview panel displays how much storage you have used in your current plan.
Manage WordPress Backups Using The Hub’s Backups Tab
To manage site backups, view a list of available backups, configure backup settings, etc., select a site from The Hub and click on the Backups panel in The Overview screen or the Backups tab in the main menu.

Clicking on either of these options will bring you to the Backups Dashboard.

Again, the Dashboard you see here will depend on your choice of hosting.
Here is the Backups Dashboard of a site hosted with WPMU DEV…
Backups Dashboard screen of a site hosted with WPMU DEV
And here is the Backups Dashboard of a site using a 3rd-party host with Snapshot installed:
Backups Dashboard screen of a site using Snapshot
See our documentation for more information on using the Backups tab.
Create a WordPress Backup in One-click
To create a full backup of any site directly from The Hub with just one click, go to the Backups tab and click the button in the Backups Dashboard.

You can also do this by clicking on the Settings icon (three dots) and selecting Create Backup from the menu.

The Hub will automatically begin to back up your site. As soon as the backup is completed, it will display on the list of available backups.

Notes:
- Your backups will be stored securely offsite on WPMU DEV’s backup storage and/or a third-party storage service as per your configuration settings.
- Hosted backups are stored for 30 days (50 days on Snapshot). If you reach your storage limit, your oldest backup will be replaced with a new one.
- If a backup fails for any reason, it will be highlighted in red on the Dashboard’s backup list.

See our Backups Dashboard Overview documentation for more details on creating backups.
Schedule WordPress Backups Automatically
If you’re using Snapshot to backup your sites, you can create a backup schedule (monthly, weekly, daily) from The Hub by going to your Backups tab and selecting Set Schedule from the Settings menu.

Configure your schedule and click Save to update your settings. Alternately, if you do not want The Hub to back up your sites, click the Remove Schedule link to set the frequency of your backups to None.
Schedule backups for sites using Snapshot from The Hub.
Note: You cannot set a schedule for backing up sites hosted on WPMU DEV, as your sites are automatically backed up daily.
Check Detailed Backup Information
To view details of your backups, go to The Hub > Backups tab and click on a backup item.

This will bring up a pop-up window with your backup details.

Click on the Settings icon (three dots) to bring up additional options that let you download and restore your backups.

Note: If you’re viewing details about backups created using Snapshot, you can also delete the backup to free up storage space, and send an email with a downloadable copy of your backup by clicking on the Filename.

If you are using Snapshot, you can also view detailed logs about your backups. Just log into your site from The Hub, go to the Snapshot Backups > Logs section, and click on a backup from the list on the Available Logs screen.

For more info, see our Snapshot Logs tab documentation.
Safely Restore Your Backups
With The Hub, you can easily download and restore your backups.
To restore your website from a full or incremental backup, select your site from The Hub, click on the Backups tab and then click on a backup from your list of available backups.
Next, click either the Restore button or select the option from your Backup Details > Settings menu.

If you can access your website, The Hub will restore your backups automatically as soon as you click the button.
If your website is unavailable, there are several methods you can use to restore your site, and The Hub will instruct you on what steps to take.

If you’re not hosting your websites with WPMU DEV, see our documentation on how to restore your website with Snapshot.
We’ll Back You Up All The Way
Whether you choose to host with WPMU DEV (and we highly recommend you do – we’re better and cheaper!) or a third-party host, you can enjoy complete peace of mind knowing that your WordPress sites are being fully and securely backed up.
Also, we’re continually improving The Hub and Snapshot (check out our roadmap) and if you need help creating or restoring your backups or have any other WordPress-related questions or issues, our 24/7 support team is always available.
20 WordPress Websites That See Millions of Visitors
WordPress powers a huge portion of the Internet. How much is that exactly? In fact, more than 43% of all …
20 WordPress Websites That See Millions of Visitors Read More »
The post 20 WordPress Websites That See Millions of Visitors appeared first on .
How to Track domain and subdomain using same Google analytics code
Hello Guys,
I want to track main domain and sub domain of my website uswing same google analytics code. Can any one help me. I have put the same code on both the website. But, It treats same user as different user when user switches website from main domain to subdomain. Is there any way to do this. Please help me
How to setup advance tracking using google tag manager?
I want to track my website with some advanced features. I want to set up event tracking using google tag mamager. How can i track my website?
How to Create a Sticky Floating Navigation Menu in WordPress
Recently, one of our users asked us how to create a sticky navigation menu for their site?
Sticky navigation menus stay on the screen as users scroll down the page. This makes the top menu always visible, which is good for user experience because it contains links to the most important sections of your website.
In this article, we’ll show you how to easily create a sticky floating navigation menu in WordPress.

What is a Sticky Floating Navigation Menu?
A sticky or floating navigation menu is one that ‘sticks’ to the top of the screen as a user scrolls down. This makes your menu visible to users at all times.
Here’s a sticky menu in action. We’re going to show you how to create a menu exactly like this for your own site:

Why and when sticky menus can be useful?
Usually, the top navigation menu contains links to the most important sections of a website. A floating menu makes those links always visible, which saves users from scrolling back to the top. It is also proven to increase conversions.
If you run an online store, then your top navigation menu likely include links to the cart, product categories, and product search. Making this menu sticky, can help you reduce cart abandonment and increase sales.
Some of the best WordPress themes have built-in support for a sticky navigation menu. Simply see your theme settings under Themes » Customize to enable this feature.
If your theme does not have this option, then keep reading, and we’ll show you how to easily create a sticky floating navigation menu in any WordPress theme or WooCommerce store.
Method 1: Add Your Sticky Floating Navigation Menu Using a Plugin
This is the easiest method. We recommend it for all WordPress users, particularly for beginners.
If you haven’t set up your navigation menu yet, go ahead and do that using our instructions on how to add a navigation menu in WordPress.
After that, you need to install and activate the Sticky Menu (or Anything!) on Scroll plugin. For more details, see our step by step guide on how to install a WordPress plugin.
Upon activation, you need to visit the Settings » Sticky Menu (or Anything!) page to configure the plugin settings.
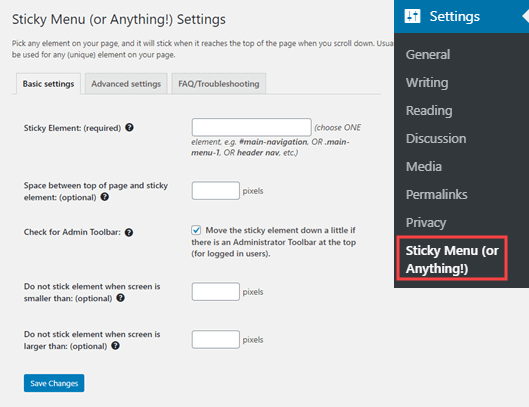
First you need to enter the CSS ID of the navigation menu that you want to make sticky.
You will need to use your browser’s inspect tool to find the CSS ID used by your navigation menu.
Simply visit your website and take your mouse to the navigation menu. After that, you need to right-click and select Inspect from your browser’s menu.
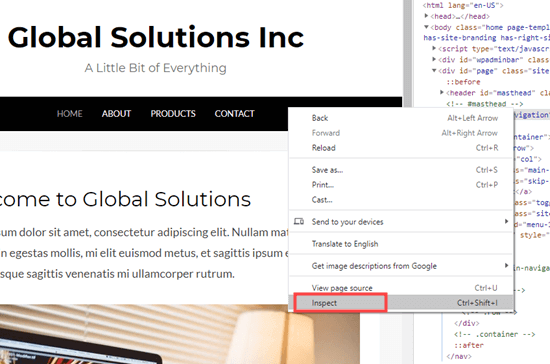
This will split your browser screen, and you will be able to see the source code for your navigation menu.
You need to find a line of code that relates to your navigation, or your site header. It will look something like this:
<nav id="site-navigation" class="main-navigation" role="navigation">
If you’re struggling to find it, bring your mouse cursor over the different lines of code in the Inspect pane. The navigation menu will be fully highlighted when you have the right line of code:
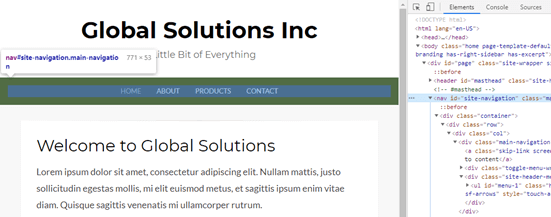
In this case, our navigation menu’s CSS ID is site-navigation.
All you need to do is enter your menu’s CSS ID in the plugin settings with a hash at the start. In this case, that’s #site-navigation.
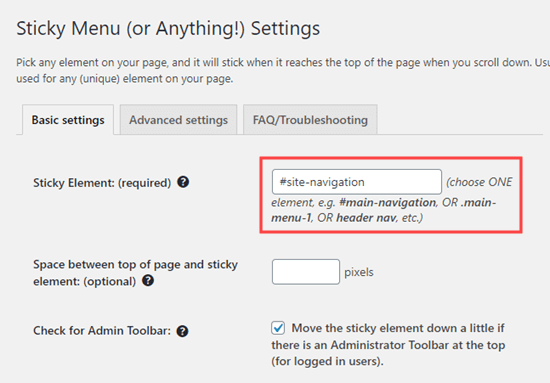
Don’t forget to click the ‘Save Changes’ button at the bottom of the page.
Now, go ahead and check out your sticky menu live on your WordPress website. It should stay on the page as you scroll down, like this:

The next option on the plugin’s settings page is to define the space between the top of your screen and the sticky navigation menu. You only need to use this setting if your menu is overlapping an element that you do not want to be hidden. If not, then ignore this setting.
We recommend leaving the box checked next to the option: ‘Check for Admin Bar’. This allows the plugin to add some space for the WordPress admin bar, which is only visible to logged-in users.
Here, you can see that the admin bar on our test site is correctly displaying above the sticky menu:
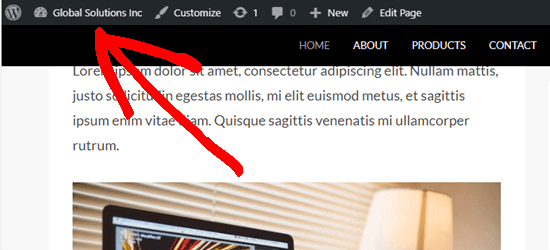
The next option allows you unstick the navigation menu if a user is visiting your website using a smaller screen such as a mobile device:
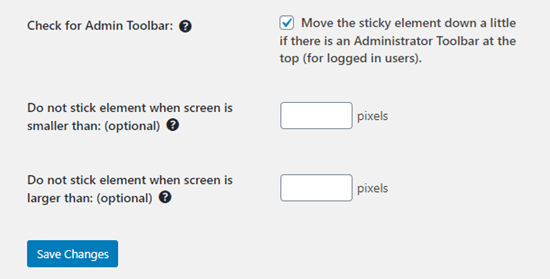
You can test how your site looks on mobile devices or tablets. If you don’t like how it looks, simply add 780px for this option.
Don’t forget to click on the Save Changes button after making any changes to your options.
Method 2: Manually Add a Sticky Floating Navigation Menu
This method requires you to add custom CSS code to your theme. We don’t recommend it for beginners.
We also recommend that you take a look at our guide on how to easily add custom CSS to your WordPress site before you begin.
First, you need to visit Appearance » Customize to launch the WordPress theme customizer.
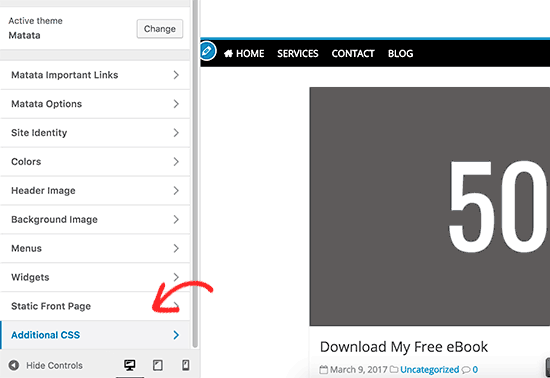
Next, click on ‘Additional CSS’ in the left pane and then add this CSS code.
#site-navigation {
    background:#00000;
    height:60px;
    z-index:170;
    margin:0 auto;
    border-bottom:1px solid #dadada;
    width:100%;
    position:fixed;
    top:0;
    left:0;
    right:0;
    text-align: center;
}
Note: This will produce a navigation menu with a black background. If you want a different color, change the number next to background. For example, using background: #ffffff will give you a white menu background.
Just replace #site-navigation with the CSS ID of your navigation menu then click on the Publish button at the top of the screen.
Go ahead and visit your website to see your sticky floating navigation menu in action:

What if your navigation menu normally appears below the site header instead of above it? If so, this CSS code could overlap the site title and header or appear too close to it before the user scrolls:

This can be easily adjusted by adding a margin to your header area using some additional CSS code:
.site-branding {
margin-top:60px !important;
}
Replace site-branding with the CSS class of your header area. Now, the sticky navigation menu will no longer overlap your header before the user scrolls down:

We hope this article helped you add a sticky floating navigation menu to your WordPress site. You may also want to see our guide on how to create a custom WordPress theme without writing any code, and our comparison of the best WordPress page builder plugins.
If you liked this article, then please subscribe to our YouTube Channel for WordPress video tutorials. You can also find us on Twitter and Facebook.
The post How to Create a Sticky Floating Navigation Menu in WordPress appeared first on WPBeginner.
10 Tips to Retain SEO Ranking After a Redesign
 If you run any kind of modern business, you understand how important a professional-looking website is a today. Running a website requires paying attention to a lot of things. You must fine-tune your content, implement a sleek brand, improve conversions, and master search engine optimization (SEO) to increase your organic reach. Occasional updates and even […]
The post 10 Tips to Retain SEO Ranking After a Redesign appeared first on WPExplorer.
Open Website from String variable
Hi, so I am very new to coding and I wanted to make something that opens a website stored in a string variable like this:
#include <string>
#include <iostream>
#include <windows.h>

int main()
{
string url = https://google.com;

//now I dont know how to open the url from the string
ShellExecute(NULL, "open", "https://google.com", NULL, NULL, SW_SHOWMAXIMIZED);
}
Unfortunately I dont know how to open the url from the string. I know how to open an url but not how to open one stored in a variable.
Tanks for all answers.
How to Create a Staging Site for WordPress
 Ever found yourself in a situation where you tried to update WordPress or a plugin only to be greeted by the white screen of death? Or maybe you love experimenting with new themes and plugins? Or adding custom functionality to your website and you’ve encountered the same thing? No matter what the case might be, […]
The post How to Create a Staging Site for WordPress appeared first on WPExplorer.
Local seo Question
If i creat a section on my website or a blog (and redirecting it to the website) where i talk about local events, i will rank better for that locality?
Though the contents are difficult to correlate?
I have no idea if this can work maybe some of you can clarift this.
How to Create a Questionnaire in WordPress (Easy Way)
Do you want to create a questionnaire in WordPress to survey your visitors or collect data?
Getting feedback on your products or simply learning more about your users can help your business to succeed.
In this article, we will show you how to easily create a questionnaire in WordPress, step by step.

Why Create a Questionnaire in WordPress?
Creating a questionnaire is a great way to learn more about your audience. This lets you tailor your content to their needs. You can also use the results to create or modify the products / services that will be most helpful to your audience.
There are several survey tools that you can use outside your website, but having your questionnaire on your website itself means you have full control over how it’s displayed. Plus, it’s more familiar and reassuring for your audience.
That being said, let’s take a look at how to easily add a questionnaire to your WordPress site.
Creating a Questionnaire Form in WordPress
For this tutorial, we’ll be using WPForms to create a questionnaire.
WPForms is the best forms plugin for WordPress and allows you to easily create any kind of forms using a simple drag and drop form builder.
First, you need to install and activate the WPForms plugin on your WordPress site. For more details, see our step by step guide on how to install a WordPress plugin.
Note: You’ll need the Pro version of the plugin to get the features that we will use in this tutorial.
Upon activation, you need to visit the WPForms » Settings page in your WordPress admin area to enter your license key. You’ll find the license key under your account on the WPForms website.
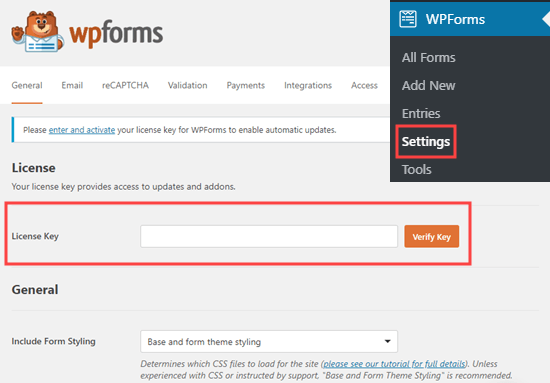
Now, it’s time to move on and create your questionnaire.
Creating a Questionnaire Using WPForms’ Survey and Polls Feature
WPForms’ powerful surveys and polls addon lets you create questionnaires easily. It also produces beautiful visual graphs of the results.
First, visit the WPForms » Addons page to install the Survey and Polls addon. Use the search bar to find it, then click the Install Addon button.
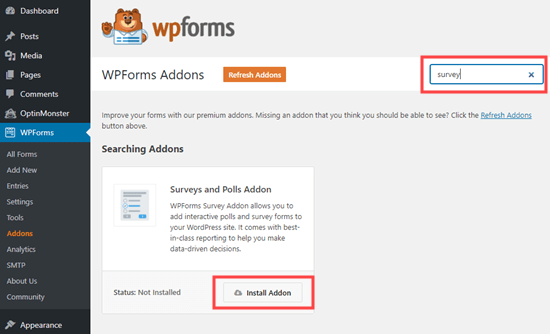
Next, go to WPForms » Add New to create a new form. First, type in a name for your form at the top of the screen:
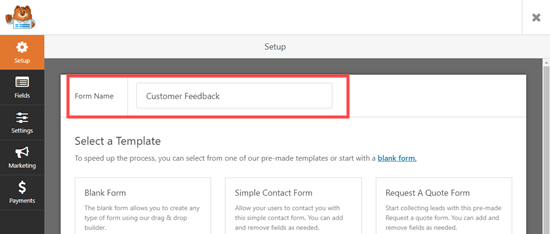
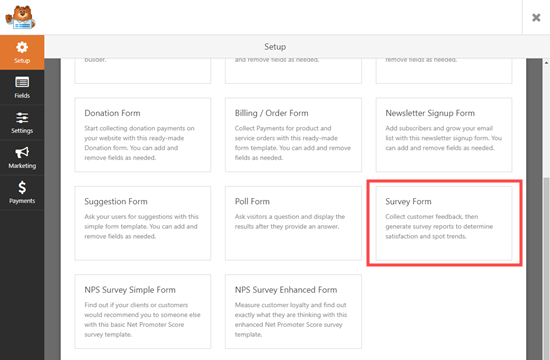
There are 4 different pre-built survey form templates to choose from. These are the Poll Form, the Survey Form, the NPS Survey Simple Form, and the NPS Survey Enhanced Form.
We are going to use the Survey Form for our questionnaire.
After you select the template, it will open up in the WPForms editor.
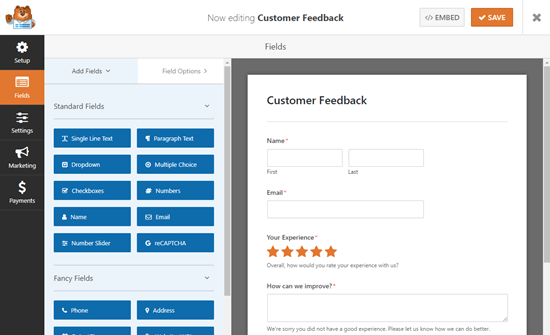
We recommend that you edit the questions to make them appropriate for your audience and needs. We are going to use the form to gather customer feedback on products and delivery.
To edit any field, simply click on it. The editing view will then open up on the left-hand side of your screen. Here, we are editing the Name field at the top. We changed the format to ‘Simple’ using the dropdown.
We also made it optional by unchecking the ‘Required’ box.
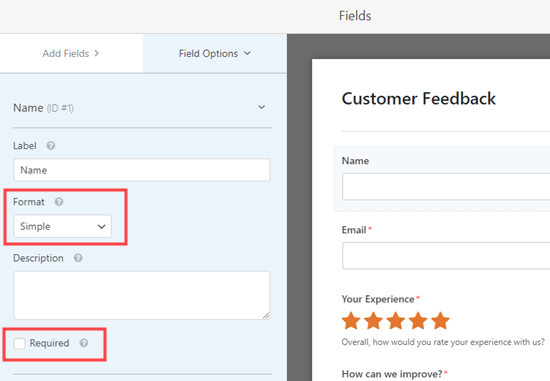
The ‘How can we improve?’ box only appears if the user rates their experience as 1 star or 2 stars.
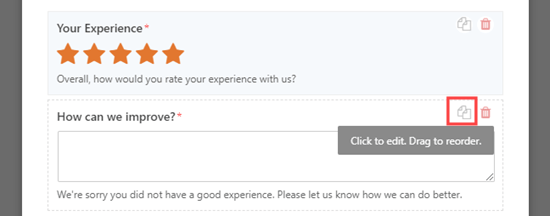
We’re going to add a new feedback box that will appear if the user rates their experience as 3 or 4 stars. To do this, simply bring your mouse cursor over the ‘How can we improve?’ box then click the Copy button:
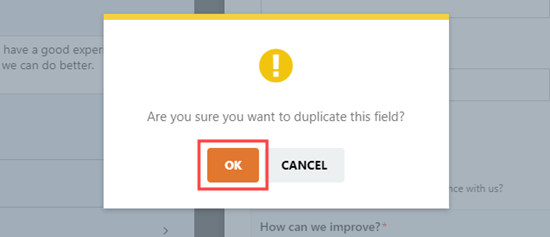
Next, WPForms will check that you want to duplicate the field. Go ahead and click the ‘OK’ button to continue:
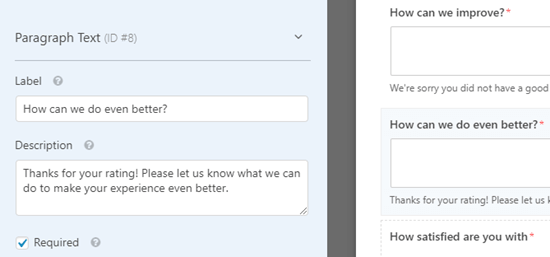
Now, you can edit your new field on the left-hand side of the screen. We have changed the label, which appears above the box. We also changed the description, which appears below the box:
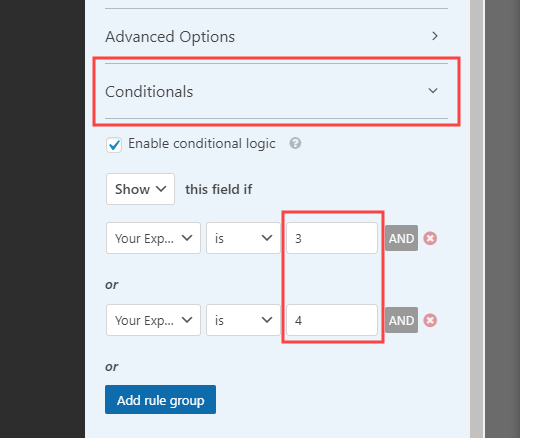
You also need to set the conditional logic for this field. To do that, click the Conditionals tab. Then, set the numbers to 3 and 4 instead of 1 and 2:
Finally, we are going to edit the ‘How satisfied are you with’ Likert scale. A Likert rating scale is a 5 or 7 point scale that is often used to measure satisfaction or attitudes.
Again, simply click on the field to edit it. Then, change the labels of the rows or columns to the text you want to use.
We are going to change the labels of the rows to make them more specific:
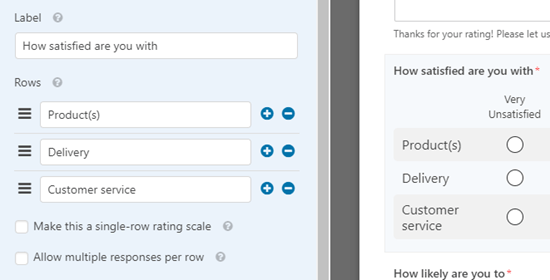
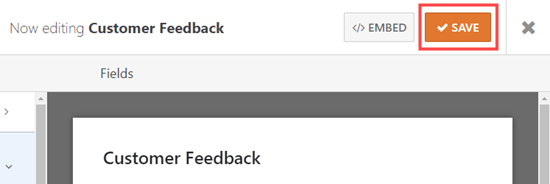
Go ahead and make as many changes to the form as you like. Don’t forget to click the ‘Save’ button at the top of the screen:
Setting Up Notifications for Your Questionnaire
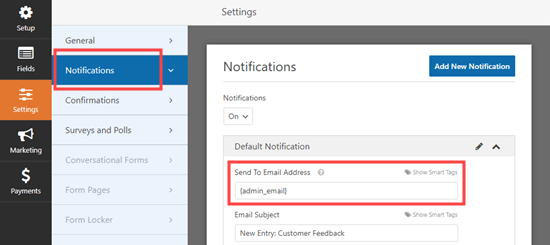
WPForms will send each completed questionnaire to the business email address that’s set in your website settings. It’s easy to change this by going to Settings » Notifications.
Simply delete the {admin_email} in the ‘Send To Email Address’ box and enter the email address you want to use instead:
Tip: Not sure what your WordPress administration email is? Go to Settings » General and check what is listed in the ‘Administration Email Address’ box.
Don’t forget to save your questionnaire after making any changes.
Adding Your Questionnaire to Your Website
You can add your questionnaire to any post or page on your website. You can even add it to your sidebar.
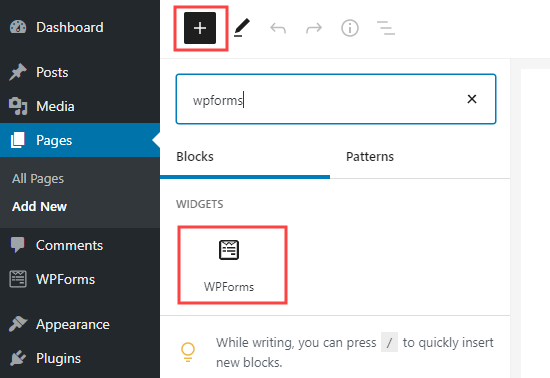
To add your form to a page, edit your page or go to Pages » Add New to create a new one. Then, click the + button to add a new block. Select the ‘WPForms’ block:
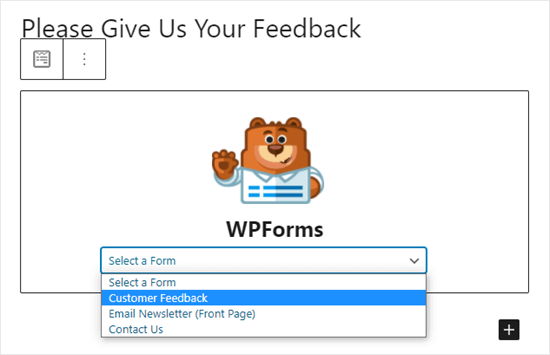
Next, simply click on the dropdown and select your questionnaire form.
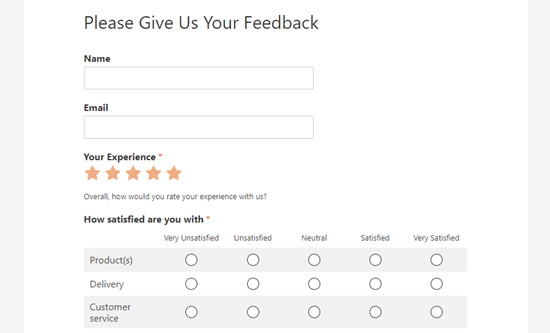
Now, simply preview or publish your post to see the form live on your WordPress website:
Creating a Questionnaire Using Conversational Forms
You can also use WPForms’ conversational forms feature.
A conversational form is an interactive form that flows like a conversation. Users answer a question and it automatically shows them the next one.
It makes longer forms like a questionnaire easier to fill out and reduces form abandonment.
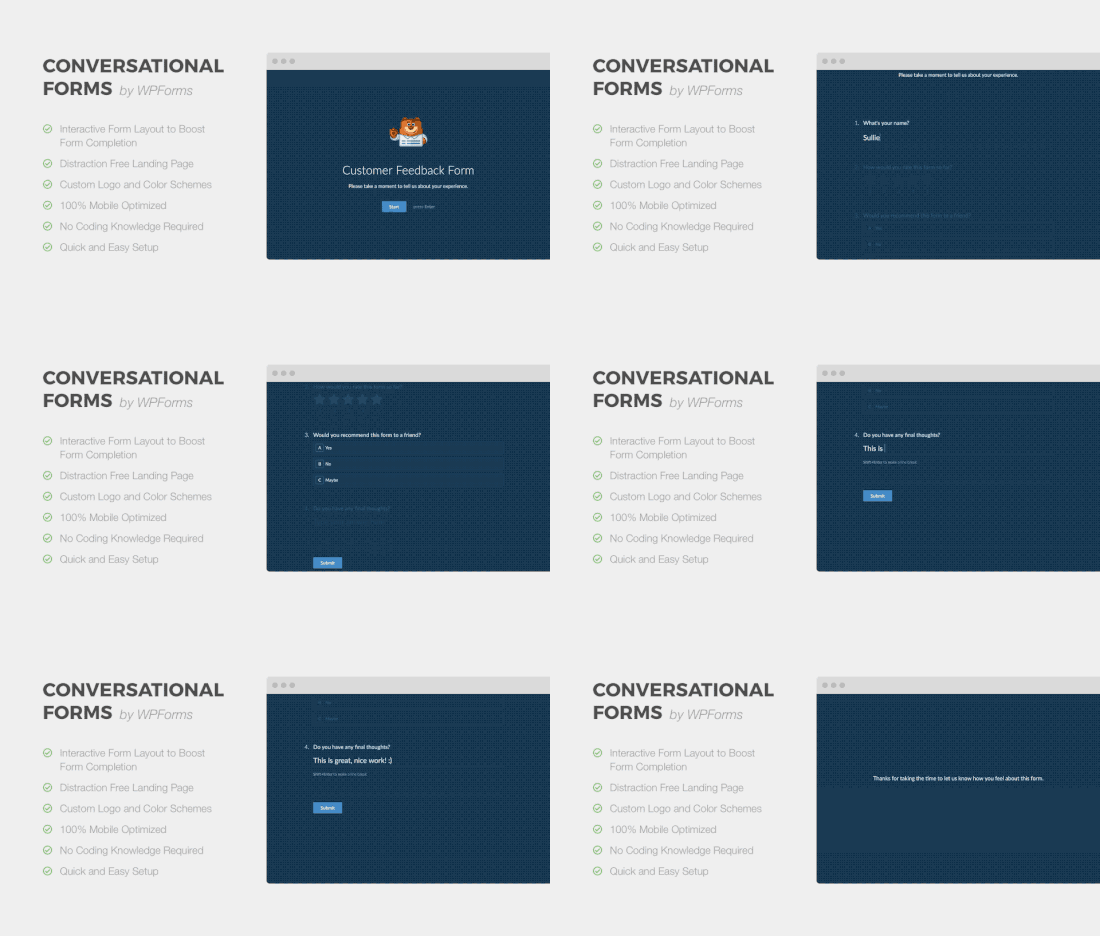
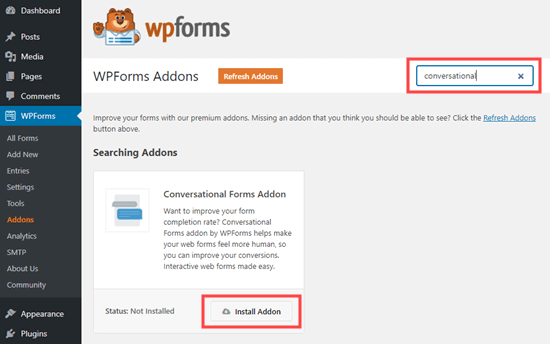
First, you need to go to WPForms » Addons in your WordPress admin. Then, search for and install the Conversational Forms addon:
After that, go to WPForms » Add New and create a new form using the instructions in the previous method.
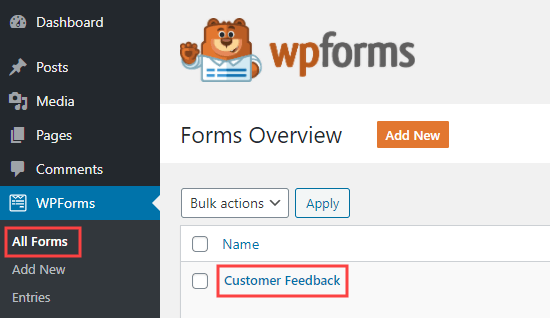
If you already created your form, then simply go to WPForms » All Forms page and click on it to edit it:
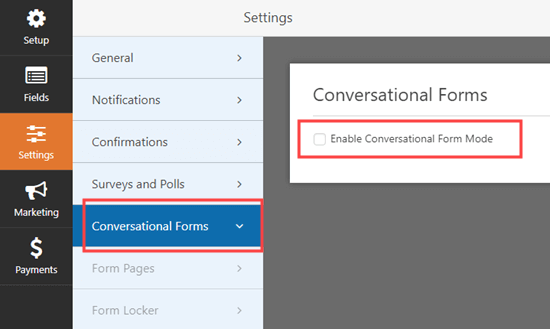
Now, we are going to convert your form into a conversational form. First, go to the Settings » Conversational Forms tab. Then, simply check the ‘Enable Conversational Form Mode’ box.
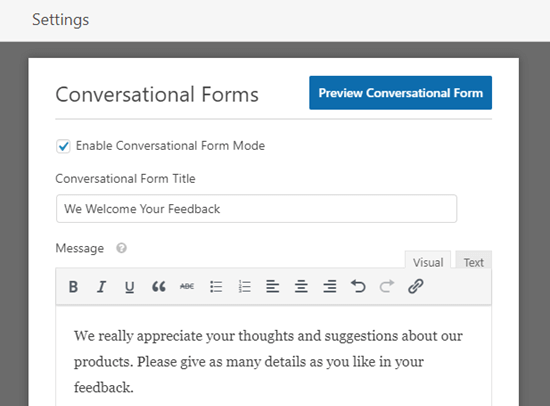
You will then see a number of extra options to fill in. Conversational forms can’t be embedded in a post or page, so you need to give your form a title here. You can also write any text that you want to display above the form:
WPForms will automatically create a URL for your conversational form based on the form’s name. If you want to change this, simply type in a different URL here.
Optionally, you can also upload a header image, choose a color scheme, and change the Progress Bar style.
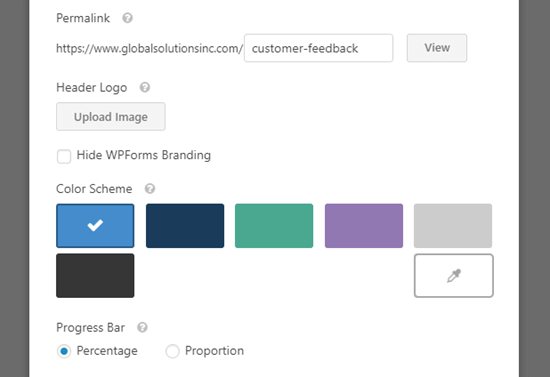
Once you are happy with your form’s settings, don’t forget to click the ‘Save’ button at the top of the screen:
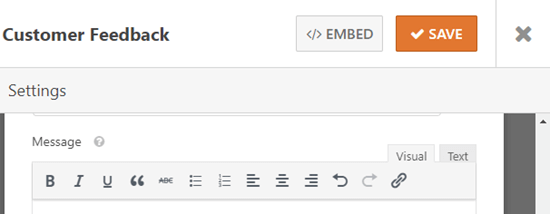
Now, click the ‘View’ button next to the permalink for your form to see it live on your site:

The customer simply clicks the Start button to begin the form.

They can then enter their responses one question at a time. The questions that aren’t active will be faded out until the customer moves to them.

The sticky progress bar at the bottom of the screen will show how far through the form the customer is:
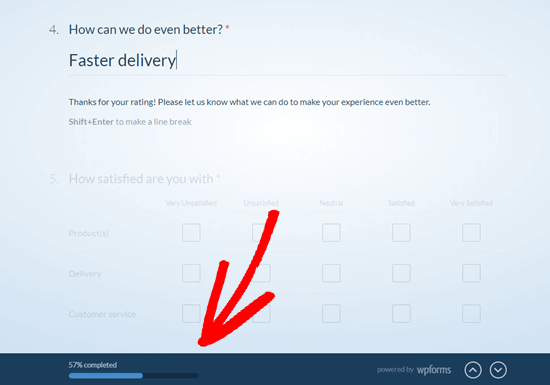
That’s it. You’ve successfully created your conversational questionnaire.
Viewing the Results from Your Questionnaire
Whether you created a regular survey or a conversational form, the process for viewing the results is the same.
Each questionnaire response will be emailed to the email address you set up under Settings » Notifications.
WPForms also stores all your survey results in your WordPress database. To view them, go to WPForms » Entries in your WordPress dashboard. Then, click on the name of your survey form:
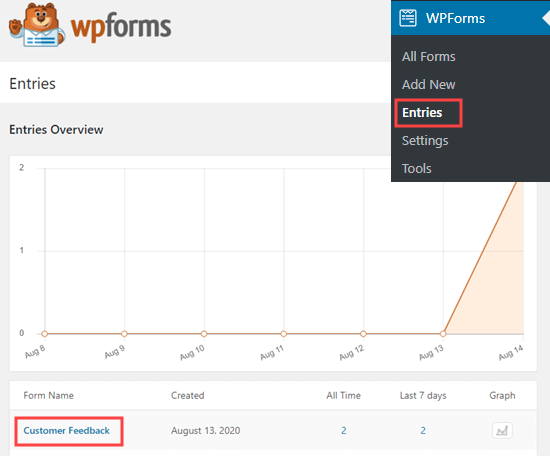
You will then see some of the answers from your questionnaire. Simply click the ‘View Survey Results’ button to view all the questionnaire results.
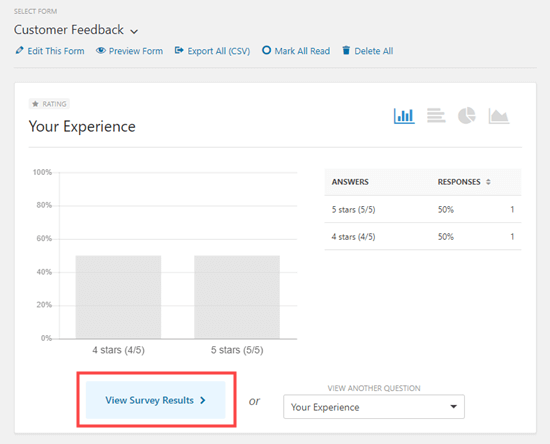
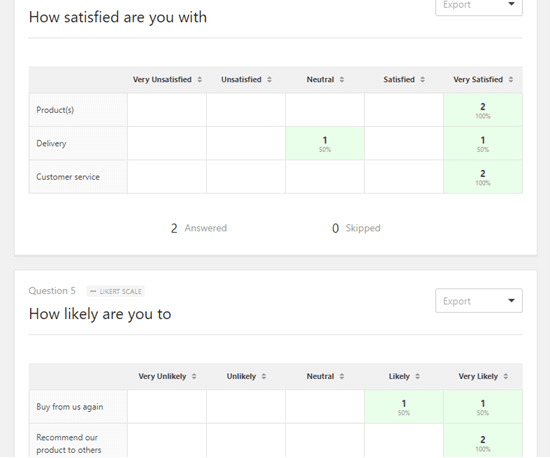
WPForms will automatically create graphs and charts to make it easy to interpret the results:
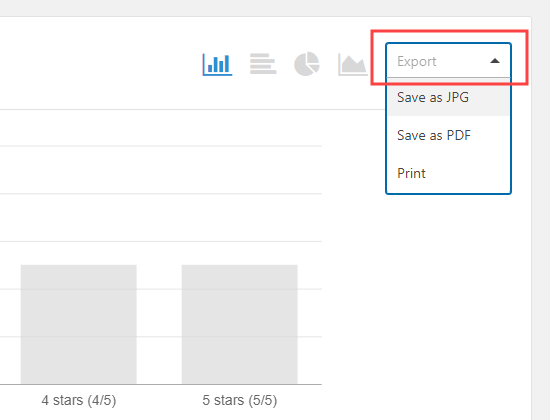
It’s easy to export any of the graphs as a PDF or JPG. You can even print them to share with others in your organization. Just click the ‘Export’ link next to any item and choose from the dropdown menu:
You can also download all your results as a CSV file. Just click the ‘Export All (CSV)’ button near the top of the page to download all the results:
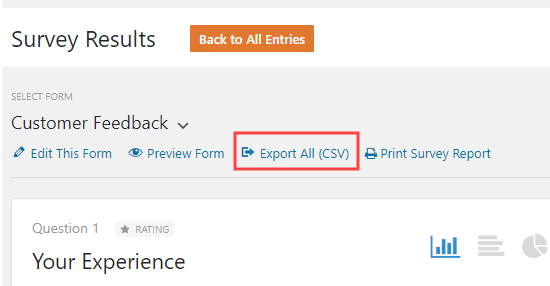
If you want to view the questionnaire answers from individual customers, then click the ‘Back to All Entries’ button at the top of the screen:

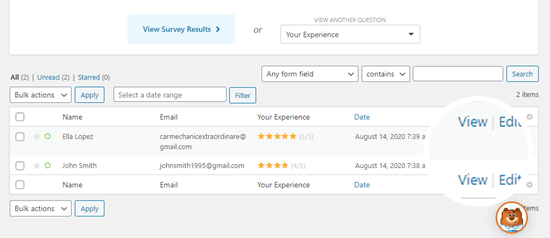
Next, scroll down to the table at the bottom of the screen. Click the ‘View’ button for the entry you want to see:
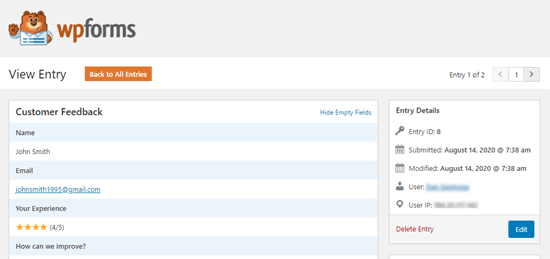
You will now see all the answers submitted by that person.
We hope this article helped you learn how to create a questionnaire in WordPress. You might also enjoy our articles on the best email marketing services and how to start an online store.
If you liked this article, then please subscribe to our YouTube Channel for WordPress video tutorials. You can also find us on Twitter and Facebook.
The post How to Create a Questionnaire in WordPress (Easy Way) appeared first on WPBeginner.
Our Website is not coming google 1st page
Hello all , Our website not ranking on google 1st page . We have done everything , content writing , back links, comments ..etc also spent huge money on google ads and Facebook ads, but no use for it. I have checked many website and their back link is very less also website speed is very less but their website is ranking good .Now our hope is "DANIWEB" . I need your suggestions and guidelines. our website is https://www.bismatrimony.com/
Regards
Soniya Bis
WordPress Permalinks Guide to Improve Site Structure
 We’ve covered how to change permalinks without breaking your website, but why would you want to change them to begin with? Well, today we are going to spend some time going over WordPress permalinks structure. And of course – why and how you might want to optimize your permalink structure for SEO. What Are Permalinks? […]
The post WordPress Permalinks Guide to Improve Site Structure appeared first on WPExplorer.
How to Set and Edit Your WordPress Homepage
 Have you ever bought a WordPress theme, installed it, then wondered why it doesn’t look exactly the way you saw it in the preview? What about a situation where you’d like to completely remove the blog portion of your website from the homepage? Website homepages mean a lot when it comes to conversions. This goes […]
The post How to Set and Edit Your WordPress Homepage appeared first on WPExplorer.
Rebranded my Website but I don’t want my SEO to be Ruined
Hi!
Recently I have decided to change my website from Fred's Fashion Boutique to Fred's Fashion (because the URL became available) and I was in the process of a redesign so I thought it would be a good time.
My website is only about 3 months old so wasn't receiving a lot of organic traffic (around 20 a month) but it was on the rise. I was wondering what I need to do in order for my organic traffic to not halt completely.
Also, I had a few backlinks to my website and was wondering if I created a permanent redirect whether the backlinks would be redirected to my new URL which would give it some authority?
I'm still fairly new at SEO and all that so any general tips that you think would help me my SEO for my website would be much appreciated! Also, I am wondering what is the best way to build backlinks and general tips in getting a good domain authority.
How to Create a Powerful and Secure Customized Firewall with Defender
Hackers can be persistent at trying to get into your site and drop malicious code, figuring out your credentials, and leaving spam. Thankfully, with WPMU DEV’s 5-star security plugin, Defender, you can set up a firewall, block IP addresses with customized lists, and more…leaving troublemakers unable to take even the first step into your WordPress site.
This tutorial will demonstrate how easy it is to set up Defender’s IP banning and keep your WordPress site safe.
Here are 8 areas we’ll be covering (jump to a specific topic by clicking on it):
- Automatically Identify Bad Acting IP Addresses
- Creating a Custom Blocklist & Allowlist
- Active Lockout Displays
- Unlocking IP Addresses
- Location Banning
- Creating Custom Message for Banned Users
- Importing and Exporting Custom Blocklist & Allowlist
- Check Your Lockout Log for Suspicious Activity
Most areas of this tutorial are accessible in Defender under the Firewall and IP Banning section unless specified differently.
Let’s get started with the best and most powerful feature of Defender’s firewall…
1. Automatically Identify Bad Acting IP Addresses
Defender automatically identifies bad acting IP addresses and adds them to a firewall, providing your site with ongoing security and protection.
You can lock out users who attempt a number of failed login attempts. Defender gives you control over the threshold and duration of the lockout in the Login Protection screen (Defender > Firewall > Login Protection).

You can view how many IP addresses have been temporarily blocked in the Active Lockouts section of the IP Banning screen (Defender > Firewall > IP Banning > Active Lockouts). You can also unblock IP addresses here.

You can also enable 404 detection (Defender > Firewall > 404 Detection), and Defender will automatically block IP addresses that repeatedly request pages on your website that don’t exist. It will also temporarily block these offending IP addresses from accessing your site.

Tip: You can use the 404 detection feature in combination with Defender’s login masking feature to immediately identify and block IP addresses requesting your site’s login page.
In addition to Defender’s automatic IP blocking features, you can also block IPs manually, as the next section explains.
2. Creating a Custom Blocklist & Allowlist
Creating a custom blocklist & allowlist with Defender will keep unwanted IPs from accessing your site.
It’s done by easily entering any IP addresses. This includes admins, too.
The first area is for your Blocklist.

You can type out any IPs you want to be blocked, and they’ll no longer be able to access your site.
When you scroll down a bit further, you’ll have the option to add IP addresses to your Allowlist.

It’s the same as the blocklist, where you just enter the IP addresses that you’d like to always have access to your WordPress site.
IPv4 and IPv6 are both supported for the blocklist and allowlist.
Note: We recommend adding your own IP to avoid getting locked out by accident. Your current IP address will be shown below the allowlist and you can easily copy and paste it in.
When you have all the information added to the blocklist and allowlist, there’s a Save Changes button at the bottom of the screen that will save everything.
Unwanted IPs are no longer going to be stopping by your WordPress site.
3.Active Lockout Displays
You can easily view any IP addresses that are blocked from accessing your site based on your rules.

Once you start having lockouts, they’ll all be compiled here. You can see how many IP addresses are currently blocked.
And if you need to unblock any IPs, there’s…
4. Unlocking IP Addresses
Sometimes an IP is blocked or banned and you need to unblock it for many reasons.
Defender makes it simple to release any IP addresses from the Active Lockout area by hitting the Unlock IPS button.

This will reveal all of the blocked IP addresses and it’s one-click to unblock them by clicking Unblock.

There’s no need to hit anything further after this. It will unblock the IP and you’re all set.
You can also search for specific IPs in the search area if you’re having difficulty locating them on the list.
5. Location Banning
Along with IP addresses, you can also ban entire countries with Defender. This feature is handy when you don’t want or expect traffic from specific locations and want to put a stop to hackers and bots visiting from certain areas.
All of this can be achieved in the Locations section.
Defender works with a company called MaxMind, so it can have access to the GeoLite2 Database. It’s free to set up an account and will ask you to do so when first setting up location banning.

There are prompts for a free account. From there, they’ll email you steps to set up a password. Once you login in, you click the link for a new license key in Defender’s dashboard.
Create a new license key in MaxMind and then it will be ready to copy and paste into Defender.

Once your new license key is pasted, you’ll be all set once you hit the Download button. It may take a few minutes for the key to register, so keep that in mind.
Now you have the option to Blocklist & Allowlist any country.
There is a drop-down menu that displays them. Once you start typing, it will populate any corresponding countries that start with that letter.

They’ll all appear in the box below your choice of blocklist or allowlist. You can also take them off the list by clicking on the ‘X’ next to the country’s name.

When completed, it’s all saved by hitting the Save Changes button.
6. Creating Custom Messages for Banned Users
Give any locked out hacker a customized message from Defender himself. All of this can be done in the Message area.
You have the ability to add a customized message in this space.

And after that, anyone that is on the blocklist will be greeted by Defender.

After clicking the Save Changes button, the message will be functioning and unwelcome guests will know why they’re IP isn’t making the cut.
7. Importing and Exporting Blocklist & Allowlist
If you have a blocklist or allowlist from another website and want to import them, it’s quick and easy to do. Likewise, you can export your list that you have for blocklist and allowlist to use on another website.
All of this is under Import and Export in Defender.

There’s an Import button to import and Export button to export a list.
Importing will not remove existing IPs. Also, when you export, it will include the blocklist and allowlist.
8. Check Your Lockout Log for Suspicious Activity
You can view all of your lockouts and quickly ban, allowlist, or delete the list in just a couple of clicks. Plus, you can easily download your activity logs of IP lockouts.
This, unlike the previous sections, is located in Firewall and Logs on Defender’s dashboard.

Once here, you can sort logs by the latest, oldest, or IP address. You can also export them as a CSV and adjust the date range.

Also, take care of the issues in one-click with Bulk Update. You can ban, allowlist, or delete just by checking the boxes individually or by the dropdown to take care of them all.

You can also get more detailed information by clicking on the arrow dropdown next to the issue. There, you’ll also have an option to allowlist or blocklist.
And just like that, all of your lockouts are now taken care of.
Setting Up a Lockout Firewall Can’t Get Any Easier
Unwanted guests won’t get far with Defender’s custom IP address lockout.
And it’s more than just customized IP address lockout — there’s custom messages, location banning, logs, and much more with Defender.
To learn more tips on using Defender, check out our article about finding & deleting suspicious code and all about how to stop hackers in their tracks.
For more information, check out Defender’s documentation page.


