Do you want to disable image attachment pages in WordPress?
Image attachment pages can look like incomplete pages on your site. If a visitor views these, then it can leave a poor impression.
In this article, we’ll show you how to disable image attachment pages in WordPress and redirect it to the parent post.

Why Should You Disable Image Attachment Pages in WordPress?
By default, WordPress creates a single page for every media attachment you have on your site.
This includes images, audio/video files, pdfs, and more. Some users might find this functionality useful, however, most WordPress websites don’t need it.
For example, a photography theme could use the attachment page to display EXIF data. This could show the camera model used, the camera settings, and even the image’s location data.
Often we get complaints from users who accidentally linked their images to the attachment pages, and they don’t like the way it looks.
This is a big issue because many themes don’t have special templates for the image attachment pages.
Sometimes an image on your website can become popular, and people might start landing on the attachment page directly from Google.
Ideally, you want visitors to land on your post and see the image in the context you have used it.
This is why we always recommend users to disable image attachment pages on their WordPress blog.
How to Disable Image Attachment Pages in WordPress (2 Methods)
There are two ways to disable image attachment pages in WordPress.
The first approach uses WordPress plugins, while the second involves adding custom code to WordPress.
You’ll want to choose the method that’s best suited for your skills.
Method 1: Disable Image Attachment Pages in WordPress (with a Plugin)
The easiest way to disable image attachment pages is to use a WordPress plugin. This method is beginner friendly and requires no coding.
We recommend using All in One SEO. It’s the best SEO plugin for WordPress used by over 2 million sites.
The first thing you’ll need to do is install and activate the plugin. To do this, see our guide on how to install a WordPress plugin.
Once the plugin is installed and activated, you’ll have a new menu item called ‘All in One SEO’.
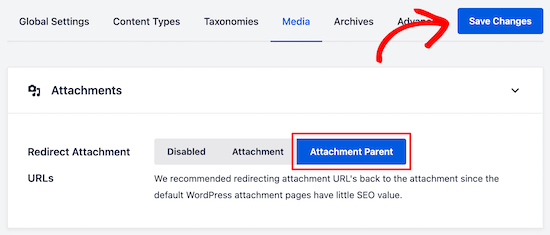
Navigate to All in One SEO » Search Appearance. Next, click the ‘Media’ navigation tab.

The first setting is ‘Redirect Attachment URLs’. You can disable the setting entirely, redirect to the attachment page, or the attachment parent page.
We recommend redirecting to the ‘Attachment Parent’ page. That way, when a user lands on the image attachment page, they’ll be redirected to your article instead.

Once you select your preferred setting, make sure to click ‘Save Changes’ before exiting the screen.
If you aren’t using the All in One SEO plugin, you can still disable image attachment pages and redirect users to a parent post using a plugin called Attachment Pages Redirect.
All you have to do is install and activate the plugin. It’ll automatically start redirecting users that land on attachment pages to the parent post.
If no parent post is found, then users will be redirected to your homepage.
This plugin works out of the box and has no settings page. Simple and easy.
Method 2: Disable Image Attachment Pages in WordPress (with Code Snippet)
Another option is to add a code snippet to WordPress that accomplishes the same goal as the plugin above.
If you don’t want to use a plugin or feel that you’re already using too many WordPress plugins, then you can use this method.
First, you’ll need to create a new file in your WordPress theme folder and name it image.php. If your theme already has an image.php file, then you’ll need to edit that file instead.
After that, all you have to do is add the following code as the first line in your image.php file:
<?php wp_redirect(get_permalink($post->post_parent)); ?>
Next, you need to save the image.php file and upload it to your theme directory using FTP or your WordPress hosting control panel.
Now, when a user lands on your image attachment page, they’ll be redirected to the parent post.
We hope this article helped you disable image attachment pages in WordPress. You may also want to see our beginner’s guide to image SEO and our guide on how to fix common image issues in WordPress.
If you liked this article, then please subscribe to our YouTube Channel for WordPress video tutorials. You can also find us on Twitter and Facebook.
The post How to Disable Image Attachment Pages in WordPress appeared first on WPBeginner.


 When building a website, the temptation to add content right away can be substantial. But, you must have a solid website structure before making a WordPress website or redesigning the current one. A well-planned structure is what turns a messy set of web pages into a site loved by users and search engines. For both, […]


 The longer your content’s SEO word count is, the better its ranking potential. Right? The average first page Google result contains 1,447 words. Some writers use this number as a strict goal, while others strive to produce more. However, achieving an ‘optimal’ word count for SEO rankings is much more complex than you might think. […]
 If you’ve launched a business on WordPress or even a blog, chances are that you’ve wanted to maximize its outreach as much as possible. It’s likely that you’ve come across the holy grail of content on the internet – keywords. As search engines continue to dominate the way we create, consume, sell, and buy on […]


 If you’re a marketing expert and know about SEO, you have surely come across the term Domain Authority. It’s a useful metric that many SEO professionals use to assess how likely content is to rank in the SERPs. Everyone interprets the relevance of domain authority differently. That makes the concept quite confusing. This blog post […]


 If you want your website to be found by your target audience, it’s important to take Search Engine Optimization (SEO) seriously. Part of that involves staying updated on Google’s ranking signals, to ensure that your site adheres to proven best practices. Google’s Page Experience update is the latest change, and places a heavy emphasis on […]


