I want to know about the exact difference between the XM Sitemap & HTML Sitemap. I already take the help of Google but not satisfied.
Expecting a better reply from your side.
Thanks

Tips, Expertise, Articles and Advice from the Pro's for Your Website or Blog to Succeed
I want to know about the exact difference between the XM Sitemap & HTML Sitemap. I already take the help of Google but not satisfied.
Expecting a better reply from your side.
Thanks
Video marketing has absolutely exploded in the last few years and for good reason. Most people prefer to consume information via video rather than read a lengthy blog post. YouTube has over 1 Billion users and has become the third-largest search engine so if it’s the best place for you to publish your videos. In […]
The post How to Optimize Your YouTube SEO appeared first on designrfix.com.

After installing WordPress, the first thing every beginner needs to learn is how to install a WordPress plugin.
In simple words, WordPress plugins are like apps for your WordPress website. They allow you to add new features to WordPress like a contact form, slideshow, shopping cart, and more.
There are thousands of free and paid plugins available for WordPress. In this step by step guide, we will show you how to install a WordPress plugin.
If you are using WordPress.com, then you cannot install plugins.
We often get complaints from users saying that they can’t see the plugins menu in their WordPress dashboard. It is because you are using WordPress.com, which has its limitations.
You cannot install plugins on WordPress.com unless you upgrade to their business plan. On the other hand, you can install any plugin you want on your self hosted WordPress.org website right out of the box (See the differences between self hosted WordPress.org vs WordPress.com).
If you want to switch from WordPress.com to WordPress.org, then read our tutorial on how to properly move from WordPress.com to WordPress.org.
That being said, now let’s take a look at how to install a WordPress plugin on your website.
To make it easy, we have created a video tutorial on how to install a WordPress plugin that you can watch below.
However, if you just want to follow text-instructions, then you can follow our step by step tutorial on how to install a WordPress plugin.
We have covered all three methods: installing a WordPress plugin using search, uploading a WordPress plugin, and manually installing a WordPress plugin using FTP.
Ready? Let’s get started.
The easiest way of installing a WordPress plugin is to use the plugin search. The only downside of this option is that a plugin must be in the WordPress plugin directory which is limited to only free plugins.
First thing you need to visit the Plugins » Add New page inside your WordPress admin area.
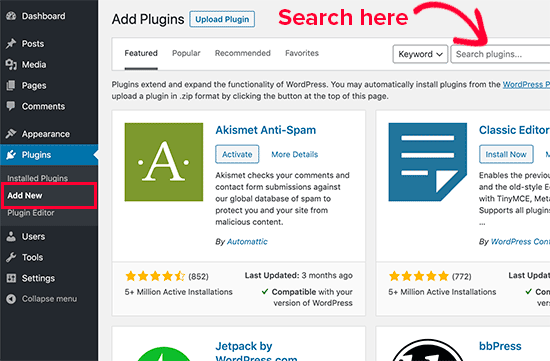
You will see a screen like the one in the screenshot above. Find the plugin by typing the plugin name or the functionality you are looking for. After that, you will see a bunch of listings like the example below:
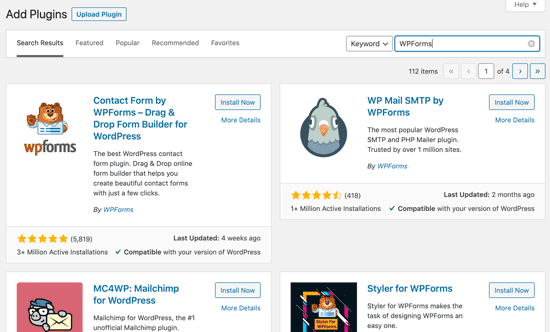
You can pick the plugin that is best for you. Since in our search, we were looking for WPForms which is the best WordPress contact form plugin, we’ll click the ‘Install Now’ button next to it.
WordPress will now download and install the plugin for you. After this, you’ll notice the ‘Install Now’ button will change into the ‘Activate’ button.
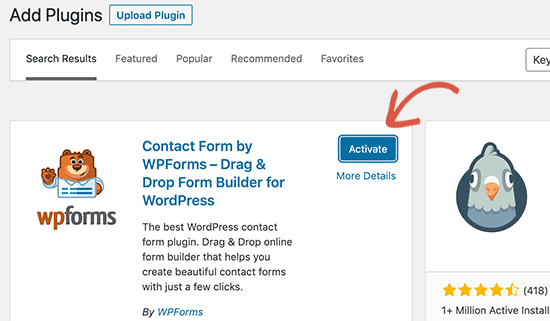
A WordPress plugin can be installed on your site, but it will not work unless you activate it. So go ahead and click on the activate button to start using that plugin on your WordPress site.
That’s all, you have successfully installed your first WordPress plugin.
The next step is to configure the plugin settings. These settings will vary for each plugin therefore we will not be covering that in this post.
Paid WordPress plugins are not listed in the WordPress plugin directory. These plugins cannot be installed using the first method.
That’s why WordPress comes with the upload method to install such plugins. We will show you how to install WordPress plugins using the upload option in the admin area.
First, you need to download the plugin from the source (which will be a zip file). Next, you need to go to WordPress admin area and visit Plugins » Add New page.
After that, click on the ‘Upload Plugin’ button on top of the page.
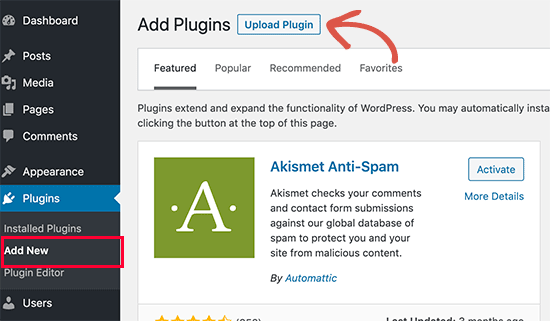
This will reveal the plugin upload form. Here you need to click on the ‘Choose File’ button and select the plugin file you downloaded earlier to your computer.
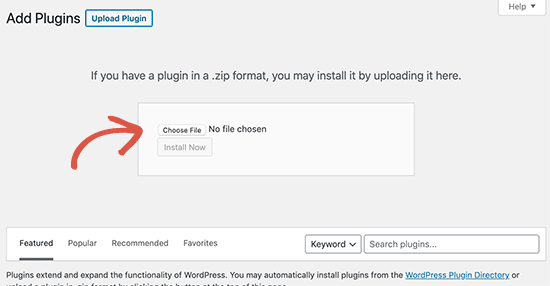
After you have selected the file, you need to click on the ‘Install Now’ button.
WordPress will now upload the plugin file from your computer and install it for you. You will see a success message like this after the installation is finished.
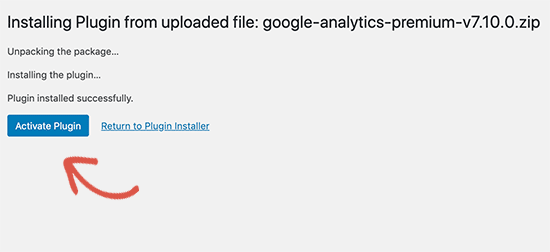
Once installed, you need to click on the Activate Plugin link to start using the plugin.
You would have to configure the settings to fit your needs. These settings will vary for each plugin therefore we will not be covering that in this post.
In some rare cases, your WordPress hosting provider may have file restrictions that could limit your ability to install a plugin from the admin area.
In this situation, your best bet is to install the plugin manually using FTP.
The FTP manager method is the least friendly for beginners.
First you will need to download the plugin’s source file (it will be a zip file). Next, you need to extract the zip file on your computer.
Extracting the plugin zip file will create a new folder with the same name. This is the folder that you need to manually upload to your website using a FTP client.
You would need to access your host through the FTP manager. If you do not have your FTP username and password, then contact your WordPress hosting provider and ask them.
Open the FTP client on your computer and connect to your website using the login credentials provided by your web host. Once connected, you need to go to the /wp-content/plugins/ folder on your website.
Next, upload the folder you extracted from the zip file to the /wp-content/plugins/ folder on your web server.
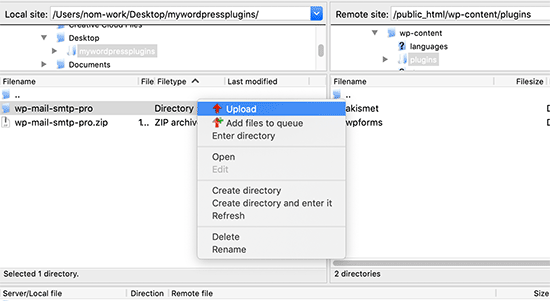
After uploading the files, you need to visit the WordPress admin area and click on the Plugins link in the admin menu. You’ll see your plugin successfully installed on the plugins page.
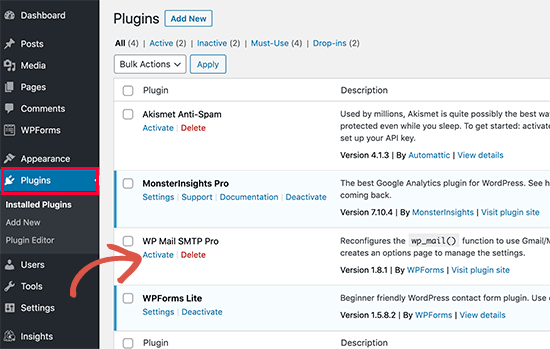
You need to click on the Activate link below the plugin to start using it.
Upon activating, you may need to configure the plugin settings. WordPress plugins come with their own settings which differ from one plugin to another so we will not describe them here.
As a beginners you may have few questions about installing WordPress plugins. As the largest WordPress resource site, we have heard all of them.
Here are some of the most frequently asked questions about installing WordPress plugins.
1. How do I find the best WordPress plugins to install on my website?
There are more than 55,000 WordPress plugins on the free WordPress plugin directory alone. Many more are available as premium plugins. This makes it a bit difficult for beginners to find the best plugin for the feature they need.
We have compiled a list of all the essential WordPress plugins that most WordPress websites need.
We also have a detailed tutorial on choosing the best WordPress plugin where we show you what to look for when looking for a plugin.
2. What is the difference between installed and active plugins?
WordPress allows you to install a plugin and not use it at all. In order to use a plugin on your site, you need to ‘Activate’ it.
You can see active plugins by visiting the ‘Plugins’ page in the WordPress admin area. They will be highlighted with a blue background.
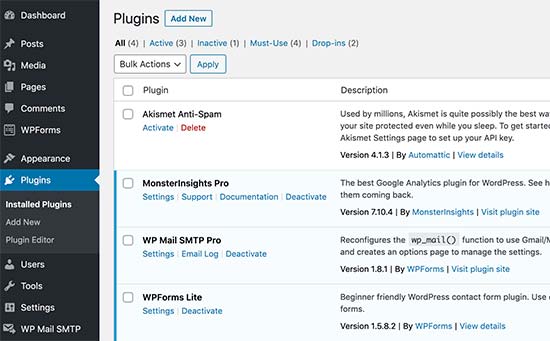
Plugins with the white background are installed on your website but not active.
3. Should I delete inactive plugins?
If you are not using a plugin, then it is recommended to delete it from your website. For more on this topic, see our article on why should you delete inactive plugins in WordPress.
4. How many plugins I can install in WordPress?
You can install as many WordPress plugins as you need. It is not the number of plugins that affect your website speed, but the quality of those plugins. For more information, see our article on how many WordPress plugins you should install.
5. How do I uninstall a WordPress plugin
You can uninstall a WordPress plugin by visiting the Plugins page in the WordPress admin area. If the plugin you want to remove is currently active, then first you’ll need to deactivate it. After that, you can simply click on the delete link to remove it from your website.
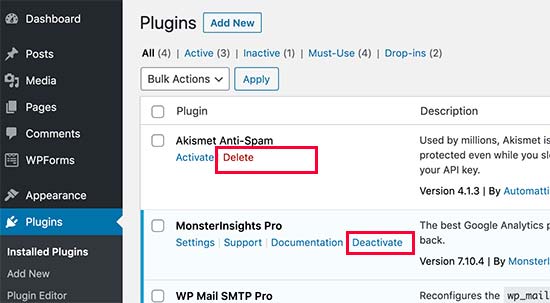
For more detailed instructions, see our guide on how to properly uninstall a WordPress plugin.
We hope this helped you learn how to install WordPress plugins.
You may also want to see our plugins category where we write about the best WordPress plugins that you can use to accomplish whatever you’re looking to do. Each of those articles comes with step-by-step instructions on how to set up individual plugins.
If you liked this article, then please subscribe to our YouTube Channel for WordPress video tutorials. You can also find us on Twitter and Facebook.
The post How to Install a WordPress Plugin – Step by Step for Beginners appeared first on WPBeginner.
In the video embedded below, Jen Simmons explains how to improve image loading by using width and height attributes. The issue is that there’s a lot of jank when an image is first loaded because an img will naturally have a height of 0 before the image asset has been successfully downloaded by the browser. Then it needs to repaint the page after that which pushes all the content around. I’ve definitely seen this problem a lot on big news websites.
Anyway, Jen is recommending that we should add height and width attributes to images like so:
<img src="dog.png" height="400" width="1000" alt="A cool dog" />This is because Firefox & Chrome will now take those values into consideration and remove all the jank before the image has loaded, even when you override those values in CSS with a fluid width and thus unknown height. That means content will always stay in the same position, even if the image hasn’t loaded yet. In the past, I’ve worked on a bunch of projects where I’ve placed images lower down the page simply because I want to prevent this sort of jank. I reckon this fixes that problem quite nicely.
Direct Link to Article — Permalink
The post Do This to Improve Image Loading on Your Website appeared first on CSS-Tricks.
I don’t want every possible padding and margin and colour and flexbox configuration in the world. I just want the ones that I know I end up using in every project. So here is
monica.css: my very own CSS framework, which I copy paste at the beginning of every CSS file and take it from there.
I love it when people make their own CSS starter. I like Sanitize, but even that feels like a bit much for most things I poke around at. If I was making one for myself, I'd probably steal some of this stuff from Monica. I'd definitely pull the margin off body as I find myself writing that line a lot. I'd probably steal some of that [class] stuff from Andy's. My center class would probably just be text-align and I'd give myself some other centering class for my other favorite centering: display: grid; place-items: center;.
I love how everyone agrees on box-sizing.
Direct Link to Article — Permalink
The post monica.css appeared first on CSS-Tricks.
SWIFT, a provider of global financial messaging services, is set to host a two-day hackathon at its annual African Regional Conference (ARC). The hackathon, which will take place on April 21st - 23rd in Cape Town, South Africa, will focus on developing solutions for cross-border financial services in Africa.
I got a bunch of questions from a "Head of Customer Success" at a company that does developer education recently. They had some great questions about how CodePen could be used in their online courses1. The answers might benefit anyone in this situation, so here's exactly what I was asked and what I answered.
Here's one way instructors/students can use CodePen for a course. The instructor has a curriculum for the course. Part of that includes coding exercises for the students. Those coding exercises can take the form of a pre-created Pen on CodePen. Maybe like this. The students then Fork that Pen and try to complete it, and they send the instructor their attempts.
Here's another way instructors can use CodePen. They teach live using the CodePen editor. Maybe it's projected onto the front of a classroom using Presentation Mode, or the students follow along on their own computers using Professor Mode. Those two features are PRO, so the instructor would need a PRO account.
Here's another. The instructor (or school) gets a Team Account. All the students are invited as members of the Team. That makes everyone involved have a PRO account, so they can do things like make Private Pens and share uploaded assets like images. As a new cohort comes in the students can be removed from the team and new students added.
We offer monthly or annual billing on any of our plans (but not quarterly).
We bill the second you sign up, and then at intervals based on that day. For example, if you sign up on March 14th and choose a monthly plan, you'll be charged again April 14th. If you picked a yearly plan, you'll be charged again March 14th the following year.
Plans are mostly fixed. If you go with a Team Account, Teams are charged based on the number of seats, so you can increase or decrease those seats at any time and are re-billed accordingly.
Only Team Accounts are billed on a per-user basis. Team Accounts are $12-per-person if billed annually or $19-per-person if billed monthly. If what worked better for you was only having the instructor with a PRO account, for example, that's a single user with a single fixed cost.
Yes, you can cancel and re-activate on a monthly basis if you choose the monthly plan.
Our dedicated page for CodePen and Education is probably also worth a read.
1 - This kind of thing is sometimes a sign that the design of your site doesn't help answer these questions well enough. In this case, I'm not that worried about that. I think we do OK there, although this is good research for the next time we're tackling those areas.
The post CodePen for Education Questions, Answered appeared first on CodePen Blog.

Mezo Istvan does a good job of covering the problem and a solution to it in a blog post on Medium¹.
If you tap on something that has a :hover state but you don't leave the page then, on a mobile device, there is a chance that :hover state "sticks." You'll see this with stuff like jump-links used as tabs or buttons that trigger on-page functionality.
button:hover {
  border: 3px solid green; /* might stick! */
}
The solution, or trick, is a new(ish) "CSS4" media query that allows you only to apply styles on devices with hover capability.
@media (hover: hover) {
  button:hover {
    border: 3px solid green; /* solves sticky problem */
  }
}
Your typical touch screen mobile device will fail that media query, the style won't apply, and you'll avoid the sticky problem.
Support is solid, so not much worry there.
Direct Link to Article — Permalink
The post Solving Sticky Hover States with @media (hover: hover) appeared first on CSS-Tricks.
Belvo, an open banking API provider for the Latin American market, is now live. After a successful beta program that began last fall, Belvo is fully up and running with a number of developer resources available. Its core offering, the Belvo API, aims to empower open banking in Latin America.
Ever thought about writing the following query in Entity Framework?
xxxxxxxxxx
Select * From Employees e
left join Employees_Attendance ea on e.id=ea.employee_id and ea.date between {{startdate}} and {{enddate}}
You might notice a smidge of extra visual activity happening down in the Pen Editor footer lately. We're trying to show you a bit more information about what the Pen Editor is actually doing.
Here's an example (5 second video) where I'm editing some HTML to include an <em> tag or not, and the editor is doing stuff to make that happen for me:
The idea is to show you (and us!) what is happening in the Pen Editor as we do it. Like sometimes code needs to get processed. Sometimes the preview needs to get rebuilt. Sometimes your code is off being linted or formatted. There is a bunch of stuff that might be going on in the editor, and we wanted a dedicated place to be clear about that rather than having it be a silent mystery.
The post Editor Activity Indicator appeared first on CodePen Blog.
The <details> and <summary> elements in HTML are useful for making content toggles for bits of text. By default, you see the <summary> element with a toggle triangle (▶︎) next to it. Click that to expand the rest of the text inside the <details> element.
But let's say you want to be able to click it open and that's that. Interactivity over. I saw this used in one of those "Read more" article designs, where you click that "Read more" button and the article expands, but there is no going back.
I'll preface this by saying that I'm not sure that this is a great idea in general. Removing controls just doesn't feel great, nor does slapping too much important content within a <details> element. But, hey, the web is a big place and you never know what you might need. The fact that this can be done in a few lines of HTML/CSS is compelling and might reduce the need for heavier solutions.
The main trick here is to hide the summary when details is open.
details[open] summary {
  display: none;
}
That's it really.
The post Creating a Details Element That Opens But Never Closes appeared first on CSS-Tricks.
Neurala, an AI-powered visual inspection solutions provider, recently announced that its Brain Builder SDK has now been optimized to enable edge learning for use cases such as manufacturing. Brain Builder is Neurala's vision AI platform. In its latest release, Brain Builder allows users to build, deploy and analyze customized AI solutions based on learning from a network edge device.
The City University of Hong Kong has set itself up for success by embraced an API-led approach to education, unifying the campus experience between City U’s five colleges and schools, a 4,000-member academic staff, and their 26,000-plus students.
The API-led approach tackles the integration of legacy systems with a unified system. This API-based system will sustain an ongoing evolution and improvement within one space, rather than requiring the campus community to bounce in and out of different systems.