Visit The Site For More...
Google Maps Team Announces Beta for Local Context
The Google Maps team has announced the beta launch of Local Context. With Local Context, site and app owners can integrate the typical Google Map experience into their properties, but that experience is amplified with rich, local information (e.g. shops, restaurants, etc.).
I Was Stunned After Seeing THIS Double Exposure Photography
Gutenberg Times to Hold Live Q&A on Block-Based Themes and Full-Site Editing
On Friday, June 26, Gutenberg Times will be holding a live Q&A on block-based themes and full-site editing. The Zoom webinar will begin at 18:00 UTC and last for around one hour, depending on how many questions are asked by viewers.
The target audience of the event will be theme developers or anyone interested in designing using the upcoming system that relies on blocks to build the entire front end. To attend, viewers should register via Zoom. By registering, Zoom will send viewers reminders about the event and allow them to ask questions to the panel. The session will also be streamed live via the Gutenberg Times YouTube Channel.
Birgit Pauli-Haack, the owner of Gutenberg Times, is hosting the event. The following developers from the WordPress theming community will join her on the panel:
- Eileen Violini – Design Engineer at Sidetrack Studio and Customer Success Engineer at CastosHQ.
- Carolina Nymark – WordPress Themes Team representative and creator of the Full Site Editing Course.
- Kjell Reigstad – Designer at Automattic who works on the Gutenberg project.
“I find the four-people-Brady-Bunch-on-screen format the most appealing and gives people the opportunity to get their questions answered,” said Pauli-Haack.
Friday’s event will begin with a five-minute demo from Reigstad. The goal is to show how theme authors can create a page header and footer by taking those concepts and applying them to a block-based theme. It is an introduction point that theme authors can use in their existing themes without starting from scratch.
The second part of the event will center on answering questions that Nymark often gets from other developers, such as how to put block code within template files. Reigstad will be showcasing demos based on those questions.
“After that, it’s all about the audience questions that I will read and the panel answers,” said Pauli-Haack. “The discussion and demo are all conversation starters. In other Q&As, after introductions, I had my own questions, and then made it all about the audience questions.”
Potential viewers can watch past Q&A events from the Gutenberg Times archive to get a feel for the format.
There is no set direction for the event beyond showing the initial demos. Pauli-Haack wants to put the audience in the driver’s seat and allow the discussion to go wherever it needs to go. The panel is open to exploring all Aspects of building themes with blocks, and it is a good opportunity for theme authors to communicate with developers who are at the forefront of the transition into full-site editing.
“I have the feeling it will be more about how to transition from the old way to the new way and how all the pieces fit together,” she said. “Beyond the demos, there probably won’t be many code examples. We will discuss the resources out there and how to approach them.”
Gutenberg Times is in its third year of sharing information about the Gutenberg project. Pauli-Haack describes it as her passion project. “The goal has been to collect all the fragmented information while Gutenberg was in beta before the release in Dec 2018,” she said. However, the site has continued going beyond its initial phase. Pauli-Haack has been holding live Q&As since 2018 on the site.
Exceptional Examples of Bokeh Photography and Quick Tutorial
25 Epic Examples of Digital Paintings
Basics to Designing Great Visual Content
They say a picture says a thousand words and that is absolutely true. Visual content generates a more profound effect that written word because it immerses the audience and makes the concept more relatable. How can you create visual content the right way to get maximum engagement? Leave some white space When an infographic or […]
The post Basics to Designing Great Visual Content appeared first on designrfix.com.
How To Migrate a WordPress Website
If you have a WordPress (or any other type of) website for any length of time, it’s likely you’ll run into the need to move it to a new host at some point. Figuring out how to migrate a WordPress website is one of those site maintenance tasks a lot of people would rather avoid as it can seem unruly, unpredictable, and time-consuming.
And sometimes, it really is all of those things. However, if you plan ahead and have a good set of instructions to walk you through the process, you should be good to go.
Why Migrate?
Site owners find they need to migrate WordPress sites for a number of different reasons. A lot of the time, it’s a matter of finding a better hosting deal elsewhere. The promise of saving money is always enticing. Another common reason to migrate your site is due to a lack of satisfaction with your current service provider. Whether they offer poor customer service or slow server response times, there are many reasons to switch.
Here are a few more common reasons people decide to migrate a WordPress website:
- Seeking better site performance. If your site is currently too slow, an upgrade to a new host might be the right call.
- A need for greater bandwidth. If your site is growing rapidly, migrating to a host that can handle your increased traffic needs is a must.
- A need for more storage space. If your site is multimedia-heavy, migrating to a host with greater storage capacity might be the right choice for you.
- More hands-on customer support. If you run an extensive website with a lot of moving parts (customers, clients, accounts, etc), the need for a more responsive customer support team might be more pronounced and necessary.
- Better pricing. Sometimes, the price tag tells the whole story. If you find a better hosting deal elsewhere, migrating your WordPress site might be your best bet.
- Expanded feature set. If your current host is lacking in features, you may find you need to migrate to one that offers more.
With the “why” spelled out, let’s move onto the “how.” We’ll cover how to manually migrate WordPress, along with some plugins that will do the hard work for you.

How to Manually Migrate a WordPress Site
You will need an FTP client to complete this process. A few options include:
Step 1: Backup Your Site
Before you can move your site anywhere, you need to back it up. This means going through the process of downloading every single file of your WordPress site from a remote location. You will need an FTP client for this. Though I typically use FileZilla for this process, I’ll keep the steps fairly generic. Apply as needed to your chosen FTP client:
- Connect to your old site’s server.
- Go to the
public_htmlfolder. - Select all files in this folder.
- Download the files.
Next, you’ll need to create and download a backup of your site’s MySQL database as well. To do this, you’ll need to go to the control panel of your web host. Most of the time, this will be cPanel. Go to phpMyAdmin and select the database associated with your WordPress site. Click Export and the database will be downloaded to your computer.
If you’d rather have this process be somewhat automated, go to cPanel (if your host supports it) and access the File Manager. In here, you can create a .zip file that contains all of your site’s files and its database for easy downloading. If you’re not super familiar with FTP, this might be the preferred method to use.
Step 2: Upload Your Files to the New WordPress Host
The next step to migrate a WordPress website is to upload your site’s files to the new host. You’ll need your trusty FTP client again. Once connected, you’ll need to go to the public_html folder on this new hosting account. Next, you’ll need to upload all the files from your site – make sure to decompress them first!
Step 3: Upload Your WordPress Database to the New Host
Once the files are uploaded, you’ll need to upload your WordPress MySQL database, too.
To do this, go to the cPanel or other control panel connected to your new hosting account. There should be a section specifically for MySQL databases. From there you’ll need to:
- Create a new database. Make note in a safe place of the database name, username, and password associated with this new database.
- Go to phpMyAdmin. The new database should be listed. Select it.
- Click Import. Then, select the MySQL database file you’d previously downloaded. Upload it and save your settings.
Step 4: Edit the wp-config.php File
Now that everything has been uploaded to the new host, you’ll need to do some fine-tuning to ensure all of the new host’s settings work with your site. This will require using your FTP client again, but this time, find the wp-config.php file.
Once you’ve located this file, you’ll need to modify some code. According to SiteGround, you need to locate this section of code within the file:
/** The name of the database for WordPress */
define('DB_NAME', 'user_wrdp1');

/** MySQL database username */
define('DB_USER', 'user_wrdp1');

/** MySQL database password */
define('DB_PASSWORD', 'password');

/** MySQL hostname */
define('DB_HOST', 'hostname');
Once you’ve located this section of code, you need to replace bits of it with information about the WordPress database you created. Here’s what you need to replace:
- Change the database name, if necessary
- Set username to your database’s username
- Set password to your database’s password
- Swap out hostname for localhost or a custom name provided by your host
Save the changes you made. In a lot of cases, this will be the last step you need to take. Your site should now be up and running on the new host.
Step 5: Update the DNS
In some cases, you’ll need to update Domain Name Server or DNS information on your new host. This will ensure that when someone types in your site’s URL, they wind up on your actual site and not a blank page. This is common practice when you’re switching domain servers, hosting plans, and hosting companies.
According to WPEngine, you’ll need DNS info about your new host and access to the registrar from whom you bought your domain name in the first place. Specifically, you’ll need:
- CNAME record
- A NAME for your site.
Input this info in your domain registrar account. This can sometimes take up to a few days to complete processing.
Plugins for Migrating WordPress Sites
If all of the above sounds like a lot of work, you can rely on plugin-based solutions to do the heavy lifting for you. These plugins are sometimes referred to as “cloning” plugins but for our purposes, we’re considering them all methods of migrating WordPress websites.
Now, you will still likely need to adjust a few settings on your new site server manually, but these plugins will definitely take care of the backing up, exporting, and importing processes.
Duplicator

The Duplicator plugin makes it much easier to migrate WordPress by streamlining the process. It works by making click-of-a-button copies of your site’s files and database. Then you can download all of this information in a handy .zip file with minimal effort.
All-in-One WP Migration

Another great option is the All-in-One WP Migration plugin. This one allows you to make backups of your site’s content and database as well and import this information over to your new host, all from within the plugin.
WP Engine Automated Migration

Our last recommendation is the WP Engine Automated Migration plugin. This one copies your files and WordPress database and allows you to upload them to your new site server with ease. So long as you have your hosting account details on hand, the plugin will handle much of the site migration process for you. Just note that this plugin only works with the WP Engine hosting provider.
Migrate Your Site Now
Whether you decide to migrate a WordPress site manually or you opt for the plugin route, you hopefully now have a stronger understanding of what the process entails, how it works, and what you need to do to prepare. Again, it might seem like a lot of work on the surface but the end result is often well worth it when you end up with a better home for your website.
Best of luck!
How to Restart a WordPress Site – Reset WordPress (The Fast Way)
Recently, one of our readers asked us, “How do I restart my WordPress site?”.
This isn’t something that most users will need to do, but knowing how to reset WordPress can be very helpful in some situations.
In this tutorial, we’ll show you how to restart or reset your WordPress site, the fast way.
Why Restart a WordPress Site?
Restarting or resetting WordPress is a process where you restore WordPress to the default settings. Think of it as a similar process to restoring your phone to the default “factory settings”.
It will delete all your apps and customizations, so you can start over fresh.
There are several situations where you might want to restart or reset a WordPress site:
1. You’re using a demo site on your own computer. If you’ve installed WordPress on localhost, then you might want to reset after you’ve built a site and moved it from localhost to a live server. If you’re a developer and constantly test themes & plugins on your local install, then it can help to reset it every quarter to start fresh.
2. You’ve been working on a new site and want to start over. Maybe you’ve been busy creating a blog or website, but you are not happy with the customizations. Instead of undoing everything, you can simply reset WordPress and quickly start over with a new design.
3. You’re going to rework a client’s website. If they want something very different from what’s already there, then you might need to reset WordPress on staging server to start from scratch.
4. You’re learning about WordPress, hands-on. Maybe you’ve had a go at developing your own plugins or themes, or you’ve been experimenting with a starter theme. You might want to start again with a fresh installation of WordPress.
How to Restart and Reset a WordPress Site
Restarting your WordPress site might sound difficult, but it’s really not.
We’re going to walk you through the entire reset process, step by step.
Before you begin, it’s important to create a full backup of your site using a WordPress backup plugin. This is important in case you want to restore your site from the backup after restarting it.
Restart Your WordPress Site with WP Reset
Now you’re ready to move on and restart your WordPress site. We’re going to use the free version of the WP Reset plugin for this.
First, you’ll need to install and activate the WP Reset plugin. For more details, see our instructions on how to install a WordPress plugin.
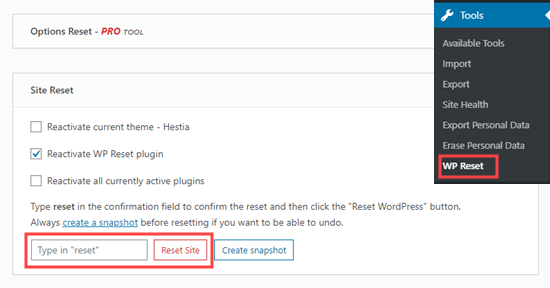
Once the plugin is activated, you need to go to the Tools » WP Reset in your WordPress dashboard and scroll down to the Site Reset section of the page.
To reset your site, you need to type the word ‘reset’ in the confirmation field before clicking the red ‘Reset Site’ button.
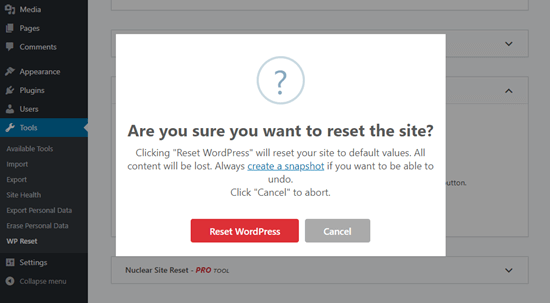
WP Reset will pop up a message asking you to confirm that you want to reset the site. Click ‘Reset WordPress’ to continue.
You’ll see a ‘Resetting in progress’ message for a few seconds. Then, your site will be restarted.
Next, you’ll see the homepage of your WordPress dashboard with a success message at the top from WP Reset.
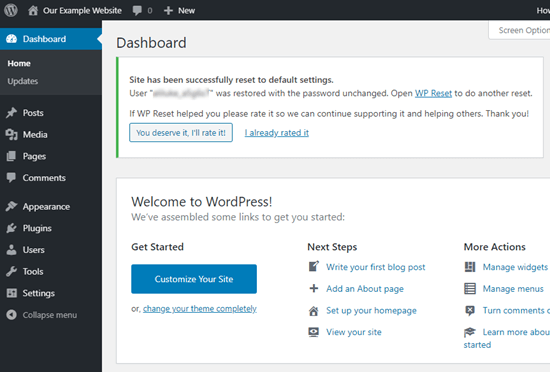
That’s it. You’ve restarted your WordPress site.
Optional WP Reset Functions When Restarting Your Site
The above method gives you everything you need in order to restart your site.
However, there are some other options in WP Reset that you might want to use too.
Taking a Snapshot of Your WordPress Site Before Restarting
You can use WP Reset to take a snapshot of your site. A snapshot is a restore point for your WordPress database. It lets you see what changes have been made since the snapshot was taken. You can use it to roll back changes if necessary.
Important: A snapshot is not a WordPress backup. You should still make backups to restore your website.
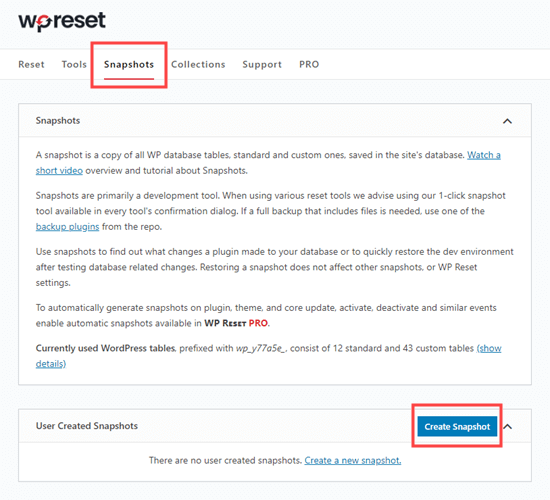
To create the snapshot, click on the Snapshots tab. Then, scroll down and click the Create Snapshot button:
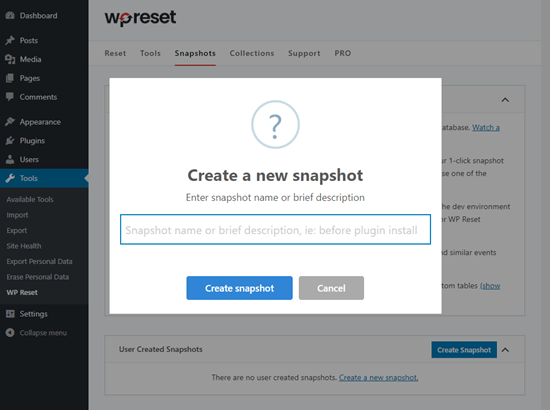
You’ll be prompted to enter a name or description for the snapshot. Type in whatever you want to use, then click the ‘Create snapshot’ button.
Deleting Themes and Plugins Using WP Reset
By default, WP Reset doesn’t delete theme and plugin files. It simply deactivates them. However, you can use it to delete these files too.
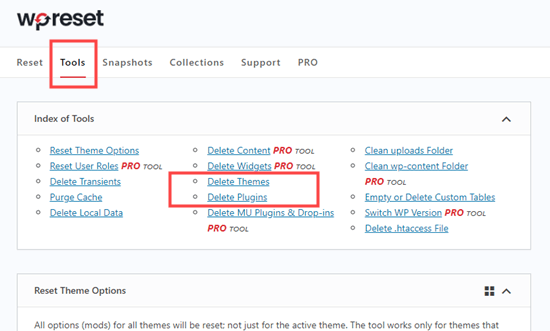
First, you’ll need to go to Tools » WP Reset and click the ‘Tools’ tab. Once there, simply click on the ‘Delete Themes’ or ‘Delete Plugins’ links to jump straight to those tools.
Once you click either link, you’ll be scrolled down the page to the right tool:
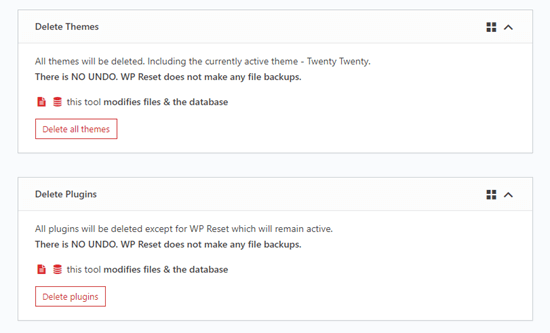
You can click the ‘Delete all themes’ or ‘Delete plugins’ button to delete them.
Important: WP Reset doesn’t backup your files in any way. Deleting your themes and plugins can’t be undone.
After you click the button, you’ll be prompted to confirm. Click the Delete button on the popup to continue.
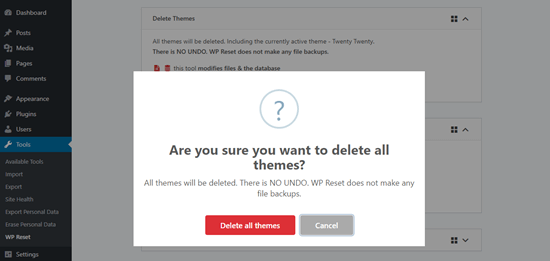
You’ll then see a message telling you how many themes or plugins have been deleted.
If you delete all themes, then you’ll need to install and activate a theme manually. Your site won’t work without one. If you go to Appearance » Themes, then you’ll see a screen like this:
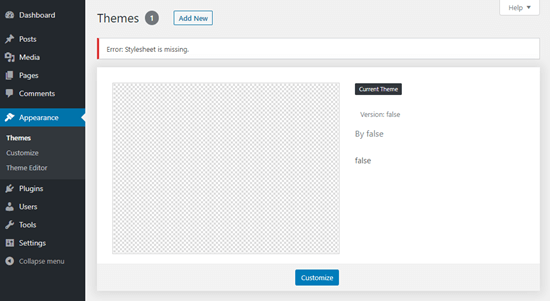
Go ahead and click the ‘Add New’ button and choose or upload a theme of your choice. If you need help, check out how to install a WordPress theme.
Restoring Your Data After Restarting Your WordPress Site
After restarting your WordPress site, any posts and pages you had will be gone. Instead, you’ll see the default pages and the ‘Hello, world’ post:

To restore your old data, you will need to reinstall and activate the backup plugin that you used to create your backup.
You can then follow its instructions to restore your site from the backup.
Viewing Your Restored Content
Once you’ve restored your site from backup, your content should be back on your site.
You’ll find all your posts under Posts » All Posts. They’ll have the correct time stamps, categories, tags, and comments.
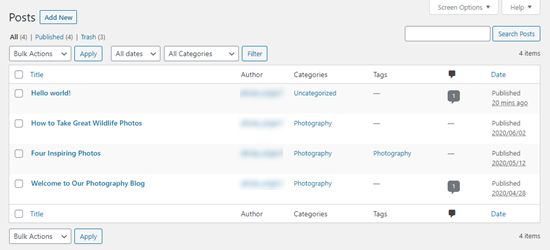
We hope this tutorial helped you learn how to reset a WordPress site the fast way. You might also like our ultimate guide to speeding up WordPress and our list of must have WordPress plugins for all sites.
If you liked this article, then please subscribe to our YouTube Channel for WordPress video tutorials. You can also find us on Twitter and Facebook.
The post How to Restart a WordPress Site – Reset WordPress (The Fast Way) appeared first on WPBeginner.
Earning Made Easy in 2020 With ClickFunnels
Starting a company was never easy, but now if they are not online, they practically don’t exist. If you are stressing over your startup or are trying to figure out the ins and outs of how to establish your presence online, ClickFunnels are just what you are looking for. ClickFunnels helps business owners with the […]
The post Earning Made Easy in 2020 With ClickFunnels appeared first on designrfix.com.
Doggylicious: 50 Wonderful Dog Pictures
25 Masterclass Hollywood Superstars Celebrity Pencil Sketches
Proposal to Rename the ‘Master’ Branch of WordPress-Owned Git Repositories
Yesterday, core contributor Aaron Jorbin proposed renaming the default “master” branch for all WordPress-owned Git repositories to “main.” The proposal comes among a flurry of related terminology changes that the larger tech community is considering around oppressive language.
Based on the ongoing discussion in the comments of the proposal, the term “trunk” has gained popularity, and the original post has been updated in favor of that term. If it moves forward, trunk would be more in line with core WordPress, which uses Subversion (SVN). It would also make sense along with the “branch” terminology already in use with both SVN and Git — tree, trunk, and branches.
“As a part of tearing down the systems of oppression that exist in the world, WordPress should remove references to master and replace them with trunk in all git repositories,” wrote Jorbin.
Amidst the backdrop of the Black Lives Matter movement and following the death of George Floyd, the tech community has been taking a deeper look into its systems and determining what changes it can make. While there are larger systemic issues at play, many are determined to remove any potentially oppressive or discriminatory terminology. The idea is not that these minor changes will create an evolution overnight but that they are small pieces of the much bigger picture — cogs in the machine that must move for the wheel to turn.
“This is a small move, but if it makes one more person comfortable contributing to a WordPress project, it will be worth it,” wrote Jorbin.
GitHub should soon be making a similar change across its platform. In response to a tweet calling for GitHub to lead the charge and rename the default “master” branch to “main,” CEO Nat Friedman said they were already working on a solution. It is unclear how this will work going forward and whether it would affect existing repositories. For now, it seems GitHub is on board.
Thus far, the WordPress proposal has been mostly met with support. However, there was some dissent.
Core contributor Zebulan Stanphill argued that language is oppressive based on context and, in this context, the change does not make sense. “Similarly, no one in their right mind is going to think you support human slavery when you use the term ‘master branch,'” he wrote in the comments of the proposal. “The term ‘master’ itself is already used far outside of the context of slavery. Think novice->pro->master. Think also: mastering the craft, remastering music, and etc.”
As harmless as the word “main” seems in most Western cultures, a comment posted by Mike Schroder (original Japanese text by Takayuki Miyoshi and translation by Shinichi Nishikawa) pointed out that it was problematic in Japanese culture. “In Japan, for example, to put ‘main’ and ‘others’ as different groups has been utilized as an excuse to justify discrimination,” said Miyoshi. “Not caring about suppressing the Ainu people and their culture at all is possible because of the assumption that Yamato folk is the main and others are secondary. I now came to a point to think we should consider that to set one thing as ‘main’ creates marginals that get oppressed.”
Language is not always easy, especially when addressing a global community, each with their own terms that are possibly discriminatory. For now, trunk seems to be a good fit while throwing a nod to WordPress’s SVN roots.
This would not be the first time that WordPress has made a move to change terminology such as this. David Artiss, a support engineer at Automattic, created a ticket seven months ago to rename “comment blacklist” to “comment blocklist.” The change, which replaced only the user-facing text, went largely unnoticed and landed in WordPress 5.4.
Jason Coleman, CEO of Stranger Studios, also opened a more extensive ticket two days ago. It calls for changes of any use of “blacklist” to “blocklist” and “whitelist” to “safelist,” even within the code and database options. Such changes would be backward compatible and not break sites upon upgrade.
Change is almost certainly coming. The big decision is going to be around what the new terms will be.
For developers who want to rename the default branches of their own Git repositories, there is an existing project with instructions and a GitHub action for doing so.
Just another +1 for subgrid
I’d say 85% of my grid usage is in one of these two categories…
- I just need some pretty basic (probably equal width) columns that ends up being something like like
grid-template-columns: repeat(3, minmax(0, 1fr));to be safe. - Actually doing some real layout where five minutes in I realize I’d really like
subgrid.
Subgrid? It’s a nice intuitive way to have a child element on the grid inherit relevant grid lines from the parent grid.
Here’s a great recent video from Rachel Andrew covering it. Last year, we linked up her talk on the same! It’s such a clutch feature and I wish we could rely on it cross-browser. Right now, Firefox is the only one that has it. (Chrome issue, Safari issue)
In my recent video, right about at 20 minutes, I realize subgrid would make even a fairly simple layout much nicer, like removing the need for variables or resorting to magic numbers.
The post Just another +1 for subgrid appeared first on CSS-Tricks.
#AskMeAnything – Let’s Talk Blogging
Google Debuts Actions SDK for Google Assistant
Google this week made more tools available to developers for customizing app interactions with Google Assistant. By releasing Actions Builder and Actions SDK, Google says developers can build their own conversational actions for Assistant faster than ever. Here's what you need to know.
How to Add Facebook Open Graph Meta Data in WordPress Themes
Do you want to add Facebook Open Graph meta data to your WordPress themes?
Open Graph metadata helps Facebook and other social media websites get meta data about your posts pages. It also allows you to control how your content appears when shared on Facebook.
In this article, we will show you how to easily add Facebook open graph metadata in WordPress themes. We’ll share three different methods, so you can choose one that works best for you.
Method 1. Adding Facebook Open Graph Meta Data with All in One SEO
All in One SEO is a popular WordPress SEO plugin used by over 2 million websites. It allows you to easily optimize your website for search engines as well as social platforms like Facebook and Twitter.
First, you need to install and activate the All in One SEO plugin. For more details, see our step by step guide on how to install a WordPress plugin.
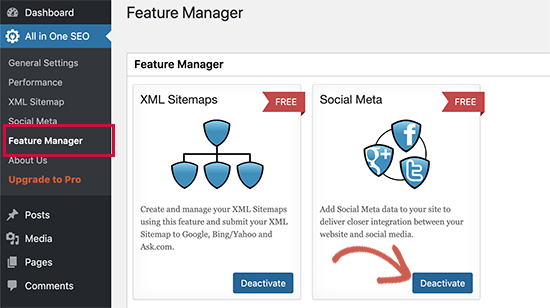
Upon activation, you need to visit All in One SEO » Feature Manager page. From here you need to activate the ‘Social Meta’ feature.
Next, you need to visit All in One SEO » Social Meta page. From here, you can simply fill in the fields to enter your Facebook meta data.
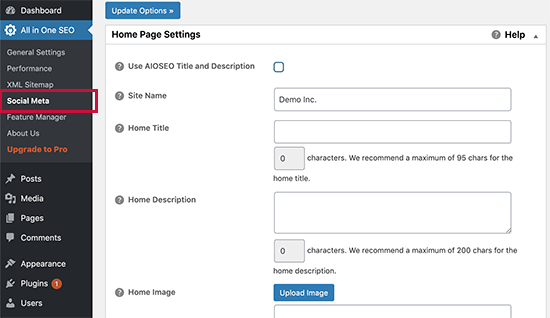
You can start by providing title, image, and description for your homepage.
Below that you can set a default image to be used if an article doesn’t have an open graph image. You can also provide the width and height of the image.
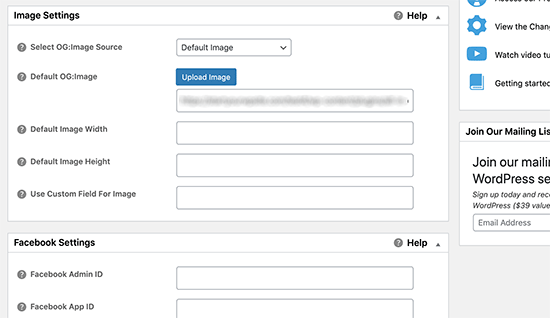
Need help choosing image sizes? See our complete social media cheat sheet for ideal image sizes that you can use on all social media platforms including Facebook.
If your website is using a Facebook App or has a Facebook page, then you can provide your Facebook app ID in the next section. This allows you to get data for Facebook insights.
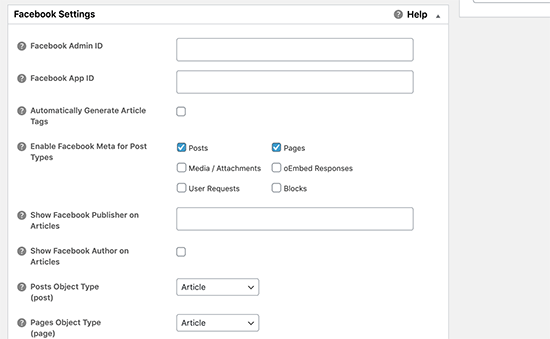
Optionally, you can also adjust settings for Twitter and run a scan to avoid duplicate Open Graph tags on your site.
Once you are done, don’t forget to click on the ‘Update Options’ button to store your changes.
Now that you have set site-wide open graph meta tags, the next step is to add open graph meta data for individual posts and pages.
By default, All in One SEO will use your post title and description for open graph title and description. You can also manually set the Facebook thumbnail for each page and post.
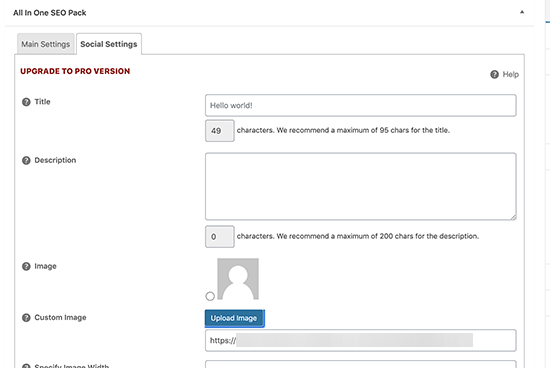
Simply edit the post or page and scroll down to the All in One SEO section below the editor. From here, switch to the Social tab and fill out open graph meta data. You can set the social media image here as well as title and description.
Method 2. Set Facebook Open Graph Meta Data using Yoast SEO
Yoast SEO is another excellent WordPress SEO plugin that you can use to add Facebook open graph meta data into any WordPress site.
First thing you need to do is install and activate, the Yoast SEO plugin. For more details, see our step by step guide on how to install a WordPress plugin.
Once activated, you need to go to SEO » Social and simply check the box next to Add Open Graph meta data.
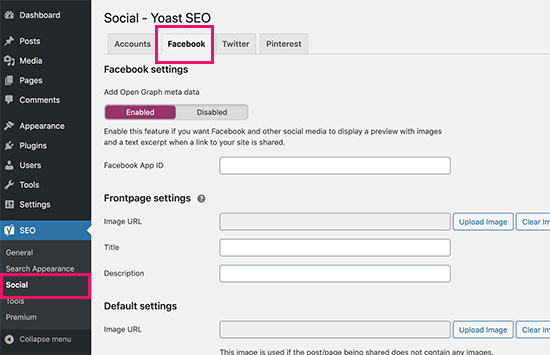
You can save your settings or continue and configure other Facebook social options on the screen.
You can provide a Facebook app ID if you use one for your Facebook page and insights. You can also change your homepage Open Graph meta title, description, and image.
Lastly, you can set a default image to be used when no image is set for a post or page.
Yoast SEO also allows you to set Open Graph metadata for individual posts and pages. Simply edit a post or page and scroll down to the SEO section below the editor.
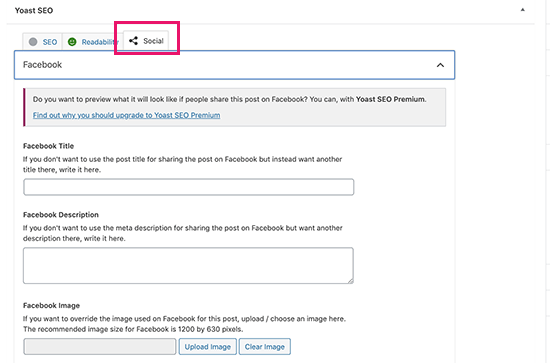
From here, you can set Facebook thumbnail for that particular post or page. If you don’t set a post title or description, then the plugin will use your SEO meta title and description.
You can now save your post or page and the plugin will store your Facebook open graph meta data.
Method 3. Manually Add Facebook Open Graph Meta Data into Your WordPress Theme
This method requires you to edit your theme files, so make sure that you back up your theme files before making any changes.
After that simply copy and paste this code in your theme’s functions.php file, or in a site-specific plugin.
//Adding the Open Graph in the Language Attributes
function add_opengraph_doctype( $output ) {
		return $output . ' xmlns:og="http://opengraphprotocol.org/schema/" xmlns:fb="http://www.facebook.com/2008/fbml"';
	}
add_filter('language_attributes', 'add_opengraph_doctype');

//Lets add Open Graph Meta Info

function insert_fb_in_head() {
	global $post;
	if ( !is_singular()) //if it is not a post or a page
		return;
        echo '<meta property="fb:app_id" content="Your Facebook App ID" />';
        echo '<meta property="og:title" content="' . get_the_title() . '"/>';
        echo '<meta property="og:type" content="article"/>';
        echo '<meta property="og:url" content="' . get_permalink() . '"/>';
        echo '<meta property="og:site_name" content="Your Site NAME Goes HERE"/>';
	if(!has_post_thumbnail( $post->ID )) { //the post does not have featured image, use a default image
		$default_image="http://example.com/image.jpg"; //replace this with a default image on your server or an image in your media library
		echo '<meta property="og:image" content="' . $default_image . '"/>';
	}
	else{
		$thumbnail_src = wp_get_attachment_image_src( get_post_thumbnail_id( $post->ID ), 'medium' );
		echo '<meta property="og:image" content="' . esc_attr( $thumbnail_src[0] ) . '"/>';
	}
	echo "
";
}
add_action( 'wp_head', 'insert_fb_in_head', 5 );
Note: Remember to change the Site Name where it says “Your Site Name Goes Here”. After that, change the default image URL with the image of yours. You also need to add your own Facebook app ID, If you don’t have a Facebook app, then you can remove the Facebook app ID line from the code.
We would recommend putting an image with your logo there, so if your post does not have a thumbnail, then it pulls your site’s logo.
That’s all you need to do. As soon as you save your functions.php file (or site-specific plugin) it will start showing Facebook open graph metadata in the WordPress header.
We hope this article helped you add Facebook open graph meta data in WordPress. You may also want to see our pick of the best social media plugins for WordPress to grow your social following, and our troubleshooting guide on how to fix the Facebook incorrect thumbnail issue in WordPress.
If you liked this article, then please subscribe to our YouTube Channel for more WordPress video tutorials. You can also find us on Twitter and Facebook.
The post How to Add Facebook Open Graph Meta Data in WordPress Themes appeared first on WPBeginner.


