Hello there, I am an affiliate marketer can you please let me know how can i get quality traffic.
please help me.
How can i get traffic from web/mobile app?


Tips, Expertise, Articles and Advice from the Pro's for Your Website or Blog to Succeed
Hello there, I am an affiliate marketer can you please let me know how can i get quality traffic.
please help me.

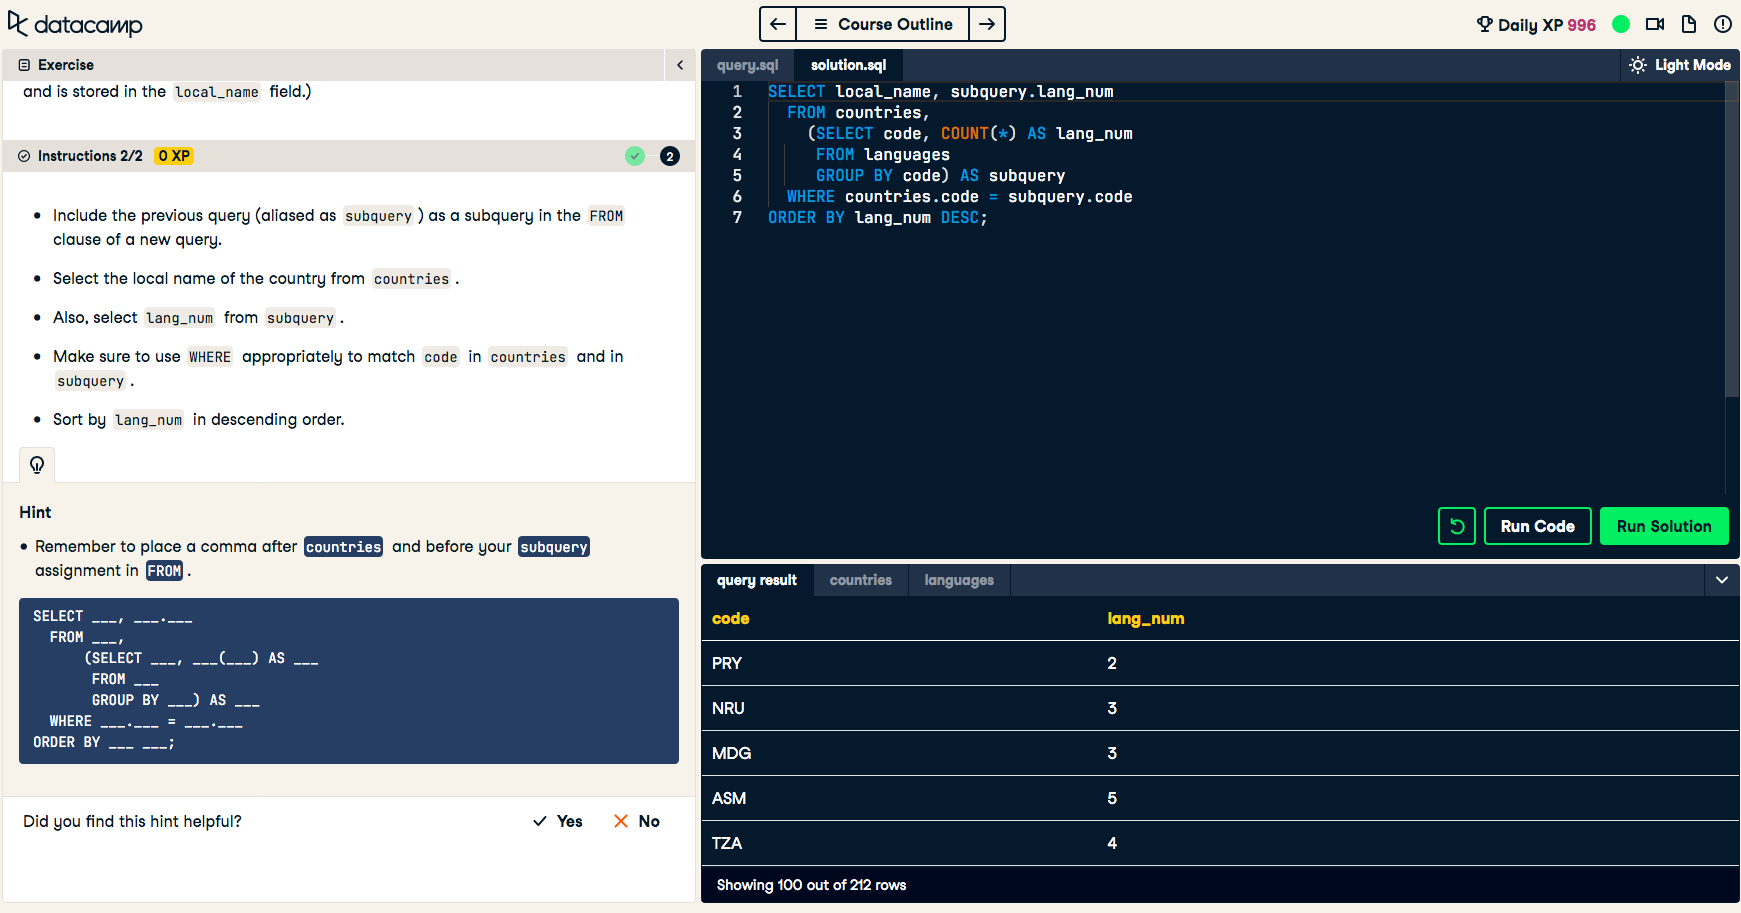
Hi everyone I am wondering if someone can help me understand why the Sub-Query's SELECT statement ended up producing the column name 'Code' vs. the initial SELECT statment call 'local_name' in the below screenshot Thanks in advance!

Stripe, a provider of a payment processing platform, is launching an embedded finance API called Stripe Treasury. The new API will allow partners to embed banking services into their platform or online marketplace.

The new Crawl Stats in Google Search Console shows a breakdown of how much googlebot recrawls existing content for refreshing its index, and how much is discovery of new content.
Has anyone been working on increasing the rate of new content and seeing that correlate to a linear increase in traffic?

If you are missing your festive meetups this year or just fancy seeing some friendly faces and learning some new things join us on December 17th for another Smashing Meets event.
Tickets are only 10 USD (and free for our lovely Smashing Members). The fun starts at 9AM ET (Eastern Time) or 15:00 CET (Central European Time) on the 17th December.
Ok. This is important. Smashing Meets by @smashingconf was soooo much fun. I will have to tune in whenever the timezone suits, it was an absolute blast!!!
— Mandy Michael (@Mandy_Kerr) May 19, 2020
This time, we will have talks from three speakers—Adekunle Oduye, Ben Hong, and Michelle Barker. There will be an interface design challenge and chance to network and meet other attendees. Just like an in-person meetup but you won’t have to go out in the cold!
If you want to know more about how our Smashing Meets events work, we have a review of a previous event, see some of the videos, or just head on over to the event page and get a ticket! I hope to see you there.
Spamhaus Technology Ltd has recently announced the release of its Intelligence API Beta. This is the first time Spamhaus has released its extensive threat intelligence via API, providing enriched data relating to IP addresses exhibiting compromised behavior.
Available free of charge, developers can readily access enhanced data that catalogues IP addresses compromised by malware, worms, Trojan infections, devices controlled by botnets, and third party exploits, such as open proxies.

If you build websites for clients with contact forms, your clients may be required by multiple privacy laws to have ...
Read moreHow to Add Privacy Policies to All Your WordPress Client Sites
The post How to Add Privacy Policies to All Your WordPress Client Sites appeared first on WPArena.

We’re so excited to introduce our newest course, Technical Interviewing! In this hour-long course, Michelle Zohlman will take you through preparation steps and best practices to make sure you’re ready for your first technical interview. Technical Interviewing will cover a...
The post New Treehouse Course: Technical Interviewing appeared first on Treehouse Blog.

Our social justice work is never done. Whether it is as individuals or a company as a whole, we know at Treehouse that we need to do this work continuously. We are nowhere near perfect, which is why we are...
The post Introducing Treehouse’s EDI Strategy appeared first on Treehouse Blog.

So I just started learning Pascal and have problems understanding how deleting specific characters works
program Project1;
var
  a:string;
  b:char;
  c:integer;


begin
  readln(a);
  b:=(chr(32));

  for c:=1 to length(a) do
  begin
    if a[c]=b then delete;
  end;
   readln;
end.
The idea is that I input random text and get back the same text but without all spaces. Sounds simple but I just started learning pascal, so not really. Help would be appreciated :)
Probably more than one thing is wrong with this sh*t code.

Do you want to add a WordPress logout link to your site?
If you run a membership site, bbPress forum, eCommerce store, or a learning management system (LMS) using WordPress, having a prominent logout link is helpful for your users.
In this article, we will show you how to add the WordPress logout link to your navigation menu, as well as to other areas of your site.

Normally you can log out of your WordPress site by clicking on the logout link. This link is located below your profile picture in the top right corner of the WordPress admin bar.
All you have to do is take your mouse over to your username, and it will appear in the dropdown menu.

In case you or your site administrator have disabled the WordPress admin bar, then you will not be able to see the WordPress logout link.
The good thing is that the WordPress logout link can be directly accessed to log out of your current WordPress session.
The logout link for your WordPress site looks like this:
http://example.com/wp-login.php?action=logout
Don’t forget to replace example.com with your own domain name.
You can access this link directly in your browser window to log out of your WordPress site.
When you visit the WordPress logout link, it will take you to a warning page. You will need to click on the logout link to confirm that you really want to log out.

You can also manually add this logout link anywhere on your WordPress site. Let’s take a look at how to do that.
If you don’t like the video or need more instructions, then continue reading.
Adding the WordPress logout link in your site’s navigation menu will make it easily accessible from any page on your website.
Simply head over to the Appearance » Menus page in your WordPress admin. After that, you need to click on the custom links tab to expand it and add the logout link in the URL field.

Once you are done, click on the ‘Add to menu’ button, and you will notice the link appear in the right column. You can adjust its position by simply dragging it up or down.
Don’t forget to click on the ‘Save Menu’ button to store your changes.
You can now visit your website to see the logout link in your navigation menu.

The problem with adding the logout link in the menu is that it is visible to all users (both logged-in and logged-out). It only makes sense to show the logout link to users who are actually logged in.
You can do that by following our instructions on how to show different menus to logged in users.
WordPress comes with a default widget called Meta. This widget shows a bunch of useful links including a logout or login link to users.

Some people find the other links in the Meta widget are not quite as useful.
As an alternate, you can also add a plain text or custom HTML widget with the logout link in plain HTML. Here is the HTML code you’ll need to add:
<a href="http://example.com/wp-login.php?action=logout">Logout</a>

If you manually add a logout link in WordPress, then the problem is that it does not change based on the user’s login status.
To fix that, you can use a plugin to dynamically display the login or logout link based on the user’s session.
First, you’ll need to install the Login or Logout Menu Item plugin. For details, see our step-by-step guide on how to install a WordPress plugin.
After you install and activate the plugin, you’ll go to Appearance » Menus in your WordPress admin and add the Login/Logout link to your menu.

After you hit ‘Save Menu’ and check your WordPress website, you’ll see the link in your menu.

When you click on it, it’ll take you to a page to login, or if you’re already logged in, it will log you out.
This method also works with WooCommerce, MemberPress, and other WordPress eCommerce platforms.
We hope this article helped you find the direct WordPress logout link and add it to your navigation menu. You may also want to see our guide on how to add a call button in WordPress, and how to track link / button clicks in WordPress to make data-driven decisions.
If you liked this article, then please subscribe to our YouTube Channel for WordPress video tutorials. You can also find us on Twitter and Facebook.
The post How to Add the WordPress Logout Link to Navigation Menu appeared first on WPBeginner.
#include <iostream>


using namespace std;

int main ()

    int charge, aftercharge, parking_hours;

     cout << "please put your parking hours:    " ;
     cin >> parking_hours;

     if (parking_hours>=1)
     {
        charge = 1 ;
     }
     else if (parking_hours>=11)
    {
        charge = 2.50 ;
    }
     else if (parking_hours>=12)
     {
        charge = 6.00 ;

     }
     aftercharge = parking_hours*charge ;

     cout << "your bills RM" << aftercharge;
     cout << "this is your charge RM: " << parking_hours;

return 0;
I first blogged about responsive data tables in 2011. When responsive web design was first becoming a thing, there were little hurdles like data tables that had to be jumped. The nature of <table> elements are that they have something a minimum width depending on the content they contain and that can easily exceed the width of a small screen device.
This image I made then still covers the issue pretty well:

Except… maybe they don’t equally suck. If that image on the left were scrollable, then maybe that’s actually… not so bad. In fact, that’s what I’ve done right here on CSS-Tricks recently. I think it’s the safest way of handling responsive tables when you have no idea what content the table contains. That’s the case here, where I need to set up base table styles that apply to any blog post which may contain a table.
The crux of the idea of a scrollable table is to wrap it in a <div> that has overflow: auto; on it. That way the <table> inside is free to exceed the width of the parent, but it won’t “blow out the width” and instead triggers a scrollbar. This isn’t quite enough though, so here’s Adrian Roselli with the real scoop. The wrapping <div> needs to be focusable and labelled, so:
<div role="region" aria-labelledby="Caption01" tabindex="0">
  <table>
    <caption id="Caption01">Appropriate caption</caption>
    <!-- ...  -->
  </table>
</div>
Then apply the scrolling and focus styles, in the condition you’ve done everything else right:
[role="region"][aria-labelledby][tabindex] {
  overflow: auto;
}

[role="region"][aria-labelledby][tabindex]:focus {
  outline: .1em solid rgba(0,0,0,.1);
}
If you’re going to further engineer responsive tables, there are all sorts of options. One of the classics is to display: block a lot of the elements, meaning that all the data in a row (<tr>) ends up as a chunk of stacked content together that stands less of a chance of breaking the parent element’s width. You can get all the data labels properly with pseudo-elements. But, this only makes sense when individual rows of content make perfect sense alone. That’s not the case with every table. A table’s purpose might be cross-referencing data, and in that case, you’ve ruined that with this approach. So again, there are nice approaches for responsive tables when you know exactly the content and purpose of the table. But the best responsive solution when you don’t know is to just make sure they are swipeable.
Direct Link to Article — Permalink
The post Under-Engineered Responsive Tables appeared first on CSS-Tricks.
You can support CSS-Tricks by being an MVP Supporter.

This post is originally published on Designmodo: When Should You Rethink Using Time-sensitive Images on Your Website?

There are two ways we can classify a website’s content in terms of time. Evergreen content is content that’s just as relevant and useful today as it is years from now. Time-sensitive content, on the other hand, has a very …
For more information please contact Designmodo
A bunch of SVG icons (of popular things) all under 1KB. SVG is awesome for golfing.
I was going to add a CodePen logo but there is already one in there at 375 Bytes. I’ve got one at 208 Bytes, based on a logo update David DeSandro did for us a couple years back.
Direct Link to Article — Permalink
The post Super Tiny Icons appeared first on CSS-Tricks.
You can support CSS-Tricks by being an MVP Supporter.

Besides being a tasty canned meat product, "spam" can be defined as unwanted messages sent via email, text messages, instant messages, social media, search listings, phone (robocalls), direct mail (junk mail), internet forums, and blog or article comments.