In the video below, we take a closer look at HTTP headers in this web services tutorial. Let's get started!
HTTP Headers: Web Services Tutorial


Tips, Expertise, Articles and Advice from the Pro's for Your Website or Blog to Succeed
In the video below, we take a closer look at HTTP headers in this web services tutorial. Let's get started!

 As a WordPress user, you’ve likely heard talk of Pinterest and the almost other-worldly power it possesses to drive FREE traffic to your website. And if you haven’t heard yet, please check out this epic post discussing how you can boost traffic to your WordPress site with Pinterest. There’s a reason why bloggers and WordPress […]
The post How To Optimize WordPress Blog Content for Pinterest appeared first on WPExplorer.


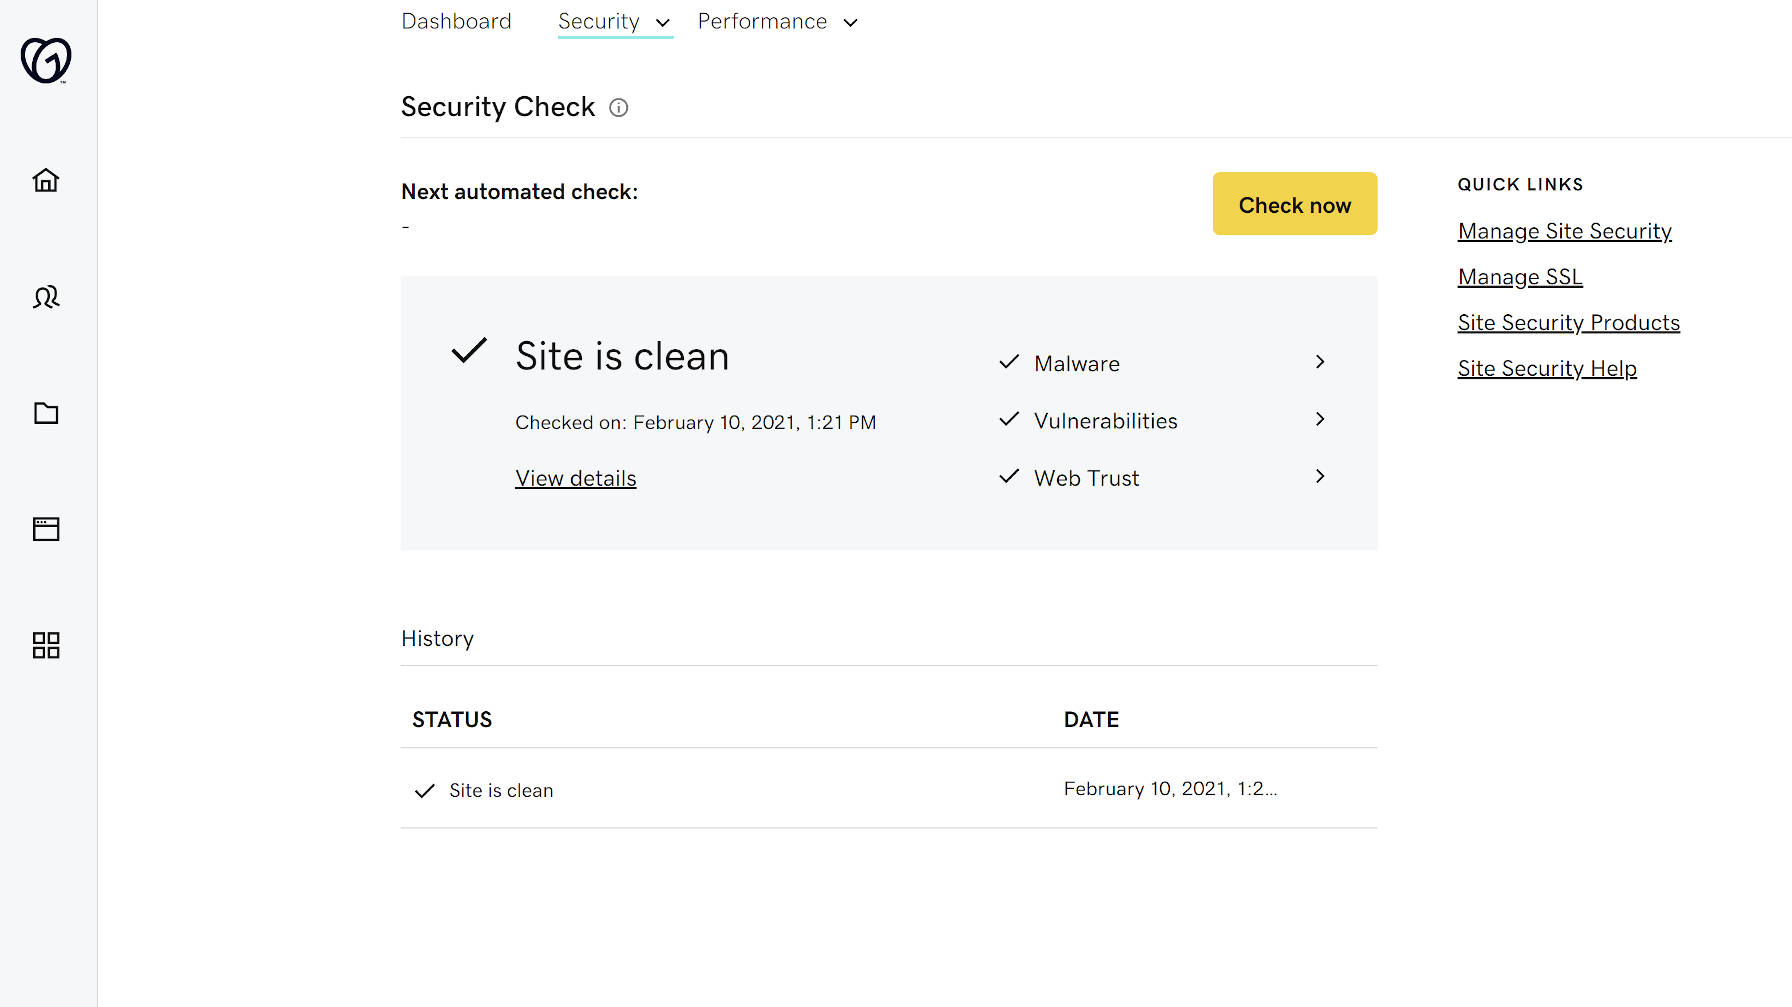
On Monday, GoDaddy officially launched the Hub by GoDaddy Pro, a dashboard that brings together all of its products, pro-specific tools, and solutions. The experience is geared toward website developers and designers, creating a central location to manage their client work.
GoDaddy Pro is not a new service by GoDaddy. The hosting company launched its initial beta in 2015. However, GoDaddy Pro is now offering a fresh experience powered by the Hub. According to Adam Warner, the Global Field Marketing Sr. Manager at GoDaddy, the Hub is being built in collaboration with real-world web designers and developers from their Customer Advisory Board.
The Hub is at hub.godaddy.com. Existing GoDaddy Pro users can opt-in to the new Hub experience. However, they may continue using the legacy experience at pro.godaddy.com. They can also jump between both as needed. Eventually, the Hub will completely replace the legacy experience.

“You can manage all your client projects, sites, and GoDaddy products from within the Hub,” said Warner. “Your clients’ WordPress sites don’t have to be hosted at GoDaddy. The Hub works with all web hosts. You can run one-click WordPress updates, security checks, backups, and other bulk site maintenance work within the Hub. We’ve seen users save an average of three hours per month, per site.”
The Hub allows web developers to access their clients’ GoDaddy products without needing to pass around credentials. Developers can also send a pre-loaded shopping cart or purchase products on their clients’ behalf.
“This makes it easier, and faster, to get a new project up and running,” said Warner. “You don’t have to worry about your client buying the wrong hosting plan or domain. Project management is integrated into the Hub, so you can keep track of client communications and ensure you’re delivering projects on time.”
Part of this journey began when GoDaddy acquired ManageWP and brought its team over in 2016. The acquisition was anything but popular at the time.
“We built the first version of our GoDaddy Pro site management tools on top of ManageWP Orion,” said Warner. “We added new GoDaddy-specific features, like allowing clients to grant delegated access to manage their GoDaddy products. We also included some premium addons for free on GoDaddy-hosted websites. Just like with ManageWP, sites managed in the Hub can be hosted anywhere, not just at GoDaddy.”
The Hub has an interface that feels more Average Joe than tech savant. I half expected to see call-to-action buttons littering the screen, funneling users to every conceivable GoDaddy product, but none were found. Expectations from the GoDaddy of 10 years ago still linger and die hard. However, the company continues to move beyond its old reputation with its free tools and more recent willingness to give back to the open-source community, including its contribution to Five for the Future.
“My goal in joining GoDaddy in 2018 was, and still is, to continue my participation in the WordPress and wider web designer and developer (WD&D) communities in order to listen and return feedback internally on how we can best support freelancers in starting, growing, and streamlining their businesses,” said Warner. “GoDaddy Pro (the legacy tool) already existed when I joined GoDaddy, and my mission was to spread the word and offer suggested enhancements based on real-world conversations with freelancers and their specific needs.”
Creating clients, projects, and sites from within the interface is simple. Performance and security checks went well for the one site I have connected. The tests seemed to be spot on in comparison to other tools I have used.
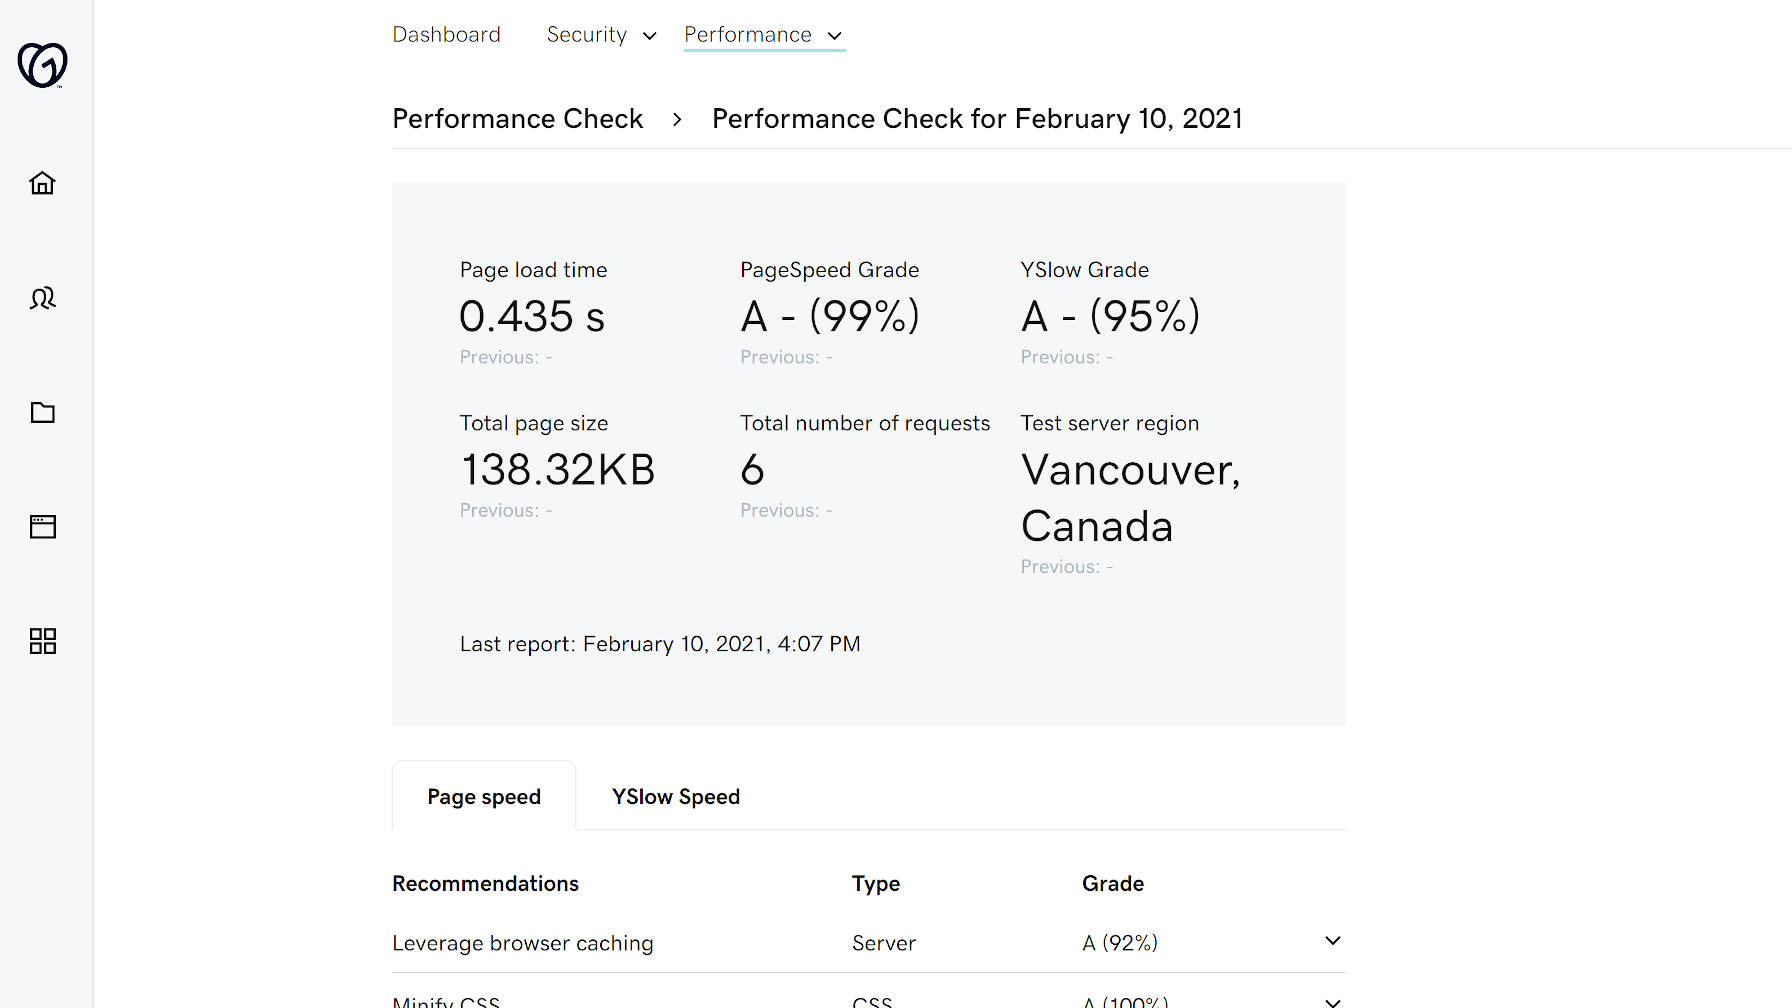
GoDaddy Pro membership is free. However, the Hub will have premium site maintenance tools in the future. Automated security checks, performance checks, backups, and uptime monitoring are currently free. There is no timetable on when they will be behind a paywall. Some of the premium features will have a downgraded free option when the switch is flipped.
“While some adjacent programs (e.g. GoDaddy Reseller program, Pro subscription) may have associated costs or fees, GoDaddy Pro’s integrated project management, site management, and client management tools are free,” said Warner.
The commitment to offering the management tools for free is undoubtedly a good thing. Thus far, I like what I am seeing with the new Hub experience.

Look at that! The :focus-visible pseudo-selector is now supported in Firefox, as of version 85 which shipped yesterday. I had to rush over to the MDN Docs just to confirm, and yep, the :focus-visible page has been updated to reflect the news.
What’s so cool about :focus-visible? It’s all about the blue focus ring that displays around elements that are in focus. It’s sort of a happy medium between loving the outline for accessibility purposes (gotta know what element is selected when tabbing on a keyboard) but not-really-loving how it looks (gotta have everything follow brand).
The strategy has largely been an all-or-nothing choice between using a custom outline when any element is in :focus (great, but that means for both keyboard tabbing and mouse clicks) or ditching the outline altogether (not great, like ever). :focus-visible accomplishes the same thing as :focus, but uses a browser’s knowledge of user inputs (or heuristics) to determine whether the focus is coming from a keyboard or a mouse.
(Are a browser’s heuristics perfect at determining the input? That depends. Things get murky once we start factoring in things like touch interactions.)
That means, we get to remove the default focus ring (yay!) for the right types of interactions (double yay!) and display our own custom styles while we’re at it (triple yay!). Allow me to pluck Andy Adams’ fine example straight from our almanac. Note that :focus-visible cannot remove the focus ring like :focus can, so the two are used together:
.next-image-button:focus {
  outline: none;
}

.next-image-button:focus-visible {
  outline: 3px solid blanchedalmond; /* That'll show 'em */
}Chrome implemented :focus-visible back in 2018. Firefox had it’s own prefixed version, :-moz-focusring, prior to this implementation. Safari? Go vote for the feature!
Igalia is gathering funding and working on getting it into Safari! Here’s Brian Kardell on this.
The post :focus-visible Support Comes to Firefox appeared first on CSS-Tricks.
You can support CSS-Tricks by being an MVP Supporter.

In the literal sense, a packet is a container of items and contents to be sent to other people. If …
How to Fix Packet Loss in 4 Simple Steps Read More »
The post How to Fix Packet Loss in 4 Simple Steps appeared first on .
this is the task given to me guix i hope you can help me
Create a program that will read the data from a file and save the output in another file
1.Create an input file named CS122Grades.
2.The contents of the input file should be the names,midterm grades and finalterm grades of 5 students (grades are from 0-100)
3.Create a main program named FinalGradeCalculator.
4.The main program will read the names,midterm grades,and finalterm gradesof the 5 students and compute the final grade (50% midterm+50%finalterm)and determine the remarks whether the student passed or failed (passing grade is 75)
5.The man program will save the outputin a file named CS122FinalGrades.The content of the output file should be the name of the student, the final grade and the remarks with labels.
6.The program shoundappend new data to your output file.
Do you want to learn how to hide a Pinterest image in WordPress?
Pinterest can be a great way to drive traffic to your blog, but displaying a Pinterest image in your post can make your content harder to read.
In this article, we’ll show you how to easily hide a Pinterest image in blog posts while still letting readers pin a custom Pinterest image when they share your content on Pinterest.

Using Pinterest can be a great way to increase blog traffic.
But, the Pinterest recommended image sizes don’t always look good when added to blog posts. That’s because the Pinterest image dimensions are long and narrow (3:2) which doesn’t fit most blog layouts.
Not to mention, these large images have the potential to slow down your website.
So you might be wondering why do bloggers use longer Pinterest images?
By hiding the Pinterest images, you can improve the appearance of your blog posts and make your site faster. All while reaping the benefits of letting readers pin a high-quality image.
You might have heard that hiding Pinterest images on your WordPress blog goes against the Pinterest Terms of Service (TOS).
But, this isn’t true.
Hiding a Pinterest image on your website is allowed, as long as you meet the following requirements:
Essentially, you can hide images on your WordPress blog as long as the image you’re hiding is relevant to your page.
For Google to properly rank your site it needs to be able to index your content. This means the search engines crawl your website to see what pages and media your website contains.
Google isn’t necessarily a big fan of hidden images or hidden content. Especially, since hidden content can be associated with spam websites.
However for legitimate use-cases like this one, it’s completely ok for you to hide Pinterest images without impacting your Google ranking.
There are several WordPress plugins that makes it easy to hide Pinterest images in WordPress. There are premium sharing plugins like WPTasty or Grow by Mediavine (formerly Social Pug).
However, we recommend using the free Shared Counts plugin, and their free Shared Counts – Pinterest Image addon.
These plugins are extremely well coded and will not impact your WordPress website speed. Not to mention, they’re 100% free.
This is the plugin that we’re using on WPBeginner to add our social share buttons.
The first thing you’ll need to do is install the Shared Counts plugin. For detailed instructions, please read our step-by-step guide on how to install a WordPress plugin.
The plugin settings are fairly straight forward, but we do have a detailed tutorial on adding social sharing buttons to WordPress that you can use as a guide to get started.
Once the Shared Counts plugin is fully set up, you’ll need to install and activate the Shared Counts – Pinterest Image addon to your site.
There are no unique settings to configure for this plugin.
It automatically adds a custom Pinterest image box to your blog posts.
Instead of having users pin random images from your blog post, you can create a higher-quality image that’ll perform better on Pinterest.
When your website visitors click on your Pinterest share button, Pinterest will pop up with the perfect image you’ve created for your post.
To add your custom Pinterest image for your blog posts, simply go to Posts » All Posts in your WordPress dashboard and open up the post you want to edit.
In the WordPress content editor, you’ll see a meta box labeled ‘Pinterest Sharing Image’ in bottom right-hand corner.

You need click on the ‘Select Image’ button and upload a new image or choose an existing image from your media library.
When you’ve found the image you’d like to use, you can add the ‘Title’ and ‘Alt Text’, then click the ‘Use Image’ button.

Next, click ‘Publish’ to publish your new post with the Pinterest sharing image, or ‘Update’ if the post is already live.
Now, when your visitors click the Pinterest share button there will be a pop-up that has your Pinterest image with the proper dimensions.

One of the best parts about using this plugin is that it automatically hides the Pinterest image for you.
Once you add your Pinterest featured image to your blog post, the plugin will add it to the bottom of your post, and apply the “display:none;” element automatically. This makes it completely hidden from view.
There is no need to add the image to your post and manually hide it or make any additional changes.
You might have seen other methods online, like using CSS to hide your Pinterest images, or adding HTML code with the “display:none;” element, but you don’t need to worry about any of that.
The plugin addon takes care of everything for you, which is why we recommend this option above all else.
Finally, it’s important you optimize your images before uploading them to WordPress. This plugin hides the image from view, but it still loads on your post. So, if it’s not properly optimized, then it could slow down your website.
We hope this article helped you learn how to hide Pinterest images on your WordPress blog posts. You may also want to learn how to verify your site on Pinterest for added functionality, and our expert pick of the 40 useful tools to manage and grow your blog.
If you liked this article, then please subscribe to our YouTube Channel for WordPress video tutorials. You can also find us on Twitter and Facebook.
The post How to Hide Pinterest Images in Your WordPress Blog Posts appeared first on WPBeginner.

George Mamadashvili’s Bookmark Card block is the sort of simple plugin that is easy to overlook. It is one of those plugins that suffers from the lack of block discoverability in WordPress at the moment. Like many other one-off blocks, you don’t know you need it until you need it.
The plugin is essentially an embed block, but it is not specific to one website or service like Twitter and YouTube. Instead, it allows users to add a “card” for any URL in their content.
Mamadashvili has previously worked as a developer on several blocks for the Sorta Brilliant brand, which sported some of my favorite block-related plugins, such as Emoji Conbini. Unfortunately, those plugins are no longer in the WordPress directory at the request of the owner, Nick Hamze.
However, Mamadashvili has continued building separately. Yesterday, he launched Toggles, a block for creating FAQs, hiding spoilers, and adding simple accordion elements..
I have had his Bookmark Card block literally bookmarked for a few months, just now finally giving it the overdue trial run that it deserves.
The name of the plugin brings me back a few years. There was once a time when bookmarks were a common feature of the web. Entire sites were dedicated to managing them, and some people created their own bookmark pages on their WordPress sites. Some were mere blogrolls. Others were more advanced galleries with images. Even the “link” post format archive in WordPress has served as a bookmark system.
The idea of bookmarks is about preserving pieces of the web that interests us. So, I opened my dusty old recipe folder in Chrome and started putting together a recipes page for fun, hoping for some inspiration in my culinary pursuits.

I enjoy this recipe page a lot more than the plain links hidden away in my Google bookmarks. I suppose I could get even more creative and break everything down by category on different pages.
The Bookmark Card block currently ships with two styles. The horizontal style, shown above, places the image to the right of the card content. The default style, shown below, adds the image at the top. Users can also try combinations with other blocks for unique looks, such as adding cards to the Columns block.

The plugin can be useful in many contexts. Users can add URLs that are not supported via the regular embed blocks. They may also enjoy the shared card style for all of their embedded links.
The simplicity of Bookmark Card is part of its allure. However, it is also overly simple in some respects. The only option it provides is the choice between a vertical and horizontal card style. This limits its potential, especially if the default design does not match the user’s theme.
The plugin does not need a plethora of options. However, it could use some basics. Text and background colors are a must. Base typography options, such as selecting the font size, would be nice-to-have features. Integration with the Gutenberg plugin’s newer border-radius component would work well with this type of block. Like all blocks I test or use, I also ask that plugin developers add support for wide and full-width alignments.
A few additional styles or layout options would help. For example, a horizontal style that moves the image to the left of the card content would be a good option.
The plugin, which is currently at version 1.0, is a good starting point. However, it could be much better with just a handful of extras in future updates.
 Every time a user logs into the WordPress dashboard, they are greeted with a few messages at the top of their screen. These are WordPress admin notices. Typically they are used to alert users of critical information such as updates, warnings, or errors. While some WordPress users may think of them as an annoyance, these […]
The post What are WordPress Admin Notices? appeared first on WPExplorer.
Commerce7, a provider of commerce solutions for the wine industry, has announced a new GraphQL API that it expects to augment the services already available through the existing Commerce7 REST API. The new API is available immediately and provides significant advantages in terms of performance.
If you’re on a stressful call and need quick, foolproof options to fix phone echoing right now, do these three things: These emergency fixes will get you through the rest of the call. Then you can go through the full list of fixes below. Phone echoing happens when we hear …
How to Fix Phone Echoing (+3 Emergency Steps) Read More
The post How to Fix Phone Echoing (+3 Emergency Steps) appeared first on .

Hello! We have different websites in different states of different countries all over the world. If you want to advertise, promote yourself, I can help you. Please give me a chance to serve once. Thank you!

This post is originally published on Designmodo: Verify Email Newsletters for Spam and Test Deliverability

When you’re creating a newsletter, you want it to look absolutely perfect. Having the most impactful campaign is something that every company is attempting to do, so having tools and resources that help is crucial. With new tools coming out …
For more information please contact Designmodo
Not sure if this is the right forum to post this. We are looking to improve the speed of our custom website to rank higher on google. Can anyone guide us on how this could be done?
Do you want to disable automatic update email notifications in WordPress?
By default, WordPress sends email notifications for automatic updates of WordPress plugins, themes, and the core itself. These notification emails can get annoying.
In this article, we will show you how to easily disable automatic update email notifications in WordPress.

WordPress is an open-source content management platform that is regularly maintained and updated.
Some of these updates are automatically installed, and you will receive an email notification that your site has been updated.

Similarly, WordPress also allows you to enable automatic updates for WordPress plugins and themes. This means that you can spend less time updating plugins and more time growing your business.
You can enable automatic updates for plugins that you trust by visiting the Plugins » All Plugins page in your WordPress admin dashboard.
Simply click on the ‘Enable auto-updates’ link next to the plugin that you want to update itself.

For WordPress themes, you can visit the Appearance » Themes page and click on a theme.
This will bring up a theme information popup where you must click on ‘Enable auto-updates’.

WordPress will send you an email notification when any of your plugins, theme, or WordPress core is updated.
This can get annoying, particularly for users who manage multiple WordPress websites. Wouldn’t it be nice if you could control and turn off these email notifications?
Let’s take a look at how to easily disable automatic update email notifications in WordPress. You can use the quick links below to jump to the method you want to use:
This method requires you to add code to your WordPress files. If you haven’t done this before, then take a look at our beginner’s guide on pasting snippets from the web into WordPress.
You can manually add the code below to your theme’s functions.php file. But this can be tricky since a mistake can bring down your whole website. Plus, if you update your theme, then any custom code snippets will be erased.
We will show you a better approach below, which is using a code snippets plugin.
1. Disable Auto Update Notification Emails for WordPress Core, Themes, and Plugins
Luckily, there is an easy and safe way to disable auto update notification emails in WordPress, and that’s using the WPCode plugin.

WPCode lets you easily add custom code snippets in WordPress without editing your theme’s functions.php file.
Plus, it has a full code library inside the plugin that includes ready-to-use, verified code snippets for popular feature requests like disabling automatic update emails, removing the WordPress version number, disabling comments, and more.
First, you need to install and activate the free WPCode plugin. For step-by-step instructions, see our tutorial on how to install a WordPress plugin.
Once the plugin is activated, you need to go to Code Snippets » Library from your WordPress admin dashboard.
Then, search for the ‘Disable Automatic Updates Emails’ snippet and click on the ‘Use snippet’ button.

WPCode will then automatically add the code and set the proper insertion method.
The snippet has three filters, with one for each type of auto-update email: WordPress core, WordPress plugins, and WordPress themes.

If you don’t want to use a particular filter, simply add a // at the beginning of the filter line.
For example, if you still want to get auto-update emails for WordPress plugins, add a // to the plugin, and the filter will stop it from executing.

After that, all you have to do is toggle the switch from ‘Inactive’ to ‘Active’.
Then, click the ‘Update’ button.

Now you will no longer get automatic update emails from WordPress.
2. Disable Auto Update Notification Emails for Core Updates
You can also use WPCode to disable notification emails for automatic WordPress core updates. Instead of choosing an existing code snippet, you will need to add this code as a custom snippet:
add_filter( 'auto_core_update_send_email', 'wpb_stop_auto_update_emails', 10, 4 );

function wpb_stop_update_emails( $send, $type, $core_update, $result ) {
if ( ! empty( $type ) && $type == 'success' ) {
return false;
}
return true;
}
For more instructions, you can see our guide on how to add custom code in WordPress.
3. Disable Auto Update Notification Emails for Plugins
Just add the following code to disable notification emails for automatic updates of WordPress plugins:
add_filter( 'auto_plugin_update_send_email', '__return_false' );
4. Disable Notification Emails for WordPress Theme Updates
Finally, you can add the following code to disable notification emails for automatic updates of WordPress themes:
add_filter( 'auto_theme_update_send_email', '__return_false' );
Next, we will show you how to disable automatic update email notifications using two different email plugins.
1. Manage Notification Emails
The first thing you need to do is install and activate the Manage Notification Emails plugin. For more details, see our step-by-step guide on how to install a WordPress plugin.
Upon activation, you need to visit the Settings » Notification emails page. This is where the plugin allows you to manage all WordPress notification emails, including auto-update notifications.

Simply scroll down to the auto-update options and uncheck the box next to the notifications you want to disable.
Finally, don’t forget to click on the ‘Save Changes’ button to store your settings.
2. WP Mail SMTP
Another plugin you can use to disable automatic update email notifications is WP Mail SMTP. It’s the best SMTP service for WordPress and ensures your emails are delivered to your inbox.
WP Mail SMTP lets you easily manage the emails sent by WordPress through its Email Controls. However, you will need the WP Mail SMTP Pro license to unlock the Email Controls option.
Next, you will need to install and activate WP Mail SMTP Pro on your website. You can check out our guide on how to install a WordPress plugin for more details.
Once the plugin is active, navigate to WP Mail SMTP » Settings from your WordPress admin panel and click the ‘Email Controls’ tab.
After that, scroll down to the ‘Automatic Updates’ section and disable email notifications for plugins, themes, WP core status, and full log.

When you are done, don’t forget to click the ‘Save Settings’ button.
That’s all. You have successfully disabled WordPress auto-update email notifications for your website.
Because WordPress plugins run on many independent WordPress hosting and server configurations, sometimes a plugin update may break a feature on your website or make it inaccessible.
This is easy to troubleshoot and fix. First, you need to figure out which plugin has caused the issue by deactivating all WordPress plugins and reactivating them one by one.
Once you have isolated the plugin causing the issue, you can use the WP Rollback plugin. It allows you to switch to the previous version of a WordPress plugin or theme.
For details, you can see our guide on how to roll back WordPress plugins and themes with step-by-step instructions.
Even if you disable WordPress auto-update emails, there are other WordPress notification emails that you may not want to miss.
For instance, if you run a WooCommerce store, then you will want to receive notifications when a new order is placed.
Similarly, if you sell an online course or run a membership website, then you might want to receive email alerts when new users sign up.
You will also want to make sure that emails sent to users are delivered, including forgotten password emails, payment receipt emails, and order confirmation notifications.
To send emails, WordPress uses the PHP mail function. This function is easily misused by spammers, and your emails may end up in the spam folder.
To make sure all your important WordPress notification emails reach your users’ inboxes, you will need a proper SMTP service to send emails.
This is where the WP Mail SMTP plugin comes in. It uses an SMTP service to send all your WordPress notification emails.
You can use it with a paid SMTP service provider or a free SMTP service like Gmail combined with the free version of the WP Mail SMTP plugin.
For more details, see our guide on How to set up WP Mail SMTP on your WordPress site.
We hope this article helped you learn how to disable automatic update email notifications in WordPress. You may also want to see our guide on how to get a free business email address and our comparison of the best email marketing services to grow your sales.
If you liked this article, then please subscribe to our YouTube Channel for WordPress video tutorials. You can also find us on Twitter and Facebook.
The post How to Disable Automatic Update Email Notification in WordPress first appeared on WPBeginner.
Anyone who uses VoIP (voice over internet protocol) for communication knows it’s very sensitive to delays and drops on your …
How to Optimize Your VoIP Network Read More »
The post How to Optimize Your VoIP Network appeared first on .
Sentiment is a judgement, thought, or attitude which is determined by how a human is a feeling. Sentiment analysis is the act of analyzing and classifying subjective information found in written phrases.