WordPress Support Team Seeks to Curb Support Requests for Commercial Plugins and Themes

Wp Plugins

WordPress’ Support Team contributors are discussing how they can curb support requests for commercial products on the official WordPress.org forums. Users sometimes seek help for commercial product upgrades on the forums of the free version, not knowing that the moderators’ official policy is to refer them to the extension’s commercial support channel. In other instances, it is not immediately clear whether the issue is with the free version or a paid upgrade that the user has installed.

“This has come up a few times the past weeks, mostly in relation to plugins that have a free base product on WordPress.org, but sell addons on their own site, and where the line is drawn on who can get supported where,” WordPress contributor Marius Jensen said during the team’s most recent meeting. “Authors are not allowed to support their paid products on WordPress.org as is, but where do you draw the line, for example, when a base plugin causes issues with a paid addon, should then support be allowed for the base product on WordPress.org, since that’s the root issue, or should it be shipped off to the author’s own site, since it affects a paying user?”

This type of issue is common among products where WordPress.org is the main distribution channel for a popular free theme or plugin. The support relationship between the free and commercial products often intersects in an ambiguous way.

“The goal is to ensure that paying customers and free users get the best support they can, from the ones that can give it,” Jensen said. Volunteers do not have access to the commercial products, nor is it their job to support them. This is the crux of the matter.

“It’s an unacceptable misuse of volunteers time to support a product someone else has been paid to support,” Jensen said.

Contributors discussed how they can handle different scenarios where it’s unclear where the root of the problem is, in order to move the burden away from the support moderators, allowing the extension’s author to discern if the problem is with the free version or commercial add-on. Volunteers should not have to familiarize themselves with the minute distinctions between the features that are offered for free or as an upgrade.

On the other side of these support scenarios, where it isn’t clear where the problem originates, plugin and theme authors can be inconvenienced when support topics are hastily closed.

“It’s just that the closing of topics seems counter productive for those (users and devs alike) that get it wrong,” plugin developer Arnan de Gans said. “Since plugin/theme makers do not have any control over these forums we can’t do a thing after topics get closed. Which works against the user experience by creating confusion.” He suggested the team consider a grace period where the developer has a day or two to respond.

Ben Meredith, head of support for a freemium plugin, chimed in on the discussion, urging the support team to consider how closing issues can sometimes create a bad user experience:

An issue related to premium products is raised, and summarily closed by forum mods for being about a premium product. This creates a “googleable” record of the error message/problem that then attracts other visitors. Once the issue has been closed, we get copy-cat issues “I am having the same problem (link to closed post)” We get those replies in both followup forum posts and internal tickets. To the layperson who has no idea the distinction between “WordPress core volunteer” and “Company I just paid money to,” this creates a bad experience all around.

Premium users are treated like second-class citizens on the forums. They don’t know the guidelines, and reached out for help. This may be their first interaction with the WordPress community, and sometimes a well-meaning forum moderator can come across as wrist-slapping the exact people we want to give white-glove service to (they just paid us!).

Michelle Frechette, Head of Customer Success at GiveWP, also shared this sentiment regarding the user experience.

“Something I’m not seeing addressed much here is how alienating it can feel to be corrected by the mods (or even the plugin authors) to be directed from the forums back to the paid support page,” she said.

Ben Meredith said that despite sticky posts telling users not to post questions about commercial products, notes in the readme file, website notices, and canned replies, users will inevitably end up posting in the forums anyway. Steering them away to commercial support channels should be done in a way that does not make seeking help on WordPress.org an unwelcoming experience.

“I want for the forums to feel as welcoming as a WordCamp,” Meredith said.

“The current enforcement of the ‘premium plugins can’t get support here’ is not in line with that overarching goal: users using and enjoying WordPress. Currently, premium users (who are potential community members and community leaders!) are getting a first impression of the community that is ‘You’re doing it wrong!’

“I’d rather their first impression be ‘Happy to help! heads up, for questions like this in the future, we need you to go here.'”

In trying to ease the burden placed on volunteer support forum moderators, it’s important to consider how any new policy might also negatively impact developers hosting their plugins and themes on WordPress.org, and what kind of vibe the response gives to users in search of help. There are more suggestions for solutions in the comments on the post, and the discussion is open until Saturday, September 12, 2020, 07:00 PM CDT. The Support Team is seeking to get a wider range of viewpoints from plugin and theme authors before making a final decision on new guidelines for addressing requests for support on commercial products. Make sure to jump in on the comments within the next week if you have something to add to the discussion.

Convert Reusable Blocks to Block Patterns with 1-Click

Wp Plugins

Now that WordPress 5.5 has shipped, block patterns are available in core for all users. If you have previously been relying on reusable blocks but prefer the flexibility of block patterns, you may want to convert these.

WordPress core developer Jean-Baptiste Audras has made this possible in the latest update of his Reusable Blocks Extended plugin. He posted a video demo of how the plugin converts reusable blocks to block patterns with one click.

What’s the difference between reusable blocks and block patterns?

Why might you want to convert your reusable blocks to block patterns? For users who are new to the concept, there are a few distinctions between these similar features.

Reusable blocks were designed to be a time-saving feature that allows users to save a block or group of blocks for use on other posts or pages. They can be edited but they have a certain distinction in that they are intended to look the same in all places they are used. Any changes made to a reusable block will apply to all instances of the block wherever it is used.

If a user wanted to make changes to a reusable block specific to one page, the process would involve clicking on the block’s properties and selecting “convert to regular block,” which would ensure that all edits would appear only on that specific instance of the block. It’s unlikely that most users would know how to do this without help, so this is one of the drawbacks of reusable blocks.

Block patterns are predefined block layouts that are designed to be changed. Once a pattern is inserted into the content, users can customize with their own text, images, alignments, colors, additional blocks, etc. The options are limitless and any changes made are not saved back to the original pattern. Block patterns provide a flexible starting point that gives users an idea of how blocks can be combined to make attractive layouts.

User-Created Patterns Are Coming Soon to the Block Pattern Builder Plugin

At the moment, users can create their own reusable blocks but not their own block patterns. Patterns have to be registered with code in order to appear in the pattern library. This is another reason that Audras’ one-click conversion is quite useful for users who are limited to capabilities offered in the editor’s current UI.

The ability to create block patterns inside the editor should be a feature in core. It would enable non-technical users to share their designs and creations in a more flexible format than reusable blocks provide. Until this feature is added to core – and it isn’t a guarantee- there is a plugin for that.

Justin Tadlock’s Block Pattern Builder plugin, which is available on WordPress.org, will soon be merging a pull request that adds the option to create block patterns inside the editor. It will work in a similar way to the process of adding reusable blocks. Now that block patterns are available in WordPress 5.5, this feature will be more useful to a wide range of users.

Audras’ Reusable Blocks Extended plugin, like many other amazing utilities for the editor, might be difficult to find unless you already know exactly what to search. Many times users are not even aware of the possibility of converting reusable blocks to patterns. This might also make a useful core feature but doesn’t seem likely to be a high priority at the moment. In the meantime, watch for more plugins to start extending block patterns to do interesting things now that they are available in core WordPress.

10 New Plugins for Beginner & Experienced Bloggers

Wp Plugins

Plugins for Beginner Bloggers and Experienced WordPress UsersSo you finally took the plunge and decided to create a WordPress website. That’s pretty impressive! You went ahead and added a great deal of fantastic content. Again, that’s awesome. All that remains now is growing your WordPress website and rock your world. Perhaps that’s not the case. You’ve been at it for a while […]
The post 10 New Plugins for Beginner & Experienced Bloggers appeared first on WPExplorer.

All in One SEO Pack Plugin Patches XSS Vulnerability

Wp Plugins

All in One SEO Pack patched an XSS vulnerability this week that was discovered by the security researchers at Wordfence on July 10. The popular plugin has more than 2 million active installs, according to WordPress.org.

Wordfence researchers categorized it as “a medium severity security issue” that could result in “a complete site takeover and other severe consequences:”

This flaw allowed authenticated users with contributor level access or above the ability to inject malicious scripts that would be executed if a victim accessed the wp-admin panel’s ‘all posts’ page.

Version 3.6.2, released on July 15, 2020, includes the following update in the changelog: “Improved the output of SEO meta fields + added additional sanitization for security hardening.”

All in One SEO Pack users are strongly recommended to update to the latest version. At the time of publishing, just 12% of the plugin’s user base is running versions 3.6.x, which includes the three most recent versions. This leaves more than 1.7 million installations (88% of the plugin’s users) vulnerable.

Many users don’t log into their WordPress sites often enough to learn about security updates in a timely fashion. Plugin authors often don’t advertise the importance of the update on their websites or social media. This is the type of situation that WordPress 5.5 should help to mitigate, as it introduces admin controls in the dashboard that allow users to enable automatic updates for themes and plugins.

How to Easily Hide Widget Title in WordPress

Wp Plugins

Do you want to hide the title of a WordPress widget in your sidebar or footer?

WordPress widgets make it easy to drag and drop dynamic content into your theme to create unique layouts. However if you need to hide the widget title, then it typically requires coding knowledge of CSS and HTML.

In this article, we’ll show you how to easily hide the widget title in WordPress (without any code).

Hiding widget title in WordPress

Why Hide Widget Title in WordPress?

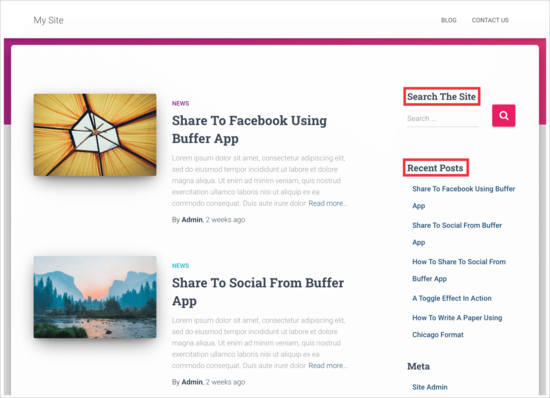
WordPress displays a default title for widgets, and it also allows you to rename them if you want. Most top WordPress themes will then display this title in the sidebar on your site.

Widgets titles displayed in sidebar

However, sometimes you may not want to display the widget title in the WordPress blog sidebar. By default, there is no built-in option to simply switch off widget titles.

That being said, let’s take a look at how you can easily hide the widget title in the WordPress sidebar.

Hiding Widget Title in WordPress

First, you want to install and activate the Widget Options plugin. For more details, please see our complete guide on how to install a WordPress plugin.

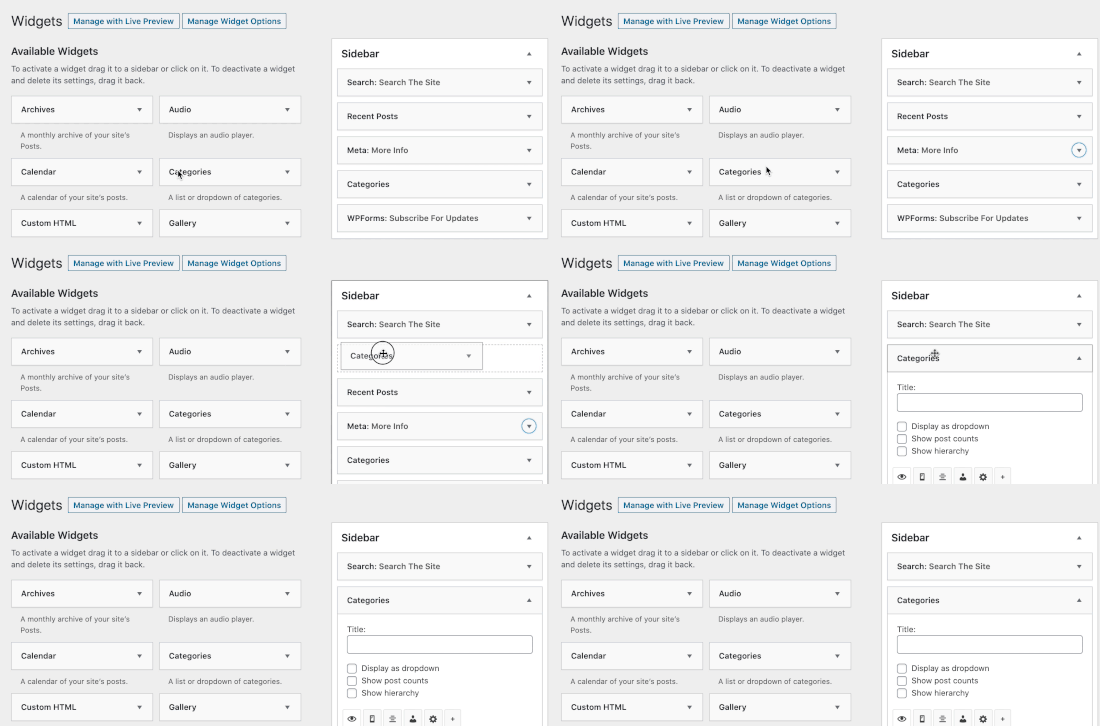
Once the plugin is activated, head over to Appearance » Widgets area in your WordPress admin area. Next, drag and drop a widget to your sidebar or any other widget-ready area on your site.

Drag and drop widget into sidebar

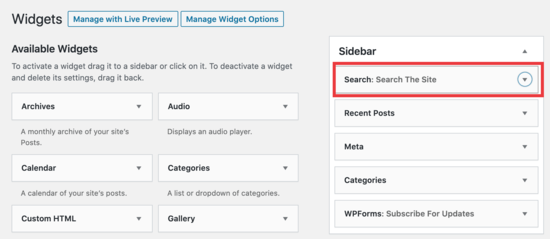
In this example, we’re going to remove the widget title ‘Search The Site’ from our search box in the sidebar.

Sidebar widget view

Simply click the arrow to open the widget and view the options to hide the title.

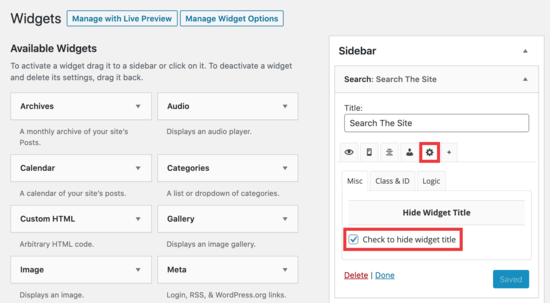
Hide widget title settings

Make sure you click on the ‘gear’ icon, and then check the box next to ‘Check to hide widget title’ and click the ‘Save’ button.

Now, when you view your site, the WordPress search box will appear without the widget title.

Widget title hidden on site

You can use this plugin to hide any widget title. The plugin also comes with multiple settings to hide or display titles based on page or post types and even screen sizes.

We hope this article helped you learn how to easily hide widget titles in WordPress. You may also want to check out our list of the most useful WordPress widgets for your site, and our comparison of the best drag and drop WordPress page builder plugins.

If you liked this article, then please subscribe to our YouTube Channel for WordPress video tutorials. You can also find us on Twitter and Facebook.

The post How to Easily Hide Widget Title in WordPress appeared first on WPBeginner.

After 11 Years, Users Will Be Able to Update Themes and Plugins via a ZIP File

Wp Plugins

It has been a long road. Eleven long years. WordPress will finally allow end-users to update an installed plugin or theme by uploading a ZIP file. After over a decade, most people who had hoped to see this day have likely moved on. However, for those of us still waiting for this long sought after feature, it will land in WordPress 5.5.

A little patience never hurt anyone. Over the years, we have seen plugins crop up to handle this missing feature. There has been a clear and present need for it. Easy Theme and Plugin Upgrades by Chris Jean has over 200,000 active installs. Update Theme and Plugins from Zip File by Jeff Sherk has another 20,000. The community owes the developers of these plugins at least a small bit of thanks for taking on a job that should have long ago been a part of the core experience.

There was a time when this feature would have been one of the most important tools to land in WordPress. This was a time when one-click updates were not a thing. This was long before the idea of automatic theme and plugin updates, a feature that is also coming in WordPress 5.5, was conceived. While it is still exciting to finally get a feature that has long been on the waiting list, it is far less useful than it once was.

This missing feature has also likely at least partially spurred commercial theme and plugin shops to come up with custom solutions. This represents arguably one of the largest segments of users that still need the feature, at least for those using products from shops that do not provide one-click or automatic updates.

Updating themes via a ZIP file is a bit old-school, but there are scenarios where that is the better or preferred option for some users.

I routinely use a third-party plugin to handle this for various sites I am involved with where I might maintain a custom theme. This is particularly true if I don’t have FTP or other access to the server. It is simple to upload a ZIP file in those cases.

Despite less of a need for this feature in 2020 than in 2009, I can still use it. Judging by the download numbers of existing plugins, a couple hundred thousand others can too.

How Updating via ZIP Works

The new feature is not immediately apparent. However, it is more of a power-user feature that users will need to know about before attempting to use.

Updating a theme or plugin works in the same fashion as uploading a new one. By visiting the Add New plugin or theme screen in the WordPress admin and clicking the upload button, users can drop the ZIP file from their computer. After clicking the Install Now button, WordPress will direct users to a new screen that compares the currently-installed extension with the uploaded versions. Users can then choose between continuing with the installation or canceling.

After clicking the “Upload Plugin” button via the new plugin screen, the uploader currently reads, “If you have a plugin in a .zip format, you may install it by uploading it here.” There is no mention that users may upload a plugin that is already installed. A tweak to the language could help make it clear.

The comparison feature is a welcome addition, which should curb users accidentally uploading something they already have installed or rolling back when they already have a newer version active on the site. Some of the existing solutions from third-party plugins do not handle this feature, so this should make for a good upgrade.

How to Setup Delivery Time Slots in WooCommerce (Step by Step)

Wp Plugins

Have you ever needed to set up delivery time slots for your online store?

Creating delivery time slots allows you to keep up with customer demand for more convenient delivery. At the same time, it also allows you to create a more manageable schedule to match your delivery capacity.

In this guide, we’ll share our step by step process on how to easily set up delivery time slots in WooCommerce.

Setting up delivery time slots in WooCommerce

What are Delivery Slots and Why Set Them up in WooCommerce?

Delivery slots allow customers on an online store to select a specific time and date ‘slots’ for delivery.

This convenient delivery model allows customers to know exactly when they’re going to receive their goods, which in turn increases customer satisfaction and confidence in your brand.

For store owners, offering specific delivery time slots for customers can drastically reduce non-deliveries. As a result, you can save money on delivery costs and make your store more profitable.

On a smaller scale, offering delivery or collection slots to customers allows store owners to manage their schedule and optimize delivery times. They can complete more orders quickly and deliver them on-time.

With that in mind, let’s take a look at how to easily add delivery or collection time slots in WooCommerce.

Creating Delivery Time Slots in WooCommerce

For this tutorial, we’ll be using the WooCommerce Delivery Slots plugin. It is a powerful plugin that adds the essential date and time-based features to the default WooCommerce delivery functionality.

First, you need to install and activate the WooCommerce Delivery Slots plugin. For more details, see our step by step guide on how to install a WordPress plugin.

Upon activation, you need to visit WooCommerce » Delivery Slots page in your WordPress dashboard.

Delivery slots menu

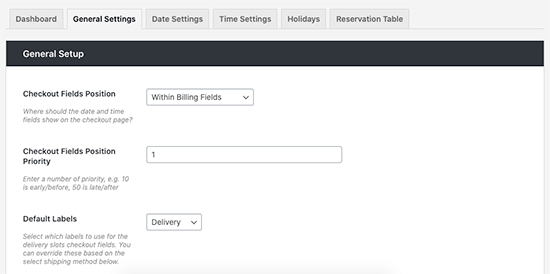
Next, you need to select the General Settings tab. From here you can change where to display the date and time fields and which shipping methods to offer.

Delivery slots settings

After that, switch to the Date Settings tab. On this screen, you can select the days of the week you’ll be offering delivery slots. You’ll also be able to add a maximum number of orders per day, set additional fees for same-day or next-day delivery, and more.

Delivery days

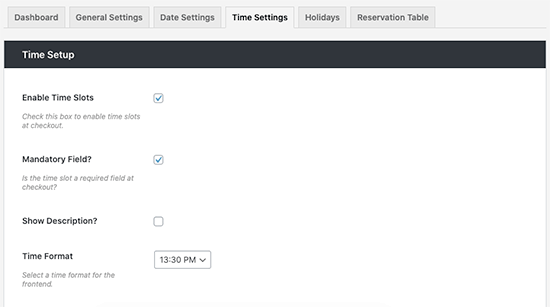
Now you can switch to the Time Settings tab to create your delivery time slots.

Time slot settings

Make sure to ‘Enable Time Slots’ is checked and scroll down to the ‘Time Slot Configuration’ section to customize.

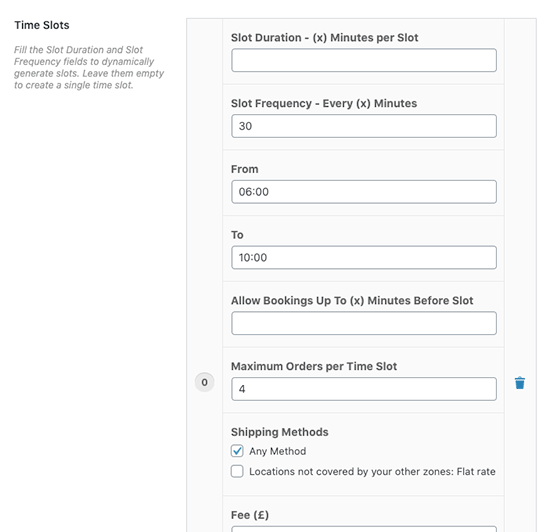
Here you’ll be able to fill the Slot Duration and Slot Frequency fields to dynamically generate slots. You can also leave them empty to create a single time slot.

For this tutorial, we’re creating time slots every 30 minutes from 6 am – 10 am every day of the week. We’re also creating premium time slots every 30 minutes from 10 am – 12 p.m noon on Thursdays and Fridays which costs an extra fee.

Time slot configuration

Tip: WooCommerce Delivery Slots allows you to fully customize your time slots, so you can add additional fees for certain slots, offer slots only for specific shipping methods, and set the maximum number of orders per slot.

Once you’re done creating your delivery time slots, go ahead and click Save Changes.

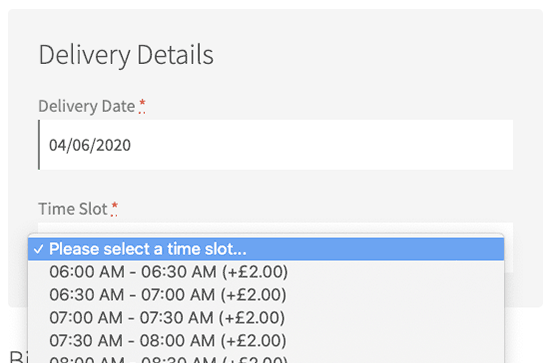
On the checkout page, your customers will now be able to select a delivery date and time slot to suit them.

Delivery slots on the checkout page

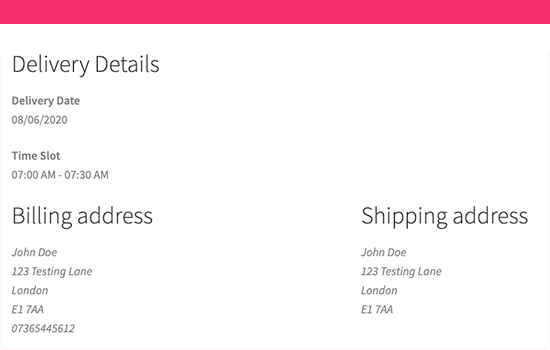
Once the customer has selected their time slot and purchased their items, they’ll be presented with an ‘Order received’ page after checkout.

This page contains a confirmation of their order, and the time slot they selected which will also be confirmed in their order email.

Delivery details

Tip: Make sure your WooCommerce email notifications are working. See our guide on how to fix WordPress not sending emails issue to set up and test your email notifications.

As the store owner, you will be able to see the selected delivery date in the orders overview and details. You can also go to WooCommerce » Delivery Slots » Deliveries page to see all deliveries.

Upcoming deliveries

Creating a Reservation Table in WooCommerce

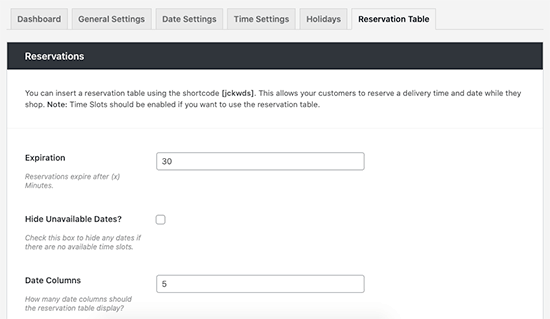
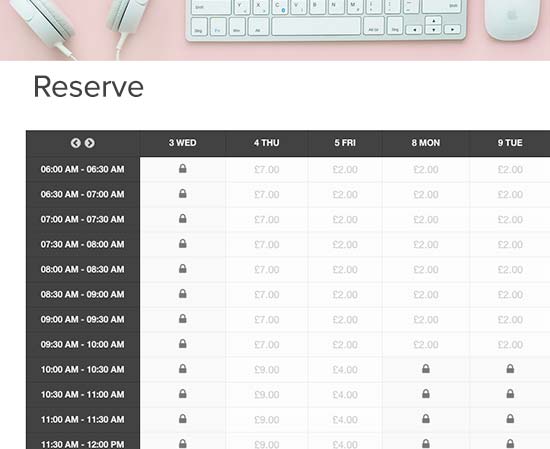
The WooCommerce Delivery Slots plugin also allows you to enable delivery reservation. This enables customers to reserve a delivery slot in advance.

Simply go to WooCommerce » Delivery Slots page and switch to the ‘Reservation Table’ tab.

Reserve time slots in advance

From here you’ll be able to adjust the settings for your table including setting limits on how long a reservation lasts before a purchase is made and changing its style to suit your store.

Once happy, click Save Changes and copy the shortcode [jckwds] at the top of this settings page.

You can now add this shortcode to any page in your site to allow customers to reserve their delivery time slot before purchase.

Adding reservation table for delivery slots

We hope this article helped you learn how to easily set up delivery time slots in WooCommerce. You might also like our list of the best WooCommerce plugins for your store and best email marketing services to grow your sales.

If you liked this article, then please subscribe to our YouTube Channel for WordPress video tutorials. You can also find us on Twitter and Facebook.

The post How to Setup Delivery Time Slots in WooCommerce (Step by Step) appeared first on WPBeginner.

Add Per-Block Notes and Create Draft Blocks With the Wholesome Publishing Plugin

Wp Plugins

Matt Watson, through his Wholesome Code brand, released a plugin called Wholesome Publishing on the WordPress plugin directory on Tuesday. Version 1.0 of the plugin adds a couple of simple but useful editing features that should help teams of writers or content designers. The plugin allows users to add nested comments on a per-block basis and mark individual blocks as drafts.

At this point, the plugin is not a fully-fledged pro editing plugin. However, its basic features go a long way toward improving collaborative publishing. It is a good first showing for a version 1.0. I hope that it continues to grow and bring new editing features to the block editor.

The plugin works with both core WordPress and third-party blocks. Overall, it performed well in my tests, but I did find a few minor issues that could be easily addressed in a future update. If you are looking for such a plugin, it is well worth a test run to see if it fits into your publishing workflow. I am seriously considering it for use here on WP Tavern, if that provides an indication of its potential.

Nested Block Comments

Adding per-block nested comments in the block editor via the Wholesome Publishing plugin.
Adding nested comments to a Cover block.

The primary feature that drew me to this plugin was the ability to leave simple notes via the block editor. Even here on the Tavern, we have an old editorial notes system, but it is no longer a user-friendly option with the block editor. Notes are tucked away at the bottom of the editing screen along with other old-school meta boxes. A new system, particularly one that allowed comments on a per-block basis, was definitely worth exploring.

Block comments — not to be confused with post comments on the front end — are simple to add. On the post editing screen, users merely need to click the comment button in the toolbar, which will open a comments sidebar panel. The panel will show a text box to add a new comment for the currently-selected block.

Comments belong to individual blocks. However, it is not clear in the comments sidebar panel which block a comment is for when there are multiple comments. Clicking on a single comment selects the block in question, which helps, but the user experience would be better with two additions:

  • The selected block’s comments should be highlighted while unrelated comments fade out.
  • There should be an indicator in the comments sidebar that points out the block each comment is assigned to.

Unfortunately, it is not possible to see or leave a comment unless you are an administrator. I am unsure if this is intentional or a bug. It is at least a user experience issue because the comments sidebar panel still appears, regardless of whether the user can read the block comments.

Despite the need for a bit of polishing to improve the experience, this feature was reasonably easy to pick up and use right away.

The plugin does clean up after itself. If a user deletes a block, its comments are also deleted.

I do have one big feature request for the plugin author. An opt-in setting for enabling an email system would be a nice touch. The post author and anyone who leaves a comment on the post should be notified when a new comment is made.

Create Draft Blocks

Marking a block as a draft in the editor via the Wholesome Publishing plugin.
Setting a Gallery block to draft status.

The second plugin feature goes hand in hand with the first. Wholesome Publishing allows end-users to mark any block in the post as a draft, which means the block will not appear on the front end of the site. The reason it works well with the comments feature is that users can explain why the block was marked as a draft. This could be particularly useful on teams of multiple writers.

In the block options panel, users should see a new tab titled “Publishing.” The tab will have a single on/off switch for setting the given block as a draft. Unlike the block comments system, any user can put an individual user into draft mode as long as they have access to edit the post.

I did run into one issue with draft blocks. When clicking the on/off toggle, all of the block options tabs would reset to the default open or closed state. It is a trivial issue that might become irritating for some. Outside of that, the feature worked well.

How To Ace Google’s Image Page Speed Recommendations With Smush

Featured Imgs 13

Smush has everything you need to optimize your images, as well as a handy repertoire of tools ready to help you smash PageSpeed Insights image-related recommendations.

It’s a simple way to speed up your site, without sacrificing your image quality.

With Smush you can:

  • Compress images in bulk and with one click
  • Automatically resize and rescale your images
  • Enable lazy loading so your server can concentrate on displaying content above the fold
  • Convert your image files to formats that are drastically smaller and much quicker to display.

Over a million installs and more than 50 billion images smushed.

There are four main recommendations when it comes to images, and Smush can answer all of them.

“I had no idea that my page load time was being dragged down by the images. The plugin nearly halved the time it took.” – karlcw

This guide will show you how Smush can help you get your PageSpeed Insights score into the green.

Defer Offscreen Images

You don‘t want to be wasting server resources and sacrificing page speed to load images that are halfway down your page, so deferring offscreen images makes sense for many sites.

When you install Smush, Lazy Load is one of the first features you should check out. Simply enabling it can fix the ‘defer offscreen images’ PageSpeed recommendation.

Smush’s Lazy Load feature comes with more than just an on and off button.

You can choose which image formats you want to include.

Screenshot of the media types, whocing jpeg, png, gif, svg and iframe which can all be excluded.
Maybe you want your JPEGs to Lazy Load, but not your PNGs?

As well as any post types you want to exclude.

Screenshot of the different pages you can exclude from lazy load including the front page, blog and posts.
There’s also the option to add the URL of any specific pages.

Lazy Loading is something that can easily be undone so turn it on, check your new PageSpeed Insights score, and most importantly, check the impact it has on your site.

Efficiently Encode Images

If you want a full and comprehensive guide to optimizing your images, I would recommend checking out this blog, as here, we’re purely focusing on how Smush can help you meet PageSpeed Insights audit requirements. In this section, specifically the ‘efficiently encode images’ recommendation.

Smushing your images prevents your server being clogged up with extra MBs that don’t need to be there.

You can Smush in a variety of ways, with virtually no difference in quality.

Smush on Upload

Automatic compression is on by default and is used to efficiently encode images. It’s a high impact, low-risk feature, which should be used on most sites.

Screenshot of automatic compression showing it enabled and ready to automatically compress images on upload.
You can select whether you want it to apply to all images, or exclude certain sizes.

If you don’t want Smush to automatically compress your photos, there are a few other ways you can manage this:

Bulk Smush

You can use the Bulk Smush feature to scan your site for photos which are in need of attention and smush them all at once.


Screenshot of bulk smush showing that there are three images in need of smushing.
Click the button and let the plugin do all the work for you.

Smush Through the Media Library

You can also head to the media library to check whether you have images available for smushing.

Screenshot of an image of a moon in the media library ready to be smushed.
You can smush individually through the media library or select images to be ignored from autosmush.

Smush Other Directories

You’re not confined to just your media uploads – you can also smush non-WordPress images outside of your uploads directory.

Screenshot of the directory smush option showing the navigati9on to the wp-content folder to search for more images.
You can easily navigate through your folders to find the images you want to Smush.

Super Smush

Super Smush is your next port of call if you want to bring your file sizes down even further.

It offers 2X the smushing power compared to the standard method, so it’s handy if you have a lot of images that are soaking up valuable resources.

Even if ensuring your images were properly encoded wasn’t one of PageSpeed Insights audit opportunities, it still makes sense to get rid of any excess bloating, as long as there is no noticeable difference to your images.

Utilize the CDN

Smush also offers a blazing-fast 45 point CDN  (Pro version only) which allows you to serve your images in next-gen formats as well as ensuring they’re delivered to your browser at breakneck speed.

Make your Images Next Gen

Next-gen image formats such as WebP and JPEG 2000/XR can bring your file size down drastically.

Serving your images in one of these formats will save you server resources, as well as meet one of PageSpeed Insights requirements.

With Smush’s CDN enabled, you can serve your images in the next-gen WebP format.

As not all browsers support WebP images, Smush does a super-quick check of the browser, and if WebP images are supported, then great – that’s what’s served to your visitor. If not, Smush can simply serve up a PNG or JPEG to make sure that no one misses out.

Properly-sized Images

Forcing the browser to resize an image before it can be displayed to the user slows down your site and lowers your PageSpeed Insight score. Part of the recommendation is to refrain from serving images that are larger than the version that will be displayed on the visitor’s screen.

Screenshot of the automatic resizing feature showing it currently turned on.
With Smush’s CDN, this is one of the easiest PageSpeed Insight recommendations to solve.

If you want to ensure you’re being completely thorough in the correct sizing of your images, read this blog to find out a few alternative tricks.

Smash PageSpeed Insights with Smush

While many users struggle to improve their web site optimization, Smush lets you boost your page loading speeds by making images easier and faster to load…and it does this all in just a few clicks!

Follow the above recommendations and put Smush to work for your site today. Also, keep an eye on our roadmap for all the exciting new features coming soon to Smush.

How to Easily Organize Media Uploads by Users in WordPress

Wp Plugins

Do you want to organize media uploads by user in WordPress?

If you run a multi-author website, then you may want to restrict each author’s media library access to only their own uploads. This can prevent an author from accidentally deleting another user’s images, and help keep subscriber-only content private.

In this article, we’ll show you how to organize media uploads by users in WordPress.

How to organize media uploads by users in WordPress

Why Restrict Author Access to Media Uploads?

If you have a multi-author WordPress blog, then people might be uploading lots of different images. This can make it difficult for an author to find the right image, or they might delete or edit another person’s media file by accident.

This can cause all sorts of problems including poor productivity, lots of extra work for site admins and editors, and a complicated editorial workflow.

This unlimited access can also be a privacy concern. For example, if you’re working on a new product or idea, then other authors might see confidential images in the media library before you make a public announcement.

If you have a WordPress membership site, then contributors and subscribers may be able to access premium media files they shouldn’t have access to. For example, if you sell online courses then a contributor might use their media library access to download premium PDFs and other course materials, without buying a subscription.

That being said, let’s take a look at how to restrict who can see media uploads inside your WordPress admin area. Simply use the quick links below to jump straight to the method you want to use.

Method 1. Organizing Media Uploads by Users With a Plugin (Quick and Easy)

The easiest way to restrict access to media uploads is by using the Frontier Restrict Access plugin.

This free plugin checks whether a user has the edit_others_posts permission, which allows them to edit another user’s posts.

By default, this ability is granted to everyone who has the site admin or editor role. If you want to change this, then you can add or remove capabilities to user roles in WordPress.

If the user doesn’t have this permission, then once this plugin is activated, they won’t be able to access another user’s files in the WordPress media library. This allows you to organize media uploads by users, without restricting access for admins and editors.

This plugin works out of the box and there are no settings for you to configure, so you can simply install and activate the Frontier Restrict Access plugin. For more details, see our guide on how to install a WordPress plugin.

Method 2. Organizing Media Uploads Using Code (Advanced)

Another option is to restrict access to files in the media library using code. This method requires you to add a code snippet to your WordPress blog or website, so it isn’t the most beginner-friendly method. However, you won’t need to install a separate plugin just to organize your media uploads.

Often, you’ll find guides with instructions to add custom code to your WordPress theme. However, this isn’t recommended as mistakes and typos in your code can cause common WordPress errors, or even break your site completely.

That’s why we recommend WPCode.

WPCode is the best code snippets plugin used by over 1 million WordPress websites. It makes it easy to add custom code in WordPress without having to edit the functions.php file.

For this method, we’ll be adding code that checks whether the user has the edit_others_posts permission. If they don’t have this permission, then the code snippet below will stop them from accessing other people’s files in the WordPress media library.

The first thing you need to do is install and activate the free WPCode plugin. For more details, see our step-by-step guide on how to install a WordPress plugin.

Upon activation, head over to Code Snippets » Add Snippet.

How to add custom PHP snippets to your site using WPCode

Here, simply hover your mouse over ‘Add Your Custom Code.’

When it appears, click on ‘Use snippet.’

Adding a custom code snippet to WordPress

To start, type in a title for the custom code snippet. This can be anything that helps you identify the snippet in the WordPress dashboard.

After that, open the ‘Code Type’ dropdown and select ‘PHP Snippet.’

Restricting access to the media library using WPCode

In the ‘Code Preview’ area, paste the following code snippet:

add_filter( 'ajax_query_attachments_args', 'user_show_attachments' );
 
function user_show_attachments( $query ) {
    $user_id = get_current_user_id();
    if ( $user_id && !current_user_can('activate_plugins') && !current_user_can('edit_others_posts
') ) {
        $query['author'] = $user_id;
    }
    return $query;
} 

Next, just scroll to the ‘Insertion’ section. WPCode can add your code to different locations, such as after every post, frontend only, or admin only.

We want to use the custom PHP code across our entire WordPress website, so click on ‘Auto Insert’ if it isn’t already selected. Then, open the ‘Location’ dropdown menu and choose ‘Run Everywhere.’

Running custom PHP code across your website using WPCode

After that, you’re ready to scroll to the top of the screen and click on the ‘Inactive’ toggle, so it changes to ‘Active.’

Finally, click on ‘Save Snippet’ to make the PHP snippet live.

How to restrict access to media files using code

Now, users will only have access to the files they upload to the WordPress media library.

We hope this article helped you better organize media uploads by users on your WordPress site. Next, you can check out our ultimate WordPress security guide or see our expert pick of the best contact form plugins for WordPress.

If you liked this article, then please subscribe to our YouTube Channel for WordPress video tutorials. You can also find us on Twitter and Facebook.

The post How to Easily Organize Media Uploads by Users in WordPress first appeared on WPBeginner.

Slider Revolution WordPress Plugin Review & How To Guide

Wp Plugins

Slider Revolution WordPress Plugin Review & How To GuideSlider Revolution is a premium slider available as a WordPress plugin and Magento extension. It’s gained huge popularity in the WordPress community due to it’s wide range of features and ease of use. In this overview we’re going to cover the main features of the Slider Revolution WordPress Plugin, and then we’ll show you just […]

The post Slider Revolution WordPress Plugin Review & How To Guide appeared first on WPExplorer.

How to Check if Post has Taxonomy Term

Category Image 036

Something I did not know about when working with Custom Post Types and Custom Taxonomies. Normally when checking if a regular WP Post belongs to a specific category, we can use the WordPress function in_category(). But that does not work with Custom Post Types. To check if a CPT belongs to a specific term in a Custom Taxonomy, use has_term() instead.

Check if WP Post belongs to specific category

To check if the current post belongs to a specific category, use in_category(). For example in your theme's single.php template, you can do this:

if (in_category(1)) {
	
	// post is in category with ID = 1
	
}

Here we are checking if the post belongs to category with ID = 1. You can change that to any category ID, name or slug, or an array containing multiple values.

Here is an example where mutliple categories are checked:

if (in_category('donuts')) {
	
	// post belongs to "donuts" category
	
} elseif (in_category(array('coffee', 'beer'))) {
	
	// post belongs to either "coffee" or "beer"
	
} else {
	
	// post does not belong to any of the above categories
	
}

Notice the use of an array in the elseif condition. You can specify as many categories as needed using an array of category IDs, names, or slugs.

Check if CPT belongs to specific taxonomy term

Now for the main point of this tutorial. To check if the current post belongs to a specific term in a custom taxonomy. For example, if we have a taxonomy named download_category and want to check if the current post belongs to the term combo, we can do this:

if (has_term('combo', 'download_category')) {
	
	// post belongs to "combo" in "download_category" taxonomy
	
}

When calling has_term(), the first parameter is the name of the term, and the second parameter is the name of the taxonomy.

To check multiple terms, use an array of term IDs, names, or slugs. For example:

if (has_term(array('combo', 'book', 'deal'), 'download_category')) {
	
	// post belongs to "combo", "book", or "deal" in "download_category" taxonomy
	
}

So this example will check if the current post belongs to "combo", "book", or "deal" in the "download_category" taxonomy.

Bonus Tip: Check for *any* taxonomy term

To check if the current post belongs to any term in a given taxonomy, simply leave the first parameter empty/blank. Example:

if (has_term('', 'download_category')) {
	
	// post belongs to a term in the "download_category" taxonomy
	
}

Here we are checking if the current post belongs to any term in the "download_category" taxonomy.

That's the thick and thin of it.

Bottom line is just remember:

  • Check post for category — use in_category()
  • Check post for tax term — use has_term()

Google Patches Critical Vulnerability in Site Kit Plugin

Wp Plugins

In late April Wordfence discovered a critical vulnerability in Google’s Site Kit plugin for WordPress that would make it possible for any user on the site to gain full access to the Google Search Console without verifying ownership. Google patched the vulnerability and released the fix in version 1.8.0 on May 7, 2020.

Wordfence published a timeline of the vulnerability, describing it as a proxySetupURL disclosure:

In order to establish the first connection with Site Kit and Google Search Console, the plugin generates a proxySetupURL that is used to redirect a site’s administrator to Google OAuth and run the site owner verification process through a proxy. Due to the lack of capability checks on the admin_enqueue_scripts action, the proxySetupURL was displayed as part of the HTML source code of admin pages to any authenticated user accessing the /wp-admin dashboard.

The other Aspect of the vulnerability is related to the site ownership verification request, which used a registered admin action that was missing capability checks. As a result, any authenticated WordPress user was capable of initiating the request.

Wordfence identified several ways a malicious attacker might use this vulnerability to the detriment of the site’s ranking and reputation, including manipulating search engine results, requesting removal of a competitor’s URLs from the search engine, modifying sitemaps, viewing performance data, and more.

The security fixes are not detailed in the plugin’s changelog on GitHub. It does, however, include a note at the top that states, “This release includes security fixes. An update is strongly recommended.” Google has not published a post to notify users on the news section of the plugin’s official website. Without Wordfence’s public disclosure, users may not know about the importance of the update.

Google’s Site Kit plugin has more than 400,000 active installs, according to WordPress.org. Details of the 1.8.0 update are not available to users in the admin, since the plugin’s changelog is hosted on GitHub. There is no way for users to know that the update includes security fixes without clicking through to research. Due to the great deal of sensitive information to which attackers could gain access, users are advised to update the plugin as soon as possible.