11 Plugins That Make Troubleshooting WordPress a Breeze

Wp Plugins

Plugins That Make Troubleshooting WordPress a BreezeAs great as WordPress is, certain problems and glitches will inevitably come up. It’s just a part of the experience of being a website owner. And you can either deal with these issues the hard way – manually – or the easy way – via a plugin. There are a host of WordPress plugins that […]

The post 11 Plugins That Make Troubleshooting WordPress a Breeze appeared first on WPExplorer.

Awesome Motive Acquires SearchWP

Wp Plugins

Awesome Motive, the company behind MonsterInsights, OptinMonster, WPForms, and several other popular products, has acquired SearchWP, a commercial plugin that enhances WordPress’ search functionality. No changes have been announced for the plugin and Awesome Motive CEO Syed Balkhi says it will be “business as usual” for current customers.

“We have built a lot of internal tools to improve our website search that I’m really looking forward to sharing with the WordPress community,” Balkhi said.

“We will be combining Jon’s vision with our own experience, so you can literally have the best search plugin in the industry without the high costs.”

In 2013, when Jon Christopher launched SearchWP, he quickly carved out a slice of the WordPress search market among early competitors. The freemium model was already popular in those days with plugins like Relevanssi, but Christopher chose to launch SearchWP as a commercial-only product.

“There was already freemium competition, and I felt that the pricing model (which is the same today) was stronger given the product itself,” Christopher said. “I saw the pricing model as something that would help SearchWP stand out, and I also wanted to avoid opening the doors to overwhelming amounts of support requests right from the start.

“I had no idea if SearchWP would be successful given the landscape, I built it first to scratch my own itch while knowing that even if no one bought it, I would 100% use it in my own work, and use it a lot.”

His gamble paid off and the plugin has been used on more than 30,000 WordPress sites. Christopher had one support contractor but otherwise had been running the business alone for the past eight years. WordPress’ growing market share has made one-person plugin businesses difficult to maintain once they become very popular, as seen in the recent sale of ACF to Delicious Brains.

“I was looking ahead and considering what would be best for SearchWP’s customers,” Christopher said. “I want SearchWP to live as long as it possibly can. If I’m by myself it’s a bit of a risk to continue that way as the business continues to grow. I know that I prefer to build things from the ground up, and I also know that I’m not the guy to build (or manage) a team, it’s not my strong suit. Given all of those pieces it was clear to me that it was a good time to consider selling.”

Christopher described the 2013 WordPress ecosystem as more “scrappy,” as developers launched product businesses and worked to figure it out along the way.

“There are pros and cons to an environment like that, but it was fantastic from my perspective,” he said. “Over time that feeling went away as companies grew, matured, and playbooks began to take shape. That cycle has continued over time and especially in the last 18 months we’re getting a look at where WordPress is headed – lots of big players in a really big space.”

For those who are jumping into the waters with a new product business, Christopher underscored the need for strong marketing.

“I think that a lack of serious marketing will in fact be a limiter in today’s WordPress economy,” he said. “Products that have been around a long time have a natural momentum that’s really tough to beat, but that momentum doesn’t come without friction. In order to keep up with where WordPress is going, I do feel like you need assets (and capital) aimed directly and solely at marketing for the long haul.”

Balkhi did not elaborate on Awesome Motive’s immediate plans for the search plugin but said the company will be executing on a 12-month plan to make it easier for beginners and non-technical business owners to set up in less than 10 minutes.

Add Editor-Only Notes via the Markdown Comment Block WordPress Plugin

Category Image 052

Rich Tabor, the Senior Product Manager of WordPress Experience at GoDaddy, tweeted that he had an idea for a new block at the end of last week. Shortly after, the Markdown Comment Block plugin appeared on WordPress.org.

The plugin is a one-off block. It allows users to enter notes directly into the post editor that will not appear on the front end of the site. Tabor said he came up with the idea when working on an article for building single-block plugins.

There are few things I love more than simple plugins with a tight focus, performing a single function. Markdown Comment Block lands in this category.

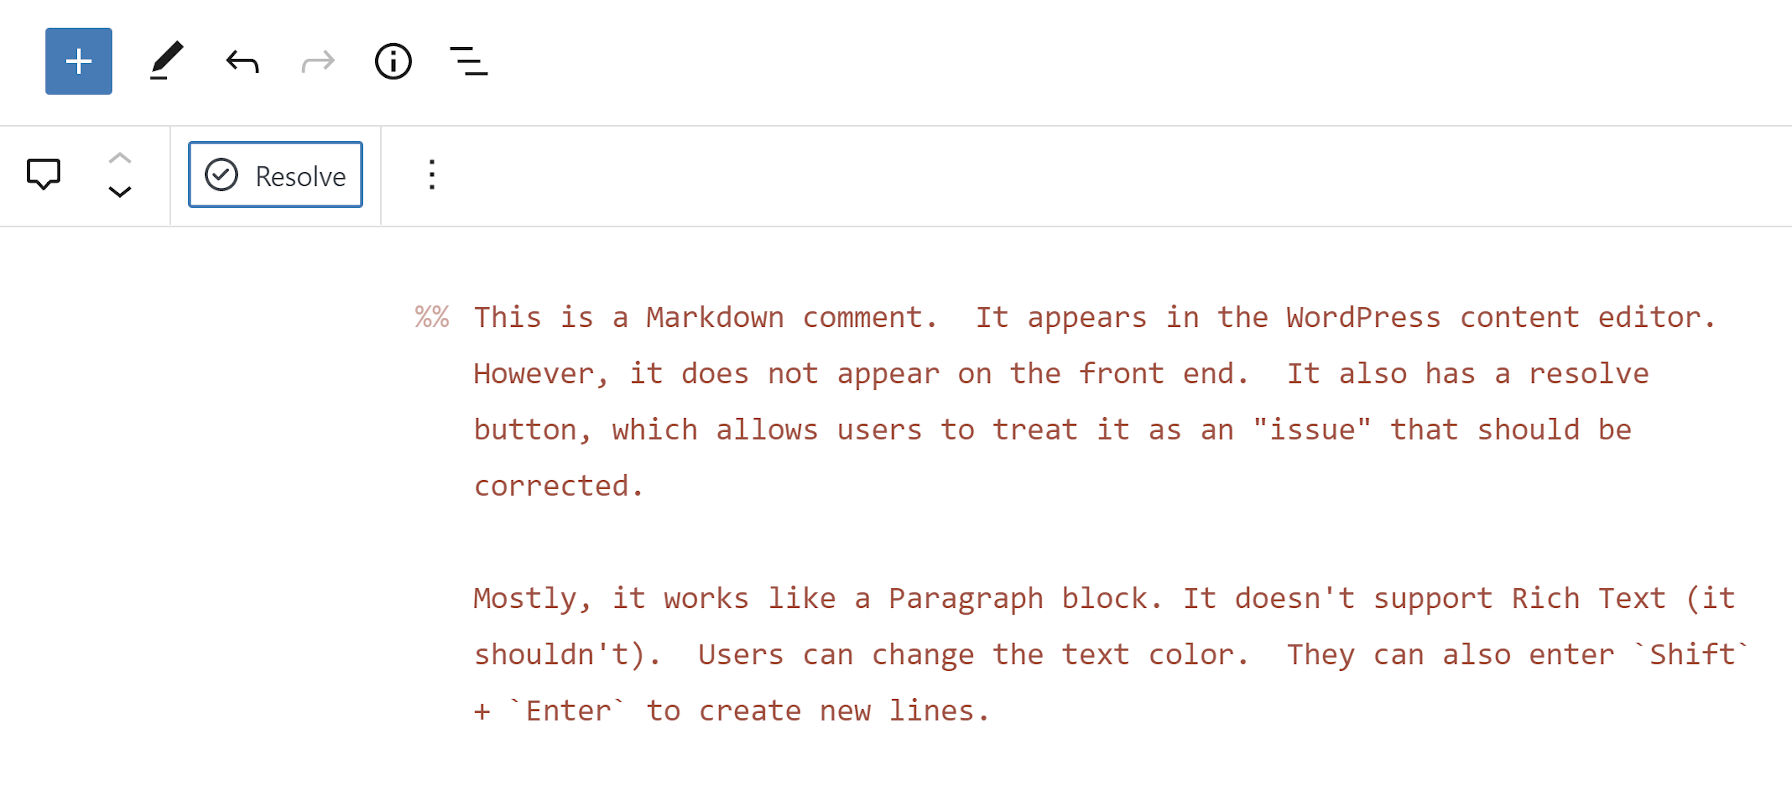
The plugin creates a new block that works nearly the same as a typical Paragraph block:

Adding inline comments to the WordPress post editor via the Markdown Comments Block plugin.
Adding inline comments to a post.

Users can change the text color, but they will not have access to the typical Rich Text controls. Those should be unnecessary anyway.

As someone who does long-form writing almost exclusively in Markdown, the block’s use of the double percent-sign syntax for comments intrigued me. Technically, the Markdown spec does not support any sort of special characters for them. It handles HTML comments. However, those appear in the source code on the front end when the document is rendered. I have only seen the %% mark to denote comments in the Inspire Writer app for Windows. Tabor said he had seen the same in Ulysses. The feature also exists in the Iceberg editor for WordPress, which Tabor created alongside Jeffrey Carandang.

The plugin also introduces the %% keyboard shortcut. Typing it directly in the editor will create a new Markdown Comment block.

My primary use case for the plugin would be leaving notes for my later self. However, it could also be handy in users’ publishing flows. The block adds a “Resolve” button to the toolbar. Clicking it deletes the comment.

Clicking the Resolve button for the Markdown Comment block to delete a comment.
Clicking the “Resolve” button will delete the block.

The block itself will not likely offer a robust enough feature set for complex workflows. However, pairing it with a plugin like Post Descriptions could round out the experience for larger teams of writers and copyeditors.

The Post Descriptions plugin allows users to add notes on the post level. These notes appear on the post-management screen, letting other team members know when to check an article. However, it may be hard to provide the full context of what issues need to be resolved before publishing. Markdown Comment Block adds an inline comments system, letting team members pass in-text notes.

Theme developers should appreciate that the block uses CSS custom properties too, which makes it easy to overwrite its default style rules. In moments, I was able to make it match my theme:

Customized output of the Markdown Comment Block.
Custom color, font, and line-height styles.

The --markdown-comment-font-size, --markdown-comment-line-height, and --markdown-comment-color variables are available for theme developers who want to add in support.

The one complaint I had about the block is its title: “Comment.” It is easy to confuse it with the six other comment-related blocks already in the WordPress block list. And, there will only be more in upcoming versions. Giving it a title of “Markdown Comment” would better distinguish it from others.

A Progress Bar Block Plugin Done Right by the Tiles Team

Wp Plugins

I have been on the hunt for a decent progress bar solution for a while now. Most of them are bundled in large block libraries, requiring me to install another 20 or 30 blocks in which I have no need. Others seem to miss the mark entirely with odd configurations and block options. Some of the remaining plugins still use shortcodes and widgets, but it is 2021. I am looking for a block.

A couple of days ago, the Tiles Progress Block landed in the directory. It seems to be a smaller piece of a larger project named Tiles. I have been keeping an eye on the team’s work since its initial design and patterns framework plugin launched last week. That project is still in beta, and only time will tell if it becomes a competitive project in the block space.

However, the team’s new progress bar block was just what I was looking for. Other than one bug, which I reported to the developer, I found no serious issues.

The plugin does what it says on the tin. It registers a Progress Bar block:

Inserting both a Small and Large progress bar into the block editor.
Small and Large progress bars with default colors.

Out of the box, it includes Small and Large styles, allowing the user to adjust the size of the bar.

Its strength is that — I cannot stress this enough — the block’s content is editable within the editor canvas area. This includes the label and percentage. This is a refreshing change from the many others that require users to jump back into the block options sidebar to change simple text. Because the block uses Rich Text fields for its label and percentage, end-users can use inline formatting tools like bold, italic, and more.

The block also uses the standard typography and color palette controls from core WordPress. This provides access to the theme’s font sizes and colors.

Customizing the output of the Progress Bar Block in the WordPress editor with custom colors.
Adding custom labels, percentages, and colors.

Plus, users can choose wide and full-width layouts, an often overlooked feature in block plugins.

Overall, I am digging this block plugin. If I had one feature request, it would be to add a border-radius option. By default, the progress bar is rounded, but some users might prefer squared corners.

Extending the Block

In theme previews, I almost always see progress bars showcased alongside how much PHP, HTML, and JavaScript the demo’s faux developer has learned. It is rarely a real-world representation of progress bars. How do you quantify how much of a coding language you have mastered? I have been doing this for nearly two decades and cannot answer that.

Progress bars should be of measurable things. For example, steps someone has taken in an online learning course, percentage of total donations received, and any number of things that can be counted are far more realistic.

My favorite use of progress bars also happens to be on my favorite novelist’s website. I like to keep an eye on Brandon Sanderson’s work, looking forward to getting my next literary fix (yes, I am a fanboy).

Screenshot of the progress bars from Brandon Sanderson's website.
Brandon Sanderson’s writing progress.

Currently, Tiles Progress Block does not handle that exact layout. However, because it is built on the block system and does not do anything out of the ordinary, theme authors can change that with custom styles.

And that is just what I did. My Sanderson-esque book progress bars (rough, unpolished code available as a Gist):

Progress bars that move the percentage next to the bar.
Progress bars with custom block style.

The thing I love about the block system is that themers can extend blocks in this way. There is no needless checking for active plugins, loading additional per-plugin stylesheets, or figuring out each plugin’s unique system.

If a block is coded to the current standards, theme authors merely need to hook in with their own styles. Users can then select those styles via the editor and even make them the default.

I want to see more of this from the block plugin ecosystem.

Upgrade Your Publishing Flow with the Post Descriptions WordPress Plugin

Featured Imgs 08

Tom de Visser, a developer from Amsterdam, released the Post Descriptions plugin last week. It was his first submission to the WordPress.org plugin repository. It allows users to write short descriptions on a per-post basis, which are then displayed on the post-management screen.

For an initial outing, it already seems to be a hit with its small user base. It has already racked up several five-star reviews and over 100 active installs. Granted, one of those reviews is from his employer, Mediaversa. While that might not seem like much from the outside looking in, anyone who has created plugins knows that it is a successful launch for an individual developer’s first plugin submission.

The plugin’s goal is simple: leave small notes, reminders, to-dos, or longer descriptions for posts. It could be an ideal solution for a small team, but lone bloggers might need it too.

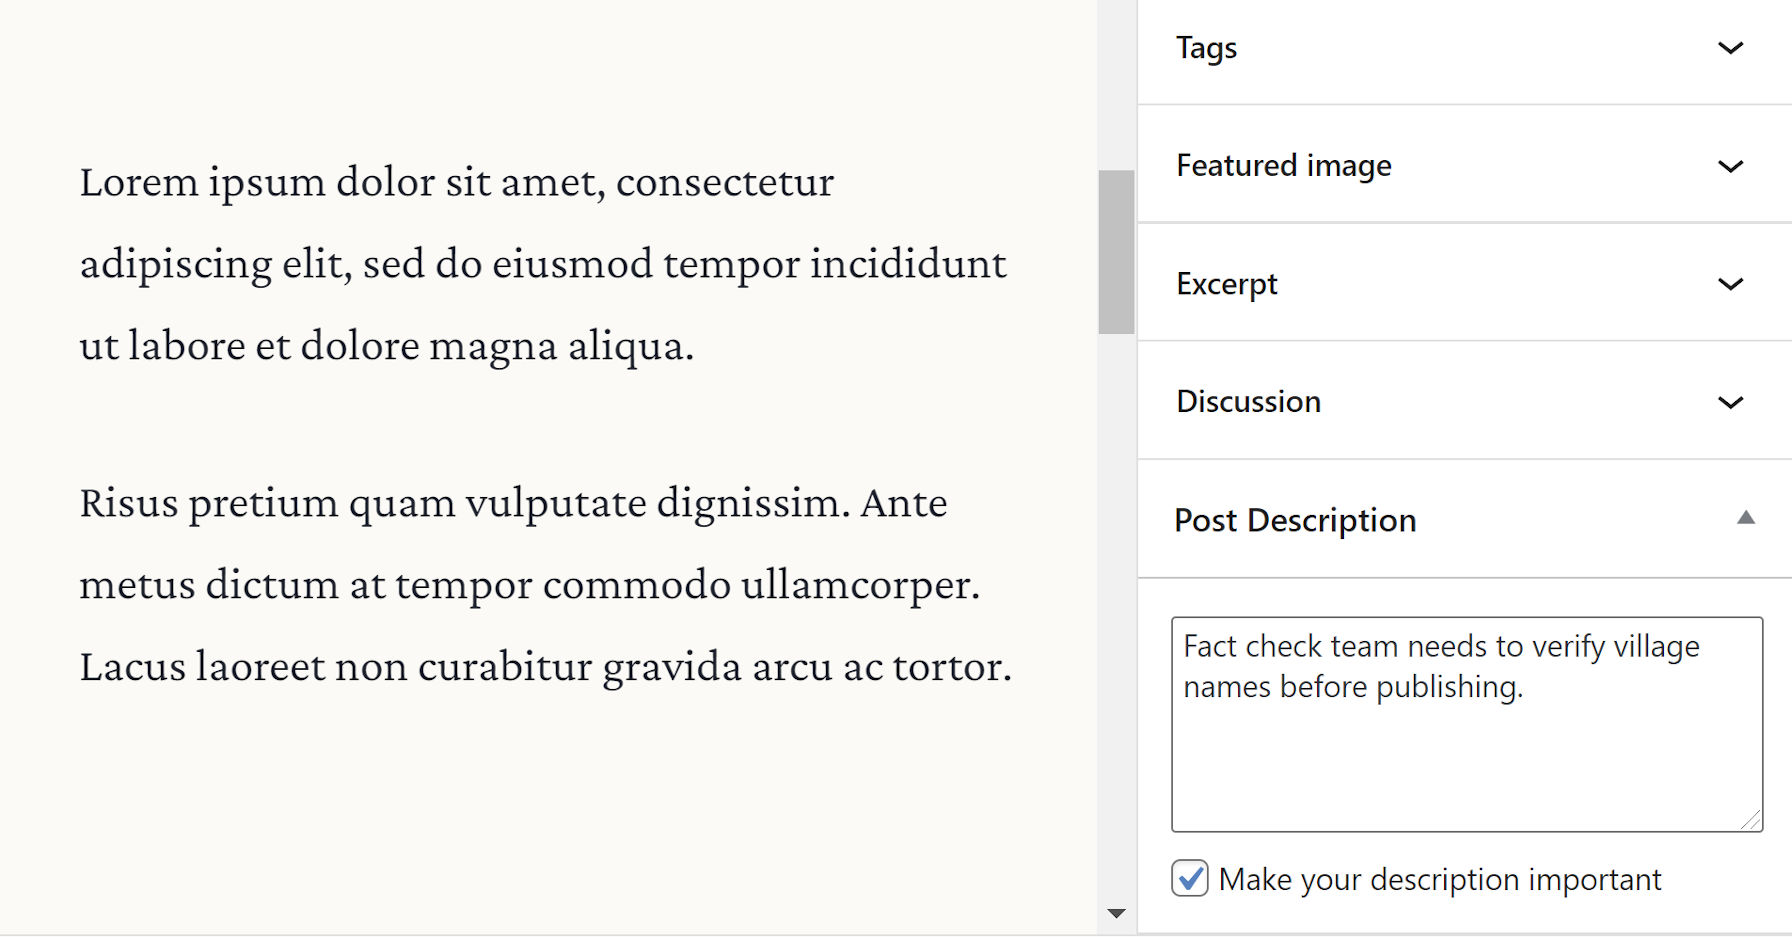
Post Descriptions works with both the regular WordPress post editor or the classic editor by adding a meta box to the side of the editing screen. Currently, it only allows descriptions for posts or pages. Maybe the developer will add a post-type-support flag or filter hook for custom post types in the future.

Meta box on the post-editing screen for adding a post description.
Posts Descriptions plugin meta box.

Aside from the description input box, users can tick the “Make your description important” checkbox to highlight a particular note. This option gives the text’s display a red color and turns it bold when viewed.

Descriptions are viewable via the post or page management screens. By default, they appear as a “state,” similar to how pending or draft states next to the title. The plugin also displays them under a “Description” column. Users can turn off the state display via the plugin’s settings screen and toggle the extra column via WordPress’s built-in Screen Options tab.

Post states via the Post Descriptions plugin on the post management screen.
Descriptions as post “states.”

One of my favorite features of this plugin is the flexibility of selecting where the notes appear on the post-management screen. Those who prefer one or two words can choose to display them as states. Those who prefer lengthier descriptions can show them in a separate column. Or, do both.

Description column on the post management screen for displaying notes.
Column for displaying post descriptions.

Users can also add descriptions via the Quick Edit link on the post-management screen.

From a user-experience standpoint, it hits some of those sweet spots of usability and simplicity. Under the hood, the code is solid. The developer does not seem to be overthinking things and making the plugin more complicated than necessary.

For small teams, I envision building a labeling system around this plugin that could address workflow issues. Adding short notes like Editor Review, SEO Review, and similar would alert the right team members to sign off on a post.

While the flexibility of displaying notes as either states or descriptions is welcome, it does not account for a third type of user. My ideal workflow would be to have separate inputs for both states and descriptions. I could create a shorter state that gets my team’s attention. Then, if more information is needed, I could add a longer description.

Post management screen displaying short notes as post states and longer ones under a description column.
Idea: Separate state and description text.

The downside in such a system is that it puts yet another input field in front of the end-user. Sometimes the route with the least effort is best. And, for a quick post note plugin, it is tough to beat the plugin’s current solution.

How to Search By Category in WordPress (2 Ways)

Wp Plugins

Do you want to add category specific search in WordPress?

Adding a search by category feature to WordPress lets your visitors quickly find what they’re looking for. You can add options to search specific blog categories, product categories, and more.

In this tutorial, we’ll show you how you can add a search by category feature to your WordPress site.
How to search by category in WordPress (2 ways)

Why Add Search By Category to WordPress?

A search by category feature allows your visitors to search specific website categories.

If you have a lot of content, then categories can help organize your content and make it easier for your visitors to find what they’re looking for.

You can add a category search feature to your archive pages to help your visitors quickly find what they’re looking for.
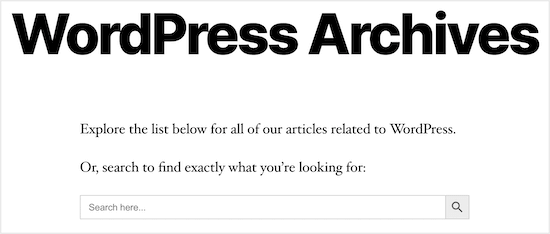
WordPress archive category search example

Category search can also be added to your online store, so visitors can quickly find the exact products they want.

Overall, this offers your visitors a better onsite experience and can help your WordPress website give off positive SEO signals like increased dwell time and lower bounce rate.

The best way to add a category search feature is by using a WordPress plugin.

We’re going to share two different WordPress search plugins that can help you customize WordPress search. Simply use the quick links below to choose the type of WordPress category search you want to add.

Method 1: Using SearchWP to Add Category Select Search Form to WordPress

SearchWP is the best search plugin for WordPress. It’s very easy to use and lets you add a category selection feature, giving your users control over their search results.

First, you need to install and activate the SearchWP plugin. For more details, see our step by step guide on how to install a WordPress plugin.

Upon activation, navigate to Settings » SearchWP. This brings up the main search settings menu.
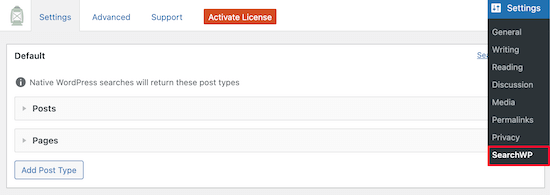
SearchWP settings menu

You can adjust the search engine settings by clicking on ‘Posts’, ‘Pages’, or ‘Library’ drop downs.

Changing the ‘Weight Multiplier’ sliders customizes how the search engine values content. If you want the search engine to value page content higher than the title, then adjust the slider accordingly.
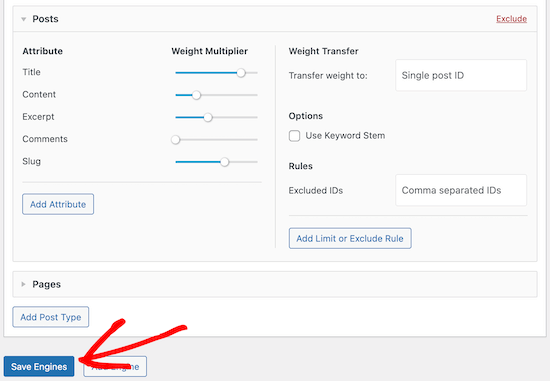
SearchWP save search engine

Once you’re done, make sure you click the β€˜Save Engines’ button to generate your first search engine.

Next, we’re going to customize the search form to add a category selection option, so your visitors can decide which category they want to search.

To do this, you’ll need to add code to your WordPress files. If you haven’t done this before, then check out our guide on how to copy and paste code in WordPress.

You’ll need to copy and paste the following code and add it to your functions.php file, in a site-specific plugin, or by using a code snippets plugin.

function my_searchwp_get_search_form_with_categories_dropdown( $form ) {
	ob_start(); ?>
		<form role="search" method="get" class="search-form" action="<?php echo home_url( '/' ); ?>">
			<label>
				<span class="screen-reader-text">Search For</span>
				<input type="search" class="search-field" placeholder="Search..." value="<?php echo esc_attr( get_search_query() ); ?>" name="s" title="Search for:" />
			</label>
			<?php
				// for more information see http://codex.wordpress.org/Function_Reference/wp_dropdown_categories
				$swp_cat_dropdown_args = array(
						'show_option_all'  => __( 'Any Category' ),
						'name'             => 'swp_category_limiter',
					);
				wp_dropdown_categories( $swp_cat_dropdown_args );
			?>
			<input type="submit" class="search-submit" value="Search" />
		</form>
	<?php return ob_get_clean();
}

add_filter( 'get_search_form', 'my_searchwp_get_search_form_with_categories_dropdown' );

This code modifies the search form on your WordPress blog, and gives users a drop down box to select their preferred category.

After the code is added you can view any of your search forms, and you’ll see that a category search drop down has been added.
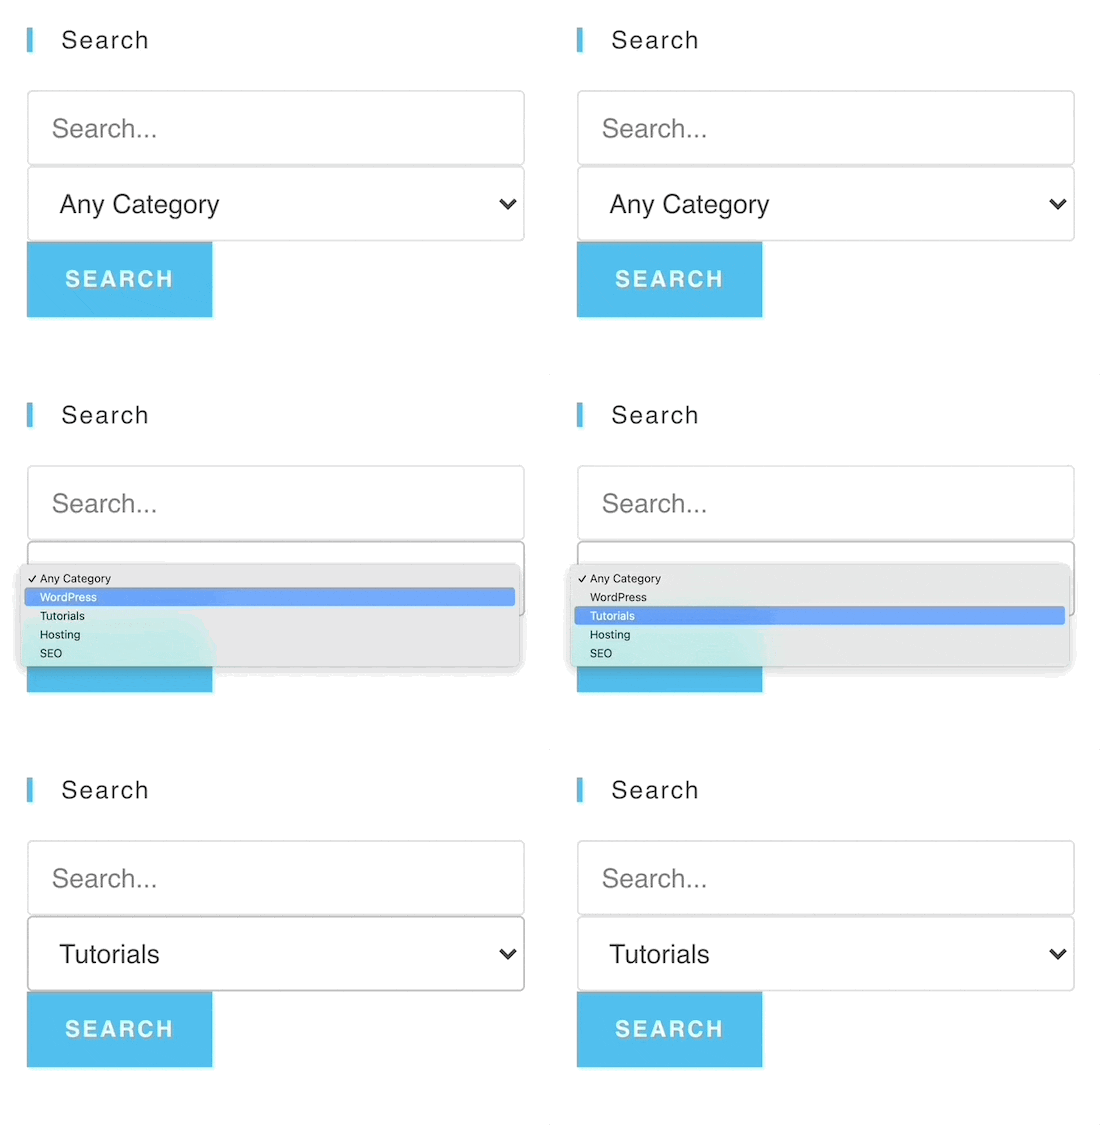
Select category drop down

You also use SearchWP to customize your WooCommerce product search pages. For more details, see our guide on how to make a smart WooCommerce product search.

Method 2: Using Ivory Search to Add Search By Category Form to WordPress

Ivory Search is another popular WordPress search plugin. It’s very easy to use and helps you simply control search categories across WordPress.

First thing you need to do is install the plugin. For more details, see our guide on how to install a WordPress plugin.

Once the plugin is activated, you’ll have a new WordPress menu item called β€˜Ivory Search’.

Go to Ivory Search » Search Forms, then click the ‘Add New Search Form Button’.

Add new category search form

Now it’s time to start building your category search form.

First, give your search form a name. This name will not appear when you add the search feature to your website. It’s only for admin purposes.
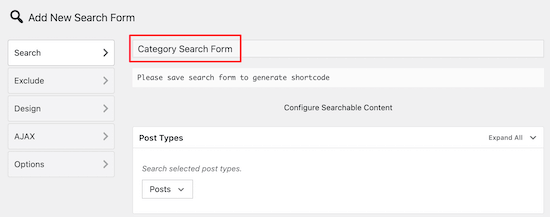
Name category search form

Next, click the drop down in the ‘Post Types’ meta box. This brings up a menu to select the type of content you want to allow. You can add Posts, Pages, and Media to the search.

You can simply enable the toggle for the content types you want to allow.
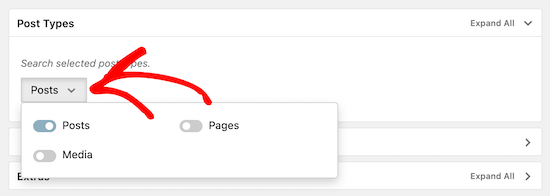
Select post option for category search

After that, click the β€˜Posts’ option to bring up the expanded menu. Then, turn on the β€˜Search posts of only selected taxonomies’ toggle.

This allows you to select the WordPress categories you can add to search.
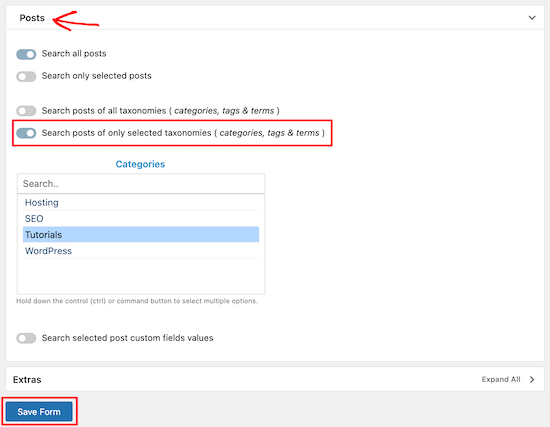
Choose WordPress search categories

Once you’ve selected the category or categories, click the β€˜Save Form’ button.

Now, under your search form title, copy the shortcode and paste it into a text file.

Copy category search shortcode

This shortcode gives you the flexibility to add WordPress category search to any page, post, or widgetized area of your website.

All you have to do now is open the post, page, or widget where you want to add your category search and paste your shortcode. For more details, see our guide on how to add a shortcode in WordPress.

Add category search shortcode

After you click β€˜Save’, the post or page will now have your active category search form.

You can add this shortcode to as many areas of your site as you’d like.

Category search form example

When a user searches with this form, they’ll only be able to view posts within the selected category.

In this case, visitors will only be able to view posts from the β€˜Tutorials’ category.

Category search form results

If you want to create multiple different category searches, then follow the steps above to create another search form and embed the new shortcode into your site.

We hoped this article helped you add search by category in WordPress. You may also want to see our expert pick of the best WordPress plugins for businesses, and our comparison of the best email marketing services.

If you liked this article, then please subscribe to our YouTube Channel for WordPress video tutorials. You can also find us on Twitter and Facebook.

The post How to Search By Category in WordPress (2 Ways) appeared first on WPBeginner.

How to Properly Setup Video SEO in WordPress (Step by Step)

Wp Plugins

Do you want to learn how to do video SEO in WordPress?

Video SEO is the process of optimizing your videos to rank higher in search engines. This can help you get more traffic from your video content back to your WordPress website.

In this article, we’ll show you how you can set up a video sitemap in WordPress to improve your video SEO, step by step.

How to do video SEO in WordPress

What is Video SEO?

Video SEO is the process of optimizing the videos on your site, so they’ll rank higher in the search results pages.

This is similar to general WordPress SEO best practices except it’s geared towards your video content.

There’s a lot you can do to optimize your videos before you embed them in your WordPress blog posts, like choosing the best video hosting.

However, once they’re live on your website, you need to make sure they’re going to bring you maximum traffic.

The best way to do this is by adding a video sitemap to WordPress.

A video sitemap is an XML sitemap that has information about the video content on your site.

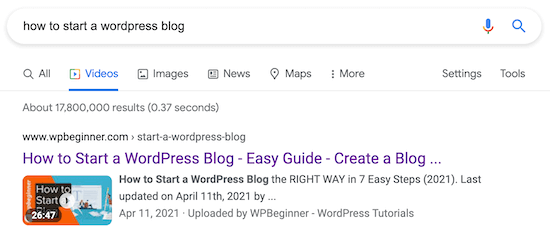
This can help you generate rich snippets that appear in the Google video search results, and increase your blog traffic across the board.

WordPress video SEO search results page

By creating a video sitemap, Google and other search engines will index your posts with the embedded video content. That way, your video can rank in the search engines and bring more traffic to your posts.

Note: if you use a third-party video host like YouTube, then your YouTube videos and embedded videos can both rank in the search results together.

If you regularly add videos in your posts and pages, then this is a must have feature.

A WordPress video sitemap plugin will automatically detect when a video is embedded in your blog content, and add that to the sitemap, so search engines like Google can prioritize it.

How to Setup Video SEO Sitemap in WordPress with AIOSEO

The best way to add video sitemaps to WordPress is with the All in One SEO plugin. It’s the best SEO plugin for WordPress used by over 2 million sites.

Google makes formatting these video sitemaps hard, but with the AIOSEO plugin it only takes a couple of clicks.

First thing you need to do is install and activate the plugin. For more details, see our guide on how to install a plugin in WordPress.

Note, there is a free version of All in One SEO available. But you need the premium version to enable and create video sitemaps.

After the plugin is activated, you’ll have a new All in One SEO menu item in your WordPress dashboard.

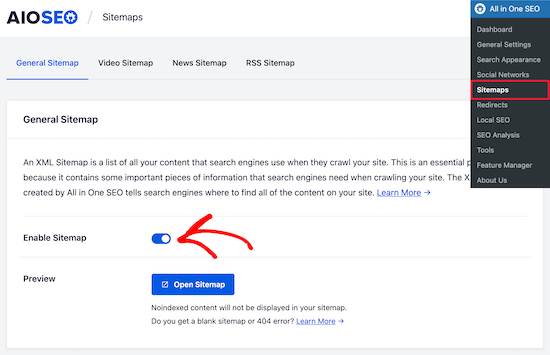
Navigate to All in One SEO » Sitemaps.

On the home screen, make sure that sitemaps are enabled. Click the ‘Enable Sitemap’ slider to turn on sitemaps.

AIOSEO enable sitemap

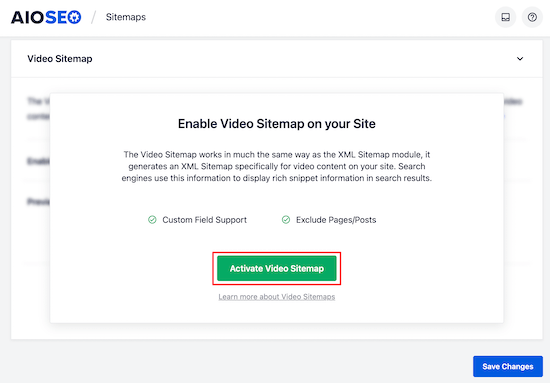
After that, select the ‘Video Sitemap’ menu option at the top of the screen.

Next, click the ‘Activate Video Sitemap’ button to enable the video sitemap module.

Activate video sitemap module

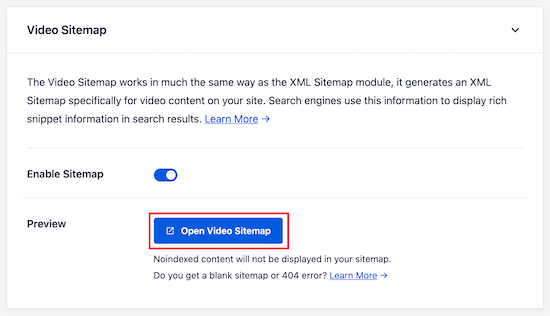
Once you’ve done that, you can view your video sitemap by clicking the β€˜Open Video Sitemap’ button.

The index page will list all of your available video sitemaps.

Open video sitemap

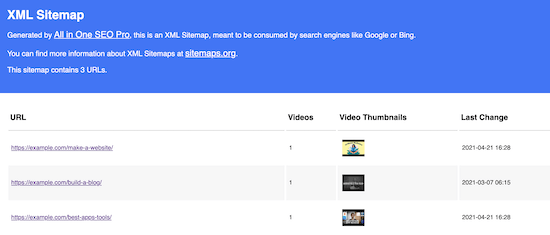
When you click on the sitemap link, it’ll show the list of available video content.

Here we can our example WordPress video sitemap contains a list of all blog posts that have an embedded video.

Video sitemap video list

You can further configure your video sitemap settings in the β€˜Video Sitemap Settings’ box.

The default settings will be enough for most WordPress blogs, however, you can adjust these depending on your video content needs.

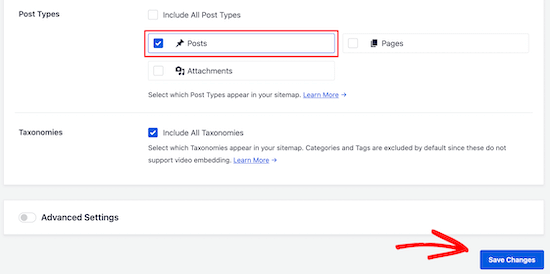
The most common change webmasters make is adjusting the ‘Post Types’ and ‘Taxonomies’ settings.

For example, if you only want the embedded videos from your blog posts to appear in your sitemap, then uncheck the β€˜Pages’ and β€˜Attachments’ boxes in the ‘Post Types’ box.

Customize video sitemap post types

Make sure you click ‘Save Changes’ if you’ve made any changes to the settings here.

You’ve now successfully added video sitemaps to WordPress, which will improve your video SEO and help you get more traffic from the search engines.

You may also want to see our comparison of the best email marketing services and our expert picks of the 24 must have WordPress plugins for business websites.

If you liked this article, then please subscribe to our YouTube Channel for WordPress video tutorials. You can also find us on Twitter and Facebook.

The post How to Properly Setup Video SEO in WordPress (Step by Step) appeared first on WPBeginner.

Comparing The Top WordPress SEO Plugins

Wp Plugins
WordPress SEO Plugins

WordPress is a popular content management system (CMS) that efficiently controls the contents without any technical background. However, this is a multi-functioned key to open all the doors for you. If you want that people find your content easily, deep research and knowledge about Search Engine Optimization (SEO) is necessary. Self-hosted WordPress blogs are probably […]

The post Comparing The Top WordPress SEO Plugins appeared first on WPArena.

How to Control Your RSS Feeds Footer in WordPress

Wp Plugins

Do you want to customize the RSS feeds footer in WordPress?

This allows you to add custom text, links, or even advertisements below your post content in your RSS feed.

In this article, we’ll show you how to easily control your RSS feed footer in WordPress, so you can display the content you want.

Control RSS feed footer in WordPress

Why Add Content to RSS Feed Footer in WordPress?

RSS feeds offer an easier way for users to read your blog posts in their favorite feed reader apps such as Feedly.

However, RSS feeds can also be used by content scrapers to automatically steal your blog posts as soon as they are published.

Sometimes these content scrapers end up ranking higher than your original post in search engines.

To learn more, see our step by step beginners guide to preventing blog content scraping in WordPress.

Adding additional content to your RSS feed footer allows you to add backlinks to your main site and the original post at the end of each article. This can help you rank higher for your posts even if they are copied by content scrapers.

By manipulating your RSS feed footer, you can also give your readers a way to visit your WordPress blog directly from your RSS feed.

Having said that, let’s take a look at how to easily control your RSS feed footer in WordPress.

Method 1. Add Content to RSS Feed Footer Using All in One SEO

This method is easier and recommended for all WordPress users. It uses the All in One SEO plugin, which is the best WordPress SEO plugin used by over 2 million websites.

First, you need to install and activate the All in One SEO plugin. For more details, see our step by step guide on how to install a WordPress plugin.

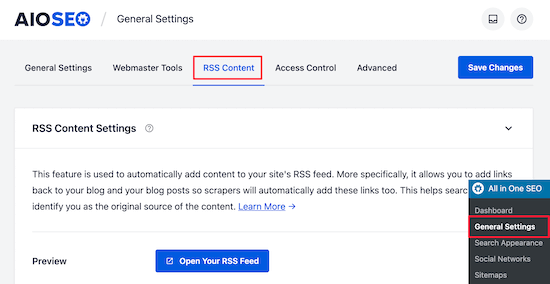
Upon activation, you need to visit All in One SEO » General Settings page and click on the ‘RSS Content’ tab.

This gives you an overview of your WordPress RSS feed settings, and your WordPress RSS feed URL.

AIOSEO RSS general settings

Under the ‘RSS Content Settings’, the first box allows you to add content before each post. The second box allows you to add content to the post footer.

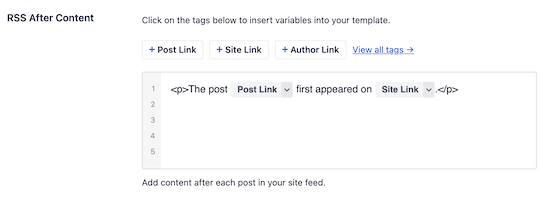
Next, scroll down to the ‘RSS After Content’ section to edit your RSS feed footer.

AIOSEO default RSS footer

Right away, you’ll notice that AIOSEO automatically adds credit text with backlinks to your website in the RSS feed footer.

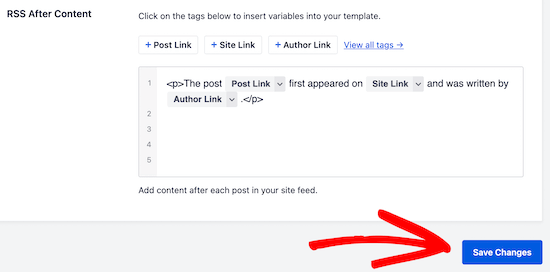
You can either use the text as-is, or you can add your own content and tags.

AIOSEO RSS feed footer save

Don’t forget to click ‘Save Changes’ before you exit the screen.

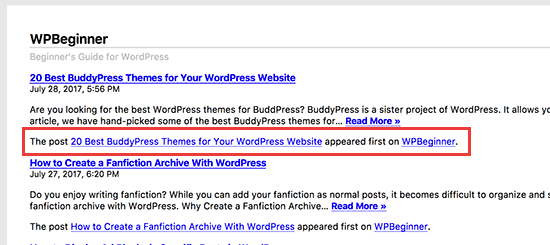
You can now view your RSS feed to see the changes. At the end of each article, you will be able to see content you added to your RSS feed footer.

Footer text in WordPress RSS feed

Method 2: Manually Add Content to RSS Feed Footer in WordPress

This method requires you to add code to your WordPress files. If you haven’t done this before, then check out our guide on how to copy and paste code in WordPress.

You’ll need to copy and paste the following code in your theme’s functions.php file, in a site-specific plugin, or by using the Code snippets plugin.

function wpb_feed_filter($query) {
if ($query->is_feed) {
add_filter('the_content','wpb_feed_content_filter');
add_filter('the_excerpt_rss','wpb_feed_content_filter');
}
return $query;
}
add_filter('pre_get_posts','wpb_feed_filter');
 
function wpb_feed_content_filter($content) {
// Content you want to show goes here 
$content .= '<p>Thanks for reading, check out <a href="'. get_bloginfo('url') .'">'. get_bloginfo('name') .'</a> for more awesome stuff.</p>';
return $content;
}

This code simply checks if the page requested is an RSS feed, and then filters the content to display your message in the RSS feed footer.

We hope this article helped you learn how to control your RSS feed footer in WordPress. You may also want to see our ultimate guide on how to setup All in One SEO for WordPress and our expert pick of the best WordPress RSS feed plugins.

If you liked this article, then please subscribe to our YouTube Channel for WordPress video tutorials. You can also find us on Twitter and Facebook.

The post How to Control Your RSS Feeds Footer in WordPress appeared first on WPBeginner.

How to Fix the Missed Schedule Post Error in WordPress

Wp Plugins

Do you want to fix the missed schedule post error in WordPress?

WordPress comes with a built-in feature that allows you to easily schedule posts to be automatically published at a later time. However, sometimes you may notice that scheduled posts don’t get published at all.

In this article, we’ll show you how to easily fix the missed schedule post error in WordPress. This will allow you to ensure that your scheduled posts are published on time.

Fixing the missed schedule post error in WordPress

What Causes WordPress to Miss Scheduled Posts?

Your WordPress hosting environment or plugin conflicts may cause WordPress to miss scheduled posts.

Normally, when you schedule a WordPress post to be published later, WordPress uses a technology called ‘Cron’ or ‘WordPress Cron‘ to automatically publish your post on time.

However, if your WordPress hosting server or a plugin is affecting the cron jobs, then WordPress would miss the scheduled tasks such as publishing scheduled posts.

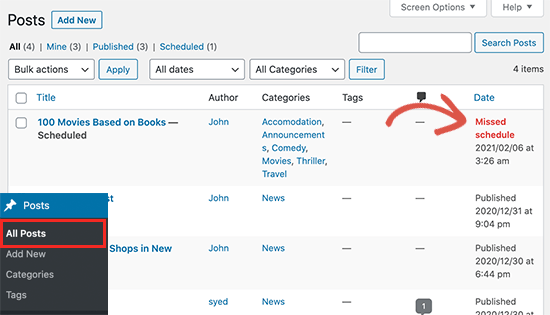
Missed schedule error for a blog post in WordPress

Your other cron jobs may still work occasionally like checking for updates or deleting auto-saved drafts. That’s because once the publishing time is missed WordPress will not publish the blog post on a different time.

For most users, it does not happen very often and for some users it can become a common WordPress issue.

That being said, let’s take a look at how to easily fix the missed schedule post error in WordPress.

Fixing The Missed Schedule Post Error in WordPress

First thing you need to do is install and activate the Missed Scheduled Post Publisher plugin. For more details, see our step by step guide on how to install a WordPress plugin.

The plugin works out of the box, and there are no settings for you to configure.

How does Missed Scheduled Post Publisher plugin work?

The plugin simply checks your website every 15 minutes to see if a scheduled WordPress post has missed schedule.

If it finds any missed schedule items, then it changes the status from scheduled to published.

It works for posts, pages, products, and any other custom post types that you may have on your WordPress website.

We built this plugin to ensure it doesn’t impact your WordPress site speed because we know speed is important for SEO. This is the plugin we’re using on our own sites.

Troubleshooting Missed Scheduled Posts Error in WordPress

If installing the plugin does not immediately fix scheduled posts error on your website, then the following are a few tips that you can try.

1. Check Your WordPress Timezone Settings

Setting your timezone is one of the first things to do after installing WordPress. However, sometimes users miss it and their WordPress timezone doesn’t match the timezone they want to use for publishing and managing their website.

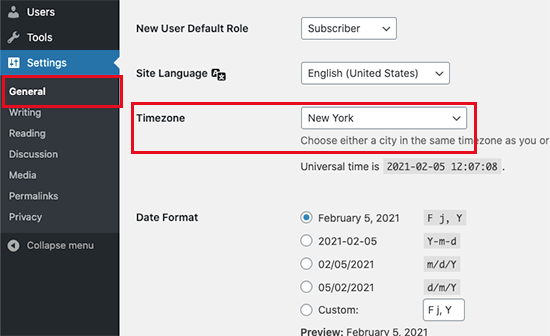
Simply go to Settings » General page and scroll down to the ‘Timezone’ section. From here, you need to select your timezone or the timezone you want to use for your WordPress website.

Set timezone in WordPress

Don’t forget to click on the Save Changes button to store your settings.

2. Clear WordPress cache

If your WordPress posts are still missing schedule, then it is likely due to a poorly configured caching plugin. Try clearing WordPress cache and make sure that your WordPress caching plugin is properly configured to automatically clear cache at regular intervals.

3. Increase WordPress memory limit

Your WordPress website may be struggling with low memory limit issue. You can fix that by allowing WordPress to use more server memory which let’s WordPress run better.

Simply add the following code to your wp-config.php file ust before the line that says ‘That’s all, stop editing! Happy publishing.’

define('WP_MEMORY_LIMIT', '500M');

For details, see our guide on how to increase memory limit in WordPress.

We hope this article helped you learn how to easily fix the missed schedule post error in WordPress. You may also want to see our guide on how to easily troubleshoot WordPress errors on your own.

If you liked this article, then please subscribe to our YouTube Channel for WordPress video tutorials. You can also find us on Twitter and Facebook.

The post How to Fix the Missed Schedule Post Error in WordPress appeared first on WPBeginner.

Embed Any URL Into WordPress With the Bookmark Card Block

Featured Imgs 08

George Mamadashvili’s Bookmark Card block is the sort of simple plugin that is easy to overlook. It is one of those plugins that suffers from the lack of block discoverability in WordPress at the moment. Like many other one-off blocks, you don’t know you need it until you need it.

The plugin is essentially an embed block, but it is not specific to one website or service like Twitter and YouTube. Instead, it allows users to add a “card” for any URL in their content.

Mamadashvili has previously worked as a developer on several blocks for the Sorta Brilliant brand, which sported some of my favorite block-related plugins, such as Emoji Conbini. Unfortunately, those plugins are no longer in the WordPress directory at the request of the owner, Nick Hamze.

However, Mamadashvili has continued building separately. Yesterday, he launched Toggles, a block for creating FAQs, hiding spoilers, and adding simple accordion elements..

I have had his Bookmark Card block literally bookmarked for a few months, just now finally giving it the overdue trial run that it deserves.

The name of the plugin brings me back a few years. There was once a time when bookmarks were a common feature of the web. Entire sites were dedicated to managing them, and some people created their own bookmark pages on their WordPress sites. Some were mere blogrolls. Others were more advanced galleries with images. Even the “link” post format archive in WordPress has served as a bookmark system.

The idea of bookmarks is about preserving pieces of the web that interests us. So, I opened my dusty old recipe folder in Chrome and started putting together a recipes page for fun, hoping for some inspiration in my culinary pursuits.

Horizontal list of Bookmark Card blocks in the WordPress editor.
Horizontal-style Bookmark Card blocks.

I enjoy this recipe page a lot more than the plain links hidden away in my Google bookmarks. I suppose I could get even more creative and break everything down by category on different pages.

The Bookmark Card block currently ships with two styles. The horizontal style, shown above, places the image to the right of the card content. The default style, shown below, adds the image at the top. Users can also try combinations with other blocks for unique looks, such as adding cards to the Columns block.

Bookmark Card blocks in three columns within the WordPress editor.
Columns of Bookmark Card blocks.

The plugin can be useful in many contexts. Users can add URLs that are not supported via the regular embed blocks. They may also enjoy the shared card style for all of their embedded links.

Future Ideas for the Plugin

The simplicity of Bookmark Card is part of its allure. However, it is also overly simple in some respects. The only option it provides is the choice between a vertical and horizontal card style. This limits its potential, especially if the default design does not match the user’s theme.

The plugin does not need a plethora of options. However, it could use some basics. Text and background colors are a must. Base typography options, such as selecting the font size, would be nice-to-have features. Integration with the Gutenberg plugin’s newer border-radius component would work well with this type of block. Like all blocks I test or use, I also ask that plugin developers add support for wide and full-width alignments.

A few additional styles or layout options would help. For example, a horizontal style that moves the image to the left of the card content would be a good option.

The plugin, which is currently at version 1.0, is a good starting point. However, it could be much better with just a handful of extras in future updates.

All in One SEO Plugin Turns on Automatic Updates without Notifying Users, Removes Functionality in Latest Release

Category Image 091

Buried in the changelog of a series of minor releases that dropped before the Christmas holiday, All in One SEO plugin users were given the surprise gift of automatic updates. After a seemingly endless run of releases (12 updates during a span of six weeks at the end of 2020), the plugin’s developers decided to change its auto update policy so that it defaults to “on.” The plugin is installed on more than 2 million WordPress sites.

Version 4.0.8, released December 21, 2020, flipped on automatic updates without notifying users of the change. Despite having auto updates turned off for the plugin, many users discovered the change when they were notified by email that their sites had been updated without permission.

Frustrated users took to the plugin’s support forums to report the issue and find out how it was possible.

“Multiple sites have updated to 4.0.11 without my permission and while all auto updates are disabled,” one user said. “I/we do not want to hear that ‘it shouldn’t happen’ and we are looking into.

“Your once reliable plugin has destroyed hundreds of pages of social meta data on multiple sites, broken layout (and this after I fixed the problems and told you last week, I will be disabling all updates).”

Others commented on the issue, citing problems with a previous major release as the source of many bugs that followed.

“The rollout of version 4, and auto-updating without any chance to backup first was a blunder by AIOSEO,” plugin user Derek Haines said. “It has cost me hours, days, and now weeks to fix the problems caused.”

The All in One SEO plugin team apologized for the inconvenience users experienced but said they could not reproduce it on their end. The plugin’s settings page has a toggle for auto updates but it is just a wrapper for WordPress’ auto updater.

“I just wanted to give you an update and let you know that we’ve decided to remove our own auto-update functionality all together since this issue seems to be happening on a limited amount of websites and we aren’t able to reproduce it on our end,” Arnaud Broes said.

The problem was also discussed in the Advanced WordPress Facebook group.

“All In One SEO Pack apparently turned auto updates on, and in a few cases I found sites where those updates failed,” Eric Karkovack reported. “I had no idea they were turned on and in one case a site was inaccessible.”

Karkovack noted that there was only a small mention in the changelog, despite the plugin liberally using the dashboard notification UI for sales.

William Earnhardt, WordPress core contributor and developer at Bluehost, offered some insight as someone who has worked on core as well as plugins installed on a massive scale.

“In my experience if you are weighing the two options, auto-updates prevent significantly more issues and support requests than they create,” Earnhardt said. “So I’m strongly in the camp of enabling them by default, with a mechanism for preventing or disabling for those who prefer (core makes this possible with filters and now with per-plugin UI).

“I think when making these decisions, we as developers have to consider what is best for the broadest number of users and be realistic about the type of users we have. If a user is already not updating plugins regularly, it is unlikely they are going to have the awareness to flip a toggle to turn auto-updates on. So opt-in makes them mostly useless.”

Earnhardt agreed that notifying users of the change would have been a good idea, but admin notices are already “frequently abused and quite noisy.”

“It would likely be missed if not persistent, but really should only show after the update and then go away,” he said. “Is that enough when combined with a note in the changelog? Probably for most, but I’m sure some would disagree.”

As promised nine days ago, All in One SEO’s developers have now removed the functionality from the plugin in its first update of 2021, version 4.0.12 released today. It is noted in the changelog: “Fixed: Completely remove auto updates wrapper to let WordPress handle updates.”

Easy WP SMTP 1.4.3 Patches Sensitive Data Disclosure Vulnerability

Category Image 032

Easy WP SMTP has patched a vulnerability that allows attackers to capture the password reset link from the plugin’s debug log file and gain unauthorized access to the site. The plugin is used by more than 500,000 WordPress sites to configure and send all outgoing emails via a SMTP server so they are less likely to end up in recipients’ junk/spam folders.

WPScan categorized the vulnerability as a “sensitive data disclosure:”

The plugin has an optional debug log file generated with a random name, located in the plugin folder and which contains all email messages sent. However, this folder does not have any index page, allowing access to log file on servers with the directory listing enabled or misconfigured. This could allow attackers to gain unauthorised access to the blog by reseting the admin password by getting the reset link from the log.

Easy WP SMTP version 1.4.3 contains the fix, adding an empty “index.html” file to the plugin’s folder to prevent anyone from browsing the files (even if the Option -Indexes is missing on that server). Users are advised to update immediately, as the vulnerability has already been exploited in the wild. Several users took to the plugin’s support forums to report attempts on their sites.

Jerome Bruandet, a security researcher from NinTechNet, reported the vulnerability and published a post explaining how an attacker might access the debug log where the plugin writes all the email messages sent by the site. Using author archive scans, the hacker can find a username and then send a password reset email that gets intercepted via the Easy WP SMTP debug log file:

Easy WP SMTP log file – source: NinTechNet

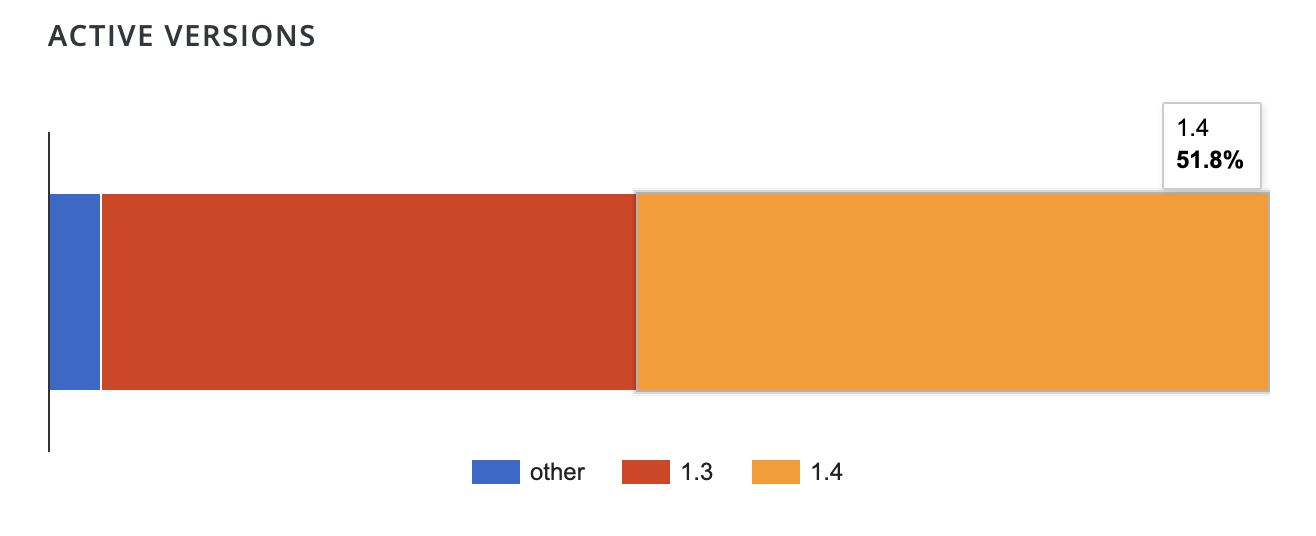
At the time of publishing, approximately 51.8% of users are on 1.4.x versions of the plugin. Without a more specific breakdown, it’s not clear how many users have updated to the patched 1.4.3 version. Approximately 59,000 sites have downloaded the plugin today, leaving many installations still vulnerable.

This is another case where automatic background updates on plugins can quietly save the day. Users who have auto-updates enabled for plugins have already received the fix. Administrators for older installations of WordPress or sites where auto-updates have been disabled will need to update manually as soon as possible.

Using the Web Stories for WordPress Plugin? You Better Play By Google’s Rules

Wp Plugins
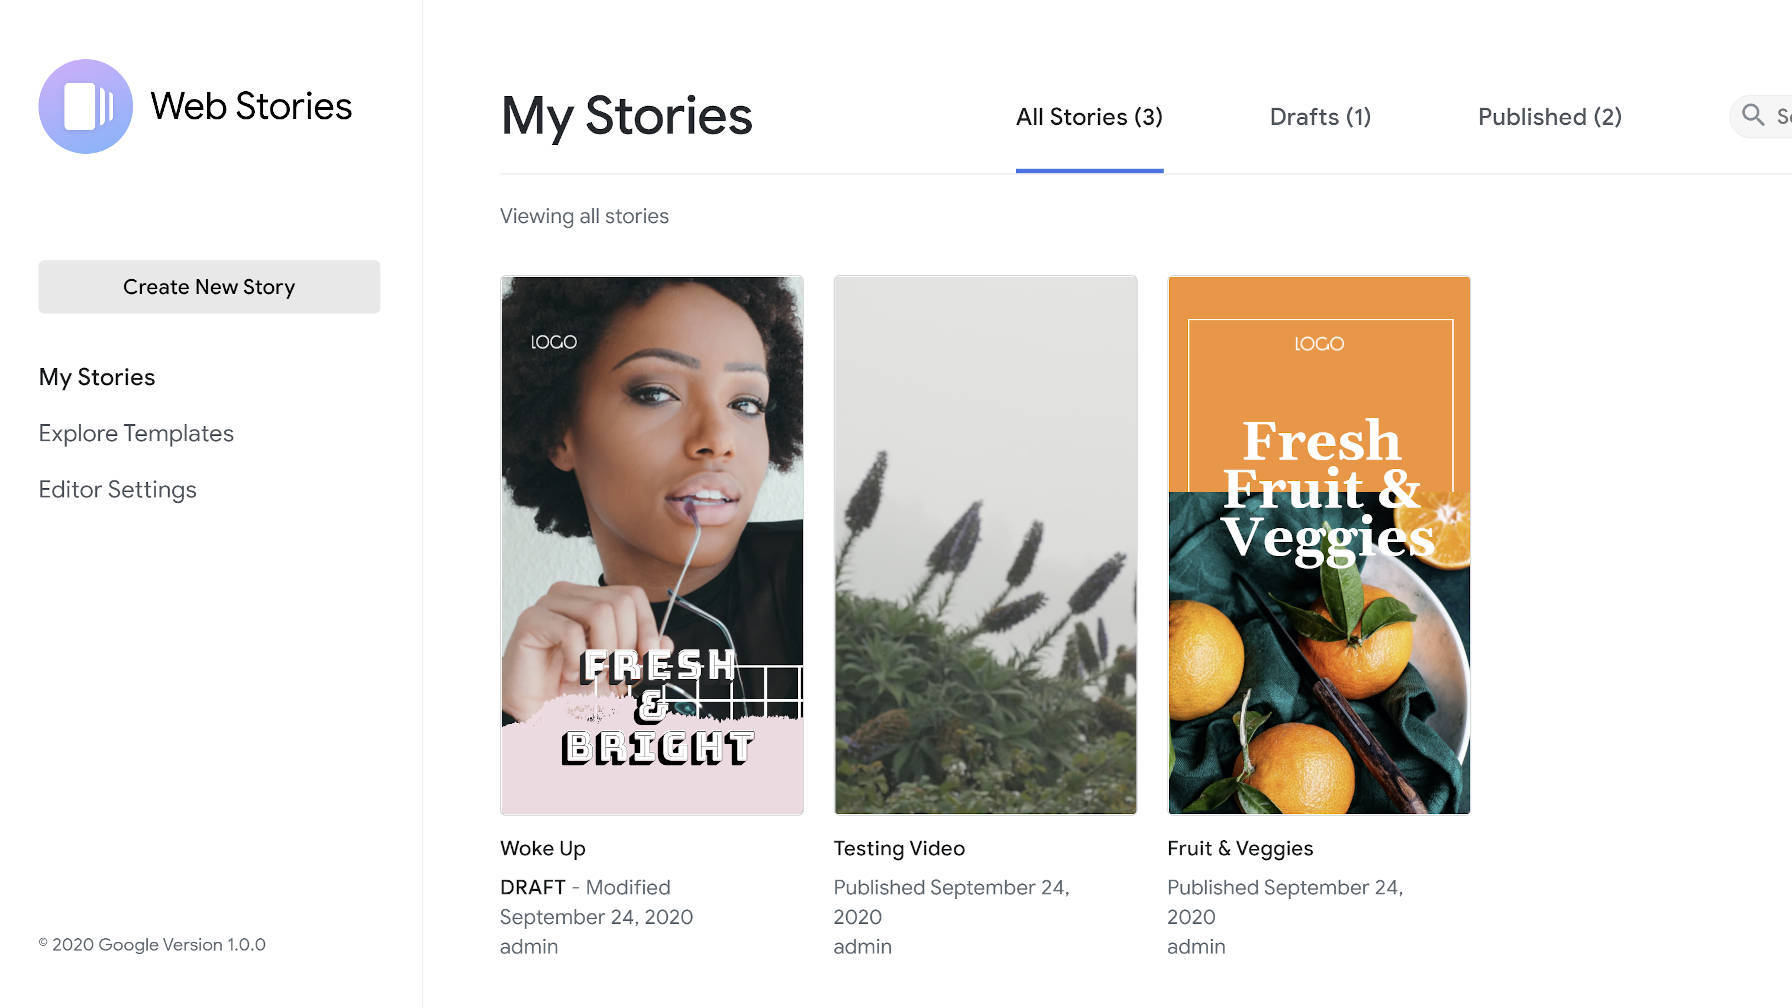
Web Stories for WordPress plugin's dashboard.
Web Stories dashboard screen in WordPress.

What comes as a surprise to few, Google has updated its content guidelines for its Web Stories format. For users of its recently-released Web Stories for WordPress plugin, they will want to follow the extended rules for their Stories to appear in the “richer experiences” across Google’s services. This includes the grid view on Search, Google Images, and Google Discover’s carousel.

Google released its Web Stories plugin in late September to the WordPress community. It is a drag-and-drop editor that allows end-users to create custom Stories from a custom screen in their WordPress admin.

Visual Stories on Search.

The plugin does not directly link to Google’s content guidelines anywhere. For users who do not do a little digging, they may be caught unaware if their stories are not surfaced in various Google services.

On top of the Discover and Webmaster guidelines, Web Stories have six additional restrictions related to the following:

  • Copyrighted content
  • Text-heavy Web Stories
  • Low-quality assets
  • Lack of narrative
  • Incomplete stories
  • Overly commercial

While not using copyrighted content is one of those reasonably-obvious guidelines, the others could trip up some users. Because Stories are meant to represent bite-sized bits of information on each page, they may become ineligible if most pages have more than 180 words of text. Videos should also be limited to fewer than 60 seconds on each page.

Low-quality media could be a flag for Stories too. Google’s guidelines point toward “stretched out or pixelated” media that negatively impacts the reader’s experience. They do not offer any specific resolution guidelines, but this should mostly be a non-issue today. The opposite issue is far more likely — users uploading media that is too large and not optimized for viewing on the web.

The “lack of narrative” guideline is perhaps the vaguest, and it is unclear how Google will monitor or police narrative. However, the Stories format is about storytelling.

“Stories are the key here imo,” wrote Jamie Marsland, founder of Pootlepress, in a Twitter thread. “Now we have an open format to tell Stories, and we have an open platform (WordPress) where those Stories can be told easily.”

Google specifically states that Stories need a “binding theme or narrative structure” from one page to the next. Essentially, the company is telling users to use the format for the purpose it was created for. They also do not want users to create incomplete stories where readers must click a link to finish the Story or get information.

Web Story page from CNN's coverage of John Lennon.
CNN’s Web Story on Remembering John Lennon.

Overly commercial Stories are frowned upon too. While Google will allow affiliate marketing links, they should be restricted to a minor part of the experience.

Closing his Twitter thread, Marsland seemed to hit the point. “I’ve seen some initial Google Web Stories where the platform is being used as a replacement for a brochure or website,” he wrote. “In my view that’s a huge missed opportunity. If I was advising brands I would say ‘Tell Stories’ this is a platform for Story Telling.”

If users of the plugin follow this advice, their Stories should surface on Google’s rich search experiences.

Google Officially Releases Its Web Stories for WordPress Plugin

Wp Plugins
Web Stories for WordPress dashboard screen.
Web Stories for WordPress dashboard.

Two and a half months after the launch of its public beta, Google released its Web Stories for WordPress plugin. So far, the plugin has over 10,000 active installations and has garnered a solid five-star rating from four reviews.

Google created the Web Stories format through its AMP Project to allow publishers to create visually-rich stories. It is primarily geared toward mobile site visitors, allowing them to quickly jump through story pages with small chunks of content.

The Web Stories plugin creates a visual interface within WordPress for creating Stories. It breaks away from the traditional WordPress interface and introduces users to an almost Photoshop-like experience for building out individual Stories. The Stories editor is completely drag-and-drop.

The plugin also offers eight predesigned templates out of the box that cover a small range of niches. However, according to Google’s announcement, the company plans to add more templates in future updates.

Web Stories Are for Storytelling

“Firstly…the power of Stories,” wrote Jamie Marsland, founder of Pootlepress, in a Twitter thread. “Stories are how we (humans) see the world and share our experiences. Up to now the platforms that we have to tell stories have been limited to books/films/tv/websites/blogs/instagram stories etc.”

“Websites are ok for telling stories but in many ways the format doesn’t really fit the linear arc of storytelling. When Marshall McLuhan said ‘the medium is the message’ in 1964 he was talking about how the medium itself has a social impact, and change the communication itself…and the possibilities for what is communicated and how it is perceived. But we should keep coming back to Stories. Stories are the key here imo. Now we have an open format to tell Stories, and we have an open platform (WordPress) where those Stories can be told easily.”

Marsland finished his thread by saying that using Stories as a replacement for a brochure or website is a missed opportunity. He said that it was a platform for storytelling and should be used as such.

It is far too early to tell if Web Stories will simply be a fad or still in wide use years from now. The technology certainly lends itself well to telling stories, particularly in mobile format, but I doubt we have seen the best of what is possible on the web. The format feels too limited to be the end-all-be-all of storytelling. It is merely one medium that will live and die by its popularity with users.

With the right design skills, some people will craft beautiful Web Stories. And, that is just what Marsland has done with the first Story he shared:

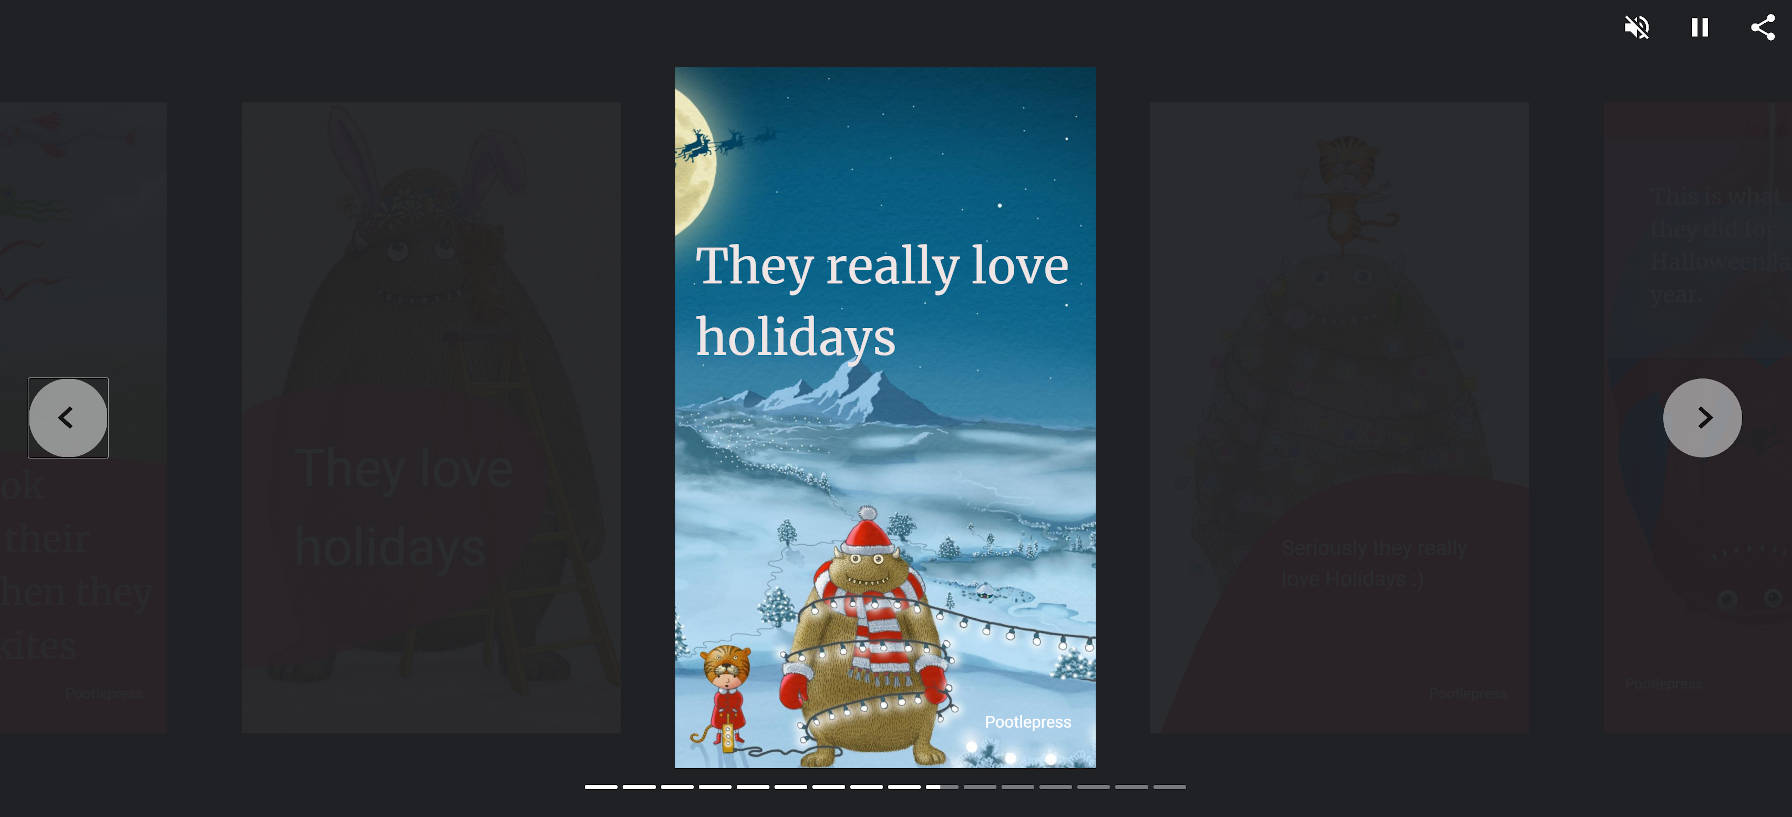
Page from Jamie Marsland's first Web Story.
Page from the Wilson and Pootle Web Story by Jamie Marsland.

I agree with his conclusion. Web Stories should be about storytelling. When you move outside of that zone, the technology feels out of place.

Where I disagree is that websites are not ideal for storytelling. Ultimately, the WordPress block editor will allow artistic end-users to craft intricate stories, mixing content and design in ways that we have not seen. We are just now scratching the surface. I expect our community of developers to build more intricate tools than what the Web Stories plugin currently allows, and we can do so in a way that revolutionizes storytelling on the web.

New Features

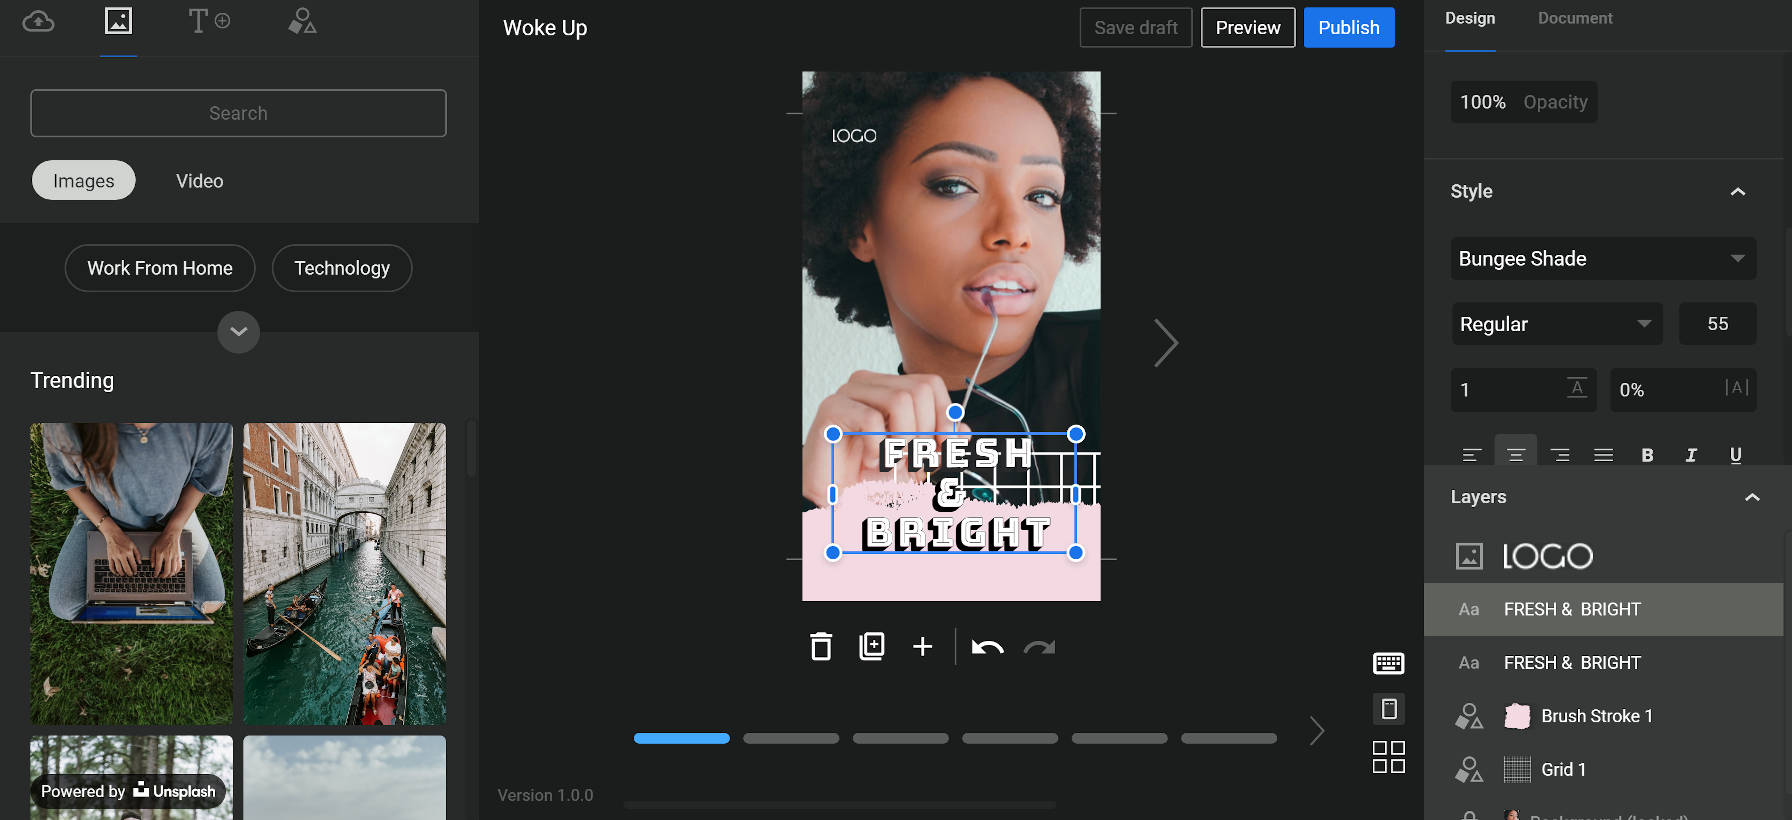
The story editor for Google's Web Stories for WordPress plugin.
Story editor with Unsplash photo integration.

The Web Stories plugin now adds support for Unsplash images and Coverr videos out of the box. The plugin adds a new tab with a “media” icon. For users of the first beta version of the plugin, this may be a bit confusing. The previous media icon was for a tab that displayed the user’s media. Now, the user’s media is under the tab with the “upload” icon.

It is also not immediately clear that the Unsplash images and Coverr videos are not hosted on the site itself. There is a “powered by” notice at the bottom of the tab, but it can be easy to miss because it blends in with the media in the background.

Media from Unsplash and Coverr is hosted off-site and not downloaded to the user’s WordPress media library. I could find no mention of this in the plugin’s documentation. Such hotlinking was a cause for debate over the recent official release of the Unsplash plugin.

Google also announced it planned to add more “stock media integrations” in the near future. According to a document shared via a GitHub ticket, such future integrations may include Google Photos and GIF-sharing site Tenor.

AMP Plugin 2.0 Adds Onboarding Wizard and Expanded Reader Mode

Wp Plugins

The official AMP plugin for WordPress recently crossed the 2.0 milestone, a major release that closed 141 issues and merged 174 pull requests. The release was originally planned for v1.6 but due to the number of major changes the team decided to bump it to 2.0.

One of the most significant updates in this release is the expansion of the Reader Mode. The plugin has a lot of AMP-specific terminology associated with it and unless you are working with it every day, it’s easy to get confused by the different modes. Standard Mode is an AMP-first site where all URLs are presented as AMP pages. Transitional Mode uses one theme but canonical non-AMP URLs may offer a separate AMP version. Reader Mode uses two themes with the active one for canonical non-AMP URLs and a separate “Reader” theme for AMP URLs.

Version 2.0 introduces a new AMP Customizer for customizing the Reader theme. It loads with a mobile view and does not support widgets or homepage settings, as they are not applicable for the AMP version. The AMP Customizer makes it easy for site owners to make tweaks and changes that will only apply to the AMP version of URLs.

The Reader Mode is especially useful for sites that are not using AMP-compatible themes. Google engineer Weston Ruter described the expanded Reader Mode as follows:

Reader mode now allows for any AMP-compatible theme to be used to serve AMP pages, rather than just the legacy post templates. This allows for long-requested features including nav menus, logos, commenting, and template design variations. It also makes it possible to serve all URLs of a Reader-mode site in AMP, as opposed to just singular posts. 

One major usability update in version 2.0 is the addition of an onboarding wizard and revamped Settings screen that guides users through the different templating modes when configuring the plugin. Users who are routed to Reader Mode will be presented with a selection of themes for serving AMP pages and the wizard will handle installation. The final step of the configuration process allows users to review their choices in a preview screen.

Given the complexity of the AMP plugin and its many configuration options, the onboarding wizard was a critical addition if the plugin is going to grow past 500,000 active installs to reach a larger number of non-technical users.

Another notable update in this release includes a feature called “Plugin Suppression” that allows administrators to turn certain plugins off for AMP pages if they are causing validation errors. It also introduces mobile redirection for Transitional/Reader mode sites where AMP is intended to be the mobile version.

AMP is still far from a plug-and-play experience for WordPress users but the plugin does a lot of the heavy lifting and is evolving towards becoming more approachable for non-technical users. To that end, the AMP plugin team just announced a new video series that will focus on success with WordPress as a content creator, as well as performance and usability.

“We are crafting it with an audience in mind that covers both technical and non-technical users,” Google Developer Advocate Alberto Medina said. “The 2.0 version of the plugin makes an emphasis on providing options for users that are non technical but still want to take advantage of AMP to bring great page experiences to their users.”

The series will launch next week on Google’s AMP YouTube channel. Medina is also working on another series geared towards content creators that will cover topics like Web Stories in the first episodes.