How to Add Navigation Menu in WordPress (Beginner’s Guide)
Do you want to add a navigation menu to your WordPress site?
WordPress comes with a drag and drop menu interface that you can use to create header menus, menus with dropdown options, and more.
In this step by step guide, we will show you how to easily add a navigation menu in WordPress.
What is a Navigation Menu?
A navigation menu is a list of a links pointing to important areas of a website. They are usually presented as a horizontal bar of links at the top of every page on a website.
Navigation menus give your site structure and help visitors find what they’re looking for. Here’s how the navigation menu looks on WPBeginner:

WordPress makes it really easy to add menus and sub-menus. You can add links to your most important pages, categories or topics, blog posts, and even custom links such as your social media profile.
The exact location of your menu will depend on your WordPress theme. Most themes will have several options, so you can create different menus that can be displayed in different places.
For instance, most WordPress themes come with a primary menu that appears on the top. Some themes may include a secondary menu, a footer menu, or a mobile navigation menu as well.
Creating Your First Custom Navigation Menu
To create a navigation menu, you need to visit the Appearance » Menus page in your WordPress admin dashboard.
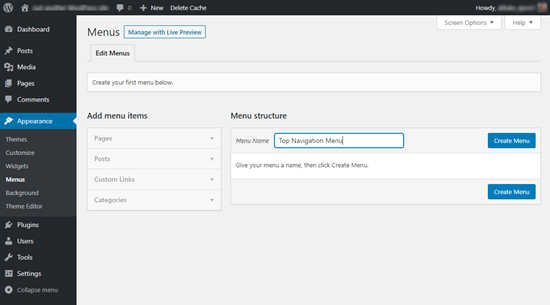
First, you need to provide a name for your menu, like ‘Top Navigation Menu’ and then click the ‘Create Menu’ button. This will expand the menu area, and it will look like this:
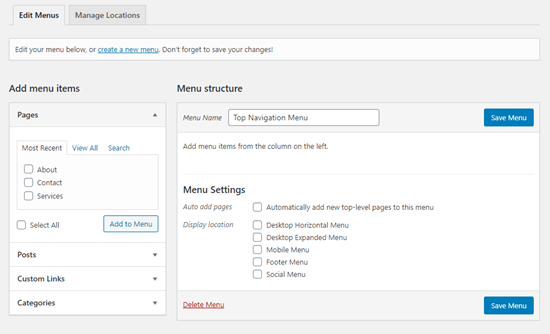
Next, you can choose the pages you want to add to the menu. You can either automatically add all new top-level pages, or you can select specific pages from the left column.
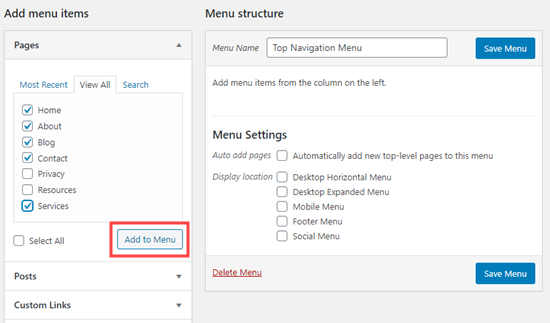
First, click the ‘View All’ tab to see all your site’s pages. After that click the box next to each of the pages you want to add to your menu, and then click on the ‘Add to Menu’ button.
Once your pages have been added, you can move them around by dragging and dropping them.
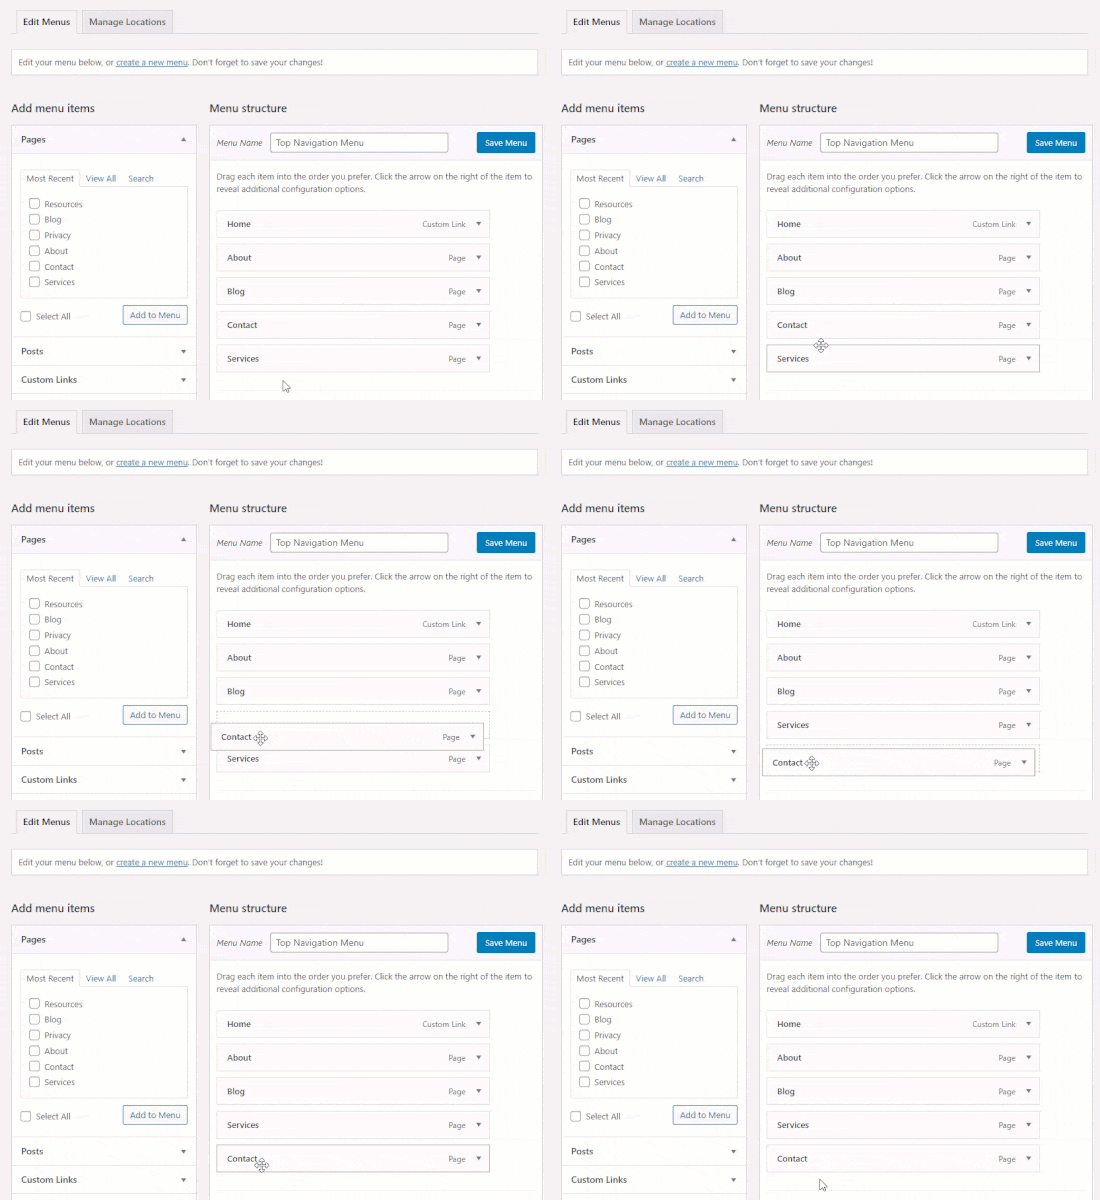
Note: All menus have their items listed in a vertical (top to bottom) list in the menu editor. When you put the menu live on your site, it’ll either display vertically or horizontally (left to right), depending on the location you select.
Most themes have several different locations where you can put menus. In this example, we’re using the default 2020 theme, which has 5 different locations.
After adding pages to the menu, select the location where you want to display the menu and click on the ‘Save Menu’ button.
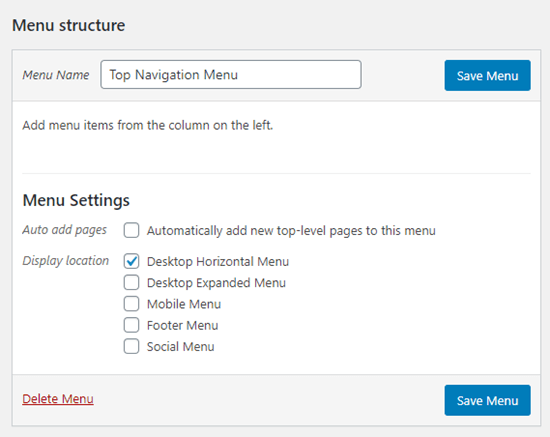
Tip: If you’re not sure where each location is, try saving the menu in different places, then visiting your site to see how it looks. You probably won’t want to use all the locations, but you might want to use more than one.
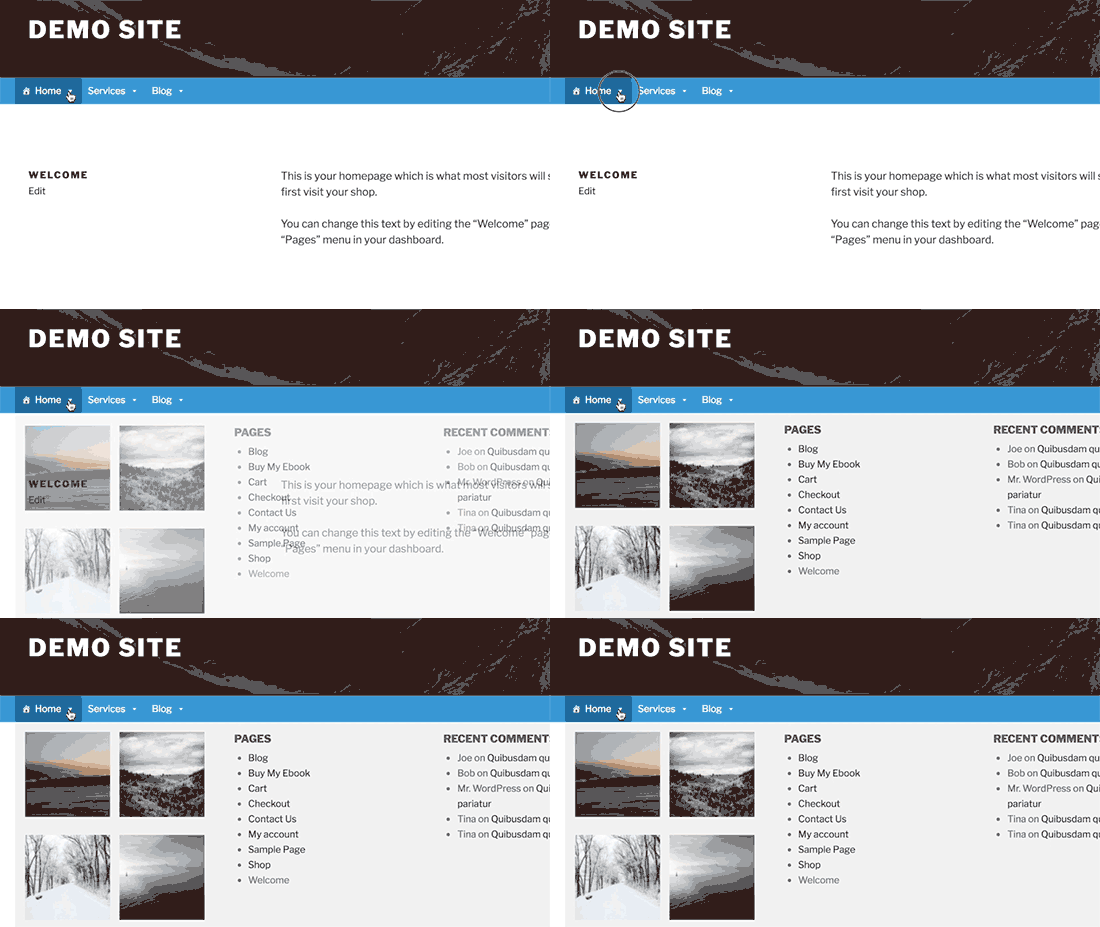
Here’s our finished menu on the site:

Creating Drop-Down Menus in WordPress
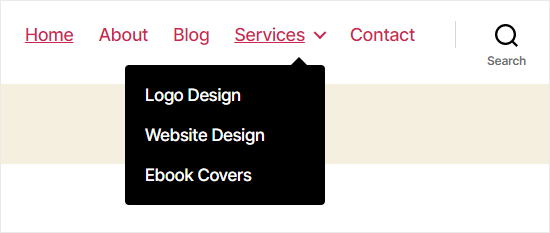
Drop-down menus, sometimes called nested menus, are navigation menus with parent and child menu items. When you run your cursor over a parent item, all the child items will appear beneath it in a sub-menu.
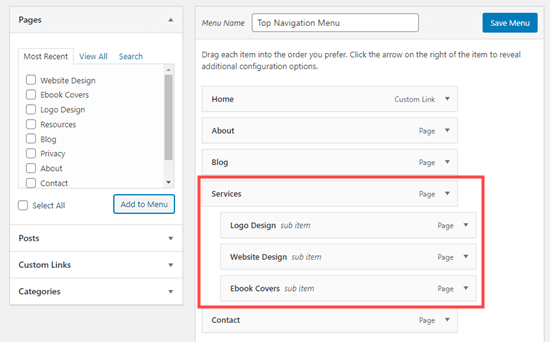
To create a sub menu, drag an item below the parent item, and then drag it slightly to the right. We’ve done that with 3 sub-items beneath ‘Services’ in our menu:
Here’s the sub-menu live on the site:
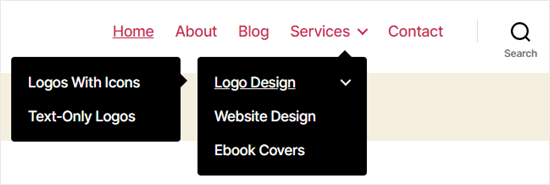
You can even add multiple layers of dropdown, so that your sub menu can have a sub menu. This can end up looking at bit cluttered, and many themes do not support multi-layer drop-down menus.
In this example, you can see that ‘Logo Design’ (a child item of ‘Services’) has two child items of its own.
Adding Categories to WordPress Menus
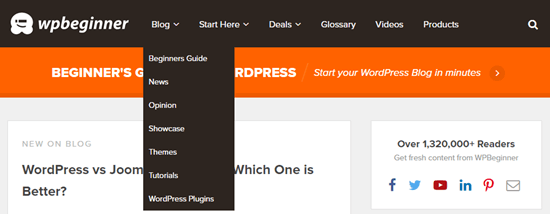
If you’re using WordPress to run a blog, then you may want to add your blog categories as a drop-down in your WordPress menu. We do this on WPBeginner:
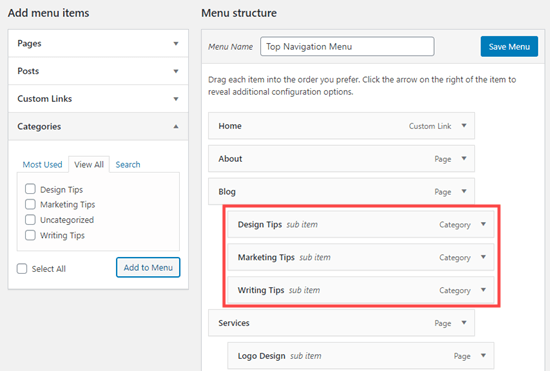
You can easily add categories to your menu by clicking the Categories tab on the left side of the Menus screen. You may also need to click the ‘View All’ tab to see all your categories.
Simply select the categories you want to add to the menu, and then click the ‘Add to Menu’ button.
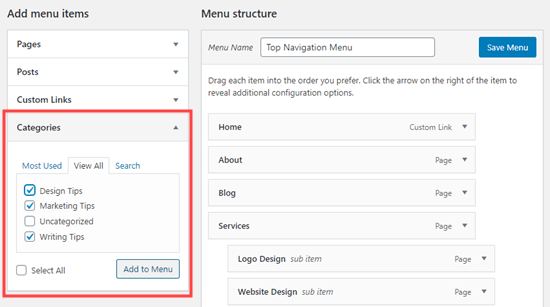
The categories will appear as regular menu items at the bottom of your menu. You can drag and drop them into position. We’re going to put all of these categories under the Blog menu item.
Do you want to have a blog page on your site that’s separate from your homepage? If so, check out our tutorial on how to create a separate page for blog posts in WordPress.
Adding Custom Links to Your WordPress Navigation Menus
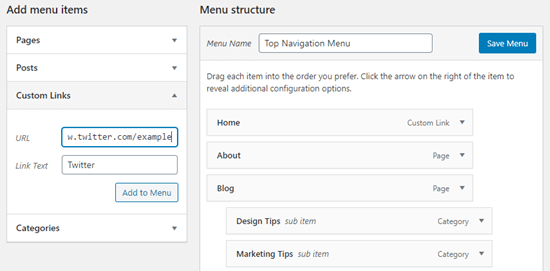
Aside from categories and pages, WordPress also makes it super easy to add custom links to your menu. You can use it to link to your social media profiles, your online store, and / or other websites that you own.
You will need to use the ‘Custom Links’ tab on the Menu screen. Simply add the link along with the text you want to use in your menu.
You can even get creative and add social media icons in your menu.

Editing or Removing a Menu Item in WordPress Navigation Menus
When you add pages or categories to your custom navigation menu, WordPress uses the page title or category name as the link text. You can change this if you want.
Any menu item can be edited by clicking on the downward arrow next to it.
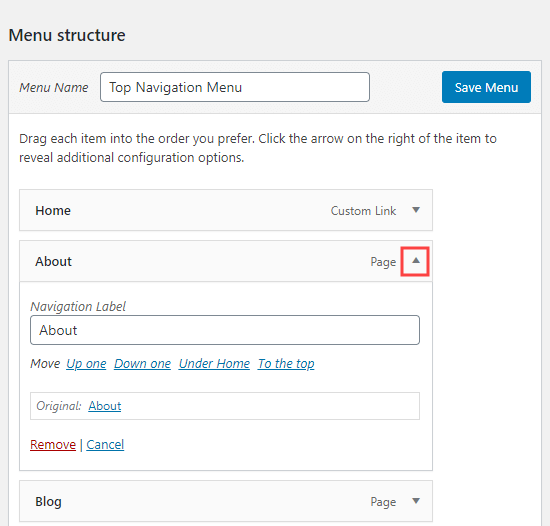
You can change the name of the menu item here. This is also where you can click ‘Remove’ to take the link off your menu altogether.
If you’re struggling with the drag and drop interface, then you can also move the menu item around by clicking the appropriate ‘Move’ link.
Adding WordPress Menus in Sidebars and Footers
You don’t have to just stick to the display locations for your theme. You can add navigation menus in any area that uses widgets, like your sidebar or footer.
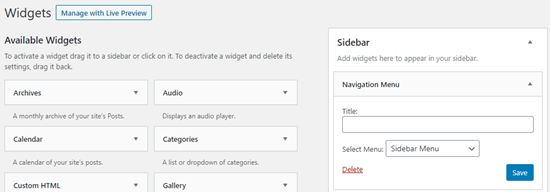
Simply go to Appearance » Widgets and add the ‘Navigation Menu’ widget to your sidebar. Next, add a title for the widget and choose the correct menu from the ‘Select Menu’ drop down list.
Here’s an example of a custom WordPress footer menu built on Syed Balkhi website.

Going Further with Navigation Menus
If you want to create a truly epic menu with loads of links, we’ve got a tutorial on how to create a mega menu in WordPress. This lets you create a drop-down with lots of items including images.
Mega menus are a great option if you have a large site, like an online store or news site. This type of menu is used by sites like Reuters, Buzzfeed, Starbucks, etc.
We hope this article helped you learn how to add a navigation menu in WordPress. You may also want to check out our guides on how to style navigation menus in WordPress and how to create a sticky floating navigation menu in WordPress.
If you liked this article, then please subscribe to our YouTube Channel for WordPress video tutorials. You can also find us on Twitter and Facebook.
The post How to Add Navigation Menu in WordPress (Beginner’s Guide) appeared first on WPBeginner.
How to Fix Common Image Issues in WordPress
WordPress comes with some pretty neat tools to manage and edit images. You can easily upload images, align them, and even edit them inside WordPress.
Most beginners are not aware of these WordPress image editing features. It takes users a while to discover out some of them while other features go completely unnoticed.
If you ever had a question about WordPress images, then you’re in luck. In this article, we will cover the most common image issues in WordPress and how to fix them.
Since this is a detailed article, here is the list of image related issues that we will cover this article.
- How to Upload Images in WordPress?
- How to Align Image to the Left or Right in WordPress?
- How to Add Caption below Images?
- How to Display Photos in Columns and Rows?
- Create Beautiful Responsive Image Galleries in WordPress
- How to Fix Missing Post Thumbnails / Featured Image?
- How to Add Cover Images in WordPress Posts and Pages
- How to Fix Featured Image Appearing Twice Issue?
- Image too Big? How to Crop Images in WordPress?
- How to Add a Header Image in WordPress?
- How to Add a Background Image in WordPress?
- How to Find Free Images for Your WordPress Blog Posts?
- How to Tag Images in WordPress?
- How to Import External Images in WordPress?
- How to Require Featured Image for Posts in WordPress?
- How to Set a Default Featured Image in WordPress?
- How to Remove the Default Image Link in WordPress?
Let’s start with the most obvious one.
1. How to Upload images in WordPress?
WordPress makes it super easy to upload images to your posts, pages, and non-content areas like sidebars.
To upload images in WordPress posts and pages, you simply need to add the image block to the content editor.
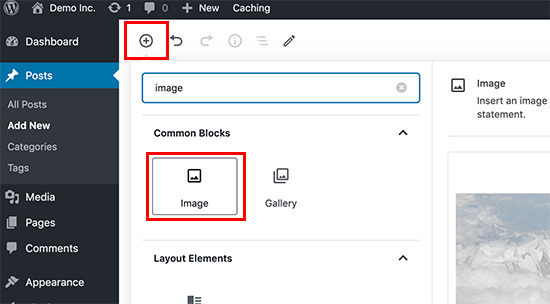
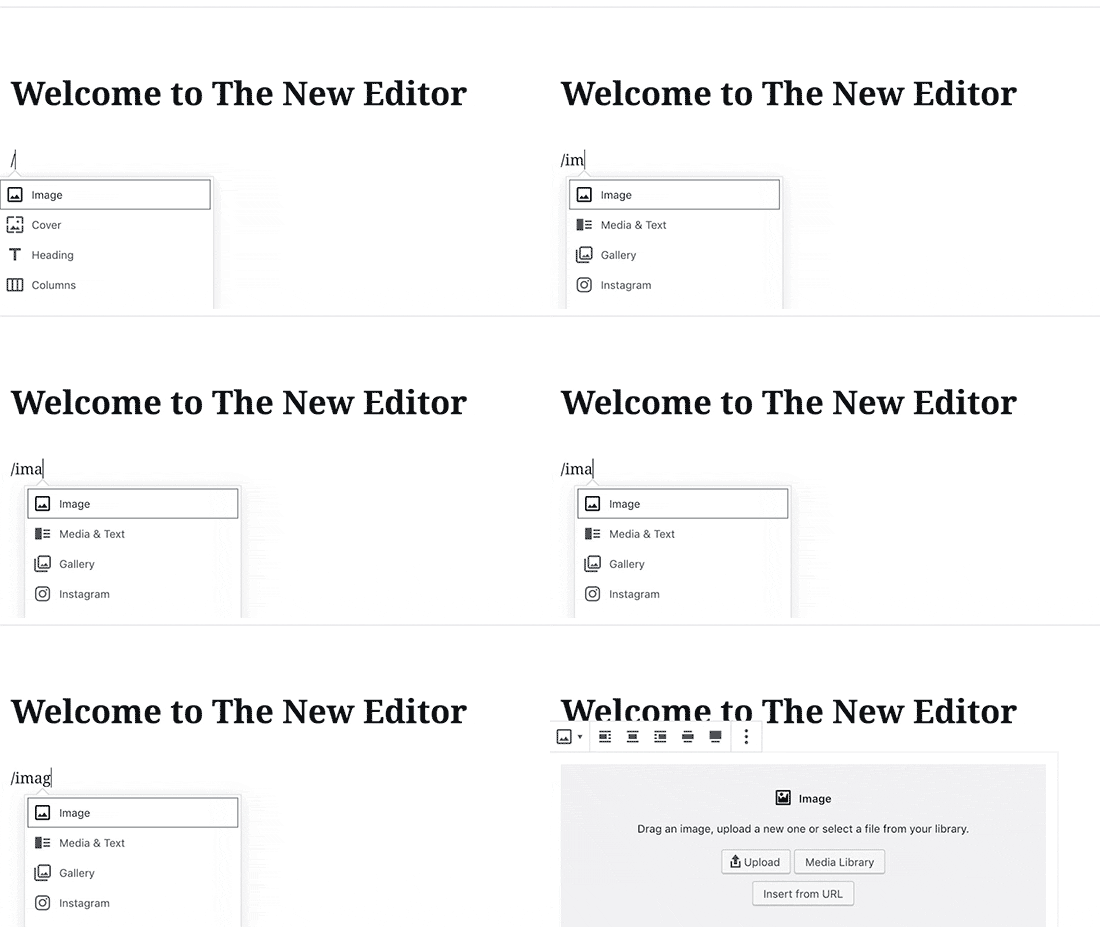
You can also add the image block by simply typing /image in a paragraph block. The editor will start showing blocks you can insert as soon as you start typing.
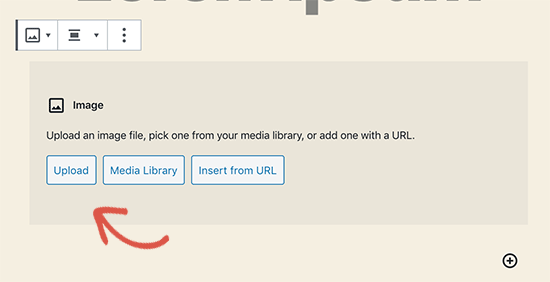
WordPress will now add the image block to the editor. You need to click on the ‘Upload’ button to select and upload the image from your computer.
You can also select a previously uploaded image from your media library.
After uploading the image, you’ll see a live preview of the image in the content editor.
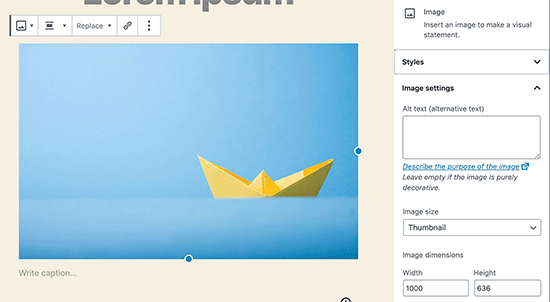
You’ll see a bunch of image settings on the right panel. From there you can provide image alt text, select image size, and image style.
2. How to Align Image to the Left or Right in WordPress?
WordPress makes it easier to align images to the left, right, or center. Simply select the image by clicking on it, and then click on alignment button from the block toolbar.
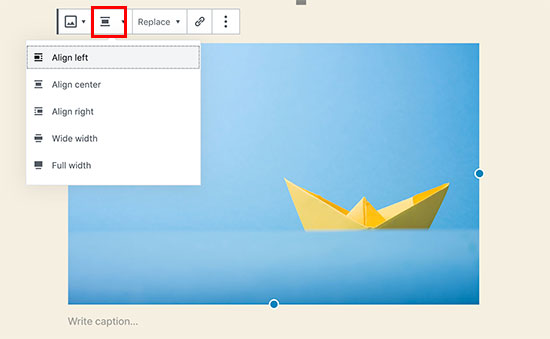
You may have noticed how some popular blogs use images with text wrapped around them. This is done by using the align feature.
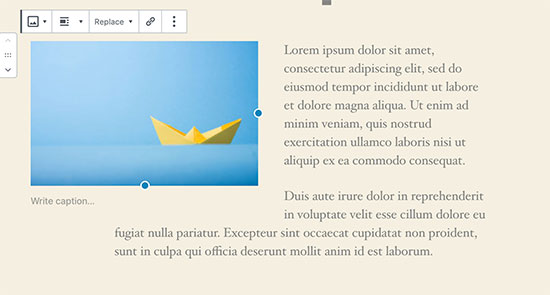
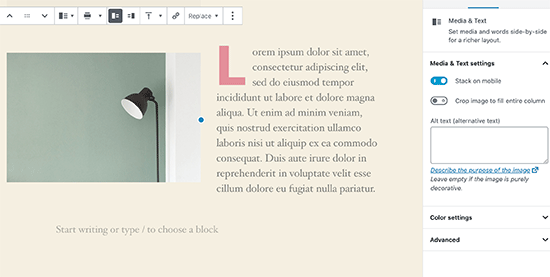
Alternatively, you can also use the ‘Media & Text’ block instead of the image block. This block is made specifically for adding images next to the text.
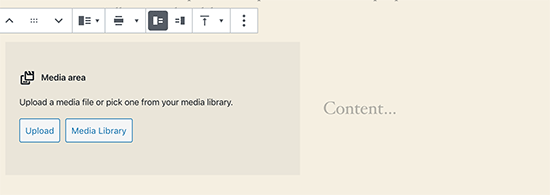
You can then upload an image and text side by side. You can also use the block toolbar to change the image or text side.
3. How to Add Caption below Images?
WordPress allows you to easily add caption for images. After you upload an image, you’ll see the option to add caption right below the image preview.
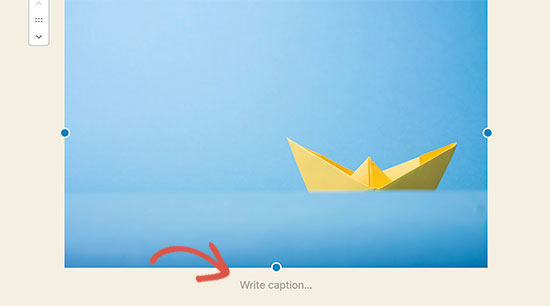
Similarly, you can also add captions to image galleries in WordPress. For more details, see our guide on how to add captions to images in WordPress.
4. How to Display Photos in Columns and Rows?
Often users ask us how to neatly display photos in columns and rows.
Let’s say you want to share photos of a birthday party or vacation photos. You can add them one by one into a post, but this will look like a lengthy list of images.
The better way to group your photos is by creating image galleries.
WordPress comes with a built-in gallery block that allows you to easily add images in rows and columns with thumbnail previews.
Simply add the gallery block to the post editor and select the images you want to upload.
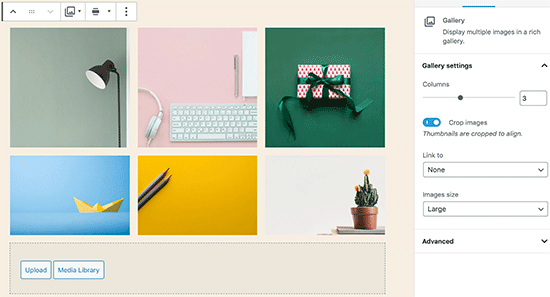
For more detailed instructions see our guide on how to create an image gallery in WordPress.
5. Create Beautiful Responsive Image Galleries in WordPress
You will notice that the default WordPress image galleries lack several features. For instance, they are also not very easy to browse.
If you often upload images and photographs to your WordPress site, then you will need a proper WordPress photo gallery plugin.
We recommend using Envira Gallery. It allows you to easily create beautiful and fully mobile-friendly image galleries on your WordPress site.
The best part is that it adds additional functionality like albums, gallery templates, social sharing, slideshows, watermarking, pagination, password protection, tagging, fullscreen view, and much more.
6. How to Fix Missing Post Thumbnails / Featured Image?
Most WordPress themes allow you to prominently display a featured image with your articles. Here is how to set a featured image in WordPress to avoid missing thumbnails.
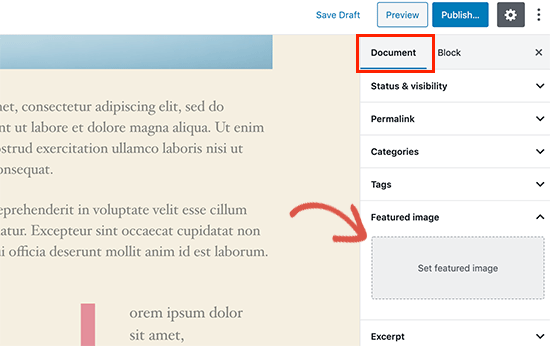
Now, you can click on ‘Set Featured Image’ to upload your post thumbnail. After uploading the image, you’ll be able to see your post thumbnail in the featured image meta box like this:
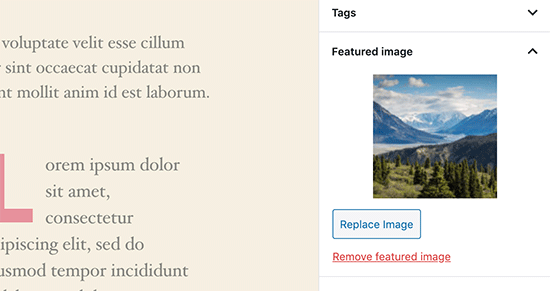
For more details, see our guide on how to add featured image or post thumbnail in WordPress.
7. How to Add Cover Images in WordPress Posts and Pages
Cover images are the wide or full-width images that can be used as a separator between different sections of an article or a lengthy sales page.
They are highly engaging and help users easily scan a page without feeling overwhelmed by too much text.
To add a cover image, you simply need to add the ‘Cover’ block to the content editor.
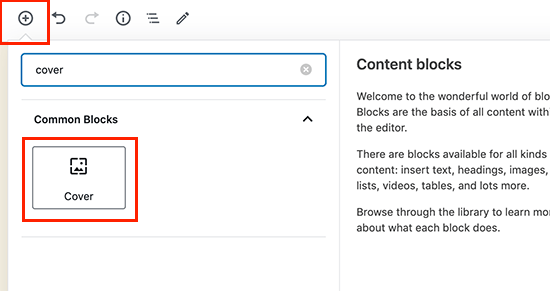
Next, you need to upload the image you want to use from your computer or select one from the media library. If you don’t want to use an image, then you can also select a color background as the cover.
Tip: It is best to use a large image for a better result.
You’ll now see a liver preview of your cover image in the editor. You can change the cover image display options from the block toolbar or using the settings on the right.
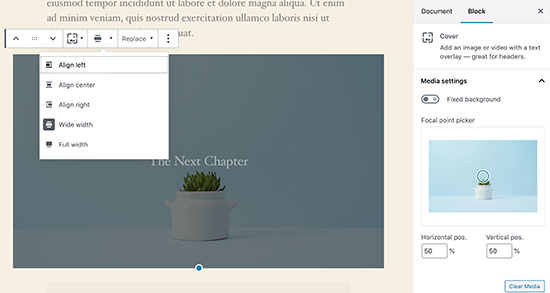
To learn more see our guide on the difference between cover image vs featured image in WordPress and how to use them effectively.
8. How to Fix Featured Image Appearing Twice Issue?
Inserting the featured image inside content is a common mistake made by beginners.
Once you set a featured image, you don’t need to insert it into the post editor along with your post content.
Doing so, will make your featured image appear twice. Once as the featured image, and once as an image inside the post.
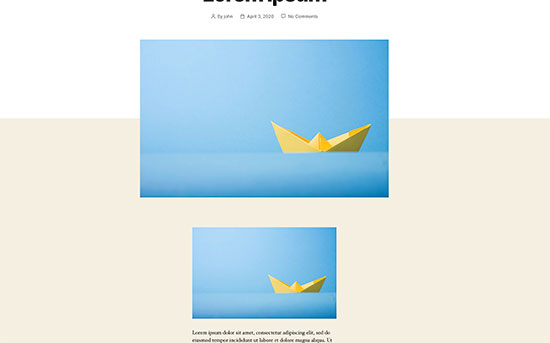
You can add other images in your post, but your featured image goes in the featured image box.
For more details, see our guide on how to fix featured image appearing twice in WordPress posts.
9. Image too Big? How to Crop Images in WordPress?
When you are uploading images from your phone or camera they are usually too big.
WordPress automatically creates small, medium, and large image sizes for your original upload. But sometimes you may need to crop the image in a different size.
WordPress is no Photoshop, but it comes with some basic image editing features like scale, crop, flip and rotate images.
Go to Media » Add New and upload your image. After uploading the image, you will see an Edit link next to the uploaded image.
Clicking on it will open the Edit Media screen where you will see an Edit Image button right below the image. This will open the WordPress image editor.
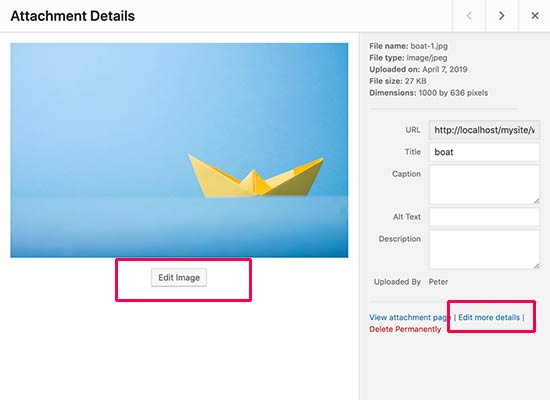
From here you can click on the ‘Edit Image’ button below the image preview. This will open the image editing screen.
On the image editor screen, you will see buttons to perform some basic image editing tasks such as cropping, rotating, resizing, etc.
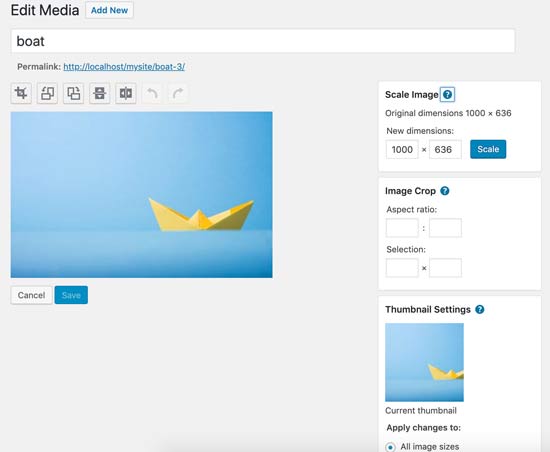
For more detailed instructions see our guide on how to crop, rotate, scale, and flip images in WordPress.
10. How to Add a Header Image in WordPress?
A header image in WordPress is a theme feature. Many WordPress free and premium themes comes with support for header image.
You can upload your own custom header image from the Appearance » Customize page.

Since it is a theme feature, many WordPress themes come with their own header options. Some allow you to set a site-wide header image, while others allow you to only set a header image for the homepage.
11. How to Add a Background Image in WordPress?
Just like the custom header image, custom background image is also a WordPress theme feature. Many WordPress themes come with support for custom background images.
Visit Appearance » Customize to launch the theme customizer. If you can see the Background Image option, then your theme has support for custom backgrounds.

It is a theme feature which is why it varies from one theme to another. Depending on your theme you’ll see different options for styling your background image.
If your theme does not support background image, then you can still use a plugin to add full-screen background images to your website.
12. How to Find Free Images for Your WordPress Blog Posts?

Images can make your articles stand out. However, you must respect copyrights of other people and try to find images that you are legally allowed to use.
We are often asked by our readers about how to find best royalty free images to use in their posts?
There are many websites where you can find free images to use. However, you will soon notice that images on those sites look overused and generic.
See our list of the best sources for free public domain and CC0-licensed images on the internet.
13. How to Tag Images in WordPress?
If you run a photography blog, then you will notice that WordPress does not allow you to sort photos and images.
Wouldn’t it be great if you could add tags to your images, so that you and your users can easily browse them?
Luckily, there are some great plugins that allow you to do just that.
For a photography related blog, the best option is to use Envira Gallery which comes with an add-on to add tags.
Envira Gallery allows you to create beautiful, mobile-ready, photo galleries in WordPress. Using tags, your users can easily filter and sort photos without even reloading a page.
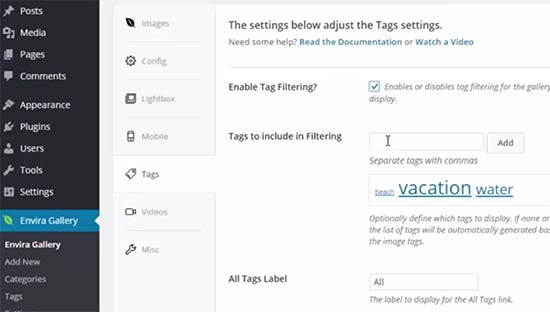
For more details, see our article on how to add categories and tags to WordPress media library.
14. How to Import External Images in WordPress?
This question often comes up when you are migrating your site to WordPress. Some images on your website may still be pointing to older location.
Specially users importing blogs from Blogger, Squarespace, or WordPress.com may face this problem.
While the images on your site may appear correctly, they are still loading from external source. To solve this issue, all you need to do is install and activate Auto Upload Images plugin.
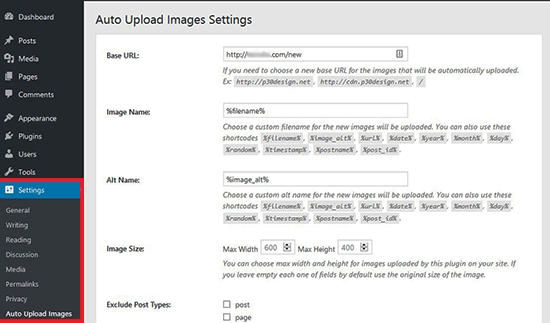
The plugin will check for external images once you update or save any post or page. You can manually do that for each post or page or you can bulk edit all posts and simply click the update button.
For detailed instructions, see our guide on how to import external images in WordPress.
15. How to Require Featured Image for Posts in WordPress?
When running a multi-author site in WordPress, some of your authors may not be familiar with the featured image functionality.
In this case, you may want to remind yourself or your users to upload a featured image whenever they are submitting a post in WordPress.
You can do this by installing and activating the Require Featured Image plugin.
Once activated, the plugin will display a notification box in the post edit area, informing users that this post requires a featured image.
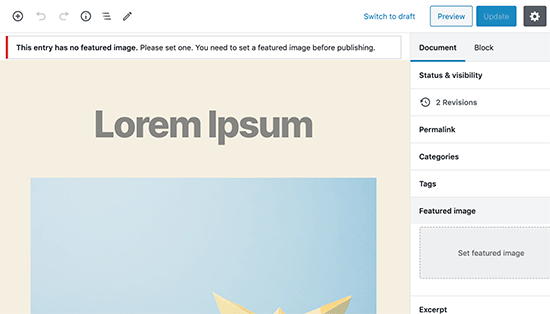
You and your users will be able to save posts as drafts, but you cannot publish the post until you add a featured image.
See our article on how to require featured images for posts in WordPress for more instructions.
16. How to Set a Default Featured Image in WordPress?
Finding the perfect featured image for every post or article is a tough task. Sometimes you may not want to add a featured image to a post, but your theme may look awkward without a featured image.
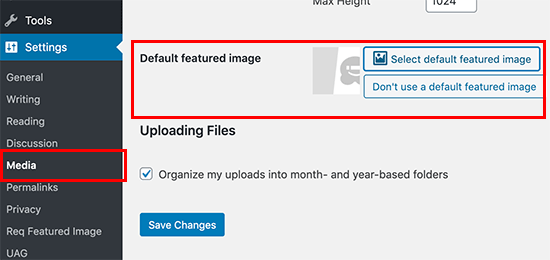
This is where a default featured image can come in handy. A default featured image is used when an article does not have a featured image of its own.
You can set a default featured image by using the default featured image plugin.
We hope this article helped you fix some of the most common image issues in WordPress. You may also want to see our list of the most common WordPress errors and how to fix them.
If you liked this article, then please subscribe to our YouTube Channel for WordPress video tutorials. You can also find us on Twitter and Facebook.
The post How to Fix Common Image Issues in WordPress appeared first on WPBeginner.
How to Disable Fullscreen Editor in WordPress
Do you want to disable the fullscreen editor in WordPress?
After the update, WordPress 5.4 now opens the post and page editor in fullscreen mode by default. While this distraction-free mode offers a clean and easy to use experience, some users may want to go back to the regular compact view.
In this article, we’ll show you how to easily disable the fullscreen editor in WordPress.
Why WordPress Switched to Fullscreen Mode for The Editor?
WordPress introduced a new editor called The Block Editor (aka Gutenberg) in WordPress 5.0. This new editor allow users to use blocks for common elements and create beautiful content layouts.
It also mimics how your article or pages will look by using the same fonts and colors as your WordPress theme.
However, an admin menu on the left and one on top made it look a bit cluttered. There were just too many options on the screen, which you don’t need if you are focusing on writing content.
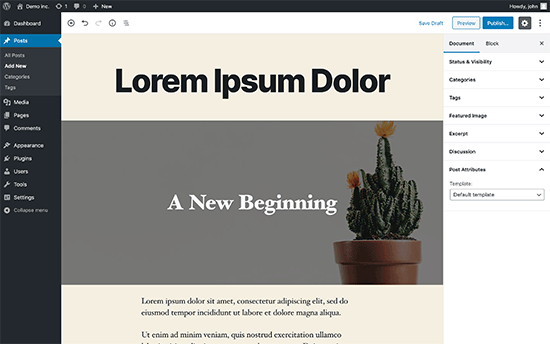
To deal with this, the WordPress core team decided to make the editor fullscreen by default, so users can have a distraction-free writing experience.
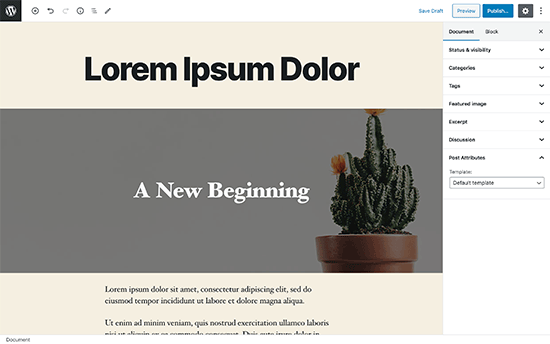
Now, it’s important to note that this fullscreen mode is nothing new. It was already there, and users were able to turn it on / off.
What’s changed now is that the fullscreen mode will now be the default view when writing posts in WordPress.
How to Disable The Fullscreen Mode for WordPress Editor (Easy Way)
It is super easy to turn off the fullscreen mode for block editor in WordPress.
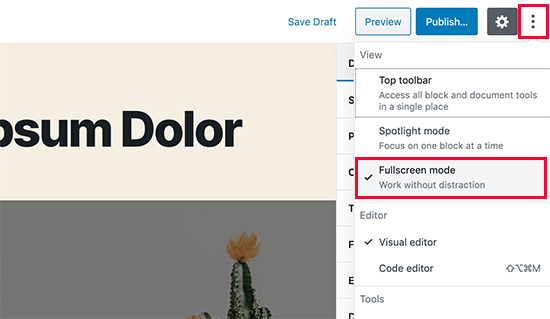
Simply edit a post or page and click on the three-dot menu on the top-right corner of the screen. This will display the settings menu for the post editor.
From here, you simply need to click on the ‘Fullscreen Mode’ to turn it off.
Post editor will instantly exit the fullscreen mode, and it will start showing the admin sidebar and the top toolbar.
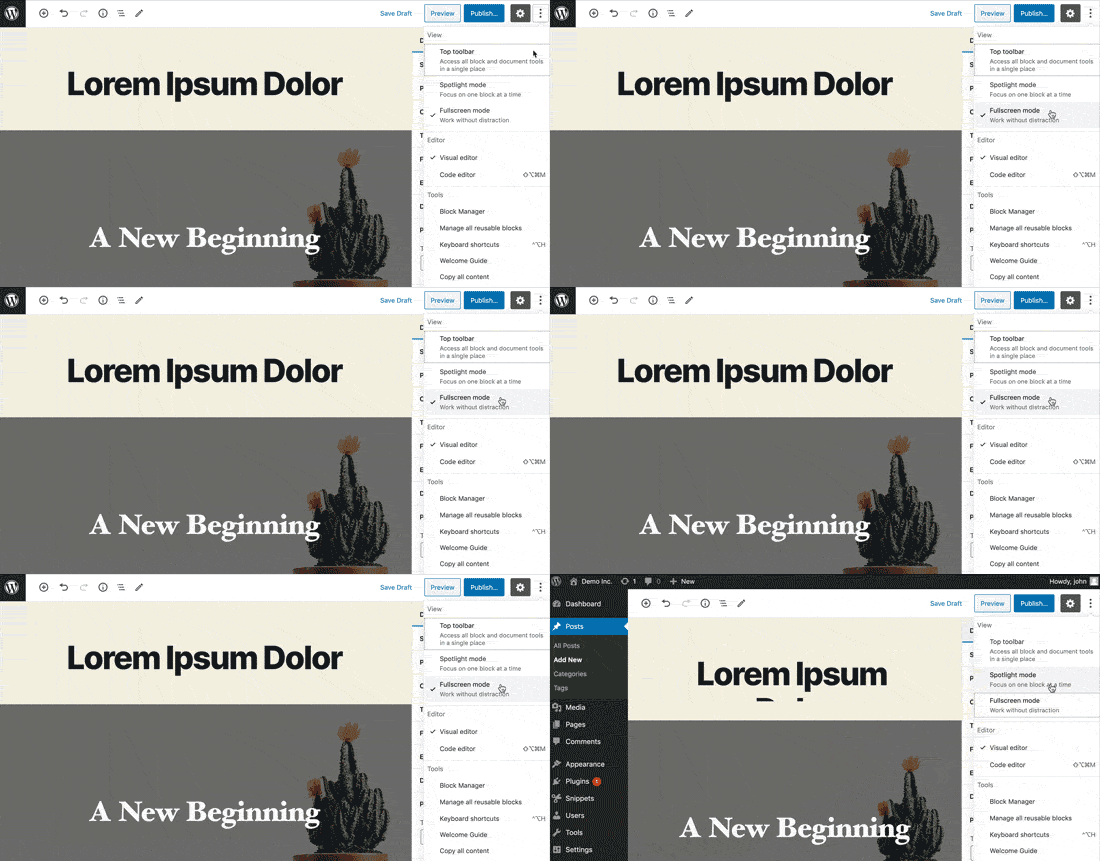
WordPress will store your fullscreen mode preference in your browser’s temporary storage.
However if you switched to a different browser, used incognito mode, or accessed the admin area from a different device, then you’ll again see the fullscreen editor.
If you use multiple devices, user accounts, or browsers to access your WordPress admin area, then this may be a little annoying to switch it back every time.
This next method helps you fix that, permanently.
Permanently Disable Fullscreen Mode in WordPress (Snippet)
This method requires you to manually add code to your WordPress site. If you have not done this before, then see our guide on how to easily add code snippets in WordPress.
You’ll need to simply enter the following code in your WordPress theme’s functions.php file, or in a site-specific plugin. You can also use the custom code snippets plugin to add this code to your site without conflicts.
if (is_admin()) {
	function jba_disable_editor_fullscreen_by_default() {
	$script = "jQuery( window ).load(function() { const isFullscreenMode = wp.data.select( 'core/edit-post' ).isFeatureActive( 'fullscreenMode' ); if ( isFullscreenMode ) { wp.data.dispatch( 'core/edit-post' ).toggleFeature( 'fullscreenMode' ); } });";
	wp_add_inline_script( 'wp-blocks', $script );
}
add_action( 'enqueue_block_editor_assets', 'jba_disable_editor_fullscreen_by_default' );
}
This code first checks if a user is viewing an admin area page. If they are, then it checks the status of the fullscreen editor.
If the fullscreen editor is enabled, then it simply turns it off.
You can still manually turn-on the fullscreen mode from the post edit screen, and your post editor would work just fine.
However, if you return back, then it will automatically turn it off. This behavior applies to all users who can access the post editor on your website.
We hope this article helped you learn how to disable the fullscreen mode in WordPress post editor. For more productivity tips, see our tips for mastering the WordPress content editor.
If you liked this article, then please subscribe to our YouTube Channel for WordPress video tutorials. You can also find us on Twitter and Facebook.
Code credit: Jean-Baptiste Audras
The post How to Disable Fullscreen Editor in WordPress appeared first on WPBeginner.
Speed of A Website & Web Hosting Anchors?
Common Mistakes That Make A WP Website Vulnerable to Cyber Attacks
How to Add Custom Fonts in WordPress
Do you want to add custom fonts in WordPress? Custom fonts allow you to use beautiful combination of different fonts on your website to improve typography and user experience.
Apart from looking good, custom fonts can also help you improve readability, create a brand image, and increase time users spend on your website.
In this article, we will show you how to add custom fonts in WordPress using Google Fonts, TypeKit, and CSS3 @Font-Face method.
Note: Loading too many fonts can slow down your website. We recommend choosing two fonts and use them across your website. We’ll also show you how to properly load them without slowing down your website.
Before we look at how to add custom fonts in WordPress, let’s take a look at finding custom fonts that you can use.
How to Find Custom Fonts to Use in WordPress
Fonts used to be expensive, but not any more. There are many places to find great free web fonts such as Google Fonts, Typekit, FontSquirrel, and fonts.com.
If you don’t know how to mix and match fonts, then try Font Pair. It helps designers pair beautiful Google fonts together.
As you are picking your fonts, remember that using too many custom fonts will slow down your website. This is why you should select two fonts and use them throughout your design. This will also bring consistency to your design.
Video Tutorial
If you don’t like the video or prefer the written guide, then please continue reading.
Adding Custom Fonts in WordPress from Google Fonts
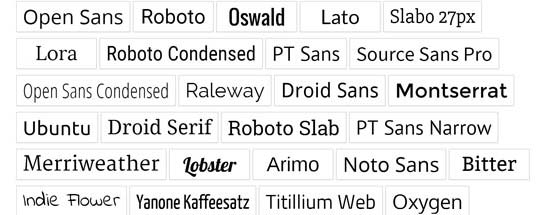
Google Fonts is the largest, free, and most commonly used font library among website developers. There are multiple ways you can add and use Google Fonts in WordPress.
Method 1: Adding Custom Fonts Using Easy Google Fonts Plugin
If you want to add and use Google Fonts on your website, then this method is by far the easiest and recommended for beginners.
First thing you need to do is install and activate the Easy Google Fonts plugin. For more details, see our step by step guide on how to install a WordPress plugin.
Upon activation, you can go to Appearance » Customizer page. This will open the live theme customizer interface where you’ll see the new Typography section.
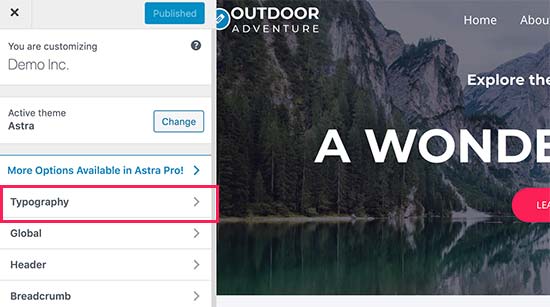
Clicking on Typography will you show different sections of your website where you can apply Google Fonts. Simply click on ‘Edit Font’ below the section you want to edit.
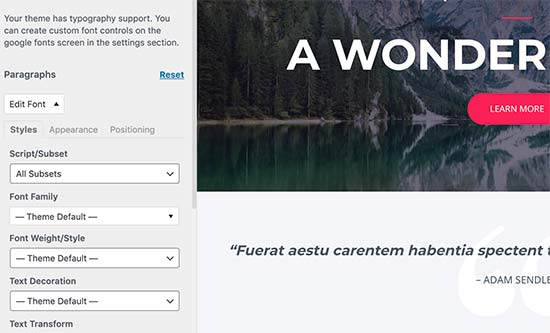
Under the font family section, you can choose any Google Font you want to use on your website. You can also choose font style, font size, padding, margin, and more.
Depending on your theme, the number of sections here could be limited and you may not be able to directly change font selection for many different areas of your website.
To fix this, the plugin also allows you to create your own controls and use them to change fonts on your website.
First, you need to visit Settings » Google Fonts page and provide a name for your font control. Use something that helps you quickly understand where you will be using this font control.
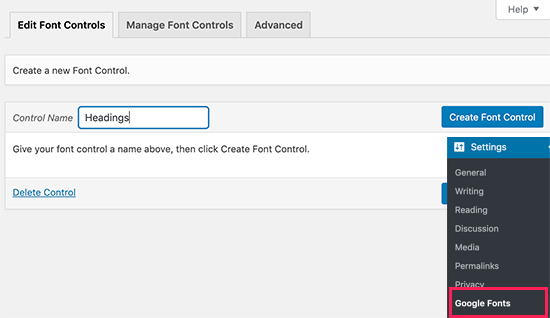
Next, click on the ‘Create font control’ button and then you will be asked to enter CSS selectors.
You can add HTML elements you want to target (for instance, h1, h2, p, blockquote) or use CSS classes.
You can use Inspect tool in your browser to find out which CSS classes are used by the particular area you want to change.
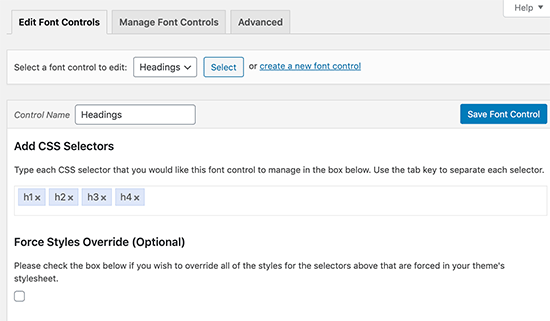
Now click on the ‘Save font control’ button to store your settings. You can create as many font controllers as you need for different sections of your website.
To use these font controllers, you need to head over to Appearance » Customizer and click on the Typography tab.
Under Typography, you will now see a ‘Theme Typography’ Option as well. Clicking on it will show your custom font controls you created earlier. You can now just click on the edit button to select the fonts and appearance for this control.
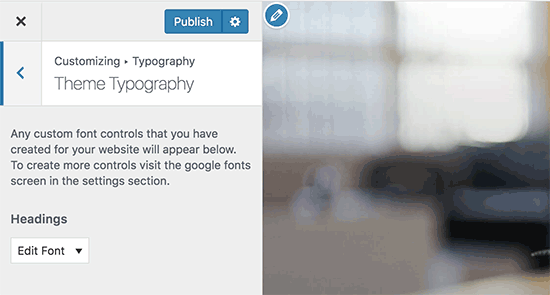
Don’t forget to click on the save or publish button to save your changes.
Method 2: Manually Add Google Fonts in WordPress
This method requires you to add code to your WordPress theme files. If you haven’t done this before, then see our guide on how to copy and paste code in WordPress.
First, visit the Google fonts library and select a font that you want to use. Next, click on the quick use button below the font.
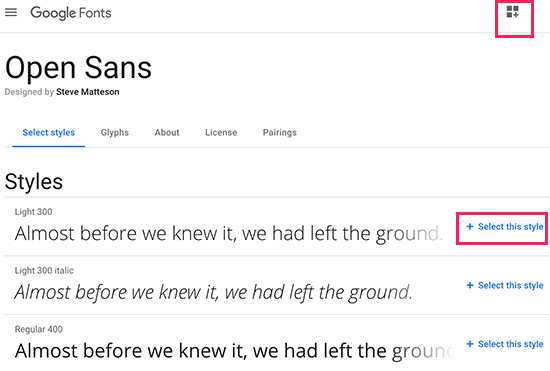
On the font page, you’ll see the styles available for that font. Select the styles that you want to use in your project and then click on the sidebar button at the top.
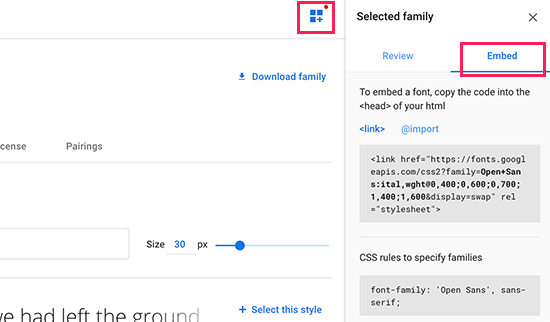
Next, you will need to switch to the ‘Embed’ tab in the sidebar to copy the embed code.
There are two ways you can add this code to your WordPress site.
First, you can simply edit your theme’s header.php file and paste the code before the <body> tag.
However, if you are unfamiliar with code editing in WordPress, then you can use a plugin to add this code.
Simply install and activate the Insert Headers and Footers plugin. For more details, see our step by step guide on how to install a WordPress plugin.
Upon activation, go to Settings » Insert Headers and Footers page and paste the embed code in the ‘Scripts in header’ box.
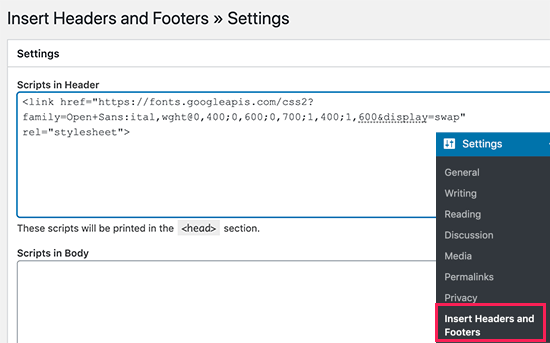
Don’t forget to click on the Save button to store your changes. The plugin will now start loading the Google Font embed code on all pages of your website.
You can use this font in your theme’s stylesheet like this:
.h1 site-title {
font-family: 'Open Sans', Arial, sans-serif;
}
For more detailed instructions see our guide on how to add Google fonts in WordPress themes.
Adding Custom Fonts in WordPress Using Typekit
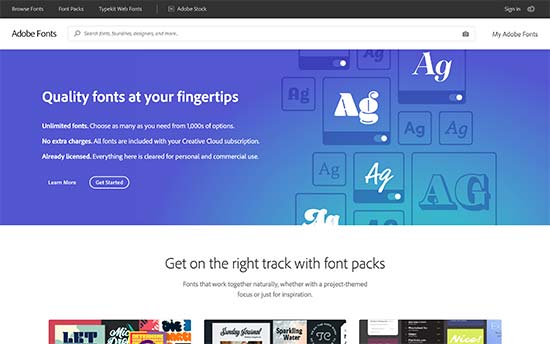
Typekit by Adobe Fonts is another free and premium resource for awesome fonts that you can use in your design projects. They have a paid subscription as well as a limited free plan that you can use.
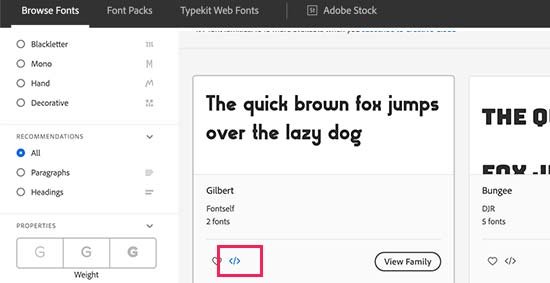
Simply signup for an Adobe Fonts account and visit the browse fonts section. From here you need to click on the </> button to select a font and create a project.
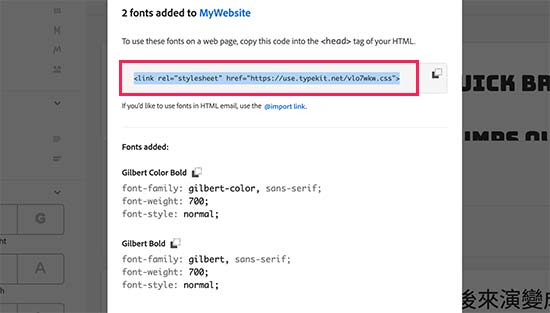
Next, you’ll see the embed code with your project ID. It will also show you how to use the font in your theme’s CSS.
You need to copy and paste this code inside the <head> section of your website.
There are two ways you can add this code to your WordPress site.
First, you can simply edit your theme’s header.php file and paste the code before the <body> tag.
However, if you are unfamiliar with code editing in WordPress, then you can use a plugin to add this code.
Simply install and activate the Insert Headers and Footers plugin.
Upon activation, go to Settings » Insert Headers and Footers page and paste the embed code in the ‘Scripts in header’ box.
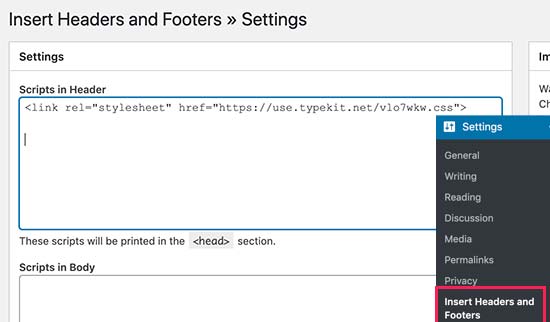
That’s all, you can now use the Typekit font you selected in your WordPress theme’s stylesheet like this:
h1 .site-title {
font-family: gilbert, sans-serif;
}
For more detailed instructions check out our tutorial how to add awesome typography in WordPress using Typekit.
Adding Custom Fonts in WordPress Using CSS3 @font-face
The most direct way of adding custom fonts in WordPress is by adding the fonts using CSS3 @font-face method. This method allows you to use any font that you like on your website.
First thing you need to do is download the font that you like in a web format. If you do not have the web format for your font, then you can convert it using the FontSquirrel Webfont generator.
Once you have the webfont files, you would need to upload it on your WordPress hosting server.
The best place to upload the fonts is inside a new “fonts” folder in your theme or child theme‘s directory.
You can use FTP or File Manager of your cPanel to upload the font.
Once you have uploaded the font, you need to load the font in your theme’s stylesheet using CSS3 @font-face rule like this:
@font-face {
	font-family: Arvo;
	src: url(http://www.example.com/wp-content/themes/your-theme/fonts/Arvo-Regular.ttf);
	font-weight: normal;
}
Don’t forget to replace the font-family and URL with your own.
After that you can use that font anywhere in your theme’s stylesheet like this:
.h1 site-title {
font-family: "Arvo", Arial, sans-serif;
}
Loading fonts directly using CSS3 @font-face is not always the best solution. If you are using a font from Google Fonts or Typekit, then it is best to serve the font directly from their server for optimal performance.
That’s all, we hope this article helped you add custom fonts in WordPress. You may also want to checkout our guide on how to use icon fonts in WordPress and how to change the font size in WordPress.
If you liked this article, then please subscribe to our YouTube Channel for WordPress video tutorials. You can also find us on Twitter and Facebook.
The post How to Add Custom Fonts in WordPress appeared first on WPBeginner.
How to Bulk Convert Classic Blocks to Gutenberg in WordPress
Do you want to bulk convert your old content using classic blocks into the Gutenberg (block) format in WordPress?
After updating to any version above WordPress 5.0, your older post and page content will show up inside a Classic block in the new WordPress content editor. If you have dozens or hundreds of posts, then converting that Classic block content into individual blocks can take a lot of time. Thankfully, there is a bulk convert option.
In this article, we will show how to easily bulk convert classic blocks into Gutenberg blocks in WordPress.

Why Convert Classic Block Into Individual Blocks in WordPress?
If you have had a WordPress blog for a long time, then chances are that some of your posts were written using the older classic editor.
This older content will now appear inside the Classic block in the post editor.

By converting the classic block into individual Gutenberg blocks, you will gain more control and flexibility over your content.
You can easily edit your post by working with individual blocks. You will also be able to take advantage of the customization options available for each block.

This helps you easily edit the content within the block editor while allowing you to create beautiful content layouts for your posts and pages.
Note: In most cases, switching from the classic to the block editor will not affect your posts on the front end.
That being said, let’s see how to easily bulk-convert classic blocks to Gutenberg in WordPress.
Method 1: Convert Classic Block to Gutenberg Using Default Settings
If you want to convert a single post or page from the Classic block into individual blocks, then this method is for you.
First, you need to edit the post and page where you want to convert the blocks. You can do this by heading to Posts » All Posts in your WordPress dashboard and then clicking on ‘Edit (block editor)’ under the post.
This will open your post in the block editor. Then, click on the ‘Convert to blocks’ button in the toolbar at the top of the Classic block.

The Classic block will now be converted into individual Gutenberg blocks.
You can now access all the block settings for individual blocks from the right column. If you cannot see this panel, then click on the gear icon at the top right of the editor.

Once you are done, don’t forget to click the ‘Update’ button to save your changes.
Method 2: Bulk Convert Classic Block into Gutenberg Blocks
If you want to easily convert the Classic block into Gutenberg blocks for all the posts and pages immediately, then this method is for you.
Important: Make sure to create a complete WordPress backup of your site before using this method because you cannot undo the conversion once it’s completed.
First, you need to install and activate the Convert to Blocks plugin. For more instructions, please see our guide on how to install a WordPress plugin.
The plugin works out of the box and automatically bulk-converts any Classic blocks into Gutenberg blocks once it’s been activated.
All you need to do is simply edit a post or page that was written using the classic editor.
You will now notice that the Classic block has been converted into individual blocks.

Remember that the conversion will not affect the layout of your posts on the front end, so the posts will look the same on your website.
This is how the same post looked on our demo site after converting it from Classic to individual blocks.

We hope this article helped you learn how to bulk convert classic blocks into Gutenberg blocks in WordPress. You may also want to see our beginners’ guide on WordPress SEO, and our top picks for the best contact form plugins.
If you liked this article, then please subscribe to our YouTube Channel for WordPress video tutorials. You can also find us on Twitter and Facebook.
The post How to Bulk Convert Classic Blocks to Gutenberg in WordPress first appeared on WPBeginner.
WordPress Database Clean-up – How to Go about It?
Operating a WordPress website comprises of multiple tasks! One of the most crucial and overlooked tasks is database maintenance. Most people think that the MySQL database is an essential Aspect of WordPress install and conveniently forget about the same. It is necessary to manage the database systems in WordPress. There needs to be daily clean-ups […]
The post WordPress Database Clean-up – How to Go about It? appeared first on WPArena.
How to Comment Out Code in WordPress for PHP, HTML and CSS
What You Need To Know Before Starting Dropshipping In 2020
You’ve heard about dropshipping and you think you have what it takes to build a business and run it from an Island in Thailand, but you are full of doubts: You’ve never run a Facebook ad, and you don’t know how to spend money on ads, you don’t know how much money it will take, […]
The post What You Need To Know Before Starting Dropshipping In 2020 appeared first on WPArena.
How a Bit of HTML and CSS Can Help You Improve Your WordPress
Are You A Talented Mechanic? Then There Is Plenty To Blog About!
4 Ways You Can Improve Your Company’s SEO in 2020
How to Install a WordPress Plugin – Step by Step for Beginners
After installing WordPress, the first thing every beginner needs to learn is how to install a WordPress plugin.
In simple words, WordPress plugins are like apps for your WordPress website. They allow you to add new features to WordPress like a contact form, slideshow, shopping cart, and more.
There are thousands of free and paid plugins available for WordPress. In this step by step guide, we will show you how to install a WordPress plugin.
Before You Start
If you are using WordPress.com, then you cannot install plugins.
We often get complaints from users saying that they can’t see the plugins menu in their WordPress dashboard. It is because you are using WordPress.com, which has its limitations.
You cannot install plugins on WordPress.com unless you upgrade to their business plan. On the other hand, you can install any plugin you want on your self hosted WordPress.org website right out of the box (See the differences between self hosted WordPress.org vs WordPress.com).
If you want to switch from WordPress.com to WordPress.org, then read our tutorial on how to properly move from WordPress.com to WordPress.org.
That being said, now let’s take a look at how to install a WordPress plugin on your website.
How to Install a WordPress Plugin
To make it easy, we have created a video tutorial on how to install a WordPress plugin that you can watch below.
However, if you just want to follow text-instructions, then you can follow our step by step tutorial on how to install a WordPress plugin.
We have covered all three methods: installing a WordPress plugin using search, uploading a WordPress plugin, and manually installing a WordPress plugin using FTP.
Ready? Let’s get started.
Install a Plugin using WordPress Plugin Search
The easiest way of installing a WordPress plugin is to use the plugin search. The only downside of this option is that a plugin must be in the WordPress plugin directory which is limited to only free plugins.
First thing you need to visit the Plugins » Add New page inside your WordPress admin area.
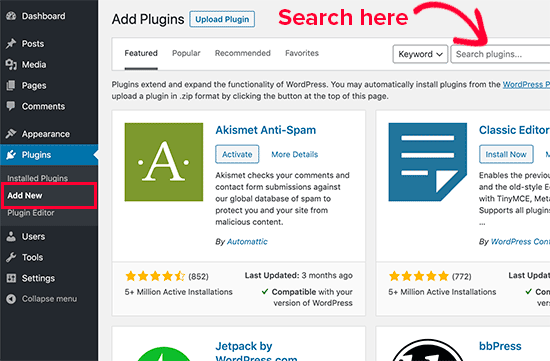
You will see a screen like the one in the screenshot above. Find the plugin by typing the plugin name or the functionality you are looking for. After that, you will see a bunch of listings like the example below:
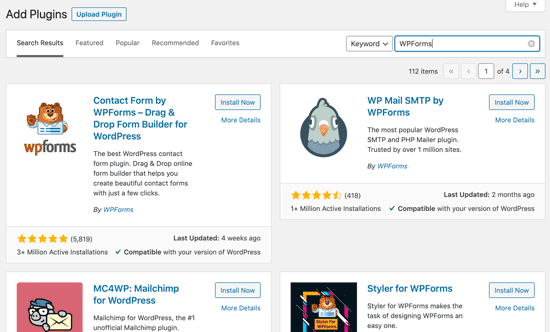
You can pick the plugin that is best for you. Since in our search, we were looking for WPForms which is the best WordPress contact form plugin, we’ll click the ‘Install Now’ button next to it.
WordPress will now download and install the plugin for you. After this, you’ll notice the ‘Install Now’ button will change into the ‘Activate’ button.
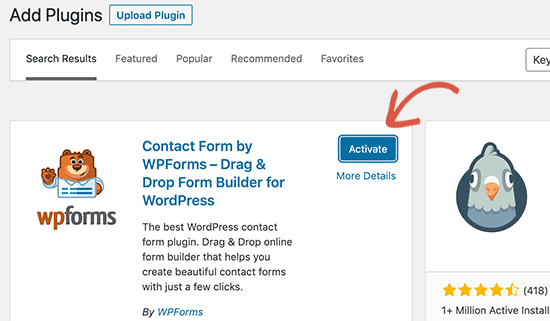
A WordPress plugin can be installed on your site, but it will not work unless you activate it. So go ahead and click on the activate button to start using that plugin on your WordPress site.
That’s all, you have successfully installed your first WordPress plugin.
The next step is to configure the plugin settings. These settings will vary for each plugin therefore we will not be covering that in this post.
Install a Plugin using the WordPress Admin Plugin Upload
Paid WordPress plugins are not listed in the WordPress plugin directory. These plugins cannot be installed using the first method.
That’s why WordPress comes with the upload method to install such plugins. We will show you how to install WordPress plugins using the upload option in the admin area.
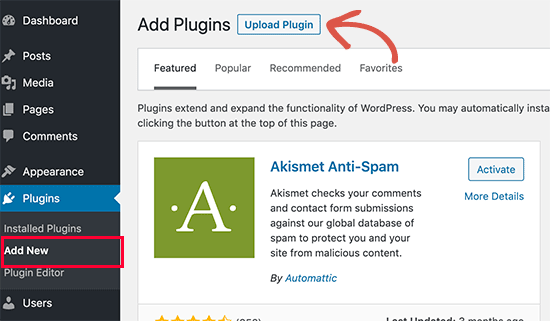
First, you need to download the plugin from the source (which will be a zip file). Next, you need to go to WordPress admin area and visit Plugins » Add New page.
After that, click on the ‘Upload Plugin’ button on top of the page.
This will reveal the plugin upload form. Here you need to click on the ‘Choose File’ button and select the plugin file you downloaded earlier to your computer.
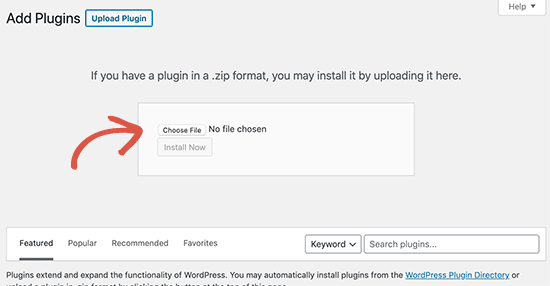
After you have selected the file, you need to click on the ‘Install Now’ button.
WordPress will now upload the plugin file from your computer and install it for you. You will see a success message like this after the installation is finished.
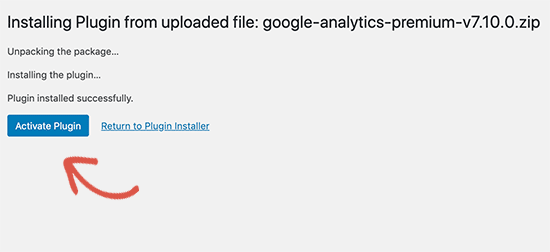
Once installed, you need to click on the Activate Plugin link to start using the plugin.
You would have to configure the settings to fit your needs. These settings will vary for each plugin therefore we will not be covering that in this post.
Manually Install a WordPress Plugin using FTP
In some rare cases, your WordPress hosting provider may have file restrictions that could limit your ability to install a plugin from the admin area.
In this situation, your best bet is to install the plugin manually using FTP.
The FTP manager method is the least friendly for beginners.
First you will need to download the plugin’s source file (it will be a zip file). Next, you need to extract the zip file on your computer.
Extracting the plugin zip file will create a new folder with the same name. This is the folder that you need to manually upload to your website using a FTP client.
You would need to access your host through the FTP manager. If you do not have your FTP username and password, then contact your WordPress hosting provider and ask them.
Open the FTP client on your computer and connect to your website using the login credentials provided by your web host. Once connected, you need to go to the /wp-content/plugins/ folder on your website.
Next, upload the folder you extracted from the zip file to the /wp-content/plugins/ folder on your web server.
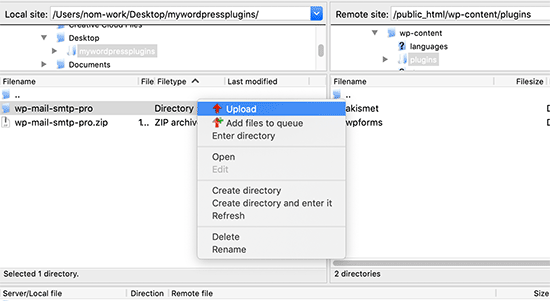
After uploading the files, you need to visit the WordPress admin area and click on the Plugins link in the admin menu. You’ll see your plugin successfully installed on the plugins page.
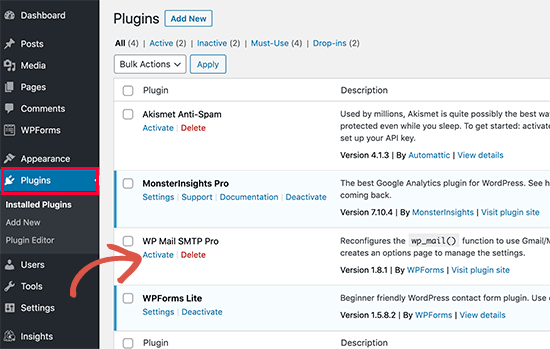
You need to click on the Activate link below the plugin to start using it.
Upon activating, you may need to configure the plugin settings. WordPress plugins come with their own settings which differ from one plugin to another so we will not describe them here.
FAQs About Installing WordPress Plugins
As a beginners you may have few questions about installing WordPress plugins. As the largest WordPress resource site, we have heard all of them.
Here are some of the most frequently asked questions about installing WordPress plugins.
1. How do I find the best WordPress plugins to install on my website?
There are more than 55,000 WordPress plugins on the free WordPress plugin directory alone. Many more are available as premium plugins. This makes it a bit difficult for beginners to find the best plugin for the feature they need.
We have compiled a list of all the essential WordPress plugins that most WordPress websites need.
We also have a detailed tutorial on choosing the best WordPress plugin where we show you what to look for when looking for a plugin.
2. What is the difference between installed and active plugins?
WordPress allows you to install a plugin and not use it at all. In order to use a plugin on your site, you need to ‘Activate’ it.
You can see active plugins by visiting the ‘Plugins’ page in the WordPress admin area. They will be highlighted with a blue background.
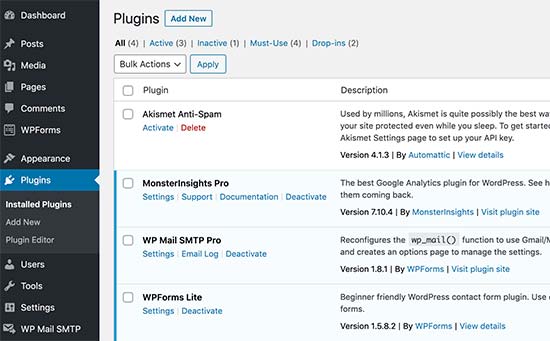
Plugins with the white background are installed on your website but not active.
3. Should I delete inactive plugins?
If you are not using a plugin, then it is recommended to delete it from your website. For more on this topic, see our article on why should you delete inactive plugins in WordPress.
4. How many plugins I can install in WordPress?
You can install as many WordPress plugins as you need. It is not the number of plugins that affect your website speed, but the quality of those plugins. For more information, see our article on how many WordPress plugins you should install.
5. How do I uninstall a WordPress plugin
You can uninstall a WordPress plugin by visiting the Plugins page in the WordPress admin area. If the plugin you want to remove is currently active, then first you’ll need to deactivate it. After that, you can simply click on the delete link to remove it from your website.
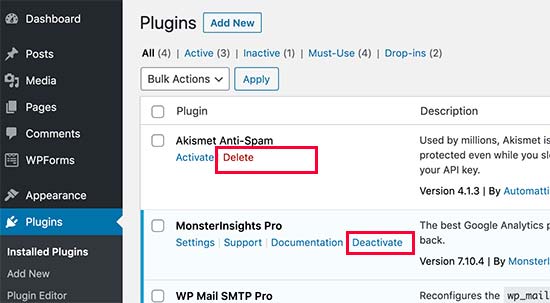
For more detailed instructions, see our guide on how to properly uninstall a WordPress plugin.
We hope this helped you learn how to install WordPress plugins.
You may also want to see our plugins category where we write about the best WordPress plugins that you can use to accomplish whatever you’re looking to do. Each of those articles comes with step-by-step instructions on how to set up individual plugins.
If you liked this article, then please subscribe to our YouTube Channel for WordPress video tutorials. You can also find us on Twitter and Facebook.
The post How to Install a WordPress Plugin – Step by Step for Beginners appeared first on WPBeginner.
Keywords — Learn More About Them
How to Write a Worth Reading Book Report
How to turn your WordPress installation into a high selling machine
Converting WordPress into a high selling machine is not a new thing. Rather, people are using various e-commerce plugins to convert WordPress into a selling machine. However, using plugins is not enough when you want to groom up your WordPress site as a top-flight salesperson. Here in this blog, we will discuss how several off-page […]
The post How to turn your WordPress installation into a high selling machine appeared first on WPArena.


