How I Learned To Stop Worrying And Love Multimedia Writing

Category Image 073

Prior to the World Wide Web, the act of writing remained consistent for centuries. Words were put on paper, and occasionally, people would read them. The tools might change — quills, printing presses, typewriters, pens, what have you — and an adventurous author may perhaps throw in imagery to compliment their copy.

We all know that the web shook things up. With its arrival, writing could become interactive and dynamic. As web development progressed, the creative possibilities of digital content grew — and continue to grow — exponentially. The line between web writing and web technologies is blurry these days, and by and large, I think that’s a good thing, though it brings its own challenges. As a sometimes-engineer-sometimes-journalist, I straddle those worlds more than most and have grown to view the overlap as the future.

Writing for the web is different from traditional forms of writing. It is not a one-size-fits-all process. I’d like to share the benefits of writing content in digital formats like MDX using a personal project of mine as an example. And, by the end, my hope is to convince you of the greater writing benefits of MDX over more traditional formats.

A Little About Markdown

At its most basic, MDX is Markdown with components in it. For those not in the know, Markdown is a lightweight markup language created by John Gruber in 2003, and it’s everywhere today. GitHub, Trello, Discord — all sorts of sites and services use it. It’s especially popular for authoring blog posts, which makes sense as blogging is very much the digital equivalent of journaling. The syntax doesn’t “get in the way,” and many content management systems support it.

Markdown’s goal is an “easy-to-read and easy-to-write plain text format” that can readily be converted into XHTML/HTML if needed. Since its inception, Markdown was supposed to facilitate a writing workflow that integrated the physical act of writing with digital publishing.

We’ll get to actual examples later, but for the sake of explanation, compare a block of text written in HTML to the same text written in Markdown.

HTML is a pretty legible format as it is:

<h2>Post Title</h2>

<p>This is an example block of text written in HTML. We can link things up like this, or format the code with <strong>bolding</strong> and <em>italics</em>. We can also make lists of items:</p>

<ul>
  <li>Like this item<li>
  <li>Or this one</li>
  <li>Perhaos a third?</li>
</ul>

<img src="image.avif" alt="And who doesn't enjoy an image every now and then?">

But Markdown is somehow even less invasive:

## Post Title

This is an example block of text written in HTML. We can link things up like this or format the code with **bolding** and *italics*. We can also make lists of items:

- Like this item
- Or this one
- Perhaos a third?


I’ve become a Markdown disciple since I first learned to code. Its clean and relatively simple syntax and wide compatibilities make it no wonder that Markdown is as pervasive today as it is. Having structural semantics akin to HTML while preserving the flow of plain text writing is a good place to be.

However, it could be accused of being a bit too clean at times. If you want to communicate with words and images, you’re golden, but if you want to jazz things up, you’ll find yourself looking further afield for other options.

Gruber set out to create a “format for writing for the web,” and given its ongoing popularity, you have to say he succeeded, yet the web 20 years ago is a long way away from what it is today.

This is the all-important context for what I want to discuss about MDX because MDX is an offshoot of Markdown, only more capable of supporting richer forms of multimedia — and even user interaction. But before we get into that, we should also discuss the concept of web components because that’s the second significant piece that MDX brings to the table.

Further Reading

A Little About Components

The move towards richer multimedia websites and apps has led to a thriving ecosystem of web development frameworks and libraries, including React, Vue, Svelte, and Astro, to name a few. The idea that we can have reusable components that are not only interactive but also respond to each other has driven this growth and continues to push on evolving web platform features like web components.

MDX is like a bridge that connects Markdown with modern web tooling. Simply put, MDX weds Markdown’s simplicity with the creative possibilities of modern web frameworks.

By leaning into the overlaps rather than trying to abstract them away at all costs, we find untold potential for beautiful digital content.

Further Reading

A Case Study

My own experience with MDX took shape in a side project of mine: teeline.online. To cut a long story short, before I was a software engineer, I was a journalist, and part of my training involved learning a type of shorthand called Teeline. What it boils down to is ripping out as many superfluous letters as possible — I like to call this process “disemvowelment” — then using Teeline’s alphabet to write the remaining content. This has allowed people like me to write lots of words very quickly.

During my studies, I found online learning resources lacking, so as my engineering skills improved, I started working on the kind of site I’d have used when I was a student if it was available. Hence, teeline.online.

I built the teeling.online site with the Svelte framework for its components. The site’s centerpiece is a dataset of shorthand characters and combinations with which hundreds of outlines can be rendered, combined, and animated as SVG paths.

Likewise, Teeline’s “disemvowelment” script could be wired into a single component that I could then use as many times as I like.

Then, of course, as is only natural when working with components, I could combine them to show the Teeline evolution that converts longhand words into shorthand outlines.

The Markdown, meanwhile, looks as simple as this:

It’s not exactly the sort of complex codebase you might expect for an app. Meanwhile, the files themselves can sit in a nice, tidy directory of their own:

The syllabus is neatly filed away in its own folder. With a bit of metadata sprinkled in, I have everything I need to render an entire section of the site using routing. The setup feels like a fluid medium between worlds. If you want to write with words and pictures, you can. If an idea comes to mind for a component that would better express what you’re going for, you can go make it and drop it in.

In fairness, a “WordToOutline” component like this might not mean much to Teeline newcomers, though with such a clear connection between the Markdown and the rendered pages, it’s not much of a stretch to work out what it is. And, of course, there’s always the likes of services like Storybook that can be used to organize component libraries as they grow.

The raw form of multimedia content can be pretty unsightly — something that needs to be kept at arm’s length by content management systems. With MDX — and its ilk — the content feels rather friendly and legible.

Benefits

I think you can start to see some of the benefits of an MDX setup like this. There are two key benefits in particulart that I think are worth calling out.

Editorial Benefits

First and foremost, MDX doesn’t distract the writing and editorial flow of working with content. When we’re working with traditional code languages, even HTML, the code format is convoluted with things like opening and closing tags. And it’s even more convoluted if we need the added complexity of embedding components in the content.

MDX (and Markdown, for that matter) is much less verbose. Content is a first-class citizen that takes up way less space than typical markup, making it clear and legible. And where we need the complex affordance of components, those can be dropped in without disrupting that nice editorial experience.

Another key benefit of using MDX is reusability. If, for example, I want to display the same information as images instead, each image would have to be bespoke. But we all know how inefficient it is to maintain content in raster images — it requires making edits in a completely different application, which is highly inconvenient. With an old-school approach, if I update the design of the site, I’m left having to create dozens of images in the new style.

With MDX (or an equivalent like MDsveX), I only need to make the change once, and it updates everywhere. Having done the leg work of building reusable components, I can weave them throughout the syllabus as I see fit, safe in the knowledge that updates will roll out across the board — and do it without affecting the editorial experience whatsoever.

Consider the time it would take to create images or videos representing the same thing. Over time, using fixed assets like images becomes a form of technical — or perhaps editorial — debt that adds up over time, while a multimedia approach that leans into components proves to be faster and more flexible than vanilla methods.

Tech Benefits

I just made the point that working with reusable components in MDX allows Markdown content to become more robust without affecting the content’s legibility as we author it. Using Svelte’s version of MDX, MDsveX, I was able to combine the clean, readable conventions of Markdown with the rich, interactive potential of components.

Caveats

It’s only right that all my gushing about MDX and its benefits be tempered with a reality check or two. Like anything else, MDX has its limitations, and your mileage with it will vary.

That said, I believe that those limitations are likely to show up when MDX is perhaps not the best choice for a particular project. There’s a sweet spot that MDX fills and it’s when we need to sprinkle in additional web functionality to the content. We get the best of two worlds: minimal markup and modern web features.

But if components aren’t needed, MDX is overkill when all you need is a clean way to write content that ports nicely into HTML to be consumed by whatever app or platform you use to display it on the web.

Without components, MDX is akin to caring for a skinned elbow with a cast; it’s way more than what’s needed in that situation, and the returns you get from Markdown’s legibility will diminish.

Similarly, if your technical needs go beyond components, you may be looking at a more complex architecture than what MDX can support, and you would be best leaning into what works best for content in the particular framework or stack you’re using.

Code doesn’t age as well as words or images do. An MDX-esque approach does sign you up for the maintenance work of dependency updates, refactoring, and — god forbid — framework migrations. I haven’t had to face the last of those realities yet, though I’d say the first two are well worth it. Indeed, they’re good habits to keep.

Key Takeaways

Writing with MDX continues to be a learning experience for me, but it’s already made a positive impact on my editorial work.

Specifically, I’ve found that MEX improves the quality of my writing. I think more laterally about how to convey ideas.

Is what I’m saying best conveyed in words, an image, or a data visualization? Perhaps an interactive game?

There is way more potential to enhance my words with componentry than I would get with Markdown alone, opening more avenues for what I can say and how I say it.

Of course, those components do not come for free. MDX does sign you up to build those, regardless of whether you have a set of predefined components included in your framework. At the same time, I’d argue that the opportunities MDX opens up for writing greatly outweigh having to build or maintain a few components.

If MDX had been around in the age of Leonardo Di Vinci, perhaps he may have reached for MDX in his journals. I know I’m taking a great leap of assumption here, but the complexity of what he was writing and trying to describe in technical terms with illustrations would have benefited greatly from MDX for everything from interactive demos of his ideas to a better writing experience overall.

Further Reading

Multimedia Writing

In many respects, MDX’s rich, varied way of approaching content is something that Markdown — and writing for the web in general — encourages already. We don’t think only in terms of words but of links, images, and semantic structure. MDX and its equivalents merely take the lid off the cookie jar so we can enhance our work.

Wouldn’t it be nice if… is a redundant turn of phrase on the web. There may be technical hurdles — or, in my case, skill and knowledge hurdles — but it’s a buzz to think about ways in which your thoughts can best manifest on screen.

At the same time, the simplicity of Markdown is so unintrusive. If someone wants to write content formatted in vanilla Markdown, it’s totally possible to do that without trading up to MDX.

Just having the possibility of bespoke multimedia content is enough to change the creative process. It leaves you using words because you want to, not because you have to.

Why describe the solar system when you can render an explorable one? Why have a picture of a proposed skyscraper when you can display a 3D model? Writing with MDX (or, more accurately, MDsveX) has changed my entire thought process. Potential answers to the question, How do I best get this across?, become more expansive.

As You Please

Good things happen when worlds collide. New possibilities emerge when seemingly disparate things come together. Many content management systems shield writers — and writing — from code. To my mind, this is like shielding painters from wider color palettes, chefs from exotic ingredients, or sculptors from different types of tools.

Leaning into the overlap between writing and coding gets us closer to one of the web’s great joys: if you can imagine it, you can probably do it.

Uniting Web And Native Apps With 4 Unknown JavaScript APIs

Category Image 080

A couple of years ago, four JavaScript APIs that landed at the bottom of awareness in the State of JavaScript survey. I took an interest in those APIs because they have so much potential to be useful but don’t get the credit they deserve. Even after a quick search, I was amazed at how many new web APIs have been added to the ECMAScript specification that aren’t getting their dues and with a lack of awareness and browser support in browsers.

That situation can be a “catch-22”:

An API is interesting but lacks awareness due to incomplete support, and there is no immediate need to support it due to low awareness.

Most of these APIs are designed to power progressive web apps (PWA) and close the gap between web and native apps. Bear in mind that creating a PWA involves more than just adding a manifest file. Sure, it’s a PWA by definition, but it functions like a bookmark on your home screen in practice. In reality, we need several APIs to achieve a fully native app experience on the web. And the four APIs I’d like to shed light on are part of that PWA puzzle that brings to the web what we once thought was only possible in native apps.

You can see all these APIs in action in this demo as we go along.

1. Screen Orientation API

The Screen Orientation API can be used to sniff out the device’s current orientation. Once we know whether a user is browsing in a portrait or landscape orientation, we can use it to enhance the UX for mobile devices by changing the UI accordingly. We can also use it to lock the screen in a certain position, which is useful for displaying videos and other full-screen elements that benefit from a wider viewport.

Using the global screen object, you can access various properties the screen uses to render a page, including the screen.orientation object. It has two properties:

  • type: The current screen orientation. It can be: "portrait-primary", "portrait-secondary", "landscape-primary", or "landscape-secondary".
  • angle: The current screen orientation angle. It can be any number from 0 to 360 degrees, but it’s normally set in multiples of 90 degrees (e.g., 0, 90, 180, or 270).

On mobile devices, if the angle is 0 degrees, the type is most often going to evaluate to "portrait" (vertical), but on desktop devices, it is typically "landscape" (horizontal). This makes the type property precise for knowing a device’s true position.

The screen.orientation object also has two methods:

  • .lock(): This is an async method that takes a type value as an argument to lock the screen.
  • .unlock(): This method unlocks the screen to its default orientation.

And lastly, screen.orientation counts with an "orientationchange" event to know when the orientation has changed.

Browser Support

Finding And Locking Screen Orientation

Let’s code a short demo using the Screen Orientation API to know the device’s orientation and lock it in its current position.

This can be our HTML boilerplate:

<main>
  <p>
    Orientation Type: <span class="orientation-type"></span>
    <br />
    Orientation Angle: <span class="orientation-angle"></span>
  </p>

  <button type="button" class="lock-button">Lock Screen</button>

  <button type="button" class="unlock-button">Unlock Screen</button>

  <button type="button" class="fullscreen-button">Go Full Screen</button>
</main>

On the JavaScript side, we inject the screen orientation type and angle properties into our HTML.

let currentOrientationType = document.querySelector(".orientation-type");
let currentOrientationAngle = document.querySelector(".orientation-angle");

currentOrientationType.textContent = screen.orientation.type;
currentOrientationAngle.textContent = screen.orientation.angle;

Now, we can see the device’s orientation and angle properties. On my laptop, they are "landscape-primary" and .

If we listen to the window’s orientationchange event, we can see how the values are updated each time the screen rotates.

window.addEventListener("orientationchange", () => {
  currentOrientationType.textContent = screen.orientation.type;
  currentOrientationAngle.textContent = screen.orientation.angle;
});

To lock the screen, we need to first be in full-screen mode, so we will use another extremely useful feature: the Fullscreen API. Nobody wants a webpage to pop into full-screen mode without their consent, so we need transient activation (i.e., a user click) from a DOM element to work.

The Fullscreen API has two methods:

  1. Document.exitFullscreen() is used from the global document object,
  2. Element.requestFullscreen() makes the specified element and its descendants go full-screen.

We want the entire page to be full-screen so we can invoke the method from the root element at the document.documentElement object:

const fullscreenButton = document.querySelector(".fullscreen-button");

fullscreenButton.addEventListener("click", async () => {
  // If it is already in full-screen, exit to normal view
  if (document.fullscreenElement) {
    await document.exitFullscreen();
  } else {
    await document.documentElement.requestFullscreen();
  }
});

Next, we can lock the screen in its current orientation:

const lockButton = document.querySelector(".lock-button");

lockButton.addEventListener("click", async () => {
  try {
    await screen.orientation.lock(screen.orientation.type);
  } catch (error) {
    console.error(error);
  }
});

And do the opposite with the unlock button:

const unlockButton = document.querySelector(".unlock-button");

unlockButton.addEventListener("click", () => {
  screen.orientation.unlock();
});

Can’t We Check Orientation With a Media Query?

Yes! We can indeed check page orientation via the orientation media feature in a CSS media query. However, media queries compute the current orientation by checking if the width is “bigger than the height” for landscape or “smaller” for portrait. By contrast,

The Screen Orientation API checks for the screen rendering the page regardless of the viewport dimensions, making it resistant to inconsistencies that may crop up with page resizing.

You may have noticed how PWAs like Instagram and X force the screen to be in portrait mode even when the native system orientation is unlocked. It is important to notice that this behavior isn’t achieved through the Screen Orientation API, but by setting the orientation property on the manifest.json file to the desired orientation type.

2. Device Orientation API

Another API I’d like to poke at is the Device Orientation API. It provides access to a device’s gyroscope sensors to read the device’s orientation in space; something used all the time in mobile apps, mainly games. The API makes this happen with a deviceorientation event that triggers each time the device moves. It has the following properties:

  • event.alpha: Orientation along the Z-axis, ranging from 0 to 360 degrees.
  • event.beta: Orientation along the X-axis, ranging from -180 to 180 degrees.
  • event.gamma: Orientation along the Y-axis, ranging from -90 to 90 degrees.

Browser Support

Moving Elements With Your Device

In this case, we will make a 3D cube with CSS that can be rotated with your device! The full instructions I used to make the initial CSS cube are credited to David DeSandro and can be found in his introduction to 3D transforms.

To rotate the cube, we change its CSS transform properties according to the device orientation data:

const currentAlpha = document.querySelector(".currentAlpha");
const currentBeta = document.querySelector(".currentBeta");
const currentGamma = document.querySelector(".currentGamma");

const cube = document.querySelector(".cube");

window.addEventListener("deviceorientation", (event) => {
  currentAlpha.textContent = event.alpha;
  currentBeta.textContent = event.beta;
  currentGamma.textContent = event.gamma;

  cube.style.transform = rotateX(${event.beta}deg) rotateY(${event.gamma}deg) rotateZ(${event.alpha}deg);
});

This is the result:

3. Vibration API

Let’s turn our attention to the Vibration API, which, unsurprisingly, allows access to a device’s vibrating mechanism. This comes in handy when we need to alert users with in-app notifications, like when a process is finished or a message is received. That said, we have to use it sparingly; no one wants their phone blowing up with notifications.

There’s just one method that the Vibration API gives us, and it’s all we need: navigator.vibrate().

vibrate() is available globally from the navigator object and takes an argument for how long a vibration lasts in milliseconds. It can be either a number or an array of numbers representing a patron of vibrations and pauses.

navigator.vibrate(200); // vibrate 200ms
navigator.vibrate([200, 100, 200]); // vibrate 200ms, wait 100, and vibrate 200ms.

Browser Support

Vibration API Demo

Let’s make a quick demo where the user inputs how many milliseconds they want their device to vibrate and buttons to start and stop the vibration, starting with the markup:

<main>
  <form>
    <label for="milliseconds-input">Milliseconds:</label>
    <input type="number" id="milliseconds-input" value="0" />
  </form>

  <button class="vibrate-button">Vibrate</button>
  <button class="stop-vibrate-button">Stop</button>
</main>

We’ll add an event listener for a click and invoke the vibrate() method:

const vibrateButton = document.querySelector(".vibrate-button");
const millisecondsInput = document.querySelector("#milliseconds-input");

vibrateButton.addEventListener("click", () => {
  navigator.vibrate(millisecondsInput.value);
});

To stop vibrating, we override the current vibration with a zero-millisecond vibration.

const stopVibrateButton = document.querySelector(".stop-vibrate-button");

stopVibrateButton.addEventListener("click", () => {
  navigator.vibrate(0);
});
4. Contact Picker API

In the past, it used to be that only native apps could connect to a device’s “contacts”. But now we have the fourth and final API I want to look at: the Contact Picker API.

The API grants web apps access to the device’s contact lists. Specifically, we get the contacts.select() async method available through the navigator object, which takes the following two arguments:

  • properties: This is an array containing the information we want to fetch from a contact card, e.g., "name", "address", "email", "tel", and "icon".
  • options: This is an object that can only contain the multiple boolean property to define whether or not the user can select one or multiple contacts at a time.

Browser Support

I’m afraid that browser support is next to zilch on this one, limited to Chrome Android, Samsung Internet, and Android’s native web browser at the time I’m writing this.

Selecting User’s Contacts

We will make another demo to select and display the user’s contacts on the page. Again, starting with the HTML:

<main>
  <button class="get-contacts">Get Contacts</button>
  <p>Contacts:</p>
  <ul class="contact-list">
    <!-- We’ll inject a list of contacts -->
  </ul>
</main>

Then, in JavaScript, we first construct our elements from the DOM and choose which properties we want to pick from the contacts.

const getContactsButton = document.querySelector(".get-contacts");
const contactList = document.querySelector(".contact-list");

const props = ["name", "tel", "icon"];
const options = {multiple: true};

Now, we asynchronously pick the contacts when the user clicks the getContactsButton.


const getContacts = async () => {
  try {
    const contacts = await navigator.contacts.select(props, options);
  } catch (error) {
    console.error(error);
  }
};

getContactsButton.addEventListener("click", getContacts);

Using DOM manipulation, we can then append a list item to each contact and an icon to the contactList element.

const appendContacts = (contacts) => {
  contacts.forEach(({name, tel, icon}) => {
    const contactElement = document.createElement("li");

    contactElement.innerText = ${name}: ${tel};
    contactList.appendChild(contactElement);
  });
};

const getContacts = async () => {
  try {
    const contacts = await navigator.contacts.select(props, options);
    appendContacts(contacts);
  } catch (error) {
    console.error(error);
  }
};

getContactsButton.addEventListener("click", getContacts);

Appending an image is a little tricky since we will need to convert it into a URL and append it for each item in the list.

const getIcon = (icon) => {
  if (icon.length > 0) {
    const imageUrl = URL.createObjectURL(icon[0]);
    const imageElement = document.createElement("img");
    imageElement.src = imageUrl;

    return imageElement;
  }
};

const appendContacts = (contacts) => {
  contacts.forEach(({name, tel, icon}) => {
    const contactElement = document.createElement("li");

    contactElement.innerText = ${name}: ${tel};
    contactList.appendChild(contactElement);

    const imageElement = getIcon(icon);
    contactElement.appendChild(imageElement);
  });
};

const getContacts = async () => {
  try {
    const contacts = await navigator.contacts.select(props, options);
    appendContacts(contacts);
  } catch (error) {
    console.error(error);
  }
};

getContactsButton.addEventListener("click", getContacts);

And here’s the outcome:

Note: The Contact Picker API will only work if the context is secure, i.e., the page is served over https:// or wss:// URLs.

Conclusion

There we go, four web APIs that I believe would empower us to build more useful and robust PWAs but have slipped under the radar for many of us. This is, of course, due to inconsistent browser support, so I hope this article can bring awareness to new APIs so we have a better chance to see them in future browser updates.

Aren’t they interesting? We saw how much control we have with the orientation of a device and its screen as well as the level of access we get to access a device’s hardware features, i.e. vibration, and information from other apps to use in our own UI.

But as I said much earlier, there’s a sort of infinite loop where a lack of awareness begets a lack of browser support. So, while the four APIs we covered are super interesting, your mileage will inevitably vary when it comes to using them in a production environment. Please tread cautiously and refer to Caniuse for the latest support information, or check for your own devices using WebAPI Check.

Introducing Search & Replace Everything by WPCode: Bulk Editing in WordPress Made Easy

Category Image 098

Have you ever wanted to make bulk updates to your WordPress site?

Wouldn’t it be nice if you could update hundreds of posts with a single click… without having to update them manually?

If you’re like me and most other smart website owners, then you have at least wished for this solution a couple of times in your WordPress journey.

Today, I am excited to announce the new Search & Replace Everything by WPCode, a free tool to easily perform bulk search and replace operations in WordPress.

Introducing Search & Replace Everything by WPCode

Why Did We Build This Tool?

By default, WordPress does not come with a Find and Replace tool. This makes it hard to do bulk updates on your site.

Especially if you want to quickly update a link on every page, change an image that’s used in multiple areas, or making bulk changes when you’re moving your site.

Website owners either have to update every page manually which is extremely inefficient and time-consuming, or hire a developer to write a SQL query which can be expensive.

And that’s why I decided to create Search & Replace Everything by WPCode.

Search & Replace Everything revolutionizes how you update your content on your site once and for all.

This tool is designed for anyone who manages a WordPress site and wants to save time and avoid errors.

Here are some of the top use cases:

  • Bulk Update Content in WordPress Posts: As the plugin’s name suggests, you can search and replace any content on your website with a single click.
  • Replace an Image Used Across Multiple Locations: Quickly replace outdated images anywhere on your site with the new ones with just a click.
  • Updating URLs After WordPress Migration: When you migrate a WordPress website to a new address, you can replace URLs pointing to the old address. The plugin helps you fix all broken links while also saving you time.

Making Bulk Changes in WordPress Effortlessly

With Search & Replace Everything, our goal is to make it easy to make bulk changes to your website.

Instead of writing complex SQL queries on your own or hiring a developer, you can enter what you want to search for and what you need to replace it with.

Let me show you what makes Search & Replace Everything incredibly powerful yet so simple.

1. Update Everything Quick and Easy

Search & Replace Everything comes with a clean user interface. Just go to the Tools » WP Search & Replace page, enter the content you want to find, and then add the content you want to replace it with.

This simple layout ensures that even non-technical users can perform complex operations without hassle.

Easy to use interface

2. Control Where to Search

Target your changes precisely by selecting specific database tables or searching across all tables for comprehensive updates.

This feature ensures you’re making changes exactly where needed, preventing any unintended modifications.

Select tables

3. Precision Search with Case Sensitivity

By default, the plugin performs case-sensitive searches, ensuring accurate and specific matches.

For example, a search for “WordPress” will not match “wordpress” or “WORDPRESS”.

However, if you need to make your searches case-insensitive, you can easily toggle the option. This allows you to find and replace text regardless of its case.

For instance, enabling case-insensitive search would allow “WordPress,” “wordpress,” and “WORDPRESS” to be treated as the same.

Case Insensitive searches

4. Preview Before Making Changes

Worried about making mistakes? Preview all the changes before you save them. This feature ensures you get everything right the first time.

Preview changes

5. Replace Any Image in Your Media Library

Replacing images used in multiple places? No problem.

Switch to the ‘Replace Image’ tab, find your image, and click ‘Replace’. It’s that simple.

Replace image in media library

6. Track & Undo Changes

You can keep track of Search & Replace activity in the ‘History’ tab. This allows you to quickly review the changes you made and undo them with the click of a button.

Track history and undo changes

Note: This feature is available with the paid plan with an introductory $30 discount.

6. Fast, Even on Large Websites

Performing site-wide search and replace operations consumes server resources, which could slow down or crash a website. Search & Replace Everything is designed to be fast and efficient, even if you have a larger website with tons of data.

With Search and Replace Everything, making bulk changes has never been easier.

What’s Coming Next?

Search & Replace Everything by WPCode provides an incredibly powerful tool for WordPress site owners.

It makes advanced database search and replacement operations quite simple for all users.

Before performing bulk updates, always create a fresh WordPress database backup. I recommend using Duplicator. It’s an easy way to back up your database and restore it with a single click if needed.

We’re truly building something special here. If you have ideas on how we can make the plugin more helpful to you, please send us your suggestions.

As always, thank you for your continued support of WPBeginner. We look forward to serving you for years to come.

Yours Truly,

Syed Balkhi
Founder of WPBeginner

The post Introducing Search & Replace Everything by WPCode: Bulk Editing in WordPress Made Easy first appeared on WPBeginner.

Case Insensitive CSS Attribute Selector

Featured Imgs 23

CSS selectors never cease to amaze me in how powerful they can be in matching complex patterns. Most of that flexibility is in parent/child/sibling relationships, very seldomly in value matching. Consider my surprise when I learned that CSS allows matching attribute values regardless off case!

Adding a {space}i to the attribute selector brackets will make the attribute value search case insensitive:

/* case sensitive, only matches "example" */
[class=example] {
  background: pink;
}

/* case insensitive, matches "example", "eXampLe", etc. */
[class=example i] {
  background: lightblue;
}

The use cases for this i flag are likely very limited, especially if this flag is knew knowledge for you and you’re used to a standard lower-case standard. A loose CSS classname standard will have and would continue to lead to problems, so use this case insensitivity flag sparingly!

The post Case Insensitive CSS Attribute Selector appeared first on David Walsh Blog.

Useful Email Newsletters For Designers

Fotolia Subscription Monthly 4685447 Xl Stock

Struggling to keep our inboxes under control and aim for that magical state of inbox zero, the notification announcing an incoming email isn’t the most appreciated sound for many of us. However, there are some emails to actually look forward to: A newsletter, curated and written with love and care, can be a nice break in your daily routine, providing new insights and sparking ideas and inspiration for your work.

With so many wonderful design newsletters out there, we know it can be a challenge to decide which newsletter (or newsletters) to subscribe to. That’s why we want to shine a light on some newsletter gems today to make your decision at least a bit easier — and help you discover newsletters you might not have heard of yet. Ranging from design systems to UX writing, motion design, and user research, there sure is something in it for you.

A huge thank you to everyone who writes, edits, and publishes these newsletters to help us all get better at our craft. You are truly smashing! 👏🏼👏🏽👏🏾

Table of Contents

Below you’ll find quick jumps to newsletters on specific topics you might be interested in. Scroll down to browse the complete list or skip the table of contents.

Design & Front-End

HeyDesigner

🗓 Delivered every Monday
🖋 Written by Tamas Sari

Aimed at product people, UXers, PMs, and design engineers, the HeyDesigner newsletter is packed with a carefully curated selection of the latest design and front-end articles, tools, and resources.

Pixels of the Week

🗓 Delivered weekly
🖋 Written by Stéphanie Walter

Stéphanie Walter’s Pixels of the Week newsletter keeps you informed about the latest UX research, design, tech (HTML, CSS, SVG) news, tools, methods, and other resources that caught Stéphanie’s interest.

TLDR Design

🗓 Delivered daily
🖋 Written by Dan Ni

You’re looking for some bite-sized design inspiration? TLDR Design is a daily newsletter highlighting news, tools, tutorials, trends, and inspiration for design professionals.

DesignOps

🗓 Delivered every two weeks
🖋 Written by Ch'an Armstrong

The DesignOps newsletter provides the DesignOps community with the best hand-picked articles all around design, code, AI, design tools, no-code tools, developer tools, and, of course, design ops.

Adam Silver’s Newsletter

🗓 Delivered weekly
🖋 Written by Adam Silver

Every week, Adam Silver sends out a newsletter aimed at designers, content designers, and front-end developers. It includes short and sweet, evidence-based design tips, mostly about forms UX, but not always.

Smashing Newsletter

🗓 Delivered every Tuesday
🖋 Written by the Smashing Editorial team

Every Tuesday, we publish the Smashing Newsletter with useful tips and techniques on front-end and UX, covering everything from design systems and UX research to CSS and JavaScript. Each issue is curated, written, and edited with love and care, no third-party mailings or hidden advertising.

UX

UX Design Weekly

🗓 Delivered every Monday
🖋 Written by Kenny Chen

UX Design Weekly provides you with a weekly dose of hand-picked user experience design links. Every issue features articles, tools and resources, a UX portfolio, and a quote to spark ideas and get you thinking.

UX Collective

🗓 Delivered weekly
🖋 Written by Fabricio Teixeira and Caio Braga

“Designers are thinkers as much as they are makers.” Following this credo, the UX Collective newsletter helps designers think more critically about their work. Every issue highlights thought-provoking reads, little gems, tools, and resources.

Built For Mars

🗓 Delivered every few weeks
🖋 Written by Peter Ramsey

The Built for Mars newsletter brings Peter Ramsey’s UX research straight to your inbox. It includes in-depth UX case studies and bite-sized UX ideas and experiments.

NN Group

🗓 Delivered weekly
🖋 Written by the Nielsen Norman Group

Studying users around the world, the Nielsen Norman Group provides research-based UX guidance. If you don’t want to miss their latest articles and videos about usability, design, and UX research, you can subscribe to the NN/g newsletter to stay up-to-date.

UX Notebook

🗓 Delivered weekly
🖋 Written by Sarah Doody

The UX Notebook Newsletter is aimed at UX and product professionals who want to learn how to apply UX and design principles to design and grow their teams, products, and careers.

Smart Interface Design Patterns

🗓 Delivered weekly
🖋 Written by Vitaly Friedman

Every issue of the Smart Interface Design Patterns newsletter is dedicated to a common interface challenge and how to solve it to avoid issues down the line. A treasure chest of design patterns and UX techniques.

UX Weekly

🗓 Delivered weekly
🖋 Written by the Interaction Design Foundation

The Interaction Design Foundation is known for their UX courses and webinars for both aspiring designers and advanced professionals. Their UX Weekly newsletter delivers design tips and educational material to help you leverage the power of design.

Design With Care

🗓 Delivered every first Tuesday of a month
🖋 Written by Alex Bilstein

Healthcare systems desparately need UX designers to improve the status quo for both healthcare professionals and patients. The Design With Care newsletter empowers UX designers to create better healthcare experiences and make an impact that matters.

UX Writing & Content Strategy

The UX Gal

🗓 Delivered every Monday
🖋 Written by Slater Katz

Whether you’re about to start your UX content education or want to get better at UX writing, The UX Gal newsletter is for you. Every Monday, Slater Katz sends out a new newsletter with prompts, thoughts, and exercises to build your UX writing and content design skills.

UX Content Collective

🗓 Delivered weekly
🖋 Written by the UX Content Collective

The newsletter by the UX Content Collective is perfect for anyone interested in content design. In it, you’ll find curated UX writing resources, new job openings, and exclusive discounts.

GatherContent

🗓 Delivered weekly
🖋 Written by the GatherContent team

The GatherContent newsletter is a weekly email full of content strategy goodies. It features articles, webinars and masterclasses, new books, free templates, and industry news.

User Research

User Research Academy

🗓 Delivered weekly
🖋 Written by Nikki Anderson

If you want to get more creative and confident when conducting user research, the User Research Academy might be for you. With carefully curated articles, podcasts, events, books, and academic resources all around user research, the newsletter is perfect for beginners and senior UX researchers alike.

User Weekly

🗓 Delivered weekly
🖋 Written by Jan Ahrend

What mattered in UX research this week? To keep you up-to-date on trends, methods, and insights across the UX research industry, Jan Ahrend captures the pulse of the UX research community in his User Weekly newsletter.

User Interviews

🗓 Delivered weekly
🖋 Written by the User Interviews team

The UX Research Newsletter by the folks at User Interviews delivers the latest UX research articles, reports, podcast episodes, and special features. For professional user researchers just like teams who need to conduct user research without a dedicated research team.

Baymard Institute

🗓 Delivered weekly
🖋 Written by the Baymard Institute

User experience, web design, and e-commerce are the topics which the Baymard Institute newsletter covers. It features ad-free full-length research articles to give you precious insights into the field.

Interaction Design

Design Spells

🗓 Delivered every other Sunday
🖋 Written by Chester How, Duncan Leo, and Rick Lee

Whether it’s micro-interactions or easter eggs, Design Spells celebrates the design details that feel like magic and add a spark of delight to a design.

Justin Volz’s Newsletter

🖋 Written by Justin Volz

Getting you ready for the future of motion design is the goal of Justin Volz’s newsletter. It features UX motion design trends, new UX motion design articles, and more to “make your UI tap dance.”

Design Systems & Figma

Design System Guide

🗓 Delivered weekly
🖋 Written by Romina Kavcic

Accompanying her interactive step-by-step guide to design systems, Romina Kavcic sends out the weekly Design System Guide newsletter on all things design systems, design process, and design strategy.

Figmalion

🗓 Delivered weekly
🖋 Written by Eugene Fedorenko

The Figmalion newsletter keeps you up-to-date on what is happening in the Figma community, with curated design resources and a weekly roundup of Figma and design tool news.

Information Architecture

Informa(c)tion

🗓 Delivered every other Sunday
🖋 Written by Jorge Arango

The Informa(c)tion newsletter explores the intersection of information, cognition, and design. Each issue includes an essay about information architecture and/or personal knowledge management and a list of interesting links.

Product Design

Product Design Challenges

🗓 Delivered weekly
🖋 Written by Artiom Dashinsky

How about a weekly design challenge to work on your core design skills, improve your portfolio, or prepare for your next job interview? The Weekly Product Design Challenges newsletter has got you covered. Every week, Artiom Dashinsky shares a new exercise inspired and used by companies like Facebook, Google, and WeWork to interview UX design candidates.

Fundament

🗓 Delivered every other Thursday
🖋 Written by Arkadiusz Radek and Mateusz Litarowicz

With Fundament, Arkadiusz Radek and Mateusz Litarowicz created a place to share what they’ve learned in their ten-year UX and Product Design careers. The newsletter is about the things that matter in design, the practicalities of the job, the lesser-known bits, and content that will help you grow as a UX or Product Designer.

Case Study Club

🗓 Delivered weekly
🖋 Written by Jan Haaland

How do people design digital products? With curated UX case studies, the Case Study Club newsletter grants insights into other designers’ processes.

Ethical Design & Sustainability

Ethical Design Network

🗓 Delivered monthly
🖋 Written by Trine Falbe

The Ethical Design Network is a space for digital professionals to share, discuss, and self-educate about ethical design. You can sign up to the newsletter to receive monthly news, resources, and event updates all around ethical design.

Sustainable UX

🗓 Delivered monthly
🖋 Written by Thorsten Jonas

As designers, we have to take responsibility for more than our users. Shining a light on how to design and build more sustainable digital products, the SUX Newsletter by the Sustainable UX Network helps you stand up to that responsibility.

AI

AI Goodies

🗓 Delivered weekly
🖋 Written by Ioana Teleanu

A brand-new newsletter on AI, design, and UX goodies comes from Ioana Teleanu: AI Goodies. Every week, it covers the latest resources, trends, news, and tools from the world of AI.

Business

d.MBA

🗓 Delivered weekly
🖋 Written by Alen Faljic

Learning business can help you become a better designer. The d.MBA newsletter is your weekly source of briefings from the business world, hand-picked for the design community by Alen Faljic and the d.MBA team.

Career & Leadership

Dan Mall Teaches

🗓 Delivered weekly
🖋 Written by Dan Mall

Tips, tricks, and tools about design systems, process, and leadership, delivered to your inbox every week. That’s the Dan Mall Teaches newsletter.

Stratatics

🗓 Delivered weekly
🖋 Written by Ryan Rumsey

To do things differently, you must look at your work in a new light. That’s the idea behind the Stratatics newsletter. Each week, Ryan Rumsey provides design leaders and executives (and those who work alongside them) with a new idea to reimagine and deliver their best work.

Spread The Word

Do you have a favorite newsletter that isn’t featured in the post? Or maybe you’re writing and publishing a newsletter yourself? We’d love to hear about it in the comments below!

Chris Corner: Git it

Category Image 080

Julia Evans has released what she’s saying is one of her most popular zines to date: How Git Works.

I don’t think you’d regret reading it. I imagine most of us get by with knowing just enough Git to do our jobs, but are probably using 5% of what it can really do. Being very strong with Git will almost surely benefit you in your career. Imagine helping a superior out of a sticky situation where it might look like code was lost or otherwise screwed up. Being the solution during an emotional time is clutch. Surely this pairs nicely with Oh Shit, Git!, a real classic from Katie-Sylor Miller which I see has been revitalized with Julia here.


Just the other day here at CodePen Headquarters, I saw a co-worker solve an issue with git bisect. Have you even heard of that?! Imagine there is a bug in your code, but you have absolutely no idea when it happened or where in the code it might be. That’s not a good feeling, but it’s exactly where git bisect comes in. As best I understand it, it sets the HEAD of your repo back in time some amount, and there, you test if the bug is present and you can say git bisect good or git bisect bad. Then it moves the HEAD and you keep testing and eventually it gets closer and closer to the exact commit (or at least a range of commits) where the bug happened. Then you can look at the changed files in those commits and figure out where in the code the bug may have came from. So cool!


I certainly know developers who know Git and work with it exclusively at the command line entirely as-provided. But I find it more common among the command line types that they at least have some aliases set up for the most common things they do. Those might be their own aliases, like they’ll make gco do a git checkout, but it’s worth knowing git itself allows you to make aliases within itself, which could be good since they won’t conflict with anything else. (Have I told you how long I had cp aliased to move to our local CodePen project directory? 🤣).


A much more elaborate take on git aliases is called Gut. With it, you don’t git commit anything (with all the params and whatnot you have to also pass), you gut save which launches a little wizard that asks you questions, and then it does the proper git stuff with the information you give it.

I could see that being great for a beginner, but maybe feel a little too slow as you get more comfortable at the command line. Except when it comes to the more advanced stuff and how it looks designed to get you out of binds. The fix and undo commands like awfully helpful and are the kind of things where I can never remember the proper commands.


Paweł Grzybek lays out a classic situation:

Let’s say that we are halfway through the feature, intensely focused on a task, when a critical bug needs to be fixed out of the blue. Happens to us all the time! Should we stash the current changes? Should we quickly smash git add . && git commit -m "wip" and promise that we will sort this mess out later?

His answer is no, it’s using git worktrees. It solves the issue by literally making another copy of your project on disk. And you can open and work on it separately but it all goes to the same repo ultimately. So you can leave your half-done uncommitted work on another worktree while you hop to the other to do work. Me, I’m mostly cool with git stash to tuck stuff away while I go work on something else, or even just the ol “work in progress” or “saving work” commit like Paweł mentioned. It’s not pretty but culturally it’s fine on our project. But I can see how you could get into a groove with worktrees, particularly if your editor supports it nicely.


Phew! We probably talked about Git too much, eh? I know nobody cares. Now let’s go back to just doing the 3-4 commands we know everyday, just with a few more resources in our pocket when we need them.

I gotta leave you with something else. (Digs through bag of hot links.) Ah here we go. This video rules: Flash is dead so I rebuilt it with javascript. Andrew Jakubowicz walks us through building an interface with a pretty modern and lightweight set of tools. Andrew works for Google on Lit, so it’s sort of a big excuse to show off working with Web Components, but it’s a fun ride. At 8 minutes more happens than a typical hour long video.

How to Set Date Time from Mac Command Line

Featured Imgs 23

Working on a web extension that ships to an app store and isn’t immediately modifiable, like a website, can be difficult. Since you cannot immediately deploy updates, you sometimes need to bake in hardcoded date-based logic. Testing future dates can be difficult if you don’t know how to quickly change the date on your local machine.

To change the current date on your Mac, execute the following from command line:

# Date Format:  MMDDYYYY
sudo date -I 06142024

This command does not modify time, only the current date. Using the same command to reset to current date is easy as well!

The post How to Set Date Time from Mac Command Line appeared first on David Walsh Blog.

Create a Striking Portfolio with These Free Webflow Templates

Featured Imgs 23

Are you ready to take your portfolio game to the next level? Let’s dive into the exciting world of Webflow templates for creating stunning portfolios! As a web designer, I can vouch for the game-changing benefits these templates bring to the table. Imagine having access to professionally designed layouts and functionalities without spending a dime. That’s the power of free Webflow portfolio templates.

Webflow templates offer a treasure trove of features that can make your portfolio shine. These templates are perfect for designers who want to create impressive designs with dynamic animations and responsive layouts. With just a few clicks, you can customize these templates to reflect your unique style and creativity. Of course! Webflow templates are a great way to save time and create a professional, polished look for your website. They make it easy to showcase your work without getting bogged down in coding and design details. So, why settle for mediocrity when you can dazzle with a Webflow portfolio template?

Advantages of using free templates for creating a striking portfolio

Using free Webflow portfolio templates for your portfolio website comes with a plethora of benefits. These templates serve as a solid foundation that jumpstarts your design process, saving you time and effort in crafting a stunning portfolio. They offer a wide range of design options, from sleek and modern layouts to vibrant and creative designs. With these templates, you can easily customize colors, fonts, and layouts to match your style and showcase your work effectively.

One major advantage is that free Webflow templates are designed by professionals with user experience in mind, ensuring that your portfolio is not only visually appealing but also easy to navigate for your viewers. Additionally, these templates are responsive by nature, meaning your portfolio will look fantastic on any device, whether it’s a desktop, tablet, or smartphone. This adaptability ensures that your work shines across various platforms, attracting potential clients and employers to your impressive design skills without missing a beat.

Benefits of using Webflow templates for portfolio creation

When it comes to building a standout portfolio, using Webflow templates is like having a secret weapon in your design arsenal. These templates offer a plethora of benefits for creating a top-notch portfolio website. First off, they are incredibly user-friendly, making the design process smooth and stress-free. With pre-built layouts and elements, you can save valuable time and focus on showcasing your work in the best possible light.

Additionally, Webflow templates are highly customizable, allowing you to tailor every aspect of your portfolio to fit your unique style and vision. This level of flexibility ensures that your portfolio stands out from the rest and leaves a lasting impression on visitors. Moreover, the responsive nature of Webflow templates guarantees that your portfolio looks stunning on any device, from desktops to smartphones.

Overall, using Webflow templates for portfolio creation not only saves time and effort but also elevates the visual appeal and functionality of your website effortlessly. With these templates, you can create a professional and polished portfolio that speaks volumes about your design expertise.

Tips for maximizing the impact of your portfolio with free templates

When it comes to making the most out of your portfolio using free Webflow templates, remember to showcase your best work first. Grab the viewer’s attention with a stunning homepage that highlights your top projects. Keep it simple and clean to ensure your designs shine through without distractions. Additionally, personalize the template to match your style and brand identity. Add a touch of creativity by incorporating unique elements that reflect your personality.

Don’t forget to optimize your images for faster loading times, as nobody likes waiting around for a portfolio to load. Use high-quality visuals that clearly demonstrate your skills and expertise. And lastly, make sure your portfolio is easy to navigate. Organize your projects into categories or sections, making it effortless for visitors to explore and discover your creations with ease. With these tips, you can maximize the impact of your portfolio and leave a lasting impression on potential clients and employers.

In conclusion, using free Webflow portfolio templates is a game-changer for any aspiring web designer. These templates provide a solid foundation to kickstart your portfolio design journey without breaking a sweat. With a wide range of customizable options at your fingertips, crafting a visually stunning and user-friendly portfolio has never been easier. The convenience and flexibility of Webflow templates allow you to showcase your work in the best light possible, impressing potential clients and employers with your creative prowess. So, why make things harder for yourself when you can take advantage of these free resources to elevate your portfolio to new heights? Embrace the power of Webflow templates and watch your design dreams come to life with style and ease. Your portfolio deserves to stand out, and with Webflow, that’s exactly what it will do.

yrFolio – Portfolio Website Template

yrFolio

Source Live Preview

Matteo Fabbiani – Personal Portfolio Web Template

Matteo Fabbiani

Source Live Preview

Personal Portfolio Webflow Website Template

Personal Portfolio Webflow Website Template

Source Live Preview

Relume Portfolio Webflow Template

Relume Portfolio Webflow Template

Source Live Preview

Solveig Portfolio Template

Solveig Portfolio Template

Source Live Preview

Portfolio Template for Architecture

Portfolio Template for Architecture

Source Live Preview

Student Portfolio

Student Portfolio

Source Live Preview

Portfolio Website Template

Portfolio Website Template

Source Live Preview

SkillSet – Minimal Portfolio Template

SkillSet

Source Live Preview

Dante Portfolio Webflow Template

Dante Portfolio Webflow Template

Source Live Preview

Free Personal Portfolio Web Template

Free Personal Portfolio Web Template

Source Live Preview

Product Design Portfolio Template

Product Design Portfolio Template

Source Live Preview

Photographer’s Portfolio Template

Photographer's Portfolio Template

Source Live Preview

Free Minimalist Portfolio Webflow Template

Free Minimalist Portfolio Webflow Template

Source Live Preview

Uncommon Portfolio Web Template

Uncommon Portfolio Web Template

Source Live Preview

Indi Harris

Indi Harris

Source Live Preview

Douglas Pinho Portfolio

Douglas Pinho Portfolio

Source Live Preview

Hire Flemming

Hire Flemming

Source Live Preview

QuickSnap Photographer Template

QuickSnap Photographer Template

Source Live Preview

Overflow

Overflow

Source Live Preview

Darren Harroff

Darren Harroff

Source Live Preview

The post Create a Striking Portfolio with These Free Webflow Templates appeared first on CSS Author.

What Are CSS Container Style Queries Good For?

Category Image 052

We’ve relied on media queries for a long time in the responsive world of CSS but they have their share of limitations and have shifted focus more towards accessibility than responsiveness alone. This is where CSS Container Queries come in. They completely change how we approach responsiveness, shifting the paradigm away from a viewport-based mentality to one that is more considerate of a component’s context, such as its size or inline-size.

Querying elements by their dimensions is one of the two things that CSS Container Queries can do, and, in fact, we call these container size queries to help distinguish them from their ability to query against a component’s current styles. We call these container style queries.

Existing container query coverage has been largely focused on container size queries, which enjoy 90% global browser support at the time of this writing. Style queries, on the other hand, are only available behind a feature flag in Chrome 111+ and Safari Technology Preview.

The first question that comes to mind is What are these style query things? followed immediately by How do they work?. There are some nice primers on them that others have written, and they are worth checking out.

But the more interesting question about CSS Container Style Queries might actually be Why we should use them? The answer, as always, is nuanced and could simply be it depends. But I want to poke at style queries a little more deeply, not at the syntax level, but what exactly they are solving and what sort of use cases we would find ourselves reaching for them in our work if and when they gain browser support.

Why Container Queries

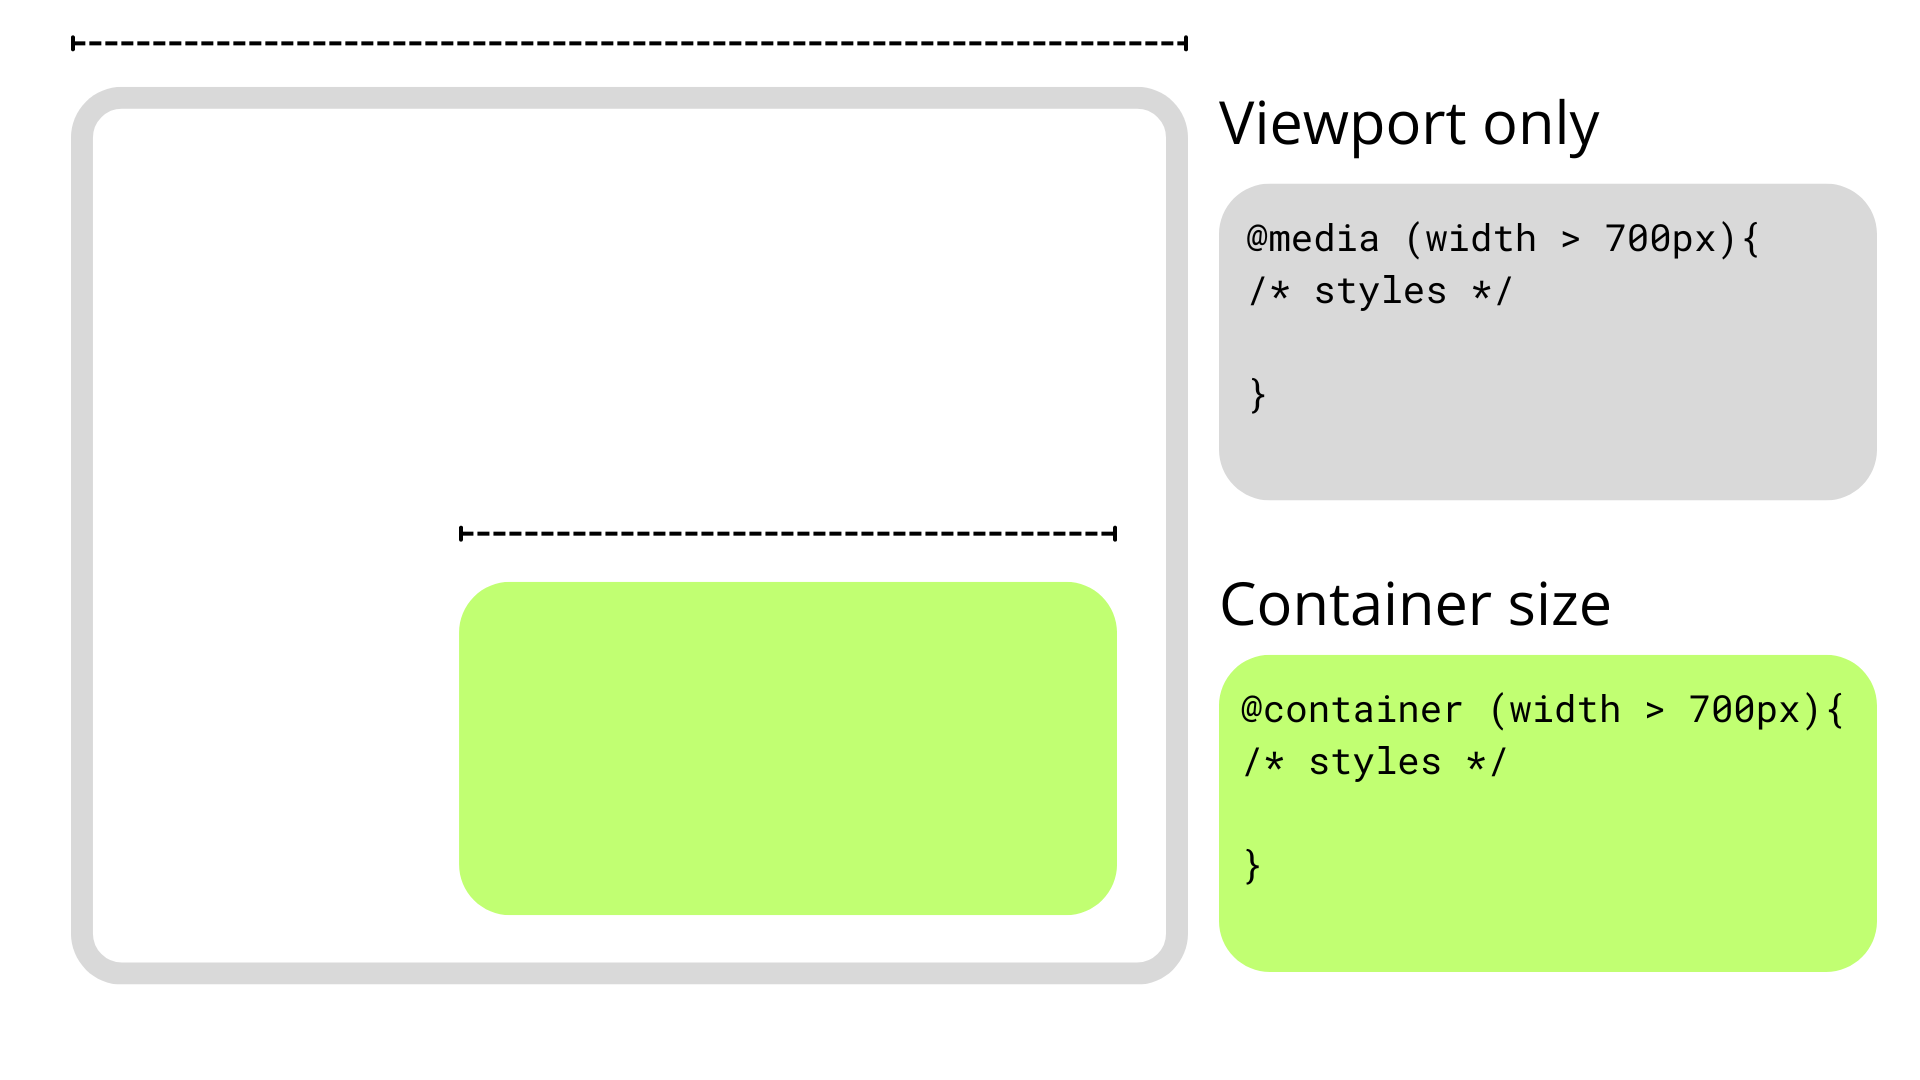
Talking purely about responsive design, media queries have simply fallen short in some Aspects, but I think the main one is that they are context-agnostic in the sense that they only consider the viewport size when applying styles without involving the size or dimensions of an element’s parent or the content it contains.

This usually isn’t a problem since we only have a main element that doesn’t share space with others along the x-axis, so we can style our content depending on the viewport’s dimensions. However, if we stuff an element into a smaller parent and maintain the same viewport, the media query doesn’t kick in when the content becomes cramped. This forces us to write and manage an entire set of media queries that target super-specific content breakpoints.

Container queries break this limitation and allow us to query much more than the viewport’s dimensions.

How Container Queries Generally Work

Container size queries work similarly to media queries but allow us to apply styles depending on the container’s properties and computed values. In short, they allow us to make style changes based on an element’s computed width or height regardless of the viewport. This sort of thing was once only possible with JavaScript or the ol’ jQuery, as this example shows.

As noted earlier, though, container queries can query an element’s styles in addition to its dimensions. In other words, container style queries can look at and track an element’s properties and apply styles to other elements when those properties meet certain conditions, such as when the element’s background-color is set to hsl(0 50% 50%).

That’s what we mean when talking about CSS Container Style Queries. It’s a proposed feature defined in the same CSS Containment Module Level 3 specification as CSS Container Size Queries — and one that’s currently unsupported by any major browser — so the difference between style and size queries can get a bit confusing as we’re technically talking about two related features under the same umbrella.

We’d do ourselves a favor to backtrack and first understand what a “container” is in the first place.

Containers

An element’s container is any ancestor with a containment context; it could be the element’s direct parent or perhaps a grandparent or great-grandparent.

A containment context means that a certain element can be used as a container for querying. Unofficially, you can say there are two types of containment context: size containment and style containment.

Size containment means we can query and track an element’s dimensions (i.e., aspect-ratio, block-size, height, inline-size, orientation, and width) with container size queries as long as it’s registered as a container. Tracking an element’s dimensions requires a little processing in the client. One or two elements are a breeze, but if we had to constantly track the dimensions of all elements — including resizing, scrolling, animations, and so on — it would be a huge performance hit. That’s why no element has size containment by default, and we have to manually register a size query with the CSS container-type property when we need it.

On the other hand, style containment lets us query and track the computed values of a container’s specific properties through container style queries. As it currently stands, we can only check for custom properties, e.g. --theme: dark, but soon we could check for an element’s computed background-color and display property values. Unlike size containment, we are checking for raw style properties before they are processed by the browser, alleviating performance and allowing all elements to have style containment by default.

Did you catch that? While size containment is something we manually register on an element, style containment is the default behavior of all elements. There’s no need to register a style container because all elements are style containers by default.

And how do we register a containment context? The easiest way is to use the container-type property. The container-type property will give an element a containment context and its three accepted values — normal, size, and inline-size — define which properties we can query from the container.

/* Size containment in the inline direction */
.parent {
  container-type: inline-size;
}

This example formally establishes a size containment. If we had done nothing at all, the .parent element is already a container with a style containment.

Size Containment

That last example illustrates size containment based on the element’s inline-size, which is a fancy way of saying its width. When we talk about normal document flow on the web, we’re talking about elements that flow in an inline direction and a block direction that corresponds to width and height, respectively, in a horizontal writing mode. If we were to rotate the writing mode so that it is vertical, then “inline” would refer to the height instead and “block” to the width.

Consider the following HTML:

<div class="cards-container">
  <ul class="cards">
    <li class="card"></li>
  </ul>
</div>

We could give the .cards-container element a containment context in the inline direction, allowing us to make changes to its descendants when its width becomes too small to properly display everything in the current layout. We keep the same syntax as in a normal media query but swap @media for @container

.cards-container {
  container-type: inline-size;
  }

  @container (width < 700px) {
  .cards {
    background-color: red;
  }
}

Container syntax works almost the same as media queries, so we can use the and, or, and not operators to chain different queries together to match multiple conditions.

@container (width < 700px) or (width > 1200px) {
  .cards {
    background-color: red;
  }
}

Elements in a size query look for the closest ancestor with size containment so we can apply changes to elements deeper in the DOM, like the .card element in our earlier example. If there is no size containment context, then the @container at-rule won’t have any effect.

/* 👎 
 * Apply styles based on the closest container, .cards-container
 */
@container (width < 700px) {
  .card {
    background-color: black;
  }
}

Just looking for the closest container is messy, so it’s good practice to name containers using the container-name property and then specifying which container we’re tracking in the container query just after the @container at-rule.

.cards-container {
  container-name: cardsContainer;
  container-type: inline-size;
}

@container cardsContainer (width < 700px) {
  .card {
    background-color: #000;
  }
}

We can use the shorthand container property to set the container name and type in a single declaration:

.cards-container {
  container: cardsContainer / inline-size;

  /* Equivalent to: */
  container-name: cardsContainer;
  container-type: inline-size;
}

The other container-type we can set is size, which works exactly like inline-size — only the containment context is both the inline and block directions. That means we can also query the container’s height sizing in addition to its width sizing.

/* When container is less than 700px wide */
@container (width < 700px) {
  .card {
    background-color: black;
  }
}

/* When container is less than 900px tall */
@container (height < 900px) {
  .card {
    background-color: white;
  }
}

And it’s worth noting here that if two separate (not chained) container rules match, the most specific selector wins, true to how the CSS Cascade works.

So far, we’ve touched on the concept of CSS Container Queries at its most basic. We define the type of containment we want on an element (we looked specifically at size containment) and then query that container accordingly.

Container Style Queries

The third value that is accepted by the container-type property is normal, and it sets style containment on an element. Both inline-size and size are stable across all major browsers, but normal is newer and only has modest support at the moment.

I consider normal a bit of an oddball because we don’t have to explicitly declare it on an element since all elements are style containers with style containment right out of the box. It’s possible you’ll never write it out yourself or see it in the wild.

.parent {
  /* Unnecessary */
  container-type: normal;
}

If you do write it or see it, it’s likely to undo size containment declared somewhere else. But even then, it’s possible to reset containment with the global initial or revert keywords.

.parent {
  /* All of these (re)set style containment */
  container-type: normal;
  container-type: initial;
  container-type: revert;
}

Let’s look at a simple and somewhat contrived example to get the point across. We can define a custom property in a container, say a --theme.

.cards-container {
  --theme: dark;
}

From here, we can check if the container has that desired property and, if it does, apply styles to its descendant elements. We can’t directly style the container since it could unleash an infinite loop of changing the styles and querying the styles.

.cards-container {
  --theme: dark;
}

@container style(--theme: dark) {
  .cards {
    background-color: black;
  }
}

See that style() function? In the future, we may want to check if an element has a max-width: 400px through a style query instead of checking if the element’s computed value is bigger than 400px in a size query. That’s why we use the style() wrapper to differentiate style queries from size queries.

/* Size query */
@container (width > 60ch) {
  .cards {
    flex-direction: column;
  }
}

/* Style query */
@container style(--theme: dark) {
  .cards {
    background-color: black;
  }
}

Both types of container queries look for the closest ancestor with a corresponding containment-type. In a style() query, it will always be the parent since all elements have style containment by default. In this case, the direct parent of the .cards element in our ongoing example is the .cards-container element. If we want to query non-direct parents, we will need the container-name property to differentiate between containers when making a query.

.cards-container {
  container-name: cardsContainer;
  --theme: dark;
}

@container cardsContainer style(--theme: dark) {
  .card {
    color: white;
  }
}
Weird and Confusing Things About Container Style Queries

Style queries are completely new and bring something never seen in CSS, so they are bound to have some confusing qualities as we wrap our heads around them — some that are completely intentional and well thought-out and some that are perhaps unintentional and may be updated in future versions of the specification.

Style and Size Containment Aren’t Mutually Exclusive

One intentional perk, for example, is that a container can have both size and style containment. No one would fault you for expecting that size and style containment are mutually exclusive concerns, so setting an element to something like container-type: inline-size would make all style queries useless.

However, another funny thing about container queries is that elements have style containment by default, and there isn’t really a way to remove it. Check out this next example:

.cards-container {
  container-type: inline-size;
  --theme: dark;
}

@container style(--theme: dark) {
  .card {
    background-color: black;
  }
}

@container (width < 700px) {
  .card {
    background-color: red;
  }
}

See that? We can still query the elements by style even when we explicitly set the container-type to inline-size. This seems contradictory at first, but it does make sense, considering that style and size queries are computed independently. It’s better this way since both queries don’t necessarily conflict with each other; a style query could change the colors in an element depending on a custom property, while a container query changes an element’s flex-direction when it gets too small for its contents.

But We Can Achieve the Same Thing With CSS Classes and IDs

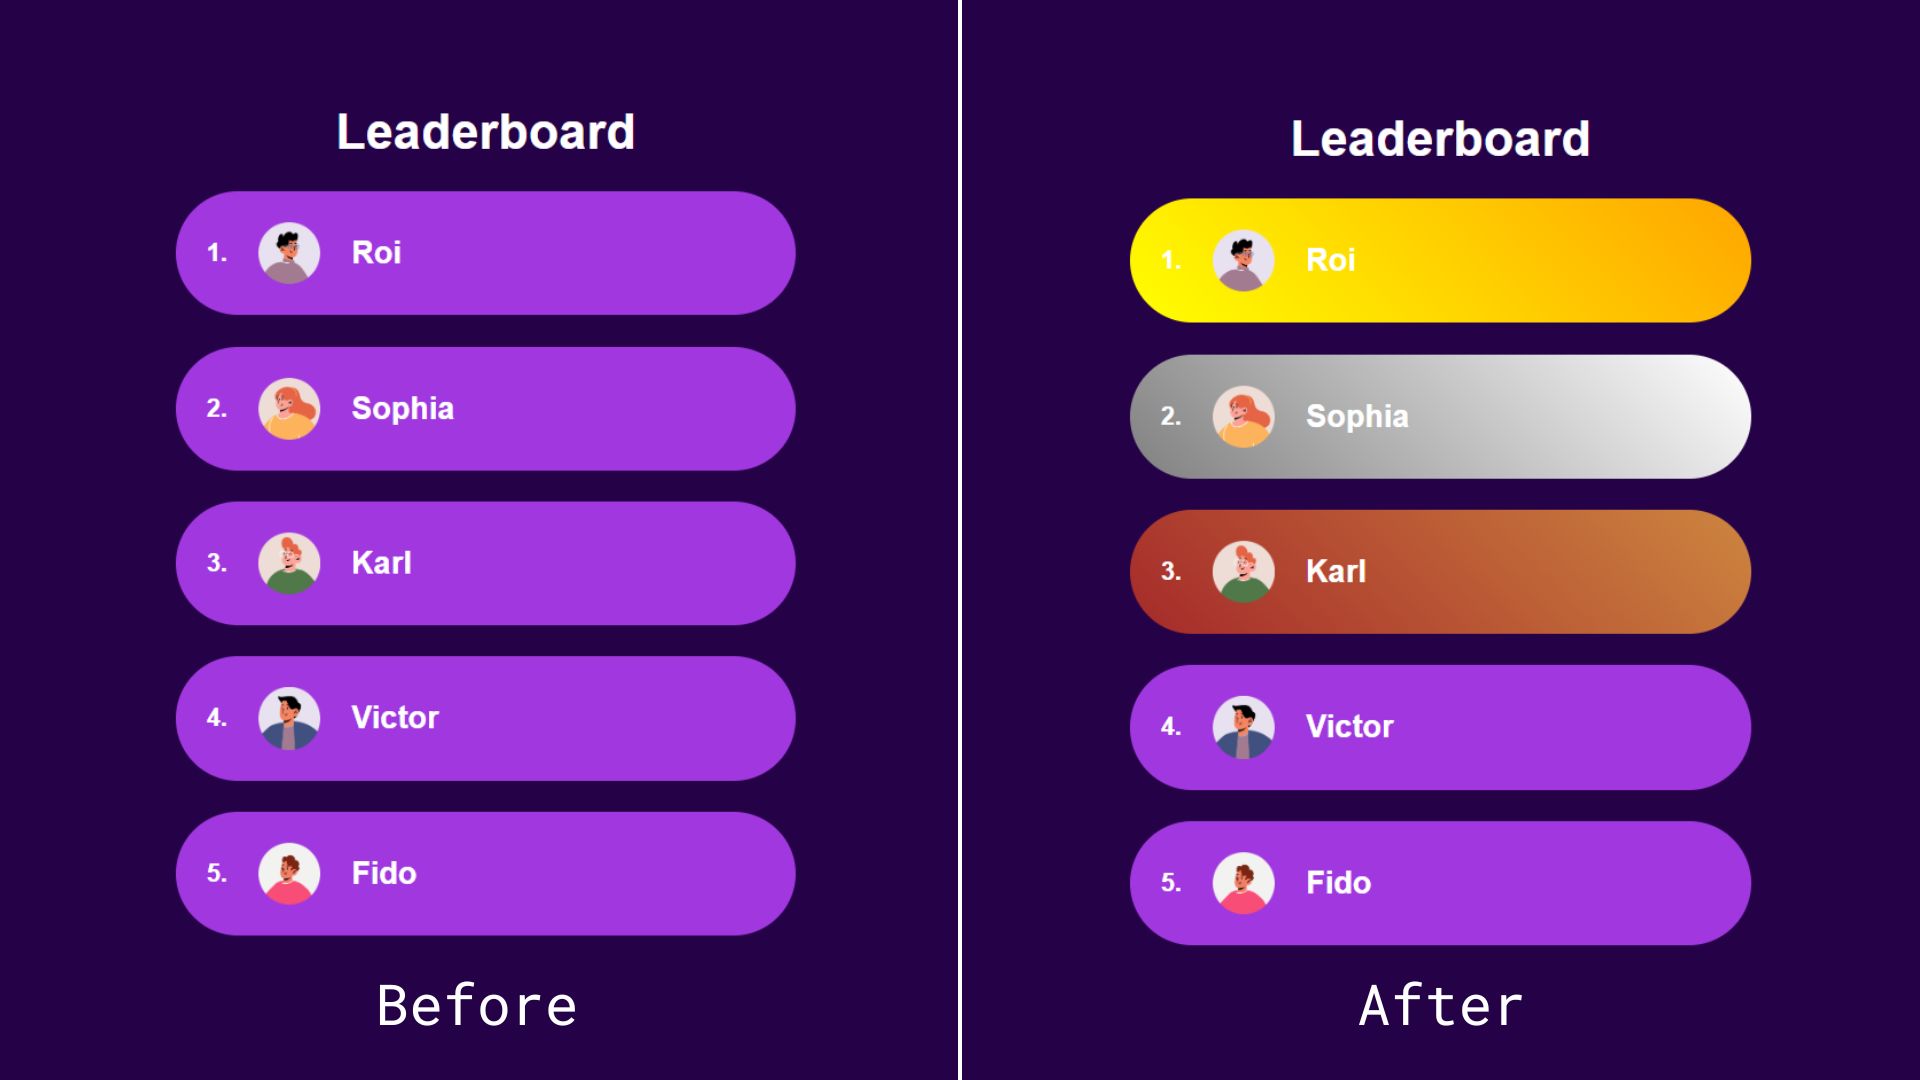
Most container query guides and tutorials I’ve seen use similar examples to demonstrate the general concept, but I can’t stop thinking no matter how cool style queries are, we can achieve the same result using classes or IDs and with less boilerplate. Instead of passing the state as an inline style, we could simply add it as a class.

<ol>
  <li class="item first">
    <img src="..." alt="Roi's avatar" />
    <h2>Roi</h2>
  </li>
  <li class="item second"><!-- etc. --></li>
  <li class="item third"><!-- etc. --></li>
  <li class="item"><!-- etc. --></li>
  <li class="item"><!-- etc. --></li>
</ol>

Alternatively, we could add the position number directly inside an id so we don’t have to convert the number into a string:

<ol>
  <li class="item" id="item-1">
    <img src="..." alt="Roi's avatar" />
    <h2>Roi</h2>
  </li>
  <li class="item" id="item-2"><!-- etc. --></li>
  <li class="item" id="item-3"><!-- etc. --></li>
  <li class="item" id="item-4"><!-- etc. --></li>
  <li class="item" id="item-5"><!-- etc. --></li>
</ol>

Both of these approaches leave us with cleaner HTML than the container queries approach. With style queries, we have to wrap our elements inside a container — even if we don’t semantically need it — because of the fact that containers (rightly) are unable to style themselves.

We also have less boilerplate-y code on the CSS side:

#item-1 {
  background: linear-gradient(45deg, yellow, orange); 
}

#item-2 {
  background: linear-gradient(45deg, grey, white);
}

#item-3 {
  background: linear-gradient(45deg, brown, peru);
}

See the Pen Style Queries Use Case Replaced with Classes [forked] by Monknow.

As an aside, I know that using IDs as styling hooks is often viewed as a no-no, but that’s only because IDs must be unique in the sense that no two instances of the same ID are on the page at the same time. In this instance, there will never be more than one first-place, second-place, or third-place player on the page, making IDs a safe and appropriate choice in this situation. But, yes, we could also use some other type of selector, say a data-* attribute.

There is something that could add a lot of value to style queries: a range syntax for querying styles. This is an open feature that Miriam Suzanne proposed in 2023, the idea being that it queries numerical values using range comparisons just like size queries.

Imagine if we wanted to apply a light purple background color to the rest of the top ten players in the leaderboard example. Instead of adding a query for each position from four to ten, we could add a query that checks a range of values. The syntax is obviously not in the spec at this time, but let’s say it looks something like this just to push the point across:

/* Do not try this at home! */
@container leaderboard style(4 >= --position <= 10) {
  .item {
    background: linear-gradient(45deg, purple, fuchsia);
  }
}

In this fictional and hypothetical example, we’re:

  • Tracking a container called leaderboard,
  • Making a style() query against the container,
  • Evaluating the --position custom property,
  • Looking for a condition where the custom property is set to a value equal to a number that is greater than or equal to 4 and less than or equal to 10.
  • If the custom property is a value within that range, we set a player’s background color to a linear-gradient() that goes from purple to fuschia.

This is very cool, but if this kind of behavior is likely to be done using components in modern frameworks, like React or Vue, we could also set up a range in JavaScript and toggle on a .top-ten class when the condition is met.

See the Pen Style Ranged Queries Use Case Replaced with Classes [forked] by Monknow.

Sure, it’s great to see that we can do this sort of thing directly in CSS, but it’s also something with an existing well-established solution.

Separating Style Logic From Logic Logic

So far, style queries don’t seem to be the most convenient solution for the leaderboard use case we looked at, but I wouldn’t deem them useless solely because we can achieve the same thing with JavaScript. I am a big advocate of reaching for JavaScript only when necessary and only in sprinkles, but style queries, the ones where we can only check for custom properties, are most likely to be useful when paired with a UI framework where we can easily reach for JavaScript within a component. I have been using Astro an awful lot lately, and in that context, I don’t see why I would choose a style query over programmatically changing a class or ID.

However, a case can be made that implementing style logic inside a component is messy. Maybe we should keep the logic regarding styles in the CSS away from the rest of the logic logic, i.e., the stateful changes inside a component like conditional rendering or functions like useState and useEffect in React. The style logic would be the conditional checks we do to add or remove class names or IDs in order to change styles.

If we backtrack to our leaderboard example, checking a player’s position to apply different styles would be style logic. We could indeed check that a player’s leaderboard position is between four and ten using JavaScript to programmatically add a .top-ten class, but it would mean leaking our style logic into our component. In React (for familiarity, but it would be similar to other frameworks), the component may look like this:

const LeaderboardItem = ({position}) => {
  <li className={item ${position &gt;= 4 && position &lt;= 10 ? "top-ten" : ""}} id={item-${position}}>
    <img src="..." alt="Roi's avatar" />
    <h2>Roi</h2>
  </li>;
};

Besides this being ugly-looking code, adding the style logic in JSX can get messy. Meanwhile, style queries can pass the --position value to the styles and handle the logic directly in the CSS where it is being used.

const LeaderboardItem = ({position}) => {
  <li className="item" style={{"--position": position}}>
    <img src="..." alt="Roi's avatar" />
    <h2>Roi</h2>
  </li>;
};

Much cleaner, and I think this is closer to the value proposition of style queries. But at the same time, this example makes a large leap of assumption that we will get a range syntax for style queries at some point, which is not a done deal.

Conclusion

There are lots of teams working on making modern CSS better, and not all features have to be groundbreaking miraculous additions.

Size queries are definitely an upgrade from media queries for responsive design, but style queries appear to be more of a solution looking for a problem.

It simply doesn’t solve any specific issue or is better enough to replace other approaches, at least as far as I am aware.

Even if, in the future, style queries will be able to check for any property, that introduces a whole new can of worms where styles are capable of reacting to other styles. This seems exciting at first, but I can’t shake the feeling it would be unnecessary and even chaotic: styles reacting to styles, reacting to styles, and so on with an unnecessary side of boilerplate. I’d argue that a more prudent approach is to write all your styles declaratively together in one place.

Maybe it would be useful for web extensions (like Dark Reader) so they can better check styles in third-party websites? I can’t clearly see it. If you have any suggestions on how CSS Container Style Queries can be used to write better CSS that I may have overlooked, please let me know in the comments! I’d love to know how you’re thinking about them and the sorts of ways you imagine yourself using them in your work.

2-Page Login Pattern, And How To Fix It

Fotolia Subscription Monthly 4685447 Xl Stock

Why do we see login forms split into multiple screens everywhere? Instead of typing email and password, we have to type email, move to the next page, and then type password there. This seems to be inefficient, to say the least.

Let’s see why login forms are split across screens, what problem they solve, and how to design a better experience for better authentication UX (video).

This article is part of our ongoing series on design patterns. It’s also an upcoming part of the 10h-video library on Smart Interface Design Patterns 🍣 and the upcoming live UX training as well. Use code BIRDIE to save 15% off.

The Problem With Login Forms

If there is one thing we’ve learned over the years in UX, it’s that designing for people is hard. This applies to login forms as well. People are remarkably forgetful. They often forget what email they signed up with or what service they signed in with last time (Google, Twitter, Apple, and so on)

One idea is to remind customers what they signed in with last time and perhaps make it a default option. However, it reveals directly what the user’s account was, which might be a privacy or security issue:

What if instead of showing all options to all customers all the time, we ask for email first, and then look up what service they used last time, and redirect customers to the right place automatically? Well, that’s exactly the idea behind 2-page logins.

Meet 2-Page-Logins

You might have seen them already. If a few years ago, most login forms asked for email and password on one page, these days it’s more common to ask only for email first. When the user chooses to continue, the form will ask for a password in a separate step. Brad explores some problems of this pattern.

A common reason for splitting the login form across pages is Single Sign-On (SSO) authentication. Large companies typically use SSO for corporate sign-ins of their employees. With it, employees log in only once every day and use only one set of credentials, which improves enterprise security.

The UX Intricacies of Single Sign-On (SSO)

SSO also helps with regulatory compliance, and it’s much easier to provision users with appropriate permissions and revoke them later at once. So, if an employee leaves, all their accounts and data can be deleted at once.

To support both business customers and private customers, companies use 2-step-login. Users need to type in their email first, then the validator checks what provider the email is associated with and redirects users there.

Users rarely love this experience. Sometimes, they have multiple accounts (private and business) with one service. Also, 2-step-logins often break autofill and password managers. And for most users, login/pass is way faster than 2-step-login.

Of course, typically, there are dedicated corporate login pages for employees to sign in, but they often head directly to Gmail, Figma, and so on instead and try to sign in there. However, they won’t be able to log in as they must sign in through SSO.

Bottom line: the pattern works well for SSO users, but for non-SSO users, it results in a frustrating UX.

Alternative Solution: Conditional Reveal of SSO

There is a way to work around these challenges (see the image below). We could use a single-page look-up with email and password input fields as a default. Once a user has typed in their email, we detect if the SSO authentication is enabled.

If Single Sign-On (SSO) is enabled for that email, we show a Single Sign-On option and default to it. We could also make the password field optional or disabled.

If SSO isn’t enabled for that email, we proceed with the regular email/password login. This is not much hassle, but it saves trouble for both private and business accounts.

Key Takeaways

🤔 People often forget what email they signed up with.
🤔 They also forget the auth service they signed in with.
🤔 Companies use Single Sign-On (SSO) for corporate sign-in.
🤔 Individual accounts still need email and password for login.
✅ 2-step login: ask for email, then redirect to the right service.

✅ 2-step-login replaces “social” sign-in for repeat users.
✅ It directs users rather than giving them roadblocks.
🤔 Users still keep forgetting the email they signed in with.
🤔 Sometimes, users have multiple accounts with one service.
🚫 2-step logins often break autofill and password managers.
🚫 For most users, login/pass is way faster than 2-step-login.

✅ Better: start with one single page with login and password.
✅ As users type their email, detect if SSO is enabled for them.
✅ If it is, reveal an SSO-login option and set a default to it.
✅ Otherwise, proceed with the regular password login.
✅ If users must use SSO, disable the password field — don’t hide it.

Wrapping Up

Personally, I haven’t tested the approach, but it might be a good alternative to 2-page logins — both for SSO and non-SSO users. Keep in mind, though, that SSO authentication might or might not require a password, as sometimes login happens via Yubikey or Touch-ID or third parties (e.g., OAuth).

Also, eventually, users will be locked out; it’s just a matter of time. So, do use magic links for password recovery or access recovery, but don’t mandate it as a regular login option. Switching between applications is slow and causes mistakes. Instead, nudge users to enable 2FA: it’s both usable and secure.

And most importantly, test your login flow with the tools that your customers rely on. You might be surprised how broken their experience is if they rely on password managers or security tools to log in. Good luck, everyone!

Useful Resources

Meet Smart Interface Design Patterns

If you are interested in similar insights around UX, take a look at Smart Interface Design Patterns, our 10h-video course with 100s of practical examples from real-life projects — with a live UX training later this year. Everything from mega-dropdowns to complex enterprise tables — with 5 new segments added every year. Jump to a free preview.

Meet Smart Interface Design Patterns, our video course on interface design & UX.

100 design patterns & real-life examples.
10h-video course + live UX training. Free preview.

The Scent Of UX: The Unrealized Potential Of Olfactory Design

Fotolia Subscription Monthly 4685447 Xl Stock

Imagine that you could smell this page. The introduction would emit a subtle scent of sage and lavender to set the mood. Each paragraph would fill your room with the coconut oil aroma, helping you concentrate and immerse in reading. The fragrance of the comments section, resembling a busy farmer’s market, would nudge you to share your thoughts and debate with strangers.

How would the presence of smells change your experience reading this text or influence your takeaways?

Scents are everywhere. They fill our spaces, bind our senses to objects and people, alert us to dangers, and arouse us. Smells have so much influence over our mood and behavior that hundreds of companies are busy designing fragrances for retail, enticing visitors to purchase more, hotels, making customers feel at home, and amusement parks, evoking a warm sense of nostalgia.

At the same time, the digital world, where we spend our lives working, studying, shopping, and resting, remains entirely odorless. Our smart devices are not designed to emit or recognize scents, and every corner of the Internet, including this page, smells exactly the same.

We watch movies, play games, study, and order dinner, but our sense of smell is left unengaged. The lack of odors rarely bothers us, but occasionally, we choose analog things like books merely because their digital counterparts fail to connect with us at the same level.

Could the presence of smells improve our digital experiences? What would it take to build the “smelly” Internet, and why hasn't it been done before? Last but not least, what power do scents hold over our senses, memory, and health, and how could we harness it for the digital world?

Let’s dive deep into a fascinating and underexplored realm of odors.

Olfactory Design For The Real World

Why Do We Remember Smells?

In his novel In Search of Lost Time, French writer Marcel Proust describes a sense of déjà vu he experienced after tasting a piece of cake dipped in tea:

“Immediately the old gray house upon the street rose up like a stage set… the house, the town, the square where I was sent before lunch, the streets along which I used to run errands, the country roads we took… the whole of Combray and of its surroundings… sprang into being, town and gardens alike, all from my cup of tea.”

— Marcel Proust

The Proust Effect, the phenomenon of an ‘involuntary memory’ evoked by scents, is a common occurrence. It explains how the presence of a familiar smell activates areas in our brain responsible for odor recognition, causing us to experience a strong, warm, positive sense of nostalgia.

Smells have a potent and almost magical impact on our ability to remember and recognize objects and events. “The nose makes the eyes remember”, as a renowned Finnish architect Juhani Pallasmaa puts it: a single droplet of a familiar fragrance is often enough to bring up a wild cocktail of emotions and recollections, even those that have long been forgotten.

A memory of a place, a person, or an experience is often a memory of their smell that lingers long after the odor is gone. J. Douglas Porteous, Professor of Geography at the University of Victoria, coined the term Smellscape to describe how a collective of smells in each particular area form our perception, define our attitude, and craft our recollection of it.

To put it simply, we choose to avoid beautiful places and forget delicious meals when their odors are not to our liking. Pleasant aromas, on the other hand, alter our memory, make us overlook flaws and defects, or even fall in love.

With such an immense power that scents hold over our perception of reality, it comes as no surprise they have long become a tool in the hands of brand and service designers.

Scented Advertising

What do a luxury car brand, a cosmetics store, and a carnival ride have in common? The answer is that they all have their own distinct scents.

Carefully crafted fragrances are widely used to create brand identities, make powerful impressions, and differentiate brands “emotionally and memorably”.

Some choose to complement visual identities with subtle, tailored aromas. 12.29, a creative “olfactive branding company,” developed the “scent identity” for Cadillac, a “symbol of self-expression representing the irrepressible pursuit of life.”

The branded Cadillac scent is diffused in dealerships and auto shows around the world, evoking a sense of luxury and class. Customers are expected to remember Cadillac better for its “signature nutty coffee, dark leather, and resinous amber notes”, forging a strong emotional connection with the brand.

Next time they think of Cadillac, their brain will recall its signature fragrance and the way it made them feel. Cadillac is ready to bet they will not even consider other brands afterwards.

Others may be less subtle and employ more aggressive, fragrant marketing tactics. LUSH, a British cosmetics retailer, is known for its distinct smells. Although even the company co-founder admits that odors can be overwhelming for some, LUSH’s scents play an important role in crafting the brand’s identity.

Indeed, the aroma of their stores is so recognizable that it lures customers in from afar with ease, and few walk away without forever remembering the brand’s distinct smell.

However, retail is not the only area that employs discernible smells.

Disney takes a holistic approach to service design, carefully considering every aspect that influences customer satisfaction. Smells have long been a part of the signature “Disney experience”: the main street smells like pastry and popcorn, Spaceship Earth is filled with the burning wood aroma, and Soarin’ is accompanied by notes of orange and pine.

Dozens of scent-emitting devices, Smellitzers, are responsible for adding scents to each experience. Deployed around each park and perfectly synced with every other sensory stimulus, they “shoot scents toward passersby” and “trigger memories of childhood nostalgia.”

As shown in the patent, Smellitzer is a rather simple odor delivery system designed to “enhance the sense of flight created in the minds of the passengers.” Scents are carefully curated and manufactured to evoke precise emotions without disrupting the ride experience.

Disney’s attractions, lanes, and theaters are packed with smell-emitting gadgets that distribute sweet and savoury notes. The visitors barely notice the presence of added scents, but later inevitably experience a sudden but persistent urge to return to the park.

Could it be something in the air, perhaps?

Well-curated, timely delivered, recognizable scents can be a powerful ally in the hands of a designer.

They can soothe a passenger during a long flight with the subtle notes of chamomile and mint or seduce a hungry shopper with the familiar aroma of freshly baked cinnamon buns. Scents can create and evoke great memories, amplify positive emotions, or turn casual buyers into eager and loyal consumers.

Unfortunately, smells can also ruin otherwise decent experiences.

Scented Entertainment

Why Fragrant Cinema Failed

In 1912, Aldous Huxley, author of the dystopian novel Brave New World, published an essay “Silence is Golden”, reflecting on his first experience watching a sound film. Huxley despised cinema, calling it the “most frightful creation-saving device for the production of standardized amusement”, and the addition of sound made the writer concerned for the future of entertainment. Films engaged multiple senses but demanded no intellectual involvement, becoming more accessible, more immersive, and, as Huxley feared, more influential.

“Brave New World,” published in 1932, features the cinema of the future — a multisensory entertainment complex designed to distract society from seeking a deeper sense of purpose in life. Attendees enjoy a ​​“scent organ” playing “a delightfully refreshing Herbal Capriccio — rippling arpeggios of thyme and lavender, of rosemary, basil, myrtle, tarragon,” and get to experience every physical stimulation imaginable.

Huxley’s critical take on the state of the entertainment industry was spot-on. Obsessed with the idea of multisensory entertainment, studios did not take long to begin investing in immersive experiences. The 1950s were the age of experiments designed to attract more viewers: colored cinema, 3D films, and, of course, scented movies.

In 1960, two films hit the American theaters: Scent of Mystery, accompanied by the odor-delivery technology called “Smell–O–Vision”, and Behind the Great Wall, employing the process named AromaRama. Smell–O–Vision was designed to transport scents through tubes to each seat, much like Disney’s Smellitzers, whereas AromaRama distributed smells through the theater’s ventilation.

Both scented movies were panned by critics and viewers alike. In his review for the New York Times, Bosley Crowther wrote that “...synthetic smells [...] occasionally befit what one is viewing, but more often they confuse the atmosphere”. Audiences complained about smells being either too subtle or too overpowering and the machines disrupting the viewing experience.

The groundbreaking technologies were soon forgotten, and all plans to release more scented films were scrapped.

Why did odors, so efficient at manufacturing nostalgic memories of an amusement park, fail to entertain the audience at the movies? On the one hand, it may attributed to the technological limitations of the time. For instance, AromaRama diffused the smells into the ventilation, which significantly delayed the delivery and required scents to be removed between scenes. Suffice it to say the viewers did not enjoy the experience.

However, there could be other possible explanations.

First of all, digital entertainment is traditionally odorless. Viewers do not anticipate movies to be accompanied by smells, and their brains are conditioned to ignore them. Researchers call it “inattentional anosmia”: people connect their enjoyment with what they see on the screen, not what they smell or taste.

Moreover, background odors tend to fade and become less pronounced with time. A short exposure to a pleasant odor may be complimentary. For instance, viewers could smell orange as the character in “Behind the Great Wall” cut and squeezed the fruit: an “impressive” moment, as admitted by critics. However, left to linger, even the most pleasant scents can leave the viewer uninvolved or irritated.

Finally, cinema does not require active sensory involvement. Viewers sit still in silence, rarely even moving their heads, while their sight and hearing are busy consuming and interpreting the information. Immersion requires suspension of disbelief: well-crafted films force the viewer to forget the reality around them, but the addition of scents may disrupt this state, especially if scents are not relevant or well-crafted.

For the scented movie to engage the audience, smells must be integrated into the film’s events and play an important role in the viewing experience. Their delivery must be impeccable: discreet, smooth, and perfectly timed. In time, perhaps, we may see the revival of scented cinema. Until then, rare auteur experiments and 4D–cinema booths at carnivals will remain the only places where fragrant films will live on.

Fortunately, the lessons from the early experiments helped others pave the way for the future of fragrant entertainment.

Immersive Gaming

Unlike movies, video games require active participation. Players are involved in crafting the narrative of the game and, as such, may expect (and appreciate) a higher degree of realism. Virtual Reality is a good example of technology designed for full sensory stimulation.

Modern headsets are impressive, but several companies are already working hard on the next-gen tech for immersive gaming. Meta and Manus are developing gloves that make virtual elements tangible. Teslasuit built a full-body suit that captures motion and biometry, provides haptic feedback, and emulates sensations for objects in virtual reality. We may be just a few steps away from virtual multi-sensory entertainment being as widespread as mobile phones.

Scents are coming to VR, too, albeit at a slower pace, with a few companies already selling devices for fragrant entertainment. For instance, GameScent has developed a cube that can distribute up to 8 smells, from “gunfire” and “explosion” to “forest” and “storm”, using AI to sync the odors with the events in the game.

The vast majority of experiments, however, occur in the labs, where researchers attempt to understand how smells impact gamers and test various concepts. Some assign smells to locations in a VR game and distribute them to players; others have the participants use a hand-held device to “smell” objects in the game.

The majority of studies demonstrate promising results. The addition of fragrances creates a deeper sense of immersion and enhances realism in virtual reality and in a traditional gaming setting.

A notable example of the latter is “Tainted”, an immersive game based on South-East Asian folklore, developed by researchers in 2017. The objective of the game is to discover and burn banana trees, where the main antagonist of the story — a mythical vengeful spirit named Pontianak — is traditionally believed to hide.

The way “Tainted” incorporates smells into the gameplay is quite unique. A scent-emitting module, placed in front of the player, diffuses fragrances to complement the narrative. For instance, the smell of banana signals the ghost’s presence, whereas pineapple aroma means that a flammable object required to complete the quest is nearby. Odors inform the player of dangers, give directions, and become an integral part of the gaming experience, like visuals and sound.

Some of the most creative examples of scented learning come from places that combine education and entertainment, most notably, museums.

Jorvik Viking Centre is famous for its use of “smells of Viking-age York” to capture the unique atmosphere of the past. Its scented halls, holograms, and entertainment programs turn a former archeological site into a carnival ride that teleports visitors into the 10th century to immerse them into the daily life of the Vikings.

Authentic smells are the center’s distinct feature, an integral part of its branding and marketing, and an important addition to its collection. Smells are responsible for making Jorvik exhibitions so memorable, and hopefully, for visitors walking away with a few Viking trivia facts firmly stuck in their heads.

At the same time, learning is becoming increasingly more digital, from mobile apps for foreign languages to student portals and online universities. Smart devices strive to replace classrooms with their analog textbooks, papers, gel pens, and teachers. Virtual Reality is a step towards the future of immersive digital education, and odors may play a more significant role in making it even more efficient.

Education will undoubtedly continue leveraging the achievements of the digital revolution to complement its existing tools. Tablets and Kindles are on their way to replace textbooks and pens. Phones are no longer deemed a harmful distraction that causes brain cancer.

Odors, in turn, are becoming “learning supplements”. Teachers and parents have access to personalized diffusers that distribute the smell of peppermint to enhance students’ attention. Large scent-emitting devices for educational facilities are available on the market, too.

At the same time, inspired to figure out the way to upload knowledge straight into our brains, we’ve discovered a way to learn things in our sleep using smells. Several studies have shown that exposure to scents during sleep significantly improves cognitive abilities and memory. More than that, smells can activate our memory while we sleep and solidify what we have learnt while awake.

Odors may not replace textbooks and lectures, but their addition will make remembering and recalling things significantly easier. In fact, researchers from MIT built and tested a wearable scent-emitting device that can be used for targeted memory reactivation.

In time, we will undoubtedly see more smart devices that make use of scents for memory enhancement, training, and entertainment. Integrated into the ecosystems of gadgets, olfactory wearables and smart home appliances will improve our well-being, increase productivity, and even detect early symptoms of illnesses.

There is, however, a caveat.

The Challenging UX Of Scents

We know very little about smells.

Until 2004, when Richard Axel and Linda Buck received a Nobel Prize for identifying the genes that control odor receptors, we didn’t even know how our bodies processed smells or that different areas in our brains were activated by different odors.

We know that our experience with smells is deep and intimate, from the memories they create to the emotions they evoke. We are aware that unpleasant scents linger longer and have a stronger impact on our mental state and memory. Finally, we understand that intensity, context, and delivery matter as much as the scent itself and that a decent aroma diffused out of place ruins the experience.

Thus, if we wish to build devices that make the best use of scents, we need to follow a few simple principles.

Design Principle #1: Tailor The Scents To Each User

In his article about Smellscapes, J. Douglas Porteous writes:

“The smell of a certain institutional soap may carry a person back to the purgatory of boarding school. A particular floral fragrance reminds one of a lost love. A gust of odour from an ethnic spice emporium may waft one back, in memory, to Calcutta.”

— J. Douglas Porteous

Smells revive hidden memories and evoke strong emotions, but their connection to our minds is deeply personal. A rich, spicy aroma of freshly roasted coffee beans will not have the same impact on different people, and in order to use scents in learning, we need to tailor the experience to each user.

In order to maximize the potential of odors in immersion and learning, we need to understand which smells have the most impact on the user. By filtering out the smells that the user finds unpleasant or associates with sad events in their past, we can reduce any potential negative effect on their wellness or memory.

Design Principle #2: Stick To The Simpler Smells

Humans are notoriously bad at describing odors.

Very few languages in the world feature specific terms for smells. For instance, the speakers of Jahai, a language in Malaysia, enjoy the privilege of having specific names for scents like “bloody smell that attracts tigers” and “wild mango, wild ginger roots, bat caves, and petrol”.

English, on the other hand, often uses adjectives associated with flavor (“smoky vanilla”) or comparison (“smells like orange”) to describe scents. For centuries, we have been trying to work out a system that could help cluster odors.

Aristotle classified all odors into six groups: sweet, acid, severe, fatty, sour, and fetid (unpleasant). Carl Linnaeus expanded it to 7 types: aromatic, fragrant, alliaceous (garlic), ambrosial (musky), hircinous (goaty), repulsive, and nauseous. Hans Henning arranged all scent groups in a prism. None of the existing classifications, however, help accurately describe complex smells, which inevitably makes it harder to recreate them.

Academics have developed several comprehensive lists, for instance, the Odor Character Profiling that contains 146 unique descriptors. Pleasant smells from the list are easier to reproduce than unique and sophisticated odors.

Although an aroma of the “warm touch of an early summer sun” may work better for a particular user than the smell of an apple pie, the high price of getting the scent wrong makes it a reasonable trade-off.

Design Principle #3: Ensure Stable And Convenient Delivery

Nothing can ruin a good olfactory experience more than an imperfect delivery system.

Disney’s Smellitzers and Jorvik’s scented exhibition set the standard for discreet, contextual, and consistent inclusion of smells to complement the experience. Their diffusers are well-concealed, and odors do not come off as overwhelming or out of place.

On the other hand, the failure of scented movies from the 1950s can at least partially be attributed to poorly designed aroma delivery systems. Critics remembered that even the purifying treatment that was used to clear the theater air between scenes left a “sticky, sweet” and “upsetting” smell.

Good delivery systems are often simple and focus on augmenting the experience without disrupting it. For instance, eScent, a scent-enhanced FFP3 mask, is engineered to reduce stress and improve the well-being of frontline workers. The mask features a slot for applicators infused with essential oil; users can choose fragrances and swap the applicator whenever they want. Beside that, eScent is no different from its “analog” predecessor: it does not require special equipment or preparation, and the addition of smells does not alter the experience of wearing a mask.

In The Not Too Distant Future

We may know little about smells, but we are steadily getting closer to harnessing their power.

In 2022, Alex Wiltschko, a former Google staff research scientist, founded Osmo, a company dedicated to “giving computers a sense of smell.” In the long run, Osmo aspires to use its knowledge to manufacture scents on demand from sustainable synthetic materials.

Today, the company operates as a research lab, using a trained AI to predict the smell of a substance by analyzing its molecular structure. Osmo’s first tests demonstrated some promising results, with machine accurately describing the scents in 53% of cases.

Should Osmo succeed at building a machine capable of recognizing and predicting smells, it will change the digital world forever. How will we interact with our smart devices? How will we use their newly discovered sense of smell to exchange information, share precious memories with each other, or relive moments from the past? Is now the right time for us to come up with ideas, products, and services for the future?

Odors are a booming industry that offers designers and engineers a unique opportunity to explore new and brave concepts. With the help of smells, we can transform entire industries, from education to healthcare, crafting immersive multi-sensory experiences for learning and leisure.

Smells are a powerful tool that requires precision and perfection to reach the desired effect. Our past shortcomings may have tainted the reputation of scented experiences, but recent progress demonstrates that we have learnt our lessons well. Modern technologies make it even easier to continue the explorations and develop new ways to use smells in entertainment, learning, and wellness — in the real world and beyond.

Our digital spaces may be devoid of scents, but they will not remain odorless for long.

Top Free Tools for Creating Accessible Email Designs

Featured Imgs 23

Creating accessible emails is crucial for web designers and students alike. Ensuring your emails are accessible widens your audience and provides a better user experience for everyone. Let’s explore some free tools to help you design accessible emails efficiently.

Why Accessibility in Email Design is Important ?

Before we dive into the tools, it’s essential to understand why accessibility matters in email design. Picture an email that you can’t read because the text is too small or the color contrast is poor. For many, this isn’t just a minor inconvenience—it can render the content completely inaccessible. Ensuring your emails are accessible is not only a good practice but a necessity for inclusive design.

Accessibility Insights for Web

Accessibility Insights

Accessibility Insights for Web is a browser extension that helps you find and fix accessibility issues in your email design. It provides automated checks and guided manual assessments, making it easy to ensure your emails are accessible to all users.

Usage Example:

Install the browser extension.

Run the automated checks on your email’s HTML.

Follow the guided assessments to fix any identified issues.

Source

WAVE Web Accessibility Evaluation Tool

WAVE

WAVE by WebAIM is a comprehensive tool for analyzing the accessibility of your email designs. It highlights issues like missing alt text, low contrast, and more, providing you with a detailed report.

Usage Example:

Copy and paste your email HTML into the WAVE tool.

Review the highlighted issues and follow the suggestions to improve accessibility.

Source

Email On Acid

Email On Acid

Email on Acid offers a free accessibility checker as part of its suite of email testing tools. This tool examines your email for various accessibility concerns, including screen reader compatibility and color contrast.

Usage Example:

Upload your email design to Email on Acid.

Run the accessibility checker to get a detailed report.

Address the issues flagged by the tool.

Source

Litmus

Litmus

Litmus provides a free accessibility checker within its suite of email testing tools. It helps you ensure that your emails are accessible by checking for issues such as color contrast and screen reader compatibility.

Usage Example:

Upload your email design to Litmus.

Use the accessibility checker to identify and fix issues.

Ensure your email meets accessibility standards before sending.

Source

accessiBe

accessiBe

accessiBe offers a range of accessibility tools, including a free audit tool that helps you identify accessibility issues in your email designs. It provides actionable insights to help you make your emails more accessible.

Usage Example:

Use the accessiBe audit tool to scan your email HTML.

Review the report and implement the suggested changes to improve accessibility.

Source

Accessible Email

Accessible Email

Accessible-Email.org provides guidelines and resources for creating accessible emails. Their online tool checks your email design against a comprehensive list of accessibility criteria.

Usage Example:

Paste your email HTML into the tool.

Receive a detailed analysis with actionable recommendations.

Source

Microsoft Outlook Accessibility Checker

Outlook

Microsoft Outlook includes an accessibility checker that helps ensure your emails are accessible to all recipients. This tool is particularly useful for those who use Outlook for email design and distribution.

Usage Example:

Compose your email in Microsoft Outlook.

Use the built-in accessibility checker to identify and fix issues.

Ensure your email meets accessibility standards before sending.

Source

AChecker

AChecker

AChecker is a web accessibility evaluation tool that helps you identify accessibility issues in your email designs. It provides a detailed report with recommendations for improvements.

Usage Example:

Copy and paste your email HTML into AChecker.

Review the report and implement the suggested changes to enhance accessibility.

Source

Gmail Accessibility Features

Gmail

Gmail offers several built-in accessibility features that help you create and manage accessible emails. These features include screen reader support, keyboard shortcuts, and more.

Usage Example:

Compose your email in Gmail.

Utilize the accessibility features to ensure your email is accessible.

Test your email with screen readers to verify compatibility.

Source

Putsmail

Putsmail

PutsMail allows you to test your email designs in various email clients and devices. While not specifically an accessibility tool, it helps you ensure that your email renders correctly across different platforms, which is a key aspect of accessibility.

Usage Example:

Upload your email design to PutsMail.

Test your email across various clients and devices.

Make adjustments to ensure consistent and accessible rendering.

Source

How to Integrate These Tools into Your Workflow

To maintain a speedy workflow while ensuring accessibility, integrate these tools into your design process. Start by checking color contrast early on, then validate your HTML with tools like WAVE and AChecker before finalizing your email. Finally, test with screen readers to catch any issues that automated tools might miss.

Engagement and Practical Tips

To keep your workflow efficient, consider creating a checklist based on the tools and their usage. Here’s a quick example:

Initial Design:

Use the Color Contrast Checker to select accessible colors.

HTML Development:

Validate your HTML with WAVE and Accessible-Email.org.

Final Review:

Test with Litmus for comprehensive accessibility checks.

Use VoiceOver and NVDA to ensure screen reader compatibility.

By following this process, you can streamline your email design workflow while ensuring accessibility.

Creating accessible emails doesn’t have to be complicated. With the right tools and a well-integrated workflow, you can design emails that everyone can enjoy. Remember, accessibility is not just a best practice—it’s a commitment to inclusivity and a broader reach. Whether you’re a seasoned web designer or a student just starting, these tools will help you make your emails accessible and effective.

Empower your designs with accessibility, and you’ll not only reach more people but also demonstrate your commitment to creating inclusive digital experiences.

The post Top Free Tools for Creating Accessible Email Designs appeared first on CSS Author.

How To Hack Your Google Lighthouse Scores In 2024

Fotolia Subscription Monthly 4685447 Xl Stock

This article is a sponsored by Sentry.io

Google Lighthouse has been one of the most effective ways to gamify and promote web page performance among developers. Using Lighthouse, we can assess web pages based on overall performance, accessibility, SEO, and what Google considers “best practices”, all with the click of a button.

We might use these tests to evaluate out-of-the-box performance for front-end frameworks or to celebrate performance improvements gained by some diligent refactoring. And you know you love sharing screenshots of your perfect Lighthouse scores on social media. It’s a well-deserved badge of honor worthy of a confetti celebration.

Just the fact that Lighthouse gets developers like us talking about performance is a win. But, whilst I don’t want to be a party pooper, the truth is that web performance is far more nuanced than this. In this article, we’ll examine how Google Lighthouse calculates its performance scores, and, using this information, we will attempt to “hack” those scores in our favor, all in the name of fun and science — because in the end, Lighthouse is simply a good, but rough guide for debugging performance. We’ll have some fun with it and see to what extent we can “trick” Lighthouse into handing out better scores than we may deserve.

But first, let’s talk about data.

Field Data Is Important

Local performance testing is a great way to understand if your website performance is trending in the right direction, but it won’t paint a full picture of reality. The World Wide Web is the Wild West, and collectively, we’ve almost certainly lost track of the variety of device types, internet connection speeds, screen sizes, browsers, and browser versions that people are using to access websites — all of which can have an impact on page performance and user experience.

Field data — and lots of it — collected by an application performance monitoring tool like Sentry from real people using your website on their devices will give you a far more accurate report of your website performance than your lab data collected from a small sample size using a high-spec super-powered dev machine under a set of controlled conditions. Philip Walton reported in 2021 that “almost half of all pages that scored 100 on Lighthouse didn’t meet the recommended Core Web Vitals thresholds” based on data from the HTTP Archive.

Web performance is more than a single core web vital metric or Lighthouse performance score. What we’re talking about goes way beyond the type of raw data we’re working with.

Web Performance Is More Than Numbers

Speed is often the first thing that comes up when talking about web performance — just how long does a page take to load? This isn’t the worst thing to measure, but we must bear in mind that speed is probably influenced heavily by business KPIs and sales targets. Google released a report in 2018 suggesting that the probability of bounces increases by 32% if the page load time reaches higher than three seconds, and soars to 123% if the page load time reaches 10 seconds. So, we must conclude that converting more sales requires reducing bounce rates. And to reduce bounce rates, we must make our pages load faster.

But what does “load faster” even mean? At some point, we’re physically incapable of making a web page load any faster. Humans — and the servers that connect them — are spread around the globe, and modern internet infrastructure can only deliver so many bytes at a time.

The bottom line is that page load is not a single moment in time. In an article titled “What is speed?” Google explains that a page load event is:

[…] “an experience that no single metric can fully capture. There are multiple moments during the load experience that can affect whether a user perceives it as ‘fast’, and if you just focus solely on one, you might miss bad experiences that happen during the rest of the time.”

The key word here is experience. Real web performance is less about numbers and speed than it is about how we experience page load and page usability as users. And this segues nicely into a discussion of how Google Lighthouse calculates performance scores. (It’s much less about pure speed than you might think.)

How Google Lighthouse Performance Scores Are Calculated

The Google Lighthouse performance score is calculated using a weighted combination of scores based on core web vital metrics (i.e., First Contentful Paint (FCP), Largest Contentful Paint (LCP), Cumulative Layout Shift (CLS)) and other speed-related metrics (i.e., Speed Index (SI) and Total Blocking Time (TBT)) that are observable throughout the page load timeline.

This is how the metrics are weighted in the overall score:

Metric Weighting (%)
Total Blocking Time 30
Cumulative Layout Shift 25
Largest Contentful Paint 25
First Contentful Paint 10
Speed Index 10

The weighting assigned to each score gives us insight into how Google prioritizes the different building blocks of a good user experience:

1. A Web Page Should Respond to User Input

The highest weighted metric is Total Blocking Time (TBT), a metric that looks at the total time after the First Contentful Paint (FCP) to help indicate where the main thread may be blocked long enough to prevent speedy responses to user input. The main thread is considered “blocked” any time there’s a JavaScript task running on the main thread for more than 50ms. Minimizing TBT ensures that a web page responds to physical user input (e.g., key presses, mouse clicks, and so on).

2. A Web Page Should Load Useful Content With No Unexpected Visual Shifts

The next most weighted Lighthouse metrics are Largest Contentful Paint (LCP) and Cumulative Layout Shift (CLS). LCP marks the point in the page load timeline when the page’s main content has likely loaded and is therefore useful.

At the point where the main content has likely loaded, you also want to maintain visual stability to ensure that users can use the page and are not affected by unexpected visual shifts (CLS). A good LCP score is anything less than 2.5 seconds (which is a lot higher than we might have thought, given we are often trying to make our websites as fast as possible).

3. A Web Page Should Load Something

The First Contentful Paint (FCP) metric marks the first point in the page load timeline where the user can see something on the screen, and the Speed Index (SI) measures how quickly content is visually displayed during page load over time until the page is “complete”.

Your page is scored based on the speed indices of real websites using performance data from the HTTP Archive. A good FCP score is less than 1.8 seconds and a good SI score is less than 3.4 seconds. Both of these thresholds are higher than you might expect when thinking about speed.

Usability Is Favored Over Raw Speed

Google Lighthouse’s performance scoring is, without a doubt, less about speed and more about usability. Your SI and FCP could be super quick, but if your LCP takes too long to paint, and if CLS is caused by large images or external content taking some time to load and shifting things visually, then your overall performance score will be lower than if your page was a little slower to render the FCP but didn’t cause any CLS. Ultimately, if the page is unresponsive due to JavaScript blocking the main thread for more than 50ms, your performance score will suffer more than if the page was a little slow to paint the FCP.

To understand more about how the weightings of each metric contribute to the final performance score, you can play about with the sliders on the Lighthouse Scoring Calculator, and here’s a rudimentary table demonstrating the effect of skewed individual metric weightings on the overall performance score, proving that page usability and responsiveness is favored over raw speed.

Description FCP (ms) SI (ms) LCP (ms) TBT (ms) CLS Overall Score
Slow to show something on screen 6000 0 0 0 0 90
Slow to load content over time 0 5000 0 0 0 90
Slow to load the largest part of the page 0 0 6000 0 0 76
Visual shifts occurring during page load 0 0 0 0 0.82 76
Page is unresponsive to user input 0 0 0 2000 0 70

The overall Google Lighthouse performance score is calculated by converting each raw metric value into a score from 0 to 100 according to where it falls on its Lighthouse scoring distribution, which is a log-normal distribution derived from the performance metrics of real website performance data from the HTTP Archive. There are two main takeaways from this mathematically overloaded information:

  1. Your Lighthouse performance score is plotted against real website performance data, not in isolation.
  2. Given that the scoring uses log-normal distribution, the relationship between the individual metric values and the overall score is non-linear, meaning you can make substantial improvements to low-performance scores quite easily, but it becomes more difficult to improve an already high score.

Read more about how metric scores are determined, including a visualization of the log-normal distribution curve on developer.chrome.com.

Can We “Trick” Google Lighthouse?

I appreciate Google’s focus on usability over pure speed in the web performance conversation. It urges developers to think less about aiming for raw numbers and more about the real experiences we build. That being said, I’ve wondered whether today in 2024, it’s possible to fool Google Lighthouse into believing that a bad page in terms of usability and usefulness is actually a great one.

I put on my lab coat and science goggles to investigate. All tests were conducted:

  • Using the Chromium Lighthouse plugin,
  • In an incognito window in the Arc browser,
  • Using the “navigation” and “mobile” settings (apart from where described differently),
  • By me, in a lab (i.e., no field data).

That all being said, I fully acknowledge that my controlled test environment contradicts my advice at the top of this post, but the experiment is an interesting ride nonetheless. What I hope you’ll take away from this is that Lighthouse scores are only one piece — and a tiny one at that — of a very large and complex web performance puzzle. And, without field data, I’m not sure any of this matters anyway.

How to Hack FCP and LCP Scores

TL;DR: Show the smallest amount of LCP-qualifying content on load to boost the FCP and LCP scores until the Lighthouse test has likely finished.

FCP marks the first point in the page load timeline where the user can see anything at all on the screen, while LCP marks the point in the page load timeline when the main page content (i.e., the largest text or image element) has likely loaded. A fast LCP helps reassure the user that the page is useful. “Likely” and “useful” are the important words to bear in mind here.

What Counts as an LCP Element

The types of elements on a web page considered by Lighthouse for LCP are:

  • <img> elements,
  • <image> elements inside an <svg> element,
  • <video> elements,
  • An element with a background image loaded using the url() function, (and not a CSS gradient), and
  • Block-level elements containing text nodes or other inline-level text elements.

The following elements are excluded from LCP consideration due to the likelihood they do not contain useful content:

  • Elements with zero opacity (invisible to the user),
  • Elements that cover the full viewport (likely to be background elements), and
  • Placeholder images or other images with low entropy (i.e., low informational content, such as a solid-colored image).

However, the notion of an image or text element being useful is completely subjective in this case and generally out of the realm of what machine code can reliably determine. For example, I built a page containing nothing but a <h1> element where, after 10 seconds, JavaScript inserts more descriptive text into the DOM and hides the <h1> element.

Lighthouse considers the heading element to be the LCP element in this experiment. At this point, the page load timeline has finished, but the page’s main content has not loaded, even though Lighthouse thinks it is likely to have loaded within those 10 seconds. Lighthouse still awards us with a perfect score of 100 even if the heading is replaced by a single punctuation mark, such as a full stop, which is even less useful.

This test suggests that if you need to load page content via client-side JavaScript, we‘ll want to avoid displaying a skeleton loader screen since that requires loading more elements on the page. And since we know the process will take some time — and that we can offload the network request from the main thread to a web worker so it won’t affect the TBT — we can use some arbitrary “splash screen” that contains a minimal viable LCP element (for better FCP scoring). This way, we’re giving Lighthouse the impression that the page is useful to users quicker than it actually is.

All we need to do is include a valid LCP element that contains something that counts as the FCP. While I would never recommend loading your main page content via client-side JavaScript in 2024 (serve static HTML from a CDN instead or build as much of the page as you can on a server), I would definitely not recommend this “hack” for a good user experience, regardless of what the Lighthouse performance score tells you. This approach also won’t earn you any favors with search engines indexing your site, as the robots are unable to discover the main content while it is absent from the DOM.

I also tried this experiment with a variety of random images representing the LCP to make the page even less useful. But given that I used small file sizes — made smaller and converted into “next-gen” image formats using a third-party image API to help with page load speed — it seemed that Lighthouse interpreted the elements as “placeholder images” or images with “low entropy”. As a result, those images were disqualified as LCP elements, which is a good thing and makes the LCP slightly less hackable.

View the demo page and use Chromium DevTools in an incognito window to see the results yourself.

This hack, however, probably won’t hold up in many other use cases. Discord, for example, uses the “splash screen” approach when you hard-refresh the app in the browser, and it receives a sad 29 performance score.

Compared to my DOM-injected demo, the LCP element was calculated as some content behind the splash screen rather than elements contained within the splash screen content itself, given there were one or more large images in the focussed text channel I tested on. One could argue that Lighthouse scores are less important for apps that are behind authentication anyway: they don’t need to be indexed by search engines.

There are likely many other situations where apps serve user-generated content and you might be unable to control the LCP element entirely, particularly regarding images.

For example, if you can control the sizes of all the images on your web pages, you might be able to take advantage of an interesting hack or “optimization” (in very large quotes) to arbitrarily game the system, as was the case of RentPath. In 2021, developers at RentPath managed to improve their Lighthouse performance score by 17 points when increasing the size of image thumbnails on a web page. They convinced Lighthouse to calculate the LCP element as one of the larger thumbnails instead of a Google Map tile on the page, which takes considerably longer to load via JavaScript.

The bottom line is that you can gain higher Lighthouse performance scores if you are aware of your LCP element and in control of it, whether that’s through a hack like RentPath’s or mine or a real-deal improvement. That being said, whilst I’ve described the splash screen approach as a hack in this post, that doesn’t mean this type of experience couldn’t offer a purposeful and joyful experience. Performance and user experience are about understanding what’s happening during page load, and it’s also about intent.

How to Hack CLS Scores

TL;DR: Defer loading content that causes layout shifts until the Lighthouse test has likely finished to make the test think it has enough data. CSS transforms do not negatively impact CLS, except if used in conjunction with new elements added to the DOM.

CLS is measured on a decimal scale; a good score is less than 0.1, and a poor score is greater than 0.25. Lighthouse calculates CLS from the largest burst of unexpected layout shifts that occur during a user’s time on the page based on a combination of the viewport size and the movement of unstable elements in the viewport between two rendered frames. Smaller one-off instances of layout shift may be inconsequential, but a bunch of layout shifts happening one after the other will negatively impact your score.

If you know your page contains annoying layout shifts on load, you can defer them until after the page load event has been completed, thus fooling Lighthouse into thinking there is no CLS. This demo page I created, for example, earns a CLS score of 0.143 even though JavaScript immediately starts adding new text elements to the page, shifting the original content up. By pausing the JavaScript that adds new nodes to the DOM by an arbitrary five seconds with a setTimeout(), Lighthouse doesn’t capture the CLS that takes place.

This other demo page earns a performance score of 100, even though it is arguably less useful and useable than the last page given that the added elements pop in seemingly at random without any user interaction.

Whilst it is possible to defer layout shift events for a page load test, this hack definitely won’t work for field data and user experience over time (which is a more important focal point, as we discussed earlier). If we perform a “time span” test in Lighthouse on the page with deferred layout shifts, Lighthouse will correctly report a non-green CLS score of around 0.186.

If you do want to intentionally create a chaotic experience similar to the demo, you can use CSS animations and transforms to more purposefully pop the content into view on the page. In Google’s guide to CLS, they state that “content that moves gradually and naturally from one position to another can often help the user better understand what’s going on and guide them between state changes” — again, highlighting the importance of user experience in context.

On this next demo page, I’m using CSS transform to scale() the text elements from 0 to 1 and move them around the page. The transforms fail to trigger CLS because the text nodes are already in the DOM when the page loads. That said, I did observe in my testing that if the text nodes are added to the DOM programmatically after the page loads via JavaScript and then animated, Lighthouse will indeed detect CLS and score things accordingly.

You Can’t Hack a Speed Index Score

The Speed Index score is based on the visual progress of the page as it loads. The quicker your content loads nearer the beginning of the page load timeline, the better.

It is possible to do some hack to trick the Speed Index into thinking a page load timeline is slower than it is. Conversely, there’s no real way to “fake” loading content faster than it does. The only way to make your Speed Index score better is to optimize your web page for loading as much of the page as possible, as soon as possible. Whilst not entirely realistic in the web landscape of 2024 (mainly because it would put designers out of a job), you could go all-in to lower your Speed Index as much as possible by:

  • Delivering static HTML web pages only (no server-side rendering) straight from a CDN,
  • Avoiding images on the page,
  • Minimizing or eliminating CSS, and
  • Preventing JavaScript or any external dependencies from loading.
You Also Can’t (Really) Hack A TBT Score

TBT measures the total time after the FCP where the main thread was blocked by JavaScript tasks for long enough to prevent responses to user input. A good TBT score is anything lower than 200ms.

JavaScript-heavy web applications (such as single-page applications) that perform complex state calculations and DOM manipulation on the client on page load (rather than on the server before sending rendered HTML) are prone to suffering poor TBT scores. In this case, you could probably hack your TBT score by deferring all JavaScript until after the Lighthouse test has finished. That said, you’d need to provide some kind of placeholder content or loading screen to satisfy the FCP and LCP and to inform users that something will happen at some point. Plus, you’d have to go to extra lengths to hack around the front-end framework you’re using. (You don’t want to load a placeholder page that, at some point in the page load timeline, loads a separate React app after an arbitrary amount of time!)

What’s interesting is that while we’re still doing all sorts of fancy things with JavaScript in the client, advances in the modern web ecosystem are helping us all reduce the probability of a less-than-stellar TBT score. Many front-end frameworks, in partnership with modern hosting providers, are capable of rendering pages and processing complex logic on demand without any client-side JavaScript. While eliminating JavaScript on the client is not the goal, we certainly have a lot of options to use a lot less of it, thus minimizing the risk of doing too much computation on the main thread on page load.

Bottom Line: Lighthouse Is Still Just A Rough Guide

Google Lighthouse can’t detect everything that’s wrong with a particular website. Whilst Lighthouse performance scores prioritize page usability in terms of responding to user input, it still can’t detect every terrible usability or accessibility issue in 2024.

In 2019, Manuel Matuzović published an experiment where he intentionally created a terrible page that Lighthouse thought was pretty great. I hypothesized that five years later, Lighthouse might do better; but it doesn’t.

On this final demo page I put together, input events are disabled by CSS and JavaScript, making the page technically unresponsive to user input. After five seconds, JavaScript flips a switch and allows you to click the button. The page still scores 100 for both performance and accessibility.

You really can’t rely on Lighthouse as a substitute for usability testing and common sense.

Some More Silly Hacks

As with everything in life, there’s always a way to game the system. Here are some more tried and tested guaranteed hacks to make sure your Lighthouse performance score artificially knocks everyone else’s out of the park:

  • Only run Lighthouse tests using the fastest and highest-spec hardware.
  • Make sure your internet connection is the fastest it can be; relocate if you need to.
  • Never use field data, only lab data, collected using the aforementioned fastest and highest-spec hardware and super-speed internet connection.
  • Rerun the tests in the lab using different conditions and all the special code hacks I described in this post until you get the result(s) you want to impress your friends, colleagues, and random people on the internet.

Note: The best way to learn about web performance and how to optimize your websites is to do the complete opposite of everything we’ve covered in this article all of the time. And finally, to seriously level up your performance skills, use an application monitoring tool like Sentry. Think of Lighthouse as the canary and Sentry as the real-deal production-data-capturing, lean, mean, web vitals machine.

And finally-finally, here’s the link to the full demo site for educational purposes.

Where to Download Blender Character Models for Free

Featured Imgs 23

When delving into the world of Blender character models, it’s essential to understand the vast array of options available for download. From detailed humanoid figures to fantastical creatures, the diversity of free models can cater to a wide range of projects and preferences. Blender character modeling offers an exciting avenue for 3D designers to explore their creativity and enhance their projects with ready-to-use assets.

As a seasoned 3D designer with over 8 years of experience, I understand the significance of Blender character modeling. Blender serves as a versatile tool for creating diverse and intricate character models with the latest version being 4.1.1.

Benefits of Using Free Character Models for Blender

Using free character models for Blender can save time and effort in creating unique designs. They provide a starting point for projects and can inspire creativity in 3D modeling workflows. Free models also help students learn and practice their skills without the need to create everything from scratch.

Using Free Character Models Effectively

Here are some ways to make the most out of the free character models you download:

  • Customization : Use Blender’s tools to modify the models, adjusting textures, poses, and other features to fit your project’s needs.
  • Learning Tool : Study how these models are constructed to improve your own modeling skills. This is especially beneficial for students and beginners.
  • Time-Saving : Free models can save you a lot of time, allowing you to focus on other aspects of your project like animation or scene composition.

Accessing free Blender character models from platforms like BlenderKit, TurboSquid, CGTrader, Free3D, and Blend Swap can significantly enhance your 3D modeling projects. These resources offer a variety of high-quality models that can save you time and help you learn new techniques. Dive into these sites and discover how they can benefit your next project!

TurboSquid

TurboSquid

Source

Blend Swap

Blend Swap

Source

Sketchfab

Sketchfab

Source

CGTrader

CGTrader

Source

Free3D

Free3D

Source

Clara.io

Clara.io

Source

Blenderkit

Blenderkit

Source

RenderHub

RenderHub

Source

3DExport

3DExport

Source

3D Warehouse

3D Warehouse

Source

Open3DModel

Open3DModel

Source

Cadnav

Cadnav

Source

Blender Market

Blender Market

Source

Blender Studio

Blender Studio

Source

Mixamo

Mixamo

Source

OpenGameArt

OpenGameArt

Source

NASA’s 3D Resources

NASA's 3D Resources

Source

Daz 3D

Daz 3D

Source

The post Where to Download Blender Character Models for Free appeared first on CSS Author.