
Learn how to conduct a WordPress security audit by following these easy steps. Protect your site from vulnerabilities. Get started today!

Tips, Expertise, Articles and Advice from the Pro's for Your Website or Blog to Succeed


Modals have been an important part of websites for two decades. Stacking contents and using fetch to accomplish tasks are a great way to improve UX on both desktop and mobile. Unfortunately most developers don’t know that the HTML and JavaScript specs have implemented a native modal system via the popover attribute — let’s check it out!
Creating a native HTML modal consists of using the popovertarget attribute as the trigger and the popover attribute, paired with an id, to identify the content element:
<!--
  "popovertarget" attribute will map to "id" of popover contents
-->
<button popovertarget="popover-contents">Open popover</button>
<div id="popover-contents" popover>This is the contents of the popover</div>
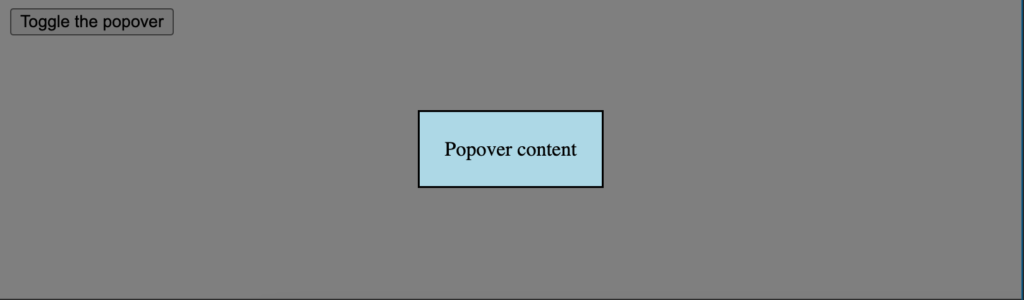
Upon clicking the button, the popover will open. The popover, however, will not have a traditional background layer color so we’ll need to implement that on our own with some CSS magic.
Styling the contents of the popover content is pretty standard but we can use the browser stylesheet selector’s pseudo-selector to style the “background” of the modal:
/* contents of the popover */
[popover] {
  background: lightblue;
  padding: 20px;
}

/* the dialog's "modal" background */
[popover]:-internal-popover-in-top-layer::backdrop {
  background: rgba(0, 0, 0, .5);
}
:-internal-popover-in-top-layer::backdrop represents the “background” of the modal. Traditionally that UI has been an element with opacity such to show the stacking relationship.
The post HTML popover Attribute appeared first on David Walsh Blog.


Are you looking for a way to create a sticky floating footer bar in WordPress?
A sticky floating footer bar stays visible on your website even when users scroll down on your page. It can help you promote discount offers or social media handles, which can reduce the bounce rate and get more conversions.
In this article, we will show you how to easily create a sticky floating footer bar in WordPress, step by step.

A sticky floating footer bar allows you to prominently display important content and news to users.
This bar remains visible to visitors at all times, so they are more likely to click on it and discover more useful content.

You can use the floating footer bar to:
Having said that, let’s see how to easily create a sticky floating footer bar in WordPress. We will show you two methods in this tutorial, and you can use the links below to jump to the method of your choice:
You can easily create a sticky floating footer bar with OptinMonster. It is the best lead generation and conversion optimization tool on the market that makes it super easy to convert your website visitors into subscribers.
OptinMonster comes with a drag-and-drop builder and premade templates that allow you to create a floating footer bar, slide-in popups, and banners without using any code.
We recommend this method because OptinMonster is super easy to use and offers more customization options than the free plugin method.
Step 1: Install OptinMonster on Your Website
First, you will need to sign up on the OptinMonster website by clicking on the ‘Get OptinMonster Now’ button.

Next, you must install and activate the free OptinMonster connector plugin on your website. For more instructions, see our beginner’s guide on how to install a WordPress plugin.
Upon activation, the OptinMonster setup wizard will open up on your screen, where you have to click the ‘Connect Your Existing Account’ button. This will connect your WordPress site with your OptinMonster account.

Once you do that, a new window will open up on your screen.
Here, click the ‘Connect to WordPress’ button to move ahead.

Step 2: Create And Customize the Floating Sticky Footer Bar
Now that you have connected OptinMonster with your website, it’s time to create a sticky floating footer bar.
To do this, you need to visit the OptinMonster » Templates page from the WordPress admin sidebar and select ‘Floating Bar’ as the campaign type.
Once you do that, all the premade templates for the floating bar will load on the screen. From here, you can click the ‘Use Template’ button on the one you want to use.

This will open the ‘Create Campaign’ prompt on the screen, where you can add a name for the floating footer bar that you are about to create. It can be anything you like, as the name won’t be displayed to your visitors.
After that, just click the ‘Start Building’ button.

OptinMonster’s drag-and-drop builder will now be launched on your screen, where you can start customizing your floating footer bar. Here, you will notice a floating bar preview on the right with blocks in the left column.
For example, you can use a countdown timer block if your floating footer bar is promoting a discount offer. This will help create a sense of urgency among users and encourage them to take action.
You can also add a CTA, video, or social media block to the footer bar. For detailed instructions, you can see our tutorial on how to create an alert bar in WordPress.

You can also edit text on the footer bar by clicking on it. This will open the block settings in the left column, where you can adjust them according to your liking.
For example, if you want to change the discount offer in the template, then you can change the button text. After that, you can select the ‘Redirect to a URL’ option and add the page link that you want users to be directed to upon clicking on the button.

Step 3: Configure The Display Rules For Your Floating Footer Bar
Once you are satisfied with your footer bar’s customization, just switch to the ‘Display Rules’ tab from the top.
Here, you can configure when to display the bar on your page. If you want to display the floating footer bar at all times, then you must select the ‘time on page’ option from the left dropdown menu.
After that, choose the ‘is immediate’ option from the dropdown menu on the right.

However, to display the floating footer bar on a specific page, you must select the ‘Page Targeting’ option from the right dropdown menu.
After that, choose the ‘exactly matches’ option from the dropdown menu in the middle and then add a page URL. Once you do that, the floating footer bar will only displayed on the page you chose.

Additionally, you can select the ‘Exit Intent’ option to show the sticky floating footer bar when the user is about to leave your site. You can then configure the exit intent sensitivity and choose the devices where the footer bar will be displayed. This can be handy if you want to reduce your bounce rate.
You can even select the ‘Visitor’s Device’ option if you only want to display the floating footer bar to desktop visitors.

You can also configure the display rules according to the date, time, or scroll distance by selecting the ‘When’ option from the left column.
For an explanation of more display rule options, you can see our complete OptinMonster review.
Step 4: Publish Your Floating Footer Bar
Once you have defined the display conditions for your footer bar, switch to the ‘Publish’ tab from the top.
Here, simply click the ‘Publish’ button.

After that, don’t forget to click on ‘Save’ to make your changes live.
Now, you can visit your WordPress blog to see the sticky floating footer bar in action.

Alternative: You can also use Thrive Ultimatum to show a countdown timer floating footer bar on your website. For more details, see our Thrive Themes Suite review.
If you are looking for a free way to create a sticky floating footer bar, then this method is for you. However, keep in mind that you will have limited customization options compared to OptinMonster.
First, you need to install and activate the Firebox Popup Builder plugin. For detailed instructions, see our tutorial on how to install a WordPress plugin.
Upon activation, visit the Firebox » Campaigns page from the WordPress dashboard and click the ‘+ New Campaign’ button.

This will open the Firebox campaign library, where you can search for sticky floating bar premade templates.
Next, simply click the ‘Insert’ link under the floating footer bar that you like. Keep in mind that if you select a header bar, then you won’t be able to change its position. You must ensure the template you select is for a footer bar.

The block editor will now open up on your screen, where you can start by adding a name for your floating bar.
After that, you can edit the text in the footer by clicking on it and add new blocks by clicking the ‘+’ button. This will open the block menu, where you can add images, headings, paragraphs, videos, quotes, or list blocks.
For instance, if you want to add social media handles, then you can choose the Social Icons block. After that, you can add social media accounts and links using the block panel.
For more details, you can see our tutorial on how to add social media icons in WordPress menus.

You can also change the text in the button block and add a link to the page where you want to direct users by clicking on the link icon in the block toolbar.
After that, type in the URL of your choice and press ‘Enter’.

Next, you can scroll down to the ‘Firebox Settings’ section.
Here, you can change the background color, text color, alignment, size, padding, and margin for the floating footer bar.

After that, switch to the ‘Behaviour’ tab from the left column and select ‘Page Load’ as the floating bar trigger point.
Then, use the ‘Delay’ slider to choose a delay timing for the floating bar. For example, if you drag the slider to 15 seconds, then the floating footer bar will be displayed once the user has spent 15 seconds on your site.
If you want the sticky floating footer bar to be displayed immediately, then you can keep the slider at 0.

Next, you can leave other settings as they are or configure them according to your liking.
Once you are done, don’t forget to click the ‘Publish’ button at the top.

Now visit your WordPress site to view the sticky floating footer bar in action.
This is what it looked like on our demo site.

Apart from adding a sticky footer bar, you might also like to create a sticky floating navigation menu on your WordPress site.
A navigation menu contains links to the most important pages on your WordPress blog and acts as an organizational structure for your website.
If you make this menu sticky, then it will remain visible on your page at all times, even as the user scrolls down on your screen. This can increase engagement and make your website easier to navigate.

To create a sticky floating navigation menu, simply install and activate the Sticky Menu & Sticky Header plugin. For details, see our tutorial on how to install a WordPress plugin.
Upon activation, visit the Settings » Sticky Menu page from the WordPress dashboard and type #main-navigation next to the ‘Sticky Element (required)’ option.

After that, click the ‘Save Changes’ button to store your settings. You have now successfully created a sticky floating navigation menu.
For detailed instructions, please see our tutorial on how to create a sticky floating navigation menu in WordPress.
We hope this article helped you learn how to easily create a floating sticky footer bar in WordPress. You may also want to see our beginner’s guide on how to add header and footer code in WordPress and our checklist of things to add to the footer on your WordPress site.
If you liked this article, then please subscribe to our YouTube Channel for WordPress video tutorials. You can also find us on Twitter and Facebook.
The post How to Create a “Sticky” Floating Footer Bar in WordPress first appeared on WPBeginner.

I have been receiving emails from a gmail email address, I tried doing reverse searches on it but not coming up anything. I have a feeling it may be the scammers posing as a police department. Is there anyway I can determine the owner of the email address or its validity?
In the ever-evolving landscape of search engine optimization (SEO), off-page techniques are crucial for enhancing your website’s visibility and authority. While on-page optimization focuses on refining your website’s content and structure, off-page SEO encompasses strategies beyond your site that influence its ranking on search engine results pages (SERPs). In this blog post, we’ll delve into …
Continue reading "Off-Page SEO Techniques: Boost Your Website’s Visibility"
The post Off-Page SEO Techniques: Boost Your Website’s Visibility first appeared on Lucid Softech.
Are you looking to customize the Minecraft game setup or add players to your fantasy world? If this is the case, you’ll need a Minecraft server hosting provider. However, due to the game’s high resource needs, it can be difficult to find a suitable host. It’s easier to select the right Minecraft hosting server when […]
The post 5 Best Minecraft Server Hosting Providers (And How to Choose One) first appeared on WPArena and is written by Editorial Staff.

What is ROI in influencer marketing?
In the digital landscape dominated by search engines, mastering on-page SEO (Search Engine Optimization) is crucial for enhancing your website’s visibility and ranking. On-page SEO involves optimizing individual web pages to rank higher and earn more relevant traffic in search engines. While off-page SEO focuses on external factors like backlinks, on-page SEO deals with optimizing …
Continue reading "Mastering On-Page SEO: Strategies for Boosting Your Website’s Visibility"
The post Mastering On-Page SEO: Strategies for Boosting Your Website’s Visibility first appeared on Lucid Softech.

Hey there social media wizards! So, you're ready to skyrocket your followers without breaking a sweat or the bank, huh? Well, buckle up because I've got some juicy secrets to spill on how to grow your audience like wildfireno fancy tricks or paid ads needed. Let's dive in!
Create Killer Content That Pops: Alright, first things firstcontent is king (and queen, and the whole royal family). If you want people to follow you, you gotta give 'em something worth following. Whip up content that's entertaining, informative, or downright inspiring. Make it so good they can't help but hit that follow button!
Engage Like There's No Tomorrow: Social media is all about being social, duh! So, don't just sit back and watch the likes roll inget in there and mingle! Respond to comments, ask questions, and join conversations like you're at the coolest party in town. The more you engage, the more people will take notice.
Use Hashtags Wisely: Ah, hashtagsthe secret sauce of social media success. But here's the thing: you gotta use 'em right. Research relevant hashtags in your niche and sprinkle them into your posts like confetti. This'll help you get discovered by people who are actually interested in what you have to say. #SocialMediaGrowth #AudienceBuilding #ContentCreation #EngagementStrategies #HashtagStrategy #SocialMediaTips
Collaborate and Conquer: Two heads are better than one, right? So why not team up with fellow influencers or brands in your industry? Collaborations can expose you to a whole new audience faster than you can say "double tap." Just make sure to choose partners that vibe with your vibe, ya know? #InfluencerCollaboration #BrandPartnerships #AudienceExpansion #CollaborativeMarketing
Be Consistent AF: Last but definitely not leastconsistency is key, my friends. You can't expect to gain followers if you're posting once in a blue moon. Set a schedule and stick to it like your social media life depends on it (spoiler alert: it kinda does). Whether it's once a day or once a week, just keep those posts coming! #ConsistencyIsKey #SocialMediaConsistency #PostingSchedule #ContentConsistency
And there you have it5 surefire ways to grow your social media audience in the blink of an eye. So, what are you waiting for? Get out there and start slaying those followers like the social media rockstar you were born to be!
Hey there social media savvy marketers! Want to take your social media game to the next level? Well, you're in luck because I've got the lowdown on the best strategies to rock your social media marketing efforts regardless of what industry you're in. Let's dive in!
Know Your Audience Inside Out: First things first, you gotta know who you're talking to. Take the time to understand your audience's demographics, interests, and pain points. This insight will help you tailor your content to resonate with them on a deeper level.
Consistency is Key: Consistency breeds familiarity, and familiarity breeds trust. Make sure your brand's voice, tone, and visuals remain consistent across all your social media platforms. This builds brand recognition and keeps your audience engaged.
Content is King (and Queen): Create killer content that adds value to your audience's lives. Whether it's entertaining, informative, or inspirational, make sure it's relevant to your industry and speaks directly to your audience's needs and interests.
Engage, Engage, Engage: Social media is a two-way street. Don't just broadcast your messageengage with your audience! Respond to comments, answer questions, and join relevant conversations. This shows that you're not just a brand, but a real, human entity.
Utilize Visuals to Grab Attention: In a sea of social media posts, visuals are your secret weapon. Use eye-catching images, videos, and graphics to stop scrollers in their tracks and draw them into your content.
Hashtags FTW: Hashtags are like social media breadcrumbsthey lead your audience straight to your content. Research relevant hashtags in your industry and use them strategically to increase your reach and discoverability. #SocialMediaMarketing #DigitalMarketing #ContentMarketing #MarketingTips #OnlineMarketing
Don't Underestimate the Power of Stories: Stories aren't just for bedtimethey're a goldmine for engaging your audience on social media. Whether it's Instagram Stories, Facebook Stories, or Snapchat Stories, use this feature to share behind-the-scenes glimpses, product demos, and exclusive offers.
Get Influential: Partnering with influencers in your industry can give your social media marketing efforts a serious boost. Find influencers whose values align with your brand and collaborate with them to reach a wider audience and build credibility. #InfluencerMarketing #BrandBuilding #AudienceEngagement
Analyze and Optimize: Don't fly blind with your social media strategy. Use analytics tools to track your performance, understand what's working (and what's not), and make data-driven decisions to optimize your strategy for maximum impact. #DigitalStrategy #MarketingInsights
Stay Up-to-Date with Trends: Social media moves at lightning speed, so it's crucial to stay on top of the latest trends and updates. Whether it's new platform features, viral challenges, or industry news, leverage these trends to keep your content fresh and relevant. #MarketingStrategy #IndustryInsights #MarketingTrends
So there you have it10 killer strategies to take your social media marketing game to new heights! Remember, Rome wasn't built in a day, so be patient, stay consistent, and keep experimenting to find what works best for your brand. Happy socializing!

Julia Evans has an extremely relatable and extremely charming talk in Making Hard Things Easy. Julia has a way of putting her finger on technology concepts that are notoriously difficult and making them easier to understand. She does this both by sharing her own tactics, like learning a reduced set of options or commands, as well as by producing very approachable guides.
I like her formula: infrequent use + lots of gotchas = disaster.
(As a CSS guy who regularly hears people complain about CSS, this tracks.)
Another trick to avoiding that disaster is… using computers! Tools like linters can help you fix (or avoid) the very mistakes that can make a technology frustrating or error prone. She uses the tool ShellCheck, which I’d never heard of, as an example to avoiding problems in Bash scripts. Then, sharing when you find tools like this that actually help you. I found that last bit especially interesting. It’s good to be “intellectually honest” about sharing tools that really have helped you, not tools that seem like they could help you, because they look nice or whatever.
Speaking of hard things… you know what can be hard? Refactoring. I’ve probably over-repeated this, but David Khorshid one said “It should be called legendary code not legacy code”, referring to the idea that code that is in production doing work, even if you think it might be sloppy, inefficient, inelegant, is literally doing the job it needs to do. Whereas some theoretically rewritten wonderful code has yet to prove itself.
Code refactoring may cost a fortune if not done right. A dysfunctional revamped system or new features coupled with incorrect rewrite is, with no doubt, damaging. One can argue to what extent.
Refactoring code can be very dangerous, so it’s worth being very considerate about what you’re doing. A few of Miroslav’s points:
✅ Isolate improvements from features. Do not apply them simultaneously.
❌ Do not mix expensive cleanups with other changes. But do that for small improvements.
This makes me think about TypeScript.
TypeScript is (uh, obviously) newer than JavaScript, so there is a good amount of code out there that has been refatored into TypeScript. Whether than was worth it or not is up for debate. People that love it might say that a refactor like this actually makes the code safer, and they probably aren’t wrong to some degree, although it wouldn’t be hard to argue that any refactored code has risks.
There is also cost to the TypeScript itself. Build tooling and whatnot of course, but also the syntax itself. Remy Sharp has made the call that his own personal code isn’t in TypeScript, partially for this reason:
A “well crafted” definition, type or interface (still no idea when I should use each), is often a huge cognitive load on me.
Being presented with lots of double colons,
<T>when I’m not sure whatTrefers to, a wall of interfaces and more is an upfront cost on me, the reader.Often the types will be tucked away in other files (probably good) but working out the argument required to a function call often leaves me distracted in the task of understanding what’s required rather than making my function call.
I feel that. I’m slowly getting better at TypeScript myself, because at CodePen we’ve decided to take advantage of it when we can. I can see the value in it fairly regularly, but I’m also fairly regularly frustrated by it and question the hours lost. I’ve felt this way for years, and I’m still not quite sure what to make of that.
One of the reasons you might be refactoring something is because you’ve decided on some new abstractions. A classic, in my experience, is that you’re adding, dropping, or changing a framework. The old one just isn’t doing it anymore, times have changed, and you either want to go vanilla or move to something more modern. There is probably some kind of axiom where any sufficiently large codebase is always undergoing at least one refactoring per hundred thousand lines of code or the like.
Have you read the Hammer Factories thing? It’s a pretty satisfying read, save for a few dated stabs at comedy that read pretty misogynisticly. Sometimes you just need a hammer, is the thing, it’s clearly the right tool for the job, but the industry wants you to you some all-in-one hammer, wait, no, a hammer factory, wait, no, a factory for building hammer factories, wait, no…
It feels true to me that front-end specific work has always been treated as lower-value than back-end work. Don’t hate me, but part of me feels like that’s fair. I’m a front-end guy myself and actually think it’s extremely valuable, but ultimately most products real value lies in some kind of unique back-end magic. The problems on the back-end, on the whole, are harder and riskier and scarier, and that translates to higher paying roles. Of course there is tons of nuance here. A product with a very decent back end and total garbage front end is likely to have problems catching and may outright fail because of a poor experience for the people actually using the thing, and making an experience people love is weighted toward the front end. Or as Josh Collinsworth recently wrote:
In many ways, CSS has greater impact than any other language on a user’s experience, which often directly influences success. Why, then, is its role so belittled?
There used to be a time where if you knew both front end and back end you were a unicorn and it was considered very rare and you were a powerful force in this industry. Now unicorns are dead. We call that “full stack” now and it’s all but expected that you are one. Especially if you’re skilled in the front end, you can’t just say that, you have to say “full stack” or your job prospects ain’t looking great. Then the actual expectations of full stack mean that you’re good at the JavaScript stuff, you’re fine with the work that connects that JavaScript client work with JavaScript on the server, and you know enough front end to use a design system, library, or hack some workable things together.
It’s just a thought, anyway. It solidified in my mind reading Andrew Walpole:
The full-stack developer was borneth!
It looks great on paper, especially to the payroll department: One person to fill traditionally two roles. But in reality, we know it doesn’t work that way. It may be a role for a technology generalist to thrive in, but one person’s effort is finite, and consistent, quality development across the entire product development spectrum requires focus and expertise. Nevertheless, start-ups soaked up the efficiency, and in a tumultuous churn of web tech it was a decent defense.
There is a new Node.js website and it’s always fun to read a little behind-the-scenes. That would be a hard job but it looks like they did a great job.