What is the Value of Browser Diversity?

Category Image 052

In 2018, Rachel Nabors made the point that browser diversity is similar to biological ecosystem diversity. There are literal advantages to more diversity. That article was before the Edge engines were shut, and now the big shakeups at Mozilla have the topic of browser diversity on people’s minds again.

I really like Dave’s take on the matter. The diversity of browser engines makes web tech slow. Frustratingly slow, to many, but that slowness can bring value.

There’s a lot of value in slow thinking. You use the non-lizard side of your brain. You make more deliberate decisions. You prioritize design over instant gratification. You can check your gut instincts and validate your hypothesis before incurring mountains of technical debt.

I’d bet you a dollar that the less engines we have, the faster things get. Fast can be satisfying in the moment, but doesn’t make for the best brisket.

If we do see a major reduction in browser diversity, I think we lose the intentional slowness and the cooperation mechanisms we have in place. Who knows what will happen, but my hope is that just like iron can sharpen iron, maybe chromium can sharpen chromium.

Direct Link to ArticlePermalink


The post What is the Value of Browser Diversity? appeared first on CSS-Tricks.

You can support CSS-Tricks by being an MVP Supporter.

Anytime Mailbox Launches API for Mail Center Operators

Featured Imgs 23

Anytime Mailbox, a service that provides physical mail handling with options for digital processing, has announced a new API that will enable mail center operators to integrate Anytime Mailbox’s service into their existing systems.

The company intends the API to assist developers in creating branded solutions for mail center operating partners that handle the physical portion of the business. The announcement of the API discussed some technical Aspects of the API, including security standards:

AND Announces the Launch of an Updated GeoBondaries API

Featured Imgs 23

AND is proud to announce the launch of its updated GeoBoundaries API, which are part of its geo-location product suite. The GeoBoundaries API adds relevant information to a location, based on its numerical co-ordinates which is usually the name or type of area.

The AND database records the geographic boundaries of all administrative zones across the globe so that you always know which area you know which area you find yourself in or alternatively which ones to avoid.

WordPress Themes Directory Adds New “Delist” Status for Non-Compliant Themes

Best Wordpress Themes 1

In August, following the suspension of the popular Astra theme, WordPress Meta contributors opened a ticket to add a new “delisting” status for non-compliant themes. Astra’s infraction, breaking the directory’s ban on affiliate links, put more than a million users at risk of not getting theme updates just as WordPress 5.5 was on deck for release. This week the team committed a patch for a delist status that will temporarily hide a theme from search, while still making it available directly. Alex Shiels outlined how the new status will work:

  • Delist is only available from a published state.
  • Relist will set the status back to publish.
  • Delisted themes are excluded from site search.

While a full suspension may seem like the best retributive action when theme authors violate directory guidelines, the necessity for users to be able to continue to get updates outweighs throwing the book at the author, especially for a first-time offense. A delisting policy is more restorative in that it seeks to maintain the connection that users have with the theme’s author instead of merely imposing a penalty that might ultimately have a negative impact on everyone involved.

In the past, the Themes Team has been limited on available actions for responding to violations. Ionut Neagu, CEO of ThemeIsle, had his company’s popular Zerif Lite theme suspended from the directory in 2016 for a five-month period that left 300,000+ users without maintenance and security updates. It also resulted in a 63% decline in the company’s revenue for that theme, since ThemeIsle was using WordPress.org as the primary channel for distribution.

Neagu remarked on how the new “delist” status provides a less severe transition back into the directory for popular themes:

The practice of delisting is something that’s already been done by other companies in similar situations. For instance, delisting is what Google does all the time when they find a website that doesn’t comply. Then, the website is allowed to come back and appear on the ranking pages again when the issues are fixed.

In the end, I think this is a move in the right direction and an improvement to the process of what happens with a problematic theme.

Despite the controversial decision that slashed ThemeIsle’s revenue from $120k/month to $45k/month in 2017, the company continued to support the theme, as well as new products, with WordPress.org as the main place to find them. Neagu reported that when the theme was reinstated, its revenue continued to be hard hit. It lost momentum and was unable to ride the wave of its initial success. Astra faired much better in the aftermath of its violation, given its short-lived suspension.

WordPress Themes Team member Alexandru Cosmin requested the ticket for adding the delisting status receive prompt attention, as the team is set to introduce some new policies and requirements that are tied to it. The patch was committed and then reverted temporarily to review how it impacted theme trac tickets, but the bugs appear to be unrelated to the patch.

The volunteer Themes Team has essentially been the de facto guardians of the WordPress.org marketplace that sends millions of dollars to theme authors, and they perform a great service to the community. But in the interest of supporting and accelerating the growth of the WordPress ecosystem, the team needs to adopt policies that create a more restorative path for violators, instead of obstructing the growth of products where issues have been quickly resolved.

Using a brightness() filter to generically highlight content

Category Image 052

Rick Strahl:

I can’t tell you how many times over the years I’ve implemented a custom ‘button’ like CSS implementation. Over the years I’ve used images, backgrounds, gradients, and opacity to effectively ‘highlight’ a control. All that works of course, but the problem with most of these approaches is that one way or the other you’re hard coding a color value, image, or gradient.

You certainly have a lot more control if you specify exact colors, but if you can pull off brightening, darkening, or even a hue-shift in a way that feels cohesive on your site, it’s certainly a lot less code to maintain,

.button.specific-button {
  background: #4CAF50;
}
.button.specific-button:focus,
.button.specific-button:hover {
  background: #A5D6A7;
}

/* vs. */
.button:focus,
.button:hover {
  filter: brightness(120%);
}

/* or maybe you're super hardcore and do it everywhere */
:focus,
:hover {
  filter: brightness(120%) saturate(120%);
}

Direct Link to ArticlePermalink


The post Using a brightness() filter to generically highlight content appeared first on CSS-Tricks.

You can support CSS-Tricks by being an MVP Supporter.

AMP Plugin 2.0 Adds Onboarding Wizard and Expanded Reader Mode

Wp Plugins

The official AMP plugin for WordPress recently crossed the 2.0 milestone, a major release that closed 141 issues and merged 174 pull requests. The release was originally planned for v1.6 but due to the number of major changes the team decided to bump it to 2.0.

One of the most significant updates in this release is the expansion of the Reader Mode. The plugin has a lot of AMP-specific terminology associated with it and unless you are working with it every day, it’s easy to get confused by the different modes. Standard Mode is an AMP-first site where all URLs are presented as AMP pages. Transitional Mode uses one theme but canonical non-AMP URLs may offer a separate AMP version. Reader Mode uses two themes with the active one for canonical non-AMP URLs and a separate “Reader” theme for AMP URLs.

Version 2.0 introduces a new AMP Customizer for customizing the Reader theme. It loads with a mobile view and does not support widgets or homepage settings, as they are not applicable for the AMP version. The AMP Customizer makes it easy for site owners to make tweaks and changes that will only apply to the AMP version of URLs.

The Reader Mode is especially useful for sites that are not using AMP-compatible themes. Google engineer Weston Ruter described the expanded Reader Mode as follows:

Reader mode now allows for any AMP-compatible theme to be used to serve AMP pages, rather than just the legacy post templates. This allows for long-requested features including nav menus, logos, commenting, and template design variations. It also makes it possible to serve all URLs of a Reader-mode site in AMP, as opposed to just singular posts. 

One major usability update in version 2.0 is the addition of an onboarding wizard and revamped Settings screen that guides users through the different templating modes when configuring the plugin. Users who are routed to Reader Mode will be presented with a selection of themes for serving AMP pages and the wizard will handle installation. The final step of the configuration process allows users to review their choices in a preview screen.

Given the complexity of the AMP plugin and its many configuration options, the onboarding wizard was a critical addition if the plugin is going to grow past 500,000 active installs to reach a larger number of non-technical users.

Another notable update in this release includes a feature called “Plugin Suppression” that allows administrators to turn certain plugins off for AMP pages if they are causing validation errors. It also introduces mobile redirection for Transitional/Reader mode sites where AMP is intended to be the mobile version.

AMP is still far from a plug-and-play experience for WordPress users but the plugin does a lot of the heavy lifting and is evolving towards becoming more approachable for non-technical users. To that end, the AMP plugin team just announced a new video series that will focus on success with WordPress as a content creator, as well as performance and usability.

“We are crafting it with an audience in mind that covers both technical and non-technical users,” Google Developer Advocate Alberto Medina said. “The 2.0 version of the plugin makes an emphasis on providing options for users that are non technical but still want to take advantage of AMP to bring great page experiences to their users.”

The series will launch next week on Google’s AMP YouTube channel. Medina is also working on another series geared towards content creators that will cover topics like Web Stories in the first episodes.

10 Tips to Retain SEO Ranking After a Redesign

Featured Imgs 26

Tips to Retain SEO Ranking After a RedesignIf you run any kind of modern business, you understand how important a professional-looking website is a today. Running a website requires paying attention to a lot of things. You must fine-tune your content, implement a sleek brand, improve conversions, and master search engine optimization (SEO) to increase your organic reach. Occasional updates and even […]

The post 10 Tips to Retain SEO Ranking After a Redesign appeared first on WPExplorer.

How to Change Sender Name in Outgoing WordPress Email

Category Image 051

Do you want to change the default sender name and email address for outgoing WordPress emails?

By default, WordPress uses ‘WordPress’ as the sender name for all outgoing WordPress notification emails. This doesn’t look very professional, and you may want to change that to your business name.

In this article, we will show you how to easily change the default sender name and email address in outgoing WordPress emails.

Changing sender name and email address in outgoing WordPress emails

Why You Should Change the Default Sender Information in WordPress?

WordPress sends several email notifications to the site administrator as well as other users on your website.

This includes very important email notifications such as forgot password emails, website error and recovery emails, new user registration, and more.

By default, it uses ‘WordPress’ as the sender’s name and a non-existent email address (wordpress@yourdomain.com) as the sender email.

Many spam filters block your WordPress emails believing it to be spam. Sometimes it does not even make it to the spam folder.

For more on this topic, take a look at our guide on how to fix WordPress not sending email issue.

The outgoing email notifications are important, and you should use your own brand and email address. This increases the authenticity of your brand and increases name recognition among your users.

For instance, if you run an online store, then you would want customers to get email notifications with your store name as the sender.

See our guide on how to get a free business email address for your website in 5 minutes.

Having said that, let’s see how to change the default sender name and email address in outgoing WordPress email notifications.

Method 1. Changing Default Sender Name and Email using WP Mail SMTP

This method is easier and recommended for all WordPress users.

For this method, we’ll be using the WP Mail SMTP Pro plugin. It is the best WordPress SMTP plugin on the market, used by over 1 million website owners.

This plugin allows you to easily change the default sender name and email address for outgoing WordPress emails. It also helps you fix the WordPress email deliverability problem.

First thing you need to do is install and activate the WP Mail SMTP Pro plugin. For more details, see our step by step guide on how to install a WordPress plugin.

Upon activation, you need to visit WP Mail SMTP » Settings to configure plugin settings. Under the Mail section, you can simply enter the email address and the name you want to use to send WordPress emails.
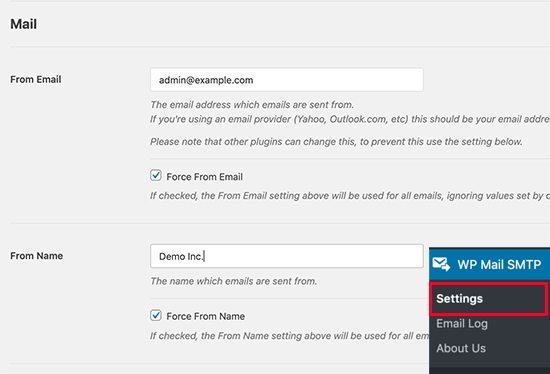
Change sender name and email in WordPress using WP Mail SMTP

Below that you can find the options to set up an SMTP server to send WordPress emails. By default, the plugin will use PHP method provided by your WordPress hosting company which is less reliable.

We recommend using any of the listed SMTP services to properly send WordPress emails for higher guaranteed deliverability.
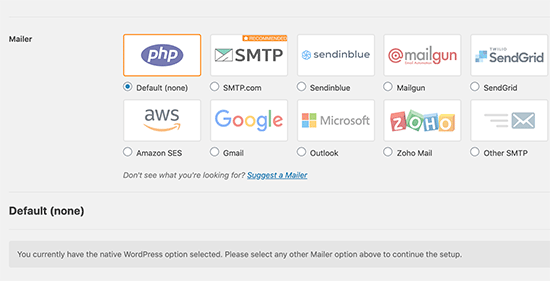
Select mailer

If you choose an SMTP service, then follow the on-screen instructions to connect the plugin with your SMTP service provider.

Don’t forget to click on the ‘Save Settings’ button to save your changes.

Test Your WordPress Emails

WP Mail SMTP Pro also allows you to test your WordPress email settings. Simply go to the WP Mail SMTP » Settings page and switch to the ‘Email Test’ tab.
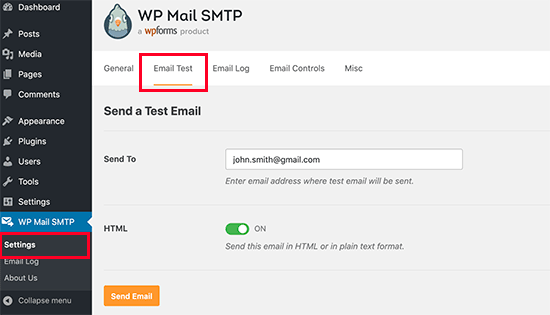
Test WordPress emails using WP Mail SMTP

From here, you just need to provide an email address that you can access and then click on the ‘Send Email’ button.

The plugin will now send a test email to the address you provided. You can check your inbox to make sure that you can receive WordPress emails, and it has the correct sender name and sender email address.

WP Mail SMTP works with all popular WordPress plugins like WooCommerce, WPForms, and more.

For more detailed instructions, you may want to see our article on how to use SMTP to send WordPress emails.

Method 2: Changing Default Sender Name and Email using a CB Change Mail Sender

This method is only recommended if you don’t use an SMTP service, or the first method is not working for you.

Using this method does not improve your WordPress email deliverability or make it easier to troubleshoot email issues. However, if your WordPress emails are working, then it will allow you to change sender name and email address.

First thing you need to do is install and activate the CB Change Mail Sender plugin. For more details, see our step by step guide on how to install a WordPress plugin.

Upon activation, you will notice a new menu item labeled CB Mail Sender in your WordPress admin bar. Clicking on it will take you to plugin’s settings page.
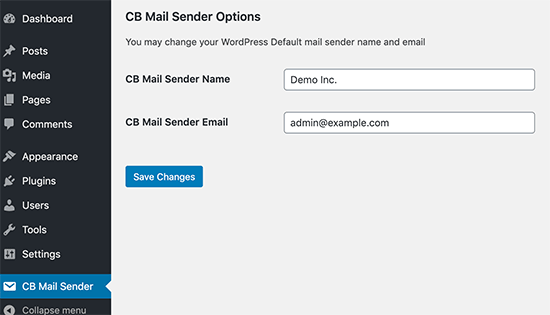
CB Mail Sender

You will need to enter the name and email address you want to be used for outgoing WordPress emails.

Don’t forget to click on the save changes button to store your settings.

That’s all, your WordPress notification emails will now show the name and email address you entered in plugin settings.

There is no method provided by the plugin to test your email settings. You can do that by performing actions that generate WordPress notification emails like creating a new user, requesting a password reset, and more.

Method 3: Manually Change Sender Name and Email Address

This method is not recommended for beginners. This method requires you to paste code into your WordPress files. It also does not fix any email deliverability issues and is harder to troubleshoot.

If you are new to adding code in WordPress, then take a look at our beginners guide on pasting snippets from web into WordPress.

You will need to add the following code in your theme’s functions.php file or a site-specific plugin.


// Function to change email address
function wpb_sender_email( $original_email_address ) {
    return 'tim.smith@example.com';
}

// Function to change sender name
function wpb_sender_name( $original_email_from ) {
	return 'Tim Smith';
}

// Hooking up our functions to WordPress filters 
add_filter( 'wp_mail_from', 'wpb_sender_email' );
add_filter( 'wp_mail_from_name', 'wpb_sender_name' );

This code simply replaces the default WordPress sender name and email address with your custom sender name and email address.

You can test this by adding a new user, changing passwords, or any other action that sends a WordPress notification email.

We hope this article helped you learn how to change the sender’s name and email address in outgoing WordPress emails. You may also want to see our guide on the best bulk email marketing services to bulk send email to all your users, and our comparison of the best WordPress page builder plugins to customize your site without any code.

If you liked this article, then please subscribe to our YouTube Channel for WordPress video tutorials. You can also find us on Twitter and Facebook.

The post How to Change Sender Name in Outgoing WordPress Email appeared first on WPBeginner.