How to Search Google Images by the Exact Size

Featured Imgs 26

Google Images earlier offered a useful “search by size” option in advanced search to help you find logos, wallpapers and other images on the Internet by their exact size (or resolution).

For instance, you could limit your search for landscape photographs to image files that were at least 10 Megapixels in size. Or, if you are were using Google Image search to find wallpapers for the desktop, you could specify the image resolution as 1920x1080 pixels and Google would only return large images with those exact dimensions.

Google Image Search by Size

The “exact size” search option is no longer available in Google Image Search but you can still limit your image searches to a particular size by using the secret imagesize search operator in the query itself.

Here’s how.

Go to images.google.com and enter the search terms as before. Then append imagesize:WIDTHxHEIGHT to your query and hit Enter. Google Images will remove the operator from the query but the results will only display images that match the specified size.

The search by size operators works on the mobile version of Google as well so you may use the simple trick to find that perfect size wallpaper for your phone.

More Search Tricks

You an also use search operators in Gmail, Google Drive, YouTube and Twitter to easily find stuff you’re looking for.

What is Parallax Effect? Why & How to Use it for WordPress

Featured Imgs 26

What is Parallax Effect? Why & How to Use it for WordPressParallax effect is an extremely popular design feature that is commonly used on WordPress websites. This special effect has featured in the gaming world for years but has more recently crossed over into web design. And so far this major trend doesn’t seem to be going anywhere, if anything it is being more widely used […]

The post What is Parallax Effect? Why & How to Use it for WordPress appeared first on WPExplorer.

Collections: Reordered!

Featured Imgs 23

Collections are the perfect way to group and share Pens. We’ve just given them a big round of improvements including reordering, sorting, and commenting!

Reordering

Many of you (including some of our own Team CodePen members) have been asking for the ability to reorder Collections. A simple request on the surface, but it required a lot of reworking and rethinking all the way from the database to the UI.

Now that we’ve done the heavy lifting, reordering is as simple as dragging & dropping or typing in an exact position!

Got a step-by-step process you want to share in a specific order? Want to feature some great examples of your new library? Order them however you like!

Fresher Look

Collections got a fresh coat of paint! The layout has been streamlined to keep the content front & center.

Sorting

By default Collections are sorted by the given order but you can also sort by the most recent additions, newest Pens and more!

Changing these controls also updates the URL so you can easily share a specific view.

Details & Comments

See more details down below and add comments, just like a Pen! Perhaps suggest some new Pens to add or get some more details on a technique.

Learn More

We have much more in the Collections Documentation, and you can hear us dive into the new Collection features and the behind-the-scenes work on CodePen Radio #281: Collection Reordering.

The post Collections: Reordered! appeared first on CodePen Blog.

Posts Sunset

Category Image 052

We are removing the Posts editor from CodePen in December 2020.

If you’re looking for a great place to publish blog posts, there are lots of places you can blog for free, like the developer-focused DEV, WordPress.com, or hey, maybe it’s a good time to play around with a static site generator and self-publish.

Here’s what’s changed now:

  • Readers cannot create new comments on Posts
  • Readers cannot heart Posts
  • We are no longer picking Posts for the homepage picks
  • Posts are removed from Topics

Here’s what will happen in December:

  • The Post editor at codepen.io/write will be removed
  • Post editing will be disabled
  • The Posts section of member profiles will be removed
  • Search for Posts will be removed
  • Only users with published Posts will see UI for it in their own work

But all published Posts will remain published at their original URLs. Nothing is being deleted or taken offline.

  • Private Posts will remain private
  • Public Posts will remain public
  • Post authors can delete published Posts and unpublished drafts
  • Post authors can view and copy the raw Markdown of published Posts and unpublished drafts

Any questions at all, feel free to message us in support.

The post Posts Sunset appeared first on CodePen Blog.

Copy the Browser’s Native Focus Styles

Category Image 052

Remy documented this the other day. Firefox supports a Highlight keyword and both Chrome and Safari support a -webkit-focus-ring-color keyword. So if you, for example, have removed focus from something and want to put it back in the same style as the browser default, or want to apply a focus style to an element when it isn’t directly in focus itself, this can be useful.

For example:

button:focus + span {
  outline: 5px auto Highlight;
  outline: 5px auto -webkit-focus-ring-color;
}

Looks good to me. It’s especially helpful with the sorta weird new Chrome double-outline style that would be slightly tricky to replicate otherwise.

Chrome 84
Safari 13.1
Firefox 80


The post Copy the Browser’s Native Focus Styles appeared first on CSS-Tricks.

You can support CSS-Tricks by being an MVP Supporter.

Local seo Question

Featured Imgs 20

If i creat a section on my website or a blog (and redirecting it to the website) where i talk about local events, i will rank better for that locality?
Though the contents are difficult to correlate?
I have no idea if this can work maybe some of you can clarift this.

How to Create a Questionnaire in WordPress (Easy Way)

Category Image 091

Do you want to create a questionnaire in WordPress to survey your visitors or collect data?

Getting feedback on your products or simply learning more about your users can help your business to succeed.

In this article, we will show you how to easily create a questionnaire in WordPress, step by step.

The easy way to create a questionnaire in WordPress

Why Create a Questionnaire in WordPress?

Creating a questionnaire is a great way to learn more about your audience. This lets you tailor your content to their needs. You can also use the results to create or modify the products / services that will be most helpful to your audience.

There are several survey tools that you can use outside your website, but having your questionnaire on your website itself means you have full control over how it’s displayed. Plus, it’s more familiar and reassuring for your audience.

That being said, let’s take a look at how to easily add a questionnaire to your WordPress site.

Creating a Questionnaire Form in WordPress

For this tutorial, we’ll be using WPForms to create a questionnaire.

WPForms is the best forms plugin for WordPress and allows you to easily create any kind of forms using a simple drag and drop form builder.

First, you need to install and activate the WPForms plugin on your WordPress site. For more details, see our step by step guide on how to install a WordPress plugin.

Note: You’ll need the Pro version of the plugin to get the features that we will use in this tutorial.

Upon activation, you need to visit the WPForms » Settings page in your WordPress admin area to enter your license key. You’ll find the license key under your account on the WPForms website.
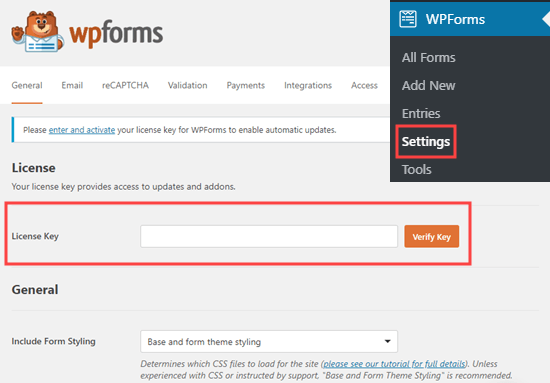
Entering your license key for WPForms

Now, it’s time to move on and create your questionnaire.

Creating a Questionnaire Using WPForms’ Survey and Polls Feature

WPForms’ powerful surveys and polls addon lets you create questionnaires easily. It also produces beautiful visual graphs of the results.

First, visit the WPForms » Addons page to install the Survey and Polls addon. Use the search bar to find it, then click the Install Addon button.
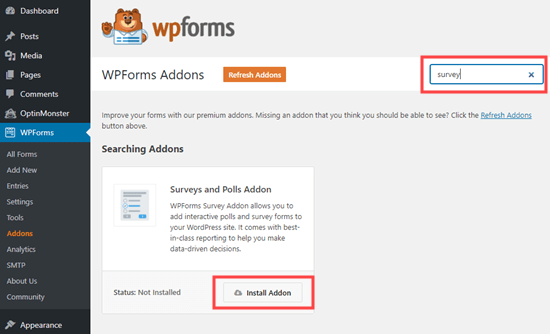
Installing the Survey and Polls addon for WPForms

Next, go to WPForms » Add New to create a new form. First, type in a name for your form at the top of the screen:
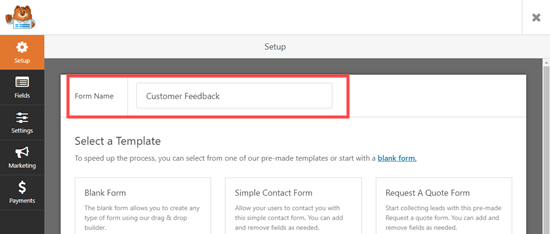
Naming your questionnaire in WPForms

There are 4 different pre-built survey form templates to choose from. These are the Poll Form, the Survey Form, the NPS Survey Simple Form, and the NPS Survey Enhanced Form.

We are going to use the Survey Form for our questionnaire.
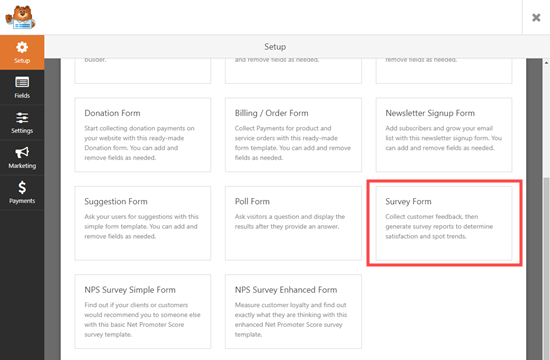
Select the Survey form template in WPForms

After you select the template, it will open up in the WPForms editor.
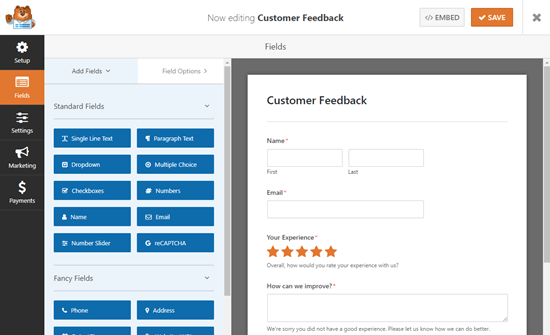
The Survey template in the WPForms editor

We recommend that you edit the questions to make them appropriate for your audience and needs. We are going to use the form to gather customer feedback on products and delivery.

To edit any field, simply click on it. The editing view will then open up on the left-hand side of your screen. Here, we are editing the Name field at the top. We changed the format to ‘Simple’ using the dropdown.

We also made it optional by unchecking the ‘Required’ box.
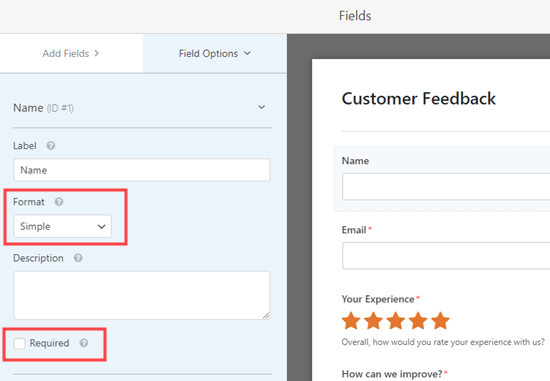
Editing the Name field in our WPForms questionnaire

The ‘How can we improve?’ box only appears if the user rates their experience as 1 star or 2 stars.

We’re going to add a new feedback box that will appear if the user rates their experience as 3 or 4 stars. To do this, simply bring your mouse cursor over the ‘How can we improve?’ box then click the Copy button:
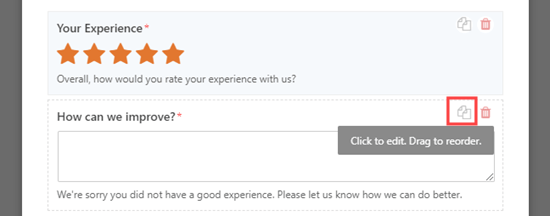
Clicking the button to copy a field in WPForms

Next, WPForms will check that you want to duplicate the field. Go ahead and click the ‘OK’ button to continue:
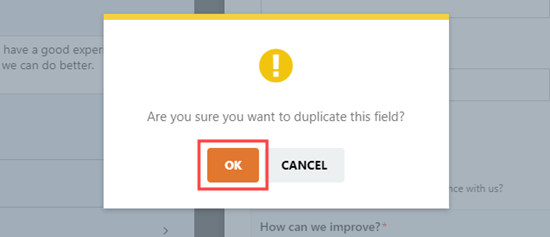
Click the OK button to go ahead and duplicate the field

Now, you can edit your new field on the left-hand side of the screen. We have changed the label, which appears above the box. We also changed the description, which appears below the box:
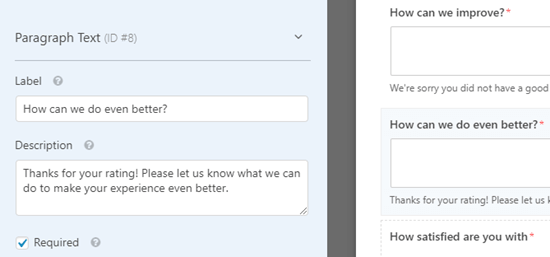
Editing the new feedback box that you've created in WPForms

You also need to set the conditional logic for this field. To do that, click the Conditionals tab. Then, set the numbers to 3 and 4 instead of 1 and 2:
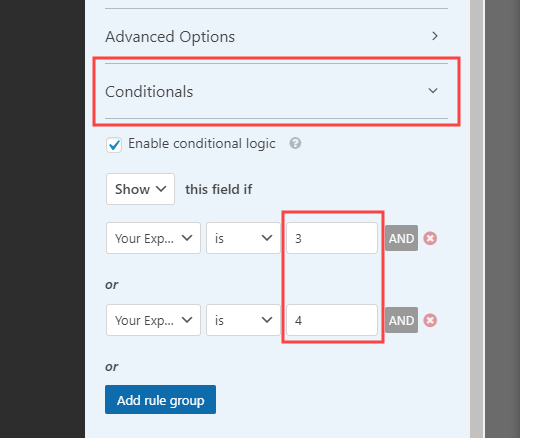
Opening up and editing the conditional logic for the field in WPForms

Finally, we are going to edit the ‘How satisfied are you with’ Likert scale. A Likert rating scale is a 5 or 7 point scale that is often used to measure satisfaction or attitudes.

Again, simply click on the field to edit it. Then, change the labels of the rows or columns to the text you want to use.

We are going to change the labels of the rows to make them more specific:
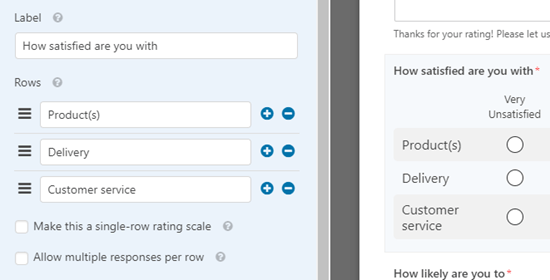
Editing the options on the Likert satisfaction scale

Go ahead and make as many changes to the form as you like. Don’t forget to click the ‘Save’ button at the top of the screen:
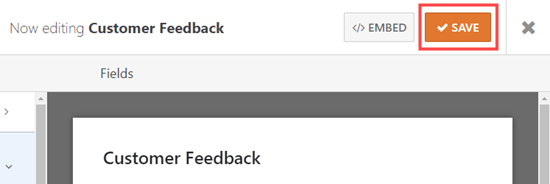
Save the customer feedback form after editing

Setting Up Notifications for Your Questionnaire

WPForms will send each completed questionnaire to the business email address that’s set in your website settings. It’s easy to change this by going to Settings » Notifications.

Simply delete the {admin_email} in the ‘Send To Email Address’ box and enter the email address you want to use instead:
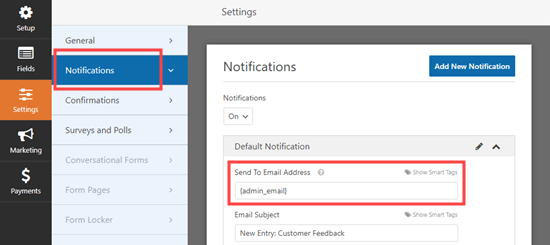
Changing the email address that the questionnaire is sent to

Tip: Not sure what your WordPress administration email is? Go to Settings » General and check what is listed in the ‘Administration Email Address’ box.

Don’t forget to save your questionnaire after making any changes.

Adding Your Questionnaire to Your Website

You can add your questionnaire to any post or page on your website. You can even add it to your sidebar.

To add your form to a page, edit your page or go to Pages » Add New to create a new one. Then, click the + button to add a new block. Select the ‘WPForms’ block:
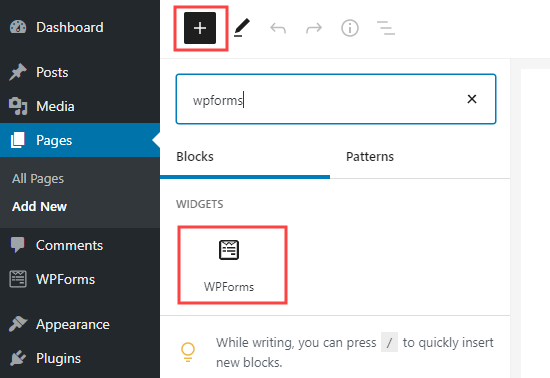
Add a WPForms block to your page in WordPress

Next, simply click on the dropdown and select your questionnaire form.
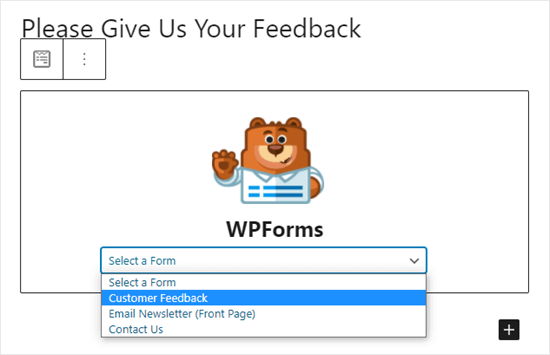
Select your questionnaire from the dropdown list

Now, simply preview or publish your post to see the form live on your WordPress website:
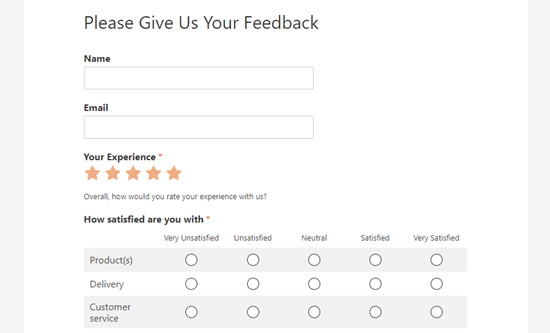
Your finished questionnaire live on the website

Creating a Questionnaire Using Conversational Forms

You can also use WPForms’ conversational forms feature.

A conversational form is an interactive form that flows like a conversation. Users answer a question and it automatically shows them the next one.

It makes longer forms like a questionnaire easier to fill out and reduces form abandonment.
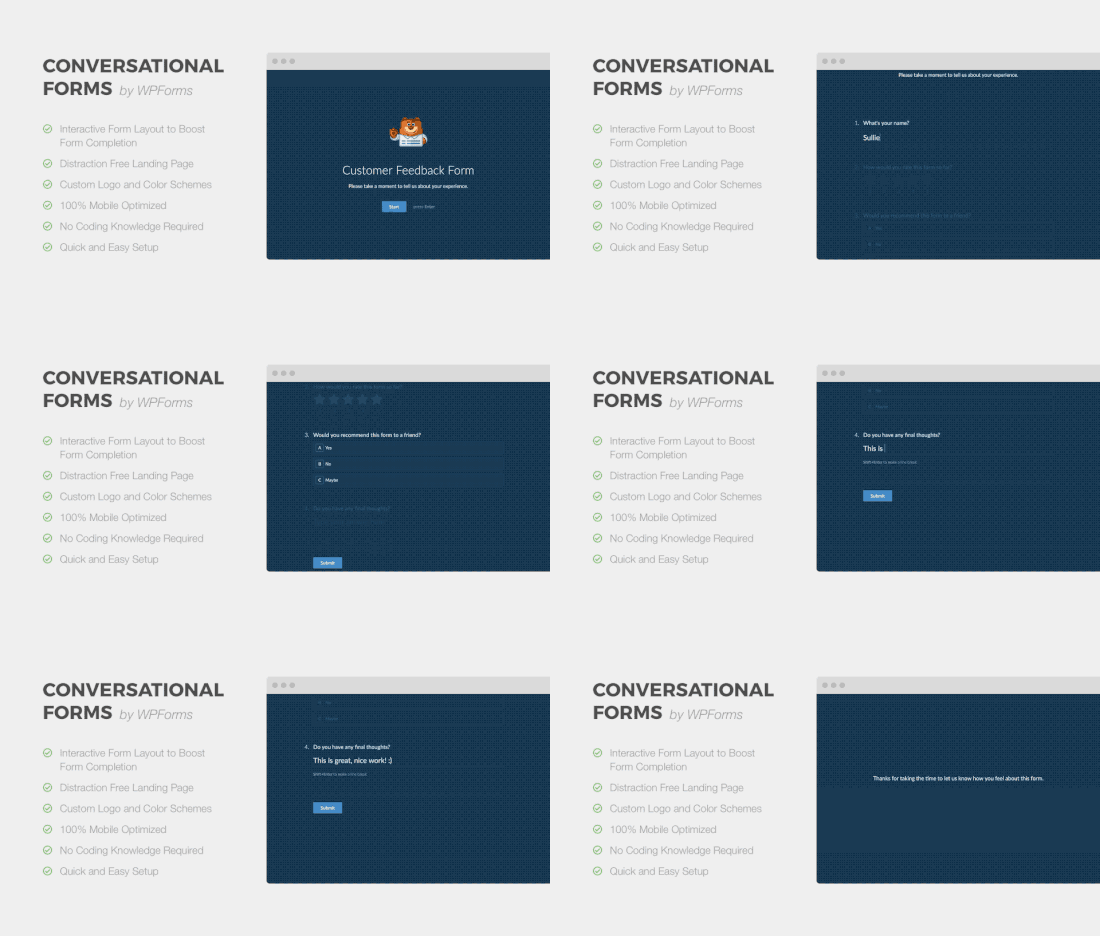
Conversational forms example

First, you need to go to WPForms » Addons in your WordPress admin. Then, search for and install the Conversational Forms addon:
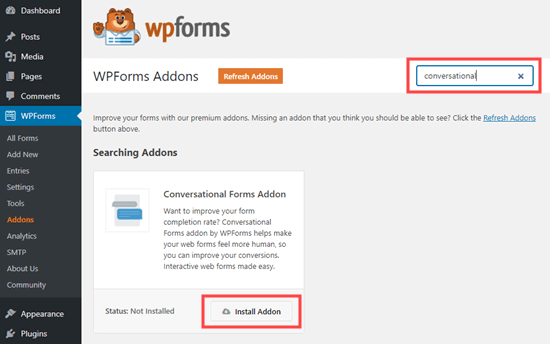
Installing the conversational forms addon in WPForms

After that, go to WPForms » Add New and create a new form using the instructions in the previous method.

If you already created your form, then simply go to WPForms » All Forms page and click on it to edit it:
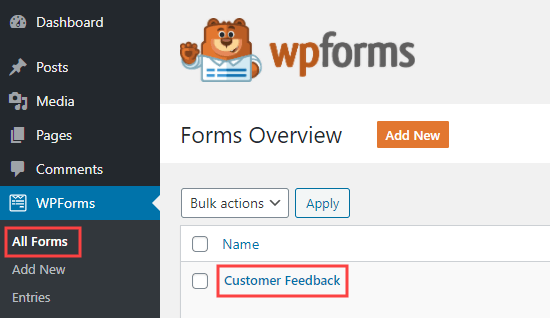
Editing your questionnaire form in WPForms

Now, we are going to convert your form into a conversational form. First, go to the Settings » Conversational Forms tab. Then, simply check the ‘Enable Conversational Form Mode’ box.
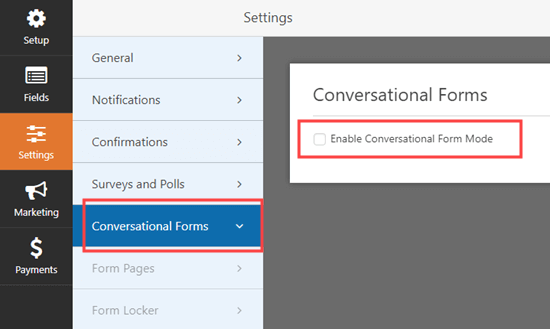
Enabling conversational form mode for your questionnaire form

You will then see a number of extra options to fill in. Conversational forms can’t be embedded in a post or page, so you need to give your form a title here. You can also write any text that you want to display above the form:
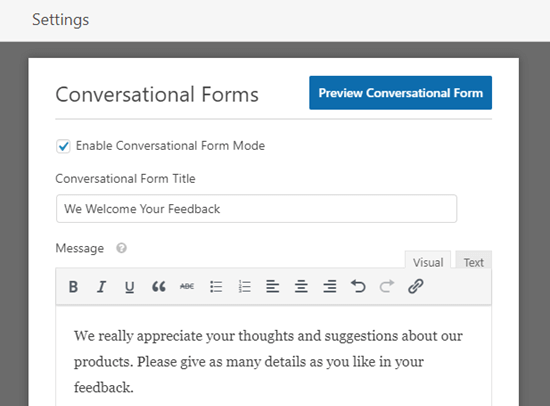
Entering a title and message for your conversational form

WPForms will automatically create a URL for your conversational form based on the form’s name. If you want to change this, simply type in a different URL here.

Optionally, you can also upload a header image, choose a color scheme, and change the Progress Bar style.
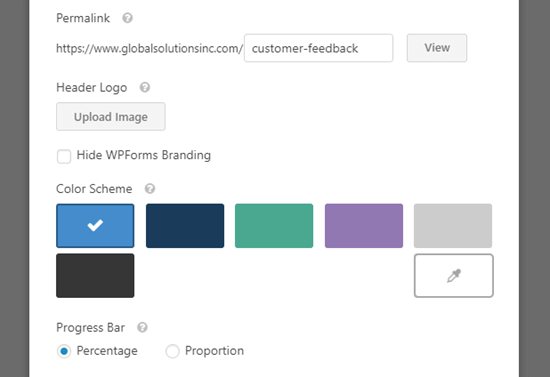
Editing the other options for your conversational form

Once you are happy with your form’s settings, don’t forget to click the ‘Save’ button at the top of the screen:
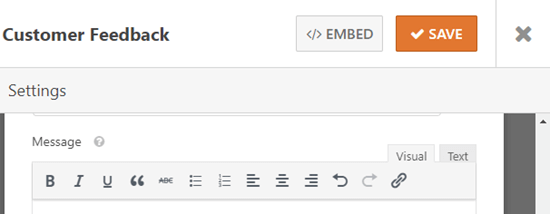
Make sure you save your conversational form before moving on

Now, click the ‘View’ button next to the permalink for your form to see it live on your site:

Click the button to view your conversational form live on your site

The customer simply clicks the Start button to begin the form.

The conversational questionnaire - user clicks the Start button to begin

They can then enter their responses one question at a time. The questions that aren’t active will be faded out until the customer moves to them.

The questions displaying on the conversational questionnaire

The sticky progress bar at the bottom of the screen will show how far through the form the customer is:
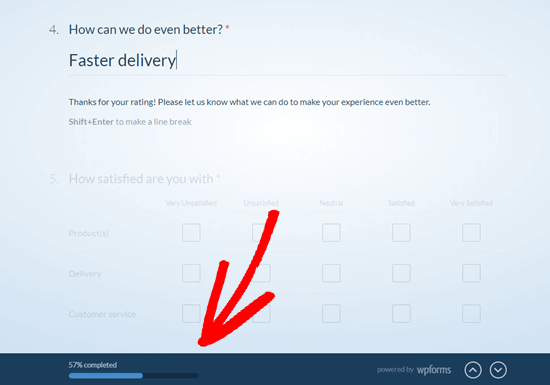
WPForms will show the user how far through the questionnaire they are, using the progress bar

That’s it. You’ve successfully created your conversational questionnaire.

Viewing the Results from Your Questionnaire

Whether you created a regular survey or a conversational form, the process for viewing the results is the same.

Each questionnaire response will be emailed to the email address you set up under Settings » Notifications.

WPForms also stores all your survey results in your WordPress database. To view them, go to WPForms » Entries in your WordPress dashboard. Then, click on the name of your survey form:
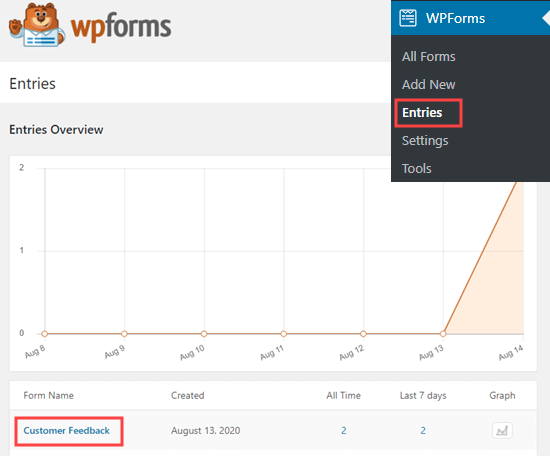
Click on the name of your form to view the questionnaire results

You will then see some of the answers from your questionnaire. Simply click the ‘View Survey Results’ button to view all the questionnaire results.
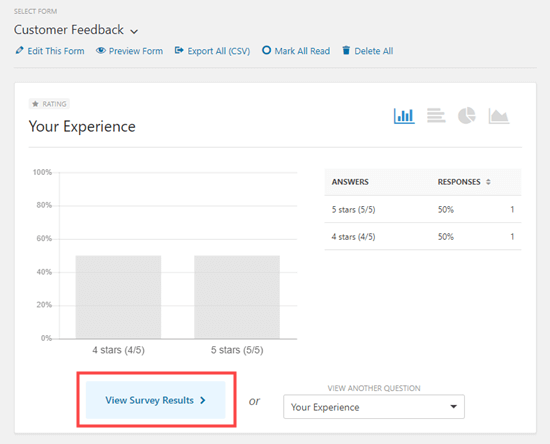
Click the View Survey Results button to see all the graphs and charts from your questionnaire results

WPForms will automatically create graphs and charts to make it easy to interpret the results:
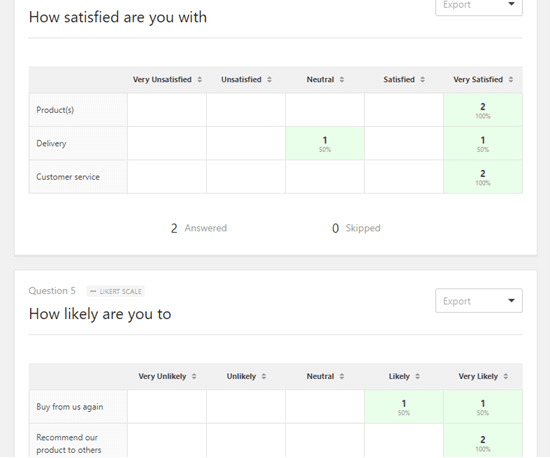
Two of the charts that WPForms has automatically created from the questionnaire results

It’s easy to export any of the graphs as a PDF or JPG. You can even print them to share with others in your organization. Just click the ‘Export’ link next to any item and choose from the dropdown menu:
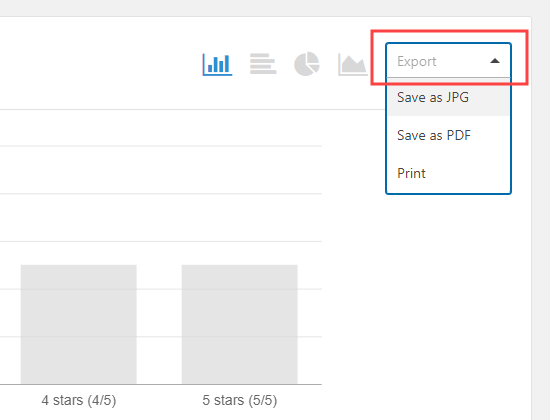
Exporting a chart from the questionnaire using the Export dropdown for that question

You can also download all your results as a CSV file. Just click the ‘Export All (CSV)’ button near the top of the page to download all the results:
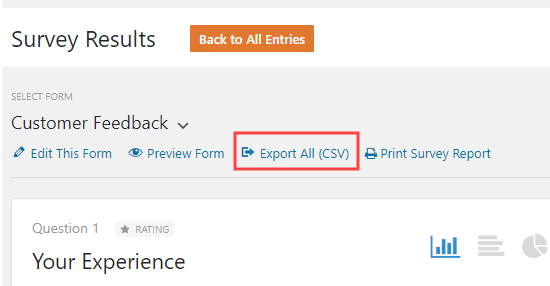
Exporting all answers from the questionnaire as a CSV file

If you want to view the questionnaire answers from individual customers, then click the ‘Back to All Entries’ button at the top of the screen:

Going back to view all the entries for the WPForms questionnaire

Next, scroll down to the table at the bottom of the screen. Click the ‘View’ button for the entry you want to see:
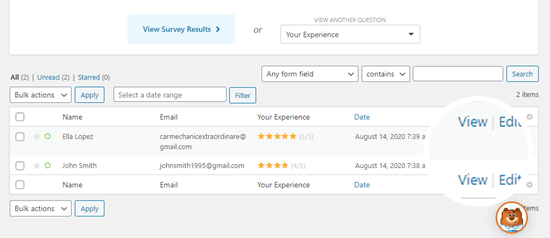
Viewing individual answers to the questionnaire

You will now see all the answers submitted by that person.
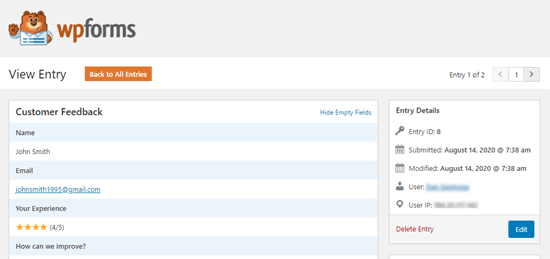
Viewing the details of one submitted survey response

We hope this article helped you learn how to create a questionnaire in WordPress. You might also enjoy our articles on the best email marketing services and how to start an online store.

If you liked this article, then please subscribe to our YouTube Channel for WordPress video tutorials. You can also find us on Twitter and Facebook.

The post How to Create a Questionnaire in WordPress (Easy Way) appeared first on WPBeginner.

WordPress Should Bump PHP Support on a Transparent and Predictable Schedule

Featured Imgs 08

Juliette Reinders Folmer released a proposal for WordPress to drop old PHP version support on a fixed schedule. She wrote the proposal after Matt Mullenweg, WordPress co-founder and project lead, reached out to discuss solutions. This was after he closed a Trac ticket last week that sought to drop support for PHP 5.6 and bump the minimum version to 7.1 for the next major WordPress release this year.

The proposal lays out a position that many in the WordPress community could get behind. It is a clear-cut, transparent path for the platform’s future PHP support.

Folmer essentially put forward two roadmaps in the proposal. The first roadmap decides at what stage WordPress would drop support for a particular PHP version. The platform would remove support for a PHP minor release that is more than five years old each December. This would coincide with whatever major release of WordPress is upcoming. The following schedule lays out the minimum-supported PHP version each year:

  • December 2020 – PHP 7.1
  • December 2021 – PHP 7.2
  • December 2022 – PHP 7.3
  • December 2023 – PHP 7.4
  • December 2024 – PHP 8.0

The second part of the proposal creates a rolling schedule for backporting security updates to WordPress. Currently, WordPress releases security updates all the way back to the version 3.7 branch. If adopted, Folmer’s recommendation would support only the previous four years of WordPress releases.

Such a change would mean that when WordPress 5.6 is released in December 2020, the WordPress project would be committed to backporting security fixes as far back as WordPress 4.7, released in December 2016.

Folmer also proposes backporting PHP upgrade notices from the site health project to the currently-supported older versions of WordPress. This measure would inform users of PHP version issues before they make the jump to a newer version of WordPress.

The overlap of bumping the minimum PHP support into the future and backporting security fixes gives users a potentially huge window of nine years in which they could stay on whatever version of PHP they are currently on. Nine years may seem like a lifetime on the web with its constantly-changing technology, and it was a point of contention from some people in the comments of the post. However, it is a plan of action, something the WordPress community has not had the pleasure of experiencing with regards to PHP support. Developers will undoubtedly argue over the dates and versions, but that is secondary to actually having a predictable timeline.

A fixed version bump schedule is welcome. It puts everyone from developers to end-users to web hosts on the same page. This level of transparency is necessary if we ever intend to move forward without rehashing the same arguments.

The system of waiting around to see when a specific PHP version’s usage stats drop below a certain percentage just muddies things. The result is typically a long-winded argument that does not move the needle. Each side picks its stats. Each side digs its heels in. And each side has plenty of good points to make. Ultimately, everyone wants the same thing — to move the entire project forward and use up-to-date tools. However, they always disagree on how we get there. Eventually, the minimum PHP version gets bumped and the community gears up for the next round. It leaves us in a constant state of tug of war between those who want quicker advancement and those who do not want to leave users behind.

The truth is that no one is ever completely right in these arguments. There is no roadmap to follow. We have no guiding principle other than “this has what’s been done before.”

WordPress needs to set clear expectations.

This is not just a problem with the minimum PHP version — many want a more-detailed roadmap for the entire project. However, minimum PHP support is one problematic area that we could have a solution for, and Folmer has carved out a path. We need only follow it.

Importing a CSV file with hex data.

Category Image 101

I have a table with the following fields:

CREATE TABLE text (
    drawing INT NOT NULL,
    blockID INT NOT NULL,
    entityID INT NOT NULL,
    style INT,
    txt VARCHAR(255) NOT NULL,
    attrib INT);

My csv file contains the data:

19  1CB2    E49 2   CLIENT MODULAR  1C2A
19  1CB3    E4B 2   CLIENT UG - 2 MODULAR PILOT PLANT   1C2C
19  1CB4    E4C 2   100 - 500 MICRON    1C2D
19  -1  E50 2   USERNAME    1C31
19  1CBA    E51 2   15.8.2020   1C32
19  1C16    E58 2   PLANT   1C39

I'm using the following SQL to import the CSV file:

LOAD DATA INFILE '/tmp/_P2.8Q9nJ4_/text' INTO TABLE text (drawing,@blockID,@entityID,style,txt,@attrib) SET blockID=UNHEX(@blockID),entityID=UNHEX(@entityID),attrib=UNHEX(@attrib);

But this is the result:

+---------+---------+----------+-------+-------------------------------------------+--------+
| drawing | blockID | entityID | style | txt                                       | attrib |
+---------+---------+----------+-------+-------------------------------------------+--------+
|      19 |       0 |        0 |     0 | CLIENT MODULAR                            |      0 |
|      19 |       0 |        0 |     0 | CLIENT UG - 2 MODULAR PILOT PLANT         |      0 |
|      19 |       0 |        0 |     2 | 100 - 500 MICRON                          |      0 |
|      19 |       0 |        0 |     2 | USERNAME                                  |      0 |
|      19 |       0 |        0 |     2 | PLANT                                     |      0 |
|      19 |       0 |        0 |     2 | 15.8.2020                                 |      0 |

What is the correct way to import a CSV file into my table?

Improving brand

Featured Imgs 20

By creating content, you will be able to draw attention to your brand, which will allow you to attract many more consumers and increase conversion rates.

If you want to create a Wikipedia page for your business, you need to focus on creating content that provides information about the products and services that the business provides. This will help the viewer to get down to business. And maybe transform yourself into a consumer.

Do you think there are other ways to improve your brand identity through content creation?