Hasura, a GraphQL data and services company, has introduced a new data federation feature: Remote Joins. Remote Joins allows developers to treat data across sources as a single database. The existing data sources do not need to be modified in order to utilize Remote Joins. With a point and click, a relationship across the sources is created and unified access is created through the GraphQL API.
50 Creative Law Firm Logos
32 Beautiful Summer Pictures That Will Refresh You
How to Add a Horizontal Line Separator in WordPress (5 Methods)
Do you want to add a horizontal line across your post or page in WordPress?
Horizontal line dividers are a great way to break long posts into smaller sections, highlight special announcements or promotion, and clearly separate different parts of a page.
In this article, we’ll show you how to easily add a horizontal line divider in WordPress.
Since this is a comprehensive guide on how to add a horizontal line divider in WordPress, you may find it helpful to use our table of content:
- How to Add a Horizontal Line Divider in Block Editor
- How to Add a Horizontal Line Divider in Classic Editor
- How to Add a Horizontal Line Divider with Manual HTML
- How to Add Other Types of Spacers and Page Breaks in WordPress
- How to Break a Long WordPress Forms into Multiple Sections
Adding a Horizontal Line in the WordPress Block Editor
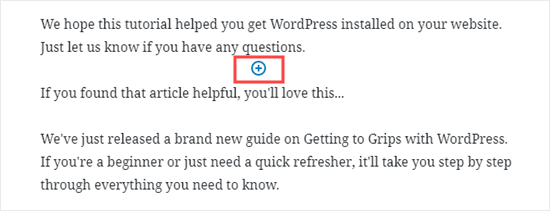
To add a horizontal line using the WordPress block editor, click the (+) icon to add a new block wherever you want the line to be.
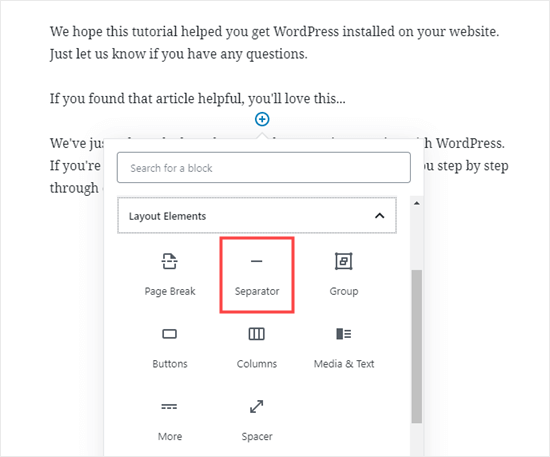
Next, select the Separator block from the Layout Elements section or search for it using the search bar.
Once added, you’ll see your horizontal line divider in your content area.
Styling the Horizontal Line in the WordPress Block Editor
By default, the horizontal divider is a pale gray line across the center of your post or page.
You can change how it looks by clicking on the line to select its block. Then, the ‘Block’ editing panel will open up on the right-hand side of your screen.
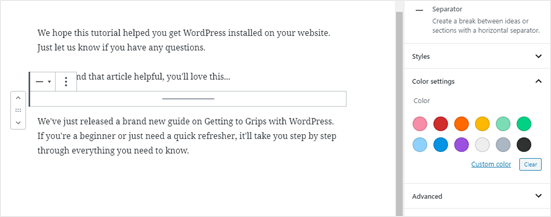
To change the style of your line, just click the little arrow next to Styles. Then, you’ll see the different options.
You can change the horizontal line to one of these, if you want:
- A wide line that covers the full width of your post’s content.
- Three dots that display in the center of your post.
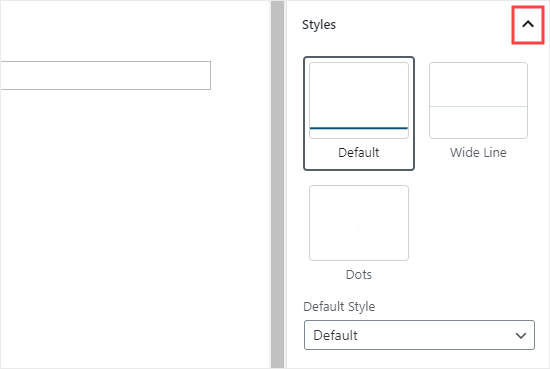
Note: In some WordPress themes, both the wide line and the default line will cover the whole width of your post.
You can also change the color of your horizontal line under the Color settings. Simply click on one of the options displayed, or use the ‘Custom color’ link to pick any color at all.
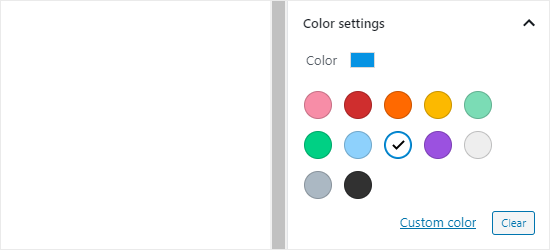
If you want to go back to the default gray color, just click ‘Clear’ button under the color options.
Here, our horizontal line is blue and uses the “wide” style.

Adding a Horizontal Line in the WordPress Classic Editor
If you’re still using the classic editor, then you can add basic horizontal lines. To do so, simply edit an existing post or page or create a new one.
If you only see one row of buttons in the toolbar above the post editor, then click on the Toolbar Toggle icon on the right:
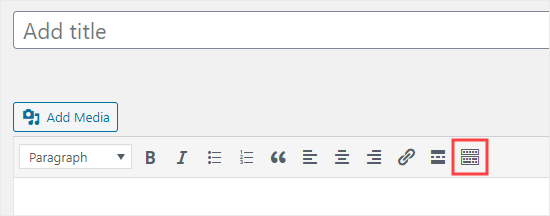
This will open up the second row of buttons, which includes the horizontal line option.
Now, go ahead and put a line break between the paragraphs where you want the horizontal line to go. You can then click the Horizontal Line button. It’s the second from the left on the second row:
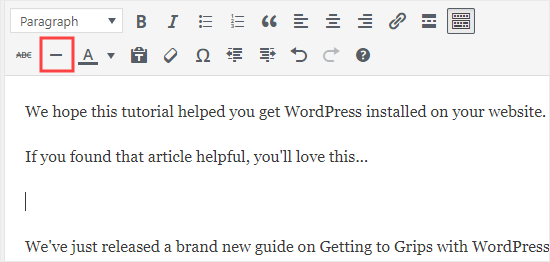
Your horizontal line will be light gray. It’ll cover the whole width of your post like this:

Manually adding a Horizontal Line divider using HTML
In some rare cases, you may need to manually add a horizontal line divider in your WordPress content.
If so, you can simply do that by using the hr HTML tag in your content:
<hr>
This will add the horizontal line separator in your post content.
Other Separators You Can Use in Your Posts and Pages
The default WordPress block editor allows you to add multiple types of separators to your posts and pages.
Aside from the horizontal line separator, the other options in the Layout Elements set of blocks include the Spacer, the More link, and the Page Break blocks.
The Spacer Block
The Spacer lets you add white space between blocks. For instance, if you want a slight gap at the end of your post before a special offer, you can use the Spacer.
You can customize the height of the spacer. Here’s how it looks when you’re creating your post in the block editor:

And here’s how the spacer appears on your site:

The More Block
If your theme shows full posts (rather than excerpts) on your main blog page, then adding a ‘More’ link will break off your post at that point. The visitor can click to read more.
Here’s how it looks when you’re creating your post:
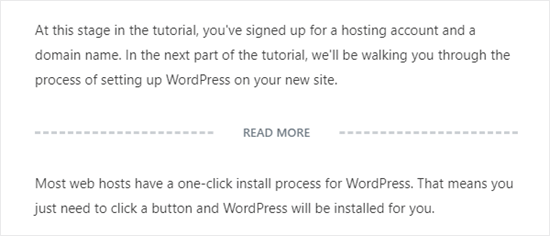
And here’s how the More link appears on your site:

You can learn more about excerpts, in our guide on how to easily customize excerpts in WordPress.
The Page Break Block
The Page Break lets you split long blog posts into multiple pages. You can’t customize it in any way. Here’s how it looks when you’re creating your post:

And here’s how the page break appears on your site:

Any of those could be good alternatives to adding a horizontal line in WordPress, depending on what you’re aiming to do.
Adding a Page Break in WordPress Forms Using WPForms
What if you want to put a break not in a post or page, but in a WordPress contact form? You can do that, too. We’re going to be using WPForms for this.
First, you’ll need to download, install, and activate the WPForms plugin. If you’re not sure how, just check out our step by step guide on how to install a WordPress plugin.
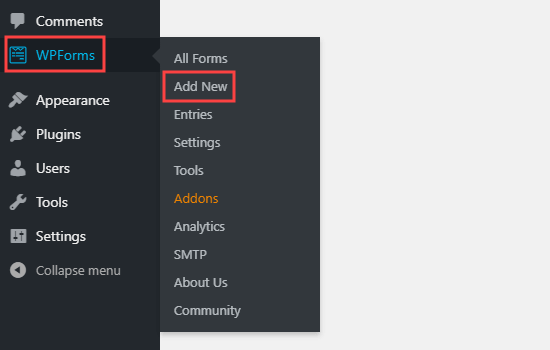
Next, go to WPForms » Add New in your WordPress dashboard.
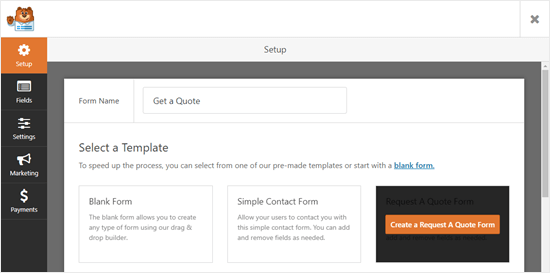
Enter a name for your form then pick a template. We’re going to use the ‘Request a Quote Form’ template for ours. Run your mouse cursor over the template and click the button to create your form.
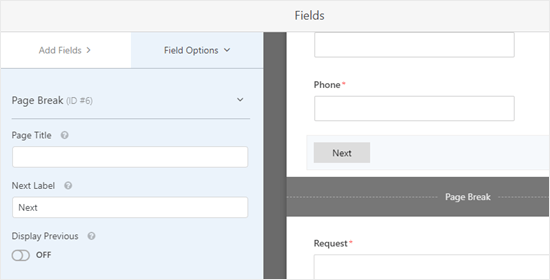
Next, scroll down the Add Fields tab on the left hand side to the Fancy Fields section. Drag and drop the Page Break to wherever you want it on the form. We’re putting it just before the Request box.
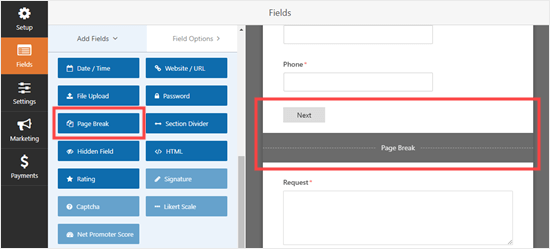
You’ll see that the form is now broken into two parts. WPForms has automatically added a ‘Next’ button, too.
You can change the ‘Next’ label if you want to and you can add a ‘Previous’ button to go on the second page of the form. Just click on the page break field to edit it.
Save your form once you’re done, by clicking the Save button on the top right.
You can now add the form to your website. First, you’ll need to create a new post or page, or edit an existing one.
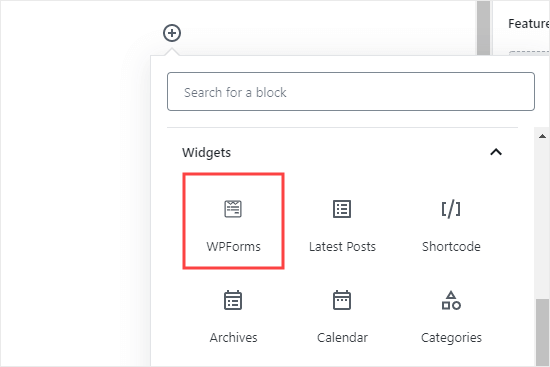
Click the (+) to add a new block to your post or page and find the WPForms block. You can use the search bar or look in the Widgets section. Add the block to your page.
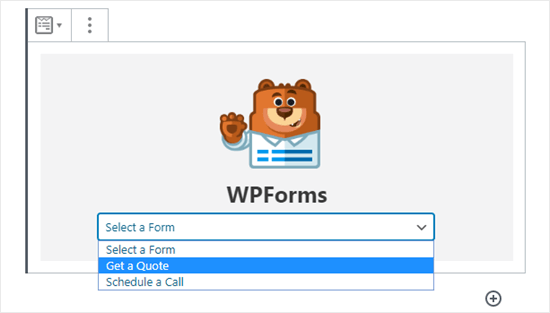
Now, select your form from the dropdown list.
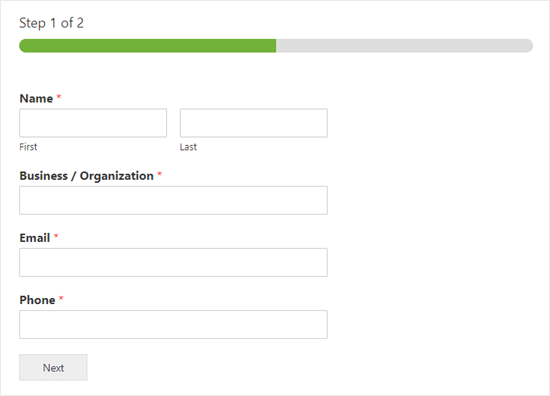
Once you’ve done that, you can publish the post or page and view how your form looks on your website.
We hope this tutorial helped you learn how to add a horizontal line separators in WordPress. If you want to add more design and layout elements to your posts and pages, check out our article on the best drag and drop WordPress page builders.
If you liked this article, then please subscribe to our YouTube Channel for WordPress video tutorials. You can also find us on Twitter and Facebook.
The post How to Add a Horizontal Line Separator in WordPress (5 Methods) appeared first on WPBeginner.
40 Macro Photography of Water Drops
Spectacular Examples of Typography Art
50 Most Impressive Photography Logos
49 Free Tattoo Fonts
Infographic: Evolution of Camera and Photography
Is Embedding Content via Instagram’s API Legal?
Ars Technica received notification via email earlier this week that Instagram does not extend its copyright license to cover content that is embedded on external websites via the Instagram API. This statement comes in light of an ongoing legal battle related to third-party use of the social plat
Why Does WordPress Sites Require Regular Database Optimization?
#include <iostream> #include <string> #include <iomanip> using namespace st
A.Employee and ProductionWorker Classes
Design a class named Employee. The class should keep the following information in
Employee name
Employee number
Hire date
Write one or more constructors and the appropriate set and get functions for the class.
Next, write a class named ProductionWorker that is derived from the Employee class. The ProductionWorker class should have member variables to hold the following information:
Shift (an integer)
Hourly pay rate (a double)
The workday is divided into two shifts: day and night. The shift variable will hold an integer value representing the shift that the employee works. The day shift is shift 1, and the night shift is shift 2. Write one or more constructors and the appropriate set and get functions for the class. Demonstrate the classes by writing a program that uses a ProductionWorker object.
Understand why CSS has no effect with the Inactive CSS rules indicator in Firefox DevTools
It’s useful when DevTools tells you that a declaration is invalid. For example, colr: red; isn’t valid because colr isn’t a valid property. Likewise color: rd; isn’t valid because rd isn’t a valid value. For the most part, a browser’s DevTools shows the declaration as crossed out with a warning ( ) icon. It would be nice if they went a step further to tell you which thing was wrong (or both) and suggest likely fixes, but hey, I don’t wanna look a gift horse in the mouth.
Firefox is starting to go a step further in telling you when certain declarations aren’t valid, not because of a syntax error, but because they don’t meet other qualifications. For example, I tossed a grid-column-gap: 1rem on a random <p> and I was told this in a little popup:
grid-column-gaphas no effect on this element since it’s not a flex container, a grid container, or a multi-column container.Try adding either
display:grid,display:flex, orcolumns:2. Learn more
Well that’s awful handy.
Elijah Manor has a blog post and video digging into this a bit.
Direct Link to Article — Permalink
The post Understand why CSS has no effect with the Inactive CSS rules indicator in Firefox DevTools appeared first on CSS-Tricks.
#271: Sending Email
Show Description
Dee and Marie talk about changes being made behind the tech we use to send out emails at CodePen. What’s the difference between transactional and non-transactional emails? When to bring an outside service vs building it yourself? And how are we sending emails so quickly now?
Time Jumps
- 00:45 Transactional vs non-transactional email
- 09:44 Bringing in outside services vs internal
- 18:04 Sponsor: An Event Apart
- 19:36 Very Important Emails get sent
- 21:24 How can we send email so quickly now?
- 29:12 Improved open rates
Sponsor: An Event Apart 18:04
To design a better web experience, attend a better-designed web conference. An Event Apart is three days of design, code, and content taught by absolute masters—the people who shape our medium. Join us and set yourself Apart.
Show Links
CodePen Links
The post #271: Sending Email appeared first on CodePen Blog.
Google Announces June Updates to the Display & Video 360 API
The Display & Video 360 API, which was first announced back in March, has seen a steady flow of updates over the past several months. Google has added to those improvements with a series of new features being added to the platform.
700+ Free PSD Templates for Download
How to Fix Facebook Incorrect Thumbnail Issue in WordPress
Have you noticed an incorrect post thumbnail when you share your articles on Facebook?
It’s a common error that beginners often complain about because knowing how to make the right thumbnail show up is not always clear.
In this article, we will show you how to fix the Facebook incorrect thumbnail issue in WordPress.

Why Facebook is Not Picking up The Thumbnail Image
There are many reasons why Facebook might not correctly display the feature image on your post.
One of the most common reasons is having multiple images set in the og:Image tag where your featured image is smaller than the other images.
Facebook uses Open Graph (og) tags, and many WordPress plugins like All in One SEO and Yoast SEO automatically adds them to your site to prevent the missing thumbnail issue.
Among other causes are caching plugins, CDN conflicts, or a missing open graph meta tag for the thumbnail image.
It’s really hard to guess what’s causing the issue because there are no specific error messages displayed when using the debugging tool.
That being said, let’s take a look at some ways to fix the incorrect Facebook thumbnail issue.
Choose Your Facebook Thumbnail with All in One SEO
One way to show the thumbnail you want is to use the All in One SEO. plugin. It is the best WordPress SEO plugin on the market and allows you to easily optimize your content for search engines and social media websites.
First, you need to install and activate All in One SEO. Here’s our full guide on how to install a WordPress plugin.
Next, you’ll need to enable the ability to add Facebook thumbnail images to each post.
Simply go to All in One SEO » Feature Manager and click the ‘Activate’ button in the ‘Social Meta’ box.

After you do this, you’ll now have a new feature unlocked at the bottom of your post editor. Scroll to the bottom, and you’ll see the ‘Social Settings’ tab.
You need to click on that and upload any image you want to display as your Facebook thumbnail.
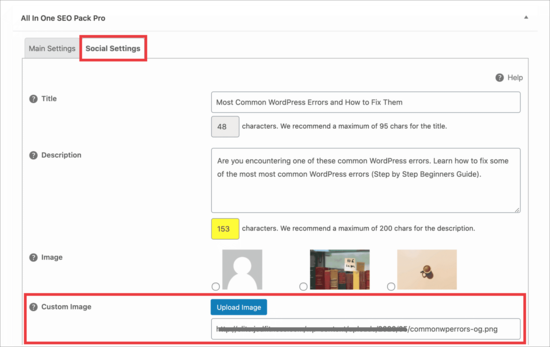
Once you add your Facebook thumbnail image there, save your post, and this will fix the issue in most cases.
Here’s what our post looks like:

Pro tip: If this doesn’t work, then make sure you have cleared your WordPress cache and refreshed the post in Facebook debug tool mentioned below in the article.
Choose Your Facebook Thumbnail with Yoast SEO Plugin
The Yoast SEO Plugin also comes with the ability to add a custom Facebook thumbnail to each individual post or page.
Simply install the Yoast SEO Plugin. After you’ve installed and activated, it’s time to set up a Facebook thumbnail into whatever post you want.
When writing a post, scroll down to the Yoast SEO meta box below the post editor and then click on the social tab. There you will see a button to upload a thumbnail image for Facebook.
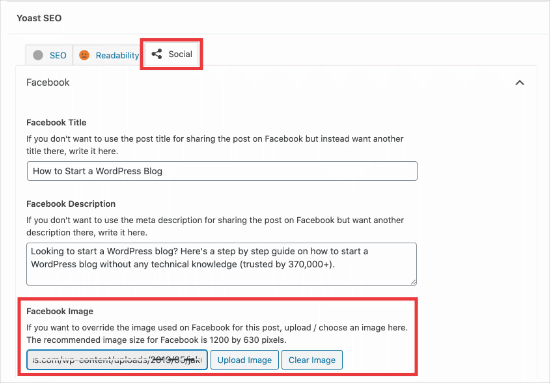
Here’s what the Facebook thumbnail looks like for our how to start a blog article:

Using Facebook Debug Tool to Clear the Cache
If you have added the right thumbnail, and Facebook is still not showing the right thumbnail, then the issue is related to caching.
First you need to make sure that you clear page cache in WordPress.
After that, you need to reset the cache in Facebook using their debug tool.
The Facebook debug tool is the easiest way to troubleshoot Facebook thumbnail issues.
Simply copy the URL of your WordPress post and paste it in the debugger tool.
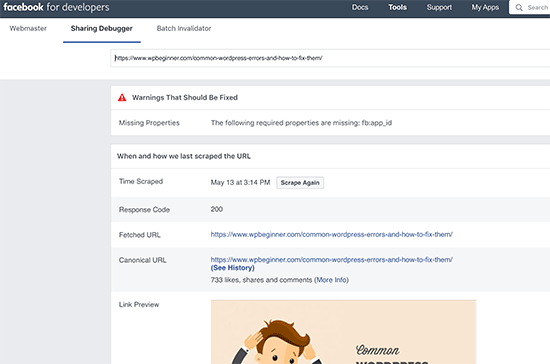
After that click on the Scrape Again button, and Facebook will update the thumbnail for your post. Sometimes, you may have to click the Scrape Again button twice.
We hope this article helped you resolve the Facebook incorrect/no thumbnail issue in WordPress. You may also want to see our guide on how to add social share buttons in WordPress and how to increase your blog traffic.
If you liked this article, then please subscribe to our YouTube Channel for WordPress video tutorials. You can also find us on Twitter and Facebook.
The post How to Fix Facebook Incorrect Thumbnail Issue in WordPress appeared first on WPBeginner.


