Visit The Site For More...
How to Influence the Readers Mind through Font Psychology
Light UI vs Dark UI – What Side Should You Embrace?
Life is an endless circle of decisions. Every day you have to consider your options and challenges, and find solutions. And at the end of the day, each solution is a decision you make based on knowledge and preferences. This article will discuss one of the choices UI designers have to make when they create […]
The post Light UI vs Dark UI – What Side Should You Embrace? appeared first on designrfix.com.
How to Easily Organize Media Uploads by Users in WordPress
Do you want to organize media uploads by user in WordPress?
If you run a multi-author website, then you may want to restrict each author’s media library access to only their own uploads. This can prevent an author from accidentally deleting another user’s images, and help keep subscriber-only content private.
In this article, we’ll show you how to organize media uploads by users in WordPress.

Why Restrict Author Access to Media Uploads?
If you have a multi-author WordPress blog, then people might be uploading lots of different images. This can make it difficult for an author to find the right image, or they might delete or edit another person’s media file by accident.
This can cause all sorts of problems including poor productivity, lots of extra work for site admins and editors, and a complicated editorial workflow.
This unlimited access can also be a privacy concern. For example, if you’re working on a new product or idea, then other authors might see confidential images in the media library before you make a public announcement.
If you have a WordPress membership site, then contributors and subscribers may be able to access premium media files they shouldn’t have access to. For example, if you sell online courses then a contributor might use their media library access to download premium PDFs and other course materials, without buying a subscription.
That being said, let’s take a look at how to restrict who can see media uploads inside your WordPress admin area. Simply use the quick links below to jump straight to the method you want to use.
Method 1. Organizing Media Uploads by Users With a Plugin (Quick and Easy)
The easiest way to restrict access to media uploads is by using the Frontier Restrict Access plugin.
This free plugin checks whether a user has the edit_others_posts permission, which allows them to edit another user’s posts.
By default, this ability is granted to everyone who has the site admin or editor role. If you want to change this, then you can add or remove capabilities to user roles in WordPress.
If the user doesn’t have this permission, then once this plugin is activated, they won’t be able to access another user’s files in the WordPress media library. This allows you to organize media uploads by users, without restricting access for admins and editors.
This plugin works out of the box and there are no settings for you to configure, so you can simply install and activate the Frontier Restrict Access plugin. For more details, see our guide on how to install a WordPress plugin.
Method 2. Organizing Media Uploads Using Code (Advanced)
Another option is to restrict access to files in the media library using code. This method requires you to add a code snippet to your WordPress blog or website, so it isn’t the most beginner-friendly method. However, you won’t need to install a separate plugin just to organize your media uploads.
Often, you’ll find guides with instructions to add custom code to your WordPress theme. However, this isn’t recommended as mistakes and typos in your code can cause common WordPress errors, or even break your site completely.
That’s why we recommend WPCode.
WPCode is the best code snippets plugin used by over 1 million WordPress websites. It makes it easy to add custom code in WordPress without having to edit the functions.php file.
For this method, we’ll be adding code that checks whether the user has the edit_others_posts permission. If they don’t have this permission, then the code snippet below will stop them from accessing other people’s files in the WordPress media library.
The first thing you need to do is install and activate the free WPCode plugin. For more details, see our step-by-step guide on how to install a WordPress plugin.
Upon activation, head over to Code Snippets » Add Snippet.

Here, simply hover your mouse over ‘Add Your Custom Code.’
When it appears, click on ‘Use snippet.’

To start, type in a title for the custom code snippet. This can be anything that helps you identify the snippet in the WordPress dashboard.
After that, open the ‘Code Type’ dropdown and select ‘PHP Snippet.’

In the ‘Code Preview’ area, paste the following code snippet:
add_filter( 'ajax_query_attachments_args', 'user_show_attachments' );

function user_show_attachments( $query ) {
    $user_id = get_current_user_id();
    if ( $user_id && !current_user_can('activate_plugins') && !current_user_can('edit_others_posts
') ) {
        $query['author'] = $user_id;
    }
    return $query;
}
Next, just scroll to the ‘Insertion’ section. WPCode can add your code to different locations, such as after every post, frontend only, or admin only.
We want to use the custom PHP code across our entire WordPress website, so click on ‘Auto Insert’ if it isn’t already selected. Then, open the ‘Location’ dropdown menu and choose ‘Run Everywhere.’

After that, you’re ready to scroll to the top of the screen and click on the ‘Inactive’ toggle, so it changes to ‘Active.’
Finally, click on ‘Save Snippet’ to make the PHP snippet live.

Now, users will only have access to the files they upload to the WordPress media library.
We hope this article helped you better organize media uploads by users on your WordPress site. Next, you can check out our ultimate WordPress security guide or see our expert pick of the best contact form plugins for WordPress.
If you liked this article, then please subscribe to our YouTube Channel for WordPress video tutorials. You can also find us on Twitter and Facebook.
The post How to Easily Organize Media Uploads by Users in WordPress first appeared on WPBeginner.
CompTIA Network+ Certification: Is It for You and Is It Worth the Effort?
To increase your chances to succeed in an IT role, it is important to have a globally recognized certification that can verify that you have essential knowledge in the sphere. Today, there are numerous credentials for specialists of different specializations and if you want to build a career as a networking professional, then CompTIA Network+ […]
The post CompTIA Network+ Certification: Is It for You and Is It Worth the Effort? appeared first on designrfix.com.
10 Cheapest WordPress Hosting Services for Small Business Websites
Looking for the cheapest WordPress hosting that you can afford on a tight budget? Here is our list with 10 cheap WordPress hosting services. Whether you run a personal website or a site for your...
The post 10 Cheapest WordPress Hosting Services for Small Business Websites appeared first on 85ideas.com.
Free Tools to Scan Your WordPress Site for Vulnerabilities
 It’s a stroke of luck for mischief makers on the internet if they can find a way to harm WordPress websites. With just one trick up their sleeves, they can take a shot at almost 30% of the websites on the internet. That’s the downside of WordPress being the most popular CMS. As website owners, […]
The post Free Tools to Scan Your WordPress Site for Vulnerabilities appeared first on WPExplorer.
WordPress Bumps Minimum PHP Recommendation to 7.2
Late last week WordPress made major progress towards the goal of getting users to adopt newer versions of PHP. The ServeHappy API has been updated to set the minimum acceptable PHP version to 7.2, while the WordPress downloads page recommends 7.3 or newer.
Sergey Biryukov committed this change on the meta trac after Marius Jensen opened a ticket for it nine days ago. Previously, the ServeHappy dashboard widget was showing the upgrade notice to users of PHP 5.6 or lower.
“After discussing with the core Site Health team and the Hosting Team, it has come up that the most sensible next move is to show the upgrade notice to users of PHP <=7.1 (this means setting ACCEPTABLE_PHP to 7.2),” Jensen said.
“Looking at the numbers, we’re seeing roughly 25% of sites running a WordPress version that includes ServeHappy [that] would then get an upgrade notice.”
This change means that the majority of WordPress sites are using an acceptable version of PHP. Approximately 47% are running WordPress on older versions. Those who are on WordPress 5.2+ (when Site Health was introduced) will see the upgrade notices generated by the ServeHappy API.
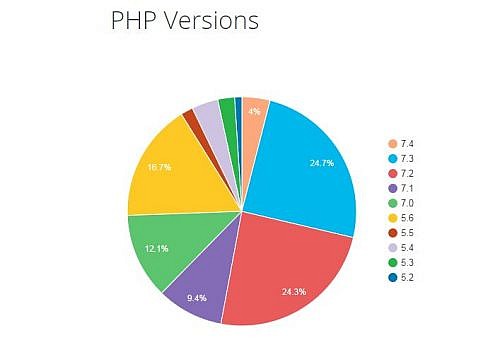
This update also bumps the lowest branch of PHP which is actively supported to 7.3 and bumps the lowest branch of PHP that is receiving security updates to 7.2.
The Site Health team scheduled the change for last Friday, but Jensen noted that the API call is cached for a week in core. It should start popping up for users throughout this week.
In December 2018, PHP 5.6 and 7.0 reached End of Life (EOL) and stopped receiving security updates. This left approximately 83% of users on unsupported versions of PHP at the end of 2018. Today, with the progress encouraged by the Site Health project, 47% are on unsupported PHP versions. The update put in place last week should help significantly decrease this number before PHP 7.2 reaches EOL in November 2020.
Jenny Wong, who helped coordinate the project as part of the Site Health team, described how they got started and worked successfully across teams with design, Polyglots, and Hosting contributors to make this update possible.
“I remember going to WordCamp San Francisco and sitting down with Andrew Nacin and Mark Jaquith at lunch and asking them why WordPress supported such old versions and what the project was doing about it,” Wong said. “They told me the work that had been going on.
“They told me the issues, they took the time took explain it all to me and answer all my questions.”
Wong said she was grateful to be part of that initial discussion in 2014 and to have shared in the journey with dozens of contributors.
“To the polyglots who translated everything we threw at them, to everyone else who gave feedback, argued, fought, discussed and debated, to everyone who has shared ideas and patches, to every person who has listened to me complain, took my wild ideas and made them an reality – Thank you!” Wong said.
Given WordPress’ large share of the market, encouraging adoption of newer versions of PHP will help make the web more secure. Please note that this update means that 7.2 is now the lowest branch of PHP that is considered acceptable for use with WordPress, according to the ServeHappy API. Sites that are running on older versions may continue to work but WordPress will continue strongly urging users to upgrade.
How to Insert image in WordPress
“Hearing and seeing something, which exists physically are two different things. When you hear about something then it is likely that you will begin to believe in it, but when you see that thing then it occurs to you that whatever you heard and believed in was accurate”. In WordPress, we see a number of […]
The post How to Insert image in WordPress appeared first on WPArena.
How to Put Images Side by Side in WordPress (Easily)
Do you want to put images side by side in your WordPress content?
Often beginners struggle to find how to put two pictures next to each other in their WordPress posts and pages.
In this step by step guide, we will show how to easily put images side by side in WordPress (without writing any code).

Using the Block Editor to Put Images Side by Side
The easiest way to get your images side by side is to use the WordPress block editor.
The block editor has a special ‘Gallery’ block that lets you display images in rows and columns.
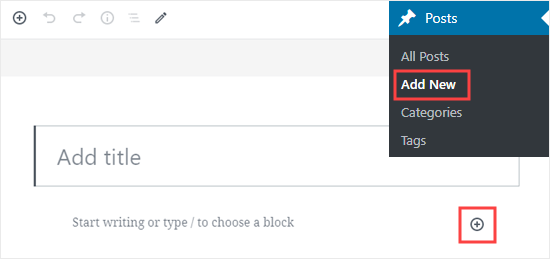
First, you’ll need to create a new post / page or edit an existing one to open the content editor. Once inside, click the (+) symbol to add a new block.
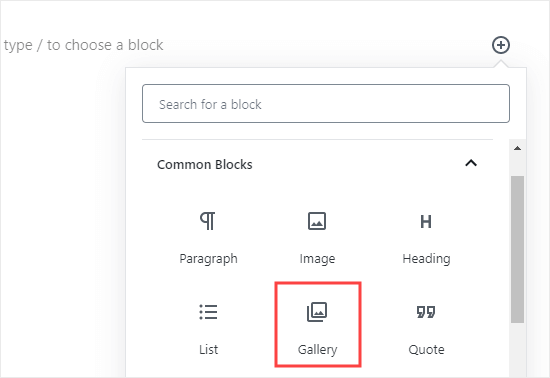
Next, you need to select the Gallery block and add it to your page. You can find the Gallery block in the Common Blocks section, or you can use the search bar to quickly locate it.
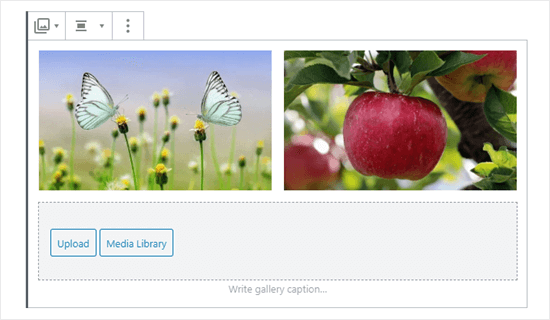
Now, you can easily add images to your gallery block, by dragging them into it or by using the Upload button. You can also select images from your WordPress media library.
As you can see, we’ve added 2 images to our Gallery block. WordPress has automatically positioned them side by side.
What if you want 3 images side by side? Here’s what happens if we add a third image. WordPress simply resizes the others to fit all 3 side by side:
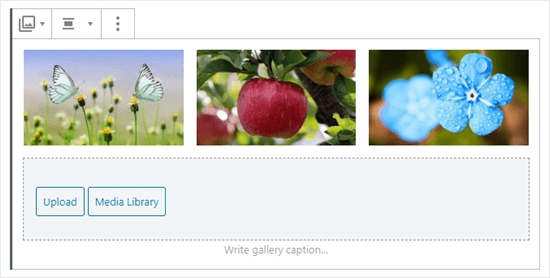
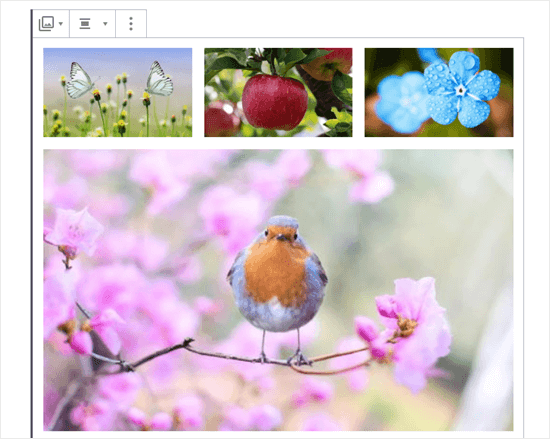
If you upload a fourth image, then WordPress will place it beneath the others.
You can change the number of images WordPress should include side by side in a single column.
First, click on the Gallery block, if it’s not already selected. On the right hand side of the screen, you’ll see the Gallery’s block settings.
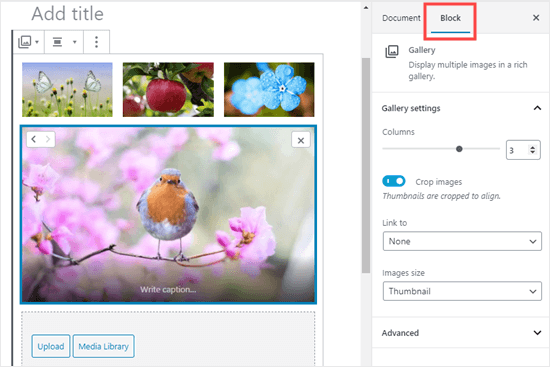
You can adjust the number of columns here to any number between 1 and 4. For instance, if you want two images side by side, and two more beneath them, you can set the Columns to 2.
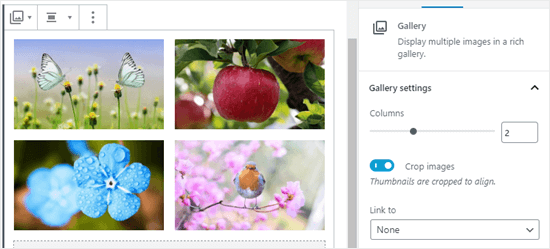
It’s as simple as that!
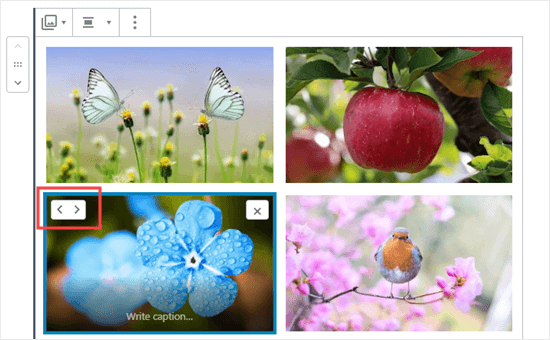
If you want to change where an image is positioned in your gallery, just click on it. You’ll then see arrows that you can use to move it forward or backward in the gallery.
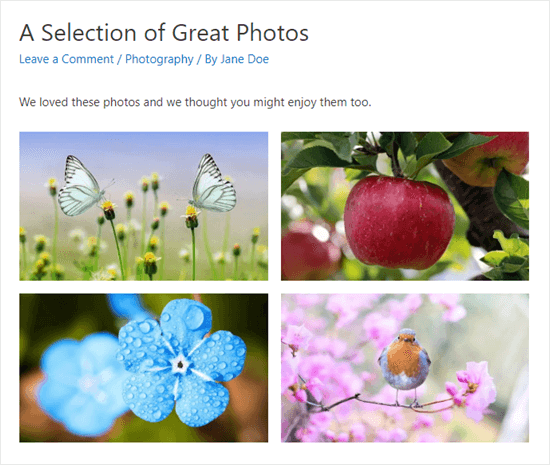
Here’s a finished gallery demo from our sample post:
Using a Plugin to Put Images Side by Side in WordPress
If you’re using the old classic WordPress editor, or if you want to create more complex galleries than the default Gallery block, then you will need a WordPress gallery plugin.
We recommend using Envira Gallery because it is the best WordPress gallery plugin
For the sake of this tutorial, we will be using the free version of Envira, but you may want to get the Pro version to get powerful features like albums, image slideshows, etc.
First, you’ll need to install and activate the Envira Gallery plugin. If you’re not sure how, just check out our step by step guide on how to install a WordPress plugin.
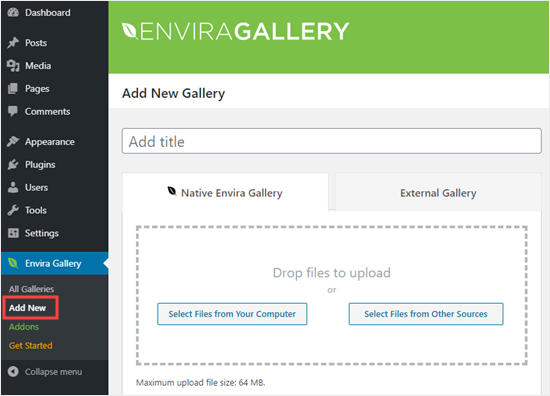
Next, you can go to Envira Gallery » Add New in your WordPress dashboard.
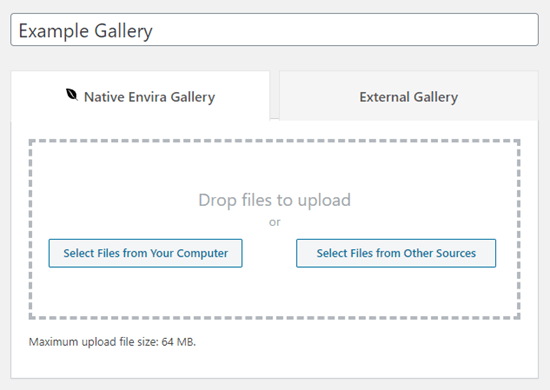
You’ll need to give your gallery a title. We’ve called ours ‘Example Gallery’. Next, upload the images you want to use.
You can either drag and drop them into the upload box, or you can use one of the ‘Select Files’ buttons.
Here’s how the images look once they’ve been uploaded:
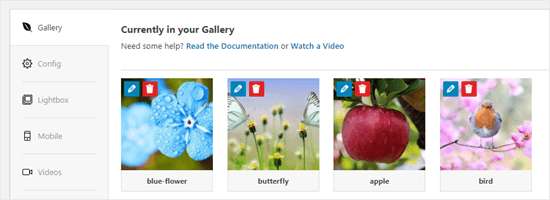
You may want to give your images a title and alt text here. The title appears below your image when the user brings their mouse cursor over it.
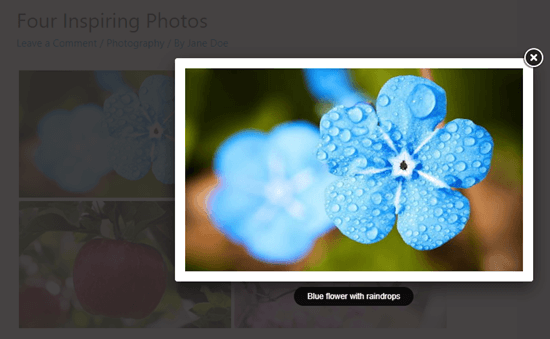
The title also appears below the image in the lightbox popup mode, which we’ll take a look at in a moment.
To edit the title and alt text, click the Edit button on an image in the gallery.
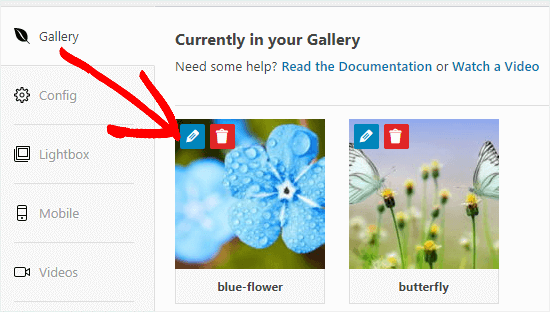
You can then change the title for your image. It defaults to the image’s filename.
You should also enter alt text, as this is helpful for your WordPress site’s SEO. If your title describes the image, then you can simply repeat it for the alt text.
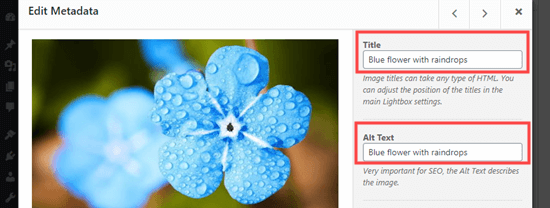
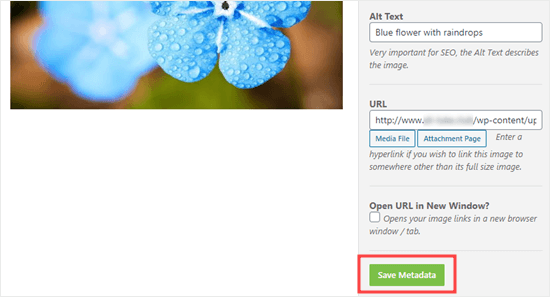
Once you’re done, please make sure you click the ‘Save Metadata’ button before clicking the X to close the window.
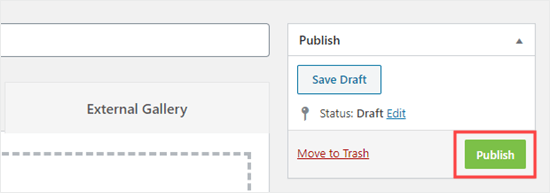
To add your gallery on the site, you’ll first need to publish it. Go ahead and click the Publish button on the right hand side of the screen.
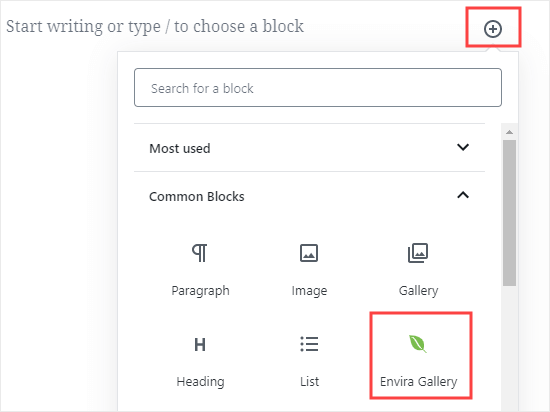
Now, edit a post or page, or create a new one. Inside the content editor, click (+) to add a block to your post, and select the Envira Gallery block. You can find it in the Common Blocks section, or you can use the search bar.
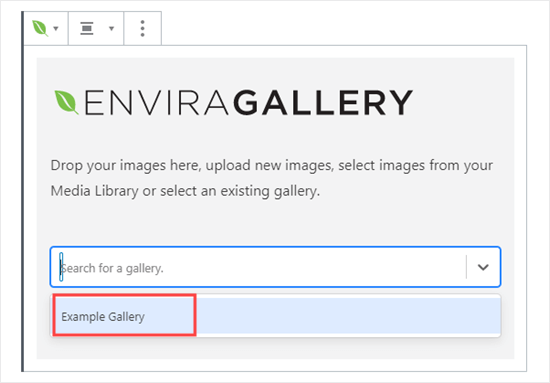
You’ll then need to click on the dropdown to select your gallery.
You should see your gallery in place in your post.
You can adjust the settings on the right-hand side of the screen. For instance, you might want to change the column layout, or the size of the margin between images.
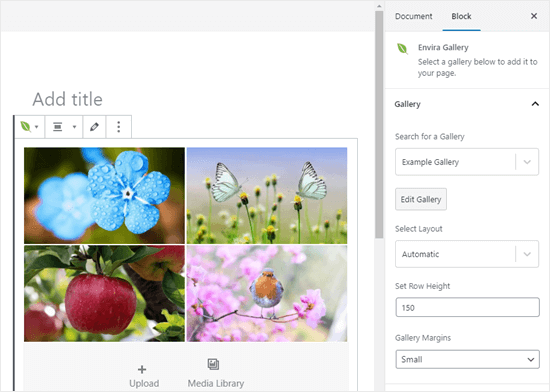
We decided to set our gallery to always display in two columns. We also added a wider margin between the images.
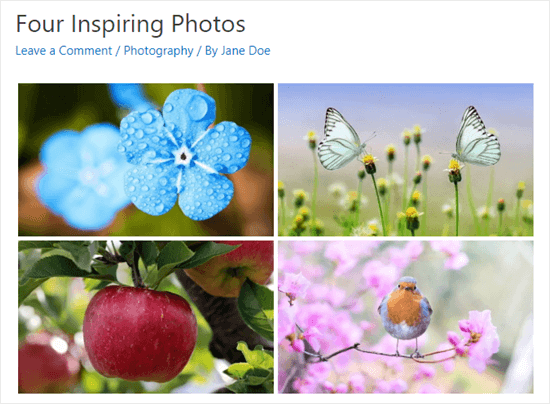
The user can click on an image to see the full-sized version in a lightbox. They can scroll through the images using the lightbox, too.
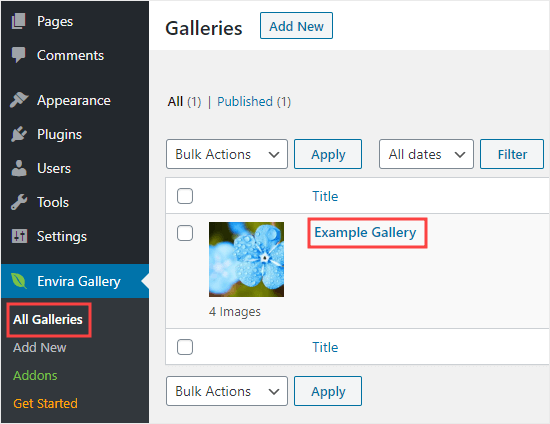
If you want to add more images to your gallery, then you can go back to it by visiting Envira Gallery » All Galleries in your WordPress dashboard. Simply click on the name of your gallery to edit it.
Any changes you make to your gallery will appear wherever you’ve placed it in your posts, pages, or sidebars. You don’t need to add it to these again.
Tip: If you’re using the classic editor instead of the block editor, you can still use Envira Gallery.
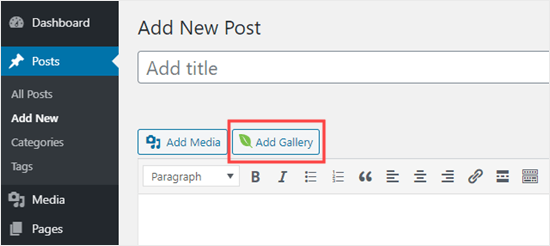
You’ll see an ‘Add Gallery’ button above the classic editor that you can use to add an existing gallery to your post.
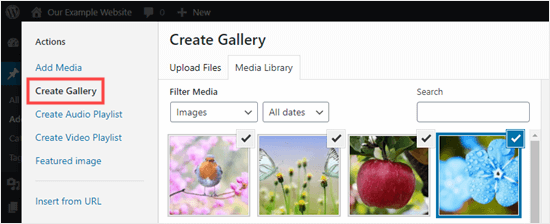
You can also create a new gallery by clicking the ‘Add Media’ button then ‘Create Gallery’.
We hope this tutorial helped you learn how to put images side by side in WordPress. You might also want to go through our guide on how to align images in the WordPress block editor, and our comprehensive list of the must have WordPress plugins (expert pick).
If you liked this article, then please subscribe to our YouTube Channel for WordPress video tutorials. You can also find us on Twitter and Facebook.
The post How to Put Images Side by Side in WordPress (Easily) appeared first on WPBeginner.
SlideCasts – Sync YouTube Videos with your Google Slides Presentation
SlideCasts let you combine YouTube videos and Google Sides / PowerPoint presentations in a single-player. The speaker video and the slides appear side-by-side and, as the video progresses, the slides auto-change in sync with the video.
You can try a live demo of SlideCasts here. Just hit the play button on the YouTube video and you’ll notice that the slides will change at the 10s, 25s and 30s mark (configurable).
SlideCasts can be really useful for educators involved in remote teaching. The teacher’s “talking head” video can be uploaded to YouTube and the lecture slides can be hosted on Google Slides.
If your course slides are available as a PowerPoint presentation that will work as well since you can directly upload your PPT and PPTX files to Google Slides.
How to Sync Presentation Slides with Video
The first step is to install Creator Studio. Next go to slides.google.com and open any existing presentation.
Go to the Addons menu inside Slides, choose Creator Studio and then select Create Slidecasts. Here specify the URL of the YouTube video and your Google Slides deck (both should be public).
Next, specify the timestamps in mm:ss format (minute seconds) when the slides should change in sync with the video.
For instance, if you want the second slide to show at the 15s point in the video, the 3rd slide at the 45s mark and the 4th slide at 1 minute, 20 second mark, your markers would be written as:
0, 15, 45, 1:20
That’s pretty much it. Click the Generate button and copy-paste the HTML code into your website.
The SlideCast player is responsive so the video and slides will auto-resize based on the size of the visitor’s screen.
Top 10 Satellites APIs
Joe Tech Reviews

Honest detailed tech reviews for the average Joe
General Public

General public is a creative agency that believes in the power of human connection.
Maria Radovanovic

I’m a web designer & developer based in Belgrade, Serbia specialized in building exceptional, high quality websites based on WordPress.
Declare Media

Declare Media offers first-class services to help companies accelerate their business and remove the confusion in pay per click marketing.
The post Declare Media appeared first on WeLoveWP.
How To Use WordPress Categories And Tags To Pinpoint Your Blog Niche
How To Use WordPress Categories And Tags To Pinpoint Your Blog Niche Read More →
How To Stop Your WordPress Website From Leaking Revenue Due To Ad Blockers
How To Stop Your WordPress Website From Leaking Revenue Due To Ad Blockers Read More →


