CreditRegistry, Nigeria's largest credit bureau, has launched an API to help financial institutions validate status checks on potential customers. The CreditRegistry Dud Cheque API should help lenders, retailers, and other businesses from accepting checks from serial dishonored (Dud) check issuers. The API will help lenders comply with new Nigerian directives and prevent check fraud which is expected to increase in the fallout from COVID-19.
Jenkins Pipeline With Sonarqube and Gitlab
In this guide, we are going to deploy a continuous integration process between Jenkins, GitLab, and SonarQube.
The end goal will be to review the code quality through SonarQube for GitLab repository using Jenkins. Following is the process flow we need to manage:
Molly Burke on the Power of Universal Design
In a 2017 speech titled “Stop trying to fix disability,” YouTube and motivational speaker Molly Burke says, “I live in a world that wasn’t built for me, but what if it was?” Burke was born with a rare, genetic eye disease that caused her to go blind. In this short but moving 8 minute video, she contends that making the world accessible helps everyone. She introduces the concept of universal design to her audience in simple terms:
“Universal design [is] designing and building everything to be accessed, enjoyed, and understood to its fullest extent by everyone, regardless of their size, their age, their ability, or their perceived disability.”
Burke identified Apple as one company that exemplifies universal design.
“Every product they release, I could buy at a store, open up, and use on my own independently, with no extra cost and no assistance needed,” she said. “I ask you to imagine how liberating, how empowering it is to be shown by a company that they view you as belonging to their customers, when so many others tell you the exact opposite.”
In honor of Global Accessibility Awareness Day, I wanted to highlight this video that tells just one person’s story on the powerful impact of technology that is built with everyone in mind. Burke’s speech is a poignant reminder of how designers and builders can extend a sense of belonging to their customers by making their products accessible.
Flexbox-like “just put elements in a row” with CSS grid
It occurred to me while we were talking about flexbox and gap that one reason we sometimes reach for flexbox is to chuck some boxes in a row and space them out a little.
My brain still reaches for flexbox in that situation, and with gap, it probably will continue to do so. It’s worth noting though that grid can do the same thing in its own special way.
Like this:
.grid {
  display: grid;
  gap: 1rem;
  grid-auto-flow: column;
}They all look equal width there, but that’s only because there is no content in them. With content, you’ll see the boxes start pushing on each other based on the natural width of that content. If you need to exert some control, you can always set width / min-width / max-width on the elements that fall into those columns — or, set them with grid-template-columns but without setting the actual number of columns, then letting the min-content dictate the width.
.grid {
  display: grid;
  gap: 1rem;
  grid-auto-flow: column;
  grid-template-columns: repeat(auto-fit, minmax(min-content, 1fr));
}
Flexible grids are the coolest.
Another thought… if you only want the whole grid itself to be as wide as the content (i.e. less than 100% or auto, if need be) then be aware that display: inline-grid; is a thing.
The post Flexbox-like “just put elements in a row” with CSS grid appeared first on CSS-Tricks.
PHP and WordPress Version Checks Coming to Themes
PHP and WordPress version checks are coming to the WordPress theme system — finally. The feature was pulled into core WordPress three days ago. It will prevent end-users from installing or activating a theme that is incompatible with their current version of PHP or WordPress. The change is slated to land in WordPress 5.5.
This feature has long been on many theme authors’ wish lists, particularly PHP version checking. Plugins authors gained the ability to support specific PHP versions starting with WordPress 5.2. However, theme authors were left feeling like the second-class citizens they usually are when it comes to the addition of core features, waiting patiently as plugin authors received the new and shiny tools they were looking forward to.
Previously, the code for manually handling version checking within individual themes was more complex than in plugins. Theme authors needed to run compatibility checks after theme switch and block theme previews in the customizer using two different methods, depending on the user’s WordPress version. That is assuming theme authors were covering all their bases.
Users had no real way of knowing whether a theme would work on their site before installing and attempting to activate it. It was a poor user experience, even when a theme gracefully failed for the end-user.
This user experience has also held back some theme authors from transitioning to newer versions of PHP. For years, many were supporting PHP 5.2. Slowly, some of these same authors are now making the move toward newer features up to PHP 5.6, which is now the minimum that WordPress supports. However, not many have made the jump to PHP 7 and newer.
Until now, there has been no mechanism for letting the user know they need to upgrade their PHP to use a particular theme.
Some theme authors may choose to continue supporting older versions of PHP, such as 5.6, for a potentially wider user base. However, developers who want to switch to newer features can now do so with the support of the core platform.
Changes for Users
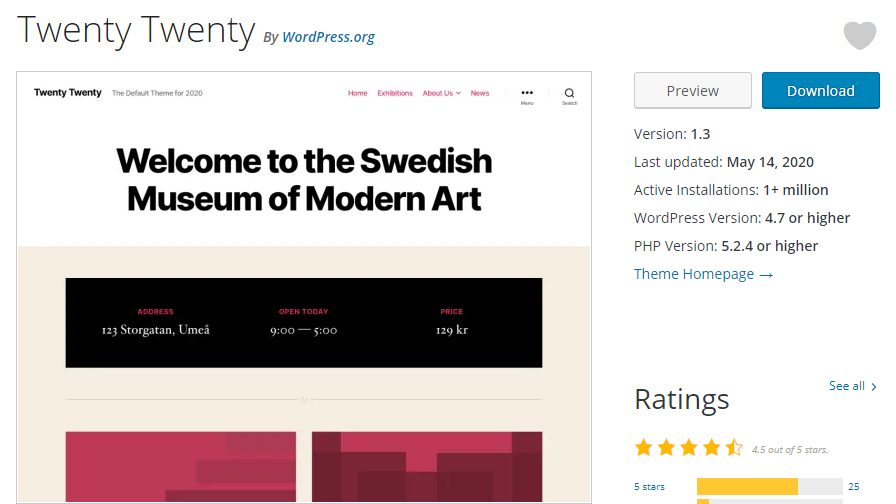
Users who are browsing the WordPress theme directory may begin to notice new information available for some themes. Similar to plugins, visitors should see a WordPress Version and PHP Version listed for some themes. For example, the Twenty Twenty theme now lists the following minimum requirements:
- WordPress Version: 4.7 or higher
- PHP Version: 5.2.4 or higher
Not all themes will have these numbers listed yet. It will take some time before older themes are updated with the data required to populate these fields.
In WordPress 5.5, the admin interface for themes will change. When attempting to install or activate a theme, WordPress will prevent such actions. If a user searches for a theme that has an incompatible WordPress or PHP version, the normal installation button will be replaced with a disabled button that reads “Cannot Install.” If a theme is installed but not activated, the activation link will similarly be replaced with a disabled “Cannot Activate” button. Users will also not be allowed to live preview incompatible themes.
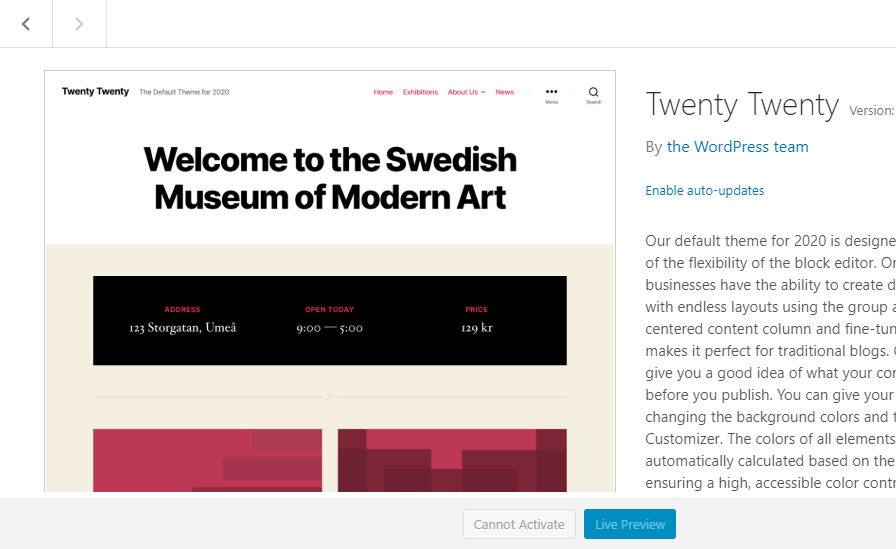
The feature works the same from within the customizer interface as it does via the themes screen in the WordPress admin.
Changes for Theme Authors
The WordPress Themes Team recently announced two new required headers for theme authors to place in their style.css files. The first required field is Tested up to, which is the latest version of WordPress the theme has been tested against. The second is a Requires PHP field, which is the minimum PHP version the theme supports.
It is unclear is why the team decided to require those two fields but not the Requires at least field, which represents the minimum WordPress version needed. Most likely, theme authors will want to place all three headers in their themes.
Theme authors who will still support versions of WordPress earlier than 5.5 will want to continue using their old compatibility checks. However, this is the first step in phasing such code out.
WordCamp Kent Online Features Business and Marketing Tracks, May 30-31
One of the exciting things about WordCamps going virtual is the community gaining access to more events and presentations than ever before, from anywhere in the world. Even in this new online-only format, local camps still retain their unique character as they feature speakers from their respective communities.
WordCamp Kent (Ohio) is one of these upcoming events that has been forced online by the pandemic. Organizers will be broadcasting all sessions on the weekend of May 30-31, and tickets are free for anyone who wants to attend.
The schedule for this particular event runs heavy on the business and marketing side of working with WordPress, with very few talks geared towards developers. If you are a freelancer, run an agency, or have a WordPress product business, you will find WordCamp Kent’s program more tailored to topics that help you improve client services.
The schedule on the first day of the event is divided into two tracks: Freelance/Business and User/Marketing. These sessions will run alongside live Q&A and a Help Desk managed by volunteers in the #wp-help-desk channel in the NEO WordPress Slack workspace. The second day of the event will be also be split into two tracks: Freelance/Business/Developer and WordPress 101/User.
Topics include designing websites for generating leads, improving your business model for freelancers and small businesses, client consultations, content marketing, and customer support.
This Kent, Ohio, WordCamp may not have made it on your radar in the past, but the pandemic has opened up events in some ways. It forces a greater number of camps online and allows attendees to join any event without the travel expenses that would ordinarily be prohibitive. In the past, many people who were not local would simply opt to save their money for the bigger camps. The WordPress community has a greater potential to accelerate their learning opportunities, as more smaller camps gain a global audience online.
Thrive Theme Builder Review: Build Websites With Less Hassle
Thrive Theme Builder Review: Build Websites With Less Hassle Read More →
20 Most Customizable WordPress Themes of 2021
Looking for the most customizable WordPress theme? Finding the best WordPress theme that functions and looks exactly how you want can be a daunting task – if not impossible. With hundreds of free and premium...
The post 20 Most Customizable WordPress Themes of 2021 appeared first on 85ideas.com.
HERE Technologies Moves Its XYZ Mapping Platform to General Availability
HERE Technologies, a provider of mapping technology and services, has announced that its XYZ platform will move into general availability. HERE XYZ is designed to provide end-to-end support for developers that are working on map publication and data management.
Auto Generated Content
I am new to internet marketing and would like to ask for advice. I came across the service https://www.articleforge.com/ and content-edge.net, which claim to be able to generate unique content in a minute. Have you encountered this? Is it wise to use them to create a PNB?
20 Minimal HTML Templates for Business Websites
When creating a business website, it’s vital to have a design and layout that serves your content well. But this can feel like a monumental task if you don’t have design skills yourself. That’s why minimal HTML templates are so useful, of course. They save you time, and for just a small upfront investment, you can get a fantastic-looking site that suits your company for years to come.
Today, we’ve compiled twenty minimal HTML templates for creating effective business websites. The minimal design is key here: it means your content stands out and won’t be lost in a sea of clutter.
UNLIMITED DOWNLOADS: Email, admin, landing page & website templates
Starting at only $16.50 per month!
Ocularus
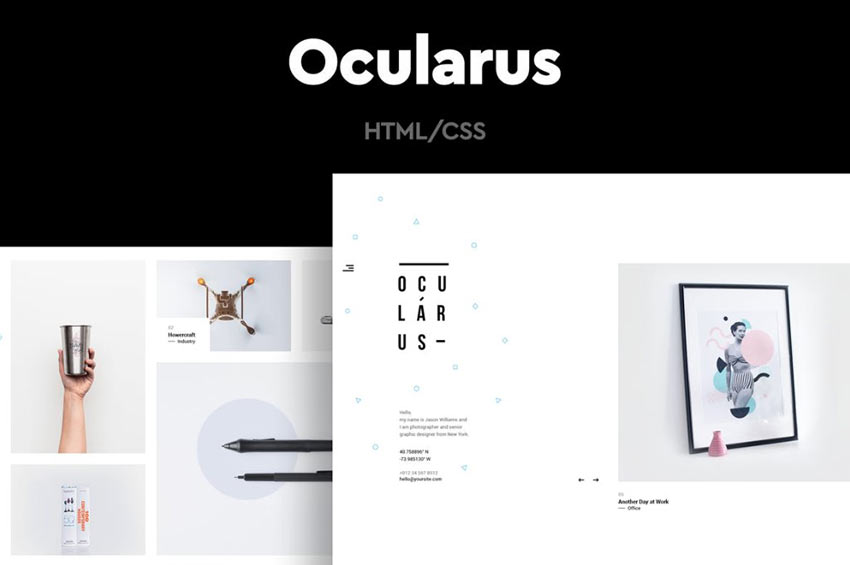
The Ocularus HTML template is easy on the eyes, mostly because there isn’t a whole lot to look at. And that’s a good thing. Its minimal design allows your content to shine.
Blossom

Another option is the Blossom template. This one offers a simple layout that you can use to create any type of company website you can imagine. Add images, add text with ease here.
Sora

The Sora template is aimed at photographers and but could be used for any type of business with a graphical focus.
Krome
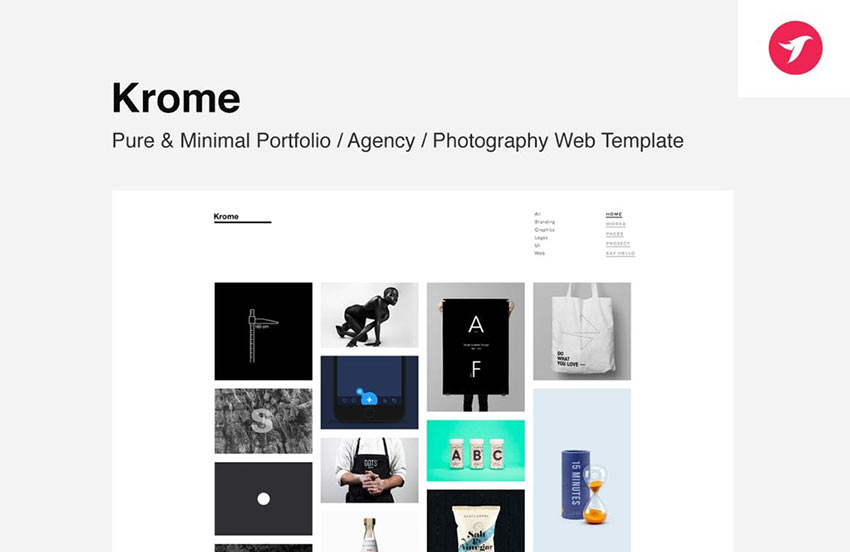
Krome is a fantastic template that is suitable for portfolios, agency websites, and more. It uses a grid-based layout for showcasing images in an eye-catching way.
Leto
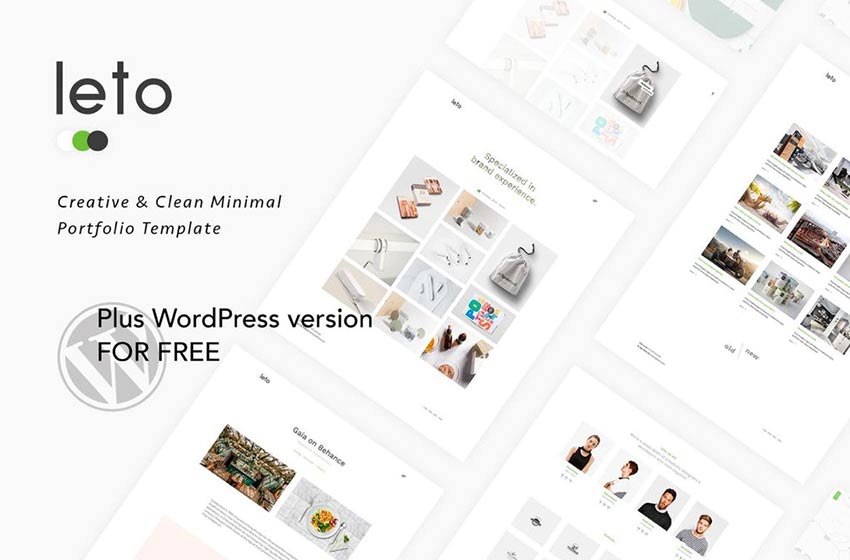
Leto is another minimal template that can be used for portfolios. Its grid-based design makes it easy to display graphics and images succinctly.
Minel
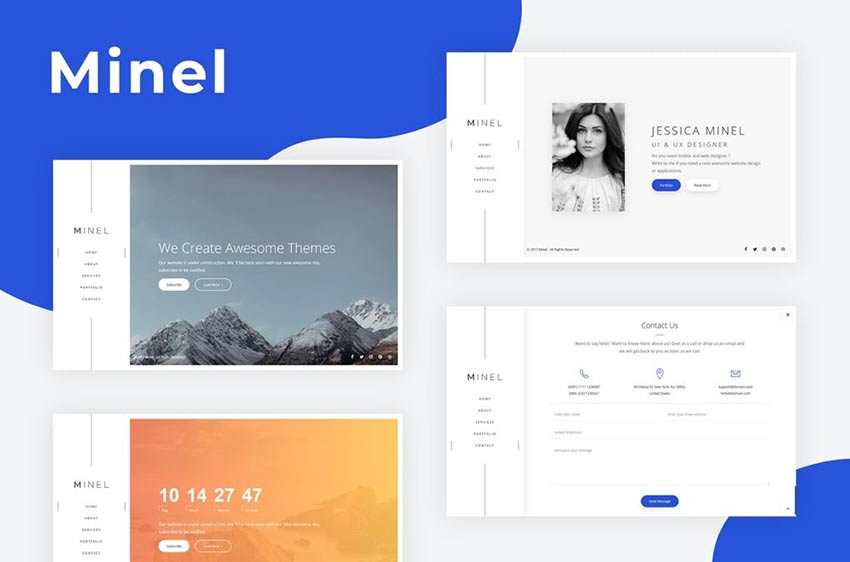
The Minel template could be customized for a wide range of businesses. It offers an interesting menu layout, call-to-action buttons, and compelling graphics.
Opium
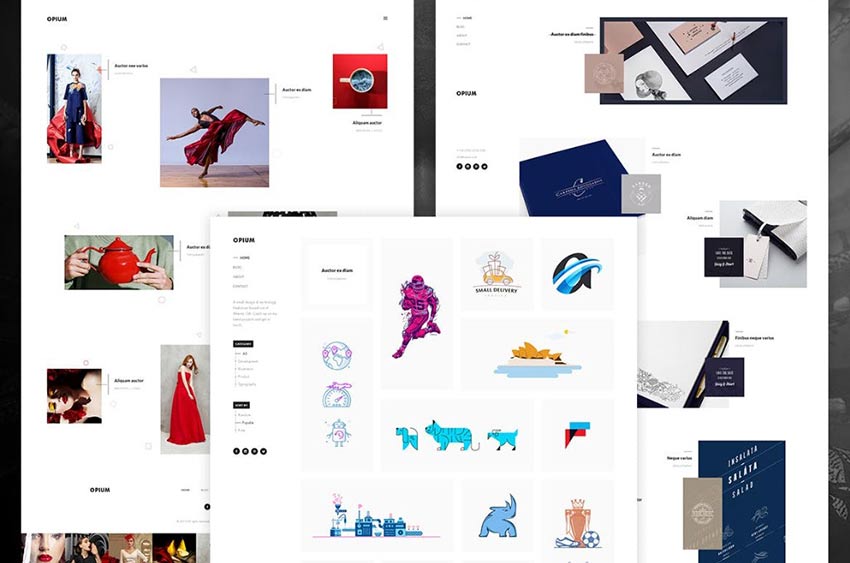
Opium is another HTML template that uses a minimal design to great effect. Enjoy the grid layout, and timeline page option to make for a unique “about us” page, and that’s just for starters.
Minimalize
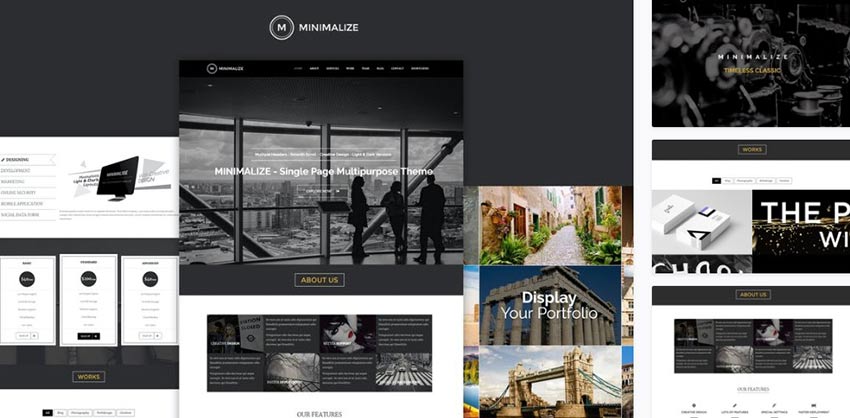
Minimalize is a lovely-to-look at HTML template that utilizes the one-page motif to create an engaging scrolling experience for your visitors.
Vinero
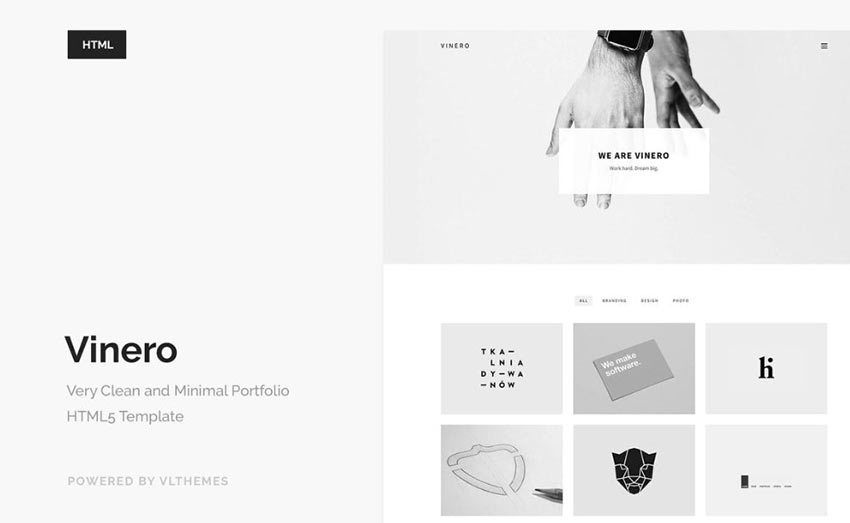
Vinero is another minimal theme, this time using a monochromatic color scheme, a grid-based layout, and an overall clean look that complements your content well.
Pisend
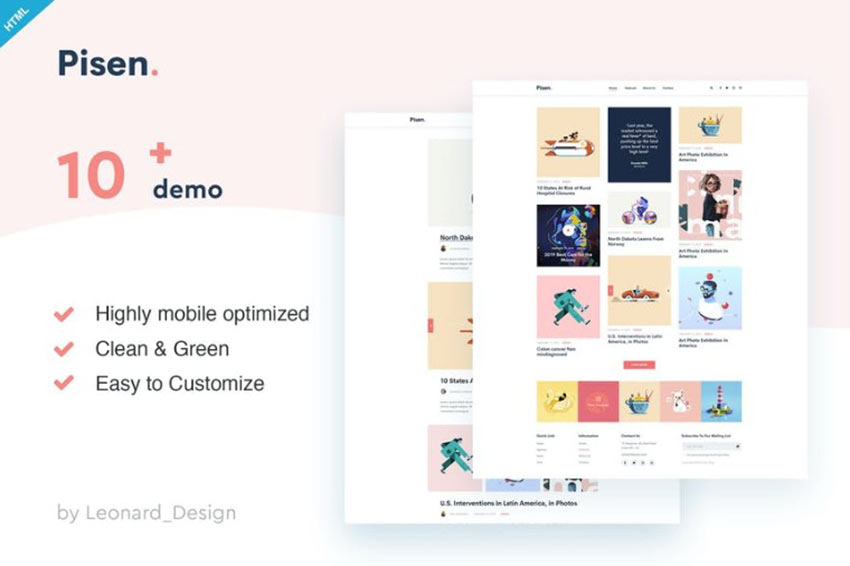
Another option is the Pisend HTML template. This one offers a minimal design, this time for blogs. It comes with 10 demos, too, so you can opt for one and get started with inserting your content immediately.
Origin

If you’re looking for a portfolio HTML template, this minimal option is a good fit. Origin offers large text, large images, and easily identifiable call-to-action buttons that leave your visitors guided through an intuitive browsing experience.
Pekko
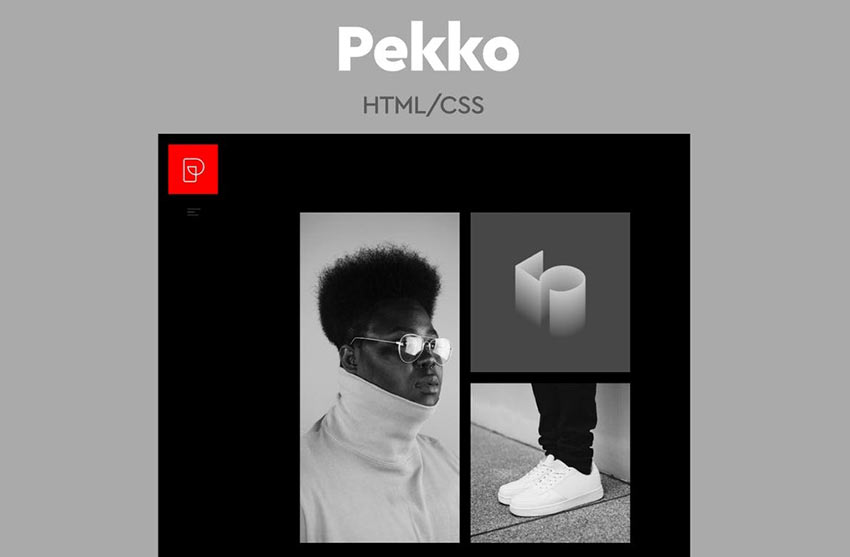
Pekko is another HTML template that is sure to catch the eye. Its monochrome design allows you to feature your best work front and center with zero distractions getting in the way.
Jestem
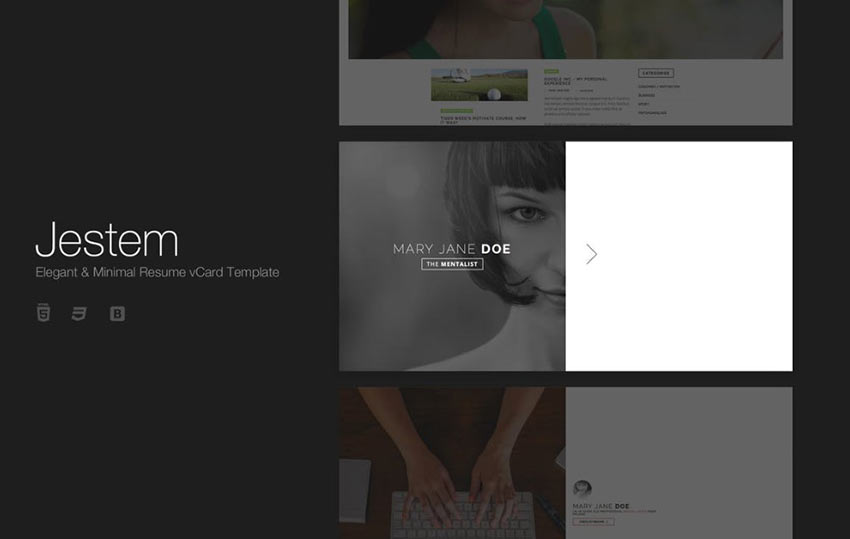
Jestem is a lovely minimal HTML template that can be used in a wide variety of ways from website to vCard to online resume. It’s easy to set up for presenting your contact info, at the very least.
T-ONE

T-ONE offers a minimal design that gives you plenty of opportunity to showcase full-width images, compelling overlaid text, graphics, and CTAs.
Omnia
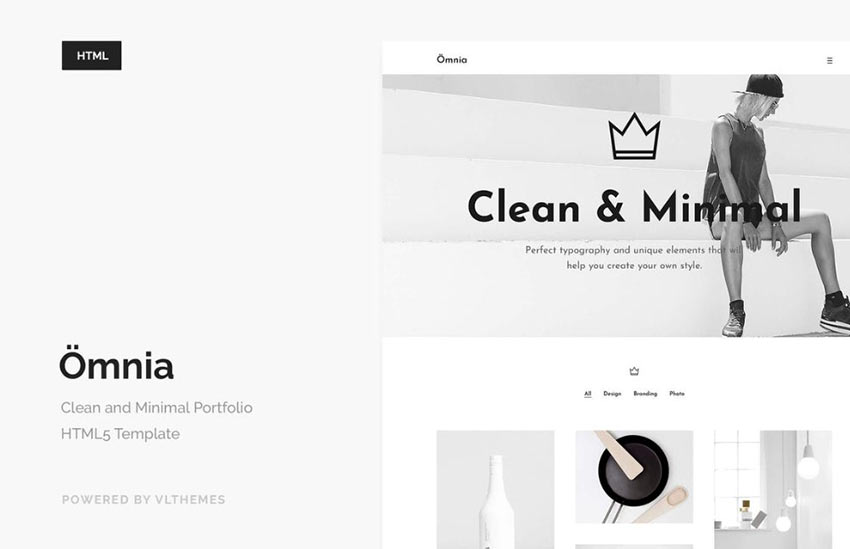
Omnia is a minimal HTML template that prioritizes whitespace above all else. And to dramatic effect, I might add. Customize with your own photography and you’ll be impressed with the results.
Laboq
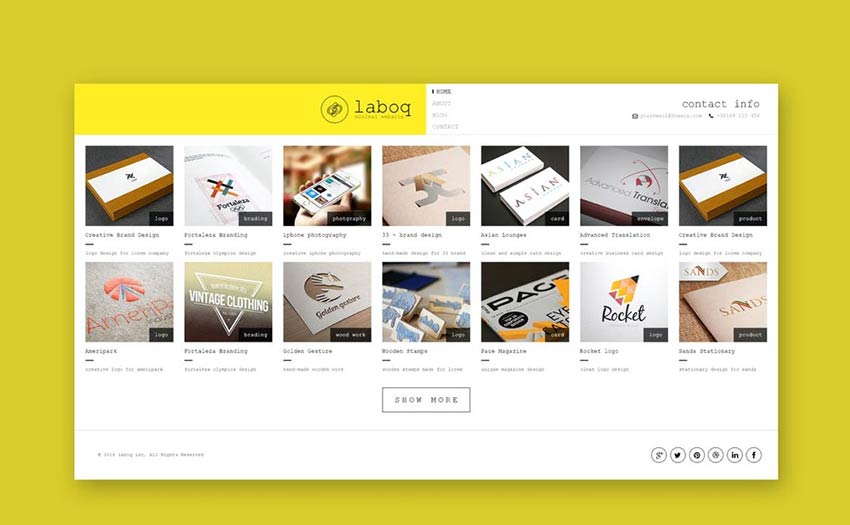
Another option is the Laboq template. This one could be customized to support a grid-based portfolio or even an online store.
Aether
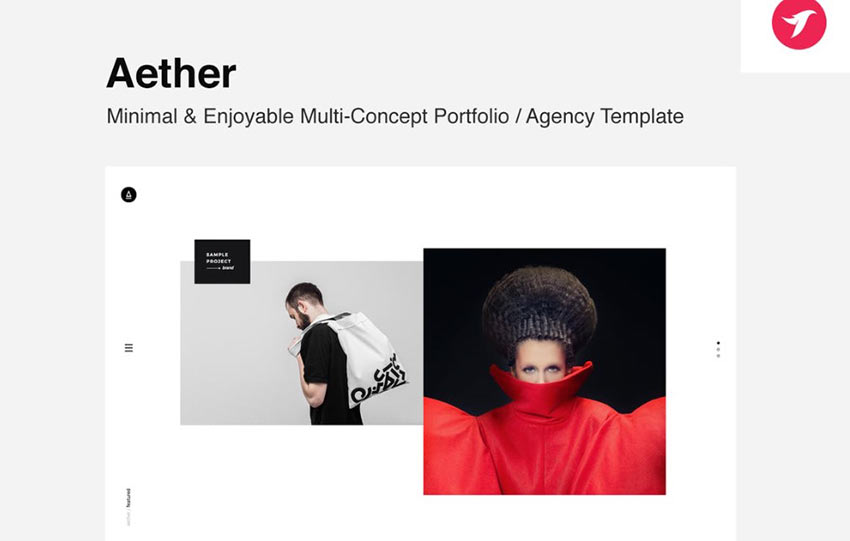
Or you may wish to consider Aether. This minimal HTML template is multipurpose and can be used for any type of site. However, it does have a penchant for agency and portfolio company websites.
Mimilism
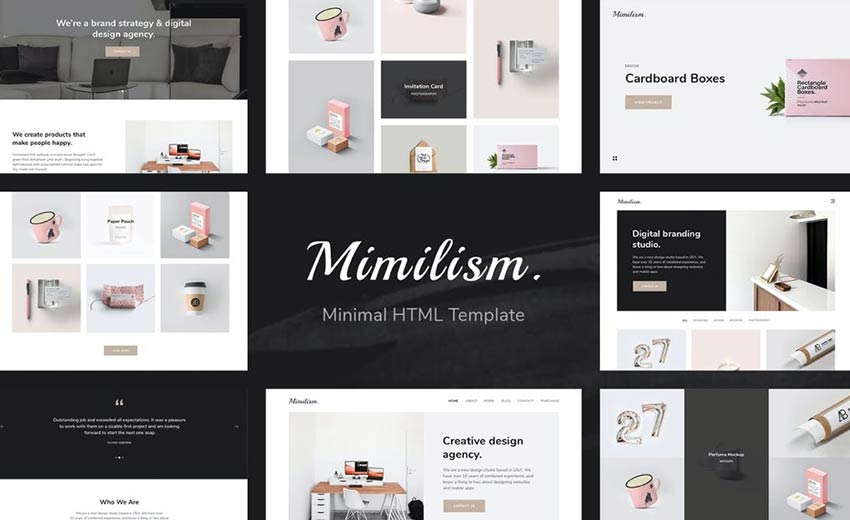
Mimilism offers a cohesive, grid-based design that makes it easy to display your best work or examples of your service in an appealing way. Customize, add buttons, and flavor text however you see fit. The fact remains, this template provides flexibility for creating the look you want.
Nubia
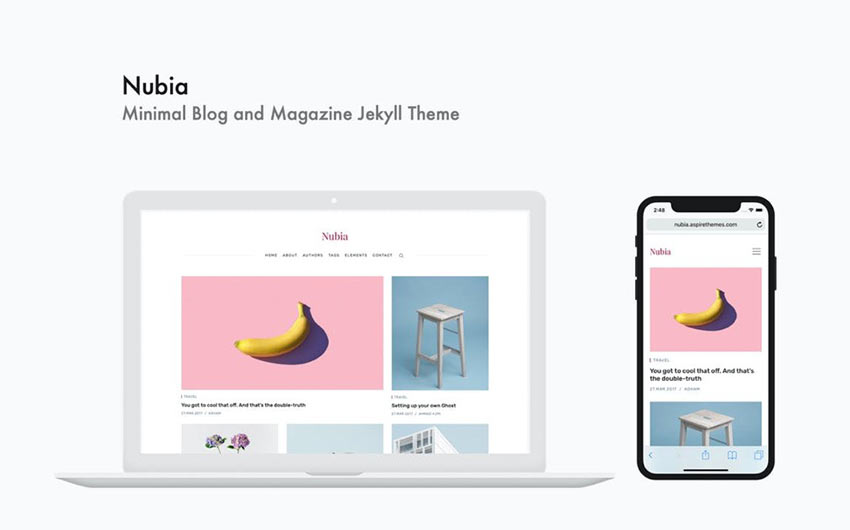
The Nubia HTML template really embraces minimalism in an eye-catching way. It has all the hallmarks: whitespace, grid-based layout, and a simple color scheme. But it presents content in such an appealing way that it looks like your site could be a magazine.
Keepsake
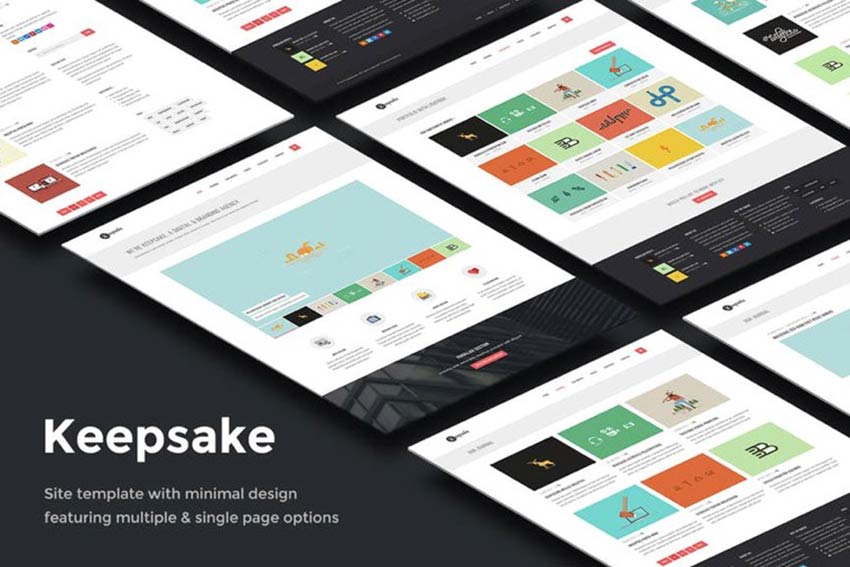
Last on our list is the Keepsake template. This one offers a minimal design with a grid layout that could serve a blog, portfolio, or service agency site well.
Set Up a Minimal HTML Template for Your Business
Now that you have twenty minimal HTML templates to choose from, you can hopefully get started with setting up your own business website quickly. So many of these offer demos as well, so you can import that data, add your own images and content and get rolling with launching your new site in a matter of hours. Which is pretty great if you ask us.
How to Create a Custom Bootstrap Theme from Scratch
This post is originally published on Designmodo: How to Create a Custom Bootstrap Theme from Scratch

Bootstrap, the most popular front end framework in the world, makes it easier for web designers and developers to quickly generate creative website themes. So, let’s build a Bootstrap website that works across modern web browsers and different viewports such …
For more information please contact Designmodo
Ringtone on Windows Mobile 7 MP3?
How can we use an mp3 song for a ringtone, we used to be able to use it on Windows 6.5, are we unable to find any details about it anywhere on Windows 7 mobile phones and there are no choices in the phone's music side to set it as a ringtone or settings?
Grow Your WordPress Business with Newsletters
 Newsletters are among the most effective ways for brands to connect with their clients and prospects. They allow you to communicate in a simple yet affordable manner. As a marketer, I feel that newsletters stand out as incredible alternatives to other channels due to the trust factor. Newsletters are effective for businesses of all sizes […]
The post Grow Your WordPress Business with Newsletters appeared first on WPExplorer.
Beginner’s Guide on How to Add a Link in WordPress
Do you want to add a hyperlink in WordPress? Recently, one of our users asked us how to add a link in WordPress.
There are several different ways to add links in WordPress. You can add links in your posts, pages, navigation menu, sidebar widgets, footer area, and more.
In this comprehensive beginner’s guide, we will show you how to add a link in WordPress posts, pages, widgets, navigation menus, and more.
Since this is a detailed tutorial, please use the navigation below to quickly jump to the section you need:
- How to Add a Link in WordPress Posts and Pages
- How to Add a Link in WordPress Text Widgets
- How to Add a Link in WordPress Navigation Menus
- How to Add Title and NoFollow to Links
- How to Create a Button Link in WordPress
- How to Embed Linked Content in WordPress
- How to Add Affiliate Links in WordPress
- How to Manually Add a Link in HTML
- How to Add Anchor Links in WordPress
- How to Add Social Share Links in WordPress
Why Are Links Important?
Links are the bloodstream of the internet, which makes them really important.
Basically, most websites on the internet are connected via links, which is why the term ‘web’ or ‘World Wide Web’ was introduced in the first place.
These are the hyperlinked text, buttons, and other elements that you click to go from one page to another or from one website to another.
Imagine visiting a web page with no link for you to click on. You’ll have no option but to click on the back button in your browser.
For individual websites, links tell your users where to click to view more information.
Properly placing links on your website allows you to increase the time users spend on your website. It also helps users discover more content, make a purchase on your online store, or subscribe to your email newsletter.
That being said, let’s take a look at how to easily add links in different areas of your WordPress website.
How to Add Links in WordPress Posts and Pages
WordPress makes it really easy to add links in your blog posts and pages using the block editor.
Simply edit your post or page, or create a new one.
Next, highlight the text that you want to attach the link to. This selected text is called the anchor text for the link. Now click on the ‘Link’ button:
You’ll see a box where you can enter a URL. A URL is a web address. For instance, WPBeginner’s guide on how to start a WordPress blog has the URL https://www.wpbeginner.com/start-a-wordpress-blog.
You can simply copy and paste the URL of the post or page you want to link to, like this:

Click the Apply (Enter) button to insert the link into your post.
If you’re linking to content on your own site, then it might be quicker to search for it. Type a word or two from your content title, and WordPress will find it:

Click on the title of the page or post you want to link to, and the URL will be automatically added for you. Again, you’ll need to click the Apply button to put the link into your post.
If you want to set your link to open in a new tab, then click the arrow on the right. You can then click the toggle and set your link to open in a new tab.

Note: We recommend that you only use this option for links to third-party websites. This way your users don’t leave your website while visiting it.
Adding Link in Old WordPress Editor
If you are using the older classic editor instead of the block editor, then the process for adding a link is quite similar.
Open up the post that you want to edit, or create a new one. Find the text you want to use as the link’s anchor and highlight it. Then, click the ‘Link’ button which should appear in the first row of toolbar buttons.

You can then copy and paste the URL you want to link to, or search for it, as in the block editor.
Pasting your URL directly onto the anchor text
Another, even quicker, way to add a link in both the block editor and classic editor is to simply paste the URL onto the anchor text.
First, copy the URL you want to link to. Then, highlight your chosen anchor text in your post.
Next, you can either right-click and select ‘Paste’ or simply press Ctrl+V (Windows) or Command+V (Mac) to paste the URL.

WordPress will automatically detect that you’re pasting a URL, not text, and will turn the anchor text into a link.
Take a look at our tips for mastering the WordPress content editor to learn more about using the block editor effectively.
How to Add Links in WordPress Text Widgets
WordPress allows you to add widgets to your site’s non-content areas like sidebar, footer, or other widget areas.
Some of these widgets are automated and do not have many options. For example, the Recent Posts widget will automatically show links to your recent posts. You don’t need to do anything extra.
However, if you want to add some custom text with links in your sidebar, then you can use the Text Widget.
Go to the Appearance » Widgets page and then drag ‘Text’ widget into your sidebar or other widget area.
You can then type in your text and add a link just as you would when adding one to a post or page.
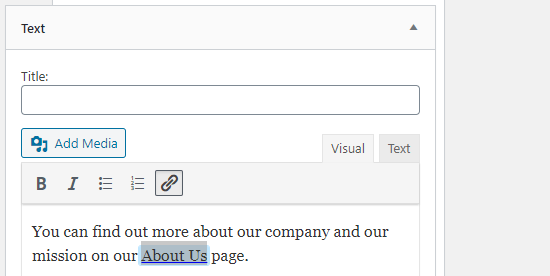
Make sure you click the ‘Save’ button beneath your widget after making changes.
How to Add Links in WordPress Navigation Menus
Do you want to add links to your site’s navigation menu? WordPress comes with a built-in drag and drop menu editor which allows you to create and manage navigation menus on your WordPress site.
Go to the Appearance » Menus page. If you don’t already have a menu set up, then you can create one by entering a menu name.
Next, select the pages you want to add to your menu on the left-hand side, then click the ‘Add to Menu’ button.
WordPress will automatically link to your selected posts and pages. You can move menu items and up and down to rearrange them.
You can also add any link you want to your menu. It doesn’t have to be a page or post on your site. For instance, you could enter the URL of your Twitter profile and add that to your navigation menu.
To enter a link, just click the arrow next to the ‘Custom Links’ section on the left. You can then type in the URL and the text you want to use for the link.
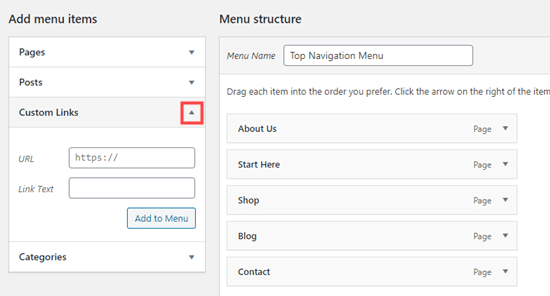
For more help with creating your menu, take a look at our beginner’s guide on how to add navigation menus in WordPress.
How to Add Title and Nofollow in WordPress Links
It’s often useful to give your links a title. This is the text that appears when someone runs their mouse cursor over the link, like this:

Adding a title often makes it clear where the link leads to. It can be helpful or even reassuring for your readers.
However, WordPress does not allow you to add title to the links with the default editor. You can still add it, and we’ll show you how to do that in a bit.
You may also want to add a nofollow tag to external links. This tells search engines not to pass your site’s SEO score to that link because you don’t own or control the content on that website.
WordPress also does not support nofollow by default either.
Method 1. Use AIOSEO plugin in Gutenberg
All in One SEO plugin (AIOSEO) for WordPress automatically adds the title, nofollow, sponsored, and UGC attributes to your links.
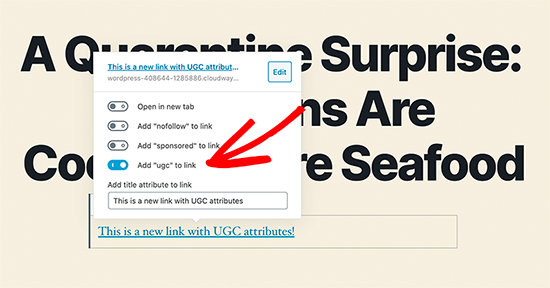
Method 2. Use HTML code in Gutenberg
If you’re using the Gutenberg editor, and don’t want to use AIOSEO, then you’ll need to manually edit the HTML to add title and nofollow attributes to your links.
First, add your link within your paragraph block in the usual way. Next, click on the three vertical dots and select ‘Edit as HTML’ as shown here:
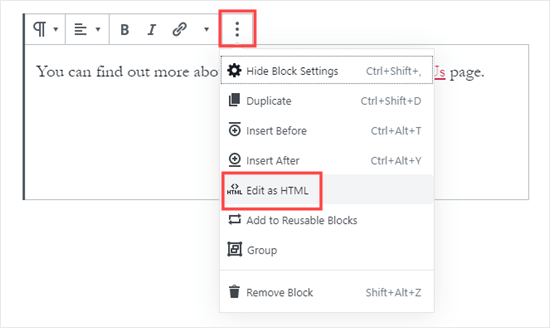
You’ll now see the HTML code for your block.

You can add a title and/or a nofollow attribute to the link like this:
<p>You can find out more about our company on our <a href="https://www.examplecompany.com/about-us/" title="About Us" rel="nofollow">About Us</a> page.</p>
For the title, you can change “About Us” to be whatever you want. With the nofollow attribute, this should always be rel="nofollow". Don’t forget the double quotation marks around the title and the “nofollow” as your link won’t work correctly without them.
Method 3. Use a Plugin with the Classic Editor
If you’re using the Classic Editor, you can install and activate the the Title and Nofollow for Links plugin.
This plugin will add title, nofollow, and sponsored checkbox options to the insert link popup.
Highlight your anchor text and click the ‘Link’ button, then click the cog:

You’ll then see the additional options:
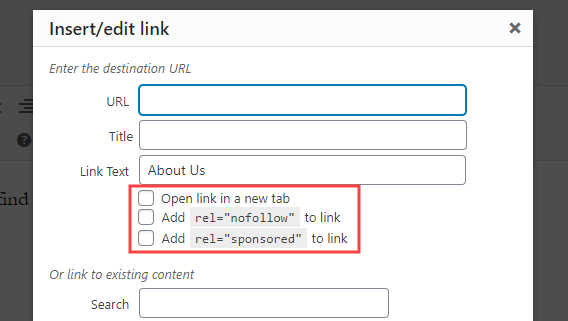
For more help, take a look at our guide on how to add title and nofollow to the insert link popup in WordPress for more information on this plugin.
How to Add Link Buttons in WordPress
Do you want to add a button to your WordPress posts or pages? There are many ways you can do this. The easiest is using WordPress’s built-in Button block.
Create a new post or page, or edit an existing one. Then, click the (+) icon to create a new block. Select ‘Button’ from the ‘Layout Elements’ options, or simply search for the Button block.
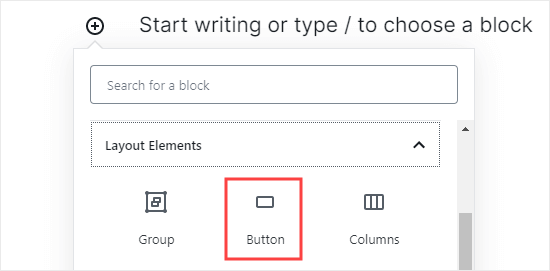
You can type the text for your button by clicking in the colored area. Enter the URL that the button should go to in the ‘Link’ box.
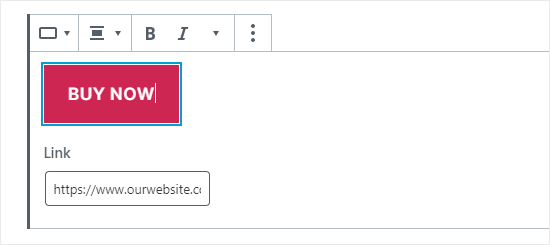
To change the button’s alignment, or to make the text bold or italic, just use the controls at the top of the block itself.
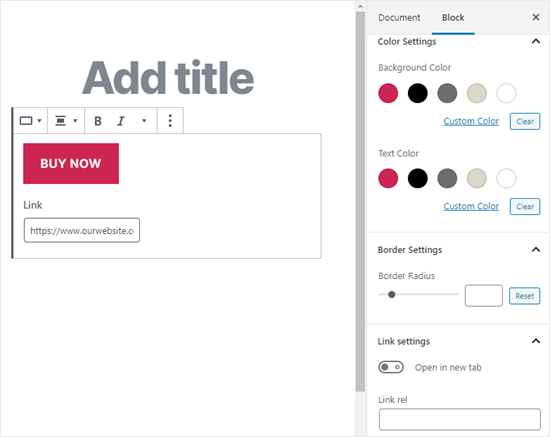
You can make more changes to how the button looks in the block options on the right-hand side of your screen. For instance, you might want to change the color or add a wider border.
You can also change the link settings here. You can set your link to open in a new tab, and if you want, you can also add the ‘nofollow’ attribute to the link by typing it in the ‘Link rel’ box.
What if you’re still using the old WordPress classic editor? You can install the “Forget About Shortcode Buttons” plugin to easily create buttons while you’re editing a post or page.
Simply install and activate the Forget About Shortcode Buttons plugin. Then, create a new post or edit an existing one.
You’ll see the ‘Insert Button’ icon in the toolbar, on the right hand side:

Click on the button, and you’ll see a popup. Here, you can customize your button, choose colors, borders, add text, add an icon, and include the link itself while seeing a live preview.
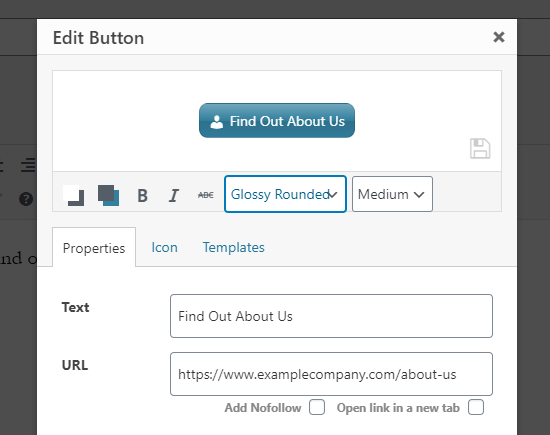
For more information and details take a look at our guide on how to add buttons in WordPress without using shortcodes.
How to Embed Linked Content in WordPress
You can easily embed certain types of content in WordPress by simply inserting its URL in your post. This is sometimes called creating a “content card” in your post.
Just paste the whole URL into its own paragraph block. The whole tweet, including images, likes, timestamp, and more will be embedded like this:
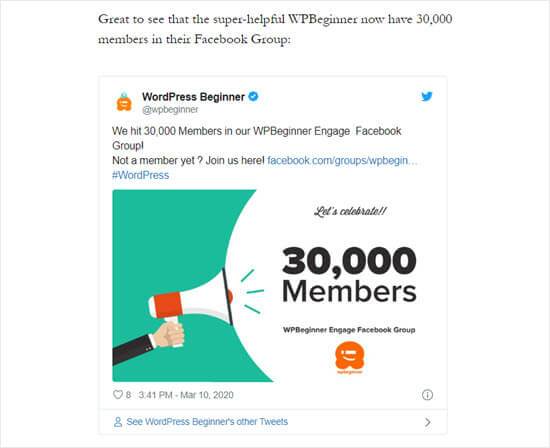
The process is the same for YouTube videos. Simply find the video you want to use on YouTube and copy the URL from the top of your browser window:
![]()
Next, paste the link into your post or page. It’ll automatically embed the video:
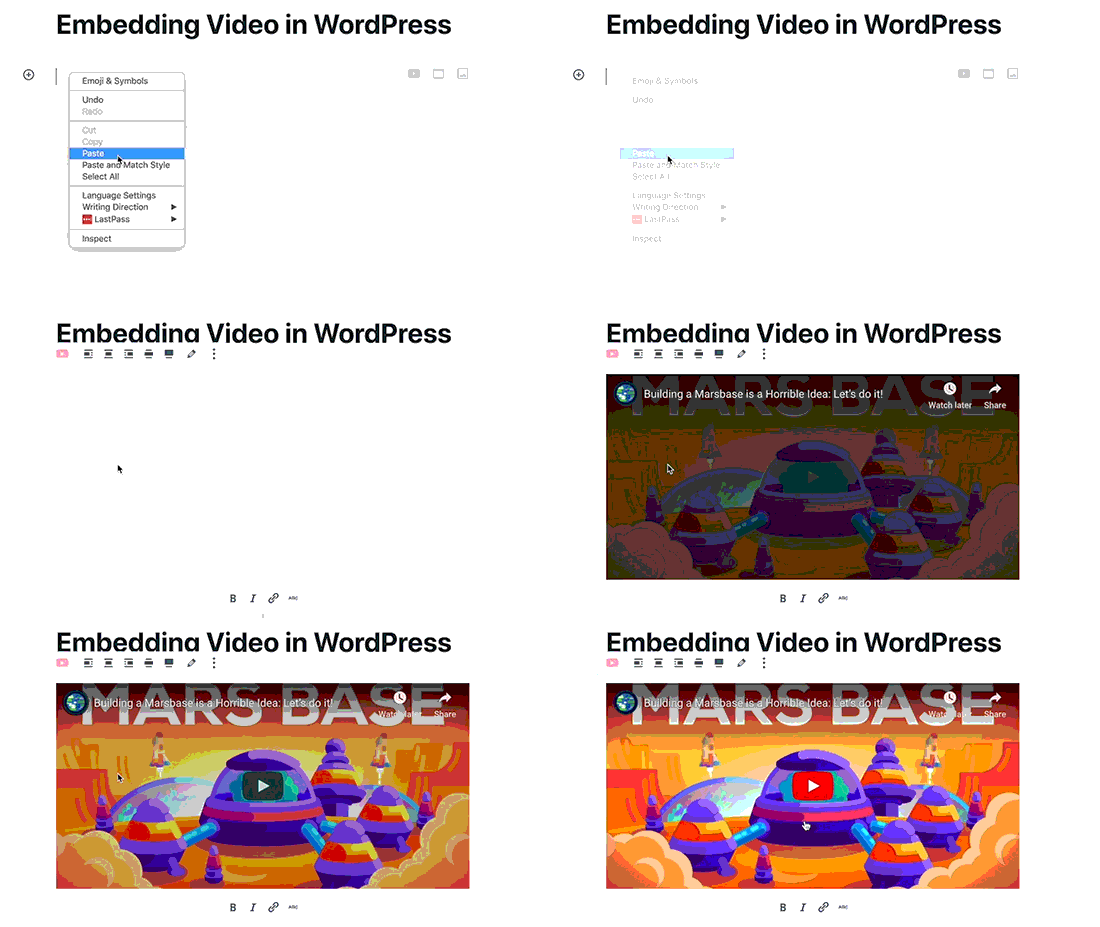
As well as being great for Twitter posts and YouTube videos, this method also works for many other types of content. You can find out more from WordPress’s support article on ‘Embeds’.
How to Add Affiliate Links in WordPress
Do you want to increase your site’s revenue by using affiliate links? Affiliate marketing provides a steady income to many blogs and websites.
All you need to do is add special referral links to products and services that you recommend. When your visitors purchase these products after clicking your links, you get a commission.
The problem that most beginners face is that each product or website they want to recommend has a different URL. It’s tricky to keep track of these, especially if you’re recommending lots of products.
The best way to add and manage affiliate links is by using an affiliate management plugin. We recommend using either Pretty Links or Thirsty Affiliates.
Both of these plugins work by creating redirect links such as www.yoursite.com/refer/partnersitename that send people to your special affiliate link.
The plugins will add a new option to your WordPress menu where you can add your affiliate links. Here’s how that looks with ThirstyAffiliates. You simply copy and paste your special affiliate link into the ‘Destination URL’ box.
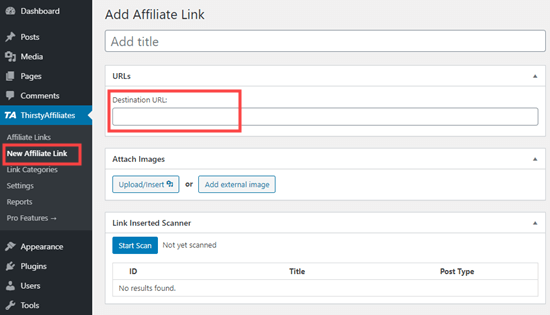
You can set specific options for your link on the right hand side, deciding whether to nofollow it, open it in a new window/tab, and more.
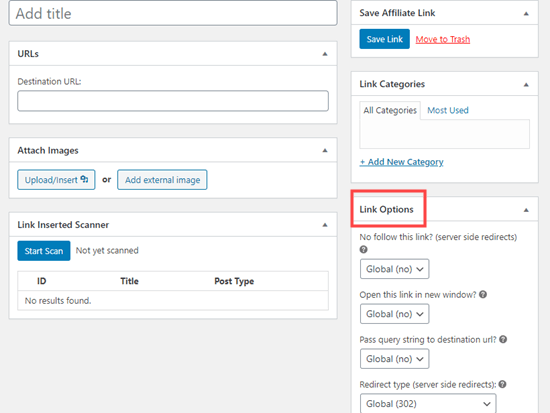
Once you’re done, click ‘Save Link’.
After you’ve set up your affiliate links, you can easily add them into your posts and pages. In a paragraph block, click the down arrow then select the ‘Affiliate Link’ option:
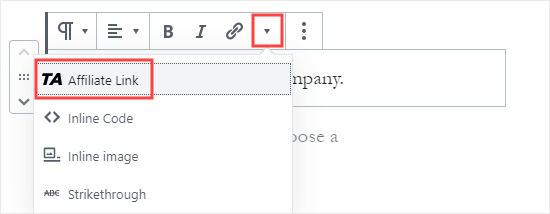
Next, type in the start of whatever you named that affiliate link. In our example, that’s “Our Affiliate Partner”.

You can then click the name and click ‘Apply’ to add the affiliate link to your post.
If you ever need to change an affiliate link (e.g. if the company you’re linking to moves to a different affiliate program) then that’s really easy to do.
You just change it once in your dashboard, under “ThirstyAffiliates” or “Pretty Links”. The redirect link stays the same as before, but it’ll now redirect to the new affiliate link everywhere it’s used.
For more handy affiliate plugins, check out our post on the best affiliate marketing tools and plugins for WordPress.
How to Manually Add a Link in HTML
Occasionally, you might want to add a link to your site using HTML code. This could happen if you need to use a custom HTML block or widget.
You might also need to directly edit a link in your theme file. Just make sure you always use a child theme so you don’t lose your changes when you update the parent theme.
It’s easy to create a link in HTML. To try it, add a custom HTML block to a post or page. You can find this block under ‘Formatting’ or you can search for it using the search bar.
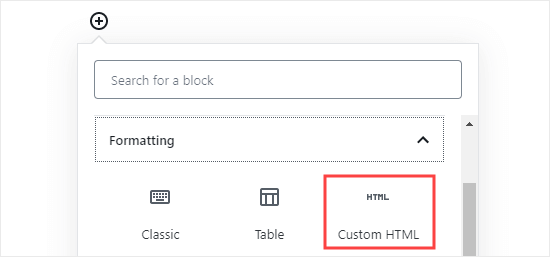
Next, you’ll see a box where you can write HTML. Copy this code into the box:
<a href="https://www.yourlinkhere.com">Text</a>
It should look like this:

You can click the ‘Preview’ tab to see how your code will look in your post or page:

Now click back to the ‘HTML’ tag. Change the URL to the URL you want to link to. Change the word ‘Text’ to whatever word or words you want to use for your link.
To add a title to your link, you’ll need to include it in the code like this. You can change “This is the title” to anything you want.
<a href="https://www.yourlinkhere.com" title="This is the title">Text</a>
If you want your link to open in a new tab, simply add target="_blank" to the HTML code, like this:
<a href="https://www.yourlinkhere.com" target="_blank">Text</a>
If you want your link to be nofollowed, add rel="nofollow", like this:
<a href="https://www.yourlinkhere.com" rel="nofollow">Text</a>
You can include all of these at once. This is how a link with a title, that opens in a new tab and is nofollowed, would look:
<a href="https://www.yourlinkhere.com" title="This is the title" target="_blank" rel="nofollow">Text</a>
That’s how you create a link in HTML, if you ever need to.
How to Easily Add Anchor Links in WordPress
An anchor link is a type of link on the page that brings you to a specific place on that same page. It allows users to jump to the section they’re most interested in.
Take a look at the animated screenshot below:
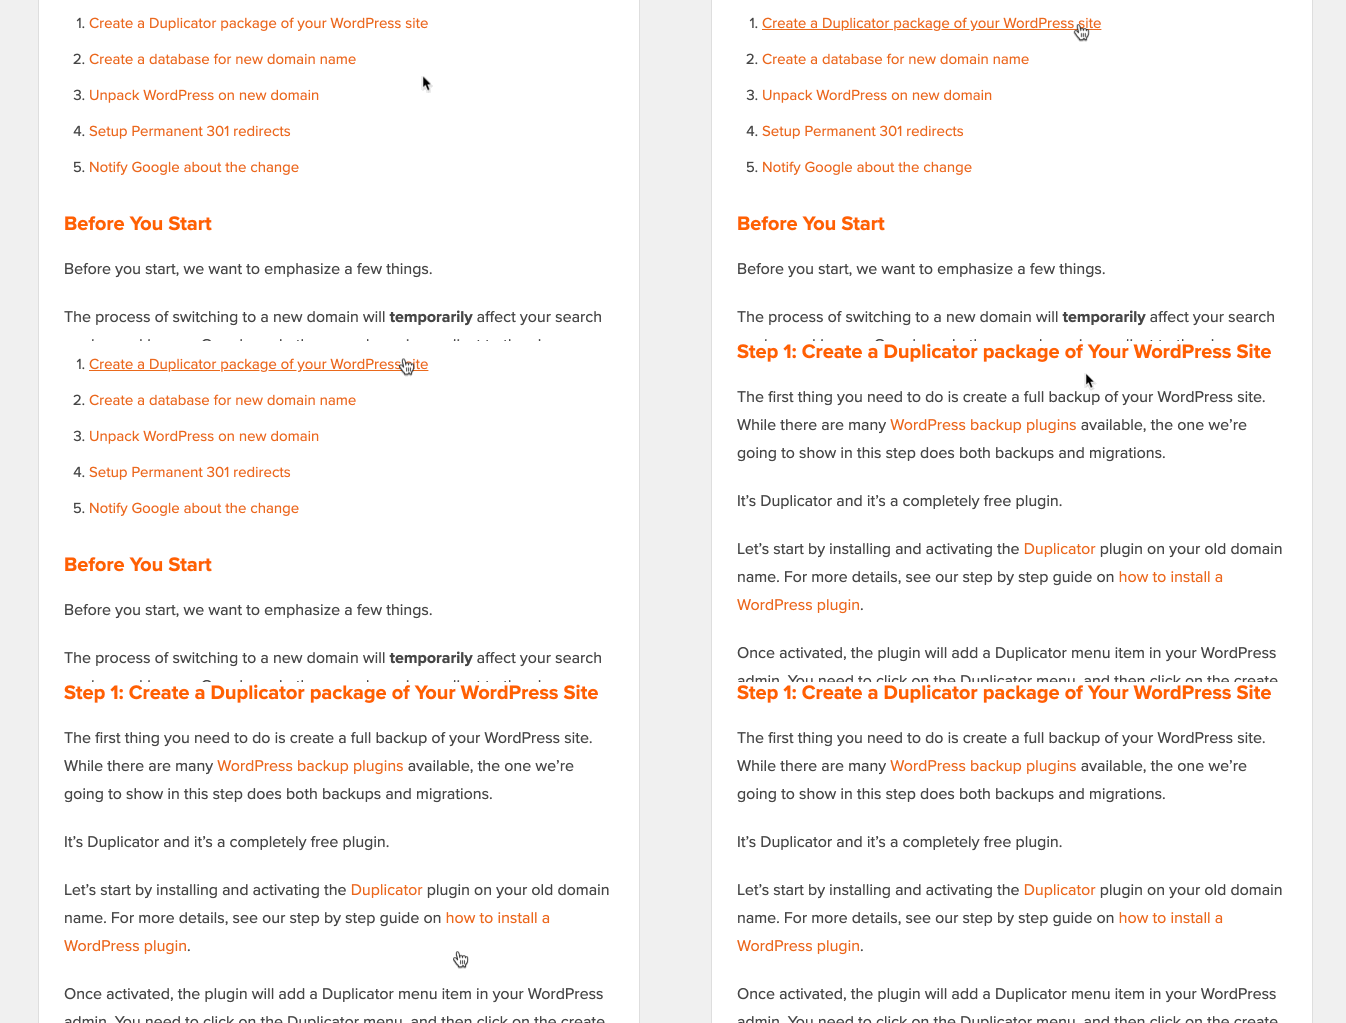
These type of links are really helpful when writing longer tutorials or content, so your users can easily jump to the section they’re most interested in.
We have created a detailed step by step guide on how to easily add anchor links in WordPress.
How to Easily Add Social Share Links in WordPress
Want to add social share links or buttons on your site?
These links make it easy for your users to share your content on their favorite social networks. Sometimes social share links or buttons are also accompanied by total share count.
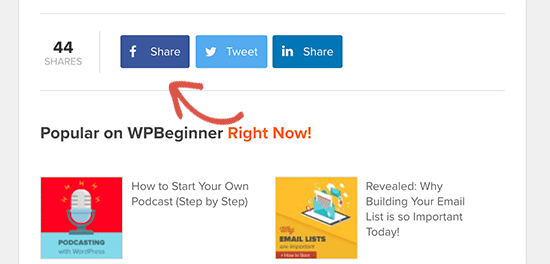
We don’t advise users to add these links manually. Instead, you should always use a social share plugin.
We have a step by step guide on how to add social share buttons in WordPress.
We hope this article helped you learn how to add a link in WordPress. You may also want to see our beginner’s guide on how to create a professional business email address, and how to start an email newsletter to grow your audience.
If you liked this article, then please subscribe to our YouTube Channel for WordPress video tutorials. You can also find us on Twitter and Facebook.
The post Beginner’s Guide on How to Add a Link in WordPress appeared first on WPBeginner.
How Will Facebook's Acquisition of Giphy Impact API Integrations?
Last week, Facebook announced its acquisition of Giphy, one of the most popular GIF sites across the internet. In its announcement, Facebook disclosed that the Facebook family of apps already makes for half of Giphy's traffic, with Instagram making up half of the overall Facebook traffic. Accordingly, the Giphy team will become part of Instagram which has enjoyed API integration with Giphy for quite some time.
How to Import and Export Navigation Menus in WordPress
Do you want to export a navigation menu from one WordPress site and import it into another?
The default WordPress import / export feature allows you to transfer menus as part of the full site transfer, but it does not let you import / export menus by themselves.
In this article, we’ll show you how to easily import / export navigation menus in WordPress, so you can save time.
Understanding WordPress’s Import / Export Features
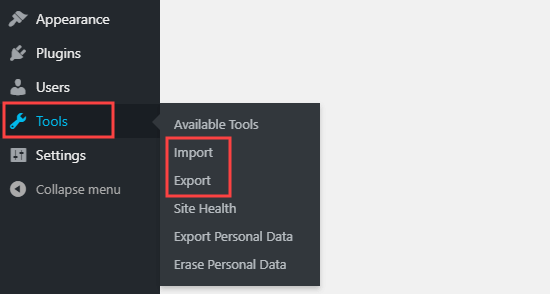
On every WordPress site, you have built-in import and export features. You can find these under Tools » Import and Tools » Export in your WordPress dashboard.
If you go to the Export page, you’ll see the WordPress default options. These let you choose between exporting all content, or exporting only your posts, pages, or media.
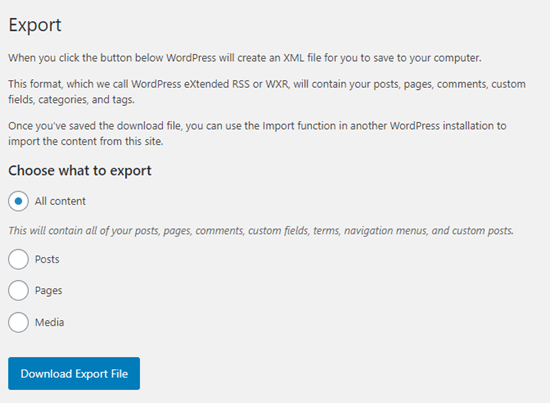
All content includes your navigation menus … plus posts, pages, comments, custom fields, terms, and custom post types.
But in many cases, you don’t want to import everything. For instance, you might just want to replicate your navigation menu and the pages included in it, but not your posts or any other pages.
Luckily, there’s an easy plugin that extends this functionality, so you can only import and export navigation menus in WordPress.
That being said, let’s take a look at how to import and export navigation menus without exporting all the content.
Export and Import Navigation Menus in WordPress
Before going further, make sure you’re happy with the menu you’ll be exporting. You can find your site’s menu under Appearance » Menus.
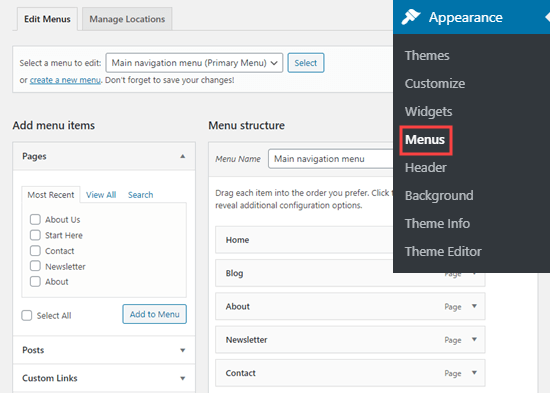
If you need help to create or change your menu, take a look at our tutorial on how to add a navigation menu in WordPress.
Next, you need to install and activate the WPS Menu Exporter plugin. For more details, see our step by step guide on how to install a WordPress plugin.
Upon activation, you need to visit Tools » Export page in your WordPress admin dashboard.
You should now see an additional option to export navigation menu items. This will include your menu itself, plus all the pages that are linked from your menu.
If you have any posts in your menu, those will be included too, along with any comments on them.
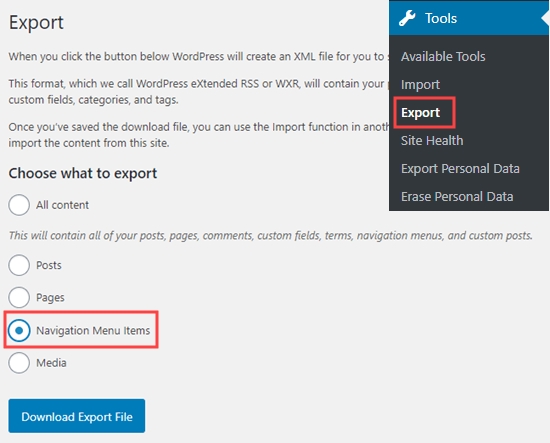
Simply select the Navigation Menu Items radio button and then click the ‘Download Export File’ button.
This lets you download your navigation menu and its associated pages to your computer. These are stored in an .xml file with the name site.wordpress.yyyy-mm-dd, where “site” is the name of your website and “yyyy-mm-dd” is the date.
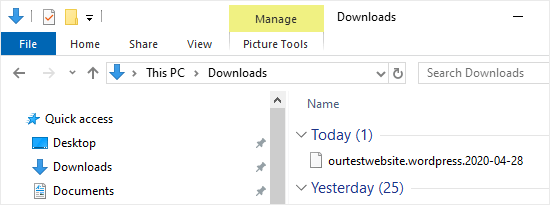
Importing Your WordPress Menu to Your New Site
You can import the .xml file you just downloaded by using WordPress’s standard Import feature. It’s a simple process. You just need to upload your navigation menu file to your new site.
Important: Make sure you don’t have any existing pages with the same name as pages in the menu you’re importing, not even in the trash. Otherwise, the import tool may not be able to import those pages correctly.
First, log in to your WordPress dashboard on the new site where you want to import your menu.
Next, go to Tools » Import. You’ll need to install the WordPress importer. Just click the ‘Install Now’ link beneath ‘WordPress’ at the bottom of the list.
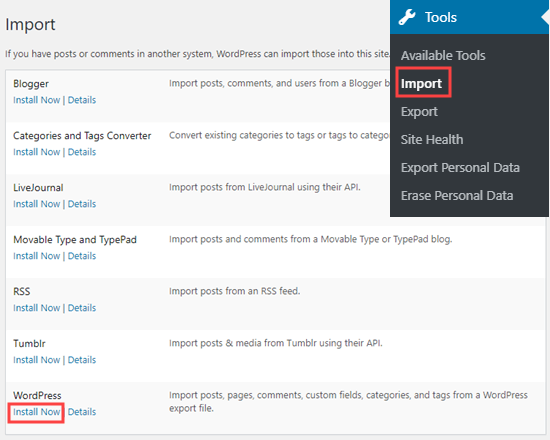
Once you’ve installed the WordPress importer, you should see a ‘Run Importer’ link in place of the ‘Install Now’ link.

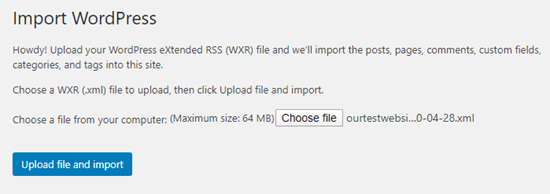
After you click on this link, you’ll see the Import WordPress screen. Here, you’ll need to click the ‘Choose file’ button so you can select the .xml file you downloaded earlier.
Once you’ve selected your file, go ahead and click the ‘Upload file and import’ button.
On the next screen, you’ll be asked to ‘Assign Authors’. The default option is to import the original author of the menu content.
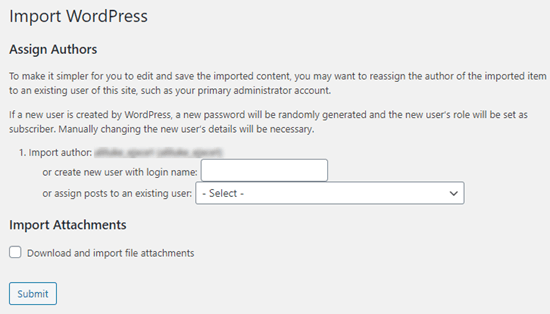
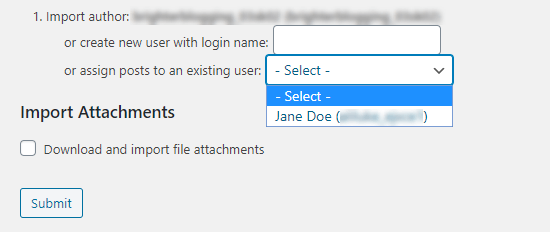
In many cases, it’ll make the most sense to set an existing user as the author of the imported content. You can do that by selecting the user’s name from the dropdown menu.
If you plan to re-use the content of the pages themselves, then you’ll also want to check the ‘Download and import file attachments’ box. This means that images will be included in the import.
Once you’re happy with your settings, click the ‘Submit’ button at the bottom of the page.
Upon completion, you should see the following message:

Viewing Your Imported Menu and Pages
The import has put your menu and the associated pages in place. To take a look at the imported menu, just go to Appearance » Menus. Here, you can make sure that it’s been imported correctly.
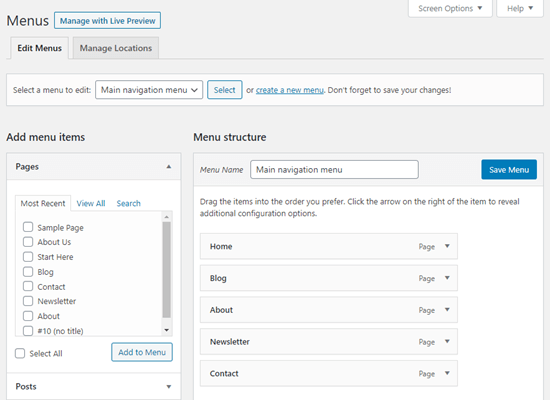
You can also click on the Pages tab in your WordPress dashboard to check out the new pages that have been imported along with the menu.
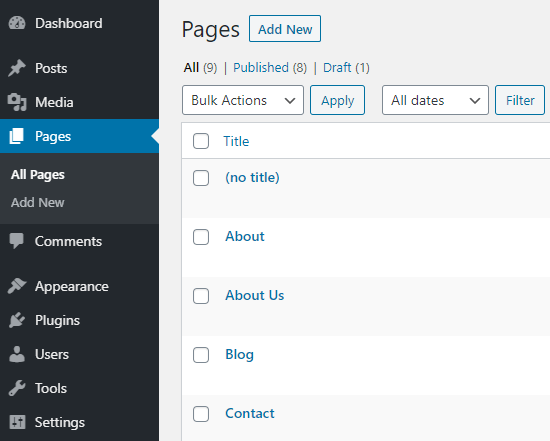
That’s it, you’ve successfully imported your navigation menu and the associated pages. You can edit the menu and the pages however you like.
We hope this article helped you learn how to import and export navigation menus in WordPress. You might also like to take a look at our tutorials on how to style WordPress navigation menus and how to create a dropdown menu in WordPress.
If you liked this article, then please subscribe to our YouTube Channel for WordPress video tutorials. You can also find us on Twitter and Facebook.
The post How to Import and Export Navigation Menus in WordPress appeared first on WPBeginner.


