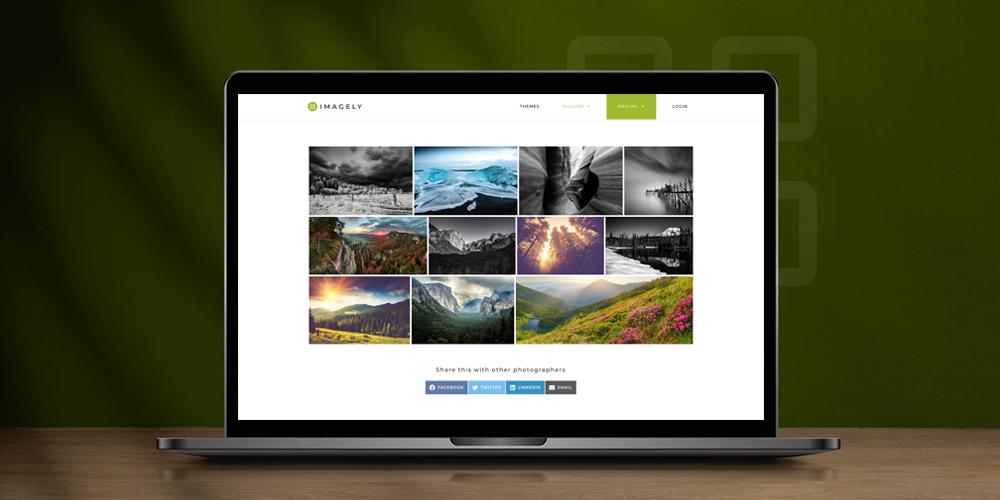
For such a robust and popular WordPress gallery plugin, I was baffled to find only a few posts covering NextGEN Gallery. I mean, most of the articles were old and caught an era when the plugin was still in its infancy. Today, things are different. NextGEN Gallery has bloomed into a fully-fledged WordPress gallery plugin. […]
I’ve been hand-coding SVG schematics to figure out how thing should go together, and as a by-product, guide me in both material buying and wood cutting.
This might sound hugely bespoke and artisanally overdone, but they’re not that complicated, and as a major benefit, the process has helped me understand SVG a little bit better.
Letterpress
This all reminds me of my own SVG-meeting-real-life scenario. Years back, when I had access to a letterpress shop, I had some SVG converted into printable plates to make fun little bits of art.
First I did a little SVG shape morphing to get some in-progress morphs:
Then I used those SVGs in Illustrator to create a design, which I sent off to a special company to make me a letterpress plate out of polymer.
Every web developer should keep useful code snippets in a personal library for future reference. Today, I'm showing you the 10 most useful snippets and functions I have added to my snippet library from the past 3 months.
A customer journey map is a visual representation of the different steps a customer goes through to achieve a goal within your company’s website or product. It’s meant to provide insight into what’s going through a customer’s mind as they’re …
Setting up an eCommerce site is a great way for you to build up an income for your business. Not only will you be able to attract new customers, but you can allow them to get in touch from all over the world. However, there are some key things you can’t forget when setting up […]
Building a new business isn’t something to take lightly. It takes a lot of time and effort, not to mention a clear business plan. But what does it take to build a solid online business? Below, we’ll discuss some of our tips for building a strong foundation for a new online business. Build a Solid […]
Do you want to enable author tracking on your WordPress website?
If you run a multi-author WordPress site, then you’re probably wondering which of your authors write the most popular posts. This information can help you increase traffic and grow your website.
In this article, we’ll share how to enable author tracking in WordPress.
Why Enable Author Tracking in WordPress?
If you run a multi-author blog, then you need to enable author tracking in WordPress. It allows you to gather data about how each author’s posts perform on your WordPress website.
You can then promote high-performing authors and offer some extra help to those who are struggling.
It is also a great way to find out whose posts bring in the most traffic and which articles are engaging readers.
For instance, you might have an author who’s great at writing posts that get lots of visitors. However, those visitors may not stick around on your site. This may result in a high bounce rate, fewer page views, and less time spent on the website.
After gathering this data, you can make informed decisions by improving your editorial workflow and offering more tips and help to struggling writers. You might find a way to funnel users from the first author’s posts to the writers you want to get more attention.
That said, let’s see how you can enable author tracking on your website.
MonsterInsights offers a Dimensions addon that allows you to set up custom dimensions in Google Analytics.
It helps you track additional information in Google Analytics that’s not available by default. This includes author tracking, most popular post types, categories, tags, and more.
Do note that you’ll need at least the MonsterInsights Pro plan because it includes the custom dimensions feature. There is also a MonsterInsights Lite version you can use for free.
First, you need to install and activate the MonsterInsights plugin. For more details, see our step-by-step guide on how to install a WordPress plugin.
Upon activation, you will see the welcome screen. Go ahead and click the ‘Launch the Wizard’ button.
Next, you can follow the instructions in the setup wizard to connect Google Analytics with your website. For more details, please see our guide on how to install Google Analytics in WordPress.
Once connected, Google Analytics will start tracking all your website traffic.
With MonsterInsights, you can easily set up dual tracking and start collecting data in a Google Analytics 4 (GA4) property. GA4 is the latest analytics version, and it will replace Universal Analytics on July 1, 2023.
After this date, you won’t be able to track website traffic in your Universal Analytics property. That’s why this is the best time to switch to Google Analytics 4.
Setting up Author Custom Dimensions for Accurate Tracking
Now that everything is up and running, let’s tell Google Analytics to start tracking authors by adding a custom dimension.
You need to start by visiting the Insights » Addons page. From here, you need to go to the ‘Dimensions’ addon and click on the ‘Install’ button.
The addon will now automatically install and activate.
Next, you can go to the Insights » Settings page and switch to the ‘Conversions’ tab.
From here, simply scroll down a little, and you’ll see the ‘Custom Dimensions’ box.
This is where you can add a new custom dimension. Go ahead and click on the ‘Add New Custom Dimension’ button.
Next, you’ll need to select the ‘Author’ dimension from the drop-down menu.
Besides that, you will also need to add the ID that will be filled in for you.
Don’t forget to click the to store your settings.
Now that you have set up custom dimensions in MonsterInsights, the next step is to do the same in Google Analytics.
We’ll go through the steps for Universal Analytics and Google Analytics 4.
Add Custom Dimensions in Universal Analytics
First, you can visit the Google Analytics website and open your website property. Do be sure that the ID for this property begins with ‘UA.’
From here, you need to click on the ‘Admin’ button at the bottom left corner of the screen.
Then you can select Custom Definitions » Custom Dimensions under the Property column.
Next, you’ll need to add a new dimension.
Simply click the ‘+ New Custom Dimension’ button.
On the next screen, type in ‘Author’ for the name and leave the other details unchanged.
After that, click the ‘Create’ button, and Google Analytics will save it.
Next, you’ll see some code on the next screen.
You don’t need to do anything, as MonsterInsights handles everything for you. Just click ‘Done’ to continue.
Next, you will see your ‘Author’ custom dimension listed in a table with an ‘Index’ column.
Make sure that the value in the ‘Index’ column is the same as the ID given to that author’s custom dimension in MonsterInsights.
If not, then don’t worry because you can edit the custom dimension in MonsterInsights.
Now, let’s see how you can set up custom dimensions in GA4.
Add Custom Dimension in Google Analytics 4
First, you will need to go to your Google Analytics 4 property.
Once logged in, head to the ‘Configure’ tab on the left.
Next, you can click the ‘Custom definitions’ option from the menu that appears.
After that, go ahead and click the ‘Create custom dimensions’ button.
A window will slide in from the right, where you will need to enter the details of your custom dimensions.
To start, enter a name for your dimension. There is also an option to add a description.
From here, you can keep the Scope set to ‘Event’ and then enter an event parameter like ‘author_tracking.’ The Event parameter is what Google Analytics 4 will use to show your dimension in the reports.
After entering these details, don’t forget to click the ‘Save’ button.
You have successfully set up author tracking on your WordPress website. Now, let’s get to the fun part of viewing the reports and finding out how your authors are doing.
Viewing Your Author Tracking Reports
After your website has collected traffic data, you can view your top authors on the WordPress dashboard.
Simply go to the Insights » Reports page and switch to the Dimensions tab.
From here, you can see the top authors that generate the most traffic on your website.
You can now use this data to improve your editorial workflow and promote content from high-performing authors. For instance, you can display their content as popular posts and get more pageviews.
Additionally, the information will help you see which writers are struggling, so you can work with them and increase traffic to their blog posts.
Sometimes you need to delete duplicate rows in a database :)
In the future, set UNIQUE keys when you need them :)
In the example below, we have a table appropriately named TABLE_NAME and there are multiple rows that have the same value for the duplicate_field field. In this example, we want to remove the ones where the id field is set to "remove". In other examples, you can pick any conditional you want when choosing which of the rows to remove or which to keep, including conditionals between them (e.g. foo.id < bar.id will keep the row with the highest id value and delete the others).
Alternatively, if you do want to add that UNIQUE index, you can do the following to brute force dropping duplicate rows:
ALTER IGNORE TABLE TABLE_NAME
ADD UNIQUE INDEX index_name (duplicate_field);
FFmpeg is a multiplatform, open-source library to record, convert and stream video and audio files. Created in 2000, it is a powerful command-line tool that runs on Linux, Windows and Mac operating systems. FFmpeg is currently used by many websites and programs, including YouTube and VLC Media Player, and is published under the GNU Lesser […]
The end result of Eric Meyer's tutorial on creating this row of slanted images is pretty classy. But it's more about the journey than the destination (there isn't even really an isolated demo for it). Eric does an amazing job at talking it through like a thought process.
We did that recently, only ours was sort of fake/generic which Eric's was for a real-world design.
This is a row of boxes, so flexbox. Eric pondered if grid would have been as good or better of a choice since the widths are known and either can be made to accept more/less boxes without adjustment. I agree it's a tough call here.
Since the image dimensions being manipulated, object-fit is a must, and the less-used object-position is used here to help with a focal point.
The captions are just pushed to the bottom of the boxes naturally by the images.
The slanting is done with clip-path, but it involves some trickery. The boxes need to be enlarged to clip without leaving blank space, then pulled together with negative margin. Percentages are used all around to keep things flexy.
Still more tweaks are needed to keep from clipping the captions, and then there is still opportunity for more clever design bits.
Sad that this is probably the last time I'll link to 24 ways.
Using open-source components makes it really easy and quick to build powerful front-end elements for websites or apps. In this tutorial, you’ll learn how to easily create an editable table using PureCSS and jQuery. There’s a demo available for this tutorial, click here to see. Getting Started The very first thing to do, indeed, is […]
As of January 2020, there are so many WordPress plugins available for lead generation, and for adding a popup to the WordPress blog. And the free version popup plugins comes with some basic features and limitations. If you are searching for a lead generation plugin, you would probably land upon the OptinMonster and Bloom created […]
I know its been a long time coming, but better late than never. In your control panel, you can now choose to hide your location from others in your member profile.
Some HTML elements accept width and height as attributes. Some do not. For example:
<!-- valid, works, is a good idea -->
<img width="500" height="400" src="..." alt="...">
<iframe width="600" height="400" src="..."></iframe>
<svg width="20" height="20"></svg>

<!-- not valid, doesn't work, not a good idea -->
<div width="40" height="40"></div>
<span width="100" height="10"></span>
Those attributes are sometimes referred to as presentational attributes. The thing to know about them is that they are overridden by any other styling information whatsoever. That makes them ideal as a fallback.
So, if CSS loads and has a declaration like:
img {
  width: 400px;
}
...that is going to override the width="500" on the <img> tag above. Presentational attributes are the weakest kind of styling, so they are overridden by any CSS, even selectors with very low specificity.
What might be a smidge confusing is that presentational attributes seem like they would have high specificity. These inline styles, for instance, are very strong:
Using an inline style (which works on any element, not a select few), we've moved from the weakest way to apply width and height to one of the strongest. Regular CSS will not override this, with a selector of any specificity strength. If we need to override them from CSS, we'll need !important rules.
img {
  width: 400px !important;
}
To reiterate, presentational attributes on elements that accept them (e.g. <img>, <iframe>, <canvas>, <svg>, <video>) are a good idea. They are fallback sizing and sizing information as the page is loading. They are particularly useful on <svg>, which may size themselves enormously in an awkward way if they have a viewBox and lack width and height attributes. Browsers even do special magic with images, where the width and height are used to reserve the correct aspect-ratio derived space in a situation with fluid images, which is great for a smooth page loading experience.
But presentational attributes are also weak and are usually overridden in the CSS.
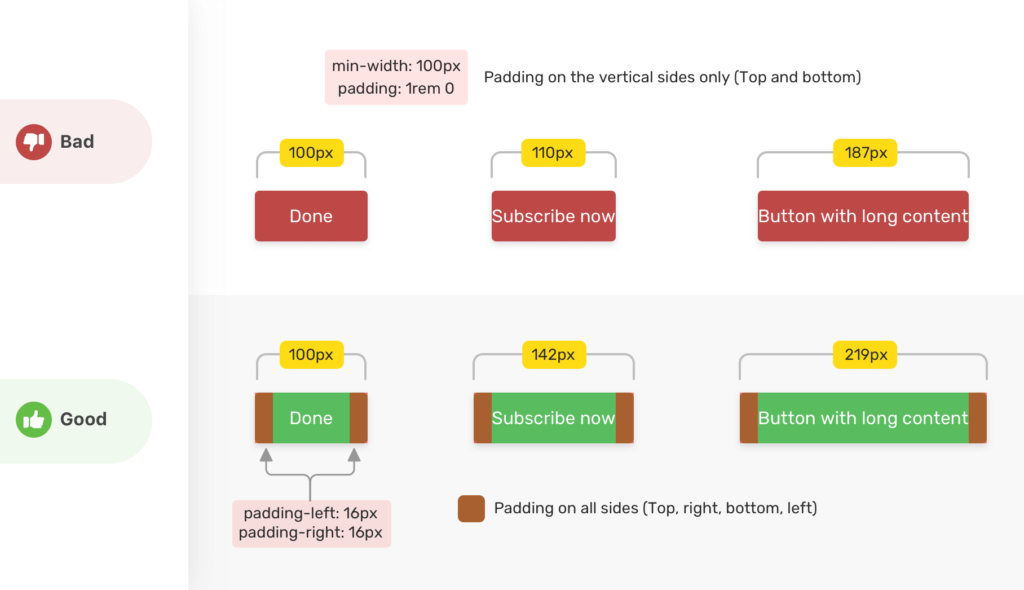
Here's a nice deep dive into min-width / min-height / max-width / max-height from Ahmad Shadeed. I like how Ahmad applies the properties to real-world design situations in addition to explaining how it works. In the very first demo, for example, he shows a button where min-width is used as a method for (trying to) make sure a button has space on its sides. It works if the text is short enough, and fails when the text is longer. That's the kind of "CSS thinking" that is fundamental to this trade.


 For such a robust and popular WordPress gallery plugin, I was baffled to find only a few posts covering NextGEN Gallery. I mean, most of the articles were old and caught an era when the plugin was still in its infancy. Today, things are different. NextGEN Gallery has bloomed into a fully-fledged WordPress gallery plugin. […]